目录
1.基本概念
1.1什么是认证
1.2什么是会话?
1.2什么是授权
1.3授权的数据模型
1.4.1基于角色的访问控制
1.4.2基于资源的访问控制
2.基于Session的认证方式
2.1认证流程
分布式系统认证方案
什么事分布式系统?
分布式认证需求
分布式认证方案
选型分析
技术方案
OAuth2.0
OAuth2.0介绍
Spring Cloud Security OAuth2
环境介绍
SpringCloud Security OAuth2快速入门案例
1.创建maven父工程,distributed-security
2.创建子模块, distributed-security-uua
3.创建子模块, distributed-security-order
4.管理令牌
5.令牌访问端点配置
JWT介绍
SpringBoo项目实现SpringSecurity登录认证
1.第一步构建SpringBoot项目添加SpringSecurity依赖和web依赖
2.创建完项目直接启动项目,访问http://localhost:8080/login默认就是SpringSecurity自带的登录页面,默认用户名user密码是IDEA控制台打印的一长串字符
3.设置密码加密规则
4..我们需要去查询自己的数据库来判断用户是否存在,查数据库,密码是否正确,这就需要新建一个类去实现UserDetailsService接口,重写configure(HttpSecurity http)方法
5.准备一个controller类,准备两个html页面
6.启动项目访问http://localhost:8080/login.html,发现还是SpringSecurity默认登录页面
7.此时发现即使我们自己写了登录页面,还是会被SpringSecurity拦截器拦截到,走的还是默认登录页,此时我们需要重写configure方法,在config包下SecurityConfig类中
8.此时在访问localhost:8080/login.html就是我们自己写的登录页面
9.修改config包下的SecurityConfig类中的configure方法
10.此时发现登录之后是404页面,这说明没有指定登录成功后跳转的页面
11.自定义登录失败页面
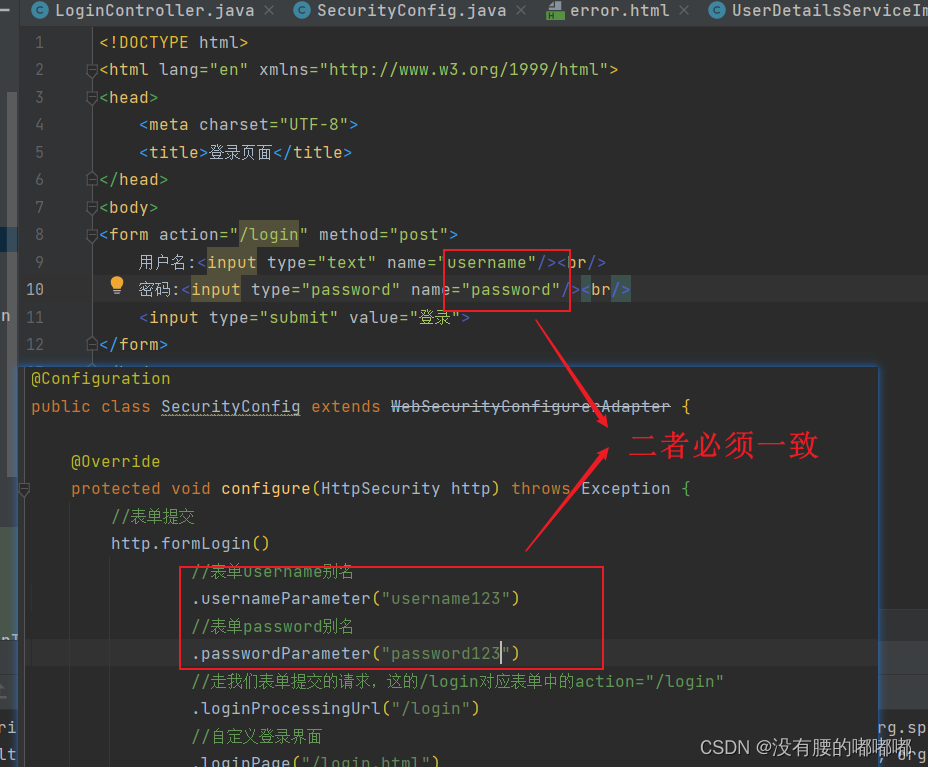
12.设置表单username和password别名
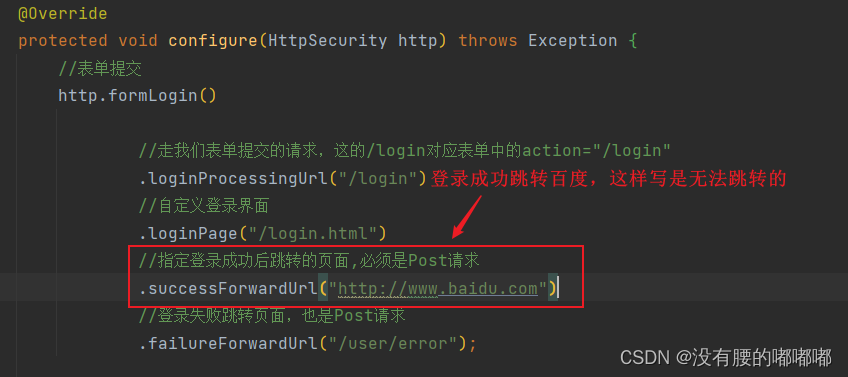
13.登录成功跳转百度页面,因为分布式系统,也许不再一个服务中
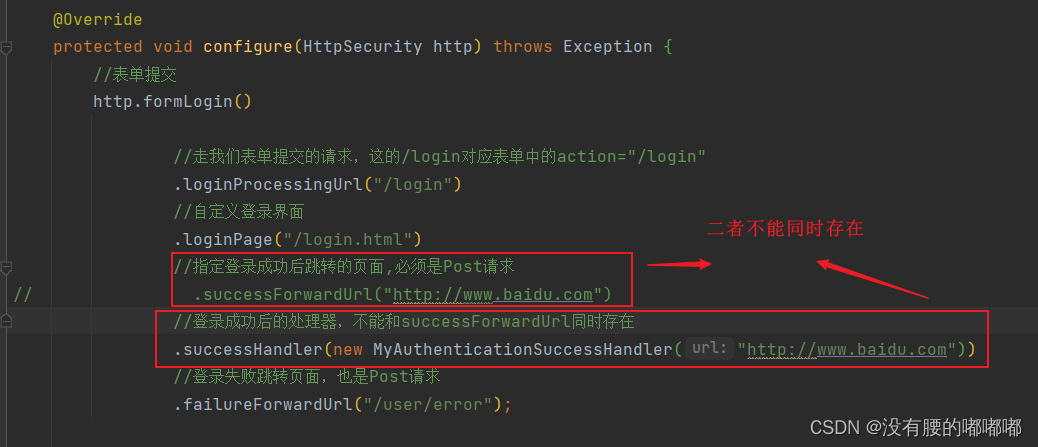
14.通过MyAuthenticationSuccessHandler类中的onAuthenticationSuccess方法中的User principal = (User) authentication.getPrincipal();
15.登录失败自定义跳转路径
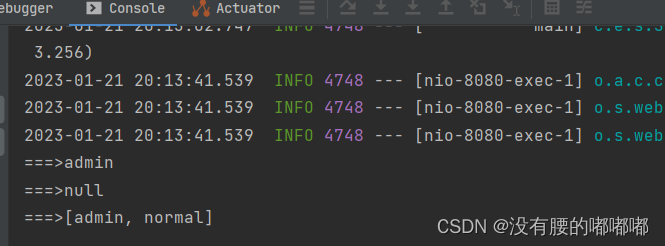
16.权限判断
17.角色判断
18.IP地址判断权限
19.自定义403处理方案
20.注解完成判断授权@Serured
21.@PreAuthorize和@PostAuthorize
RememberMe记住我功能实现
1.退出登录
SpringSecurityOAuth2授权码模式案例
1.新建SpringSecurityoauth2-dome项目
2.SpringSecurity配置类,在cofig包下新建SecurityConfig类继承WebSecurityConfigurerAdapter类重写configure(HttpSecurity http)方法
3.定义自己的User类
4.自定义登录逻辑
5.授权服务器配置
6.资源服务器配置
7.Controller
8.启动程序
SpringSecurityOAuth2密码模式案例
1.修改授权服务器类AuthorizationServerConfig中configure方法
2.授权服务器AuthorizationServerConfig类需要重写configure(AuthorizationServerEndpointsConfigurer endpoints)
3.启动程序
Redis存储token
1.添加redis依赖
2.配置redis,在application.properties中添加redis地址和密码
3.编写redis配置类,在config包下新建RedisConfig类
4.授权服务器配置类AuthorizationServerConfig,使用@Autowired注解注入TokenStore对象
5.启动程序
SpringSecurityOAuth整合JWT案例
1.新建JwtTokenStoreConfig配置类
2.授权服务器配置类AuthorizationServerConfig,使用@Autowired注入JwtTokenStoreConfig类
3.启动项目。发送请求获取token
扩展JWT中存储的内容
1.新建JwtTokenEnhancer类implementes TokenEnhancer接口编辑
2.在JwtTokenStoreConfig配置类添加JwtTokenEnhancer Bean
3.授权服务器类AuthorizationServerConfig添加以下内容
解析JWT令牌
1.添加依赖
2.编写Controller
3.启动项目
刷新令牌
SpringSecurityOauth2整合OOS实现单点登录
1.新建oauth2client01-dome项目
2.导入依赖
3.配置application.properties文件
4.启动类添加EnableOAuth2Sso注解,开启点单登录功能
5.编写controller获取当前登陆用户信息
6.修改授权服务器类AuthorizationServerConfig,跳转url,改为http://localhost:8081/login,添加,自动授权,添加令牌刷新时间,重写void configure(AuthorizationServerSecurityConfigurer security) 方法
7.启动程序
1.基本概念
1.1什么是认证
进入移动互联网时代,大家每天都在刷手机,常用的软件有微信、支付宝、头条等,下边拿微信来举例子说明认证相关的基本概念,在初次使用微信前需要注册成为微信用户,然后输入账号和密码即可登录微信,输入账号和密码登录微信的过程就是认证。
系统为什么要认证?
认证是为了保护系统的隐私数据与资源,用户的身份合法方可访问该系统的资源。
认证︰用户认证就是判断一个用户的身份是否合法的过程,用户去访问系统资源时系统要求验证用户的身份信息,身份合法方可继续访问,不合法则拒绝访问。常见的用户身份认证方式有∶用户名密码登录,二维码登录,手机短信登录,指纹认证等方式。
1.2什么是会话?
用户认证通过后,为了避免用户的每次操作都进行认证可将用户的信息保证在会话中。会话就是系统为了保持当前用户的登录状态所提供的机制,常见的有基于session方式、基于token方式等。
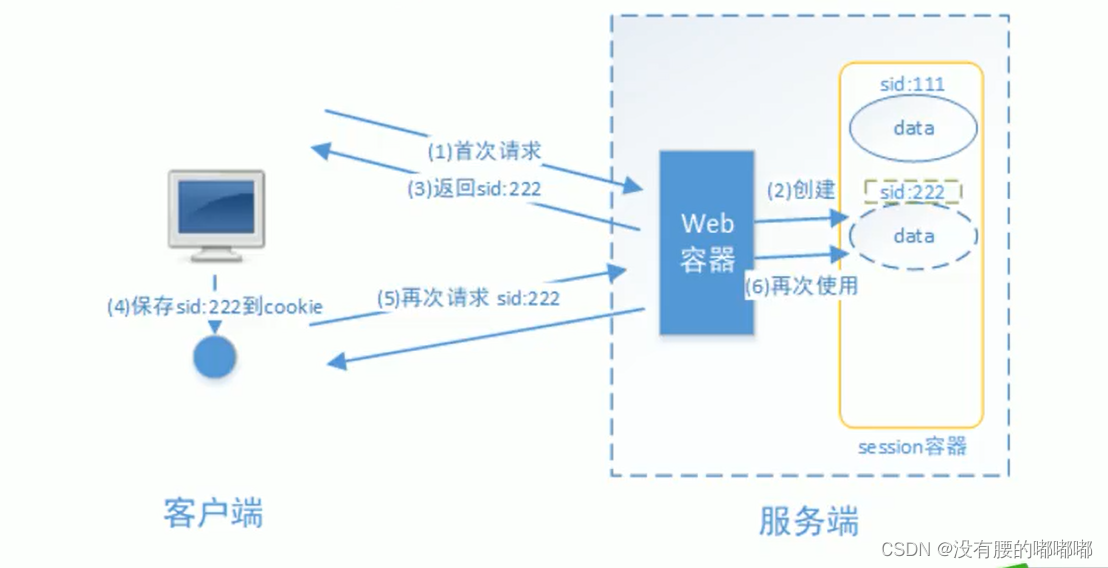
基于session的认证方式如下图:
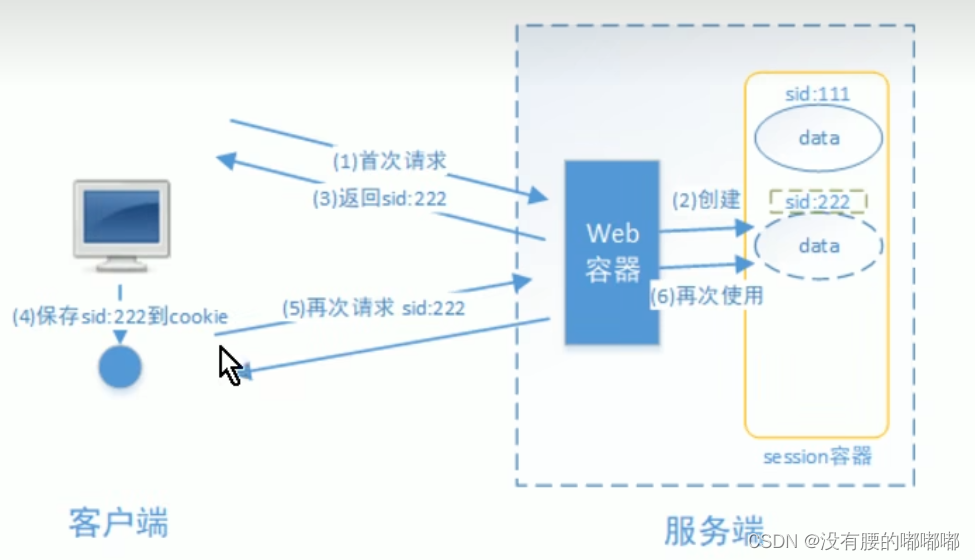
它的交互流程是,用户认证成功后,在服务端生成用户相关的数据保存在session(当前会话)中,发给客户端的sesssion_id存放到cookie 中,这样用户客户端请求时带上session_id就可以验证服务器端是否存在session数据,以此完成用户的合法校验,当用户退出系统或session过期销毁时,客户端的session_id也就无效了。
基于token方式如下图∶
它的交互流程是,用户认证成功后,服务端生成一个token发给客户端,客户端可以放到cookie 或localStorage等存储中,每次请求时带上token,服务端收到token通过验证后即可确认用户身份。
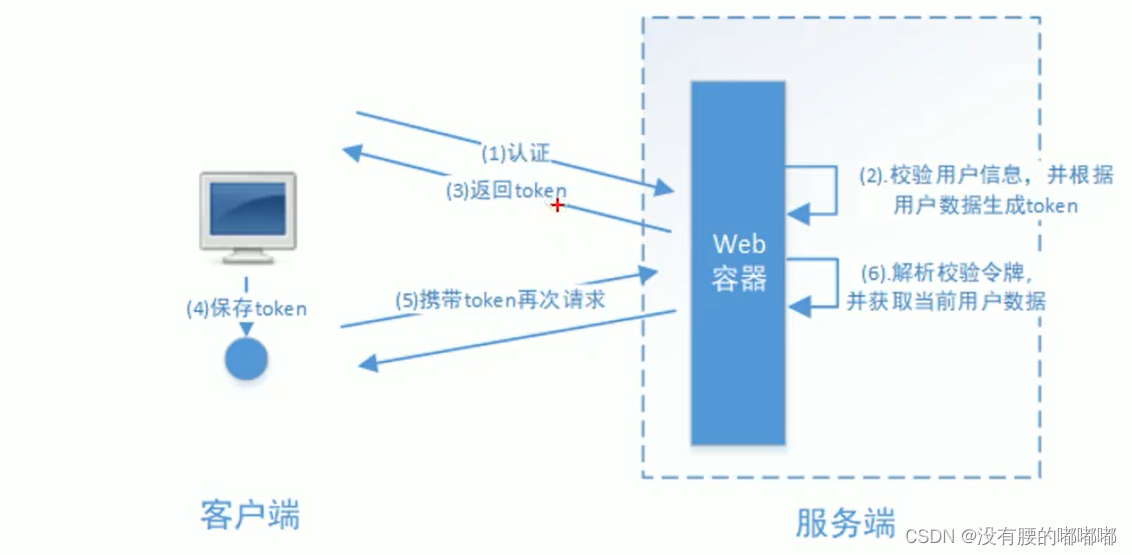
基于session的认证方式由Servlet规范定制,服务端要存储session信息需要占用内存资源,客户端需要支持cookie;基于token的方式则一般不需要服务端存储token,并且不限制客户端的存储方式。如今移动互联网时代更多类型的客户端需要接入系统,系统多是采用前后端分离的架构进行实现,所以基于token的方式更适合。
1.2什么是授权
还拿微信来举例子,微信登录成功后用户即可使用微信的功能,比如,发红包、发
朋友圈、添加好友等,没
有绑定银行卡的用户是无法发送红包的,绑定银行卡的用户才可以发红包,发红包功能、发朋友圈功能都是微信的资源即功能资源,用户拥有发红包功能的权限才可以正常使用发送红包功能,拥有发朋友圈功能的权限才可以使用发朋友圈功能,这个根据用户的权限来控制用户使用资源的过程就是授权。
为什么要授权?
认证是为了保证用户身份的合法性,授权则是为了更细粒度的对隐私数据进行划分,授权是在认证通过后发生的,控制不同的用户能够访问不同的资源。
授权︰授权是用户认证通过根据用户的权限来控制用户访问资源的过程,拥有资源的访问权限则正常访问,没有权限则拒绝访问。
1.3授权的数据模型
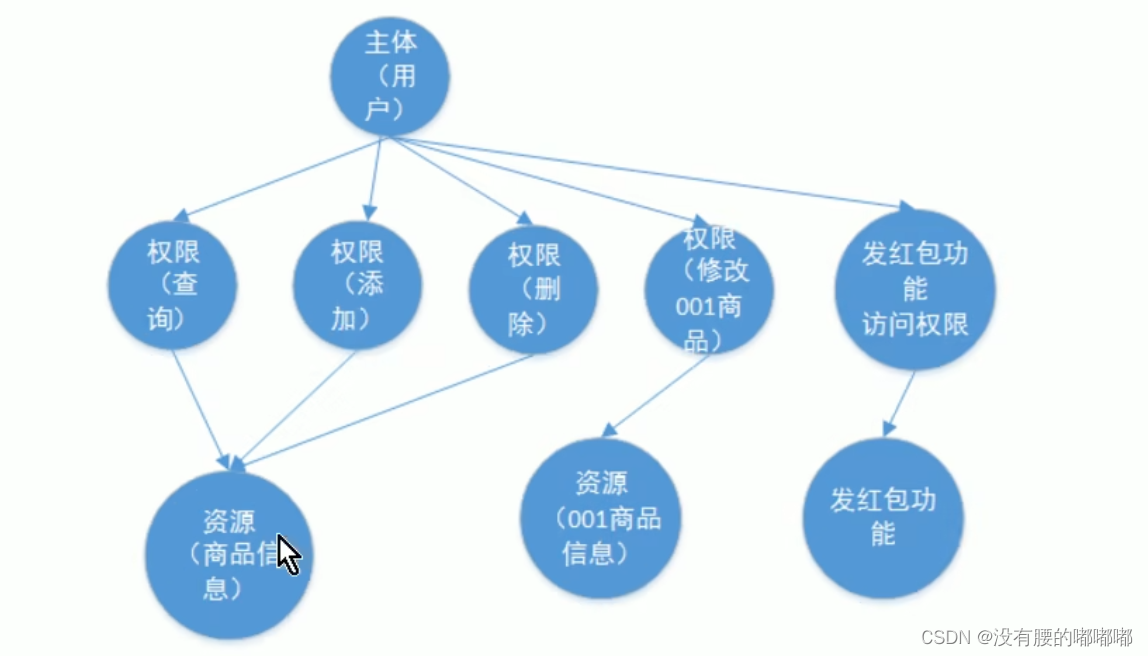
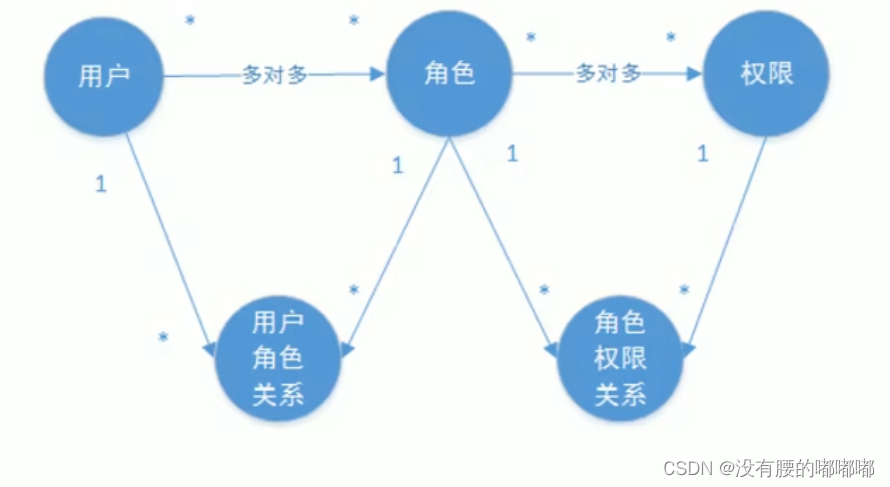
如何进行授权即如何对用户访问资源进行控制,首先需要学习授权相关的数据模型授权可简单理解为Who对What(which)进行How操作,包括如下:
Who,即主体 ( Subject ),主体一般是指用户,也可以是程序,需要访问系统中的资源。
What,即资源( Resource ),如系统菜单、页面、按钮、代码方法、系统商品信息、系统订单信息等。系统菜单、页面、按钮、代码方法都属于系统功能资源,对于web系统每个功能资源通常对应一个URL;系统商品信息、系统订单信息都属于实体资源(数据资源),实体资源由资源类型和资源实例组成,比如商品信息为资源类型,商品编号为001的商品为资源实例。
How,权限/许可( Permission ),规正了用尸x负尔日山宋1F的收改权阳笙﹐通过权限可知用户对哪些资源限、用户添加权限、某个代码方法的调用权限、编号为001的用户的修改权限等,通过权限可知用户对哪些资源
都有哪些操作许可。
主体、资源、权限关系如下图:
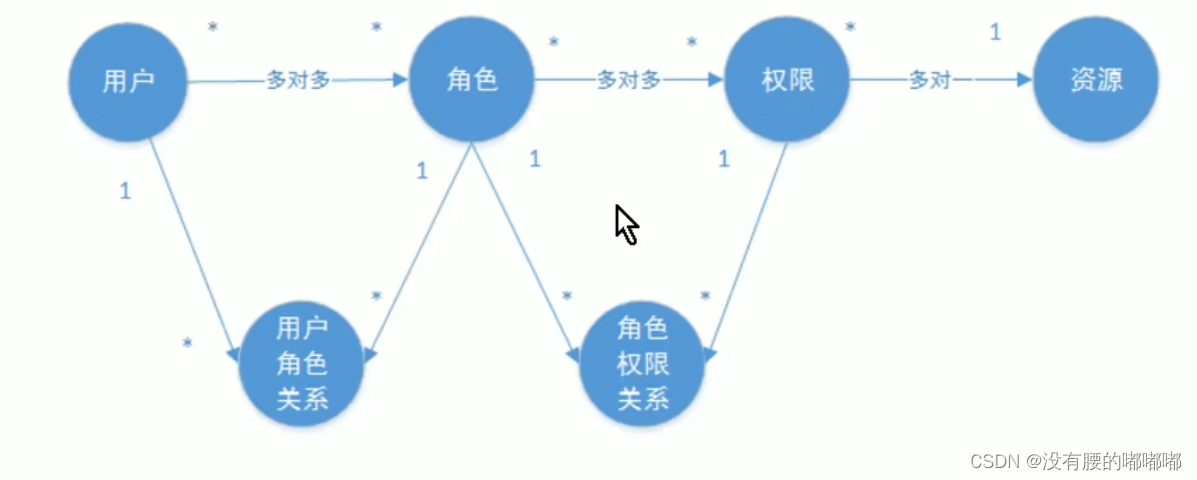
主体、资源、权限相关的数据模型如下:主体(用户id、账号、密码、...)
资源(资源id、资源名称、访问地址、...)
权限(权限id、权限标识、权限名称、资源id、... )角色(角色id、角色名称、... )
角色和权限关系(角色id、权限id、... )
主体(用户)和角色关系(用户id、角色id、...)主体(用户)、资源、权限关系如下图:
通常企业开发中将资源和权限表合并为一张权限表,如下︰资源(资源id、资源名称、访问地址、...)
权限(权限id、权限标识、权限名称、资源id、... )合并为:
权限(权限id、权限标识、权限名称、资源名称、资源访问地址、...)修改后数据模型之间的关系如下图:
1.4.1基于角色的访问控制
RBAC基于角色的访问控制( Role-Based Access Control )是按角色进行授权,比如∶主体的角色为总经理可以查询企业运营报表,查询员工工资信息等,访问控制流程如下︰

根据上图中的判断逻辑,授权代码可表示如下:
if(主体.hasRole("总经理角色id")){
查询工资
}
如果上图中查询工资所需要的角色变化为总经理和部门经理,此时就需要修改判断逻辑为“"判断用户的角色是否是总经理或部门经理”,修改代码如下:
if(主体.hasRole("总经理角色id") l|主体.hasRole("部门经理角色id")){
查询工资}
根据上边的例子发现,当需要修改角色的权限时就需要修改授权的相关代码,系统可扩展性差。
1.4.2基于资源的访问控制
RBAC基于资源的访问控制(Resource-Based Access
Control )是按资源(或权限)进行授权,比如∶用户必须具有查询工资权限才可以查询员工工资信息等,访问控制流程如下:
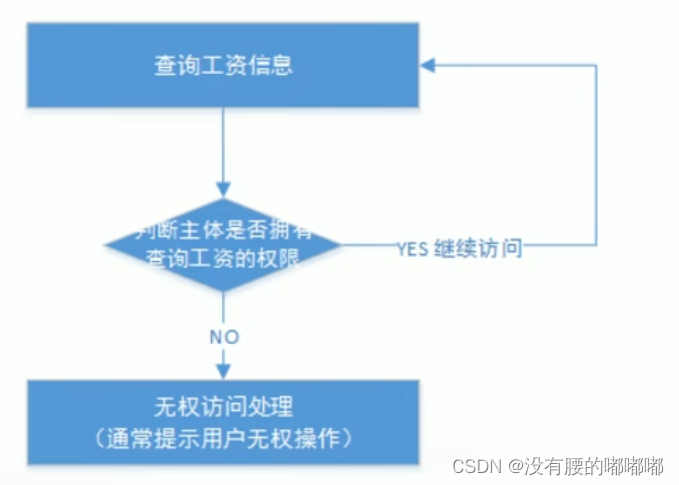
根据上图中的判断,授权代码可以表示为:
if(主体.hasPermission("查询工资权限标识")){
查询工资}
2.基于Session的认证方式
2.1认证流程
基于Session认证方式的流程是,用户认证成功后,在服务端生成用户相关的数据保存在session(当前会话),而发给客户端的sesssion_id存放到cookie中,这样用客户端请求时带上session_id就可以验证服务器端是否存在session 数据,以此完成用户的合法校验。当用户退出系统或session过期销毁时,客户端的session_id也就无效了。下图是session认证方式的流程图:|
基于Session的认证机制由Servlet规范定制,Servlet容器已实现,用户通过HttpSession的操作方法即可实现,如下是HttpSession相关的操作APl。
分布式系统认证方案
什么事分布式系统?
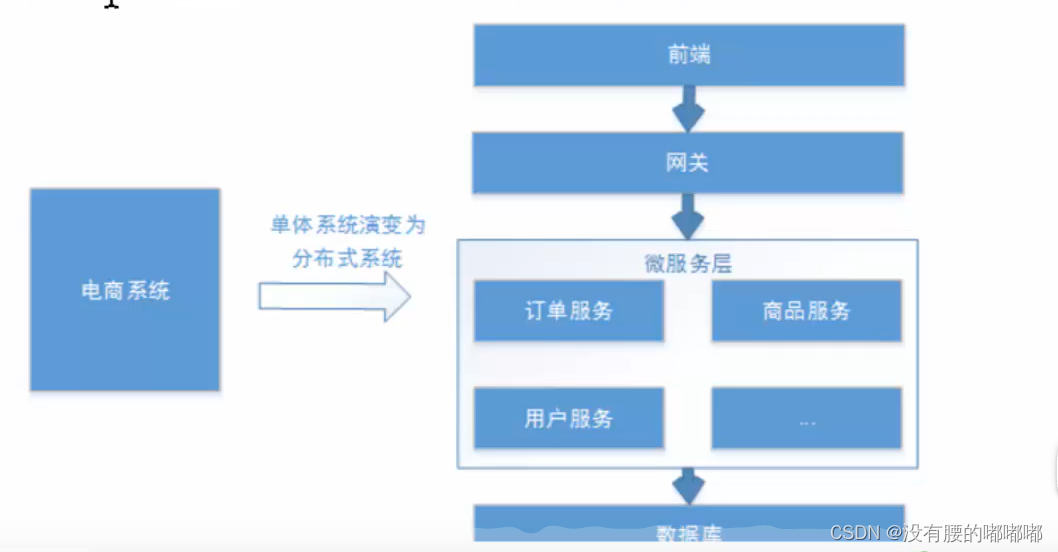
随着软件环境和需求的变化,软件的架构由单体结构演变为分布式架构,具有分布式架构的系统叫分布式系统,分布式系统的运行通常依赖网络,它将单体结构的系统分为若干服务,服务之间通过网络交互来完成用户的业务处理,当前流行的微服务架构就是分布式系统架构,如下图:
分布式系统具体如下基本特点:
1、分布性:每个部分都可以独立部署,服务之间交互通过网络进行通信,比如∶订单服务、商品服务。
2、伸缩性︰每个部分都可以集群方式部署,并可针对部分结点进行硬件及软件扩容,具有一定的伸缩能力。3.(共享性}每个部分都可以作为共享资源对外提供服务,多个部分可能有操作共享资源的情况。
4、开放性∶每个部分根据需求都可以对外发布共享资源的访问接口,并可允许第三方系统访问。
分布式认证需求
分布式系统的每个服务都会有认证、授权的需求,如果每个服务都实现一套认证授权逻辑会非常冗余,考虑分布式系统共享性的特点,需要由独立的认证服务处理系统认证授权的请求﹔考虑分布式系统开放性的特点,不仅对系统内部服务提供认证,对第三方系统也要提供认证。分布式认证的需求总结如下
统一认证授权
提供独立的认证服务,统一处理认证授权。
无论是不同类型的用户,还是不同种类的客户端(web旘,H5、APP),均采用一致的认证、权限、会话机制,实现统—认证授权。
要实现统─则认证方式必须可扩展,支持各种认证需求,比如∶用户名密码认证、
短信验证码、二维码、人
脸识别等认证方式,并可以非常灵活的切换。
应用接入认证
应提供扩展和开放能力,提供安全的系统对接机制,并可开放部分API给接入第三方使用,一方应用(内部系统服务)和三方应用(第三方应用)均采用统—机制接入。
分布式认证方案
选型分析
1、基于session的认证方式
在分布式的环境下,基于session的认证会出现一个问题,每个应用服务都需要在session中存储用户身份信息,通过负载均衡将本地的请求分配到另一个应用服务需要将session信息带过去,否则会重新认证。

这个时候,通常的做法有下面几种:
Session复制:多台应用服务器之间同步session,使session保持一致,对外透明。Session黏贴︰当用户访问集群中某台服务器后,强制指定后续所有请求均落到此机器上。
Session集中存储∶将Session存入分布式缓存中,所有服务器应用实例统一从分布式缓存中存取Session。
总体来讲,基于session认证的认证方式,可以更好的在服务端对会话进行控制,且安全性较高。但是,session机制方式基于cookie,在复杂多样的移动客户端上不能有效的使用,并且无法跨域,另外随着系统的扩展需提高session的复制、黏贴及存储的容错性。
2、基于token的认证方式
基于token的认证方式,服务端不用存储认证数据,易维护扩展性强,客户端可以把token存在任意地方,并且可以实现web和app统一认证机制。其缺点也很明显,token由于自包含信息,因此一般数据量较大,而且每次请求都需要传递,因此比较占带宽。另外,token的签名验签操作也会给cpu带来额外的处理负担。
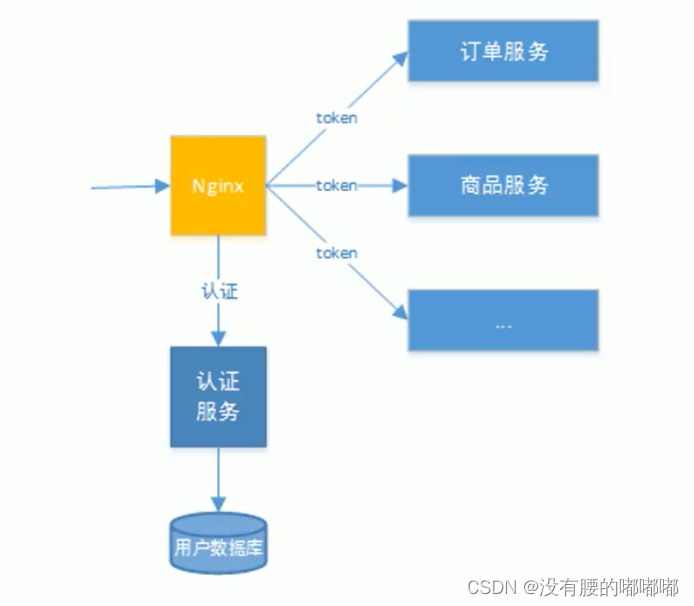
技术方案
根据选型的分析,决定采用基于token的认证方式,它的优点是︰
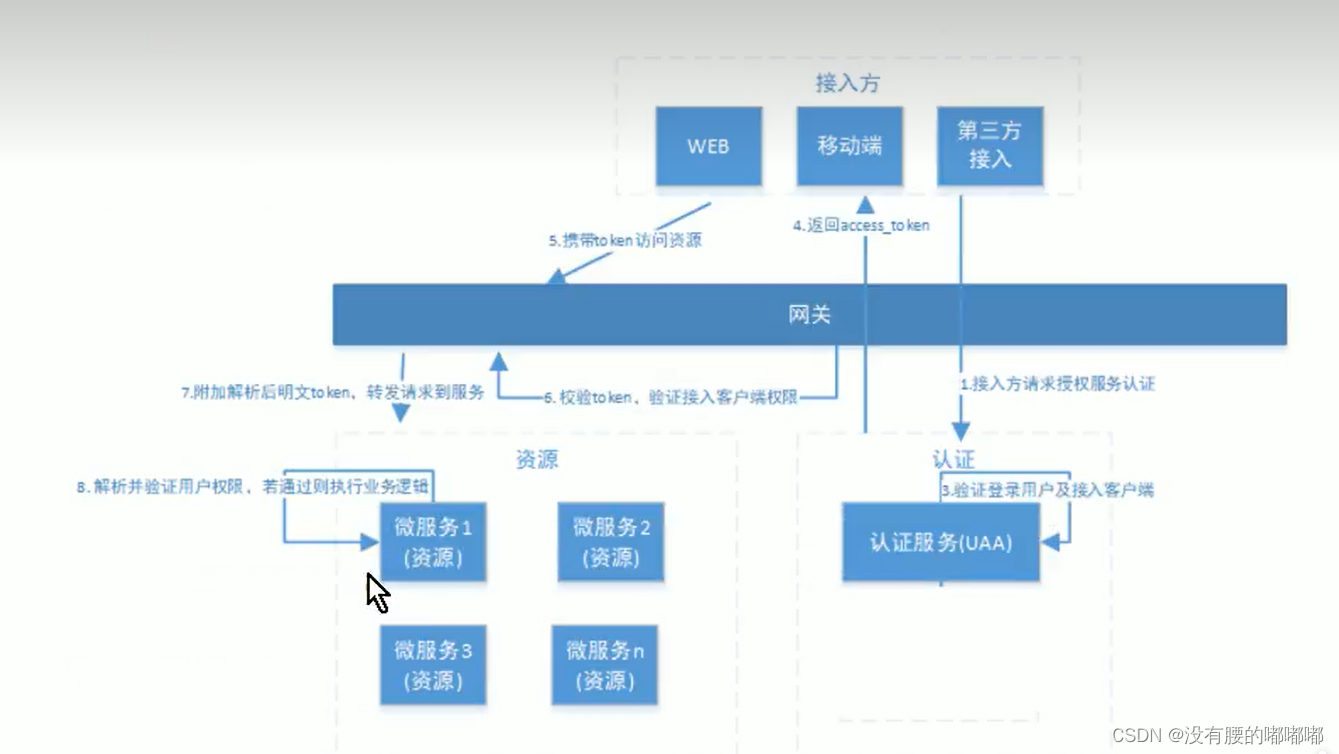
1、适合统一认证的机制,客户端、一方应用、三方应用都遵循一致的认证机制。
2、token认证方式对第三方应用接入更适合,因为它更开放,可使用当前有流行的开放协议Oauth2.0、JWT等。3、一般情况服务端无需存储会话信息,减轻了服务端的压力。
分布式系统认证技术方案见下图:
OAuth2.0
OAuth2.0介绍
OAuth (开放授权)是一个开放标准,允许用户授权第三万应用访问他们存储仕另外的服芳提供首上的后息,而不需要将用户名和密码提供给第三方应用或分享他们数据的所有内容。OAuth20是OAuth协议的延实欣本,但不向后兼容OAuth 1.0即完全废止了QAutn1.0。很多大公可刚(GOogle , Yanoo , MlCr0sUl守的是六JOAUTH认证服务,这些都足以说明OAUTH标准逐渐成为开放资源授权的标准。
Oauth协议目前发展到2.0版本,1.0版本过于复杂,2.0版本已得到广泛应用。
下边分析一个Oauth2认证的例子,通过例子去理解OAuth2.0协议的认证流程,本例子是王者荣耀网站使用微信认证的过程,这个过程的简要描述如下:
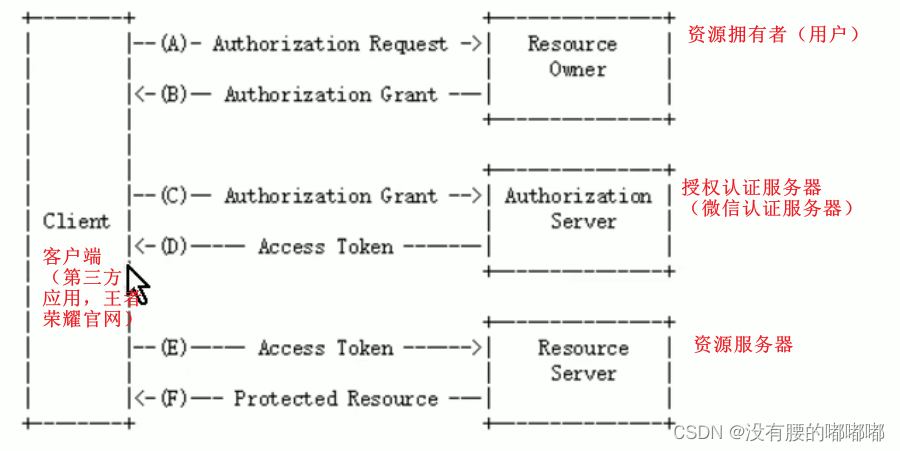
用户借助微信认证登录王者荣耀网站,用户就不用单独在王者荣耀注册用户,怎么样算认证成功吗?王者荣耀网站需要成功从微信获取用户的身份信息则认为用户认证成功,那如何从微信获取用户的身份信息?用户信息的拥有者是用户本人,微信需要经过用户的同意方可为王者荣耀网站生成令牌,王者荣耀网站拿此令牌方可从微信获取用户的信息。
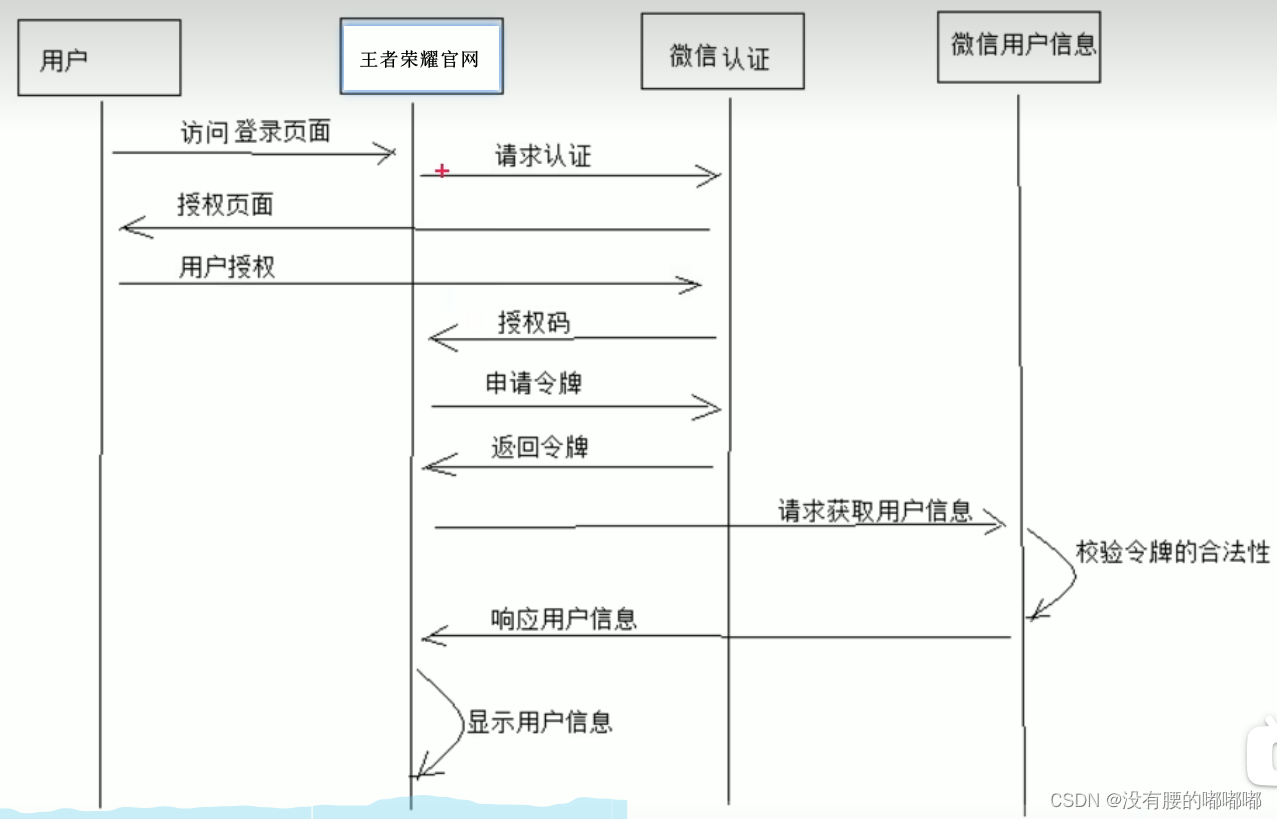
OAuth2.0认证过程
Spring Cloud Security OAuth2
环境介绍
Spring-Security-QAuth2是对OAuth2的一种实现,并且跟我们之前学习的Spring Security相辅相成,与Spring Cloud体系的集成也非常便利。
OAuth2.Q的服务提供方涵盖两个服务,即授权服务(Authorization Server,也叫认证服务)和资源服务(Resource Server),使用Spring Security OAuth2的时候你可以选择把它们在同一个应用程序中实现,也可以选择建立使用同一个授权服务的多个资源服务。
授权服务(Authorization Server )应包含对接入端以及登入用户的合法性进行验证并颁发token等功能,对令牌的请求端点由Spring MVC控制器进行实现,下面是配置一个认证服务必须要实现的endpoints :
AuthorizationEndpoint服务于认证请求。默认URL:/oauth/authorize
TokenEndpoin服务于访问令牌的请求。默认URL: /oauth/token
资源服务(Resource Server),应包含对资源的保护功能,对非法请求进行拦截
对请求中token进行解析鉴权等,下面的过滤器用于实现OAuth 2.0资源服务︰
OAuth2.AuthenticationProcessingFilter用来对请求给出的身份令牌解析鉴权。
教程分别创建uaa授权服务(也可叫认证服务)和order订单资源服务。
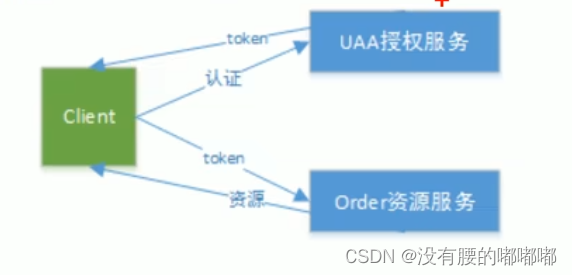
认证流程如下:
- 客户端请求UAA授权服务进行认证。
- 认证通过后由UAA颁发令牌。
- 客户端携带令牌Token请求资源服务。
- 资源服务校验令牌的合法性,合法即返回资源信息。
SpringCloud Security OAuth2快速入门案例
1.创建maven父工程,distributed-security
父工程主要来管理依赖jar的版本号
1.pom.xml
<?xml version="1.0" encoding="UTF-8"?>
<project xmlns="http://maven.apache.org/POM/4.0.0"
         xmlns:xsi="http://www.w3.org/2001/XMLSchema-instance"
         xsi:schemaLocation="http://maven.apache.org/POM/4.0.0 http://maven.apache.org/xsd/maven-4.0.0.xsd">
    <modelVersion>4.0.0</modelVersion>

    <groupId>com.songrongzhen.security</groupId>
    <artifactId>distributed-security</artifactId>
    <version>1.0-SNAPSHOT</version>
    <modules>
        <module>distributed-security-order</module>
    </modules>

    <packaging>pom</packaging>

    <parent>
        <groupId>org.springframework.boot</groupId>
        <artifactId>spring-boot-starter-parent</artifactId>
        <version>2.1.3.RELEASE</version>
    </parent>

    <properties>
        <project.build.sourceEncoding>UTF-8</project.build.sourceEncoding>
        <project.reporting.outputEncoding>UTF-8</project.reporting.outputEncoding>
        <java.version>1.8</java.version>
    </properties>

    <dependencyManagement>
        <dependencies>

            <dependency>
                <groupId>org.springframework.cloud</groupId>
                <artifactId>spring-cloud-dependencies</artifactId>
                <version>Greenwich.RELEASE</version>
                <type>pom</type>
                <scope>import</scope>
            </dependency>


            <dependency>
                <groupId>javax.servlet</groupId>
                <artifactId>javax.servlet-api</artifactId>
                <version>3.1.0</version>
                <scope>provided</scope>
            </dependency>

            <dependency>
                <groupId>javax.interceptor</groupId>
                <artifactId>javax.interceptor-api</artifactId>
                <version>1.2</version>
            </dependency>

            <dependency>
                <groupId>com.alibaba</groupId>
                <artifactId>fastjson</artifactId>
                <version>1.2.47</version>
            </dependency>

            <dependency>
                <groupId>org.projectlombok</groupId>
                <artifactId>lombok</artifactId>
                <version>1.18.0</version>
            </dependency>

            <dependency>
                <groupId>mysql</groupId>
                <artifactId>mysql-connector-java</artifactId>
                <version>5.1.47</version>
            </dependency>


            <dependency>
                <groupId>org.springframework.security</groupId>
                <artifactId>spring-security-jwt</artifactId>
                <version>1.0.10.RELEASE</version>
            </dependency>


            <dependency>
                <groupId>org.springframework.security.oauth.boot</groupId>
                <artifactId>spring-security-oauth2-autoconfigure</artifactId>
                <version>2.1.3.RELEASE</version>
            </dependency>


        </dependencies>
    </dependencyManagement>


    <build>
        <finalName>${project.name}</finalName>
        <resources>
            <resource>
                <directory>src/main/resources</directory>
                <filtering>true</filtering>
                <includes>
                    <include>**/*</include>
                </includes>
            </resource>
            <resource>
                <directory>src/main/java</directory>
                <includes>
                    <include>**/*.xml</include>
                </includes>
            </resource>
        </resources>
        <plugins>
            <!--<plugin>
                <groupId>org.springframework.boot</groupId>
                <artifactId>spring-boot-maven-plugin</artifactId>
            </plugin>-->

            <plugin>
                <groupId>org.apache.maven.plugins</groupId>
                <artifactId>maven-compiler-plugin</artifactId>
                <configuration>
                    <source>1.8</source>
                    <target>1.8</target>
                </configuration>
            </plugin>

            <plugin>
                <artifactId>maven-resources-plugin</artifactId>
                <configuration>
                    <encoding>utf-8</encoding>
                    <useDefaultDelimiters>true</useDefaultDelimiters>
                </configuration>
            </plugin>
        </plugins>
    </build>

</project>
2.创建子模块, distributed-security-uua
1.pom继承父工程
<?xml version="1.0" encoding="UTF-8"?>
<project xmlns="http://maven.apache.org/POM/4.0.0"
         xmlns:xsi="http://www.w3.org/2001/XMLSchema-instance"
         xsi:schemaLocation="http://maven.apache.org/POM/4.0.0 http://maven.apache.org/xsd/maven-4.0.0.xsd">
    <parent>
        <groupId>com.songrongzhen.security</groupId>
        <artifactId>distributed-security</artifactId>
        <version>1.0-SNAPSHOT</version>
    </parent>
    <modelVersion>4.0.0</modelVersion>

    <artifactId>distributed-security-uaa</artifactId>

    <dependencies>

        <dependency>
            <groupId>org.springframework.cloud</groupId>
            <artifactId>spring-cloud-starter-netflix-eureka-client</artifactId>
        </dependency>

        <dependency>
            <groupId>org.springframework.cloud</groupId>
            <artifactId>spring-cloud-starter-netflix-hystrix</artifactId>
        </dependency>

        <dependency>
            <groupId>org.springframework.cloud</groupId>
            <artifactId>spring-cloud-starter-netflix-ribbon</artifactId>
        </dependency>

        <dependency>
            <groupId>org.springframework.cloud</groupId>
            <artifactId>spring-cloud-starter-openfeign</artifactId>
        </dependency>

        <dependency>
            <groupId>com.netflix.hystrix</groupId>
            <artifactId>hystrix-javanica</artifactId>
        </dependency>

        <dependency>
            <groupId>org.springframework.retry</groupId>
            <artifactId>spring-retry</artifactId>
        </dependency>

        <dependency>
            <groupId>org.springframework.boot</groupId>
            <artifactId>spring-boot-starter-actuator</artifactId>
        </dependency>


        <dependency>
            <groupId>org.springframework.boot</groupId>
            <artifactId>spring-boot-starter-web</artifactId>
        </dependency>

        <dependency>
            <groupId>org.springframework.boot</groupId>
            <artifactId>spring-boot-starter-freemarker</artifactId>
        </dependency>


        <dependency>
            <groupId>org.springframework.data</groupId>
            <artifactId>spring-data-commons</artifactId>
        </dependency>

        <dependency>
            <groupId>org.springframework.cloud</groupId>
            <artifactId>spring-cloud-starter-security</artifactId>
        </dependency>

        <dependency>
            <groupId>org.springframework.cloud</groupId>
            <artifactId>spring-cloud-starter-oauth2</artifactId>
        </dependency>

        <dependency>
            <groupId>org.springframework.security</groupId>
            <artifactId>spring-security-jwt</artifactId>
        </dependency>

        <dependency>
            <groupId>javax.interceptor</groupId>
            <artifactId>javax.interceptor-api</artifactId>
        </dependency>

        <dependency>
            <groupId>mysql</groupId>
            <artifactId>mysql-connector-java</artifactId>
        </dependency>
        <dependency>
            <groupId>org.springframework.boot</groupId>
            <artifactId>spring-boot-starter-jdbc</artifactId>
        </dependency>


        <dependency>
            <groupId>com.alibaba</groupId>
            <artifactId>fastjson</artifactId>
        </dependency>

        <dependency>
            <groupId>org.projectlombok</groupId>
            <artifactId>lombok</artifactId>
        </dependency>


    </dependencies>

</project>
2.项目目录结构补充完整
启动类
配置文件


spring.application.name=uaa-service
server.port=53020
spring.main.allow-bean-definition-overriding = true

logging.level.root = debug
logging.level.org.springframework.web = info

spring.http.encoding.enabled = true
spring.http.encoding.charset = UTF-8
spring.http.encoding.force = true
server.tomcat.remote_ip_header = x-forwarded-for
server.tomcat.protocol_header = x-forwarded-proto
server.use-forward-headers = true
server.servlet.context-path = /uaa

spring.freemarker.enabled = true
spring.freemarker.suffix = .html
spring.freemarker.request-context-attribute = rc
spring.freemarker.content-type = text/html
spring.freemarker.charset = UTF-8
spring.mvc.throw-exception-if-no-handler-found = true
spring.resources.add-mappings = false

spring.datasource.url = jdbc:mysql://localhost:3306/user_db?useUnicode=true
spring.datasource.username = root
spring.datasource.password = mysql
spring.datasource.driver-class-name = com.mysql.jdbc.Driver

eureka.client.serviceUrl.defaultZone = http://localhost:53000/eureka/
eureka.instance.preferIpAddress = true
eureka.instance.instance-id = ${spring.application.name}:${spring.cloud.client.ip-address}:${spring.application.instance_id:${server.port}}
management.endpoints.web.exposure.include = refresh,health,info,env

feign.hystrix.enabled = true
feign.compression.request.enabled = true
feign.compression.request.mime-types[0] = text/xml
feign.compression.request.mime-types[1] = application/xml
feign.compression.request.mime-types[2] = application/json
feign.compression.request.min-request-size = 2048
feign.compression.response.enabled = true
3.创建子模块, distributed-security-order
1.pom 也继承父distributed-security
<?xml version="1.0" encoding="UTF-8"?>
<project xmlns="http://maven.apache.org/POM/4.0.0"
         xmlns:xsi="http://www.w3.org/2001/XMLSchema-instance"
         xsi:schemaLocation="http://maven.apache.org/POM/4.0.0 http://maven.apache.org/xsd/maven-4.0.0.xsd">
    <parent>
        <artifactId>distributed-security</artifactId>
        <groupId>com.songrongzhen.security</groupId>
        <version>1.0-SNAPSHOT</version>
    </parent>
    <modelVersion>4.0.0</modelVersion>

    <artifactId>distributed-security-order</artifactId>

    <properties>
        <maven.compiler.source>8</maven.compiler.source>
        <maven.compiler.target>8</maven.compiler.target>
    </properties>

    <dependencies>

        <dependency>
            <groupId>org.springframework.cloud</groupId>
            <artifactId>spring-cloud-starter-netflix-eureka-client</artifactId>
        </dependency>

        <dependency>
            <groupId>org.springframework.cloud</groupId>
            <artifactId>spring-cloud-starter-netflix-hystrix</artifactId>
        </dependency>

        <dependency>
            <groupId>org.springframework.cloud</groupId>
            <artifactId>spring-cloud-starter-netflix-ribbon</artifactId>
        </dependency>

        <dependency>
            <groupId>org.springframework.cloud</groupId>
            <artifactId>spring-cloud-starter-openfeign</artifactId>
        </dependency>

        <dependency>
            <groupId>com.netflix.hystrix</groupId>
            <artifactId>hystrix-javanica</artifactId>
        </dependency>

        <dependency>
            <groupId>org.springframework.retry</groupId>
            <artifactId>spring-retry</artifactId>
        </dependency>

        <dependency>
            <groupId>org.springframework.boot</groupId>
            <artifactId>spring-boot-starter-actuator</artifactId>
        </dependency>


        <dependency>
            <groupId>org.springframework.boot</groupId>
            <artifactId>spring-boot-starter-web</artifactId>
        </dependency>

        <dependency>
            <groupId>org.springframework.boot</groupId>
            <artifactId>spring-boot-starter-freemarker</artifactId>
        </dependency>


        <dependency>
            <groupId>org.springframework.data</groupId>
            <artifactId>spring-data-commons</artifactId>
        </dependency>

        <dependency>
            <groupId>org.springframework.cloud</groupId>
            <artifactId>spring-cloud-starter-security</artifactId>
        </dependency>

        <dependency>
            <groupId>org.springframework.cloud</groupId>
            <artifactId>spring-cloud-starter-oauth2</artifactId>
        </dependency>

        <dependency>
            <groupId>org.springframework.security</groupId>
            <artifactId>spring-security-jwt</artifactId>
        </dependency>

        <dependency>
            <groupId>javax.interceptor</groupId>
            <artifactId>javax.interceptor-api</artifactId>
        </dependency>

        <dependency>
            <groupId>mysql</groupId>
            <artifactId>mysql-connector-java</artifactId>
        </dependency>
        <dependency>
            <groupId>org.springframework.boot</groupId>
            <artifactId>spring-boot-starter-jdbc</artifactId>
        </dependency>


        <dependency>
            <groupId>com.alibaba</groupId>
            <artifactId>fastjson</artifactId>
        </dependency>

        <dependency>
            <groupId>org.projectlombok</groupId>
            <artifactId>lombok</artifactId>
        </dependency>


    </dependencies>
</project>
2.补全目录结构
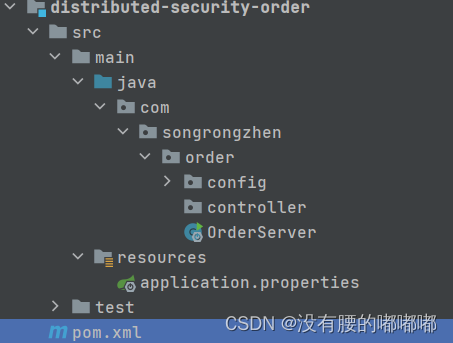
配置文件
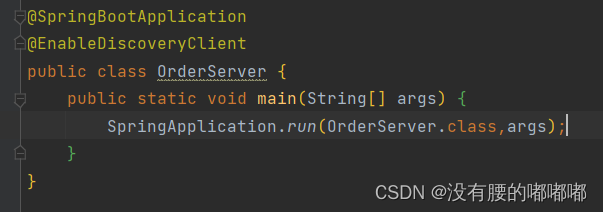
启动类
spring.application.name=order-service
server.port=53021
spring.main.allow-bean-definition-overriding = true

logging.level.root = debug
logging.level.org.springframework.web = info
spring.http.encoding.enabled = true
spring.http.encoding.charset = UTF-8
spring.http.encoding.force = true
server.tomcat.remote_ip_header = x-forwarded-for
server.tomcat.protocol_header = x-forwarded-proto
server.use-forward-headers = true
server.servlet.context-path = /order


spring.freemarker.enabled = true
spring.freemarker.suffix = .html
spring.freemarker.request-context-attribute = rc
spring.freemarker.content-type = text/html
spring.freemarker.charset = UTF-8
spring.mvc.throw-exception-if-no-handler-found = true
spring.resources.add-mappings = false


eureka.client.serviceUrl.defaultZone = http://localhost:53000/eureka/
eureka.instance.preferIpAddress = true
eureka.instance.instance-id = ${spring.application.name}:${spring.cloud.client.ip-address}:${spring.application.instance_id:${server.port}}
management.endpoints.web.exposure.include = refresh,health,info,env

feign.hystrix.enabled = true
feign.compression.request.enabled = true
feign.compression.request.mime-types[0] = text/xml
feign.compression.request.mime-types[1] = application/xml
feign.compression.request.mime-types[2] = application/json
feign.compression.request.min-request-size = 2048
feign.compression.response.enabled = true
3.授权服务器配置
EnableAuthorizationServer
可以用@EnableAuthorizationServer注解并继承AuthorizationServerConfigurerAdapter来配置OAuth2.0授权服务器。
在Config包下创建AuthorizationServer :

AuthorizationServerConfigurerAdapter要求配置以下几个类,这几个类是由Spring创建的独立的配置对象,它们会被Spring传入AuthorizationServerConfigurer中进行配置。

ClientDetailsServiceCnfigurer:用来配置客户端详情服务(ClientDetailsService ),客户端详情信息在这里进行初始化,你能够把客户端详情信息写死在这里或者是通过数据库来存储调取详情信息。AuthorizationServerEndpointsConfigurer:用来配置令牌( token )的访问端点和令牌服务(token
services)。
AuthorizationServerSecurityconfigurer:用来配置令牌端点的安全约束.
4.配置客户端详细信息
ClientDetailsServiceConfigurer能够使用内存或者JDBC来实现客户端详情服务
( ClientDetailsService ),ClientDetailsService负责查找ClientDetails,而ClientDetails有几个重要的属性如下列表:
clientld :(必须的)用来标识客户的Id。
secret :(需要值得信任的客户端)客户端安全码,如果有的话。
scope :用来限制客户端的访问范围,如果为空(默认)的话,那么客户端拥有全部的访问范围。. authorizedGrantTypes : 此客户端可以使用的授权类型,默认为空。
authorities : 此客户端可以使用的权限(基于Spring Security authorities )。
客户端详情(Client Details )能够在应用程序运行的时候进行更新,可以通过访问底层的存储服务(例如将客户端详情存储在一个关系数据库的表中,就可以使用JdbcClientDetailsService )或者通过自己实现ClientRegistrationService接口(同时你也可以实现ClientDetailsService接口)来进行管理。
我们暂时使用内存方式存储客户端详情信息,配置如下:
 @Override
    public void configure(ClientDetailsServiceConfigurer clients)
            throws Exception {
      /* clients.withClientDetails(clientDetailsService);*/
        //使用in-memory存储
        clients.inMemory()
                /*client_id*/
                .withClient("c1")
                .secret(new BCryptPasswordEncoder().encode("secret"))
                /*资源id*/
                .resourceIds("res1")
                //该client允许的授权类型authorization_code, password,refresh_token,implicit,client_credentials
                .authorizedGrantTypes("authorization_code",
                        "password", "client_credentials", "implicit", "refresh_token")
                //允许的授权范围
                .scopes("all")
                //false跳转到授权页面
                .autoApprove(false)
                //加上验证回调地址
                .redirectUris("http: // www.baidu.com");
    }
4.管理令牌
AuthorizationServeTokenServices 接口定义了一些操作使得你可以对令牌进行一些必要的管理,令牌可以被用来加载身份信息,里面包含了这个令牌的相关权限。
自己可以创建 AuthorizationServerTokenServices这个接口的实现,则需要继承DefaultTokenServices这个类,里面包含了一些有用实现,你可以使用它来修改令牌的格式和令牌的存储。默认的,当它尝试创建一个令牌的时候,是使用随机值来进行填充的,除了持久化令牌是委托一个TokenStore 接口来实现以外,这个类几乎帮你做了所有的事情。并且TokenStore这个接口有一个默认的实现,它就是InMemoryTokenStore,如其命名,所有的令牌是被保存在了内存中。除了使用这个类以外,你还可以使用一些其他的预定义实现,下面有几个版本,它们都实现了TokenStore接口︰
- InMemoryTokenStore :这个版本的实现是被默认采用的,它可以完美的工作在单服务器上(即访问并发量压力不大的情况下,并且它在失败的时候不会进行备份),大多数的项目都可以使用这个版本的实现来进行尝试,你可以在开发的时候使用它来进行管理,因为不会被保存到磁盘中,所以更易于调试。
- JdbcTokenStore :这是一个基于JDBC的实现版本,令牌会被保存进关系型数据库。使用这个版本的实现时,你可以在不同的服务器之间共享令牌信息,使用这个版本的时候请注意把"spring-jdbc"这个依赖加到你的classpath当中。
- JwtTokenStore :这个版本的全称是JSON Web Token (JWT),它可以把令牌相关的数据进行编码(因此对于后端服务来说,它不需要进行存储,这将是一个重大优势),但是它有一个缺点,那就是撤销一个经授权令牌将会非常困难,所以它通常用来处理一个生命周期较短的令牌以及撤销刷新令牌( refresh_token )。另外一个缺点就是这个令牌占用的空间会比较大,如果你加入了比较多用户凭证信息。JwtTokenStore 不会保存任何数据,但是它在转换令牌值以及授权信息方面与DefaultTokenServices所扮演的角色是一样的。
1、定义TokenConfig
在config包下定义TokenConfig,我们暂时先使用InMemoryTokenStore,生成一个普通的令牌。

2、定义AuthorizationServerTokenServices
在AuthorizationServer中定义AuthorizationServerTokenServices
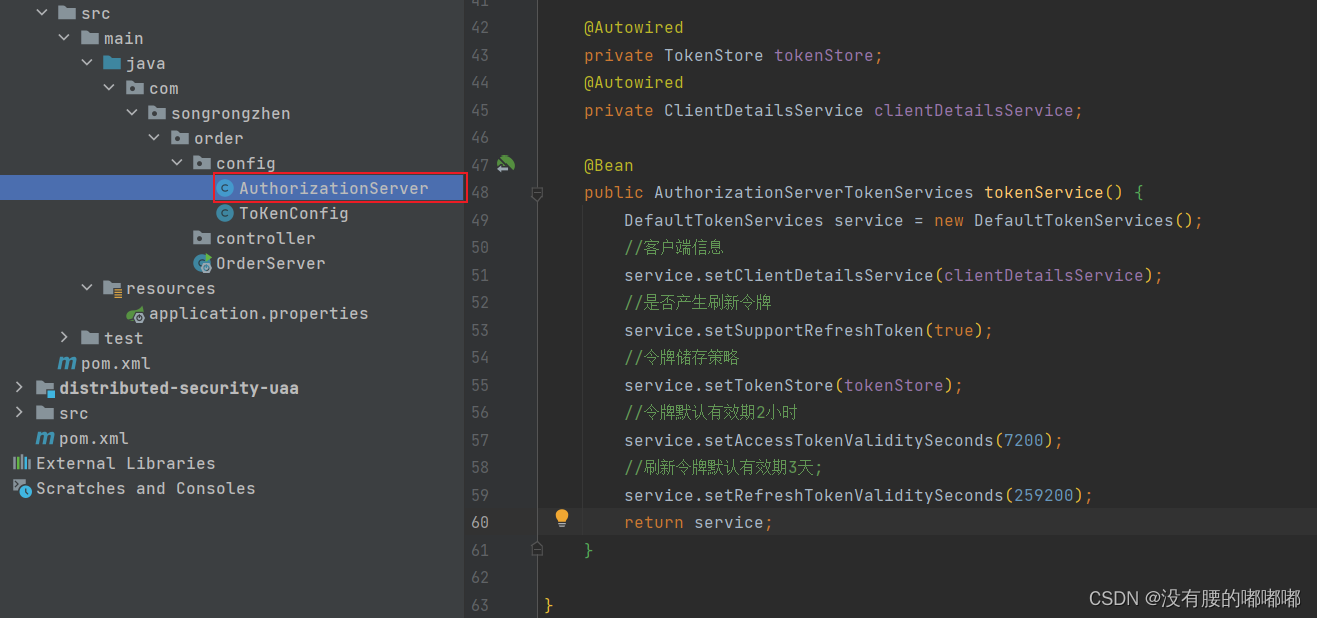
5.令牌访问端点配置
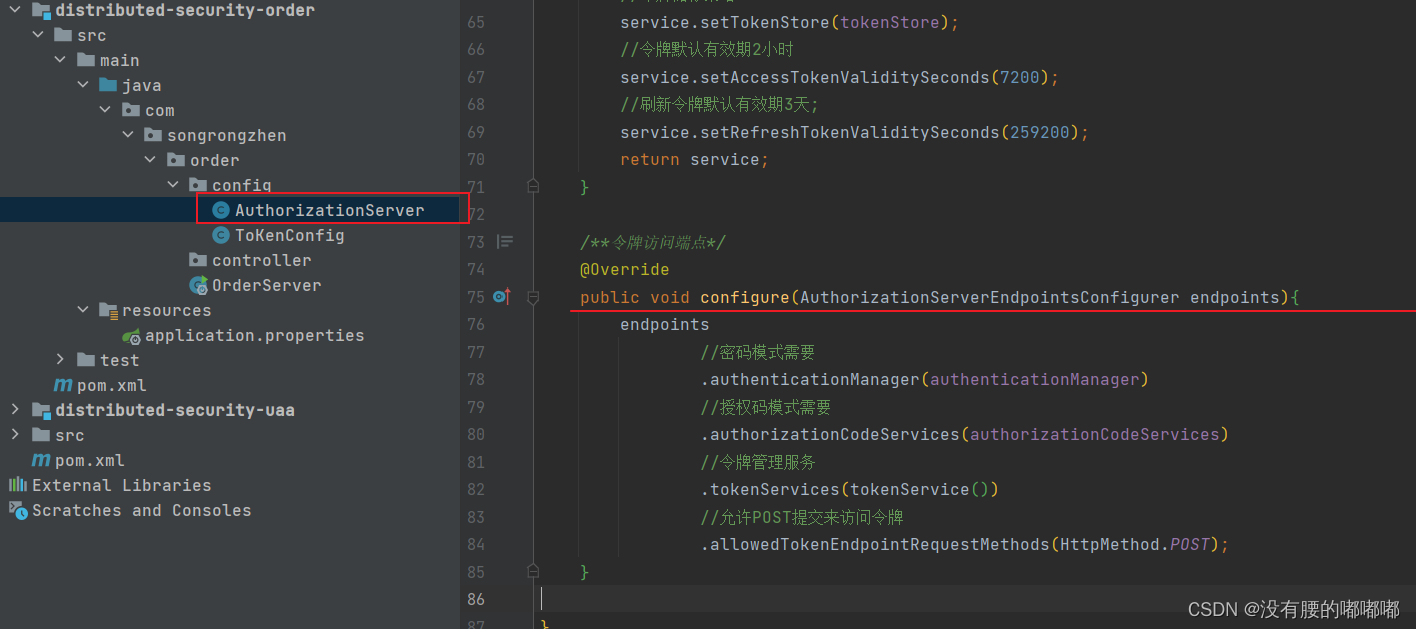
AuthorizationServerEndpointsConfigurer这个对象的实例可以完成令牌服务以及令牌endpoint配置
配置授权类型(Grant Types )
AuthorizationServerEndpointsConfigurer通过设定以下属性决定支持的授权类型(Grant Types ) :
- authenticationManager:认证管理器,当你选择了资源所有者密码( password )授权类型的时候,请设置这个属性注入一个AuthenticationManager对象。
- userDetailsService:如果你设置了这个属性的诂,那玩明你有一个目Ciy useruEdlu52eEMite rxr的人配现,或者你可以把这个东西设置到全局域上面去(例刘gloDalAUtnenuarA.Ma的p担中就2句会二个置对象),当你设置了这个之后,那么"refresh_token”即刷新令牌授权类型模式的流程中就会包含一个检查,用来确保这个账号是否仍然存效,假如说你禁用了这个账户的话。
- authorizationCodeServices :这个属性是用来设置授权码服务的(即AuthorizationCodeServices 的头例对象),主要用于"authorization_code"授权码类型模式。
- implicitGrantService :这个属性用于设置隐式授权模式,用来管理隐式授权模式的状态。
- tokenGranter:当你设置了这个东西(即TokenGranter接口实现),那么授权将会交由你来完全掌控,并且会忽略掉上面的这几个属性,这个属性一般是用作拓展用途的,即标准的四种授权模式已经满足不了你的需求的时候,才会考虑使用这个。
配置授权端点的URL ( Endpoint URLS )
AuthorizationServerEndpointsConfigurer这个配置对象有一个叫做pathMapping)的方法用来配置端点URL链接,它有两个参数︰
- 第一个参数: String类型的,这个端点URL的默认链接。
- 第二个参数: String 类型的,你要进行替代的URL链接
以上的参数都将以"字符为开始的字符串,框架的默认URL链接如下列表,可以作为这个pathMapping()方法的第一个参数:
- /oauth/authorize:授权端点。
- /oauth/token :令牌端点。
- /oauth/confirm_access:用户确认授权提交端点。
- /oauth/error:授权服务错误信息端点。
- /oauth/check_token:用于资源服务访问的令牌解析端点。
- /oauth/token_key:提供公有密匙的端点,如果你使用WT令牌的话。
需要注意的是授权端点这个URL应该被Spring Security保护起来只供授权用户访问
在AuthorizationServer配置令牌访问端点
令牌端点的安全约束
AuthorizationServerSecurityConfigurer:用来配置令牌端点(Token Endpoint)的安全约束,在AuthorizationServer中配置如下:

授权服务配置总结:授权服务配置分成三大块,可以关联记忆。
要完成认证,首先得知道客户端信息从哪儿读取,因此要进行客户端详情配置。
既然要颁发token,那必须得定义token的相关endpoint(端点url),以及token如何存取,以及客户端支持哪些类型的token。
既然暴露除了一些endpoint,那对这些endpoint可以定义一些安全上的约束等。
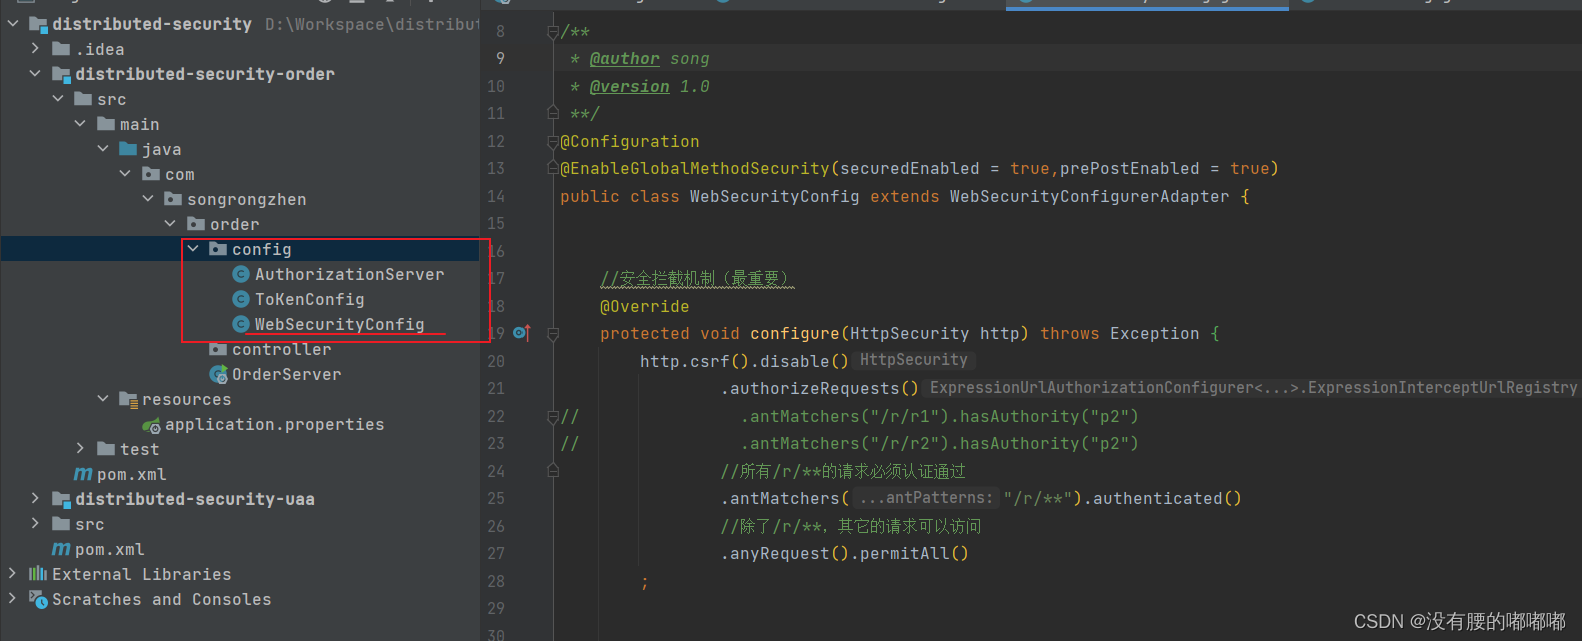
Web安全配置
JWT介绍
通过上边的测试我们发现,当资源服务和授权服务不在一起时资源服务使用RemoteTokenServices远程请求授权服务验证token,如果访问量较大将会影响系统的性能。
解决上边问题:|
令牌采用JWT格式即可解决上边的问题,用户认证通过会得到一个JWT令牌,JWT令牌中已经包括了用户相关的信息,客户端只需要携带JWT访问资源服务,资源服务根据事先约定的算法自行完成令牌校验,无需每次都请求认证服务完成授权。
1、什么是JWT?
JSON Web Token (JMT )是一个开放的行业标准(RFC 7519),它定义了一种简介的、自包含的协议格式,用于在通信双方传递json对象,传递的信息经过数字签名可以被验证和信任。JMT可以使用HMAC算法或使用RSA的公钥/私钥对来签名,防止被篡改。
2.JWT令牌结构
通过学习JWT令牌结构为自定义jwt令牌打好基础。
JWT令牌由三部分组成,每部分中间使用点(.)分隔,比如︰xxxx.yyyyy.zzzz
Header
头部包括令牌的类型(即JWT )及使用的哈希算法(如HMAC SHA256或RSA )
一个例子如下︰
下边是Header部分的内容

将上边的内容使用Base64Url编码,得到一个字符串就是JWT令牌的第一部分。
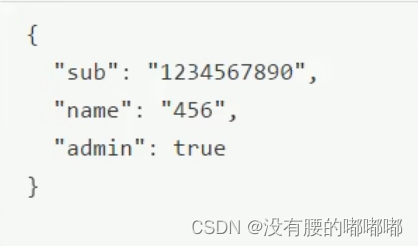
Payload
第二部分是负载,内容也是一个json对象,它是存放有效信息的地方,它可以存放jwt提供的现成字段,比如:iss (签发者) ,exp (过期时间戳) , sub (面向的用户)等,也可自定义字段。
此部分不建议存放敏感信息,因为此部分可以解码还原原始内容。
最后将第二部分负载使用Base64Url编码,得到一个字符串就是JWT令牌的第二部分
一个例子︰
Signature
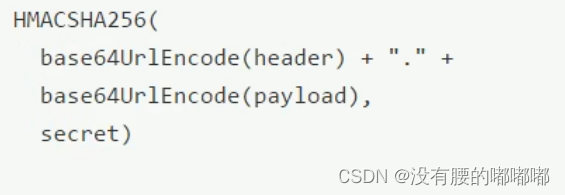
第三部分是签名,此部分用于防止jwt内容被篡改。
这个部分使用base64url将前两部分进行编码,编码后使用点( . )连接组成字符串,最后使用header中声明签名算法进行签名。
一个例子:|
--------------------------------------------------
SpringBoo项目实现SpringSecurity登录认证
1.第一步构建SpringBoot项目添加SpringSecurity依赖和web依赖
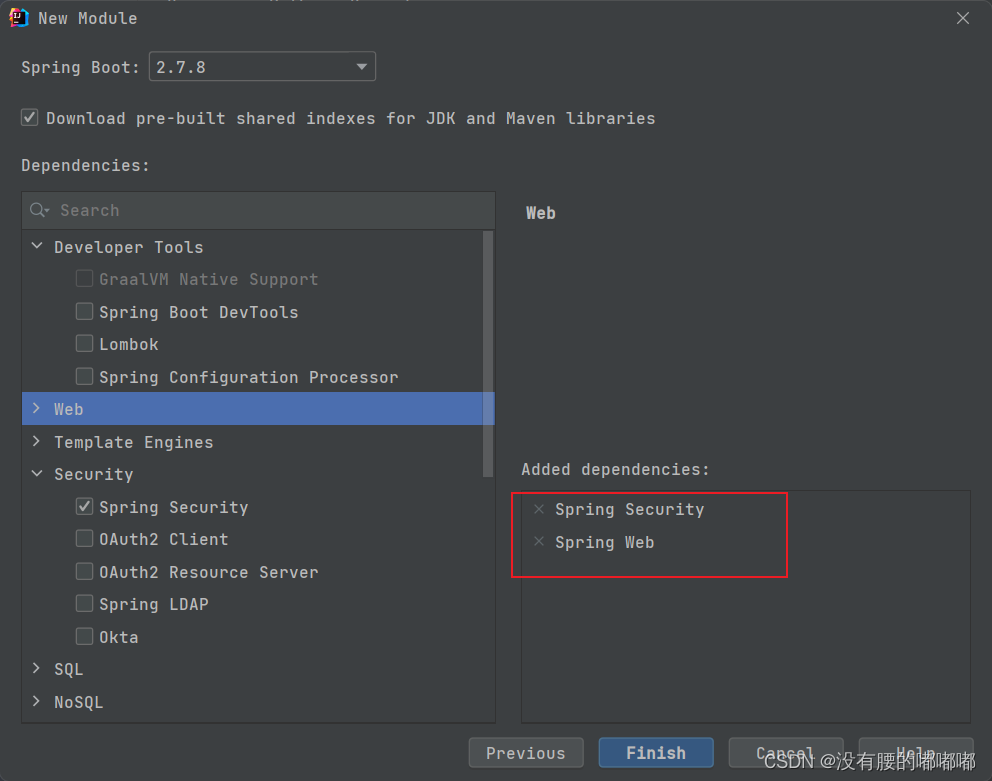
2.创建完项目直接启动项目,访问http://localhost:8080/login默认就是SpringSecurity自带的登录页面,默认用户名user密码是IDEA控制台打印的一长串字符
3.设置密码加密规则
BCryptPasswordEncoder介绍
BCryptPasswordEncoder是Spring Security中的一个加密方法。BCryptPasswordEncoder方法采用了SHA-256+随机盐+密钥对密码进行加密。
在config包中新建SecurityConfig类
@Configuration
public class SecurityConfig extends WebSecurityConfigurerAdapter {
//密码加密规则,BCryptPasswordEncoder方法采用了SHA-256+随机盐+密钥对密码进行加密
    @Bean
    public PasswordEncoder pw(){
        return new BCryptPasswordEncoder();
    }
4..我们需要去查询自己的数据库来判断用户是否存在,查数据库,密码是否正确,这就需要新建一个类去实现UserDetailsService接口,重写configure(HttpSecurity http)方法
这里采用的是写死的用户名和密码,没有去查数据库
import org.springframework.beans.factory.annotation.Autowired;
import org.springframework.security.core.authority.AuthorityUtils;
import org.springframework.security.core.userdetails.User;
import org.springframework.security.core.userdetails.UserDetails;
import org.springframework.security.core.userdetails.UserDetailsService;
import org.springframework.security.core.userdetails.UsernameNotFoundException;
import org.springframework.security.crypto.password.PasswordEncoder;
import org.springframework.stereotype.Service;

@Service
public class UserDetailsServiceImpl implements UserDetailsService {
    @Autowired
    private PasswordEncoder pw;

    @Override
    public UserDetails loadUserByUsername(String username) throws UsernameNotFoundException {
       if (!"admin".equals(username)){
           throw new UsernameNotFoundException("用户不存在");
       }
        String pass = pw.encode("123");

        return new User(username,pass, AuthorityUtils.commaSeparatedStringToAuthorityList("admin,normal"));
    }
}
5.准备一个controller类,准备两个html页面
@Controller
@RequestMapping("/user")
public class LoginController {

    @PostMapping("/login")
    public String login(){
        System.out.println("====<<<>>>====");
        return "redirect:main.html";
    }
}
一个简单的表单登录
<!DOCTYPE html>
<html lang="en" xmlns="http://www.w3.org/1999/html">
<head>
    <meta charset="UTF-8">
    <title>登录页面</title>
</head>
<body>
<form action="/login" method="post">
    用户名:<input type="text" name="username"/><br/>
    密码:<input type="password" name="password"/><br/>
    <input type="submit" value="登录">
</form>
</body>
</html>
一个登录成功的跳转页面
<!DOCTYPE html>
<html lang="en">
<head>
    <meta charset="UTF-8">
    <title>Title</title>
</head>
<body>
<h3>登录成功</h3>
</body>
</html>
6.启动项目访问http://localhost:8080/login.html,发现还是SpringSecurity默认登录页面
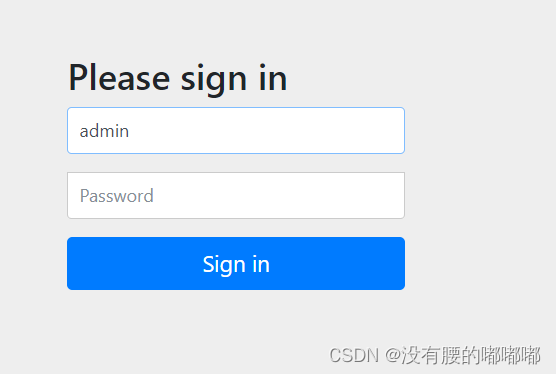
此时我们输入账号admin 密码123才跳转到我们的登录页面
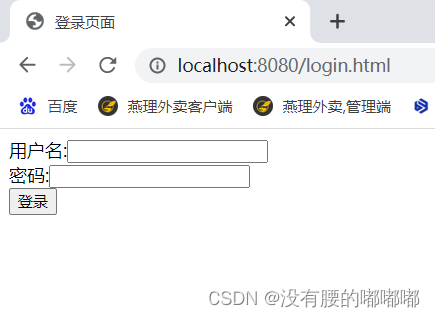
7.此时发现即使我们自己写了登录页面,还是会被SpringSecurity拦截器拦截到,走的还是默认登录页,此时我们需要重写configure方法,在config包下SecurityConfig类中
SecurityConfig类需要继承WebSecurityConfigurerAdapter类重写configure方法
 @Override
    protected void configure(HttpSecurity http) throws Exception {
        //表单提交
        http.formLogin()
                //自定义登录界面
                .loginPage("/login.html");
        //相当于拦截器,拦截所有请求
        http.authorizeRequests()
                //放行登录页面,登录页面不需要被拦截
                .antMatchers("/login.html").permitAll()
                //所有请求必须认证登录后才可访问
                .anyRequest().authenticated();
    }
8.此时在访问localhost:8080/login.html就是我们自己写的登录页面
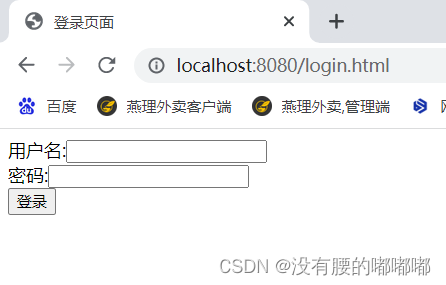
此时输入admin 123登录发现无法登录页面不跳转,这是因为SpringSecurity没有拦截我们的登录请求,也就是没有走我们自己写的
9.修改config包下的SecurityConfig类中的configure方法
当发现是/login是认为是登录,必须和表单提交地址一致,去执行UserDetailsServiceImpl
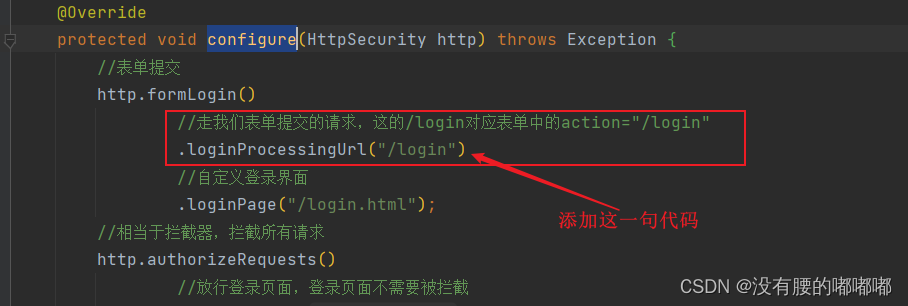
此时发现还不行,我们还需要在加一段代码
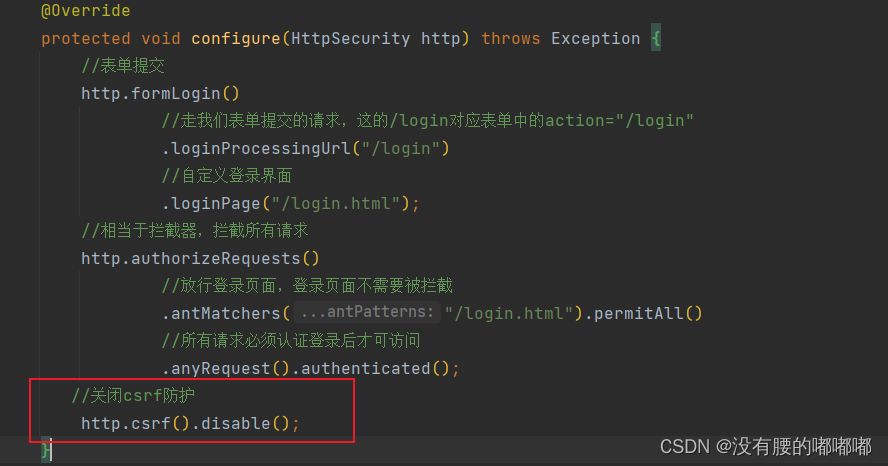
10.此时发现登录之后是404页面,这说明没有指定登录成功后跳转的页面
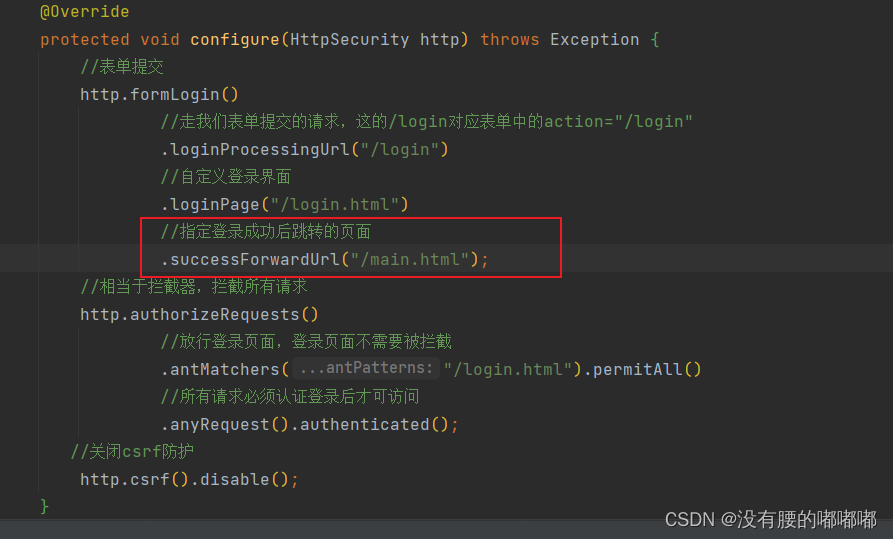
添加这段代码后,在启动项目发现变成405

登录成功后跳转需要时POST请求,我们是Get请求,此时需要修改代码config包下SecurityConfig类
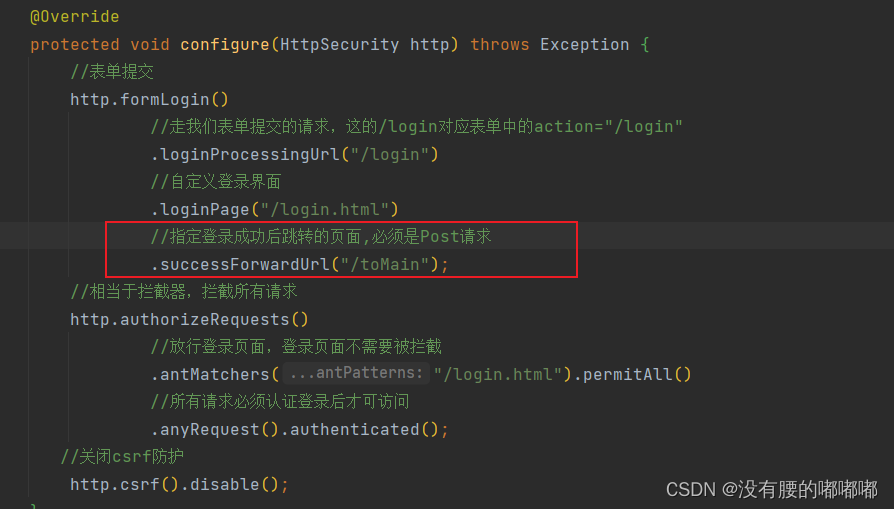
Controller包下LoginController类添加toMain方法
 @PostMapping("/toMain")
    public String toMain(){
        System.out.println("====<<<>>>====");
        return "redirect:main.html";
    }
此时在运行程序,输入密码和账号发现登录成功
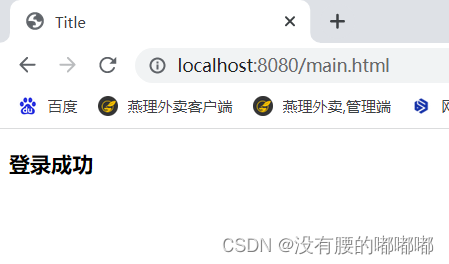
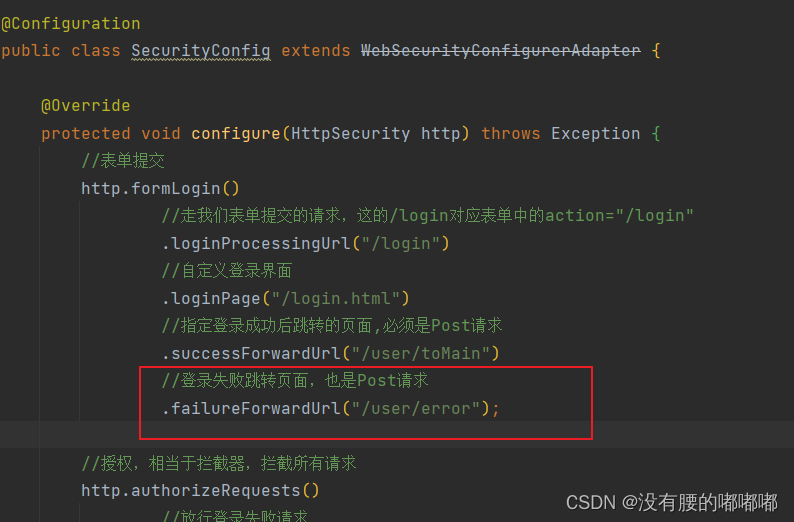
11.自定义登录失败页面
config包下SecurityConfig类,添加以下代码
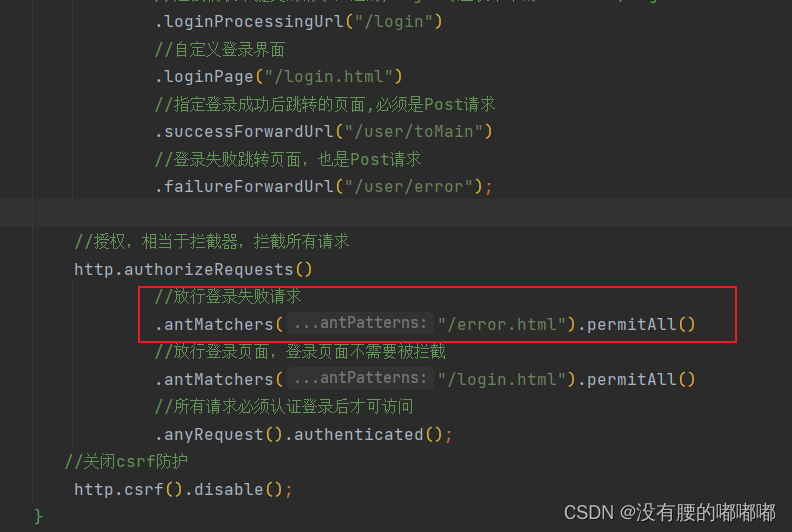
不需要授权添加error.html
error.html失败页
<!DOCTYPE html>
<html lang="en">
<head>
    <meta charset="UTF-8">
    <title>error</title>
</head>
<body>
<a href="/login.html">账号密码错误,请重新登录</a>
</body>
</html>
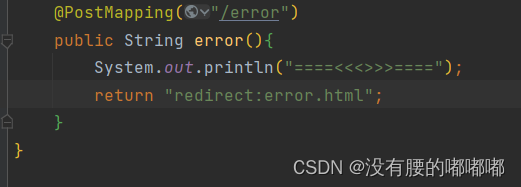
Controller中添加error方法,登录失败重定向到失败页
12.设置表单username和password别名
如果不做配置,这必须是username和password,别的会登录失败

配置也很简单,在config包下SecurityConfig类中添加如下代码
13.登录成功跳转百度页面,因为分布式系统,也许不再一个服务中
因此需要创建一个类去实现AuthenticationSuccessHandler接口
新建handler包,新建如下类
public class MyAuthenticationSuccessHandler implements AuthenticationSuccessHandler {

   private String url;

    public MyAuthenticationSuccessHandler(String url) {
        this.url = url;
    }

    @Override
    public void onAuthenticationSuccess(HttpServletRequest request, HttpServletResponse response, Authentication authentication) throws IOException, ServletException {
        response.sendRedirect(url);
    }
}
修改登录成功后跳转代码
config包下SecurityConfig类下的configure方法
14.通过MyAuthenticationSuccessHandler类中的onAuthenticationSuccess方法中的User principal = (User) authentication.getPrincipal();
通过这个方法可以拿到登录用户的用户名和密码,和权限
因为安全的作用,密码会输出null
15.登录失败自定义跳转路径
新建MyAuthenticationFailureHandler类实现AuthenticationFailureHandler接口
public class MyAuthenticationFailureHandler implements AuthenticationFailureHandler {

    private String url;

    public MyAuthenticationFailureHandler(String url) {
        this.url = url;
    }

    @Override
    public void onAuthenticationFailure(HttpServletRequest request, HttpServletResponse response, AuthenticationException exception) throws IOException, ServletException {
        response.sendRedirect(url);
    }
}
修改登录失败后跳转代码
config包下SecurityConfig类下的configure方法

16.权限判断

public ExpressionUrlAuthorizationConfigurer<H>.ExpressionInterceptUrlRegistry hasAuthority(String authority)拥有某一个权限可以访问public ExpressionUrlAuthorizationConfigurer<H>.ExpressionInterceptUrlRegistry hasAnyAuthority(String... authorities)拥有多个权限,满足一个即可访问
拥有一个权限
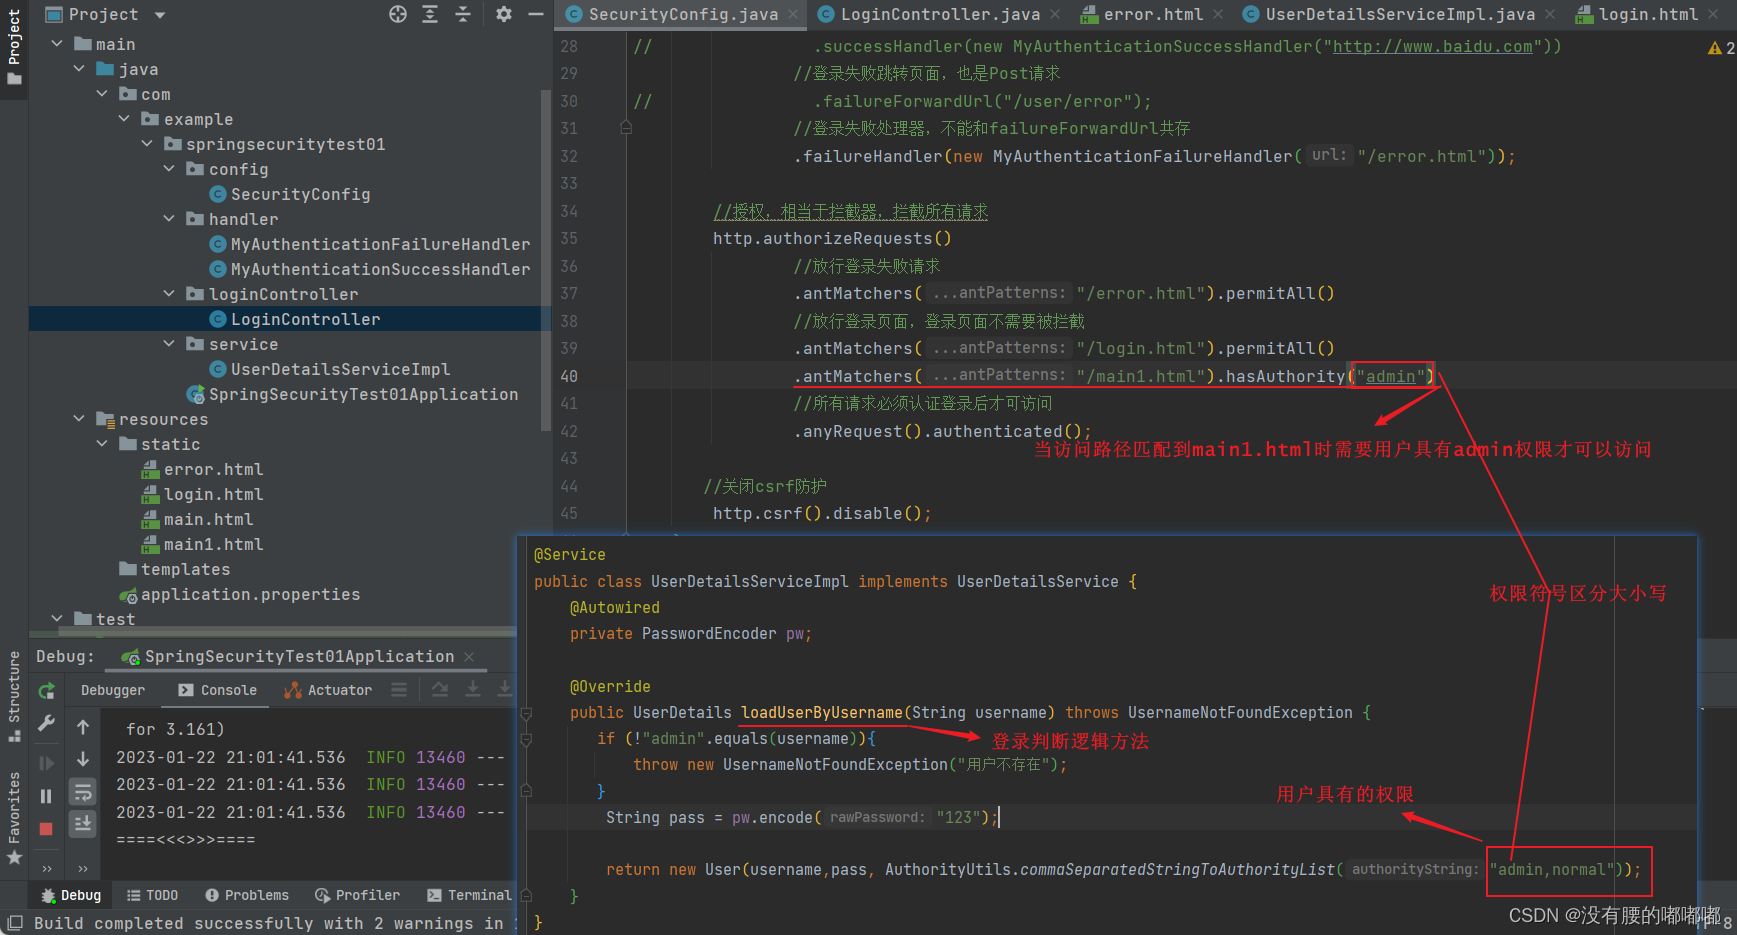
用户拥有多个权限,满足hasAnyAuthority方法中的一个权限即可访问

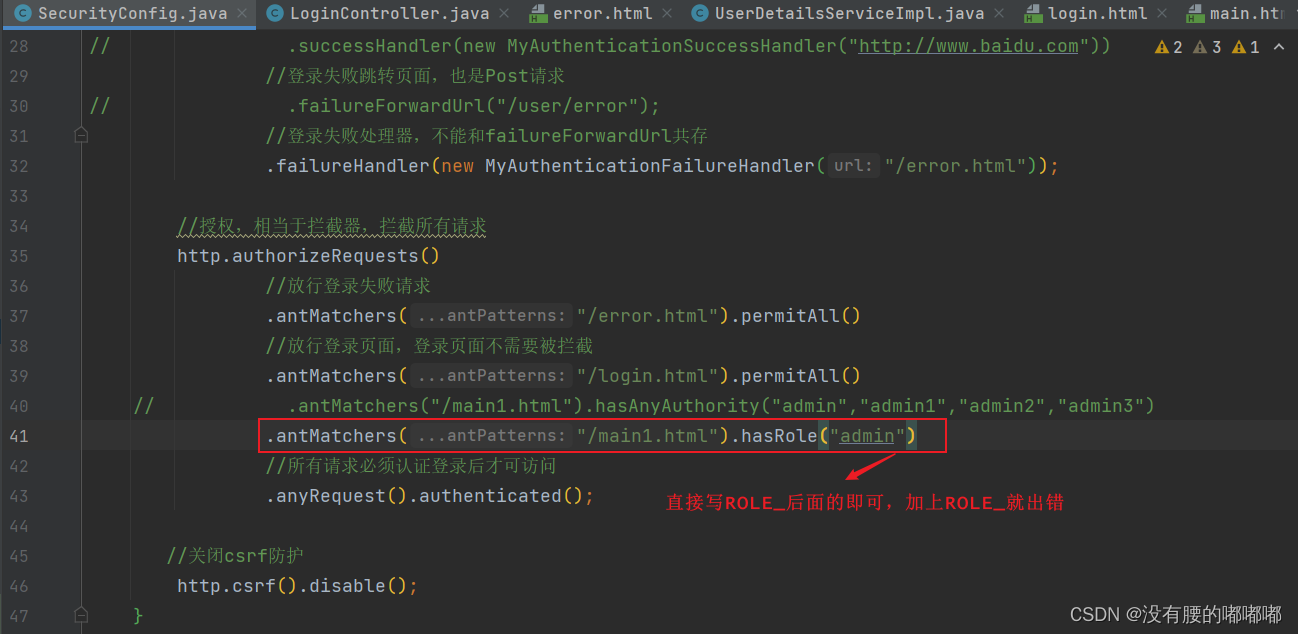
17.角色判断
有固定写法ROLE_开头

权限配置
http.authorizeRequests().antMatchers("/main1.html").hasRole("admin");一个角色
http.authorizeRequests().antMatchers("/main1.html").hasAnyRole("admin");多个角色

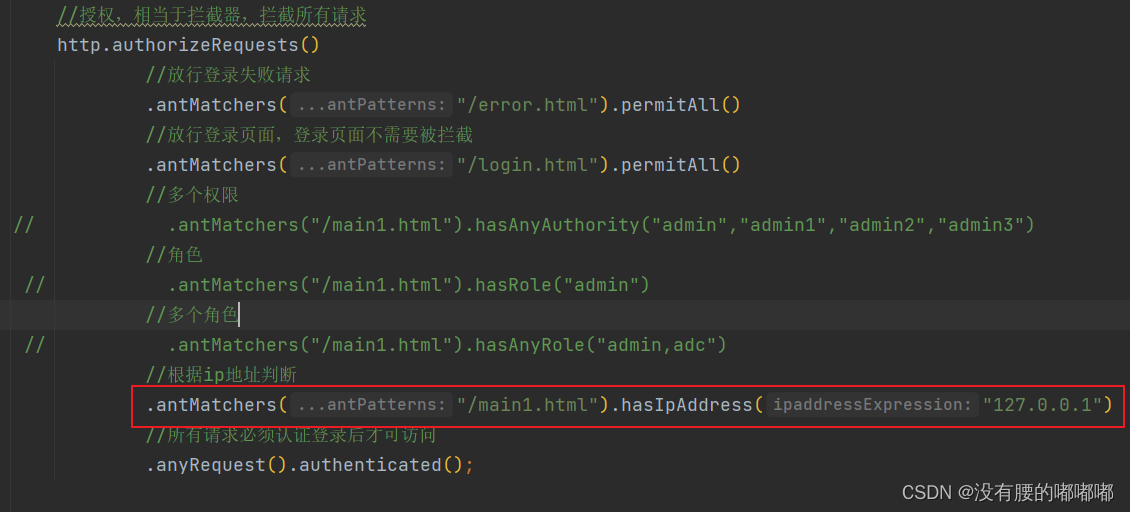
18.IP地址判断权限

http.authorizeRequests().antMatchers("/main1.html").hasIpAddress("127.0.0.1")
19.自定义403处理方案
已定义一个类实现AccessDeniedHandler接口重写handle方法

@Component
public class MyAccessDeniedHandler implements AccessDeniedHandler {
    @Override
    public void handle(HttpServletRequest request, HttpServletResponse response, AccessDeniedException accessDeniedException) throws IOException, ServletException {
       //设置相应的状态码
        response.setStatus(HttpServletResponse.SC_FORBIDDEN);
        response.setHeader("Content-Type","application/json;charset=utf-8");
        PrintWriter writer = response.getWriter();
        writer.write("{\"status\":\"error\",\"msg\":\"权限不足\"}");
        writer.flush();
        writer.close();
    }
}
权限配置类SecurityConfig引入MyAccessDeniedHandler类

在configure方法中
http.exceptionHandling()
        //权限不足
        .accessDeniedHandler(myAccessDeniedHandler);

启动程序登录后点击跳转,权限不够时,如下

20.注解完成判断授权@Serured
Controller添加注解

启动类添加注解

21.@PreAuthorize和@PostAuthorize
- @PreAuthorize和@PostAuthorize都是方法或类级别注解
- @PreAuthorize表示访问方法或类在执行前先判断权限,大多使用这个注解
- @PostAuthorize表示访问方法或类执行结束后判断权限
开启注解

Controller上添加@PreAuthorize注解

RememberMe记住我功能实现
1.添加依赖
         <dependency>
            <groupId>org.mybatis.spring.boot</groupId>
            <artifactId>mybatis-spring-boot-starter</artifactId>
            <version>2.2.2</version>
        </dependency>
        <dependency>
            <groupId>mysql</groupId>
            <artifactId>mysql-connector-java</artifactId>
        </dependency>
2.配置数据源信息
spring.main.allow-circular-references= true
spring.datasource.driver-class-name= com.mysql.cj.jdbc.Driver
spring.datasource.url= jdbc:mysql://localhost:3306/security?serverTimezone=Asia/Shanghai&useUnicode=true&characterEncoding=utf-8&zeroDateTimeBehavior=convertToNull&useSSL=false&allowPublicKeyRetrieval=true
spring.datasource.username= root
spring.datasource.password= 333
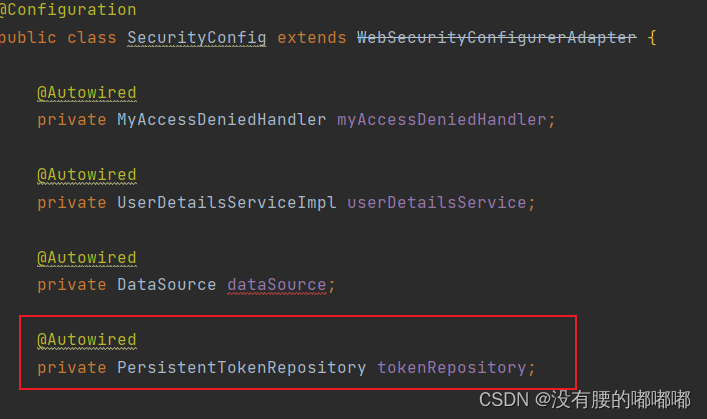
3.SecurityConfig类中注入数据源

注入自定义登录逻辑类
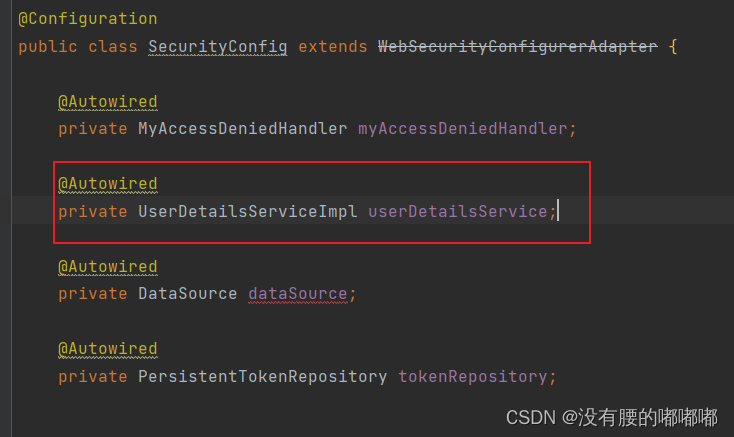
SecurityConfig类configure方法中添加
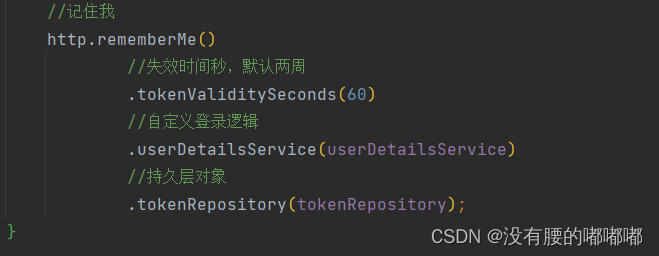
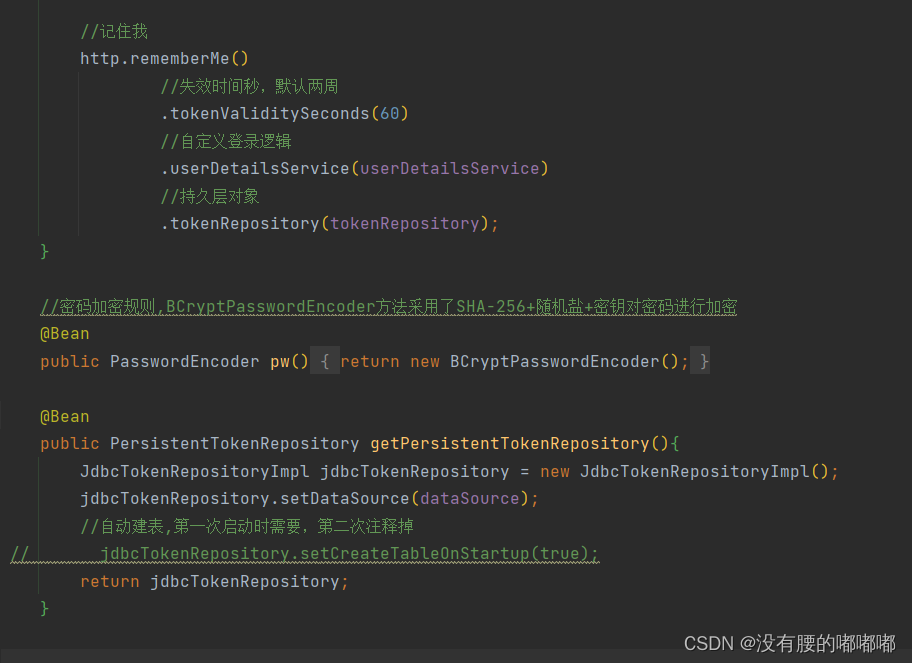
tokenRepository方法参数是持久令牌存储库PersistentTokenRepository对象,就需要创建,还是在SecurityConfig类中创建
  @Bean
    public PersistentTokenRepository getPersistentTokenRepository(){
        JdbcTokenRepositoryImpl jdbcTokenRepository = new JdbcTokenRepositoryImpl();
        jdbcTokenRepository.setDataSource(dataSource);
        //自动建表,第一次启动时需要,第二次注释掉
 //       jdbcTokenRepository.setCreateTableOnStartup(true);
        return jdbcTokenRepository;
    }
把持久令牌存储库PersistentTokenRepository对象注入进来

4.登录页面login.html添加记住我复选框

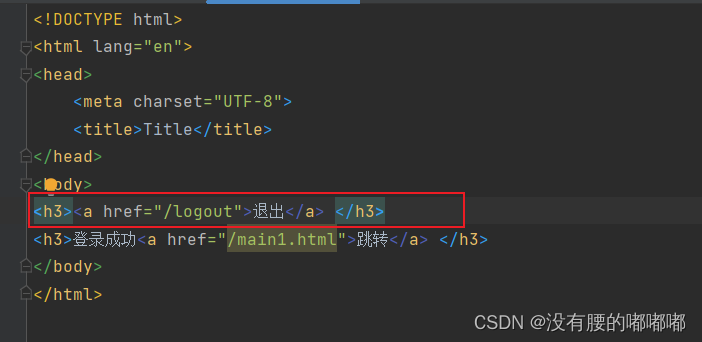
1.退出登录
SpringSecurity默认退出就是/logout
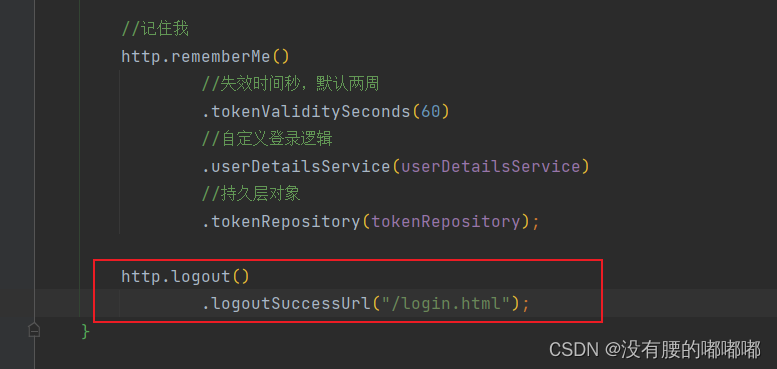
SpringSecurityOAuth2授权码模式案例
1.新建SpringSecurityoauth2-dome项目
添加依赖,注意springboot版本号

<?xml version="1.0" encoding="UTF-8"?>
<project xmlns="http://maven.apache.org/POM/4.0.0" xmlns:xsi="http://www.w3.org/2001/XMLSchema-instance"
         xsi:schemaLocation="http://maven.apache.org/POM/4.0.0 https://maven.apache.org/xsd/maven-4.0.0.xsd">
    <modelVersion>4.0.0</modelVersion>


    <parent>
        <groupId>org.springframework.boot</groupId>
        <artifactId>spring-boot-starter-parent</artifactId>
        <version>2.2.6.RELEASE</version>
        <relativePath/> <!-- lookup parent from repository -->
    </parent>


    <groupId>com.srz</groupId>
    <artifactId>SpringSecurityoauth2-dome</artifactId>
    <version>0.0.1-SNAPSHOT</version>
    <name>SpringSecurityoauth2-dome</name>
    <description>SpringSecurityoauth2-dome</description>

    <properties>
        <java.version>1.8</java.version>
        <spring-cloud.version>Greenwich.SR2</spring-cloud.version>
    </properties>
    <dependencies>
        <!-- oauth2依赖-->
        <dependency>
            <groupId>org.springframework.cloud</groupId>
            <artifactId>spring-cloud-starter-oauth2</artifactId>
        </dependency>
        <!--SpringSecurity依赖-->
        <dependency>
            <groupId>org.springframework.cloud</groupId>
            <artifactId>spring-cloud-starter-security</artifactId>
        </dependency>
        <!--web -->
        <dependency>
            <groupId>org.springframework.boot</groupId>
            <artifactId>spring-boot-starter-web</artifactId>
        </dependency>
        <!-- test -->
        <dependency>
            <groupId>org.springframework.boot</groupId>
            <artifactId>spring-boot-starter-test</artifactId>
            <scope>test</scope>
        </dependency>

        <dependency>
            <groupId>org.springframework.cloud</groupId>
            <artifactId>spring-cloud-context</artifactId>
        </dependency>

    </dependencies>

    <dependencyManagement>
        <dependencies>
            <dependency>
                <groupId>org.springframework.cloud</groupId>
                <artifactId>spring-cloud-dependencies</artifactId>
                <version>${spring-cloud.version}</version>
                <type>pom</type>
                <scope>import</scope>
            </dependency>
        </dependencies>
    </dependencyManagement>

    <build>
        <plugins>
            <plugin>
                <groupId>org.springframework.boot</groupId>
                <artifactId>spring-boot-maven-plugin</artifactId>
            </plugin>
        </plugins>
    </build>

</project>
2.SpringSecurity配置类,在cofig包下新建SecurityConfig类继承WebSecurityConfigurerAdapter类重写configure(HttpSecurity http)方法
PasswordEncoder密码编码模式
@Configuration
@EnableWebSecurity
public class SecurityConfig extends WebSecurityConfigurerAdapter {

    @Bean
    public PasswordEncoder passwordEncoder(){
        return new BCryptPasswordEncoder();
    }

    @Override
    protected void configure(HttpSecurity http) throws Exception {
        http.csrf().disable()
                .authorizeRequests()
                //放行的请求
                .antMatchers("/oauth/**","/login/**","/logout/**")
                //其他请求必须通过认证
                .permitAll()
                .anyRequest()
                .authenticated()
                .and()
                //允许表单登录
                .formLogin()
                .permitAll();
    }
}
3.定义自己的User类
SpringSecurity中的User类也是实现了UserDetails接口,实现之后在实现它对应的方法
创建pojo包,新建User类
public class User implements UserDetails {

    private String username;
    private String password;
    private List<GrantedAuthority> authorities;

    public User(String username, String password, List<GrantedAuthority> authorities) {
        this.username = username;
        this.password = password;
        this.authorities = authorities;
    }

    @Override
    public Collection<? extends GrantedAuthority> getAuthorities() {
        return authorities;
    }

    @Override
    public String getPassword() {
        return password;
    }

    @Override
    public String getUsername() {
        return username;
    }

    @Override
    public boolean isAccountNonExpired() {
        return true;
    }

    @Override
    public boolean isAccountNonLocked() {
        return true;
    }

    @Override
    public boolean isCredentialsNonExpired() {
        return true;
    }

    @Override
    public boolean isEnabled() {
        return true;
    }
}
4.自定义登录逻辑
service包下新建UserService类implements UserDetailsService接口
使用@Autowired注解把PasswordEncoder注入进来
注意new User时用我们自己创建的
@Service
public class UserService implements UserDetailsService {

    @Autowired
    private PasswordEncoder passwordEncoder;

    @Override
    public UserDetails loadUserByUsername(String username) throws UsernameNotFoundException {
        String pass = passwordEncoder.encode("123456");
        return new User("admin",pass, AuthorityUtils.commaSeparatedStringToAuthorityList("admin"));
    }
}
5.授权服务器配置
config包下新建AuthorizationServerConfig类extends AuthorizationServerConfigurerAdapter类,重写void configure(ClientDetailsServiceConfigurer clients)方法
/**
 * 授权服务器配置
 */
@Configuration
@EnableAuthorizationServer
public class AuthorizationServerConfig extends AuthorizationServerConfigurerAdapter {

    @Autowired
    private PasswordEncoder passwordEncoder;

    @Override
    public void configure(ClientDetailsServiceConfigurer clients) throws Exception {
        clients.inMemory()
                //配置client-id
                .withClient("admin")
                //配置client-secret
                .secret(passwordEncoder.encode("112233"))
                //配置访问token的有效期,单位秒
                .accessTokenValiditySeconds(3600)
                //配置redirect_url,用于授权成功后跳转
                .redirectUris("http://www.baidu.com")
                //配置申请的权限范围
                .scopes("all")
                //grant_type,表示授权类型,授权码模式
                .authorizedGrantTypes("authorization_code");
    }
}
6.资源服务器配置
config包下新建ResourceServerConfig类 extends ResourceServerConfigurerAdapter类,重写
void configure(HttpSecurity http)方法
/**
 * 资源服务器配置
 */
@Configuration
@EnableResourceServer
public class ResourceServerConfig extends ResourceServerConfigurerAdapter {

    @Override
    public void configure(HttpSecurity http) throws Exception {
        http.authorizeRequests()
                .anyRequest()
                .authenticated()
                .and()
                .requestMatchers()
                .antMatchers("/user/**");
    }
}
7.Controller
因为第6步认证成功后要去获取一个资源,所以要创建这个Controller
创建Controller包新建UserController类
获取的资源很简单就是当前登陆用户的信息
@RestController
@RequestMapping("/user")
public class UserController {


    /**
     * 获取当前用户
     * @param authentication
     * @return
     */
    @RequestMapping("/getCurrentUser")
    public Object getCurrentUser(Authentication authentication){
        return authentication.getPrincipal();
    }
}
8.启动程序
访问以下地址,获取授权码
http://localhost:8080/oauth/authorize?response_type=code&client_id=admin&redirect_url=http://www.baidu.com&scope=all
登录页输入账号admin 密码123456,跳转到授权页面

选择Approve点击确定,跳转到百度页面,路径上携带code码

此时我们需要使用ApiPost工具发送Post请求获取token,修改两处,一个是Body里发送的请求参数,一个是认证里是授权服务器的账号密码
http://localhost:8080/oauth/token
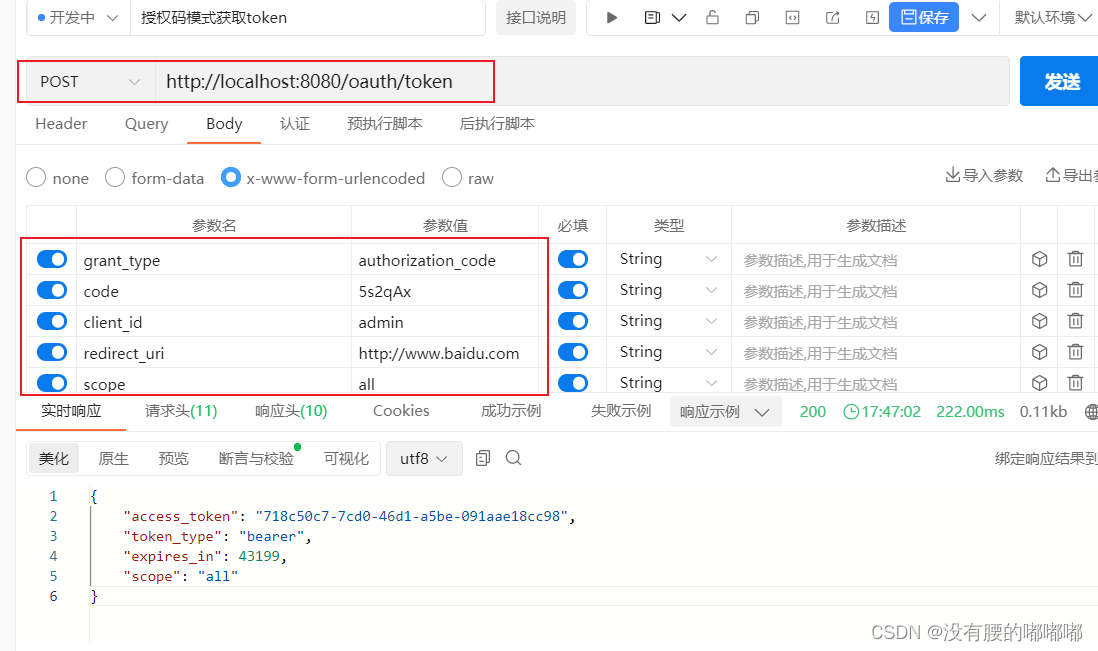

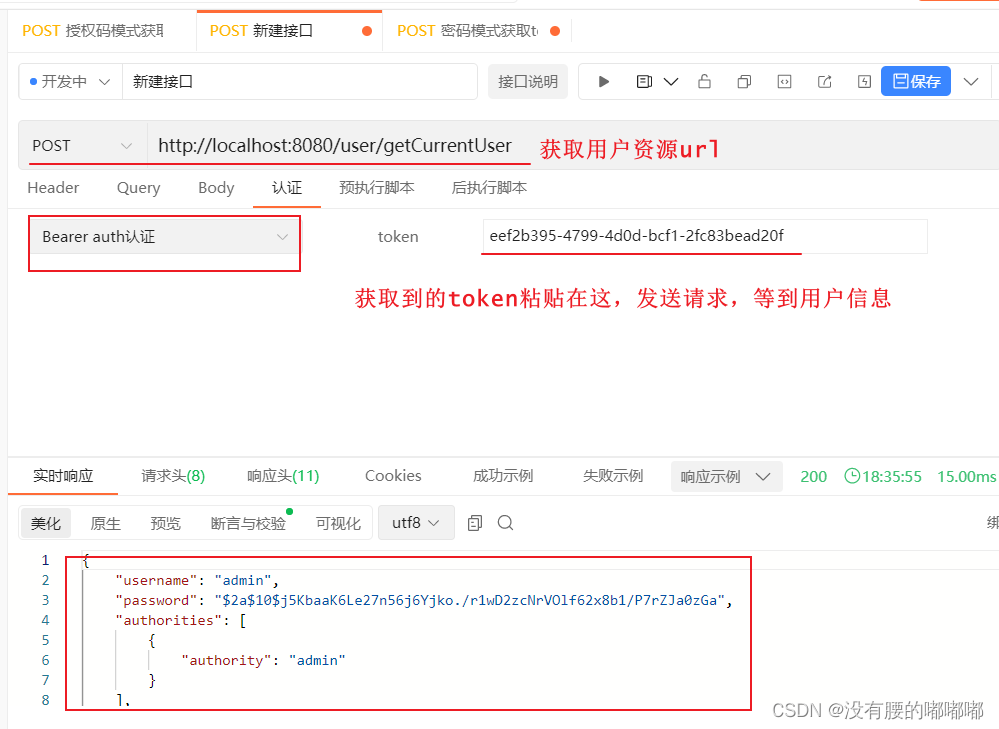
获取到token令牌就可以访问我们的资源,获取当前登陆用的信息

SpringSecurityOAuth2密码模式案例
我们在授权码模式基础上修改即可
1.修改授权服务器类AuthorizationServerConfig中configure方法
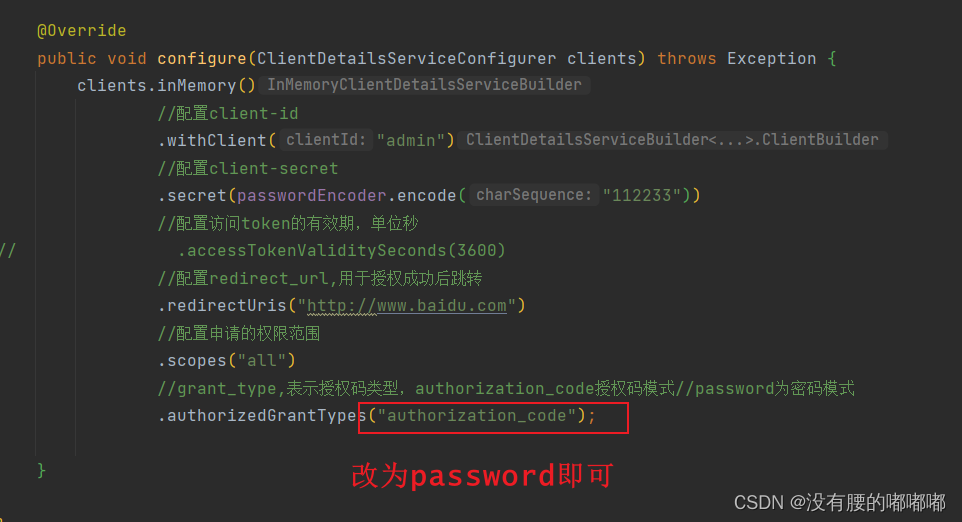
2.授权服务器AuthorizationServerConfig类需要重写configure(AuthorizationServerEndpointsConfigurer endpoints)
authenticationManager方法参数:AuthenticationManager对象
我们在SecurityConfig类中用@Bean加入到容器中
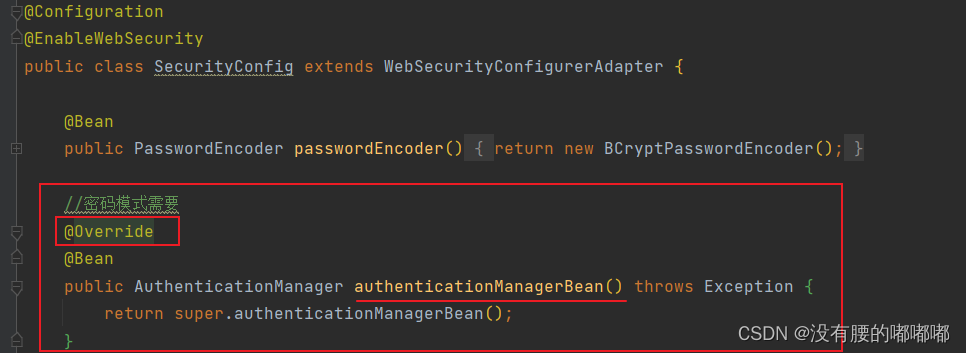
userDetailsServicef方法参数:自定义登录逻辑类UserService
之后使用@Autowired注入进来,UserService和AuthenticationManager
3.启动程序
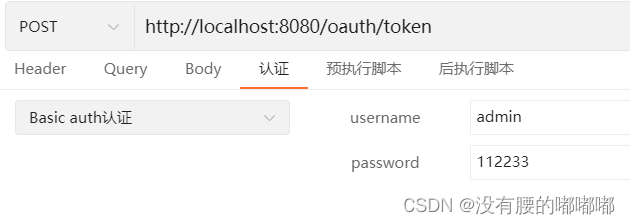
使用ApiPost工具发送http://localhost:8080/oauth/token
认证选项还是
获取到的token,粘贴在
Redis存储token
在密码模式项目的基础上修改
1.添加redis依赖
       <!--redis-->
        <dependency>
            <groupId>org.springframework.boot</groupId>
            <artifactId>spring-boot-starter-data-redis</artifactId>
        </dependency>
        <!--commons-pool2对象池依赖-->
        <dependency>
            <groupId>org.apache.commons</groupId>
            <artifactId>commons-pool2</artifactId>
        </dependency>
2.配置redis,在application.properties中添加redis地址和密码

3.编写redis配置类,在config包下新建RedisConfig类

4.授权服务器配置类AuthorizationServerConfig,使用@Autowired注解注入TokenStore对象

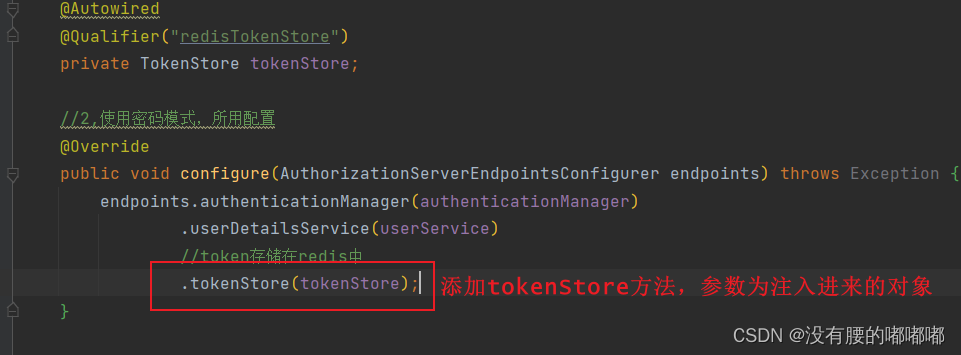
5.启动程序
使用ApiPost工具去获取token,然后查看redis
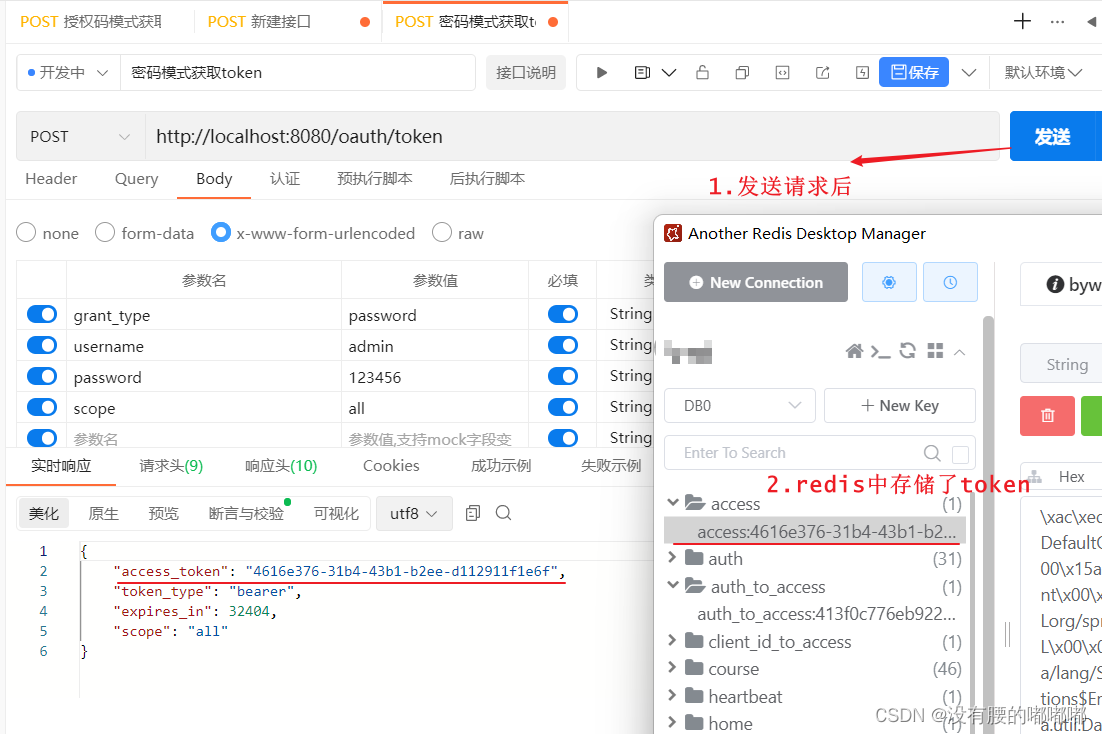
SpringSecurityOAuth整合JWT案例
在上一个项目的基础上改造,JWT不需要存储在redis中,所以把redis依赖删除掉,redis配置删除,RedisConfig类删除,
1.新建JwtTokenStoreConfig配置类
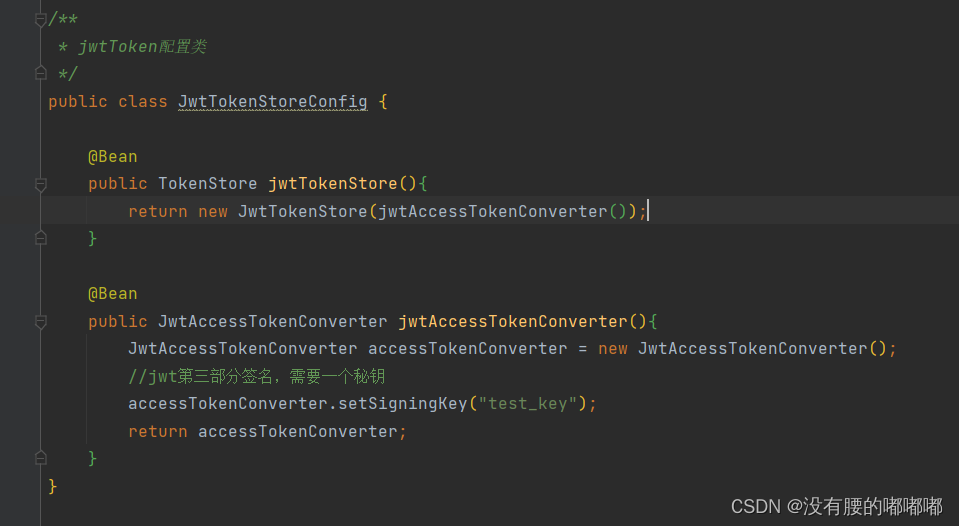
2.授权服务器配置类AuthorizationServerConfig,使用@Autowired注入JwtTokenStoreConfig类
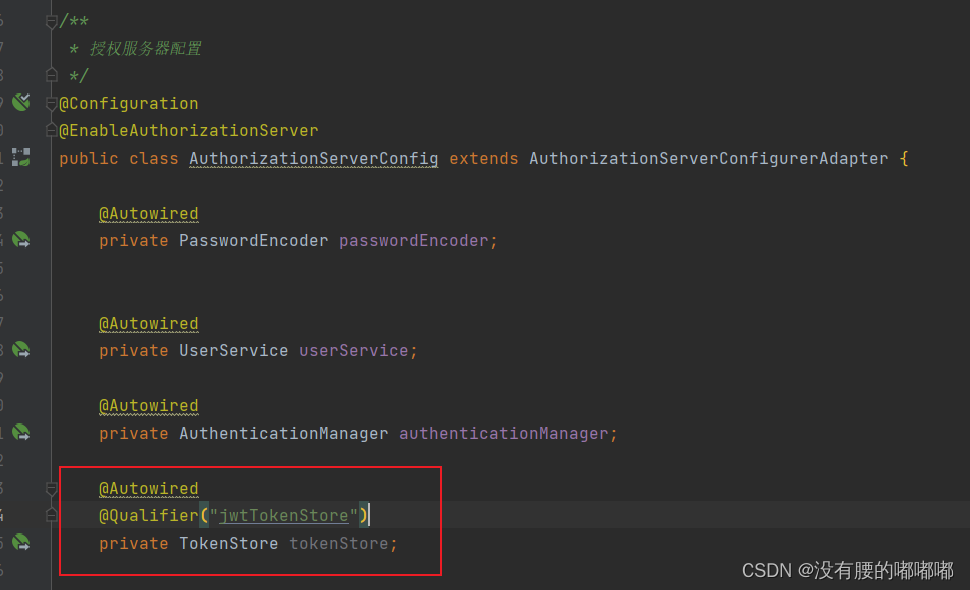
添加以下代码

3.启动项目。发送请求获取token

扩展JWT中存储的内容
1.新建JwtTokenEnhancer类implementes TokenEnhancer接口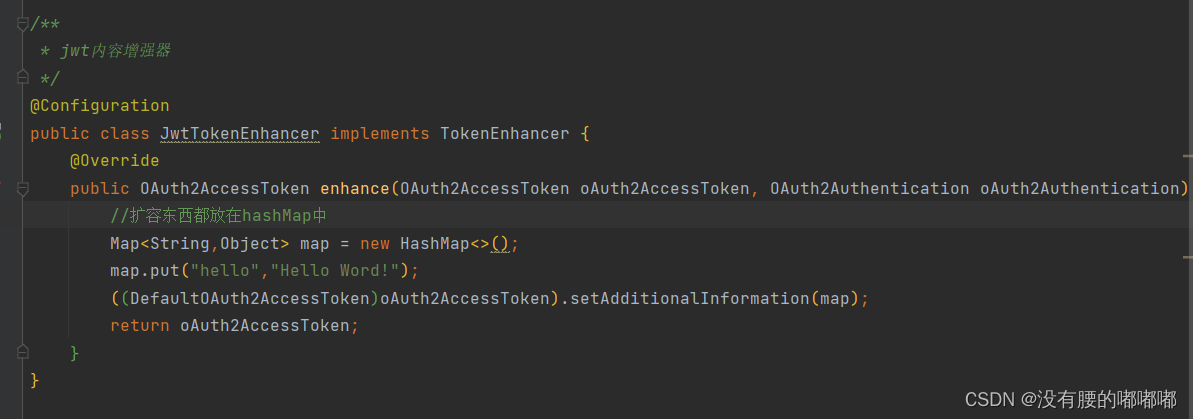
2.在JwtTokenStoreConfig配置类添加JwtTokenEnhancer Bean
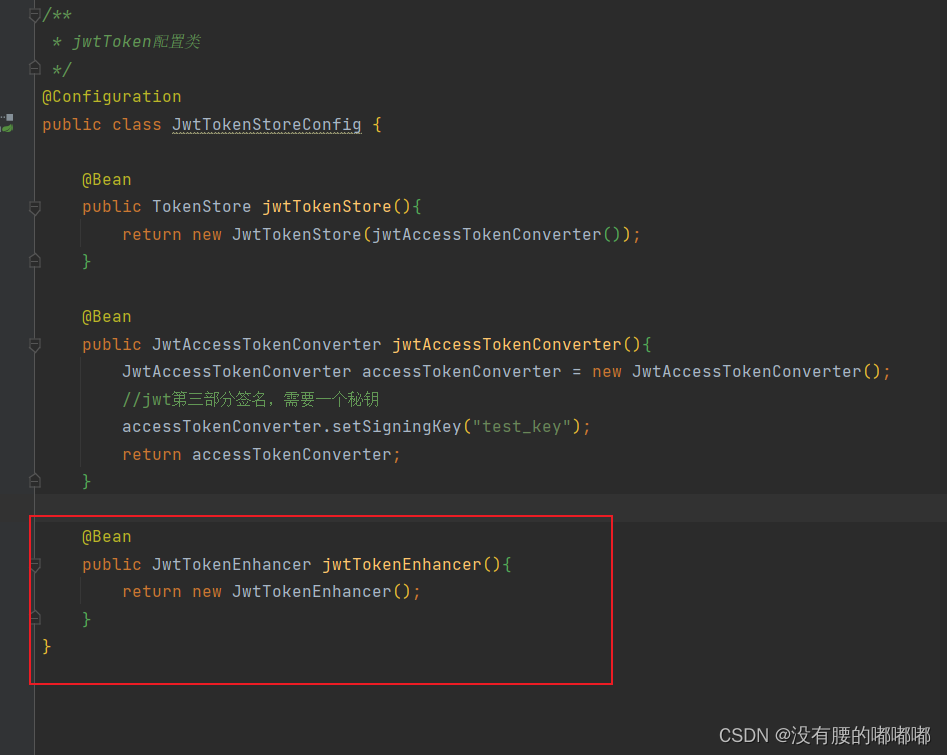
3.授权服务器类AuthorizationServerConfig添加以下内容
1.注入JwtTokenEnhancer对象

2.在configure放中配置JWT增强器
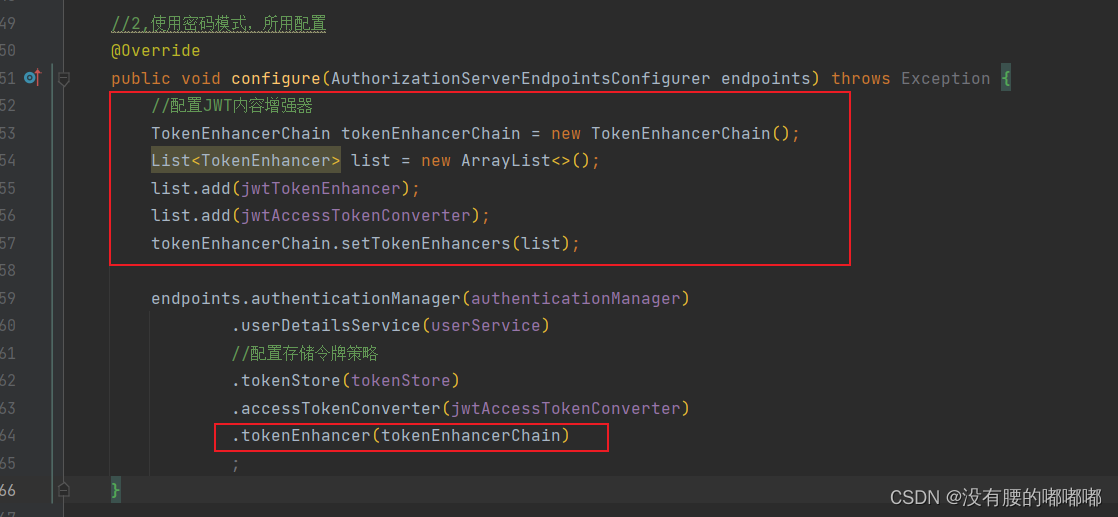
4.启动程序,用ApiPost发送获取token请求,得到token,去jwt.io官网解析token
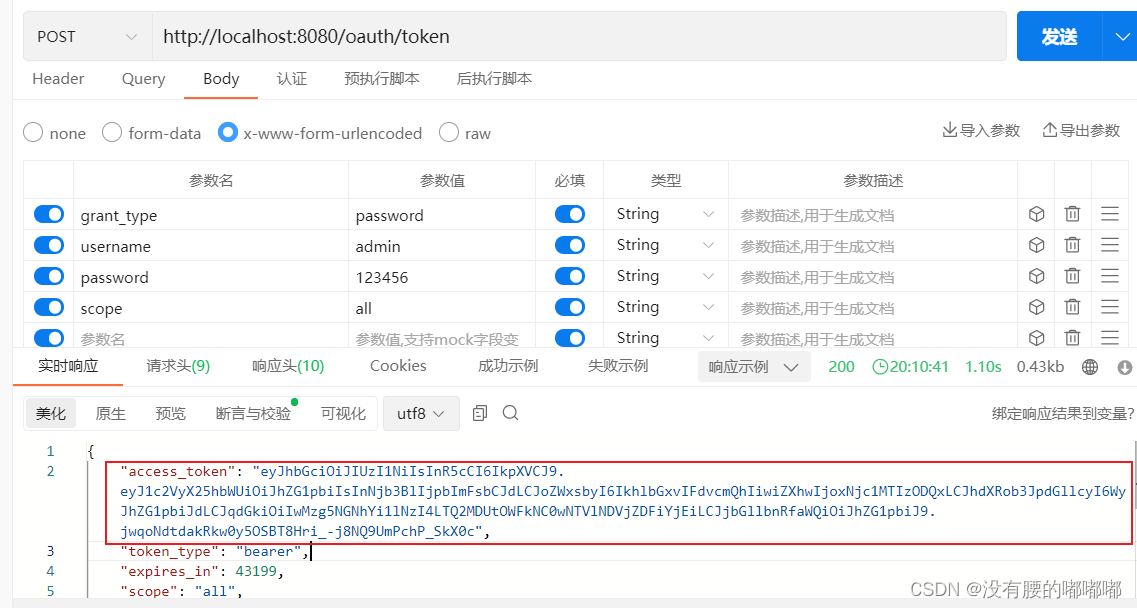
复制token到jwt.io官网解析
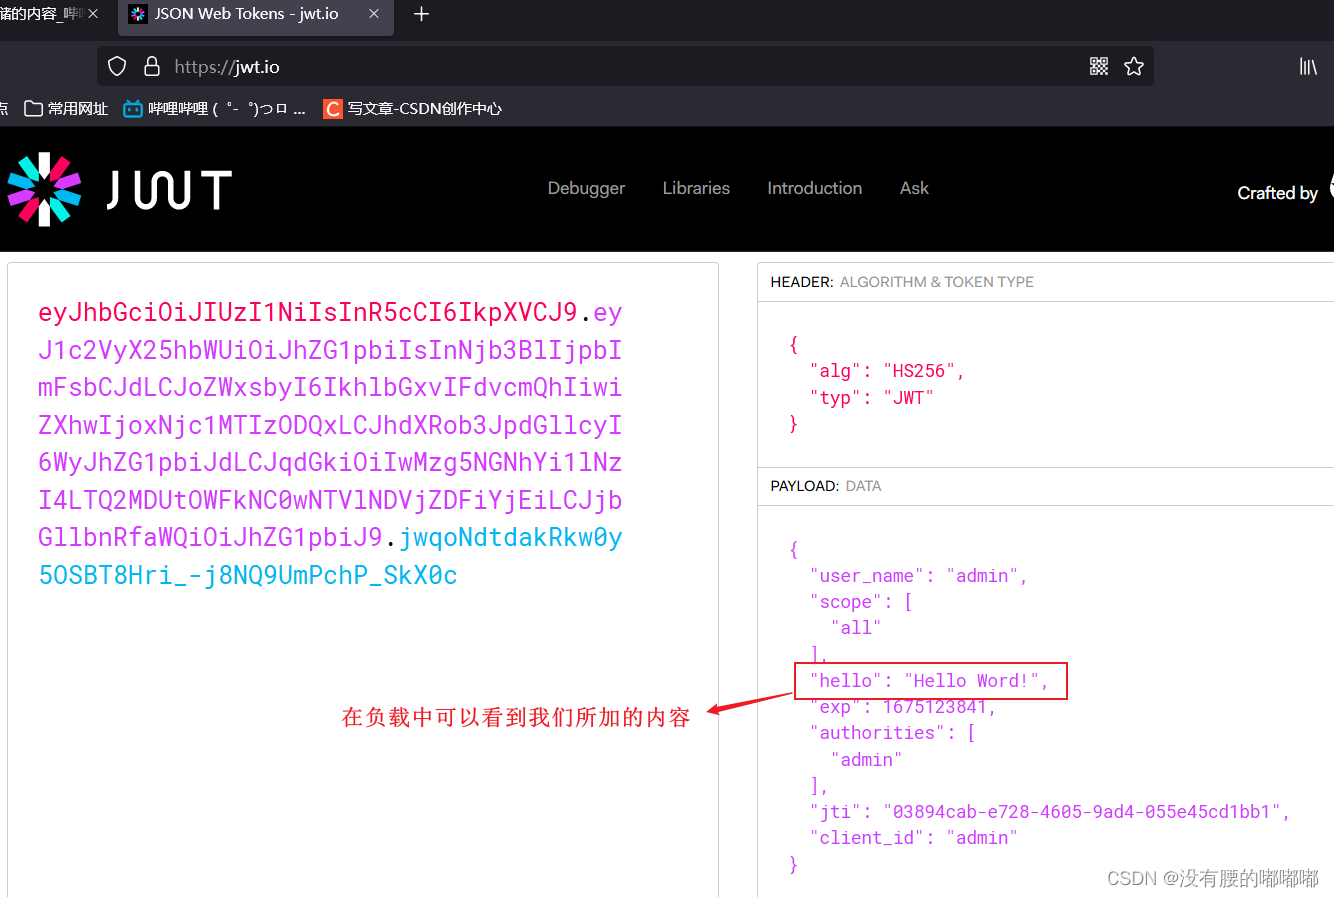
解析JWT令牌
1.添加依赖
       <!--jwt-->
        <dependency>
            <groupId>io.jsonwebtoken</groupId>
            <artifactId>jjwt</artifactId>
            <version>0.9.0</version>
        </dependency>
2.编写Controller
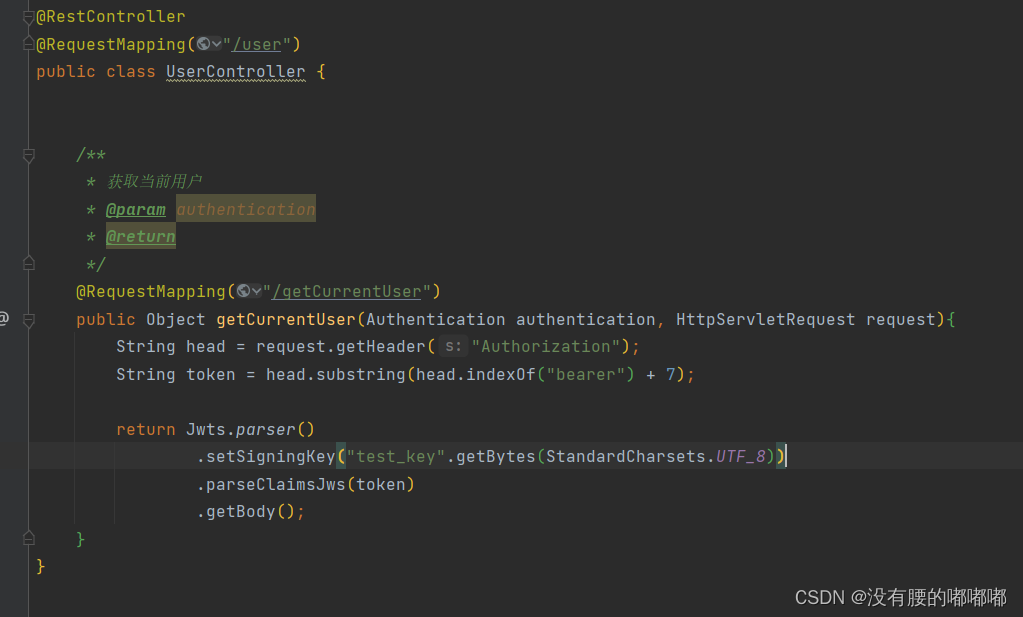
3.启动项目
发送获取token请求
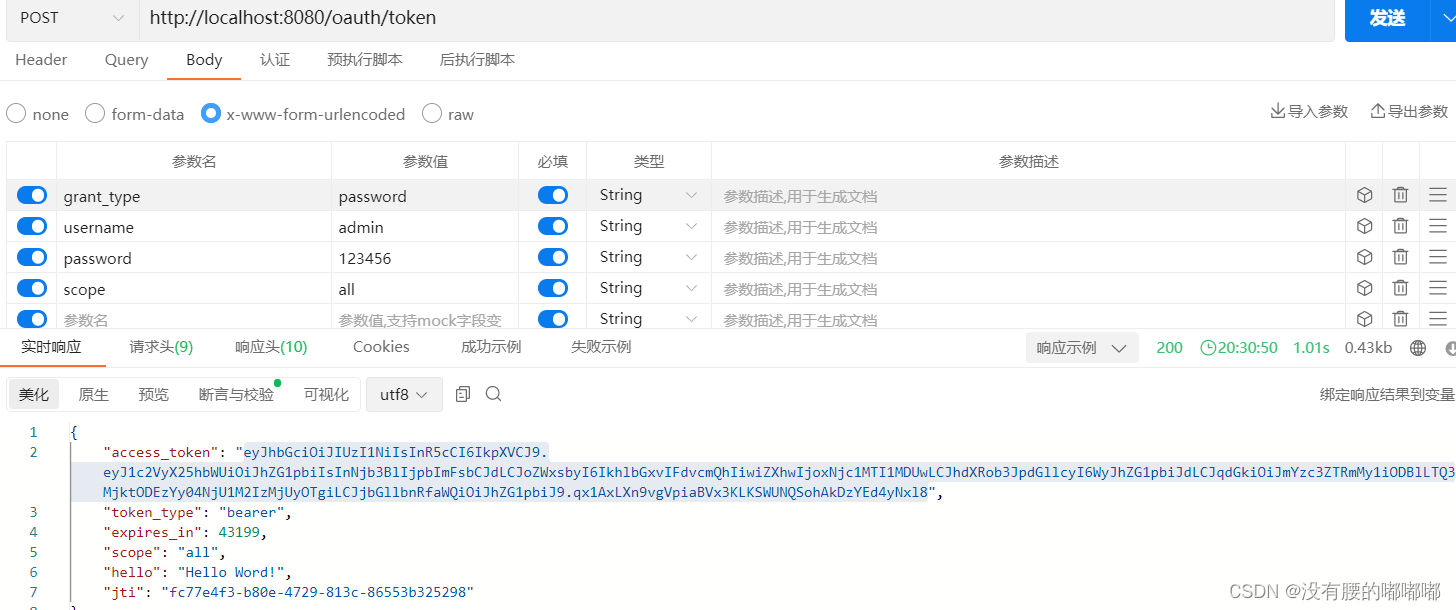
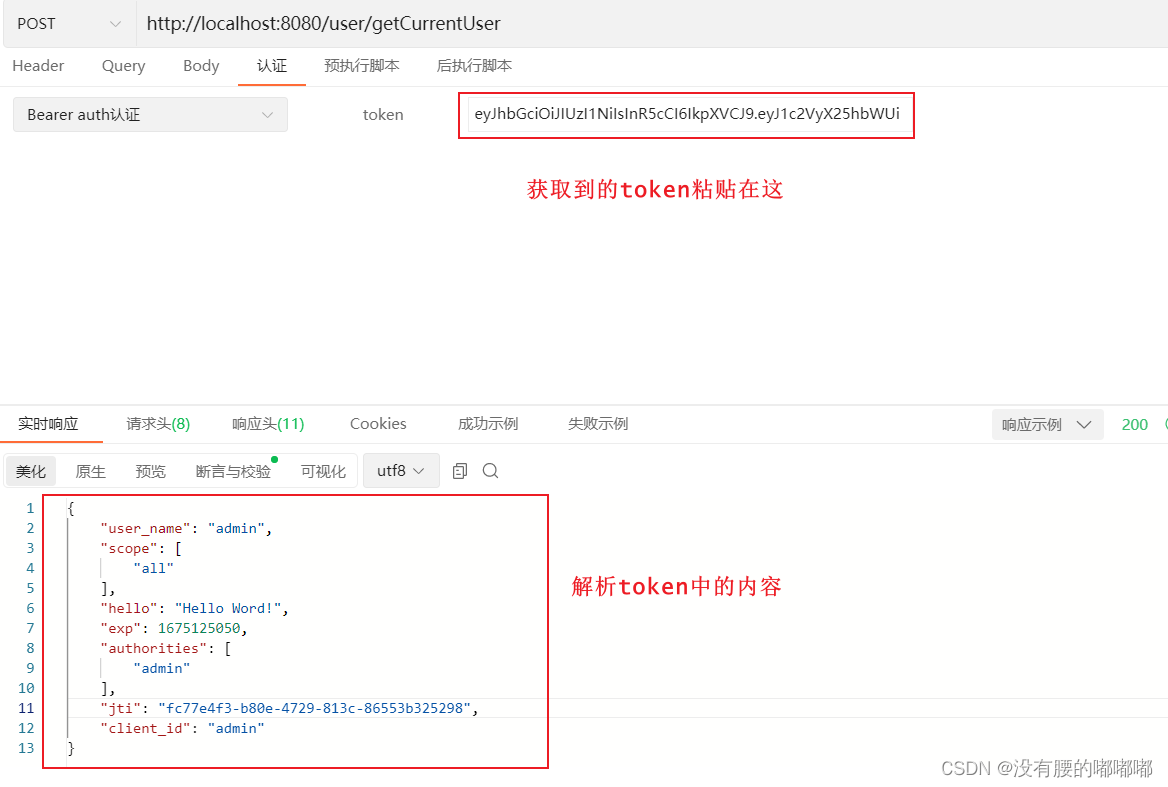
复制token到获取解析token请求中
刷新令牌
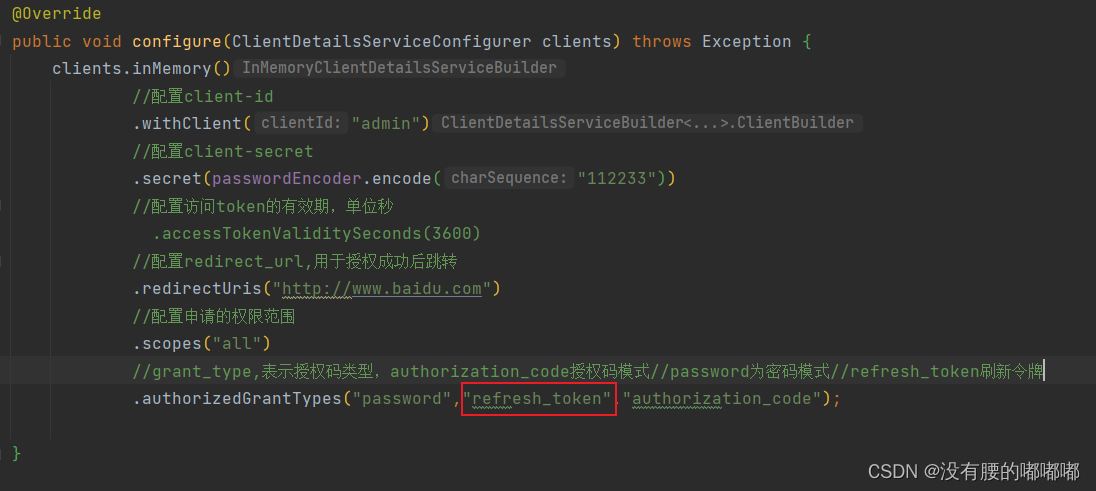
1.授权服务器配置类AuthorizationServerConfig,添加refresh_token
发送请求获得token
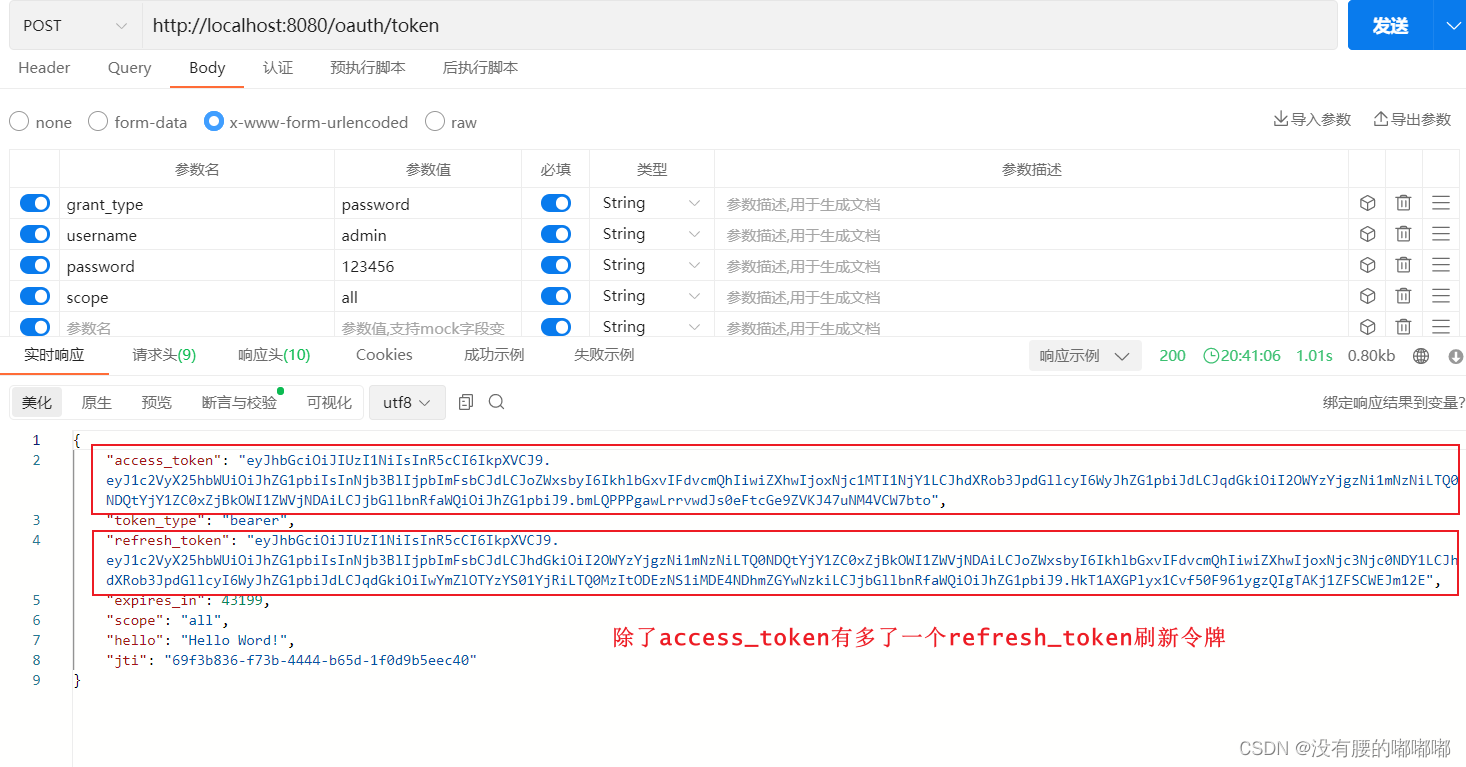
通过刷新令牌可以直接授权服务器获取到新令牌,简化操作
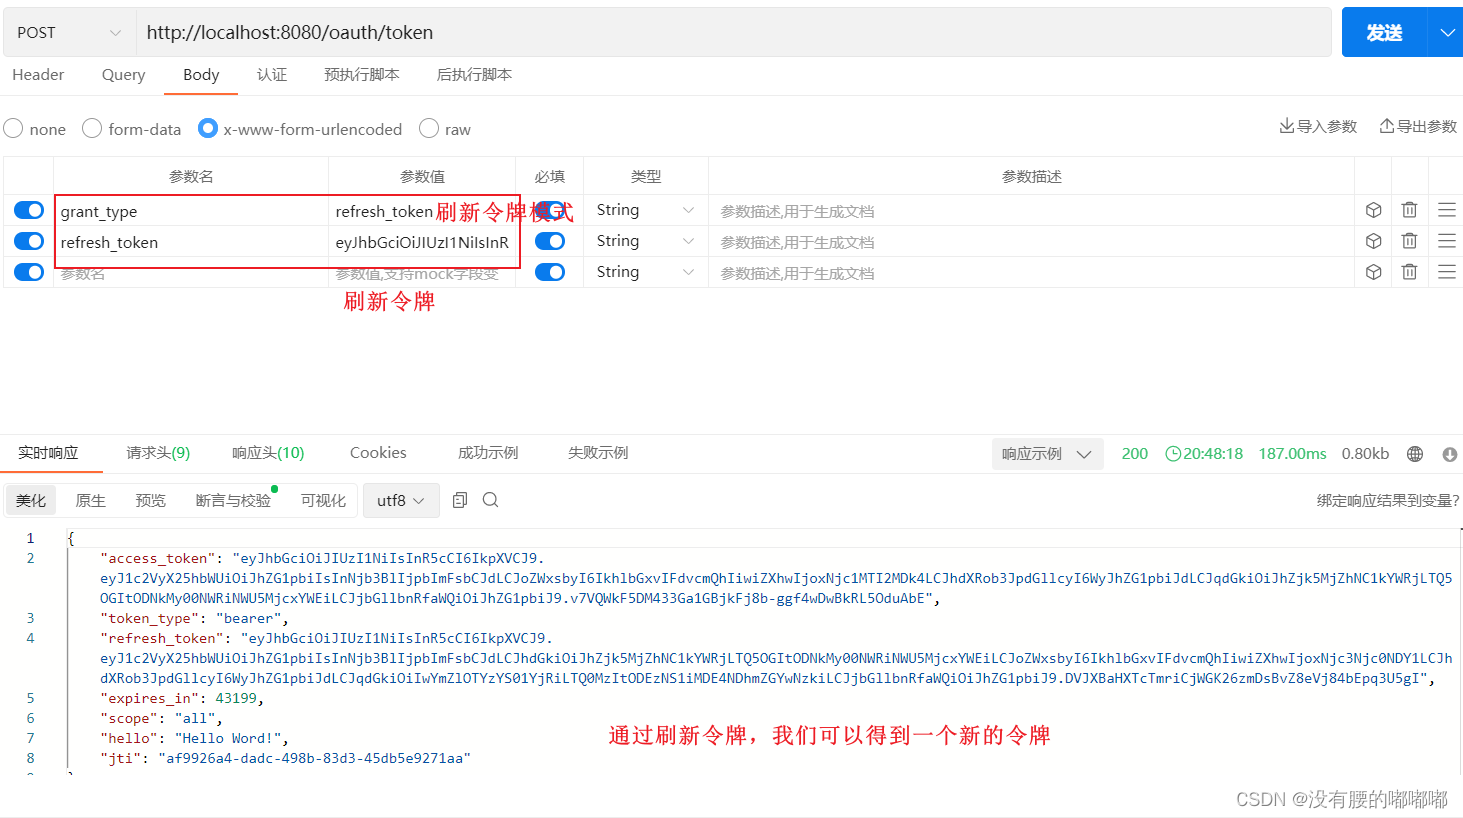
SpringSecurityOauth2整合OOS实现单点登录
之前的项目就用来当我们的授权服务器,现在我们新建一个项目来当我们的客户端
1.新建oauth2client01-dome项目
2.导入依赖
  <properties>
        <java.version>1.8</java.version>
        <spring-cloud.version>Greenwich.SR2</spring-cloud.version>
    </properties>
    <dependencies>
        <dependency>
            <groupId>org.springframework.boot</groupId>
            <artifactId>spring-boot-starter</artifactId>
        </dependency>

        <dependency>
            <groupId>org.springframework.boot</groupId>
            <artifactId>spring-boot-starter-test</artifactId>
            <scope>test</scope>
        </dependency>
        <dependency>
            <groupId>org.springframework.cloud</groupId>
            <artifactId>spring-cloud-starter-oauth2</artifactId>
        </dependency>
        <dependency>
            <groupId>org.springframework.cloud</groupId>
            <artifactId>spring-cloud-starter-security</artifactId>
        </dependency>
        <dependency>
            <groupId>org.springframework.boot</groupId>
            <artifactId>spring-boot-starter-web</artifactId>
        </dependency>
        <dependency>
            <groupId>io.jsonwebtoken</groupId>
            <artifactId>jjwt</artifactId>
            <version>0.9.0</version>
        </dependency>
        <dependency>
            <groupId>cn.hutool</groupId>
            <artifactId>hutool-all</artifactId>
            <version>4.6.3</version>
        </dependency>
    </dependencies>
    <dependencyManagement>
        <dependencies>
            <dependency>
                <groupId>org.springframework.cloud</groupId>
                <artifactId>spring-cloud-dependencies</artifactId>
                <version>${spring-cloud.version}</version>
                <type>pom</type>
                <scope>import</scope>
            </dependency>
        </dependencies>
    </dependencyManagement>
3.配置application.properties文件
server.port=8081
#防止Cookie冲突,冲突会导致登录验证不通过
server.servlet.session.cookie.name=OAUTH2-CLIENT-SESSIONID01
#授权服务器地址
oauth2-server-url=http://localhost:8080
#于授权服务器对应的配置
security.oauth2.client.client-id=admin
security.oauth2.client.client-secret=112233
security.oauth2.client.user-authorization-uri=${oauth2-server-url}/oauth/authorize
security.oauth2.client.access-token-uri=${oauth2-server-url}/oauth/token
security.oauth2.resource.jwt.key-uri=${oauth2-server-url}/oauth/token_key
4.启动类添加EnableOAuth2Sso注解,开启点单登录功能

5.编写controller获取当前登陆用户信息
package com.yonghui.oauth2clientdemo.controller;

import org.springframework.security.core.Authentication;
import org.springframework.web.bind.annotation.GetMapping;
import org.springframework.web.bind.annotation.RequestMapping;
import org.springframework.web.bind.annotation.RestController;

@RestController
@RequestMapping("/user")
public class UserController {
    @GetMapping("/getCurrentUser")
    public Object getCurrentUser(Authentication authentication) {
        return authentication;
    }

}
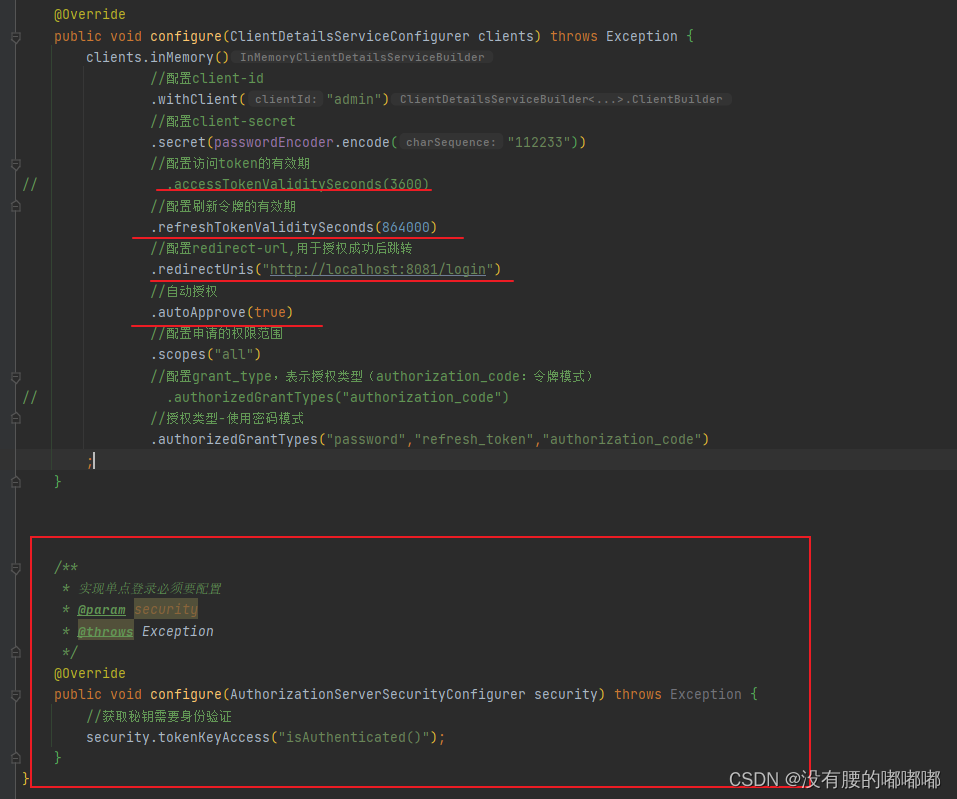
6.修改授权服务器类AuthorizationServerConfig,跳转url,改为http://localhost:8081/login,添加,自动授权,添加令牌刷新时间,重写void configure(AuthorizationServerSecurityConfigurer security) 方法
@Override
    public void configure(ClientDetailsServiceConfigurer clients) throws Exception {
        clients.inMemory()
                //配置client-id
                .withClient("admin")
                //配置client-secret
                .secret(passwordEncoder.encode("112233"))
                //配置访问token的有效期
//                .accessTokenValiditySeconds(3600)
                //配置刷新令牌的有效期
                .refreshTokenValiditySeconds(864000)
                //配置redirect-url,用于授权成功后跳转
                .redirectUris("http://localhost:8081/login")
                //自动授权
                .autoApprove(true)
                //配置申请的权限范围
                .scopes("all")
                //配置grant_type,表示授权类型(authorization_code:令牌模式)
//                .authorizedGrantTypes("authorization_code")
                //授权类型-使用密码模式
                .authorizedGrantTypes("password","refresh_token","authorization_code")
        ;
    }

    @Override
    public void configure(AuthorizationServerSecurityConfigurer security) throws Exception {
        //获取密钥需要身份认证,使用单点登录时必须配置
        security.tokenKeyAccess("isAuthenticated()");

    }
7.启动程序
先启动服务端 springsecurityoauth2-demo
再启动客户端 oauth2clientdemo
访问地址:http://localhost:8081/user/getCurrentUser
【
1,发现浏览器自动跳转到“http://localhost:8080/login”页面。
2,此时输入的账号密码是在服务端的UserService类中设置的账号密码哦,
3,输入成功后页面跳转到“getCurrentUser”接口,正常展示接口返回的数据,效果如下图所示。
】
