文章目录
- 一 系统环境
- 二 用户身份验证
- 2.1 编写主配置文件
- 2.2 编写用户身份验证的配置文件
- 2.3 创建用户密码文件
- 2.4 创建测试页面
- 2.5 测试
- 三 基于个人主页的身份验证
- 3.1 修改主配置文件
- 3.2 创建测试用户
- 3.3 创建测试的个人主页
- 3.4 设置防火墙和selinux
- 3.5 测试
在部署了apache服务的基础上,通过修改配置文件,获得相应需求的服务。
笔者的CentOS-6.9主机部署apache服务的CSDN文章链接如下:
在CentOS-6.9部署apache服务
一 系统环境
| 参数 | 值 |
|---|---|
| 主机IP | 10.0.0.100 |
| 主机名 | test |
| 操作系统版本 | CentOS release 6.9 (Final) |
| 操作系统内核 | 2.6.32-696.el6.x86_64 |
| 防火墙规则 | 允许80端口 |
二 用户身份验证
2.1 编写主配置文件
在 /etc/httpd/conf.d/ 目录下创建身份验证的配置文件
[root@test auth]# cat /etc/httpd/conf.d/user_auth.conf
<Directory "/var/www/html/auth">
  Options Indexes
  AllowOverride AuthConfig
  Order allow,deny
  Allow from all
</Directory>
此处参数 AllowOverride 后面的值 AuthConfig 表示 允许 /var/www/html/auth 目录下的 .htaccesss文件生效,如果改成 AllowOverride None,即使 /var/www/html/auth 目录下存在 .htaccesss文件,也不会生效。
| 参数值 | 含义 |
|---|---|
| AllowOverride AuthConfig | /var/www/html/auth 目录下的 .htaccesss 文件会生效 |
| AllowOverride None | /var/www/html/auth 目录下的 .htaccesss 文件不会生效 |
2.2 编写用户身份验证的配置文件
[root@test ~]# cd /var/www/html/auth/
[root@test auth]# cat .htaccess
AuthType Basic
AuthName "请输入用户名和密码"
AuthUserFile "/var/www/html/auth/.htpasswd"
Require user oldboy
| 参数 | 说明 |
|---|---|
| AuthType | 表示验证类型 |
| AuthName | 表示验证时显示的信息 |
| AuthUserFile | 表示验证时的用户密码存储文件 |
| Require user oldboy | 表示允许用户oldboy访问(虚拟用户,在apache服务器不存在) |
如果想要允许 /var/www/html/auth/.htpasswd 的所有有效用户访问,第四个参数应是Require valid-user 。
2.3 创建用户密码文件
htpasswd -c /var/www/html/auth/.htpasswd oldboy
使用上述命令,创建 oldboy 的登录密码,本机创建密码为 123456

2.4 创建测试页面
创建测试文件,放在身份验证的站点目录下
[root@test auth]# echo "welcome to oldboy auth page" > /var/www/html/auth/index.html
2.5 测试
重启 apache 服务,并访问浏览器

此处需要注意的是,浏览器访问的是 10.0.0.100/auth,再输入用户名和密码
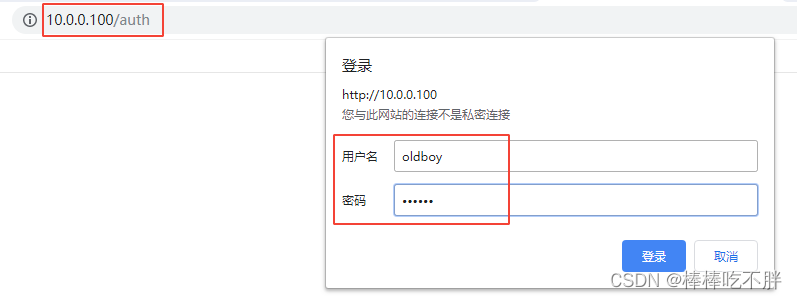
并得到下方结果,表示成功

三 基于个人主页的身份验证
在 二 中,操作了基本的身份验证配置方法,接下来需要创建一个个人主页服务器,禁止root用户创建个人主页,而其余所有普通用户都可以创建个人主页。
3.1 修改主配置文件
首先进行配置文件的备份
[root@test ~]# cd /etc/httpd/conf
[root@test conf]# cp httpd.conf httpd.conf.bak
其次进行过滤,去掉所有的注释和空行内容
[root@test conf]# egrep -vn '#|^$' /etc/httpd/conf/httpd.conf
修改成下列的内容。
其中 disable root 表示禁止root用户创建个人主页,也就是允许所有普通用户创建个人主页。
其中 html 表示设置个人主页的目录。
其中 /home/*/html 表示针对所有普通用户的主页,例如 oldboy 用户的个人主页为 /home/oldboy/html 目录。
剩下的语句是允许客户端通过任何IP地址使用 GET POST OPTIONS 方法进行操作。

3.2 创建测试用户
创建用户a,禁止其shell登录,属组为a
创建用户b,禁止其shell登录,属组为a
创建用户c,禁止其shell登录,属组为c
useradd a -s /sbin/nologin
useradd b -s /sbin/nologin -g a
useradd c -s /sbin/nologin
3.3 创建测试的个人主页
先创建个人主页的目录,再创建测试文件
[root@test ~]# mkdir /home/{a,b,c}/html -p
[root@test conf]# echo "---welcome to a home page---" > /home/a/html/index.html
[root@test conf]# echo "---welcome to b home page---" > /home/b/html/index.html
[root@test conf]# echo "---welcome to c home page---" > /home/c/html/index.html
接着在每个用户的 html 目录下创建 .htaccess 文件。
[root@test conf]# touch /home/a/html/.htaccess
[root@test conf]# touch /home/b/html/.htaccess
[root@test conf]# touch /home/c/html/.htaccess
再分别给3个用户的 .htaccess 文件中添加内容。
[root@test conf]# cat /home/a/html/.htaccess
AuthType Basic
AuthName "请输入用户名和密码"
AuthUserFile "/home/a/html/.htpasswd"
AuthGroupFile "/home/a/html/.htgroup"
Require user user_a
Require group group_a_b
[root@test conf]#
[root@test conf]# cat /home/b/html/.htaccess
AuthType Basic
AuthName "请输入用户名和密码"
AuthUserFile "/home/a/html/.htpasswd"
AuthGroupFile "/home/a/html/.htgroup"
Require user user_b
Require group group_a_b
[root@test conf]#
[root@test conf]# cat /home/c/html/.htaccess
AuthType Basic
AuthName "请输入用户名和密码"
AuthUserFile "/home/c/html/.htpasswd"
Require user user_c
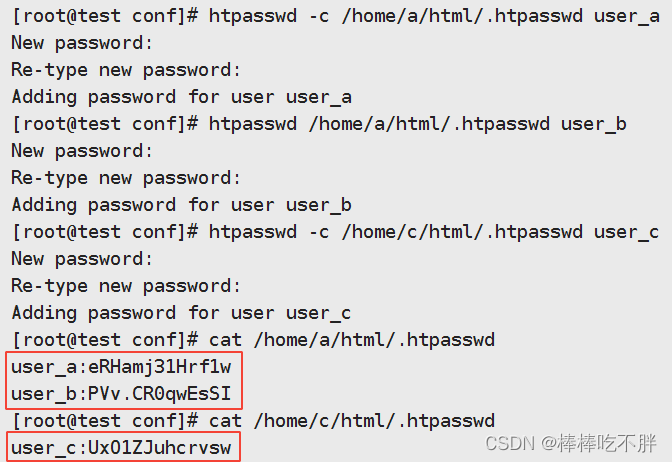
然后创建身份验证用户,密码分别是12345a 、12345b 、12345c
htpasswd -c /home/a/html/.htpasswd user_a
htpasswd /home/a/html/.htpasswd user_b
htpasswd -c /home/a/html/.htpasswd user_c
接着创建身份验证组。
echo "group_a_b: user_a user_b" > /home/a/html/.htgroup
最后也是非常重要的一步,给目录和文件授权,配置文件注释部分的原文如下:
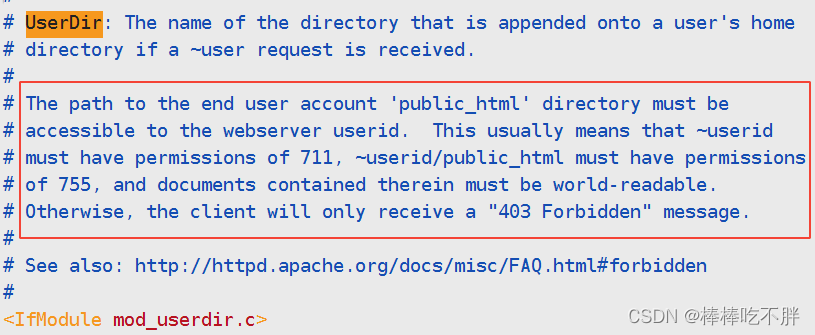
这段英文的意思我们举例说明:
如果我们创建了 oldboy 用户的个人主页,主页文件是 /home/oldboy/html/index.html。
那么目录 /home/oldboy 的权限必须至少是 711
目录 /home/oldboy/html 的权限必须至少是 755
目录 /home/oldboy/html 下面的文件 index.html 权限至少是全员可读的。
否则在浏览器访问时会得到 403 无权访问的提示。
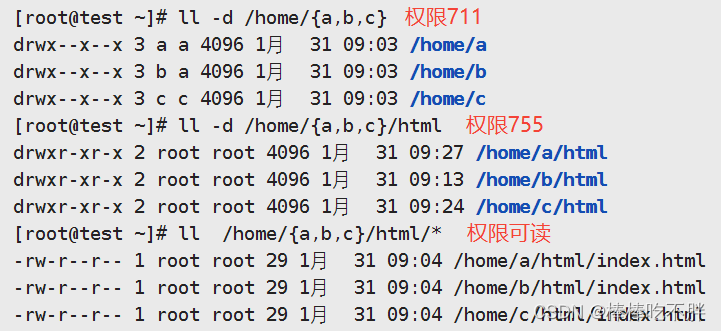
chmod 711 /home/{a,b,c}
chmod 755 /home/{a,b,c}/html
chmod a+r /home/{a,b,c}/html/*
最后检查一遍权限。
3.4 设置防火墙和selinux
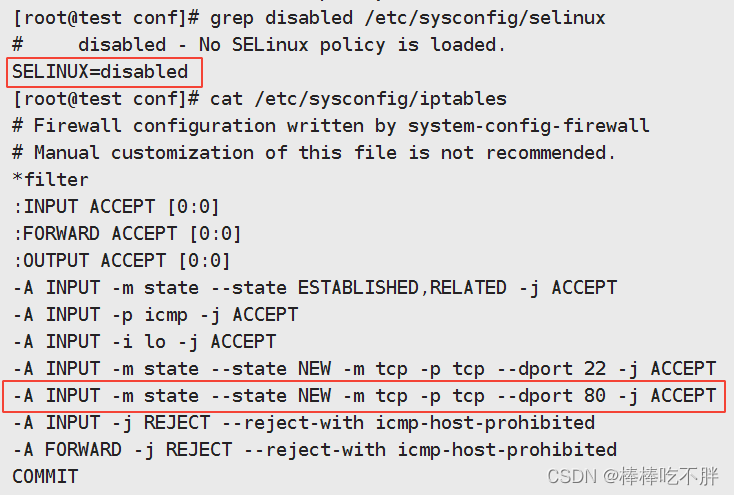
使用命令临时关闭 SELinux
setenforce 0
接着在配置文件永久关闭SELinux,并添加防火墙规则,允许 80 端口。
3.5 测试
重启防火墙和apache服务。

在浏览器输入本机的IP以及对应的用户。
10.0.0.100/~a
10.0.0.100/~b
10.0.0.100/~c
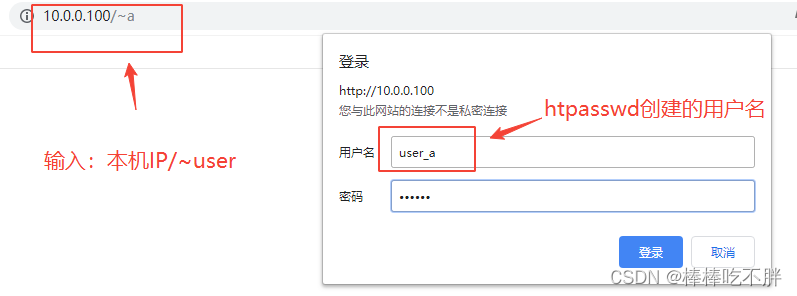
登陆成功后,得到的结果如下图:

其他用户主页的登陆方式同理。

