前言
☀️ 在低照度场景下进行目标检测任务,常存在图像RGB特征信息少、提取特征困难、目标识别和定位精度低等问题,给检测带来一定的难度。
🌻使用图像增强模块对原始图像进行画质提升,恢复各类图像信息,再使用目标检测网络对增强图像进行特定目标检测,有效提高检测的精确度。
⭐本专栏会介绍传统方法、Retinex、EnlightenGAN、SCI、Zero-DCE、IceNet、RRDNet、URetinex-Net等低照度图像增强算法。
👑完整代码已打包上传至资源→低照度图像增强代码汇总资源
目录
前言
🚀一、URetinex-Net介绍
☀️1.1 URetinex-Net简介
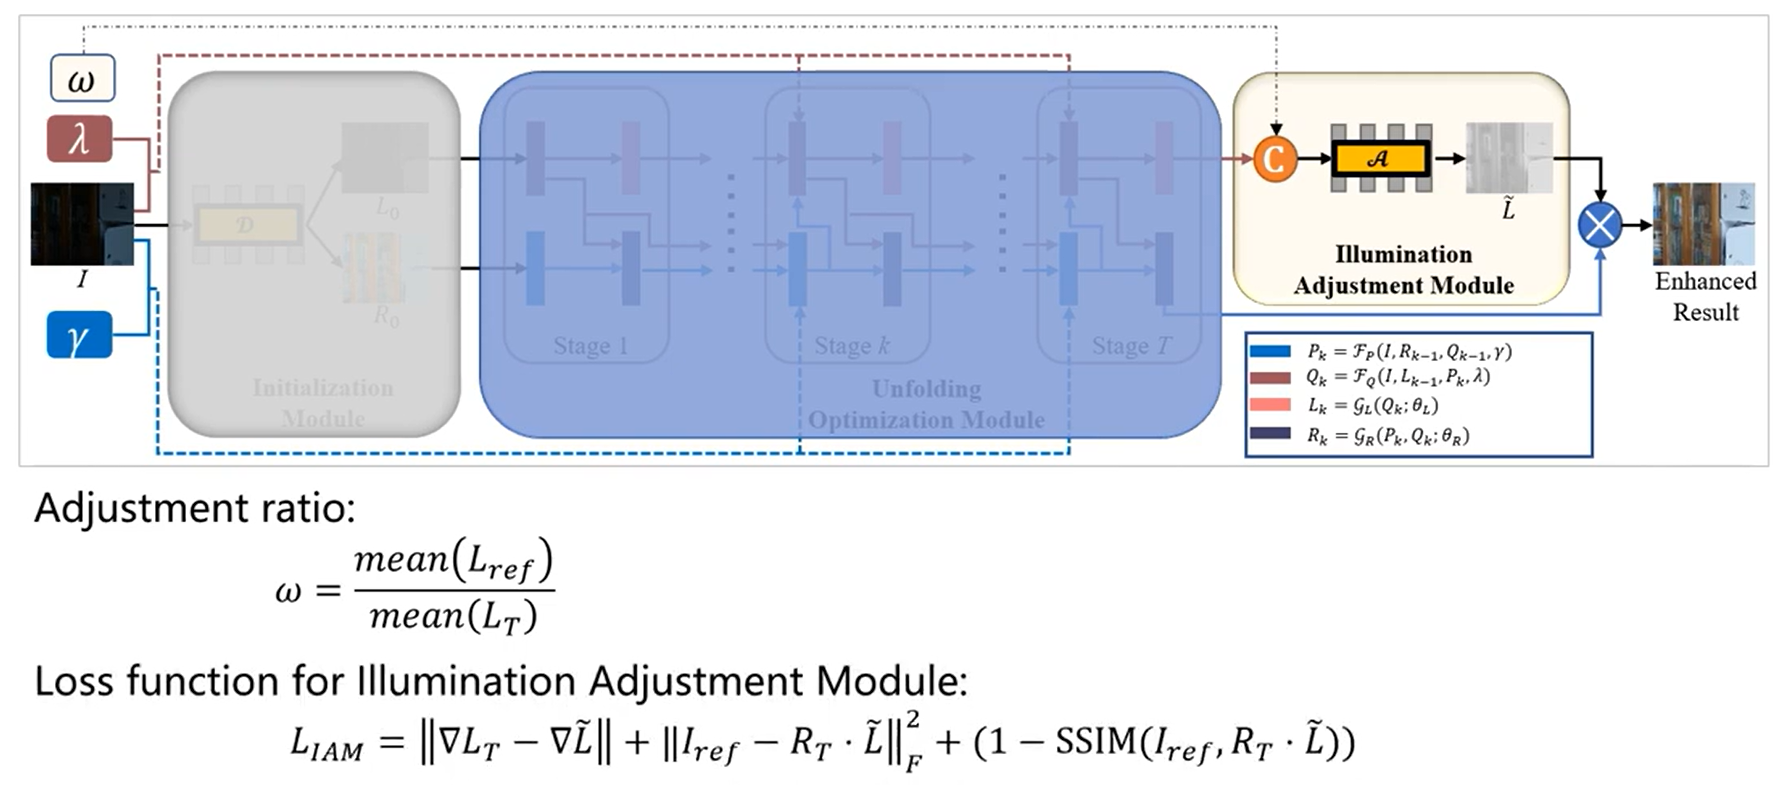
☀️1.2 URetinex-Net的网络结构
(1)初始化模块
(2)展开优化模块
(3)照度调整模块
🚀二、URetinex-Net核心代码
☀️2.1 architecture.py
☀️2.2 decom.py
☀️2.3 illumination_adjustment.py
☀️2.4 illumination_enhance.py
☀️2.5 Math_Module.py
☀️2.6 restoration.py
☀️2.7 evaluate.py
🚀三、URetinex-Net代码复现
☀️3.1 环境配置
☀️3.2 运行过程
☀️3.3 运行效果

🚀一、URetinex-Net介绍
学习资料:
- 论文题目:《URetinex-Net: Retinex-based Deep Unfolding Network for Low-light Image Enhancement》(URetinex-Net:基于Retinex的低光图像增强深度展开网络)
- 论文解读:CVPR|《URetinex-Net: Retinex-based Deep Unfolding Network for Low-light Image Enhance》论文超详细解读(翻译+精读)
- 原文地址:Wu_URetinex-Net_Retinex-Based_Deep_Unfolding_Network_for_Low-Light_Image_Enhancement_CVPR_2022_paper.pdf
- 源码地址:GitHub - AndersonYong/URetinex-Net: Code Released for URetinex-Net
☀️1.1 URetinex-Net简介

这是深圳大学、香港城市大学和南洋理工大学发表在CVPR2022的一篇暗图增强的论文。
URetinex-Net借鉴了Retinex模型,该模型基于人眼对亮度感知的理论,旨在分离图像中的色彩和光照信息。
通过将分解问题公式化为隐式先验正则化模型,设计了三个基于学习的模块:
- 数据依赖初始化:一个模块负责根据数据进行初始化。
- 高效展开优化:引入两个网络,以数据驱动方式自适应地拟合隐式先验,实现噪声抑制和细节保留。
- 用户指定的照明增强:一个模块负责用户指定的照明增强。
特别地,所提出的展开优化模块通过引入两个网络,以数据驱动的方式自适应拟合隐式先验,实现了最终分解结果的噪声抑制和细节保留。
通过深度学习的手段,该项目提出了一种深度展开网络,能够更精确地估计图像的亮度分布,从而在提升图像亮度的同时保留原有的色彩信息和细节。
☀️1.2 URetinex-Net的网络结构

(1)初始化模块
本文提出一个使用全卷积网络的初始化模块D,自适应学习R0和L0。

组成:初始化模块由三个 Conv+LeakyReLU 层组成,后面是卷积层和 ReLU 层。
整个卷积层的内核大小设置为3*3。
损失函数设计:

第一项是重建损失,第二项是结构保留损失,鼓励初始化照明保留图像整体结构。
效果:
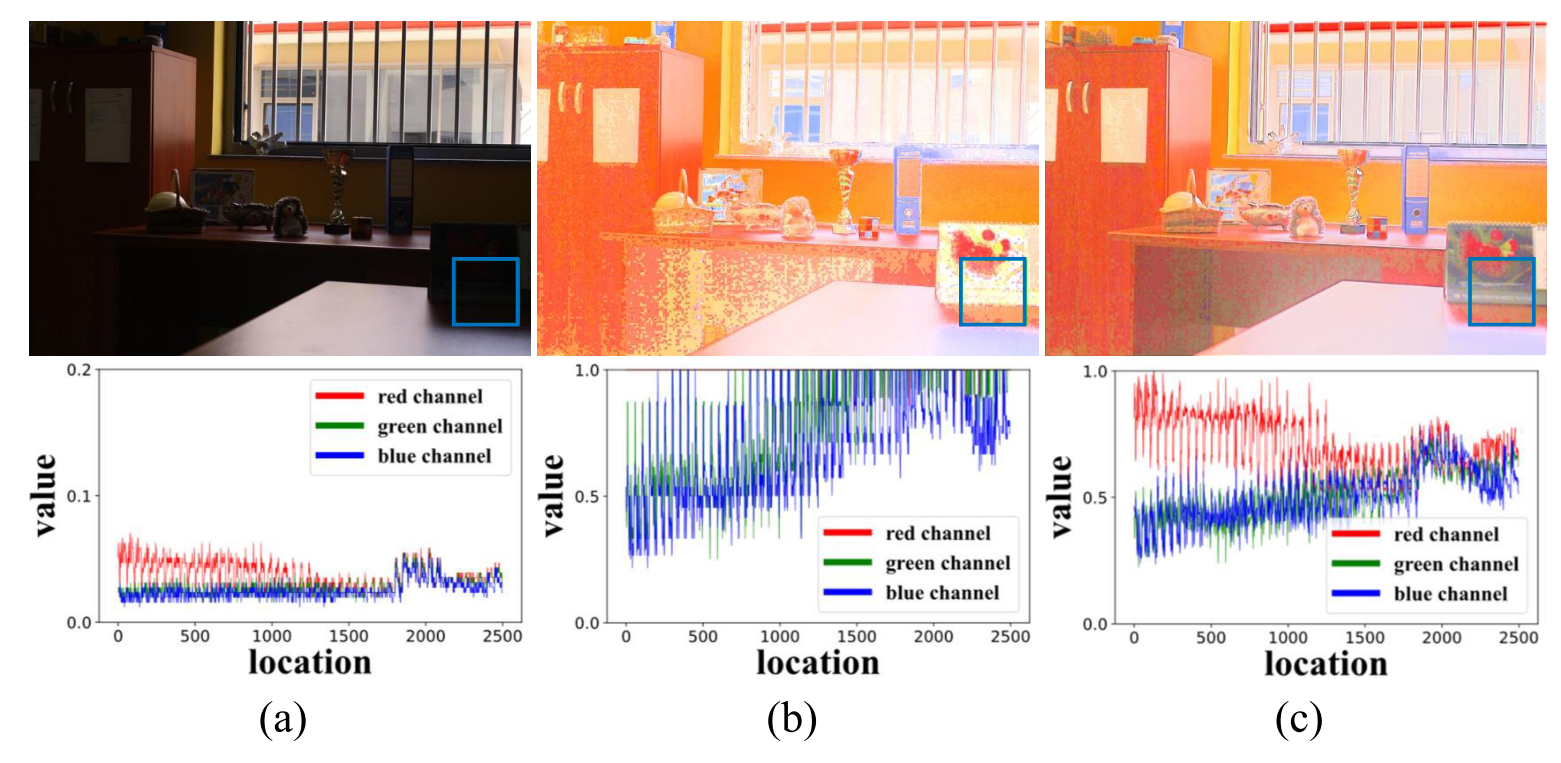
图3:低光图像中一个 patch 的统计特征,显然,刚性初始化(b)改变了原始弱光图像三个通道 {R,G,B} 的强度统计特性,而在本文的初始化模块(c)中得到很好的保留。
(2)展开优化模块
模块目标:
展开优化模块通过迭代解决四个单变量子问题,在T次迭代中更新变量。

P的更新规则:
P子问题是经典最小二乘问题,通过求导得到闭式解,更新公式基于初始反射。

Q的更新规则:
Q的更新可以通过求解方程中的Q子问题来完成,由于RGB通道共享同一灰度照明层,更新公式基于初始照明。


L的更新规则:
对于L和R子问题,不再手工设计先验,而是采用基于学习的方法探索隐式先验。 引入两个网络GL和GR分别更新L和R。

R的更新规则:
用GR表示,输入为Pk和Qk,θR为可学习参数。
使用压缩和激励(SE)块融合Pk和Qk以更新Rk。

(3)照度调整模块
模块目标:增加图像增强的真实光照水平,需要灵活调整以适应不同需求。
结构:初始化模块由三个 Conv+LeakyReLU 层组成,后面是卷积层和 ReLU 层。
整个卷积层的内核大小设置为5*5。
学习方式的照明调整:
本文提出一个照明调整模块,以低光照照明 L 和用户指定的增强比率 ω 作为输入,表示为

损失函数:

包含梯度一致性损失、重构损失和结构相似性损失,以确保调整后的照明图保持与原图的一致性并能重建正常光照图像。
🚀二、URetinex-Net核心代码
这一节主要介绍 architecture.py、decom.py、illumination_adjustment.py、illumination_enhance.py、Math_Module.py、restoration.py、evaluate.py

☀️2.1 architecture.py
import torch
import torch.nn as nn
import torchvision

#--------------------------------1.批归一化层---------------------------------------------#
def get_batchnorm_layer(opts):
    if opts.norm_layer == "batch":
        norm_layer = nn.BatchNorm2d # 批归一化层
    elif opts.layer == "spectral_instance":
        norm_layer = nn.InstanceNorm2d # 实例归一化层
    else:
        print("not implemented")
        exit()
    return norm_layer

#--------------------------------2.卷积层---------------------------------------------#
def get_conv2d_layer(in_c, out_c, k, s, p=0, dilation=1, groups=1):
    '''
    in_c:输入通道数。
    out_c:输出通道数。
    k:卷积核大小。
    s:步幅。
    p:填充(默认值为0)。
    dilation:卷积核扩展(默认值为1)。
    groups:分组卷积(默认值为1)。
    '''
    return nn.Conv2d(in_channels=in_c,
                    out_channels=out_c,
                    kernel_size=k,
                    stride=s,
                    padding=p,dilation=dilation, groups=groups)

#--------------------------------3.反卷积层---------------------------------------------#
def get_deconv2d_layer(in_c, out_c, k=1, s=1, p=1):
    return nn.Sequential(
        nn.Upsample(scale_factor=2, mode="bilinear"), # 进行双线性插值,将输入的特征图上采样2倍。
        nn.Conv2d(
            in_channels=in_c,
            out_channels=out_c,
            kernel_size=k,
            stride=s,
            padding=p
        )
    )

#--------------------------------4.恒等映射层---------------------------------------------#
class Identity(nn.Module):

    def __init__(self):
        super(Identity, self).__init__()

    def forward(self, x):
return x这段代码主要就是实现的一些基本的神经网络层的定义和操作
☀️2.2 decom.py
import torch
import torch.nn as nn
from network.architecture import *

class Decom(nn.Module):
    def __init__(self):
        super().__init__()
        self.decom = nn.Sequential(
        '''
            in_c=3: 表示输入通道数为3。
            out_c = 32: 表示输出通道数为32。
            k = 3: 表示卷积核的尺寸为3x3。
            s = 1: 表示步幅为1。
            p = 1: 表示填充为1
        '''
            get_conv2d_layer(in_c=3, out_c=32, k=3, s=1, p=1),
            nn.LeakyReLU(0.2, inplace=True),
            get_conv2d_layer(in_c=32, out_c=32, k=3, s=1, p=1),
            nn.LeakyReLU(0.2, inplace=True),
            get_conv2d_layer(in_c=32, out_c=32, k=3, s=1, p=1),
            nn.LeakyReLU(0.2, inplace=True),
            get_conv2d_layer(in_c=32, out_c=4, k=3, s=1, p=1),
            nn.ReLU()
        )

    def forward(self, input):
        output = self.decom(input)
        R = output[:, 0:3, :, :]
        L = output[:, 3:4, :, :]
return R, L这段代码主要就是用于将输入图像分解为反射分量和照明分量。
通过多个卷积层和激活函数,模型逐步提取特征,最后输出四个通道,其中前三个通道表示反射分量,最后一个通道表示照明分量。
☀️2.3 illumination_adjustment.py
import torch
import numpy as np
import torch.nn as nn
from network.architecture import get_conv2d_layer
import torch.nn.functional as F

class Adjust_naive(nn.Module):
    def __init__(self, opt):
        super().__init__()
        self.conv1 = get_conv2d_layer(in_c=2, out_c=32, k=5, s=1, p=2)
        self.conv2 = get_conv2d_layer(in_c=32, out_c=32, k=5, s=1, p=2)
        self.conv3 = get_conv2d_layer(in_c=32, out_c=32, k=5, s=1, p=2)
        self.conv4 = get_conv2d_layer(in_c=32, out_c=1, k=5, s=1, p=2)
        self.leaky_relu = nn.LeakyReLU(0.2)
        self.relu = nn.ReLU()
        '''
        卷积层定义:
           conv1: 输入通道数为2,输出通道数为32,卷积核大小为5x5,步幅为1,填充为2。
           conv2 和 conv3: 输入和输出通道数为32,其他参数与 conv1 相同。
           conv4: 输入通道数为32,输出通道数为1,其他参数与 conv1 相同。
        激活函数:
           leaky_relu: LeakyReLU 激活函数,负斜率为0.2。
           relu: ReLU 激活函数。
        '''
    def forward(self, l, alpha):
        input = torch.cat([l, alpha], dim=1)
        x = self.conv1(input)
        x = self.conv2(self.leaky_relu(x))
        x = self.conv3(self.leaky_relu(x))
        x = self.conv4(self.leaky_relu(x))
        x = self.relu(x)
return x这段代码主要就是用于图像处理任务,包含调整图像的亮度或其他特定特征。
☀️2.4 illumination_enhance.py
import torch.nn as nn
import torch
import math
from network.architecture import get_batchnorm_layer, get_conv2d_layer

class Illumination_Alone(nn.Module):
    def __init__(self, opts):
        super().__init__()
        self.opts = opts
        self.conv1 = get_conv2d_layer(in_c=1, out_c=32, k=5, s=1, p=2)
        self.conv2 = get_conv2d_layer(in_c=32, out_c=32, k=5, s=1, p=2)
        self.conv3 = get_conv2d_layer(in_c=32, out_c=32, k=5, s=1, p=2)
        self.conv4 = get_conv2d_layer(in_c=32, out_c=32, k=5, s=1, p=2)
        self.conv5 = get_conv2d_layer(in_c=32, out_c=1, k=1, s=1, p=0)
        '''
           卷积层定义:
              conv1: 输入通道数为1,输出通道数为32,卷积核大小为5x5,步幅为1,填充为2。
              conv2, conv3, conv4: 输入和输出通道数均为32,其他参数与 conv1 相同。
              conv5: 输入通道数为32,输出通道数为1,卷积核大小为1x1,步幅为1,无填充。
        '''
        self.leaky_relu_1 = nn.LeakyReLU(0.2, inplace=True)
        self.leaky_relu_2 = nn.LeakyReLU(0.2, inplace=True)
        self.leaky_relu_3 = nn.LeakyReLU(0.2, inplace=True)
        self.leaky_relu_4 = nn.LeakyReLU(0.2, inplace=True)
        self.relu = nn.ReLU()
        #self.sigmoid = nn.Sigmoid()
        '''
           激活函数:
               leaky_relu_1 到 leaky_relu_4: LeakyReLU 激活函数,负斜率为0.2,inplace=True 表示直接在输入上进行操作,节省内存。
               relu: ReLU 激活函数。
        '''

    def forward(self, l):
        x = l
        x1 = self.leaky_relu_1(self.conv1(x))
        x2 = self.leaky_relu_2(self.conv2(x1))
        x3 = self.leaky_relu_3(self.conv3(x2))
        x4 = self.leaky_relu_4(self.conv4(x3))
        x5 = self.relu(self.conv5(x4))
        return x5
这段代码主要是定义了Illumination_Alone 这个类,主要用于处理图像照明分量的卷积神经网络。
☀️2.5 Math_Module.py
import torch
import torch.nn as nn
from torchvision.transforms import Grayscale


class P(nn.Module):
    """
        to solve min(P) = ||I-PQ||^2 + γ||P-R||^2
        this is a least square problem
        how to solve?
        P* = (gamma*R + I*Q) / (Q*Q + gamma)
    """
    def __init__(self):
        super().__init__()

    def forward(self, I, Q, R, gamma):
        return ((I * Q + gamma * R) / (gamma + Q * Q))
        '''
           I: 输入图像或特征图。
           Q: 一个特征图或滤波器。
           R: 参考图像或特征图。
           gamma: 正则化参数。
        '''
class Q(nn.Module):
    """
        to solve min(Q) = ||I-PQ||^2 + λ||Q-L||^2
        Q* = (lamda*L + I*P) / (P*P + lamda)
    """
    def __init__(self):
        super().__init__()

    def forward(self, I, P, L, lamda):
        '''
           I: 输入图像或特征图。
           P: 一个特征图或滤波器。
           L: 参考图像或特征图。
           lamda: 正则化参数。
        '''
        # 将 I 和 P 分别分成红、绿、蓝三个通道。
        IR = I[:, 0:1, :, :]
        IG = I[:, 1:2, :, :]
        IB = I[:, 2:3, :, :]

        PR = P[:, 0:1, :, :]
        PG = P[:, 1:2, :, :]
        PB = P[:, 2:3, :, :]

return (IR*PR + IG*PG + IB*PB + lamda*L) / ((PR*PR + PG*PG + PB*PB) + lamda)这段代码主要就是展开模块那一部分的计算规则。
☀️2.6 restoration.py
import torch.nn as nn
import torch
from torch.nn.modules.linear import Identity
from network.architecture import *
import math
import torch.nn.functional as F

class HalfDnCNNSE(nn.Module):
    def __init__(self, opts):
        super().__init__()
        self.opts = opts

        if self.opts.concat_L:  # 一个布尔值,决定是否将 l 输入拼接到 r 输入
            self.conv1 = get_conv2d_layer(in_c=3, out_c=32, k=3, s=1, p=1) # 根据 self.opts.concat_L,设置不同的卷积层。
            self.relu1 = nn.ReLU(inplace=True)
            self.conv2 = get_conv2d_layer(in_c=1, out_c=32, k=3, s=1, p=1)
            self.relu2 = nn.ReLU(inplace=True)
        else:
            self.conv1 = self.conv1 = get_conv2d_layer(in_c=3, out_c=64, k=3, s=1, p=1)
            self.relu1 = nn.ReLU(inplace=True)
        self.se_layer = SELayer(channel=64)  # 引入 SE 层来提升通道间的特征表示能力。
        self.conv3 = get_conv2d_layer(in_c=64, out_c=64, k=3, s=1, p=1)
        self.relu3 = nn.ReLU(inplace=True)
        self.conv4 = get_conv2d_layer(in_c=64, out_c=64, k=3, s=1, p=1)
        self.relu4 = nn.ReLU(inplace=True)
        self.conv5 = get_conv2d_layer(in_c=64, out_c=64, k=3, s=1, p=1)
        self.relu5 = nn.ReLU(inplace=True)
        self.conv6 = get_conv2d_layer(in_c=64, out_c=64, k=3, s=1, p=1)
        self.relu6 = nn.ReLU(inplace=True)
        self.conv7 = get_conv2d_layer(in_c=64, out_c=64, k=3, s=1, p=1)
        self.relu7 = nn.ReLU(inplace=True)

        self.conv8 = get_conv2d_layer(in_c=64, out_c=3, k=3, s=1, p=1)  # 将特征图还原到3个通道。

    def forward(self, r, l):
        if self.opts.concat_L:  # 如果 self.opts.concat_L 为真,则分别处理 r 和 l,然后将它们拼接。
            r_fs = self.relu1(self.conv1(r))
            l_fs = self.relu2(self.conv2(l))
            inf = torch.cat([r_fs, l_fs], dim=1)  # 将拼接后的特征或仅 r 的特征输入到 SE 层。
            se_inf = self.se_layer(inf)  # 最后一层卷积输出 n,然后将 n 加到 r 上,得到最终的恢复图像 r_restore。
        else:
            r_fs = self.relu1(self.conv1(r))
            se_inf = self.se_layer(r_fs)
        x1 = self.relu3(self.conv3(se_inf))
        x2 = self.relu4(self.conv4(x1))
        x3 = self.relu5(self.conv5(x2))
        x4 = self.relu6(self.conv6(x3))
        x5 = self.relu7(self.conv7(x4))
        n = self.conv8(x5)
        r_restore = r + n  # 最后一层卷积输出 n,然后将 n 加到 r 上,得到最终的恢复图像 r_restore。
        return r_restore

class SELayer(nn.Module):
    def __init__(self, channel, reduction=16):  # reduction: 降维因子,用于减少通道数。

        super(SELayer, self).__init__()
        self.avg_pool = nn.AdaptiveAvgPool2d(1)
        self.fc = nn.Sequential(
            nn.Linear(channel, channel // reduction, bias=False),
            nn.ReLU(inplace=True),
            nn.Linear(channel // reduction, channel, bias=False),
            nn.Sigmoid()
        )

    def forward(self, x):
        b, c, _, _ = x.size()
        y = self.avg_pool(x).view(b, c)
        y = self.fc(y).view(b, c, 1, 1)
return x * y.expand_as(x)这段代码主要就是定义了HalfDnCNNSE这个类,实现了一个包含通道注意力机制的卷积神经网络,旨在增强图像特征表示。
☀️2.7 evaluate.py
import argparse
from fileinput import filename
from locale import locale_encoding_alias
import torch
import torch.nn as nn
from network.Math_Module import P, Q
from network.decom import Decom
import os
import torchvision
import torchvision.transforms as transforms
from PIL import Image
import time
from utils import *
import glob
'''
各个包的作用:
  argparse:用于解析命令行参数。
  torch 和 torch.nn : PyTorch 的核心模块。
  从 network.Math_Module 中导入了 P 和 Q 模块,用于计算。
  从 network.decom 中导入了 Decom 模块,用于图像分解。
  os :用于操作系统接口。
  torchvision 和 PIL :用于图像处理和变换。
  time :用于计时。
  utils 和 glob :用于工具函数和文件操作。
'''

"""
  As different illumination adjustment ratio will cause
different enhanced results. Certainly you can tune the ratio youself
to get the best results.
  To get better result, we use the illumination of normal light image
to adaptively generate ratio.
  Noted that KinD and KinD++ also use ratio to guide the illumination adjustment,
for fair comparison, the ratio of their methods also generate by the illumination
of normal light image.
"""

def one2three(x):  # one2three函数将单通道的张量复制三次,生成三通道的张量。
    return torch.cat([x, x, x], dim=1).to(x)

class Inference(nn.Module):
    def __init__(self, opts):
        super().__init__()
        self.opts = opts
        # loading decomposition model
        self.model_Decom_low = Decom()
        self.model_Decom_high = Decom()
        self.model_Decom_low = load_initialize(self.model_Decom_low, self.opts.Decom_model_low_path)
        self.model_Decom_high = load_initialize(self.model_Decom_high, self.opts.Decom_model_high_path)
        # loading R; old_model_opts; and L model
        self.unfolding_opts, self.model_R, self.model_L= load_unfolding(self.opts.unfolding_model_path)
        # loading adjustment model
        self.adjust_model = load_adjustment(self.opts.adjust_model_path)
        self.P = P()
        self.Q = Q()
        transform = [
            transforms.ToTensor(),
        ]
        self.transform = transforms.Compose(transform)  # 使用 transforms.Compose 定义图像预处理方法,将图像转换为张量。
        print(self.model_Decom_low)
        print(self.model_R)
        print(self.model_L)
        print(self.adjust_model)
        #time.sleep(8)

    def get_ratio(self, high_l, low_l):  # 计算高低光照图像的比率,用于后续的光照调整。
        ratio = (low_l / (high_l + 0.0001)).mean()
        low_ratio = torch.ones(high_l.shape).cuda() * (1/(ratio+0.0001))  # 防止除以零,添加了一个小常数 0.0001。
        return low_ratio

    def unfolding(self, input_low_img):
        for t in range(self.unfolding_opts.round):  # 展开函数对低光照图像进行多轮处理,初始时生成 P 和 Q,然后逐步更新。
            if t == 0: # initialize R0, L0
                P, Q = self.model_Decom_low(input_low_img)
            else: # update P and Q # 使用了 P 和 Q 模块进行更新。
                w_p = (self.unfolding_opts.gamma + self.unfolding_opts.Roffset * t)
                w_q = (self.unfolding_opts.lamda + self.unfolding_opts.Loffset * t)
                P = self.P(I=input_low_img, Q=Q, R=R, gamma=w_p)
                Q = self.Q(I=input_low_img, P=P, L=L, lamda=w_q)
            R = self.model_R(r=P, l=Q) # 返回反射分量 R
            L = self.model_L(l=Q)# 返回光照分量 L
        return R, L

    def lllumination_adjust(self, L, ratio):
        ratio = torch.ones(L.shape).cuda() * ratio
        return self.adjust_model(l=L, alpha=ratio)

    def forward(self, input_low_img, input_high_img): # 前向传播函数接收低光照图像和高光照图像作为输入。
        if torch.cuda.is_available(): # 将图像移动到 GPU(如果可用)。
            input_low_img = input_low_img.cuda()
            input_high_img = input_high_img.cuda()
        with torch.no_grad():
            start = time.time()   # 在不计算梯度的情况下,进行图像增强处理,计算反射分量 R 和光照分量 L。
            R, L = self.unfolding(input_low_img)
            # the ratio is calculated using the decomposed normal illumination
            _, high_L = self.model_Decom_high(input_high_img)
            ratio = self.get_ratio(high_L, L) # 计算高光照图像的光照分量 high_L,得到调整比率 ratio。
            High_L = self.lllumination_adjust(L, ratio)
            I_enhance = High_L * R # 调整光照分量并生成增强后的图像 I_enhance。
            p_time = (time.time() - start) # 返回增强后的图像和处理时间。
        return I_enhance, p_time

    def evaluate(self): # evaluate 函数遍历低光照图像目录中的所有图像文件
        low_files = glob.glob(self.opts.low_dir+"/*.png")
        for file in low_files:
            file_name = os.path.basename(file)
            name = file_name.split('.')[0]
            high_file = os.path.join(self.opts.high_dir, file_name)
            low_img = self.transform(Image.open(file)).unsqueeze(0)
            high_img = self.transform(Image.open(high_file)).unsqueeze(0)
            enhance, p_time = self.forward(low_img, high_img)
            if not os.path.exists(self.opts.output):
                os.makedirs(self.opts.output)
            save_path = os.path.join(self.opts.output, file_name.replace(name, "%s_URetinexNet"%(name)))
            np_save_TensorImg(enhance, save_path)
            print("================================= time for %s: %f============================"%(file_name, p_time))


if __name__ == "__main__":
    parser = argparse.ArgumentParser(description='Configure')
    # specify your data path here!
    parser.add_argument('--low_dir', type=str, default="E:/RetinexNet_PyTorch-master/data/train/low")
    parser.add_argument('--high_dir', type=str, default="E:/RetinexNet_PyTorch-master/data/train/high")
    parser.add_argument('--output', type=str, default="./demo/output/LOL")
    # ratio are recommended to be 3-5, bigger ratio will lead to over-exposure
    # model path
    parser.add_argument('--Decom_model_low_path', type=str, default="./ckpt/init_low.pth")
    parser.add_argument('--Decom_model_high_path', type=str, default="./ckpt/init_high.pth")
    parser.add_argument('--unfolding_model_path', type=str, default="./ckpt/unfolding.pth")
    parser.add_argument('--adjust_model_path', type=str, default="./ckpt/L_adjust.pth")
    parser.add_argument('--gpu_id', type=int, default=0)

    opts = parser.parse_args()
    for k, v in vars(opts).items():
        print(k, v)

    os.environ['CUDA_VISIBLE_DEVICES'] = str(opts.gpu_id)
    model = Inference(opts).cuda()
    model.evaluate()
这段代码主要就是实现了一个完整的低光照图像增强流程。通过加载不同的模型,对输入的低光照图像进行分解、比率计算、光照调整,最终生成增强后的图像并保存。
🚀三、URetinex-Net代码复现
☀️3.1 环境配置
- Python == 3.7.6
- PyTorch == 1.4.0
- torchvision == 0.5.0
☀️3.2 运行过程
暗光增强——URetinex-Net网络推理测试(详细图文教程)-CSDN博客
参考这篇文章。
☀️3.3 运行效果


美丽的凌水湖~