文章目录
- 前言
- 1. 涉及的核心配置文件与启动文件
- 1.1 demo01_gazebo.launch
- 1.2 nav06_path.launch
- 1.3 nav04_amcl.launch
- 1.4 nav05_path.launch
- 1.5 move_base_params.yaml
- 1.6 dwa_local_planner_params.yaml
- 2. 调参时的一些经验与心得
- 2.1 DWA算法流程
- 2.2 对costmap的参数进行调整
- 2.3 前向模拟
- 3. dwa_planner代码详解
- 3.1 算法流程
- 3.1.1 第一步
- 3.1.2 第二步
- 3.1.3 第三步
- 3.1.4 第四步
- 3.1.5 第五步
- 3.1.6 第六步
- 3.1.7 第七步
- 3.1.8 第八步
- 3.1.9 第九步
- 参考文献
前言
最近在学习ROS的navigation部分,写些东西作为笔记,方便理解与日后查看。本文从Astar算法入手,对navigation源码进行解析。
PS:ros navigation源码版本https://gitcode.net/mirrors/ros-planning/navigation/-/tree/noetic-devel
DWA具体的算法原理在之前的博客(见自动驾驶路径规划——DWA(动态窗口法))中已有阐述,本文就不多做赘述了.
1. 涉及的核心配置文件与启动文件
1.1 demo01_gazebo.launch
<launch>
    <!-- 将 Urdf 文件的内容加载到参数服务器 -->
    <param name="robot_description" command="$(find xacro)/xacro $(find urdf02_gazebo)/urdf/xacro/car.urdf.xacro" />
    <!-- 启动 gazebo -->
    <include file="$(find gazebo_ros)/launch/empty_world.launch" >
        <arg name="world_name" value="$(find urdf02_gazebo)/worlds/test.world"/>
    </include>
    <!-- 在 gazebo 中显示机器人模型 -->
    <node pkg="gazebo_ros" type="spawn_model" name="model" args="-urdf -model mycar -param robot_description  -x -3.182779  -y 0.866966 -Y -1.57"  />
    <!-- <node pkg="gazebo_ros" type="spawn_model" name="model" args="-urdf -model mycar -param robot_description "  /> -->
</launch>
首先该launch文件启动,将机器人模型的xacro文件加载到参数服务器;再启动gazebo,加载出预设的地图以及加载机器人的初始位置.
1.2 nav06_path.launch
<launch>
    <!-- 设置地图的配置文件 -->
    <arg name="map" default="test01.yaml" />
    <!-- 运行地图服务器,并且加载设置的地图-->
    <node name="map_server" pkg="map_server" type="map_server" args="$(find nav_demo)/map/$(arg map)"/>

    <!-- 启动AMCL节点 -->
    <include file="$(find nav_demo)/launch/nav04_amcl.launch" />

    <!-- 启动move_base节点 -->
    <include file="$(find nav_demo)/launch/nav05_path.launch" />

    <!-- 运行rviz -->
    <node pkg="rviz" type="rviz" name="rviz" args="-d $(find nav_demo)/config/test02.rviz" />
    <!-- 添加关节状态发布节点 -->
    <node pkg="joint_state_publisher" type="joint_state_publisher" name="joint_state_publisher" />
    <!-- 添加机器人状态发布节点 -->
    <node pkg="robot_state_publisher" type="robot_state_publisher" name="robot_state_publisher" />
</launch>
启动这个launch文件后,将会运行地图服务器,加载设置的地图;启动AMCL节点,实现机器人的定位功能;启动move_base节点,加载move_base相关的参数;运行rviz,显示机器人在rviz中的图像.
1.3 nav04_amcl.launch
这部分就不细讲了,具体可以参考【ROS】—— 机器人导航(仿真)—导航实现(十八)中的amcl部分.
1.4 nav05_path.launch
<launch>
    <node pkg="move_base" type="move_base" respawn="false" name="move_base" output="screen" clear_params="true">
        <rosparam file="$(find nav_demo)/param/costmap_common_params.yaml" command="load" ns="global_costmap" />
        <rosparam file="$(find nav_demo)/param/costmap_common_params.yaml" command="load" ns="local_costmap" />
        <rosparam file="$(find nav_demo)/param/local_costmap_params.yaml" command="load" />
        <rosparam file="$(find nav_demo)/param/global_costmap_params.yaml" command="load" />
        <!-- <rosparam file="$(find nav_demo)/param/base_local_planner_params.yaml" command="load" /> -->
        <rosparam file="$(find nav_demo)/param/move_base_params.yaml" command="load" />
        <rosparam file="$(find nav_demo)/param/global_planner_params.yaml" command="load" />
        <rosparam file="$(find nav_demo)/param/dwa_local_planner_params.yaml" command="load" />

    </node>
</launch>
这部分是move_base的核心,主要目的是加载代价图的相关参数,包括全局代价地图和局部代价地图的参数;加载move_base的参数以及全局规划器和局部规划器(这里选用的是dwa_local_planner)的相关参数.部分参数文件在【ROS】—— 机器人导航(仿真)—导航实现(十八)中已有讲述,这里就不重复了.本文主要对move_base_params.yaml dwa_local_planner_params.yaml进行介绍.
1.5 move_base_params.yaml
参数配置的说明可以参考注释
shutdown_costmaps: false  #当move_base在不活动状态时,是否关掉costmap.

controller_frequency: 15.0  #向底盘控制移动话题cmd_vel发送命令的频率.
controller_patience: 3.0 #在空间清理操作执行前,控制器花多长时间等有效控制下发

planner_frequency: 5.0  #全局规划操作的执行频率.如果设置为0.0,则全局规划器仅
                        #在接收到新的目标点或者局部规划器报告路径堵塞时才会重新执行规划操作.
planner_patience: 5.0  #在空间清理操作执行前,留给规划器多长时间来找出一条有效规划.

oscillation_timeout: 10.0  #执行修复机制前,允许振荡的时长.
oscillation_distance: 0.02  #来回运动在多大距离以上不会被认为是振荡.

#全局路径规划器
# base_global_planner: "global_planner/GlobalPlanner" #指定用于move_base的全局规划器插件名称.
# base_global_planner: "navfn/NavfnROS" #指定用于move_base的局部规划器插件名称.
base_global_planner: "global_planner/GlobalPlanner"
# base_global_planner: "carrot_planner/CarrotPlanner"

#局部路径规划器的调用在文件【teb_local_planner.launch】、【dwa_local_planner.launch】对应文件内自动调用,该部分可以忽略
# base_local_planner: "teb_local_planner/TebLocalPlannerROS" #指定用于move_base的局部规划器插件名称.
base_local_planner: "dwa_local_planner/DWAPlannerROS" #指定用于move_base的全局规划器插件名称.


max_planning_retries: 1  #最大规划路径的重复次数,-1表示无限次

recovery_behavior_enabled: true  #是否启动恢复机制
clearing_rotation_allowed: true  #是否启动旋转的恢复,必须是recovery_behavior_enabled在使能的基础上才能生效


recovery_behaviors:  # 自恢复行为
  - name: 'conservative_reset'
    type: 'clear_costmap_recovery/ClearCostmapRecovery'
  #- name: 'aggressive_reset'
  #  type: 'clear_costmap_recovery/ClearCostmapRecovery'
  #- name: 'super_reset'
  #  type: 'clear_costmap_recovery/ClearCostmapRecovery'
  - name: 'clearing_rotation'
    type: 'rotate_recovery/RotateRecovery'
  # - name: 'move_slow_and_clear'
  #   type: 'move_slow_and_clear/MoveSlowAndClear'

#保守清除,用户指定区域之外的障碍物将从机器人地图中清除
conservative_reset:
  reset_distance: 1.0
  #layer_names: [static_layer, obstacle_layer, inflation_layer]
  layer_names: [obstacle_layer]
#保守清除后,如果周围障碍物允许,机器人将进行原地旋转以清理空间

#保守清除失败,积极清除,清除指定区域之外的所有障碍物,然后进行旋转
aggressive_reset:
  reset_distance: 3.0
  #layer_names: [static_layer, obstacle_layer, inflation_layer]
  layer_names: [obstacle_layer]
#积极清除也失败后,放弃规划路径

#可能是更进一步的清除,wiki未找到相关资料
super_reset:
  reset_distance: 5.0
  #layer_names: [static_layer, obstacle_layer, inflation_layer]
  layer_names: [obstacle_layer]

#另一种恢复行为,需要注意该行为只能与具有动态设置速度限制功能的局部路径规划器适配,例如dwa
move_slow_and_clear:
  clearing_distance: 0.5  #与小车距离0.5内的障碍物会被清除
  limited_trans_speed: 0.1
  limited_rot_speed: 0.4
  limited_distance: 0.3
#局部路径规划器的调用在文件【teb_local_planner.launch】、【dwa_local_planner.launch】对应文件内自动调用,该部分可以忽略
# base_local_planner: "teb_local_planner/TebLocalPlannerROS" #指定用于move_base的局部规划器插件名称.
base_local_planner: "dwa_local_planner/DWAPlannerROS" #指定用于move_base的全局规划器插件名称.
此部分用于指定move_base中局部规划器的类型,可以选择teb_local_planner/TebLocalPlannerROS 或dwa_local_planner/DWAPlannerROS,若都不选择,可使用base_local_planner。
1.6 dwa_local_planner_params.yaml
DWAPlannerROS:

# Robot Configuration Parameters - Kobuki 机器人配置参数,这里为Kobuki底座
  max_vel_x: 0.5  # 0.55
  #x方向最大线速度绝对值,单位:米/秒
  min_vel_x: 0.0
  #x方向最小线速度绝对值,单位:米/秒。如果为负值表示可以后退.

  max_vel_y: 0.0  # diff drive robot
  #y方向最大线速度绝对值,单位:米/秒。turtlebot为差分驱动机器人,所以为0
  min_vel_y: 0.0  # diff drive robot
  #y方向最小线速度绝对值,单位:米/秒。turtlebot为差分驱动机器人,所以为0

  max_trans_vel: 0.5 # choose slightly less than the base's capability
  #机器人最大平移速度的绝对值,单位为 m/s
  min_trans_vel: 0.1  # this is the min trans velocity when there is negligible rotational velocity
  #机器人最小平移速度的绝对值,单位为 m/s
  trans_stopped_vel: 0.1
  #机器人被认属于“停止”状态时的平移速度。如果机器人的速度低于该值,则认为机器人已停止。单位为 m/s

  # Warning!
  #   do not set min_trans_vel to 0.0 otherwise dwa will always think translational velocities
  #   are non-negligible and small in place rotational velocities will be created.
  #注意不要将min_trans_vel设置为0,否则DWA认为平移速度不可忽略,将创建较小的旋转速度。

  max_rot_vel: 5.0  # choose slightly less than the base's capability #机器人的最大旋转角速度的绝对值,单位为 rad/s
  min_rot_vel: 0.4  # this is the min angular velocity when there is negligible translational velocity #机器人的最小旋转角速度的绝对值,单位为 rad/s
  rot_stopped_vel: 0.4 #机器人被认属于“停止”状态时的旋转速度。单位为 rad/s

  acc_lim_x: 10.0 # maximum is theoretically 2.0, but we  机器人在x方向的极限加速度,单位为 meters/sec^2
  acc_lim_theta: 12.0 #机器人的极限旋转加速度,单位为 rad/sec^2
  acc_lim_y: 0.0      # diff drive robot 机器人在y方向的极限加速度,对于差分机器人来说当然是0

# Goal Tolerance Parameters 目标距离公差参数
  yaw_goal_tolerance: 0.3  # 0.05
  #到达目标点时,控制器在偏航/旋转时的弧度容差(tolerance)。即:到达目标点时偏行角允许的误差,单位弧度
  xy_goal_tolerance: 0.15  # 0.10
  #到到目标点时,控制器在x和y方向上的容差(tolerence)(米)。即:到达目标点时,在xy平面内与目标点的距离误差
  # latch_xy_goal_tolerance: false
  # 设置为true时表示:如果到达容错距离内,机器人就会原地旋转;即使转动是会跑出容错距离外。
#注:这三个参数的设置及影响讨论请参考《ROS导航功能调优指南》

# Forward Simulation Parameters 前向模拟参数
  sim_time: 1.0       # 1.7
  #前向模拟轨迹的时间,单位为s(seconds)
  vx_samples: 6       # 3
  #x方向速度空间的采样点数.
  vy_samples: 1       # diff drive robot, there is only one sample
  #y方向速度空间采样点数.。Tutulebot为差分驱动机器人,所以y方向永远只有1个值(0.0)
  vtheta_samples: 20  # 20
  #旋转方向的速度空间采样点数.
#注:参数的设置及影响讨论请参考《ROS导航功能调优指南》

# Trajectory Scoring Parameters 轨迹评分参数
  path_distance_bias: 64.0      # 32.0   - weighting for how much it should stick to the global path plan
  #控制器与给定路径接近程度的权重

  goal_distance_bias: 24.0      # 24.0   - weighting for how much it should attempt to reach its goal
  #控制器与局部目标点的接近程度的权重,也用于速度控制

  occdist_scale: 0.06          # 0.01   - weighting for how much the controller should avoid obstacles
  # 控制器躲避障碍物的程度

  forward_point_distance: 0.325 # 0.325  - how far along to place an additional scoring point
  #以机器人为中心,额外放置一个计分点的距离

  stop_time_buffer: 0.2         # 0.2    - amount of time a robot must stop in before colliding for a valid traj.
  #机器人在碰撞发生前必须拥有的最少时间量。该时间内所采用的轨迹仍视为有效。即:为防止碰撞,机器人必须提前停止的时间长度

  scaling_speed: 0.25           # 0.25   - absolute velocity at which to start scaling the robot's footprint
  #开始缩放机器人足迹时的速度的绝对值,单位为m/s。
  #在进行对轨迹各个点计算footprintCost之前,会先计算缩放因子。如果当前平移速度小于scaling_speed,则缩放因子为1.0,否则,缩放因子为(vmag - scaling_speed) / (max_trans_vel - scaling_speed) * max_scaling_factor + 1.0。然后,该缩放因子会被用于计算轨迹中各个点的footprintCost。
  # 参考:https://www.cnblogs.com/sakabatou/p/8297479.html
  #亦可简单理解为:启动机器人底盘的速度.(Ref.: https://www.corvin.cn/858.html)

  max_scaling_factor: 0.2       # 0.2    - how much to scale the robot's footprint when at speed.
  #最大缩放因子。max_scaling_factor为上式的值的大小。

# Oscillation Prevention Parameters 振荡预防参数
  oscillation_reset_dist: 0.05  # 0.05   - how far to travel before resetting oscillation flags
  #机器人必须运动多少米远后才能复位震荡标记(机器人运动多远距离才会重置振荡标记)

# Global Plan Parameters
  #prune_plan: false
  #机器人前进是否清除身后1m外的轨迹.

# Debugging 调试参数
  publish_traj_pc : true #将规划的轨迹在RVIZ上进行可视化
  publish_cost_grid_pc: true
  #将代价值进行可视化显示
  #是否发布规划器在规划路径时的代价网格.如果设置为true,那么就会在~/cost_cloud话题上发布sensor_msgs/PointCloud2类型消息.
  global_frame_id: odom #全局参考坐标系为odom


# Differential-drive robot configuration - necessary? 差分机器人配置参数
#  holonomic_robot: false
   #是否为全向机器人。 值为false时为差分机器人; 为true时表示全向机器人
这部分为dwa_planner 的配置文件,在接下来的部分结合算法原理进行介绍.
2. 调参时的一些经验与心得
2.1 DWA算法流程
将机器人的控制空间离散化(dx,dy,dtheta),即在速度空间之中进行速度采样
对于每一个采样速度,从机器人的当前状态执行正向模拟,以预测如果在短时间段内采用采样速度将会发生什么,消除不良的轨迹(可能会发生碰撞的轨迹)
评估从正向模拟产生的每个轨迹使用包含诸如:障碍物接近度、目标接近度、全局路径接近度和速度等特征的度量,丢弃非法轨迹(与障碍物相撞的轨迹).输出轨迹得分
选择得分最高的轨迹,将相关联的速度发送给移动基站
清零然后重复以上过程
DWA 规划器取决于提供障碍物信息的本地成本图。
因此,调整本地成本图的参数对于 DWA 本地规划的最佳行为至关重要。
2.2 对costmap的参数进行调整
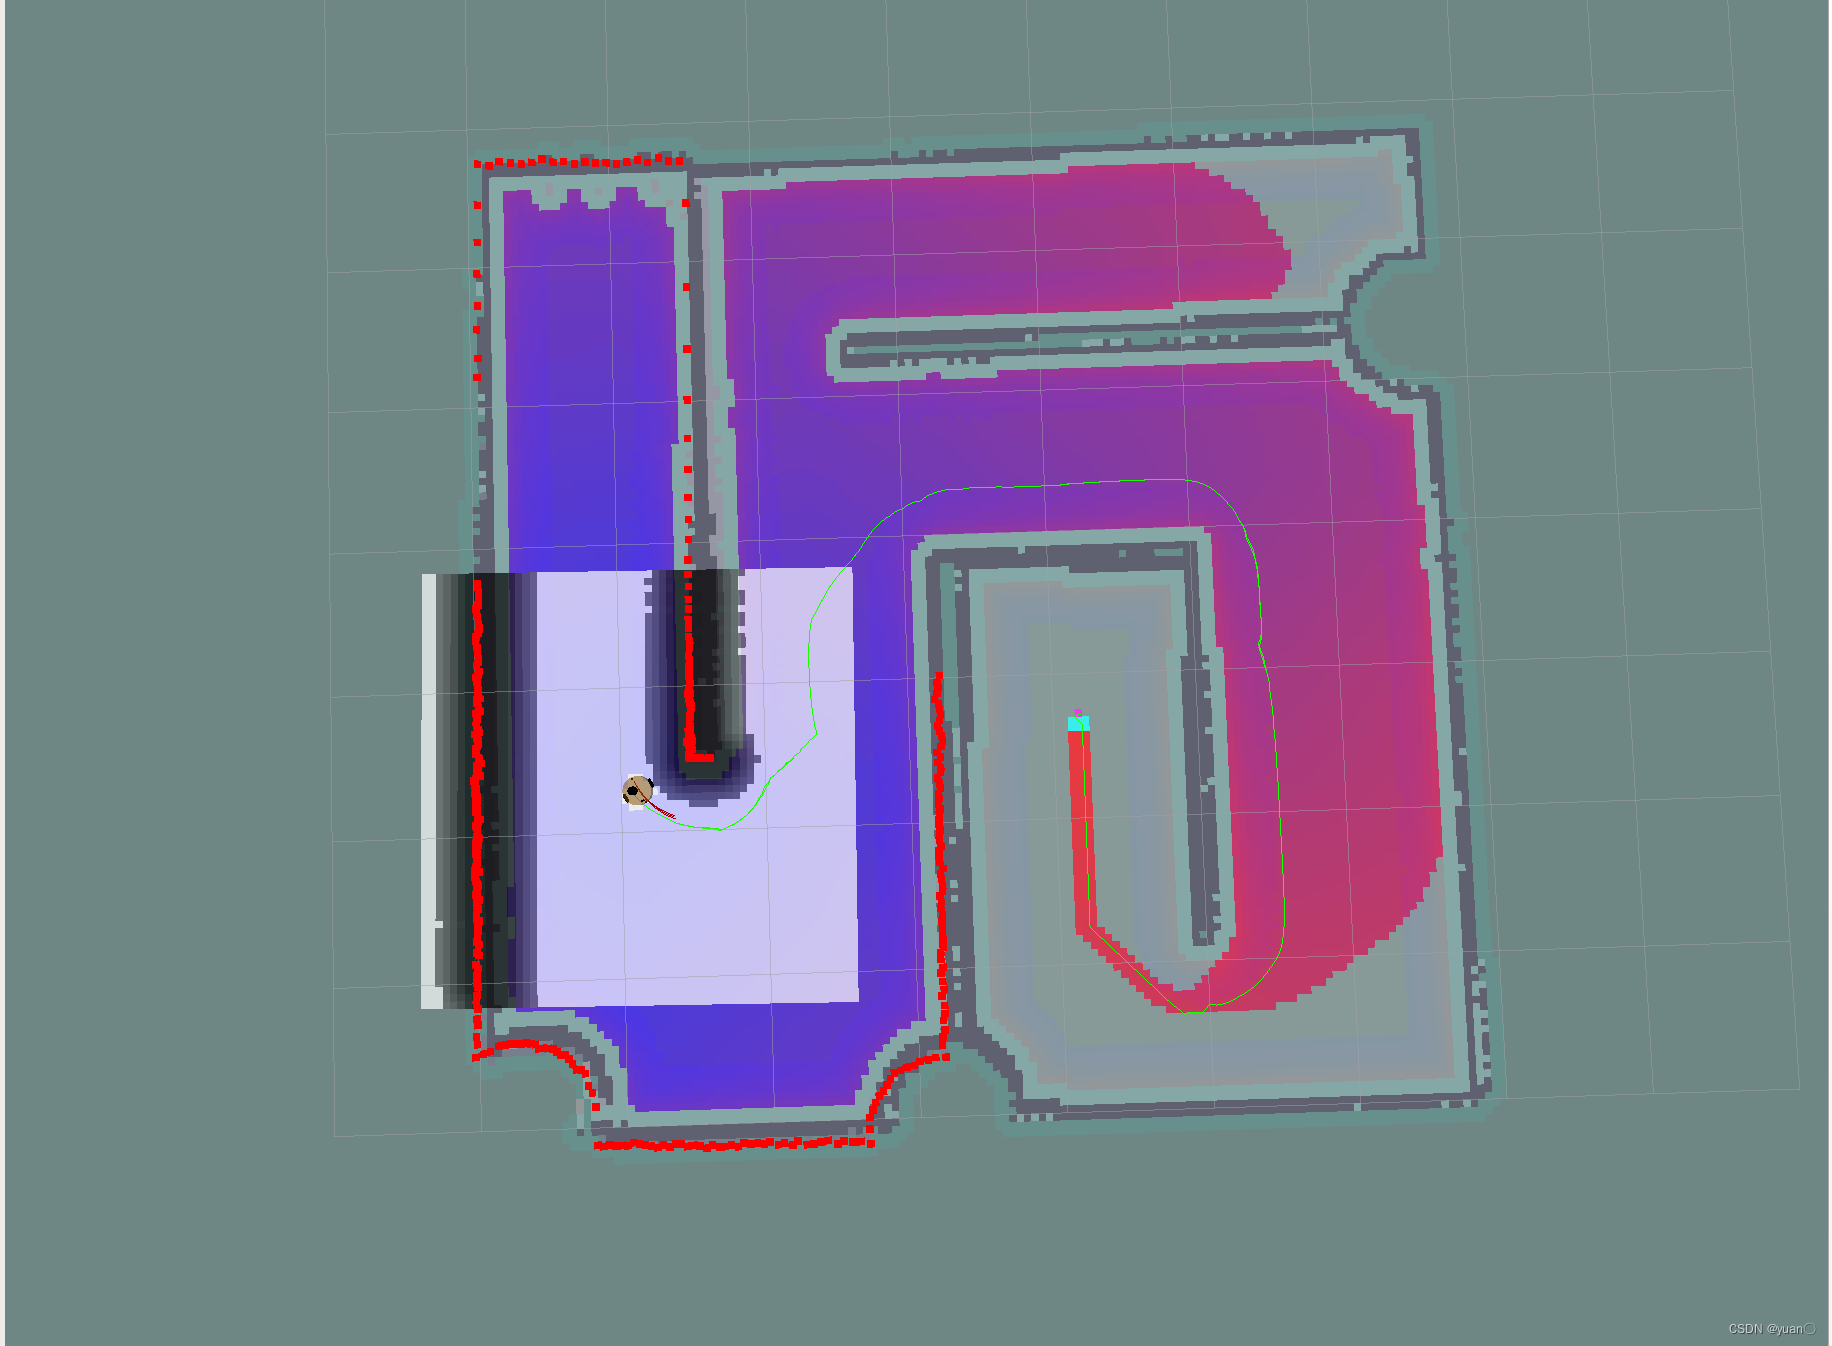
在进行导航时,需要适当的提高global_costmap的膨胀半径inflation_radius以及代价比例系数cost_scaling_factor,使导航规划出的路径尽量远离障碍物,避免机器人卡死与膨胀.dwa_planner对于"C"字型的路径适应性较差,经常出现卡死的状况,如下图.

inflation_radius=0.3 cost_scaling_factor=3.0若对其适当提高,则可以避免这种状况.
inflation_radius=0.4 cost_scaling_factor=10.02.3 前向模拟
在前向模拟这一步中,机器人通过在速度空间中进行采样,并去除可能与障碍物发生碰撞的轨迹.
# Forward Simulation Parameters 前向模拟参数
  sim_time: 1.0       # 1.7
  #前向模拟轨迹的时间,单位为s(seconds)
  vx_samples: 6       # 3
  #x方向速度空间的采样点数.
  vy_samples: 1       # diff drive robot, there is only one sample
  #y方向速度空间采样点数.。Tutulebot为差分驱动机器人,所以y方向永远只有1个值(0.0)
  vtheta_samples: 20  # 20
  #旋转方向的速度空间采样点数.
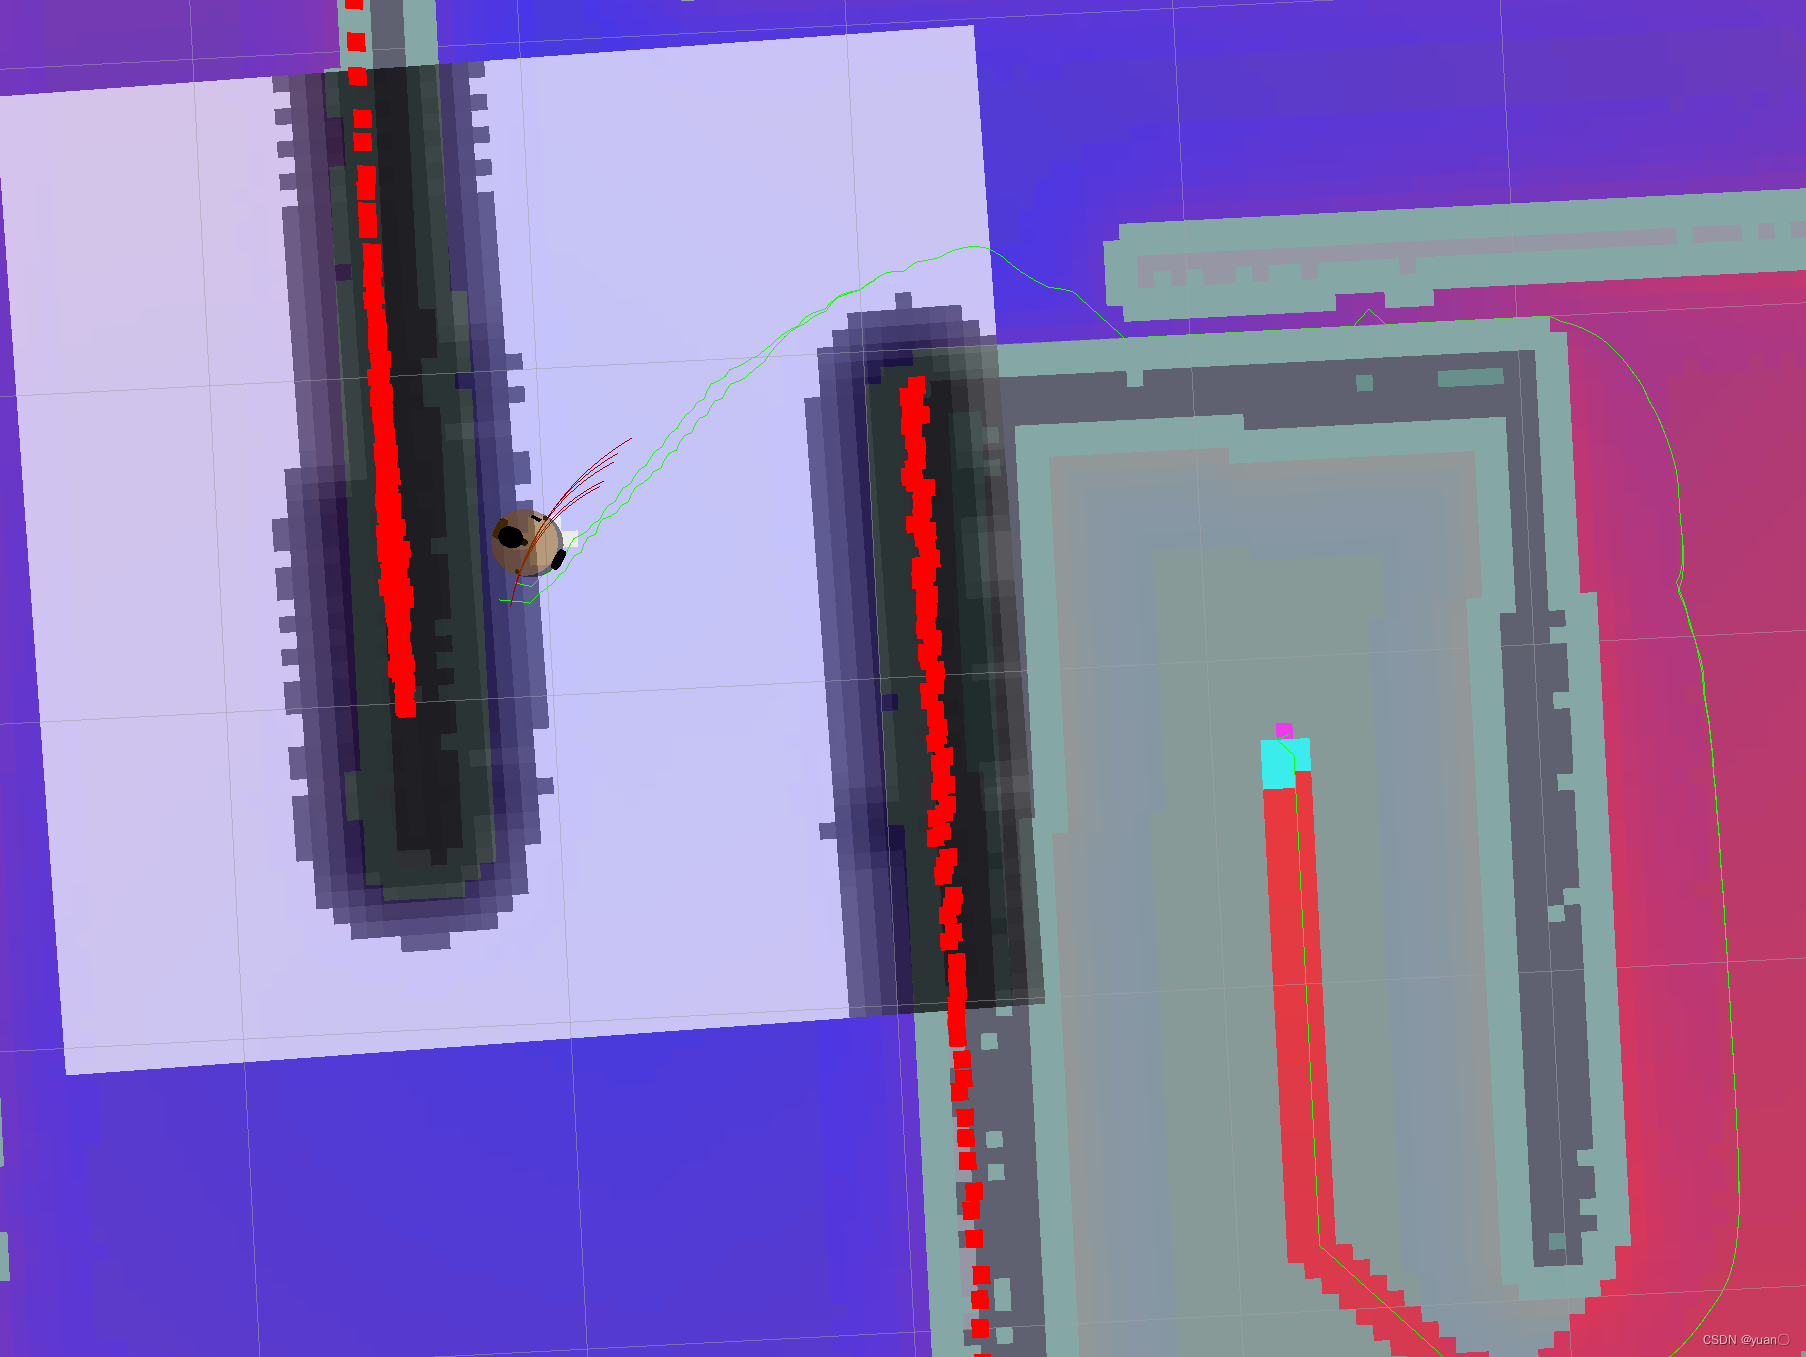
前向模拟轨迹的时间sim_time长短对DWA规划出的轨迹具有影响,可将其视为允许机器人以采样速度移动的时间.
sim_time = 1.0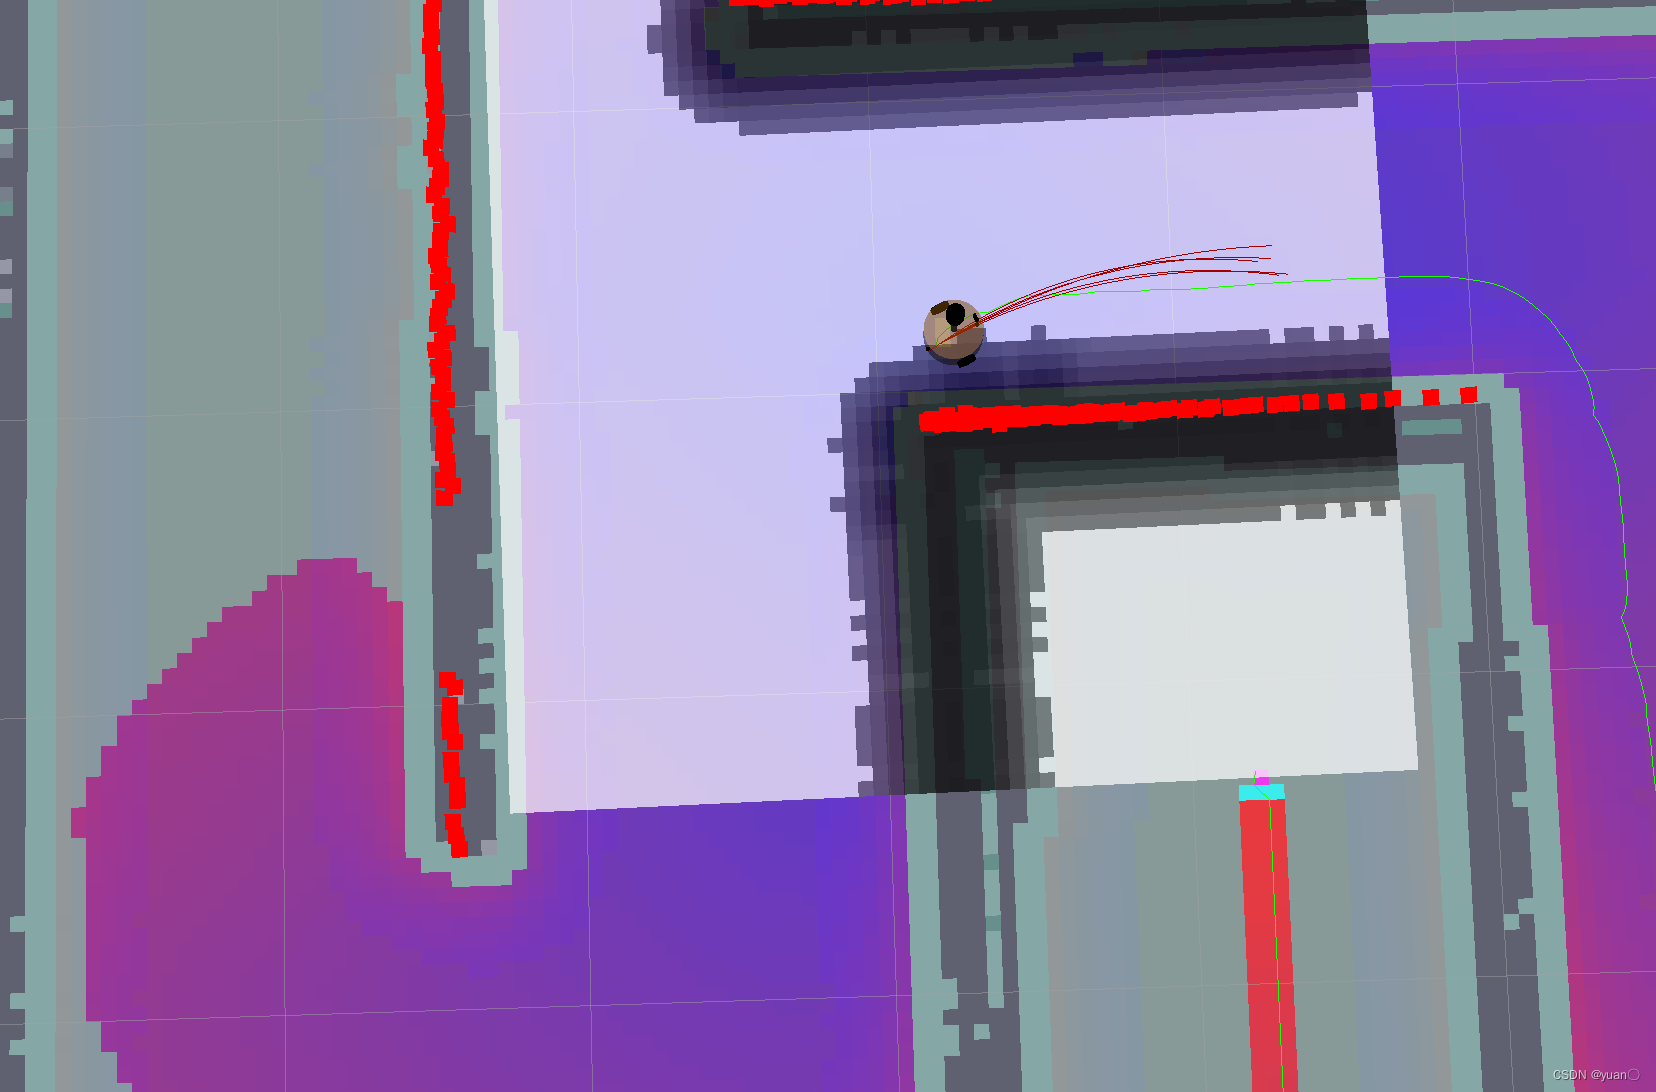
sim_time = 4.0前向模拟轨迹的时间若设置过低,例如小于2.0,则会使机器人前向规划的轨迹较短,在遇到狭窄间隙时,可能会因为没有足够的时间来规划出一条合理的路线导致无法通过狭窄间隙.
前向模拟轨迹的时间若设置过高,例如大于5.0,由于DWA规划出的路径是由简单的圆弧组成的,可能会使规划出的路线不灵活,同时过长的时间也意味着较大的计算负荷,对计算机的性能消耗大.
  vx_samples: 6       # 3
  vy_samples: 1       # diff drive robot, there is only one sample
  vtheta_samples: 20  # 20
vx_samples vy_samples 决定了在x,y方向上采样点的数目vtheta_samples决定控制旋转速度的采样点数目.样本的数量取决于计算机的计算能力。在大多数情况下,倾向于设置 vtheta_samples高于平移速度方向上的采样点数目,因为通常旋转比直线前进更复杂。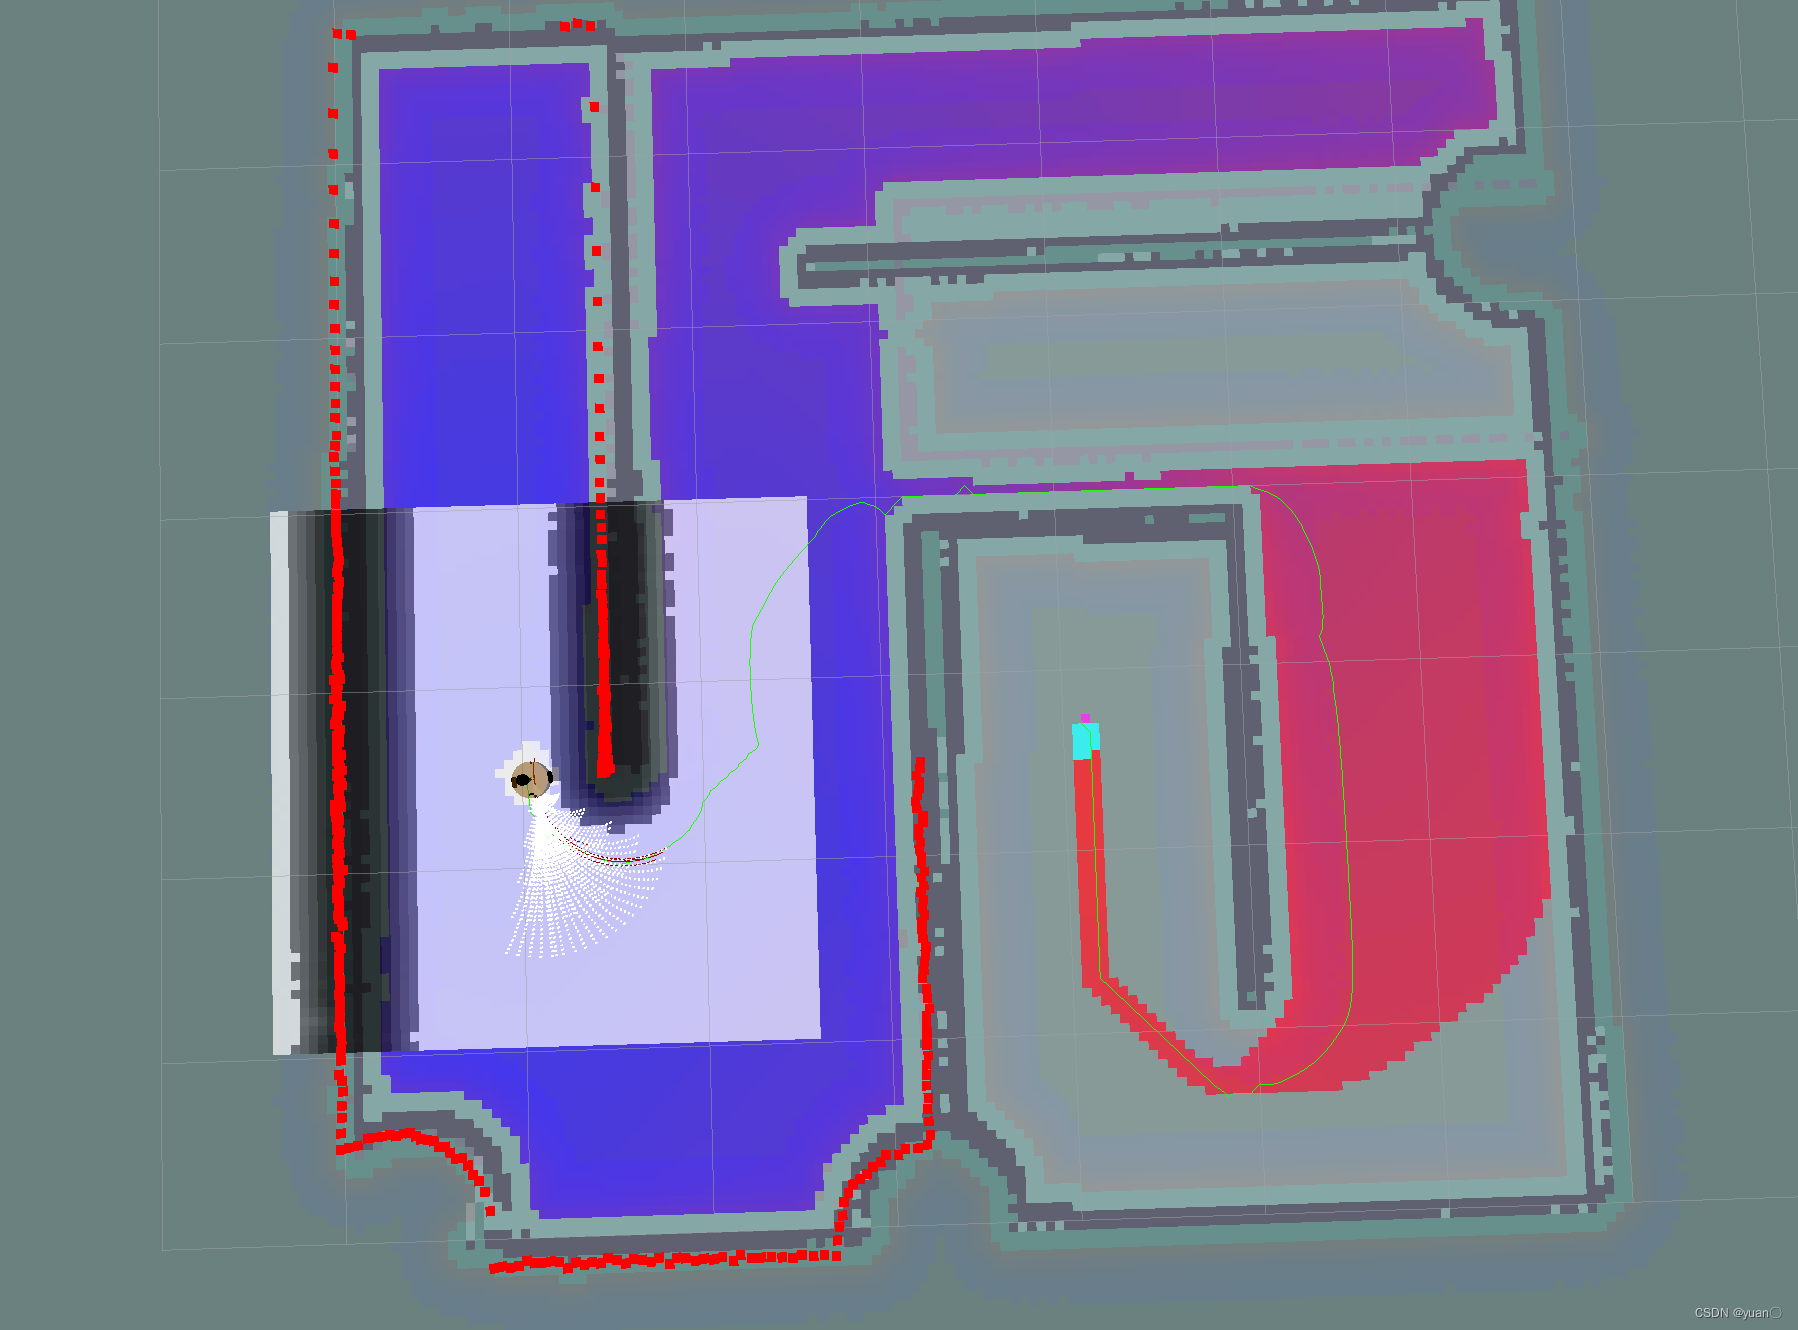
cloudpoint2,选择/move_base/DWAPlannerROS/trajectory_cloud话题,可以看到采样点的分布状况与数目3. dwa_planner代码详解
关于dwa_planner的代码解释,这篇博客写得很详细—— ROS Navigation-----DWA
3.1 算法流程
3.1.1 第一步
  bool DWAPlannerROS::setPlan(const std::vector<geometry_msgs::PoseStamped>& orig_global_plan) {
    if (! isInitialized()) {
      ROS_ERROR("This planner has not been initialized, please call initialize() before using this planner");
      return false;
    }
    //when we get a new plan, we also want to clear any latch we may have on goal tolerances
    latchedStopRotateController_.resetLatching();

    ROS_INFO("Got new plan");
    return dp_->setPlan(orig_global_plan);
  }

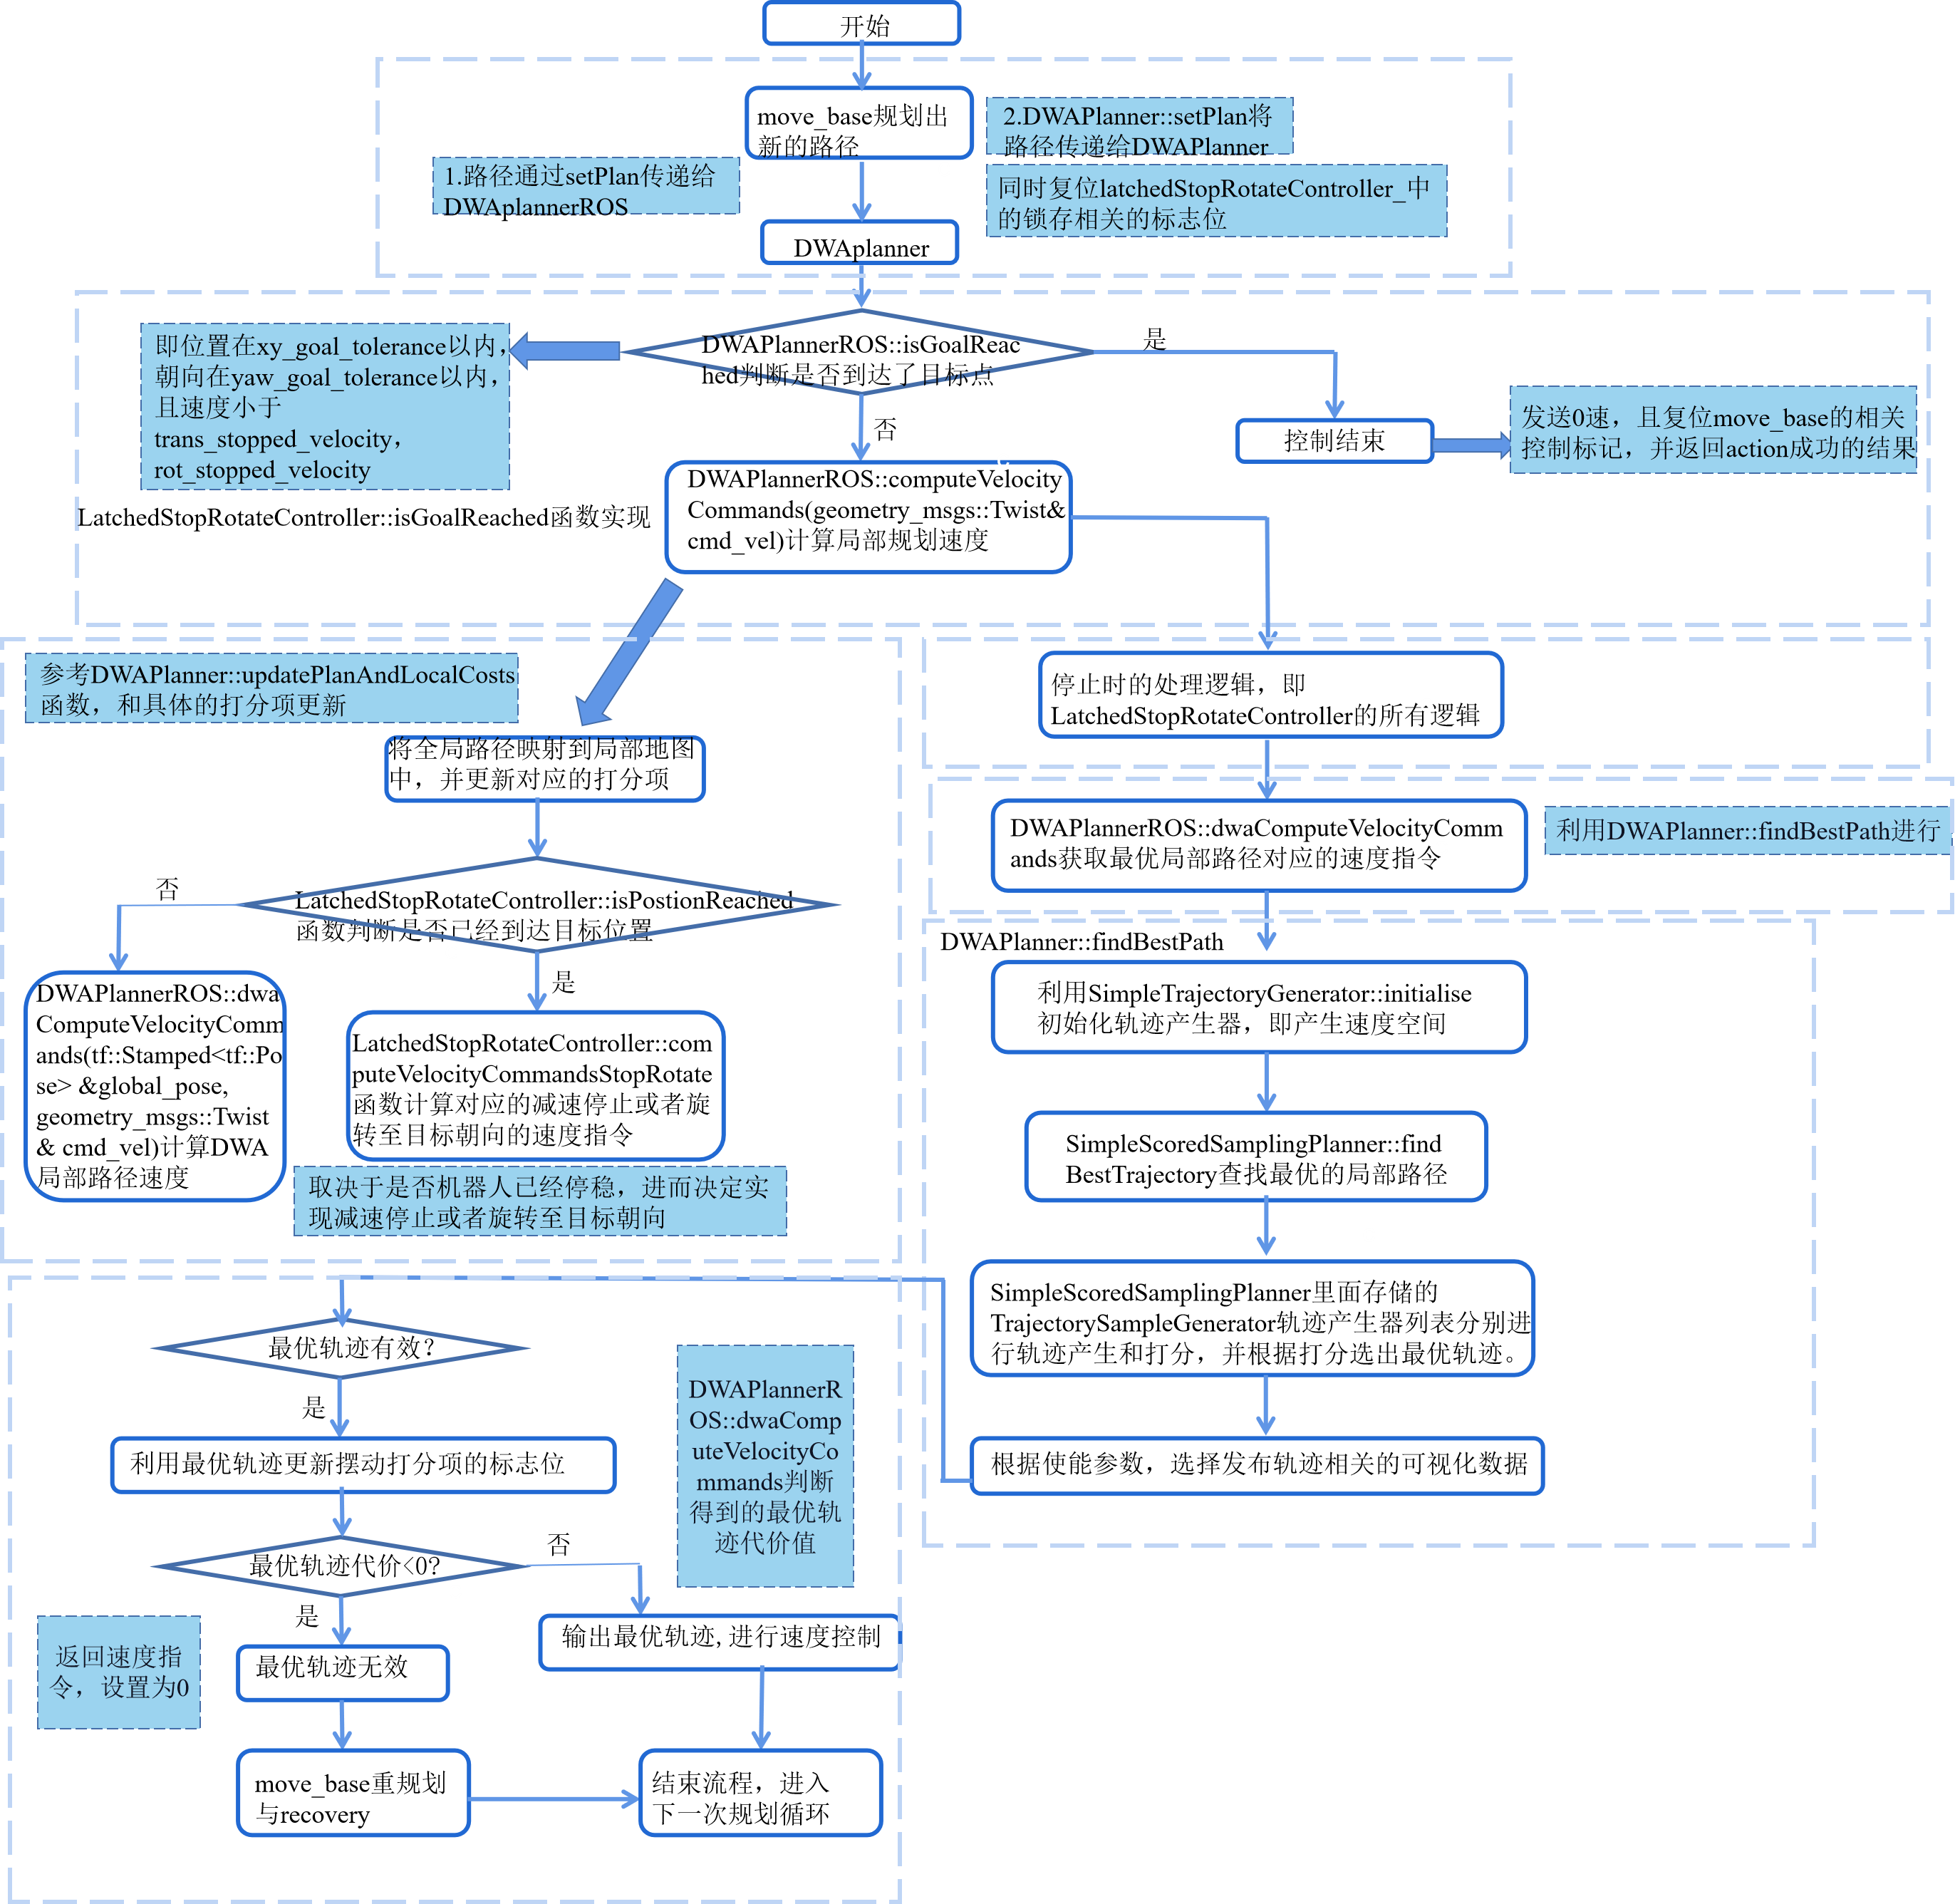
在move base控制循环中会在规划出新的路径时,将新的全局路径利用setPlan传给DWAPlannerROS,然后调用DWAPlanner::setPlan将路径传递给DWAPlanner(同时复位latchedStopRotateController_中的锁存相关的标志位)。
3.1.2 第二步
  bool DWAPlannerROS::isGoalReached() {
    if (! isInitialized()) {
      ROS_ERROR("This planner has not been initialized, please call initialize() before using this planner");
      return false;
    }
    if ( ! costmap_ros_->getRobotPose(current_pose_)) {
      ROS_ERROR("Could not get robot pose");
      return false;
    }

    if(latchedStopRotateController_.isGoalReached(&planner_util_, odom_helper_, current_pose_)) {
      ROS_INFO("Goal reached");
      return true;
    } else {
      return false;
    }
  }

在运动规划之前,move_base先利用DWAPlannerROS::isGoalReached(内部利用LatchedStopRotateController::isGoalReached函数实现)判断是否已经到达了目标点(即位置在xy_goal_tolerance以内,朝向在yaw_goal_tolerance以内,且速度小于trans_stopped_velocity,rot_stopped_velocity),如果是则控制结束,即发送0速,且复位move_base的相关控制标记,并返回action成功的结果。否则,利用DWAPlannerROS::computeVelocityCommands(geometry_msgs::Twist& cmd_vel)计算局部规划速度
3.1.3 第三步
  bool DWAPlannerROS::computeVelocityCommands(geometry_msgs::Twist& cmd_vel) {
    // dispatches to either dwa sampling control or stop and rotate control, depending on whether we have been close enough to goal
    if ( ! costmap_ros_->getRobotPose(current_pose_)) {
      ROS_ERROR("Could not get robot pose");
      return false;
    }
    std::vector<geometry_msgs::PoseStamped> transformed_plan;
    if ( ! planner_util_.getLocalPlan(current_pose_, transformed_plan)) {
      ROS_ERROR("Could not get local plan");
      return false;
    }

    //if the global plan passed in is empty... we won't do anything
    if(transformed_plan.empty()) {
      ROS_WARN_NAMED("dwa_local_planner", "Received an empty transformed plan.");
      return false;
    }
    ROS_DEBUG_NAMED("dwa_local_planner", "Received a transformed plan with %zu points.", transformed_plan.size());

    // update plan in dwa_planner even if we just stop and rotate, to allow checkTrajectory
    dp_->updatePlanAndLocalCosts(current_pose_, transformed_plan, costmap_ros_->getRobotFootprint());

    if (latchedStopRotateController_.isPositionReached(&planner_util_, current_pose_)) {
      //publish an empty plan because we've reached our goal position
      std::vector<geometry_msgs::PoseStamped> local_plan;
      std::vector<geometry_msgs::PoseStamped> transformed_plan;
      publishGlobalPlan(transformed_plan);
      publishLocalPlan(local_plan);
      base_local_planner::LocalPlannerLimits limits = planner_util_.getCurrentLimits();
      return latchedStopRotateController_.computeVelocityCommandsStopRotate(
          cmd_vel,
          limits.getAccLimits(),
          dp_->getSimPeriod(),
          &planner_util_,
          odom_helper_,
          current_pose_,
          boost::bind(&DWAPlanner::checkTrajectory, dp_, _1, _2, _3));
    } else {
      bool isOk = dwaComputeVelocityCommands(current_pose_, cmd_vel);
      if (isOk) {
        publishGlobalPlan(transformed_plan);
      } else {
        ROS_WARN_NAMED("dwa_local_planner", "DWA planner failed to produce path.");
        std::vector<geometry_msgs::PoseStamped> empty_plan;
        publishGlobalPlan(empty_plan);
      }
      return isOk;
    }
  }

在DWAPlannerROS::computeVelocityCommands(geometry_msgs::Twist& cmd_vel)中,会先将全局路径映射到局部地图中,并更新对应的打分项(参考DWAPlanner::updatePlanAndLocalCosts函数,和具体的打分项更新)。然后,利用LatchedStopRotateController::isPostionReached函数判断是否已经到达目标位置,如果是,则利用LatchedStopRotateController::computeVelocityCommandsStopRotate函数计算对应的减速停止或者旋转至目标朝向的速度指令(取决于是否机器人已经停稳,进而决定实现减速停止或者旋转至目标朝向),否则利用DWAPlannerROS::dwaComputeVelocityCommands(tf::Stampedtf::Pose &global_pose, geometry_msgs::Twist& cmd_vel)计算DWA局部路径速度。
3.1.4 第四步
对于停止时的处理逻辑,即LatchedStopRotateController的所有逻辑
3.1.5 第五步
bool DWAPlannerROS::dwaComputeVelocityCommands(geometry_msgs::PoseStamped &global_pose, geometry_msgs::Twist& cmd_vel) {
    // dynamic window sampling approach to get useful velocity commands
    if(! isInitialized()){
      ROS_ERROR("This planner has not been initialized, please call initialize() before using this planner");
      return false;
    }

    geometry_msgs::PoseStamped robot_vel;
    odom_helper_.getRobotVel(robot_vel);

    /* For timing uncomment
    struct timeval start, end;
    double start_t, end_t, t_diff;
    gettimeofday(&start, NULL);
    */

    //compute what trajectory to drive along
    geometry_msgs::PoseStamped drive_cmds;
    drive_cmds.header.frame_id = costmap_ros_->getBaseFrameID();

    // call with updated footprint
    base_local_planner::Trajectory path = dp_->findBestPath(global_pose, robot_vel, drive_cmds);
    //ROS_ERROR("Best: %.2f, %.2f, %.2f, %.2f", path.xv_, path.yv_, path.thetav_, path.cost_);

    /* For timing uncomment
    gettimeofday(&end, NULL);
    start_t = start.tv_sec + double(start.tv_usec) / 1e6;
    end_t = end.tv_sec + double(end.tv_usec) / 1e6;
    t_diff = end_t - start_t;
    ROS_INFO("Cycle time: %.9f", t_diff);
    */

    //pass along drive commands
    cmd_vel.linear.x = drive_cmds.pose.position.x;
    cmd_vel.linear.y = drive_cmds.pose.position.y;
    cmd_vel.angular.z = tf2::getYaw(drive_cmds.pose.orientation);

    //if we cannot move... tell someone
    std::vector<geometry_msgs::PoseStamped> local_plan;
    if(path.cost_ < 0) {
      ROS_DEBUG_NAMED("dwa_local_planner",
          "The dwa local planner failed to find a valid plan, cost functions discarded all candidates. This can mean there is an obstacle too close to the robot.");
      local_plan.clear();
      publishLocalPlan(local_plan);
      return false;
    }

    ROS_DEBUG_NAMED("dwa_local_planner", "A valid velocity command of (%.2f, %.2f, %.2f) was found for this cycle.",
                    cmd_vel.linear.x, cmd_vel.linear.y, cmd_vel.angular.z);

    // Fill out the local plan
    for(unsigned int i = 0; i < path.getPointsSize(); ++i) {
      double p_x, p_y, p_th;
      path.getPoint(i, p_x, p_y, p_th);

      geometry_msgs::PoseStamped p;
      p.header.frame_id = costmap_ros_->getGlobalFrameID();
      p.header.stamp = ros::Time::now();
      p.pose.position.x = p_x;
      p.pose.position.y = p_y;
      p.pose.position.z = 0.0;
      tf2::Quaternion q;
      q.setRPY(0, 0, p_th);
      tf2::convert(q, p.pose.orientation);
      local_plan.push_back(p);
    }

    //publish information to the visualizer

    publishLocalPlan(local_plan);
    return true;
  }
对于DWAPlannerROS::dwaComputeVelocityCommands(tf::Stampedtf::Pose &global_pose, geometry_msgs::Twist& cmd_vel)函数,直接利用
DWAPlanner::findBestPath(
	      tf::Stamped<tf::Pose> global_pose,
	      tf::Stamped<tf::Pose> global_vel,
	      tf::Stamped<tf::Pose>& drive_velocities,
	      std::vector<geometry_msgs::Point> footprint_spec)
获取最优局部路径对应的速度指令。
3.1.6 第六步

在DWAPlanner::findBestPath函数中,先利用
SimpleTrajectoryGenerator::initialise(
      const Eigen::Vector3f& pos,
      const Eigen::Vector3f& vel,
      const Eigen::Vector3f& goal,
      base_local_planner::LocalPlannerLimits* limits,
      const Eigen::Vector3f& vsamples,
      bool discretize_by_time = false)
初始化轨迹产生器,即产生速度空间。
然后,利用SimpleScoredSamplingPlanner::findBestTrajectory(Trajectory& traj, std::vector* all_explored = 0)查找最优的局部路径。在该函数中,先调用每个打分项的prepare函数进行准备,参考“打分”章节。然后,利用SimpleScoredSamplingPlanner里面存储的TrajectorySampleGenerator轨迹产生器列表(目前,只有SimpleTrajectoryGenerator一个产生器)分别进行轨迹产生和打分,并根据打分选出最优轨迹。对于每个轨迹的打分,调用SimpleScoredSamplingPlanner::scoreTrajectory执行,在该函数中,遍历各个打分项进行打分并进行求和,如果某个打分项打分小于0,则将该负值作为路径打分项进行立刻返回。在对每个打分项打分之前,先获取对应的scale参数,如果scale为0证明该打分项无效,则跳过。如果获取到正常的打分项打分后(利用打分项的scoreTrajectory函数),将打分项乘以对应的scale作为最终的打分项打分。
具体的速度采样和轨迹规划参考“运动规划”章节。
3.1.7 第七步

接着在DWAPlanner::findBestPath中,根据使能参数,选择发布轨迹相关的可视化数据。
然后,如果最优轨迹有效,则利用最优轨迹更新摆动打分项的标志位。
最后,在返回最优规划轨迹之前,判断最优轨迹代价,如果代价小于0,则代表最优轨迹无效,即没有有效轨迹,则将返回速度指令,设置为0。
3.1.8 第八步
最后,DWAPlannerROS::dwaComputeVelocityCommands会判断得到的最优轨迹代价值,如果小于0,则该函数会返回false,从而引起move_base进行进一步的处理,如重新规划、recovery等。
3.1.9 第九步
至此,完成了整个dwa local planner的流程。
总的流程如下
参考文献
[1] ROS-Navigation包中DWA算法研究一(DWA算法介绍)
[2] ROS Navigation-----DWA
[3] ROS 机器人导航调参手册
[4] ROS源码阅读—局部路径规划之DWAPlannerROS分析
[5] ros局部路径规划器dwa
