1.导航组件
导航栏位置可以调整,导航栏位置

@Entry
@Component
struct t1 {
  build() {
    Tabs(){
      TabContent() {
        Text('qwer')
      }
      .tabBar("首页")
      TabContent() {
        Text('发现内容')
      }
      .tabBar('发现')
      TabContent() {
        Text('我的内容')
      }
      .tabBar("我的")
    }
    // 做平板适配的
    .vertical(false)
  }
}
可滚动就是加个方法即可
.barMode(BarMode.Scrollable)
自定义导航 @Build 表示组件ui的复用,相当于抽取出来个组件,差不多的意思。
ArkUI还提供了⼀种更轻量的UI元素复用机制 @Builder , @Builder 所装饰的函数遵循
build() 函数语法规则,开发者可以将重复使用的UI元素抽象成⼀个方法,在build方法里调用。
Image(this.currentIndex === index ? iconSelected : icon)
这句话我们知道选的是哪个tags,根据index
这个是什么意思,是当前导航栏的意思吗?
.onChange((index) => {
this.currentIndex = index;
})
@Entry
@Component
struct BarCustomPage {
  @State currentIndex: number = 0;

  build() {
    Tabs() {
      TabContent() {
        Text('首页')
      }.tabBar(this.barBuilder(0, '主页', $r('app.media.icon_home'), $r('app.media.icon_home_selected')))

      TabContent() {
        Text('消息')
      }.tabBar(this.barBuilder(1, '消息', $r('app.media.icon_message'), $r('app.media.icon_message_selected')))

      TabContent() {
        Text('我的')
      }.tabBar(this.barBuilder(2, '我的', $r('app.media.icon_mine'), $r('app.media.icon_mine_selected')))
    }.barPosition(BarPosition.End)
    .onChange((index) => {
      this.currentIndex = index;
    })
  }

  @Builder barBuilder(index: number, title: string, icon: Resource, iconSelected: Resource) {
    Column() {
      Image(this.currentIndex === index ? iconSelected : icon)
        .width(25)
        .height(25)
      Text(title)
        .fontColor(this.currentIndex === index ? '#0491d1' : '#8a8a8a')
        .fontWeight(FontWeight.Medium)
    }
  }
}
上面为什么tarBar可以放个函数进去
tarbar源码需要的参数,我发现这鸿蒙感觉和java太像了没啥意思,听这课无聊的批爆,不推荐大家学。
这源码说了,tarbar可以给的参数有string,resource,customerbuild(这个是个回调函数),或者{。。。。}这个意思是有以下参数的函数。

2.页面路由
给每个页面配个唯一标识,然后让他跳。
router模块提供了两种跳转模式,分别是router.pushUrl()和router.replaceUrl(),这两种模式的区别在于是否保留当前页的状态。pushUrl()会将当前页面压入历史页面栈,因此使用该方法跳转到目标页面之后,还可以再返回。而replaceUrl(),会直接销毁当前页面并释放资源,然后用目标页替换当前页,因此使用该方法跳转到目标页面后,不能返回。
页面栈什么意思?
栈底,栈顶,相当于有一个栈,里面可以存多个页面,可以回滚页面,初始的页面就放栈底?比如首页点登录,push到登录页面,因为要回首页,登录成功,回首页就replace,把登录干掉就行了,不要回滚。
页面跳转,这个文件看,在main_pages.json中配置自己的路由和vue差不多,你要用哪些路由在这个文件配置

或者
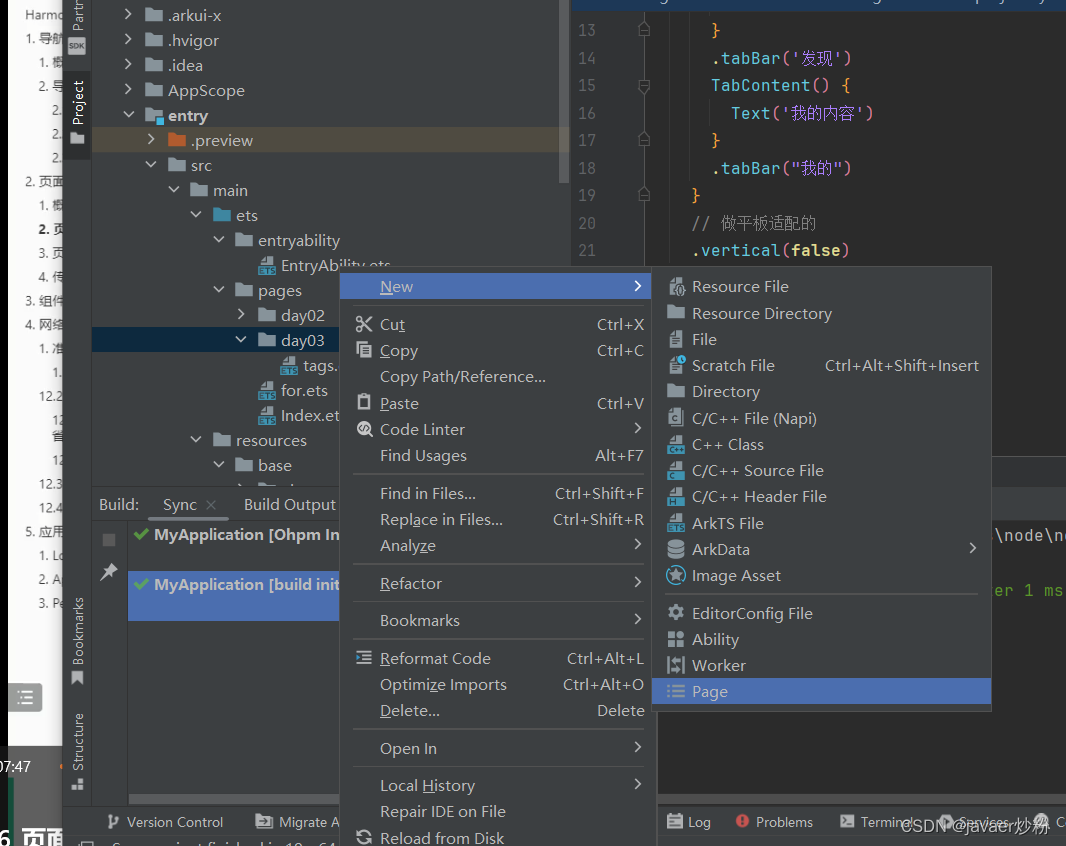 它会自动添加路由
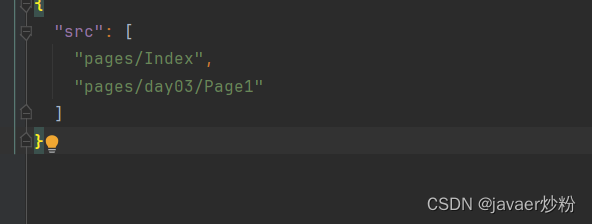
刚才报了个错,如果你要跳的话,你必须要把你准备跳的那个界面同样添加到路由地址那里。
服了,它又不给提示,只有靠自己猜,这点差评,错误提示不明显。
import router from '@ohos.router'
@Entry
@Component
struct t2 {
  build() {
    Row({space:20}){
        Button("11")
          .onClick(()=>{
            router.pushUrl({
              url:"pages/day03/Page1"
            })
          })
    }

  }
}
页面返回
router.back({url:'pages/Index'})
可以指定个路径返回
4.传递参数
可以在调用上述方式时,添加一个params属性,并指定一个对象作为参数
目标页面可通过router.getParams()方法获取参数
对象可以 as来获取对象
也可以不用传对象哈
发送页
import router from '@ohos.router'

export  class ProDto{
  id:number
  productName:string
  price:number

  constructor(id: number, productName: string, price: number) {
    this.id = id
    this.productName = productName
    this.price = price
  }
}
@Entry
@Component
struct t2 {
  build() {
    Row({space:20}){
        Button("11")
          .onClick(()=>{
            router.pushUrl({
              url:"pages/day03/Page1",
              params: new ProDto(1,"wawa",6999)


            })
          })
    }

  }
}
接受方
import router from '@ohos.router';
import { ProDto } from '../day03/T1';
@Entry
@Component
struct Page1 {
  @State message: string = 'Hello World';

  build() {
    RelativeContainer() {
      Text(this.message)
        .id('Page1HelloWorld')
        .fontSize(50)
        .fontWeight(FontWeight.Bold)
        .alignRules({
          center: { anchor: '__container__', align: VerticalAlign.Center },
          middle: { anchor: '__container__', align: HorizontalAlign.Center }
        })
      Button("获取参数")
        .onClick(()=>{
          // let obj :ProDto=()router.getParams() as ProDto;
         let obj:ProDto = router.getParams() as ProDto;
          // console.log(obj.productName)
          console.log(obj.id+"")
          console.log(obj.productName+"")
          console.log(obj.price+"")
        })
    }
    .height('100%')
    .width('100%')
  }
}
组件的构造函数
普通组件的生命周期
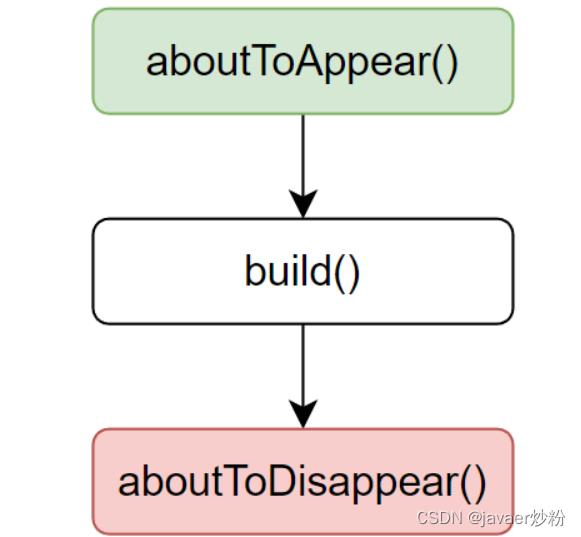
aboutApeear:组件出现之前,build之前
build:构建页面结构
abouttoDisappear:销毁之前,build之后
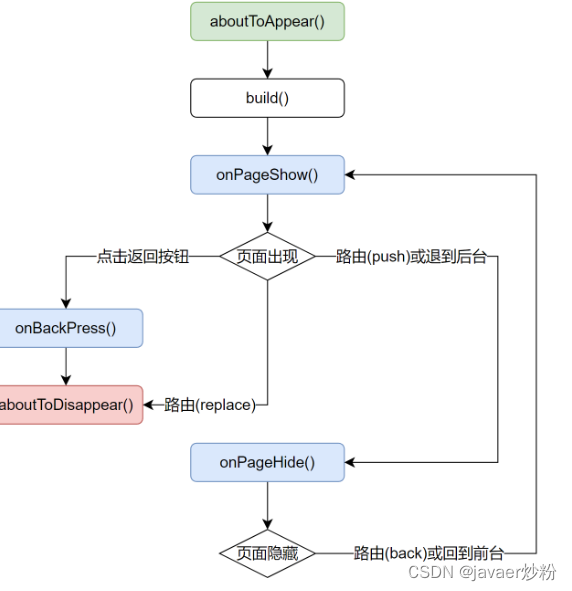
入口组件的生命周期,打了@entry的那个组件
独有的三个
onpageshow:每次页面显示的时候,路由跳转过去,后台进入前台
onpageHide:每次隐藏都会调用一次
onbackpress:每次点击返回按钮会被调用
使用axios
系统权限 用户权限
就手机那些权限
配置权限
开发者需要在entry/src/main/module.json5文件中声明所需权限,具体格式如下
从这英文来看,似乎是什么网络权限,我在想后面,需要什么权限的话,同样也可以在上面配吧。
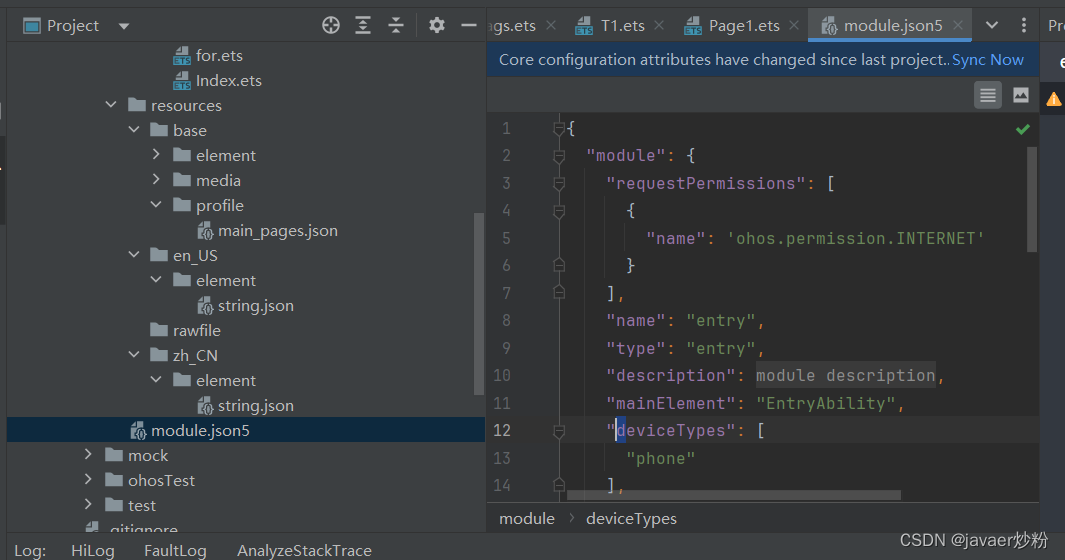
{
  "module": {
    ......
    "requestPermissions": [
      {
        "name": 'ohos.permission.INTERNET'
      }
    ]
  }
}
在terminal安装 ohpm类似于npm
ohpm i @ohos/axios
安装不起,我看有些需要在path路径上添加ohpm,但是我没有添加依旧下起了,不知道为什么
安装好了

const instance = axios.create({
  baseURL: 'http://<ip>:<port>',
  timeout: 2000
})注意:需要根据实际情况替换上述的ip地址和端口号
第二步
创建axios实例后,便可通过该实例的api来发送各种http请求,常用的api定义如下
| api | 功能 |
|---|---|
get(url, config?): Promise | 发送GET请求 |
delete(url, config?): Promise | 发送DELETE请求 |
post(url, data?, config?): Promise | 发送POST请求 |
put(url, data?, config?): Promise | 发送PUT请求 |
第三步返回值也是一样的
then和catch
上述api的返回值类型均为Promise,Promise是JavaScript中用于表示异步操作结果的对象,若操作成功,其中会包含具体结果,若操作失败,其会包含错误的原因。在实际应用中,开发者可以通过该对象的then()方法来处理操作成功时的结果,通过catch()方法来处理操作失败的情况,例如
get(...)
  .then((response:AxiosResponse)=>{
    //处理请求成功的结果
    ...
  })
  .catch((error:AxiosError)=>{
    //处理请求失败的错误
    ...
  })
自己实战测试了下
关于axios传递参数,它可以有多个方式,可以放个对象,也可以其他。
import axios, { AxiosError, AxiosResponse } from '@ohos/axios'

//创建axios实例
const instance = axios.create({
  baseURL: 'http://127.0.0.1:8888',
  timeout: 1000
})

@Entry
@Component
struct AxiosPage {
  @State phone: string = ''
  @State code: string = ''

  build() {
    Column({ space: 40 }) {
      Button('发送验证码')
        .onClick(() => {
          console.log("1322")
          //发送get请求
          instance.get('/t1')
            .then((response:AxiosResponse) => {
              this.code = response.data
              console.log(this.code)
            })
            .catch((error:AxiosResponse) => {
              console.log(error.data)
            })
        })
    }.width('100%')
    .height('100%')
    .justifyContent(FlexAlign.Center)
    .padding(20)
  }
}
成功了哈










![[FreeRTOS 基础知识] 互斥量 概念](https://i-blog.csdnimg.cn/direct/13c74441253f499287398625950c0dfd.png)