介绍
Swagger接口文档是一种自动生成、描述、调用和可视化的RESTful风格Web服务接口文档的工具。它通过一系列的规范和自动化工具,极大地简化了后端开发人员与前端开发人员之间的协作。
依赖
<!--swagger-->
<dependency>
    <groupId>io.springfox</groupId>
    <artifactId>springfox-swagger-ui</artifactId>
    <version>3.0.0</version>
</dependency>
<dependency>
    <groupId>io.springfox</groupId>
    <artifactId>springfox-swagger2</artifactId>
    <version>3.0.0</version>
</dependency>
<dependency>
    <groupId>io.springfox</groupId>
    <artifactId>springfox-boot-starter</artifactId>
    <version>3.0.0</version>
</dependency>
配置类
@EnableSwagger2//开启Swagger2
@Configuration
@EnableWebMvc
public class SwaggerConfig {
    @Bean
    public Docket docket(){
        return new Docket(DocumentationType.SWAGGER_2)
                .select()
                .apis(RequestHandlerSelectors.basePackage("com.mybatis.mybatisplusdemo.controller"))
                .build();
    }
}
启动项目
访问:http://127.0.0.1:8080/swagger-ui/index.html
进入文档
以上就安装好了Swagger
修改配置类
@EnableSwagger2//开启Swagger2
@Configuration
@EnableWebMvc
public class SwaggerConfig {
    @Bean
    public Docket docket(){
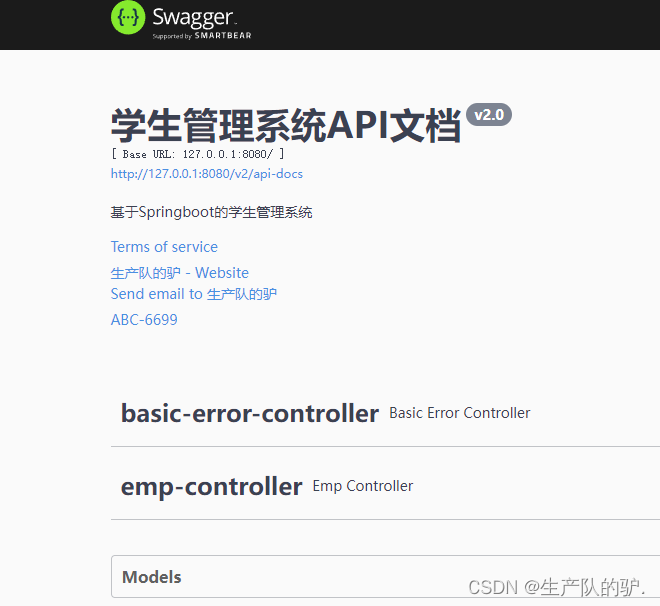
        Contact contact = new Contact("生产队的驴","www.baidu.com","66666@qq.com");//作者信息
        return new Docket(DocumentationType.SWAGGER_2).
                apiInfo(new ApiInfo("学生管理系统API文档",
                        "基于Springboot的学生管理系统",
                        "v2.0",
                        "http://local:8080",
                        contact,
                        "ABC-6699",
                        "www.baidu.com",
                        new ArrayList<>()))
                .select().apis(RequestHandlerSelectors.basePackage("com.mybatis.mybatisplusdemo.controller"))
                //指定扫描的包 只显示该包下的接口 RequestHandlerSelectors:指定扫描的方式
                .build();
    }
}
- RequestHandlerSelectors.basePackage 指定扫描某个包下的接口 一般使用这个
- RequestHandlerSelectors.asy 扫描全部
- RequestHandlerSelectors.none 什么都不扫描
- RequestHandlerSelectors.withMethodAnnotation(RestController.class || GetMapping.class) 扫描类上的注解 只扫描类上有 RestController 注解
- RequestHandlerSelectors.withMethodAnnotation() 扫描方法上的注解
过滤接口
有的接口不需要存在API文档里,可以过滤掉
.paths(PathSelectors.ant("/user/**"))
生产和开发环境
要求API文档只在开发环境中使用,项目上线不显示。
@Bean
public Docket docket(Environment environment){
    Profiles profiles =Profiles.of("dev");//获取环境
   Boolean isOpen= environment.acceptsProfiles(profiles); //是否处于开发环境
    return new Docket(DocumentationType.SWAGGER_2).
    		.select()
    		.enable(isOpen) //是否开启
    		.build()


}
分组
可以构建多个对象 进行分组:如 用户 数据 钱包
.build()
.groupName("用户");
实体类注解
@Data
@ApiModel("部门")
public class Emp {
        @ApiModelProperty("姓名")
        private  String name;
}
只要返回的对象中是实体类就会被扫描到

Controlle注解
@RestController
@RequestMapping("/emp")

public class EmpController {
    @PostMapping()
    @ApiOperation("添加员工")
    public  Result add(@RequestBody  Emp emp){
       Boolean isSuccess= empService.save(emp);
        return  Result.success("操作成功",isSuccess);
    }

}
不在文档显示
@RestController
@RequestMapping("/emp")
@ApiIgnore
public class EmpController {
....
}






![[C++初阶]vector的初步理解](https://img-blog.csdnimg.cn/direct/0e231b4bd62b47ee9f311a7dbd652eed.png)
