目录
源码下载
一、ResNet(Deep Residual Network,深度残差网络)
1.残差结构
编辑
2.ResNet网络结构
3.pytorch搭建ResNet
二、CIFAR-10分类:ResNet预训练权重的迁移学习实践
1.CIFAR-10数据集
2.ResNet18实现CIFAR-10分类
3.训练模型
4.测试结果
三、微调模型(冻结参数训练)
1.以ResNet18为基础搭建目标检测模型
2.模型冻结训练和解冻训练
3.测试结果
源码下载
GitHub - 1578630119/Single_Object_Detection
有时想将深度学习应用于小型图像数据集,一种常用且非常高效的方法是使用预训练网络(pretrained network)。预训练网络是一个保存好的网络,之前已在大型数据集(通常是大规模图像分类任务)上训练好。如果这个原始数据集足够大且足够通用,那么预训练网络学到的特征的空间层次结果可以有效作为视觉世界的通用模型。
简单来说就是一个已经在大规模数据集上训练好的网络模型,它的卷积层的特征提取能力具有通用性,即对没有训练过的类别也有一定的特征提取能力。这些训练好的参数和模型再在自己的数据集进行训练,能较快的收敛同时有较高的准确率。
一、ResNet(Deep Residual Network,深度残差网络)
人们认为卷积层和池化层的层数越多,在图片中提取的特征信息越全,模型的学习效果也越好。但是在实际的实验中发现,不断叠加卷积层和池化层并没有出现学习效果越来越好的情况,随着层数的增加,预测效果反而越来越差。当单方面叠加卷积层和池化层时会出现梯度消失和梯度爆炸的情况。
- 梯度消失:若每一层的误差梯度小于1,反向传播时,网络越深,梯度越趋近于0。
- 梯度爆炸:若每一层的误差梯度大于1,反向传播时,网络越深,梯度越来越大。
ResNet是由微软亚洲研究院的何凯明等人于2015年提出,并在2016年的CVPR会议上获得最佳论文奖。该网络结构主要用于解决深度神经网络在训练过程中的梯度消失和梯度爆炸问题,从而允许网络向更深的方向发展。
1.残差结构

其核心思想是引入残差结构(Residual connections),通过将前面网络层的输入信号直接传递到后面的网络层中,如上图所示,残差结构使得梯度可以更好地在网络中流动,避免了梯度消失的问题。ResNet由多个残差块组成,每个残差块包含两个或多个卷积层,这种设计使得网络可以更加灵活地学习到不同尺度和层次的特征。
class Net(nn.Module):
    def __init__(self):
        super(Net, self).__init__()
        self.conv1=nn.Conv2d(3,32,1)
        self.conv2=nn.Conv2d(32,128,1)
        self.conv3=nn.Conv2d(128,128,3,1,1)
        self.maxpool=nn.MaxPool2d((2,2))
        self.downsample=nn.Conv2d(32,32,1,2)
    def forward(self,x):
        #输入x的形状为(batch_size,channel,height,width) 假设为(8,3,320,320)
        layer1=self.conv1(x)                                #layer1(8,32,320,320)
        layer2=self.conv2(layer1)                           #layer2(8,128,320,320)
        layer3=self.conv3(layer2)                           #layer3(8,128,320,320)
        layer3=self.maxpool(layer3)                         #layer3(8,32,160,160)

        identity=self.downsample(layer1)                    #identity(8,32,160,160)
        layer4=torch.cat((layer3,identity),dim=1)    #layer4(8,160,160,160)
        return layer4
一个简单的残差模块如上面代码和结构图所示,上图的残差模块连接是通过在通道维度上进行融合叠加,前提是保证两边网络层输出特征图的尺度一致,即长宽一致,这种残差连接有效的减少梯度消失的情况。
2.ResNet网络结构
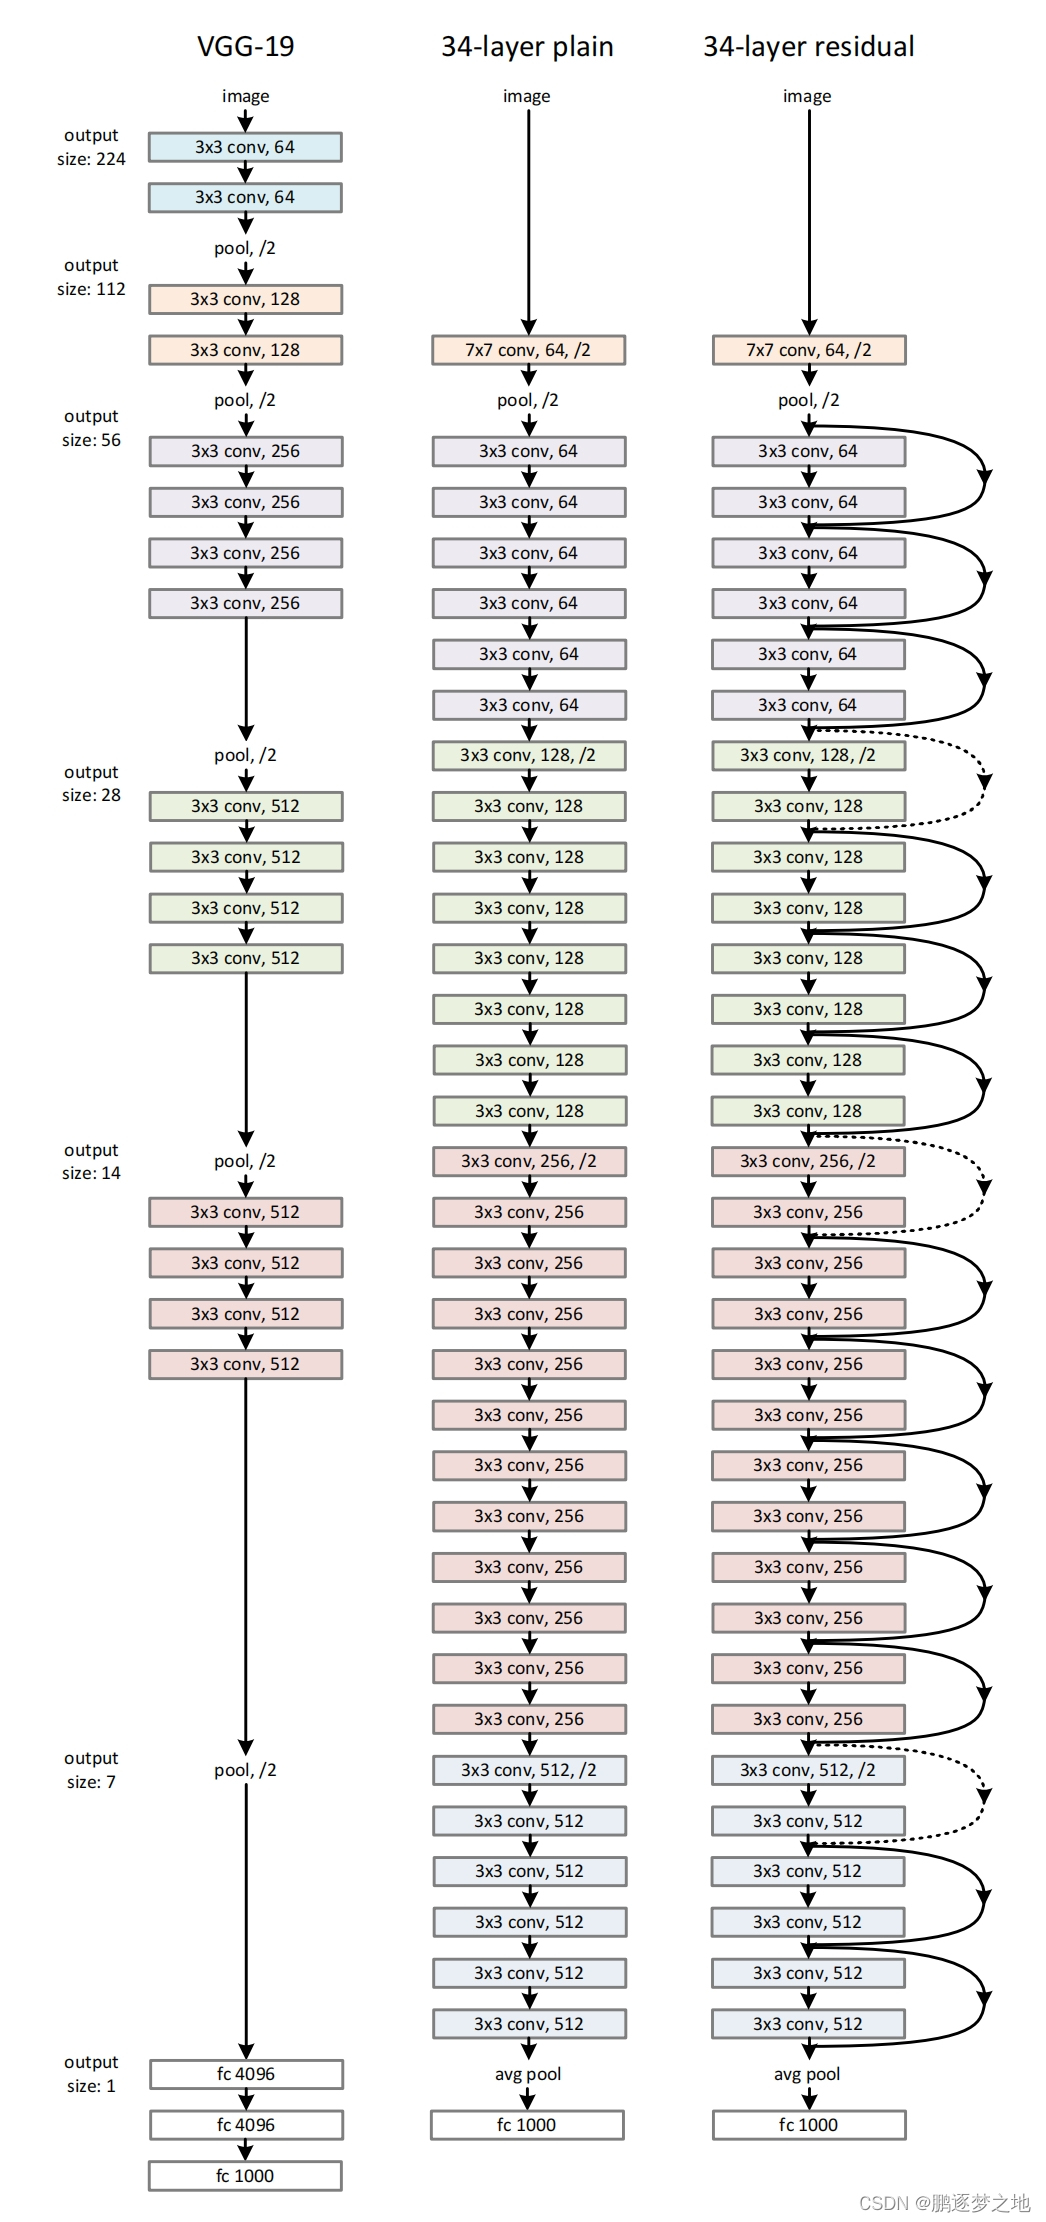
VGG-19和ResNet34的网络结构
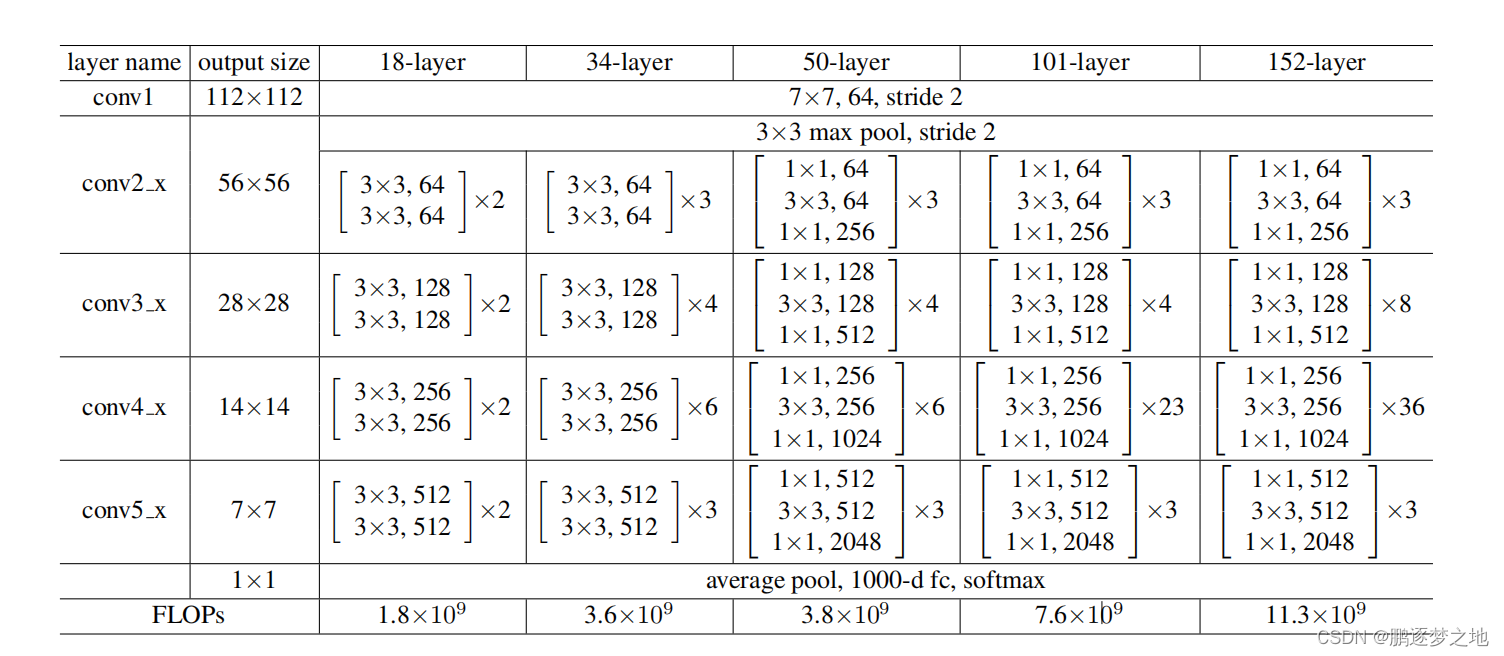
ResNet有多个版本,包括ResNet18、ResNet34、ResNet50,ResNet101,ResNet152,ResNet后面的数字代表该版本的ResNet网络中的神经网络层数,各个版本的ResNet的网络结构如下所示,不同的ResNet版本的网络结构有所差距,但每个都采用了残差结构,最后一层卷积层的输出是将输入图像的宽高皆缩放为原本的1/32,只有通道数不相同。
3.pytorch搭建ResNet
在pytorch中可以通过torchvision来调用各个版本的ResNet,如下代码所示:
from torchvision import models

ResNet18 = models.resnet18(pretrained=False) #设置为True则使用预训练权重
ResNet34 = models.resnet34(pretrained=False)
ResNet50 = models.resnet50(pretrained=False)
ResNet101 = models.resnet101(pretrained=False)
ResNet152 = models.resnet152(pretrained=False)
其中的pretrained参数代表是否使用预训练权重,如果使用,则会下载相对于的权重加载到模型之中,这些预训练权重都是在ImageNet数据集中训练得到的。ImageNet是一个非常大的图像数据集,包含超过1400万幅图片,涵盖超过2万个类别,ResNet通过在ImageNet等大型图像分类任务上训练,可以学习到一些通用的特征和模式,这些特征和模式可以被转移到其他任务中,使得其他任务的模型更快地收敛,并提高模型的泛化能力。
也可以自己搭建ResNet网络,以下是直接代码搭建ResNet50:
import torch
import torch.nn as nn
from torch.hub import load_state_dict_from_url

#这两个模块(conv3x3和conv1x1)用于残差链接
def conv3x3(in_planes, out_planes, stride=1, groups=1, dilation=1):
    return nn.Conv2d(in_planes, out_planes, kernel_size=3, stride=stride,
                     padding=dilation, groups=groups, bias=False, dilation=dilation)
def conv1x1(in_planes, out_planes, stride=1):
    return nn.Conv2d(in_planes, out_planes, kernel_size=1, stride=stride, bias=False)


class Bottleneck(nn.Module): #残差模块
    expansion = 4

    def __init__(self, inplanes, planes, stride=1, downsample=None, groups=1,
                 base_width=64, dilation=1, norm_layer=None):
        super(Bottleneck, self).__init__()
        if norm_layer is None:
            norm_layer = nn.BatchNorm2d
        width = int(planes * (base_width / 64.)) * groups
        self.conv1 = conv1x1(inplanes, width)
        self.bn1 = norm_layer(width)
        self.conv2 = conv3x3(width, width, stride, groups, dilation)
        self.bn2 = norm_layer(width)
        self.conv3 = conv1x1(width, planes * self.expansion)
        self.bn3 = norm_layer(planes * self.expansion)
        self.relu = nn.ReLU(inplace=True)
        self.downsample = downsample
        self.stride = stride

    def forward(self, x):
        identity = x

        out = self.conv1(x)
        out = self.bn1(out)
        out = self.relu(out)

        out = self.conv2(out)
        out = self.bn2(out)
        out = self.relu(out)

        out = self.conv3(out)
        out = self.bn3(out)

        if self.downsample is not None:
            identity = self.downsample(x)

        out += identity
        out = self.relu(out)

        return out


class ResNet(nn.Module):

    def __init__(self, block, layers, num_classes=1000, zero_init_residual=False,
                 groups=1, width_per_group=64, replace_stride_with_dilation=None,
                 norm_layer=None):
        super(ResNet, self).__init__()
        if norm_layer is None:
            norm_layer = nn.BatchNorm2d
        self._norm_layer = norm_layer

        self.inplanes = 64
        self.dilation = 1
        if replace_stride_with_dilation is None:
            replace_stride_with_dilation = [False, False, False]

        if len(replace_stride_with_dilation) != 3:
            raise ValueError("replace_stride_with_dilation should be None "
                             "or a 3-element tuple, got {}".format(replace_stride_with_dilation))
        self.groups = groups
        self.base_width = width_per_group
        self.conv1 = nn.Conv2d(3, self.inplanes, kernel_size=7, stride=2, padding=3,
                               bias=False)
        self.bn1 = norm_layer(self.inplanes)
        self.relu = nn.ReLU(inplace=True)
        self.maxpool = nn.MaxPool2d(kernel_size=3, stride=2, padding=1)
        self.layer1 = self._make_layer(block, 64, layers[0])
        self.layer2 = self._make_layer(block, 128, layers[1], stride=2,
                                       dilate=replace_stride_with_dilation[0])
        self.layer3 = self._make_layer(block, 256, layers[2], stride=2,
                                       dilate=replace_stride_with_dilation[1])
        self.layer4 = self._make_layer(block, 512, layers[3], stride=2,
                                       dilate=replace_stride_with_dilation[2])
        self.avgpool = nn.AdaptiveAvgPool2d((1, 1))
        self.fc = nn.Linear(512 * block.expansion, num_classes)

        for m in self.modules():
            if isinstance(m, nn.Conv2d):
                nn.init.kaiming_normal_(m.weight, mode='fan_out', nonlinearity='relu')
            elif isinstance(m, (nn.BatchNorm2d, nn.GroupNorm)):
                nn.init.constant_(m.weight, 1)
                nn.init.constant_(m.bias, 0)

        if zero_init_residual:
            for m in self.modules():
                if isinstance(m, Bottleneck):
                    nn.init.constant_(m.bn3.weight, 0)

    def _make_layer(self, block, planes, blocks, stride=1, dilate=False):
        norm_layer = self._norm_layer
        downsample = None
        previous_dilation = self.dilation
        if dilate:
            self.dilation *= stride
            stride = 1
        if stride != 1 or self.inplanes != planes * block.expansion:
            downsample = nn.Sequential(
                conv1x1(self.inplanes, planes * block.expansion, stride),
                norm_layer(planes * block.expansion),
            )

        layers = []
        layers.append(block(self.inplanes, planes, stride, downsample, self.groups,
                            self.base_width, previous_dilation, norm_layer))
        self.inplanes = planes * block.expansion
        for _ in range(1, blocks):
            layers.append(block(self.inplanes, planes, groups=self.groups,
                                base_width=self.base_width, dilation=self.dilation,
                                norm_layer=norm_layer))

        return nn.Sequential(*layers)

    def forward(self, x):
        x = self.conv1(x)
        x = self.bn1(x)
        x = self.relu(x)
        x = self.maxpool(x)

        x = self.layer1(x)
        x = self.layer2(x)
        x = self.layer3(x)
        x = self.layer4(x)

        x = self.avgpool(x)
        x = torch.flatten(x, 1)
        x = self.fc(x)

        return x


def resnet50(pretrained=False, progress=True, num_classes=1000):
    model = ResNet(Bottleneck, [3, 4, 6, 3])    #对应ResNet论文中conv2_x、conv3_x、conv4_x、conv5_x调用Bottleneck次数
    model_urls = {
        'resnet50': 'https://download.pytorch.org/models/resnet50-19c8e357.pth',
    }#预训练权重下载地址

    if pretrained:
        state_dict = load_state_dict_from_url(model_urls['resnet50'], model_dir='./model_data',
                                              progress=progress)
        model.load_state_dict(state_dict)   #加载预训练权重

    if num_classes != 1000: #当前分类任务的类别如果不等于1000
        model.fc = nn.Linear(512 * model.block.expansion, num_classes) #重搭全连接层
    return model


if __name__ == "__main__":
    resnet=resnet50(pretrained=True)
二、CIFAR-10分类:ResNet预训练权重的迁移学习实践
1.CIFAR-10数据集
CIFAR-10是一个常用于图像识别的小型数据集,由10个类别的60000张32x32彩色图像组成,每个类别有6000张图像。这个数据集被分为50000张训练图像和10000张测试图像,是计算机视觉领域的一个基准数据集。CIFAR-10的10个类别是:
- 飞机(airplane)
- 汽车(automobile)
- 鸟(bird)
- 猫(cat)
- 鹿(deer)
- 狗(dog)
- 蛙(frog)
- 马(horse)
- 船(ship)
- 卡车(trunk)
在pytorch1中加载CIFAR-10方法如下:
import torchvision

train_data = torchvision.datasets.CIFAR10(root='./data', train=True, transform=torchvision.transforms.ToTensor(),
                                              download=True)
    test_data = torchvision.datasets.CIFAR10(root='./data', train=False, transform=torchvision.transforms.ToTensor(),
                                             download=True)
2.ResNet18实现CIFAR-10分类
ResNet18模型的全连接层是处理ImageNet数据集而设置的输出结果有1000个类,因此在我们加载好ResNet的权重参数后还需要将最后一层全连接层重写,设置为输出结果为10个类。代码如下:
import torchvision
from torch import nn

def Net():
    resnet18 = torchvision.models.resnet18(pretrained=True) #调用ResNet18,并加载预训练权重
    #print(resnet18)    #打印模型结构,可以看见最后一层输出的1000个结果
    resnet18.fc = nn.Linear(512, 10)  # 重搭全连接层
    return resnet18
3.训练模型
import torchvision
import torch
from torch import nn
import torch.nn.functional as F
import numpy as np
import cv2
from torch import optim
from tqdm import tqdm
import matplotlib.pyplot as plt

learning_rate = 0.001  # 学习率
momentum = 0.5  # 使用optim.SGD(随机梯度下降)优化器时,momentum是一个重要的参数。它代表了动量(Momentum)的大小,是动量优化算法中的一个关键概
train_batch_size = 32
eval_batch_size = 128
test_batch_size = 128
trainset = torchvision.datasets.CIFAR10('./data/', train=True, download=True,  # 训练集下载
                                        transform=torchvision.transforms.Compose([
                                            torchvision.transforms.ToTensor(),  # 转换数据类型为Tensor
                                        ]))

# ------------------------------------------------------------------#
#       将训练集再划分为训练集和测试集(训练集:测试集=4:1)    #
# ------------------------------------------------------------------#
train_size = len(trainset)
indices = list(range(train_size))

# 划分索引
split = int(0.8 * train_size)
train_indices, val_indices = indices[:split], indices[split:]

# 创建训练集和验证集的子集
trainset_subset = torch.utils.data.Subset(trainset, train_indices)
valset_subset = torch.utils.data.Subset(trainset, val_indices)

# 创建数据加载器
train_loader = torch.utils.data.DataLoader(trainset_subset, batch_size=train_batch_size, shuffle=True)
eval_loader = torch.utils.data.DataLoader(valset_subset, batch_size=eval_batch_size, shuffle=False)
test_loader = torch.utils.data.DataLoader(
    torchvision.datasets.CIFAR10('./data/', train=False, download=True,  # 测试集下载
                                 transform=torchvision.transforms.Compose([
                                     torchvision.transforms.ToTensor(),
                                 ])),
    batch_size=test_batch_size, shuffle=True)


def Net():
    resnet18 = torchvision.models.resnet18(pretrained=True) #调用ResNet18,并加载预训练权重
    #print(resnet18)    #打印模型结构,可以看见最后一层输出的1000个结果
    resnet18.fc = nn.Linear(512, 10)  # 重搭全连接层
    return resnet18


model = Net()
optimizer = optim.SGD(model.parameters(), lr=learning_rate, momentum=momentum)  # 优化器
device = torch.device("cuda" if torch.cuda.is_available() else "cpu")  # 检测电脑是否能使用cuda训练,不行则使用cpu
model = model.to(device)
Train_Loss = []
Eval_Loss = []


def train(epoch, epochs):
    # 训练模型
    train_loss = 0
    model.train()
    pbar = tqdm(total=len(train_loader), desc=f'Epoch {epoch + 1}/{epochs}', mininterval=0.3)
    for batch_idx, (data, target) in enumerate(train_loader):  # 批次,输入数据,标签
        data = data.to(device)
        target = target.to(device)
        optimizer.zero_grad()  # 清空优化器中的梯度
        output = F.log_softmax(model(data), dim=1)  # 前向传播,获得当前模型的预测值
        loss = F.nll_loss(output, target)  # 真实值和预测值之前的损失
        loss.backward()  # 反向传播,计算损失函数关于模型中参数梯度
        optimizer.step()  # 更新模型中参数
        # 输出当前训练轮次,批次,损失等
        Train_Loss.append(loss.item())
        train_loss += loss.item()
        pbar.set_postfix(**{'train loss': train_loss / (batch_idx + 1)})
        pbar.update(1)
    return train_loss / (batch_idx + 1)


def eval(epoch, epochs):
    # 测试模型
    model.eval()
    pbar = tqdm(total=len(eval_loader), desc=f'Epoch {epoch + 1}/{epochs}', mininterval=0.3)
    eval_loss = 0
    with (torch.no_grad()):  # 仅测试模型,禁用梯度计算
        for batch_idx, (data, target) in enumerate(eval_loader):
            data = data.to(device)
            target = target.to(device)
            output = F.log_softmax(model(data), dim=1)
            loss = F.nll_loss(output, target).item()
            eval_loss += loss

            Eval_Loss.append(loss)
            pbar.set_postfix(**{'eval loss': eval_loss / (batch_idx + 1)})
            pbar.update(1)
    return eval_loss / (batch_idx + 1)


def model_fit(epochs):
    best_loss = 1e7
    for epoch in range(epochs):
        train_loss = train(epoch, epochs)
        eval_loss = eval(epoch, epochs)
        print('\nEpoch: {}\tTrain Loss: {:.6f}\tEval Loss: {:.6f}'.format(epoch + 1, train_loss, eval_loss))
        if eval_loss < best_loss:
            best_loss = eval_loss
            torch.save(model.state_dict(), 'model.pth')
    with open("Train_Loss.txt", 'w') as f:
        for num in Train_Loss:
            f.write(str(num) + '\n')
    with open("Eval_Loss.txt", 'w') as f:
        for num in Eval_Loss:
            f.write(str(num) + '\n')


def test():
    # 如果已经训练好了权重,模型直接加载权重文件进行测试#
    model_test = Net()
    model_test.load_state_dict(torch.load('model.pth'))
    model_test.eval()
    test_loss = 0
    correct = 0
    with torch.no_grad():
        for data, target in test_loader:
            output = F.log_softmax(model_test(data),dim=1)
            test_loss += F.nll_loss(output, target, reduction='sum').item()
            pred = output.data.max(1, keepdim=True)[1]
            correct += pred.eq(target.data.view_as(pred)).sum()
    test_loss /= len(test_loader.dataset)
    print('\nTest set: Avg. loss: {:.4f}, Accuracy: {}/{} ({:.0f}%)\n'.format(
        test_loss, correct, len(test_loader.dataset),
        100. * correct / len(test_loader.dataset)))


def demo():
    with open('Train_Loss.txt') as f:
        lines = f.readlines()
    lines = np.array(lines, dtype=np.float32)
    iters = range(1, len(lines) + 1)  # 训练步数(或迭代次数),这里简单用1到损失值的数量来表示

    # 使用plot函数绘制损失图
    plt.plot(iters, lines, marker='.')  # marker='o' 表示在数据点上显示圆圈

    # 添加标题和坐标轴标签
    plt.title('Training Loss')
    plt.xlabel('Iterations')
    plt.ylabel('Loss')

    # 显示网格(可选)
    plt.grid(True)

    # 显示图形
    plt.show()
    model_test = Net()
    examples = enumerate(test_loader)
    batch_idx, (example_data, example_targets) = next(examples)
    with torch.no_grad():
        output = model_test(example_data)
    for i in range(6):
        plt.subplot(2, 3, i + 1)
        plt.tight_layout()
        plt.imshow(example_data[i][0], cmap='gray', interpolation='none')
        plt.title("Prediction: {}".format(output.data.max(1, keepdim=True)[1][i].item()))
        plt.xticks([])
        plt.yticks([])
    plt.show()


if __name__ == "__main__":
    model_fit(100)  #训练100轮
    test()          #测试模型
    demo()          #输出损失图,测试样本
4.测试结果
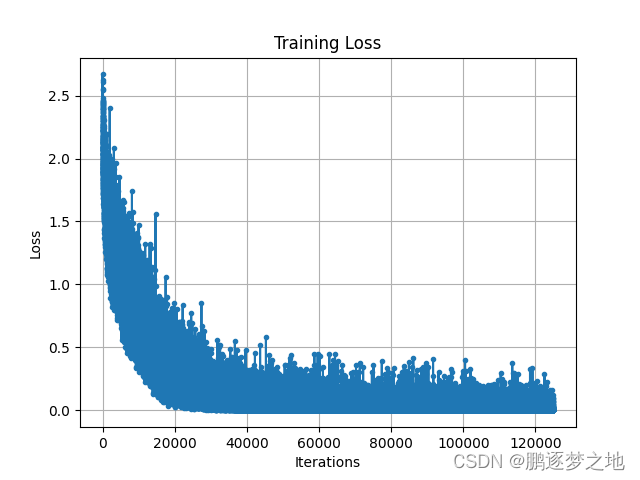
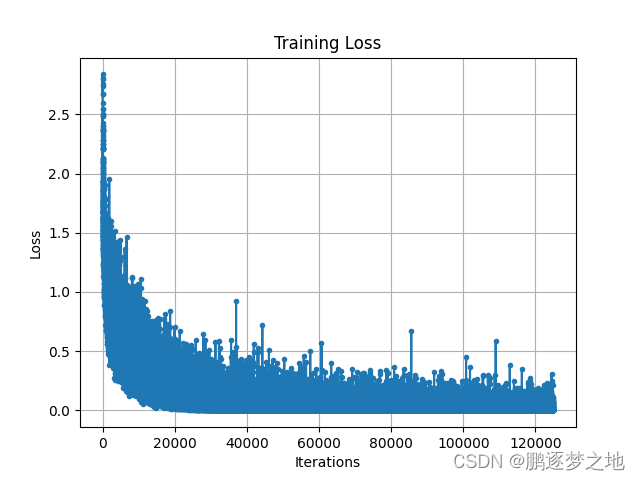
由图可知,在无预训练权重情况下,模型训练迭代约20000次,训练集的损失收敛到最小值附近,而在有预训练权重情况下,模型训练迭代约10000次,训练集的损失收敛到最小值附近。
三、微调模型(冻结参数训练)
微调模型是一种在深度学习领域中常用的技术,这种方法指将其顶部的几层“解冻”,并将这解冻的几层和新增加的部分(新的全连接层)联合训练,其他的层冻结,即仅参与前向传播,并不进行梯度更新,这些网络层的参数会保持一直不变的状态。
在卷积神经网络中,更靠底部的层编码的是更加通用的可复用特征,即这些层在各个任务上是通用的,而更靠顶部的层编码的是更加专业化的特征,即更加针对于当前训练任务的参数。同时,通过冻结大部分参数,可以减少训练过程中的计算量和内存消耗,加快训练速度。在某些情况下,冻结参数还可以作为一种正则化手段,有助于防治模型在新任务上过拟合。
本节将利用之前的小黄人单目标价检测任务来展示微调模型。
1.以ResNet18为基础搭建目标检测模型
class Net_res(nn.Module):
    def __init__(self):
        super(Net_res, self).__init__()
        resnet18=torchvision.models.resnet18(pretrained=True)
        # ----------------------------------------------------------------------------#
        #   获取特征提取部分,从conv1到model.layer3,最终获得一个h/16,w/16,256的特征层
        # ----------------------------------------------------------------------------#
        features = list([resnet18.conv1, resnet18.bn1, resnet18.relu, resnet18.maxpool, resnet18.layer1, resnet18.layer2])
        self.features = nn.Sequential(*features)
        self.layer3=resnet18.layer3
        self.fc1 = nn.Linear(26*20*256, 1024)
        self.fc2 = nn.Linear(1024, 4)


    def forward(self, x):
        x=self.features(x)
        x=self.layer3(x)
        x = x.view(-1, 26*20*256)
        x = F.relu(self.fc1(x))
        x = self.fc2(x)
        return x
以上代码是以ResNet18为基础搭建的神经网络模型,当然大家也可以选择ResNet的其他版本,ResNet的layer4层并没有使用,只使用到ResNet的l第一层到layer3层。此时输出的特征图形状为(batch_size,256,h/16,w/16)。同时重新搭建了全连接层。
2.模型冻结训练和解冻训练
前半部分训练为冻结训练,冻结卷积神经网络中前面的卷积层,只训练最后一部分的卷积层和后面的全连接层,优化器选择Adam。后面部分训练解冻所有网络层,训练整个神经网络,优化器此时选择SGD。
    for param in model.features.parameters():   #冻结网络的features层,即resnet的第一层到layer2层
        param.requires_grad = False
    optimizer = optim.Adam(model.parameters(), lr=1e-3, weight_decay=1e-4)

        for param in model.features.parameters():   #解冻features层
        param.requires_grad = True
    optimizer = optim.SGD(model.parameters(), lr=1e-3, momentum=0.9, weight_decay=1e-4)
3.测试结果

对比上一章自己搭建的简单网络模型,使用ResNet搭建的模型在测试时,不仅损失值更低,预测框也更加精准,模型的每一个预测框基本都能完美的框住目标。


