微服务架构理念
关于微服务的概念、理念及设计相关内容,并没有特别严格的边界和定义,某种意义上说,适合的就是最好的,在之前的文章中有过详细的阐述,微服务[v1.0.0][Spring生态概述]、微服务[设计与运行]、微服务[v1.0.0][服务调用]、微服务[开发生命周期]、微服务[面临的挑战]、架构师修炼系列【微服务】
Spring Cloud基础架构和概念
构建微服务架构其实是一件很复杂的事情,很多企业都不具备这个能力,这不只是技术能力的问题,往往并非因为技术问题导致的困难,在实际工作中时间、人力、成本、各维度的压力都有可能导致微服务体系的建设并不是很顺利,更无法做到彻底,即便是技术驱动的公司也存在诸多困难
为了构建微服务体系,业内有不少的组件可以使用,Spring Cloud就是其中典型之一,它是有Pivotal团队维护的,而这个团队并没有自己造轮子,而是借鉴当前若干企业在长期实践中经过考验的优秀的分布式产品,将这些产品以Spring Boot的形式进行了封装,因此学习Spring Cloud的基础是Spring Boot
在Spring Cloud封装的分布式产品中,是以Netflix为核心的,该公司有大量的分布式经验,也有很多优秀的产品,但随着时代的发展,该公司很多组件都停止了更新,或者更新缓慢,因此Pivotal开始从Spring Cloud中去除Netflix组件,但耗费巨大,只是无论用的组件借鉴了哪里,其包含的思想确是相似的,学好一种或者一套,例如Netflix组件,明确他们的设计思想和应用场景,再看其他的同类组件也是大同小异
Spring Cloud融入了很多组件,而这些组件由各个公司进行开发和维护,版本十分凌乱,且更新不一致,为了对这些组件进行统一管理,Pivotal团队决定使用伦敦地铁站的站名作为版本名,如下表格所示

Spring Cloud架构和组件
Spring Cloud最重要的是其架构和组件,架构是方向,组件是细节
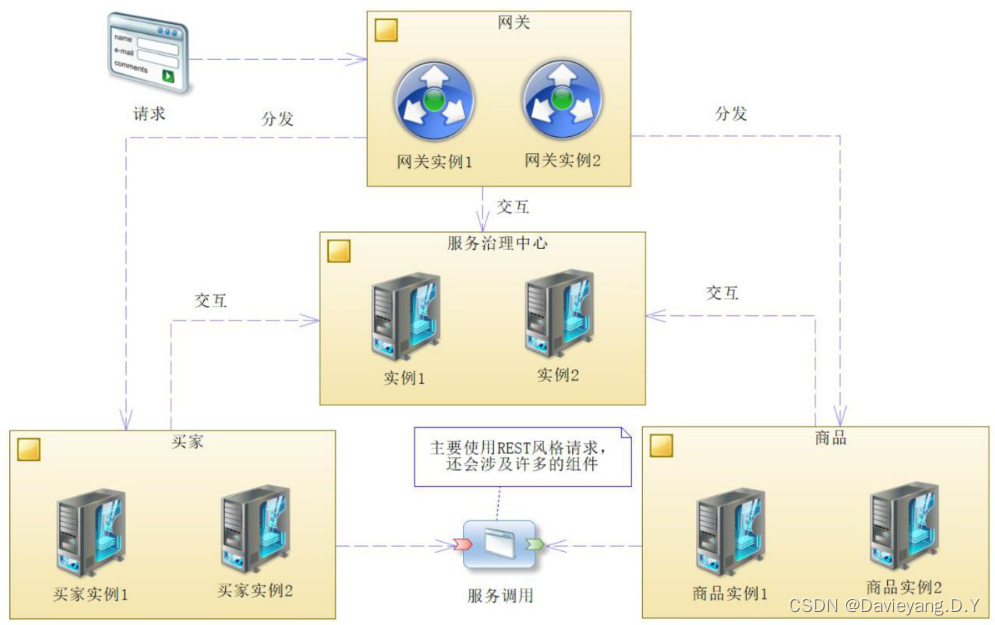
- 服务:
- 服务实例:
- 服务调用:
- 服务治理中心:
- 网关:
- 业务服务:
- 基础服务:
服务治理和服务发现
在Spring Cloud中,服务治理一般是通过Netflix Eureka完成,Pivotal团队将其以Spring Boot的形式封装为Spring Cloud Netflix Eureka,以便能够快速简单的使用,为了展示微服务治理和服务发现,创建如下项目
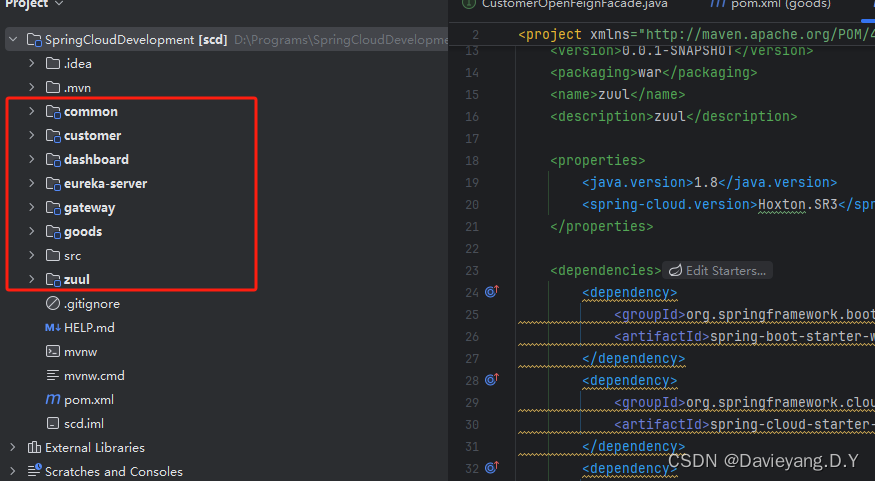
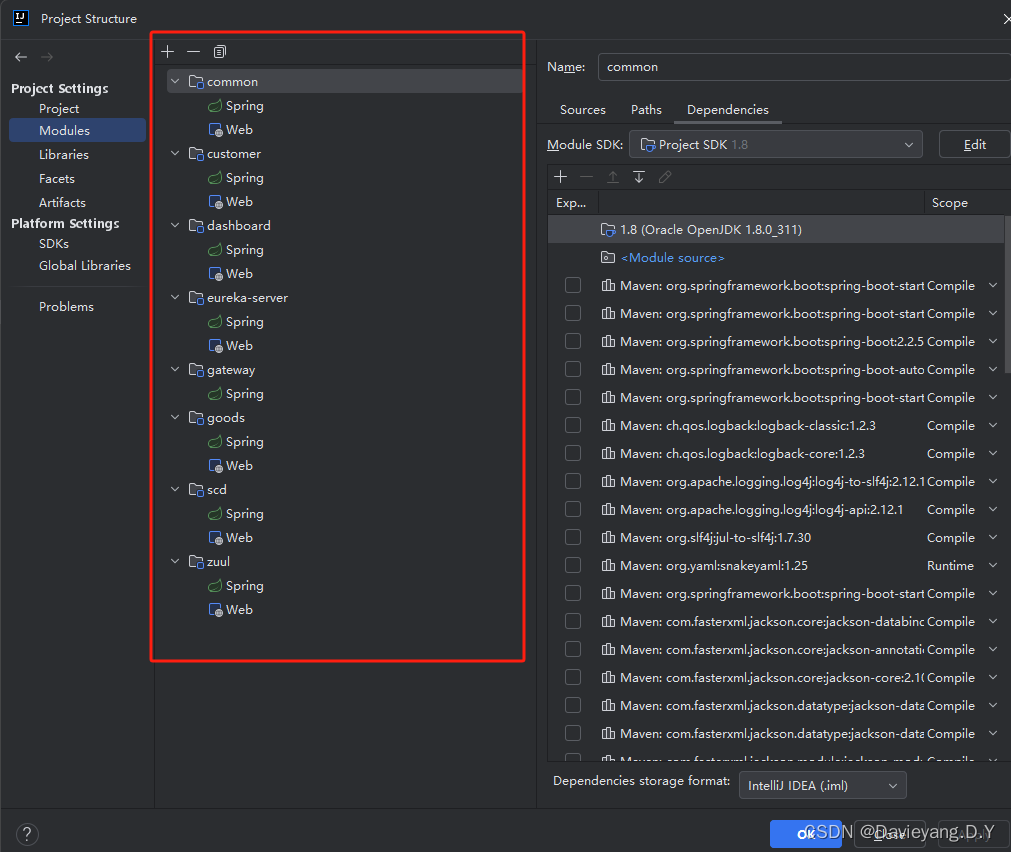
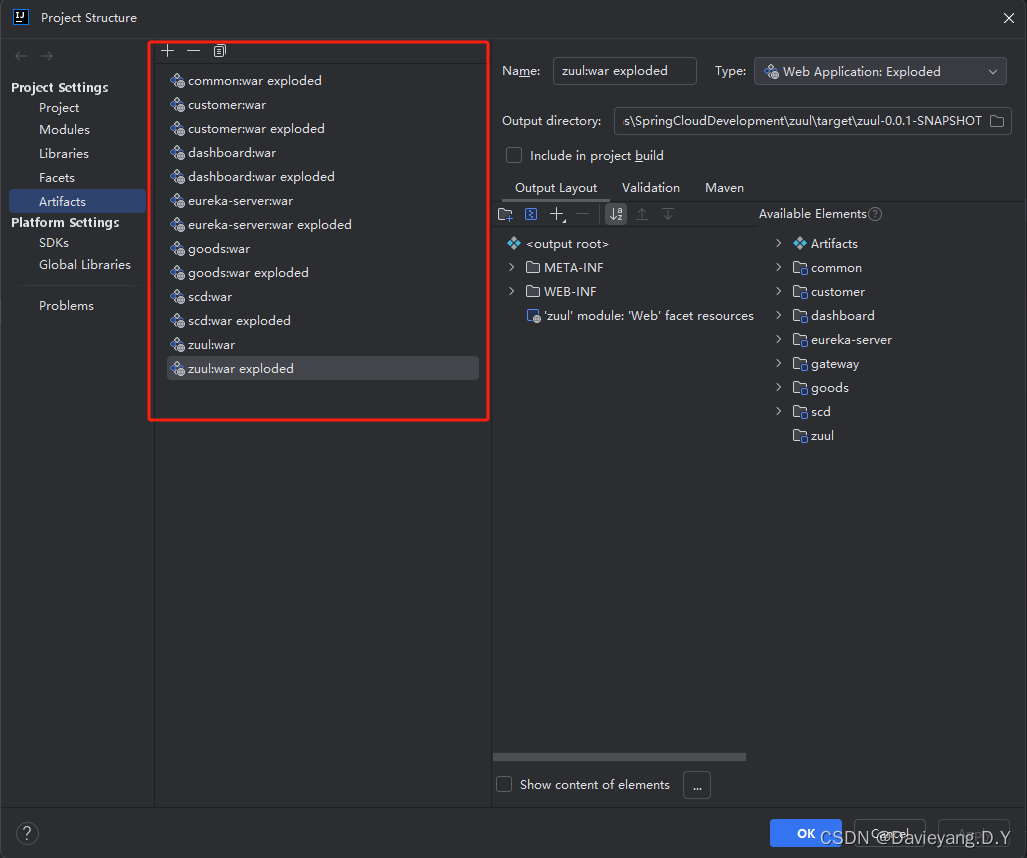
微服务治理中心-Eureka
首先引入相关依赖(因为Eureka是在Web环境下运行的因此也会引入spring-boot-starter-web),如下所示
        <!-- 引入Spring Boot的Webstarter依赖,它为构建Web应用程序提供了必需的组件,包括Servlet容器和Spring Web MVC。 -->
        <dependency>
            <groupId>org.springframework.boot</groupId>
            <artifactId>spring-boot-starter-web</artifactId>
        </dependency>

        <!-- 引入Spring Cloud的Eureka Server starter依赖,用于实现服务注册与发现的功能。 -->
        <!-- 它基于Netflix Eureka,提供了微服务架构中服务之间互相发现和通信的能力。 -->
        <dependency>
            <groupId>org.springframework.cloud</groupId>
            <artifactId>spring-cloud-starter-netflix-eureka-server</artifactId>
        </dependency>
然后修改eureka-server模块的启动类,代码如下
package com.scd.eurekaserver;

import org.springframework.boot.SpringApplication;
import org.springframework.boot.autoconfigure.SpringBootApplication;
import org.springframework.cloud.netflix.eureka.server.EnableEurekaServer;

/**
 * Eureka Server应用程序入口类。
 * 使用@SpringBootApplication注解标记这是一个Spring Boot应用程序,
 * 同时通过@EnableEurekaServer注解启用Eureka Server功能,使得当前应用程序成为一个Eureka注册中心。
 */
@SpringBootApplication
@EnableEurekaServer
public class EurekaServerApplication {


    /**
     * 程序入口方法。
     * 使用SpringApplication.run方法启动Spring Boot应用程序,
     * 参数为当前类和应用程序启动参数。
     *
     * @param args 应用程序启动参数
     */
    public static void main(String[] args) {

        SpringApplication.run(EurekaServerApplication.class, args);
    }
}
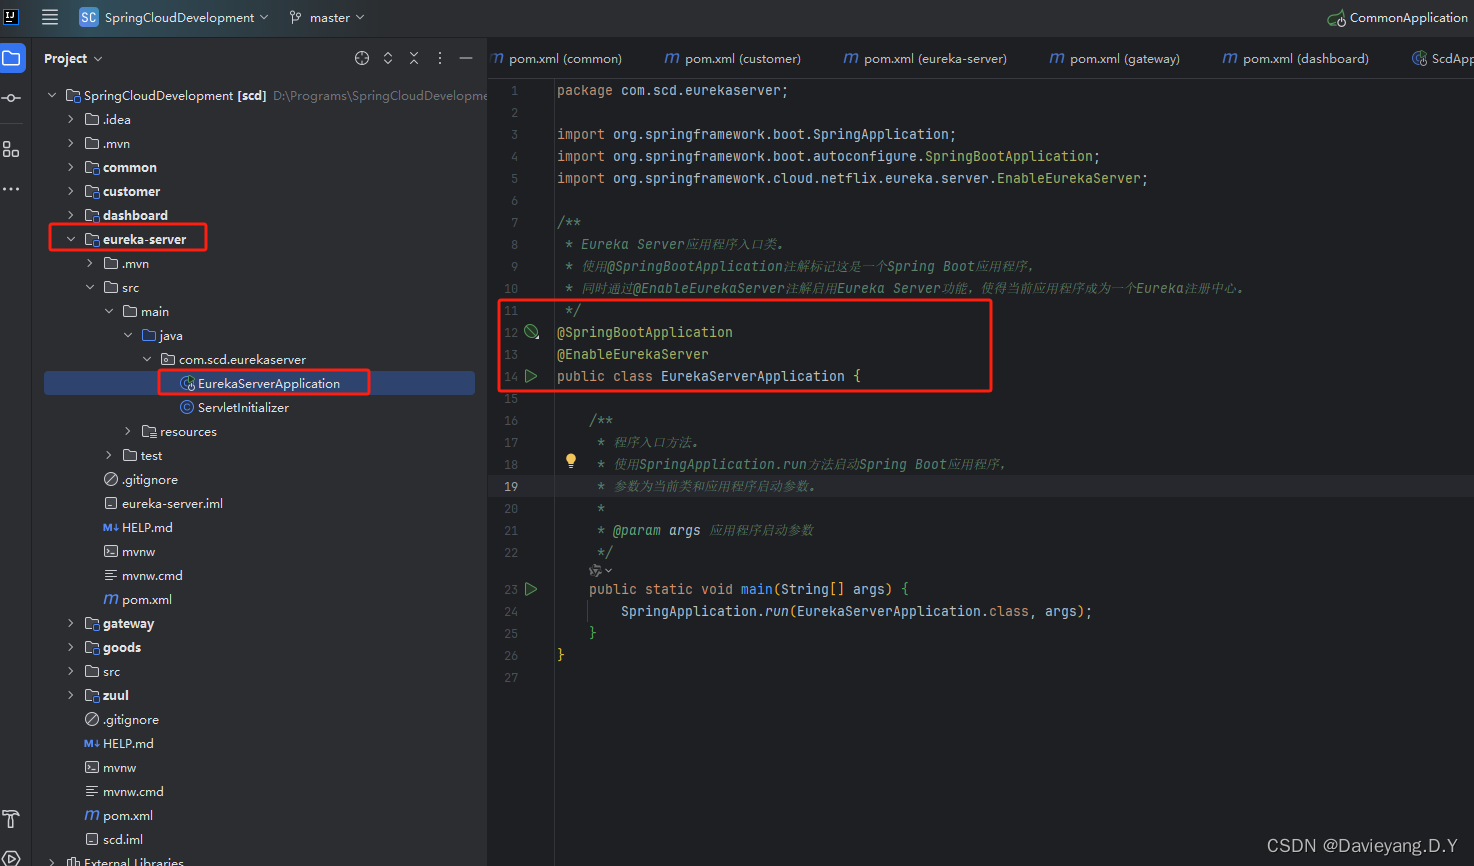
添加相关配置到eureka-server模块的配置文件,如下所示
# 定义Spring应用名称,它是一个服务的名称,一个服务可拥有多个实例
spring:
  application:
    name:  eureka-server
# 启动端口
server:
  port: 1001
eureka:
  client:
    # 服务自身就是治理中心,所以这里设置为false,取消注册
    register-with-eureka: false
    # 取消服务获取,至于服务获取,后续会进行讨论
    fetch-registry: false
  instance:
    # 服务治理中心服务器IP
    hostname: 192.168.3.115
启动eureka-server模块

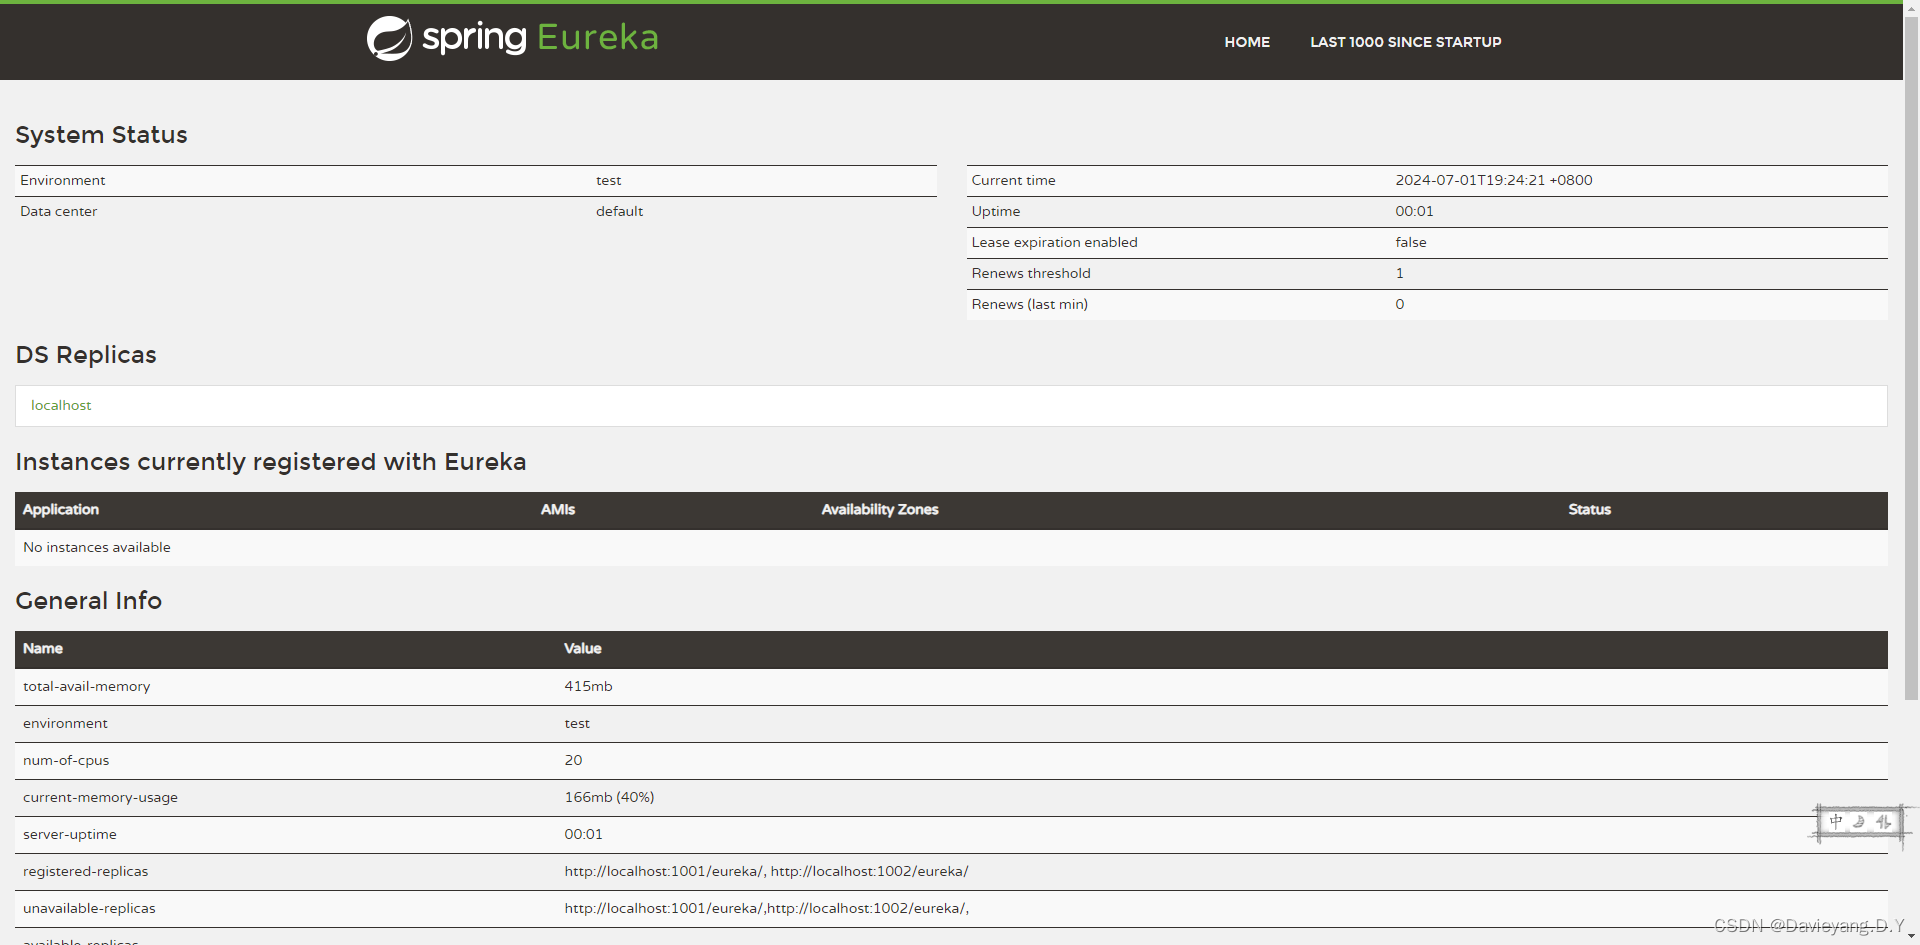
然后浏览器访问http://localhost:1001/即可看到如下页面
服务发现
Eureka服务治理中心是不会主动发现服务的,具体的服务实例会通过发送REST请求去Eureka服务治理中心进行注册、续约和下线等操作,接下来将Customer和Goods模块注册给Eureka服务治理中心,首先引入Eureka客户端依赖
        <!-- 引入Eureka客户端依赖,用于实现服务发现功能 -->
        <dependency>
            <groupId>org.springframework.cloud</groupId>
            <artifactId>spring-cloud-starter-netflix-eureka-client</artifactId>
        </dependency>
Eureka的服务治理中心相当于服务端,eureka-client相当于客户端,具体的服务实例添加了eureka-client依赖之后,通过发送REST请求到服务端,建立联系,然后修改这两个模块的的配置文件
# Spring应用名称(服务名称)
spring:
  application:
    name: customer
# 请求URL,指向Eureka服务治理中心
eureka:
  client:
    serviceUrl:
      defaultZone: http://localhost:1001/eureka/
  instance:
    # 服务实例主机
    hostname: 192.168.3.115

# 服务端口
server:
  port: 3001
# Spring应用名称(服务名称)
spring:
  application:
    name: goods
# 请求URL,指向Eureka服务治理中心
eureka:
  client:
    serviceUrl:
      defaultZone: http://localhost:1001/eureka/
  instance:
    # 服务实例主机
    hostname: 192.168.3.115

# 服务端口
server:
  port: 2001
在旧版本的Spring Cloud中还需要使用注解@EnableEurekaClient来驱动Eureka客户端,在新版本中已经不需要,只需要依赖spring-cloud-starter-netflix-eureka-client即可,也就是说并不需要修改任何启动类的内容,启动模块大概30s即可完成服务注册,启动Goods模块和Customer模块后,访问页面http://localhost:1001/,如下所示
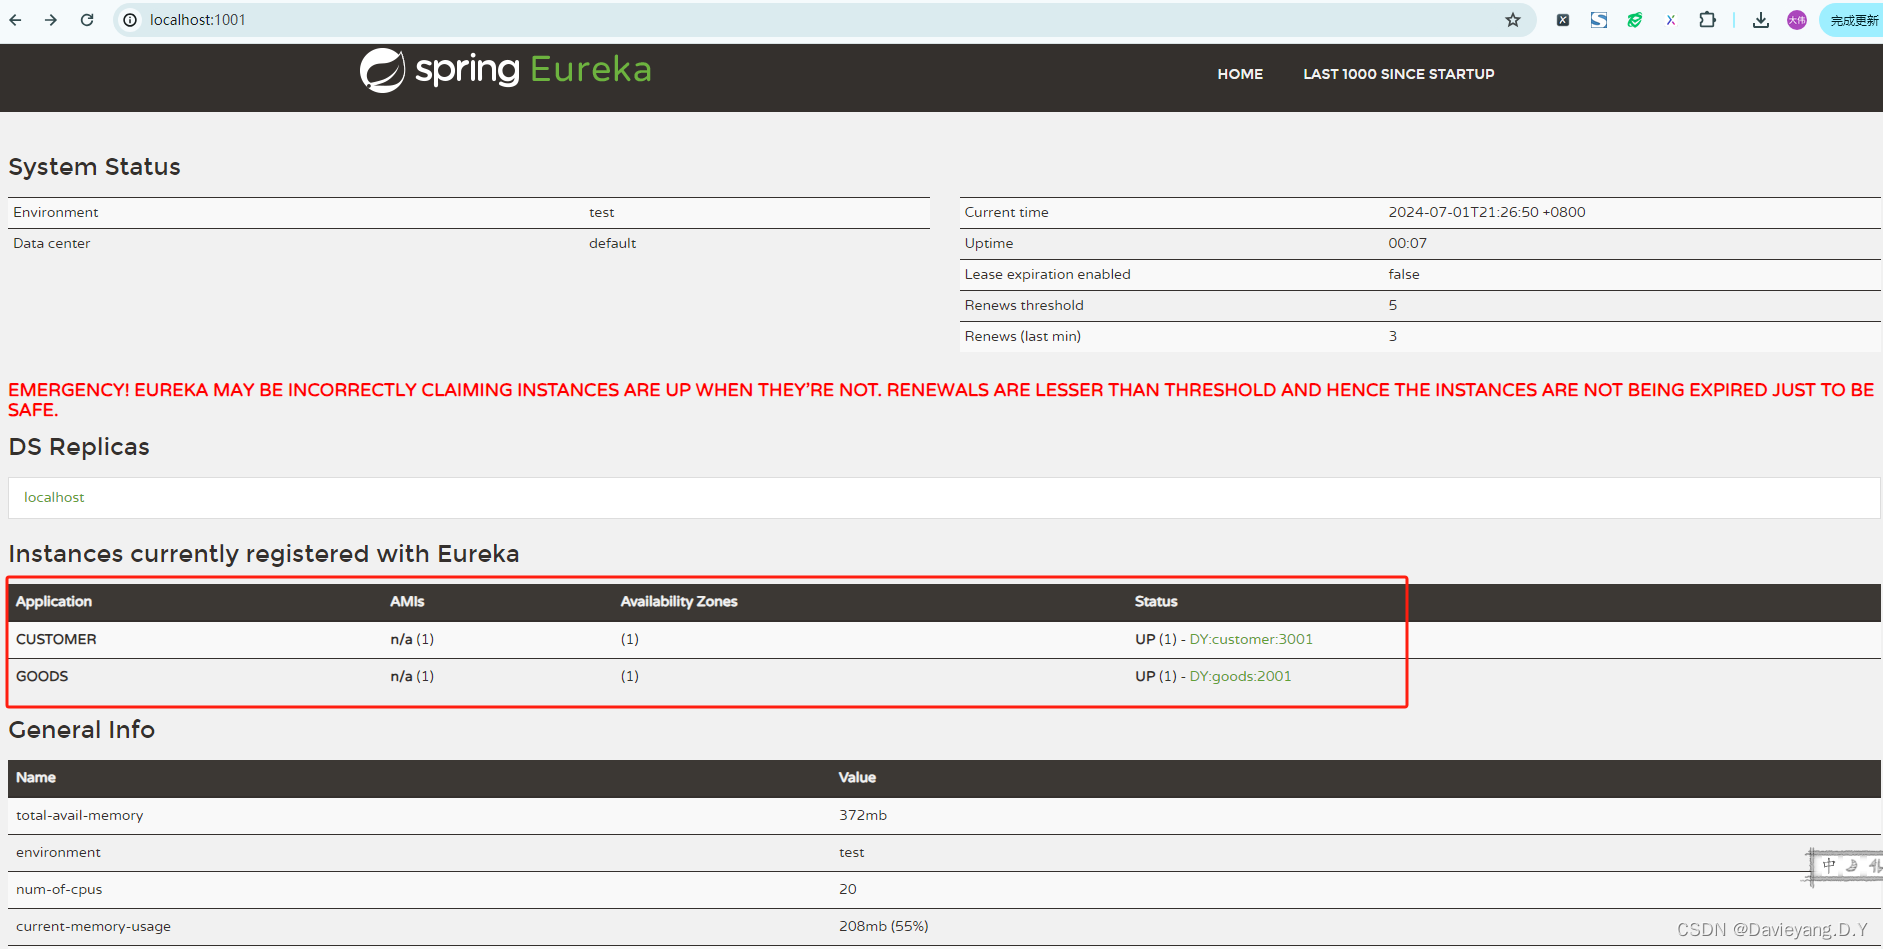
页面上出的红色警告是Eureka服务端做的自我保护机制,如果要去掉需要在Eureka Server模块添加配置项enable-self-preservation: false, 默认为true
# 定义Spring应用名称,它是一个服务的名称,一个服务可拥有多个实例
spring:
  application:
    name:  eureka-server

# 启动端口
server:
  port: 1001

eureka:
  # 服务器配置段,用于定义服务器的行为和特性
  server:
    # 是否启用自我保护模式
    # 自我保护模式是一种机制,用于在服务器负载过高时自动限制某些操作,以保护服务器免于崩溃
    enable-self-preservation: false

  client:
    # 服务自身就是治理中心,所以这里设置为false,取消注册
    register-with-eureka: false
    # 取消服务获取,至于服务获取,后续会进行讨论
    fetch-registry: false
  instance:
    # 服务治理中心服务器IP
    hostname: 192.168.3.115
服务高可用
一个服务可能存在多个服务实例,服务治理中心也可能存在多个实例,多个服务治理中心加上一个服务多个实例将大大提升服务能力,加下来看如何操作,首先使用IDEA的功能,通过不同的端口启动同一个服务的多个服务实例
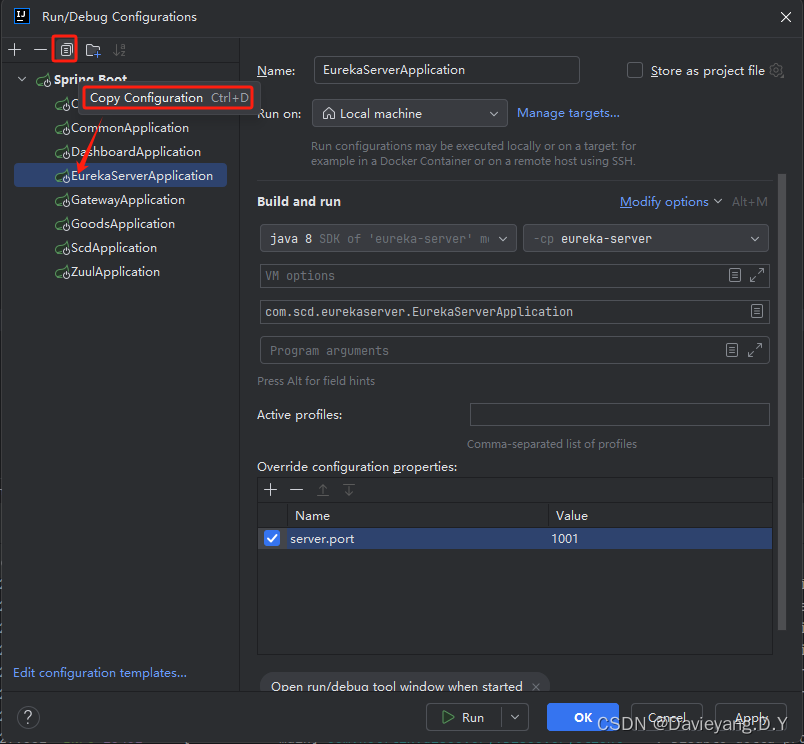
首先给这个运行的实例添加运行端口,如图所示

软后复制另一个运行配置
将运行端口改为1002
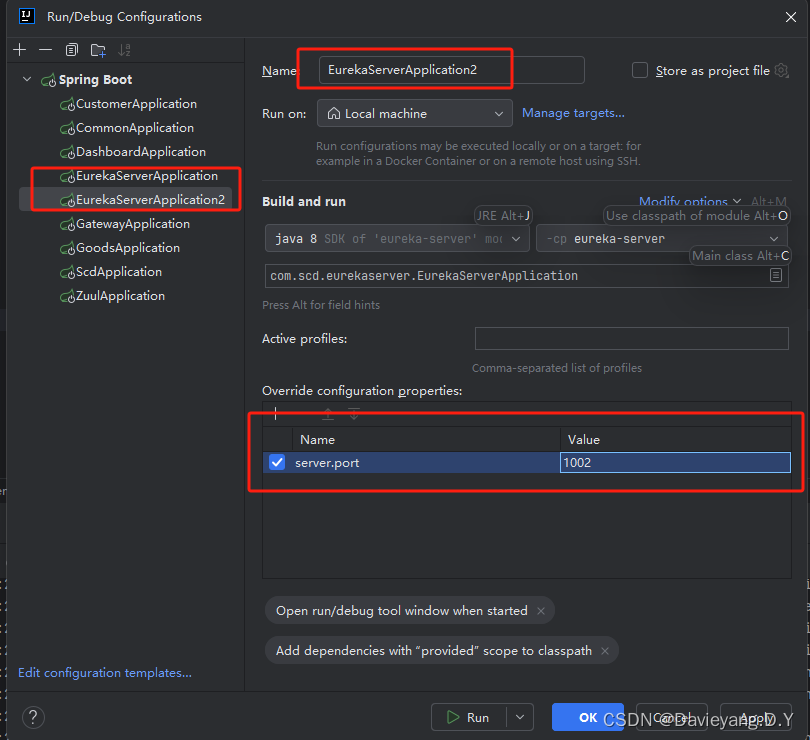
然后用相同的方法,将Goods和Customer服务都复制两个运行实例出来

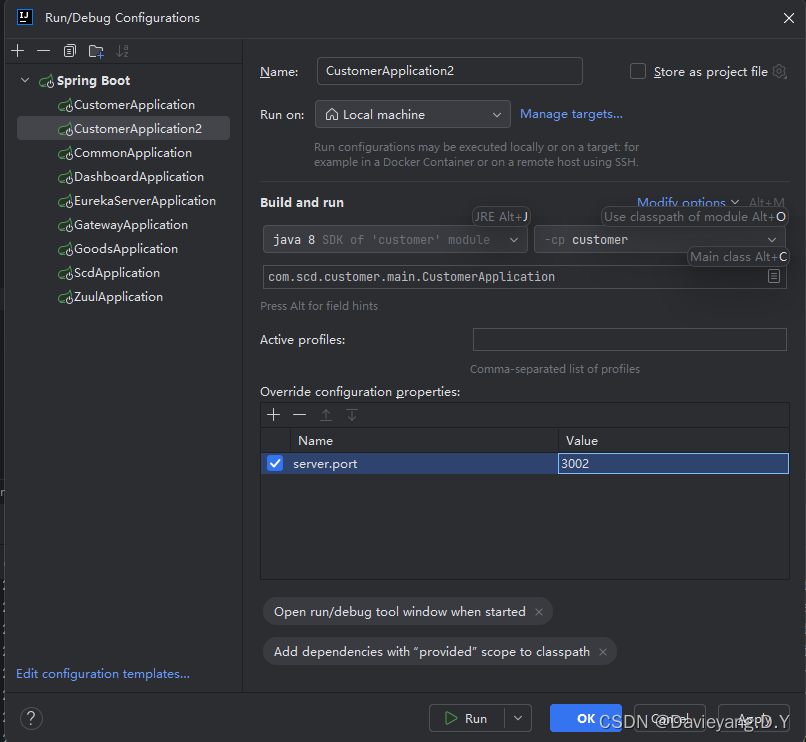
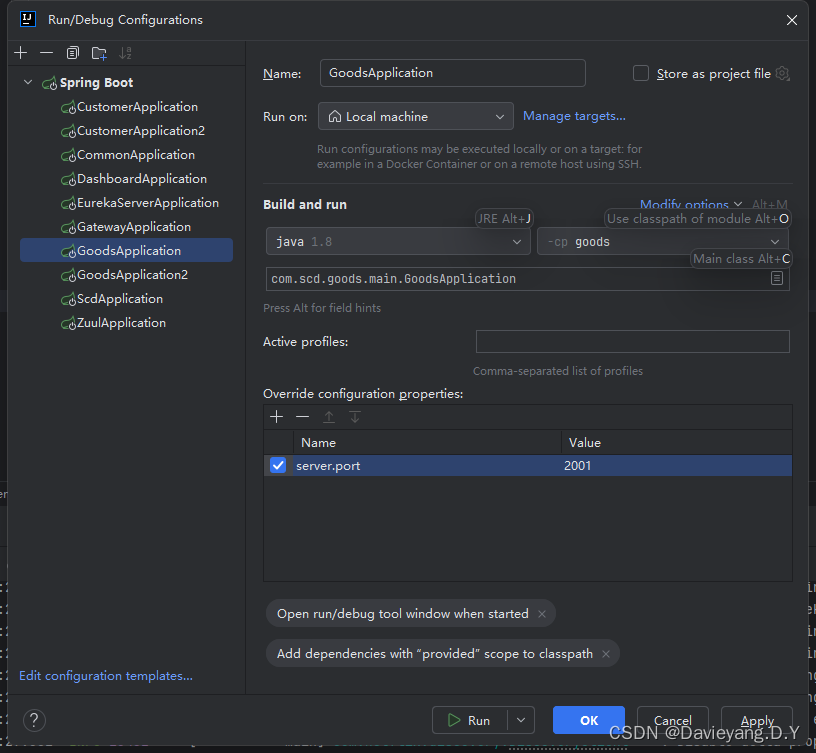
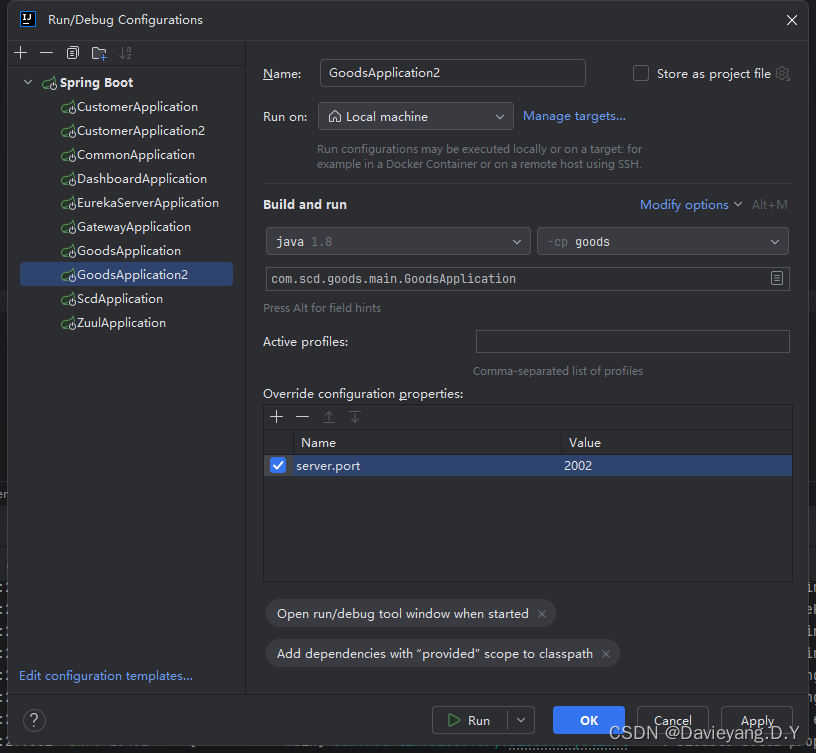
这样配置完后,server.port就会作为命令行参数输入到Spring Boot项目,它将覆盖application.yml配置文件里的端口配置,还没完还需要修改服务治理中的配置,如下所示
# 定义Spring应用名称,它是一个服务的名称,一个服务可拥有多个实例
spring:
  application:
    name:  eureka-server

# 启动端口
# server:
#   port: 1001

eureka:
  # 服务器配置段,用于定义服务器的行为和特性
  server:
    # 是否启用自我保护模式
    # 自我保护模式是一种机制,用于在服务器负载过高时自动限制某些操作,以保护服务器免于崩溃
    enable-self-preservation: false

  client:
    # 服务自身就是治理中心,所以这里设置为false,取消注册
    register-with-eureka: false
    # 取消服务获取,至于服务获取,后续会进行讨论
    fetch-registry: false
    serviceUrl:
      # Eureka服务端相互注册
      defaultZone: http://localhost:1001/eureka/,http://localhost:1002/eureka/
  instance:
    # 服务治理中心服务器IP
    hostname: 192.168.3.115
注释掉了端口配置,实际上不注释掉也会被命令行覆盖,添加了defaultZone: http://localhost:1001/eureka/,http://localhost:1002/eureka/两个地址分别指向两个Eureka服务治理中心,这两个服务治理中心可相互注册 还要修改两个服务的配置如下所示
# Spring应用名称(服务名称)
spring:
  application:
    name: goods

# 请求URL,指向Eureka服务治理中心
eureka:
  client:
    serviceUrl:
      defaultZone: http://localhost:1001/eureka/,http://localhost:1002/eureka/
  instance:
    # 服务实例主机
    hostname: 192.168.3.115

# 服务端口
server:
  port: 2001
# Spring应用名称(服务名称)
spring:
  application:
    name: customer

# 请求URL,指向Eureka服务治理中心
eureka:
  client:
    serviceUrl:
      defaultZone: http://localhost:1001/eureka/,http://localhost:1002/eureka/
  instance:
    # 服务实例主机
    hostname: 192.168.3.115

# 服务端口
server:
  port: 3001
然后重新启动各模块,如下所示

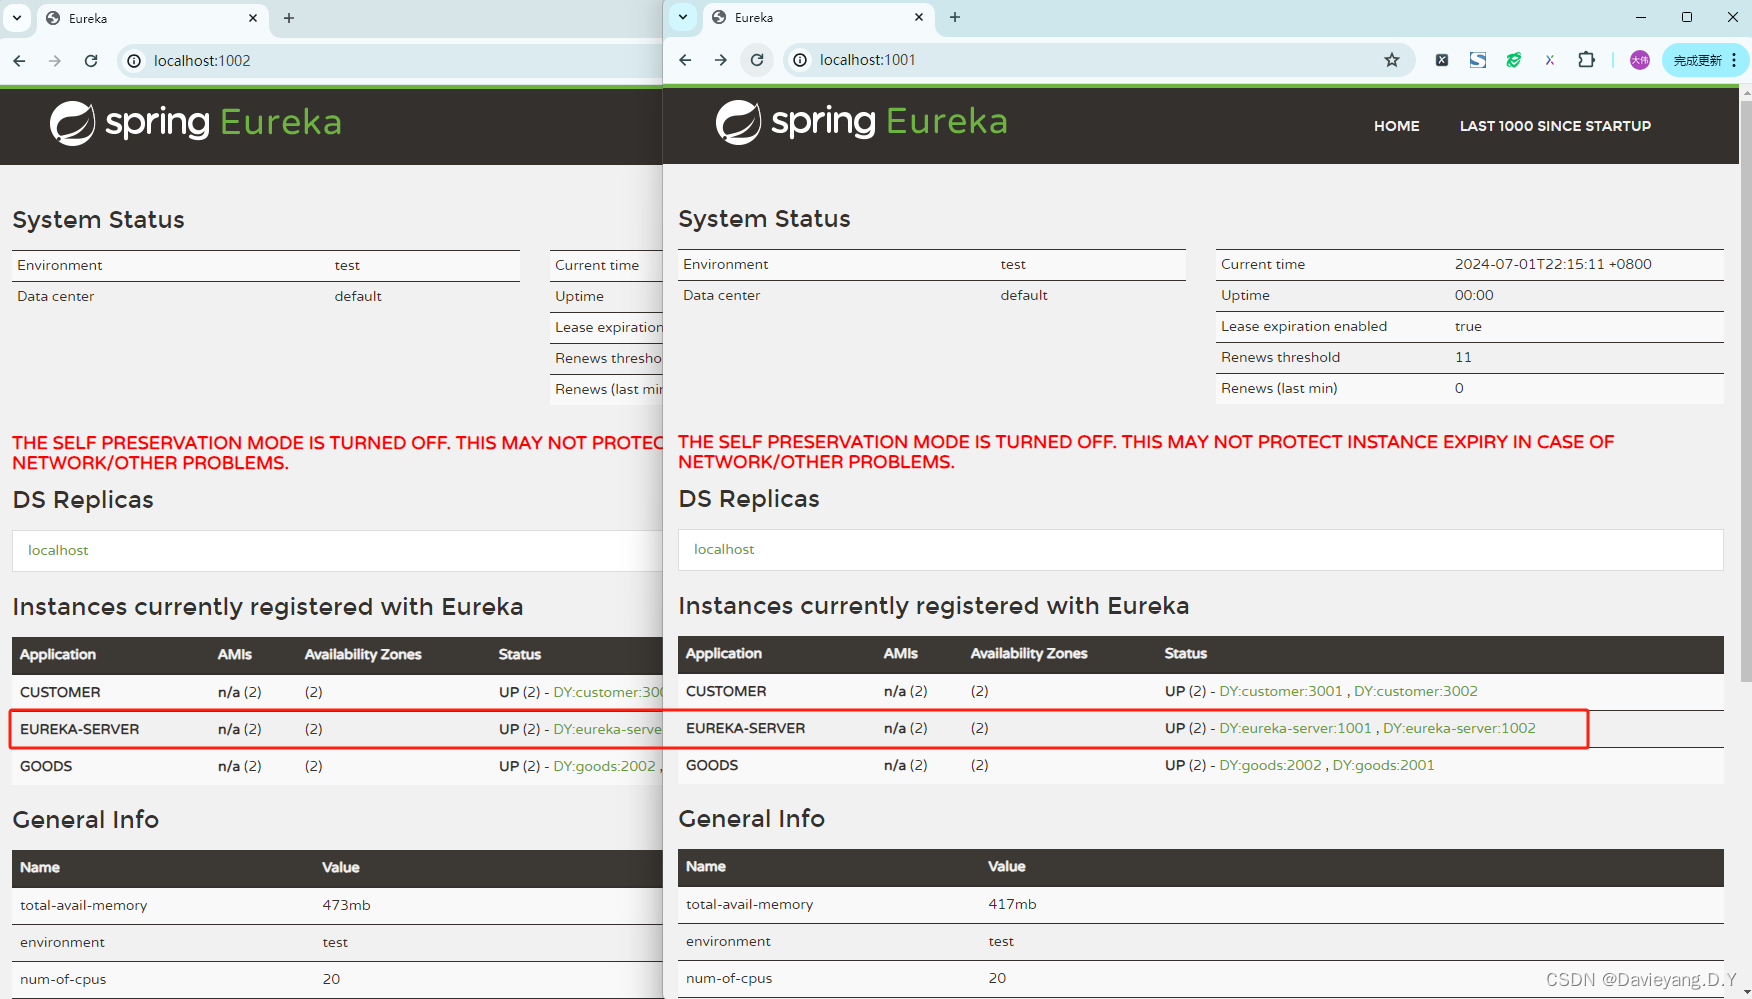
再访问页面http://localhost:1002/和http://localhost:1001/如下页面所示
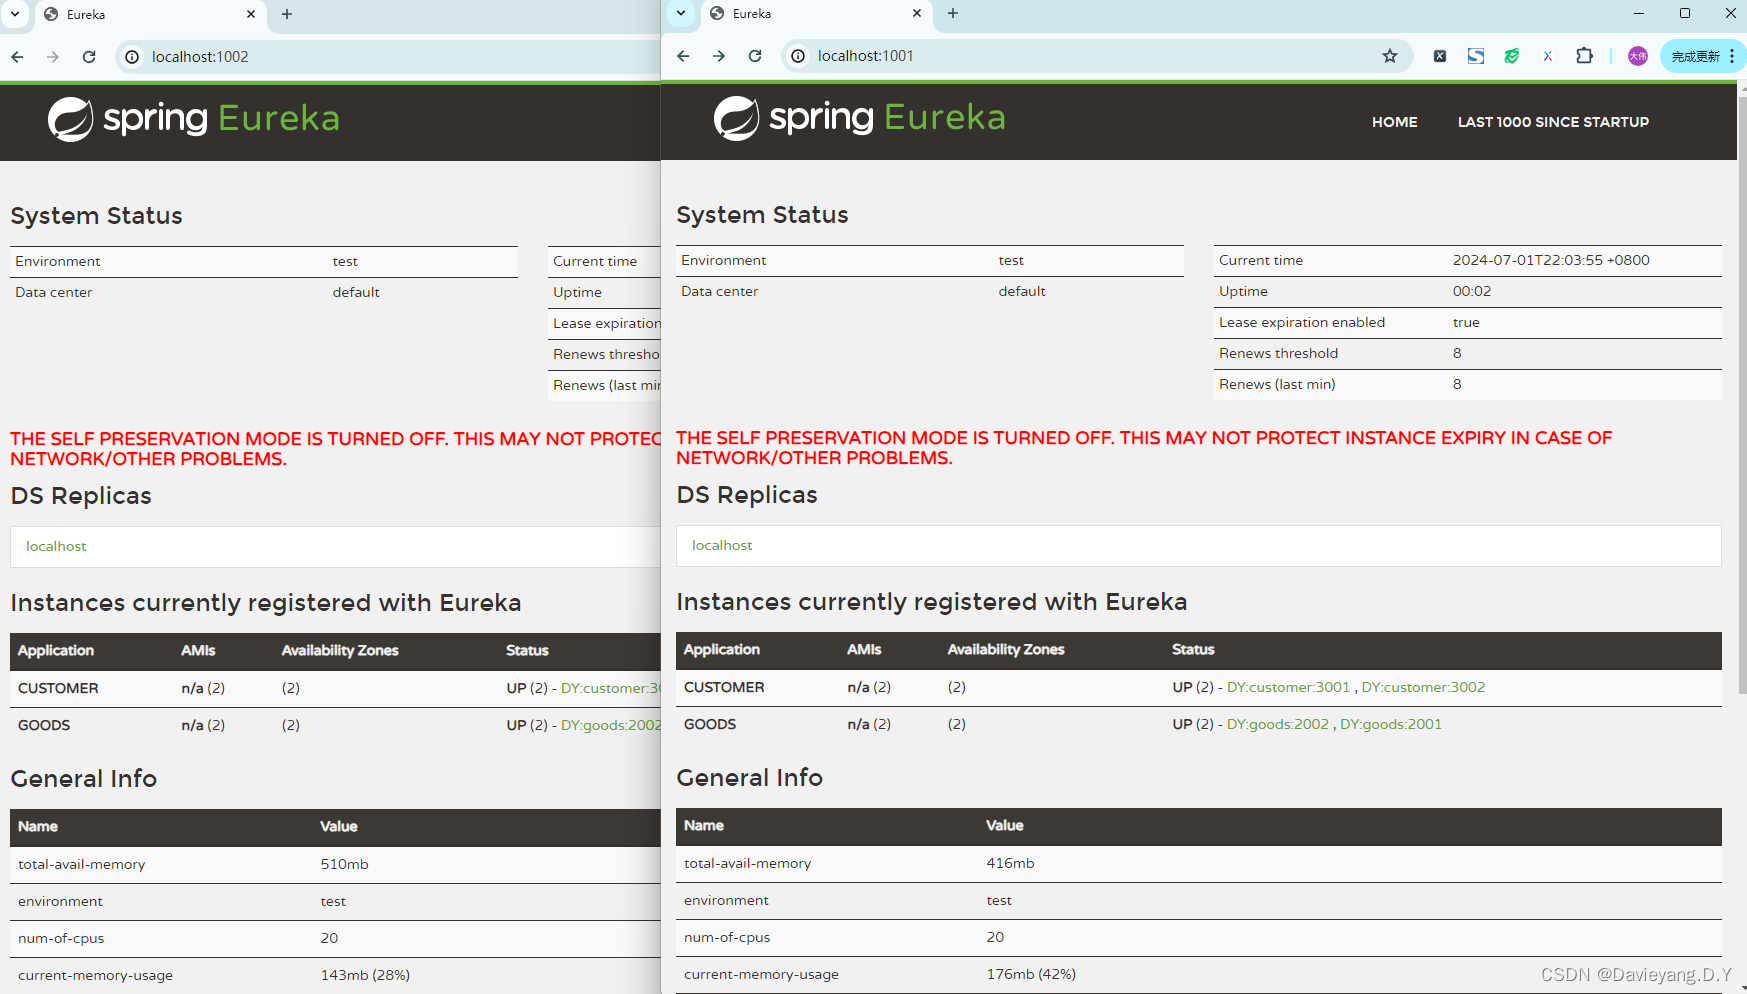
如此便实现了高可用,注册到服务治理中心的服务实例,当服务治理中心判断有挂掉的就会自动将其踢掉,但再次前提是服务治理中本身没有挂掉,因此它本身也需要是高可用的,因此还需要让他们之间能够互相发现,就需要将配置
register-with-eureka: true设置为true
然后重启服务治理中心模块,便能看到他们之间互相注册为服务实例,如此当一个挂掉,另一个也能监控到
Eureka工作原理

Eureka服务端和客户端由客户端发送Rest请求完成服务注册、续约、下线等操作的,发送请求的是Eureka的客户端,而不是服务端,Rest请求的地址是通过
eureka.client.serviceUrl.defaultZone生成;两个服务治理中心之间是对等关系,不是主从关系
-
服务注册:一个服务实例要被服务治理中心发现,首先需要注册,客户端把相关的信息以REST请求的方式注册到服务治理中心,这里值得注意的配置项是
spring.application.name,Eureka会通过这个配置项去区分服务实例属于哪个服务,相同的服务实例应该有相同的业务能力;服务注册不是服务启动后就注册,默认情况下服务启动后40s才会发起注册,如果需要改变它,需要通过配置项eureka.client.initial-instance-info-replication-interval-seconds:40来改变 -
服务续约:在服务实例启动后,可能会出现下线、故障等不可用的情况,Eureka为了监测这些实例是否可用,要求实例每隔一段时间对Eureka发送请求,以告知服务治理中心是否可用状态,这个过程被称为续约(Renew),如果迟迟没有续约,那么服务治理中心会认为该实例不可用,然后Eureka就会将其剔除。默认情况下30s一次续约,90s不续约就会被剔除,如果需要改变它,则需要通过配置项
eureka.instance.lease-expiration-duration-in-seconds:90和eureka.instance.lease-renewal-interval-in-seconds:30来改变 -
服务下线:当一个服务正常下线时,会向Eureka发送Rest请求,告知下线然后Eureka会将其剔除
服务调用Ribbon
在系统整个体系中看,各服务之间是需要通过写作来完成某一个任务的,在Spring Cloud中是以Rest请求作为主要的服务调用方式的,Spring Cloud将Netflix Ribbon封装成Spring Cloud Netflix Ribbon作为服务调用的组件,并将Spring Cloud Netflix Ribbon和第三方开源工具OpenFeign(也是Netflix Ribbon开发的)结合,封装成为Spring Cloud OpenFeign作为声明式服务调用,以简化开发过程
Ribbon也被称为客户端负载均衡,这里的客户端是相对于Eureka服务端而言的,主要有如下几个特点:
- 将单机服务变为多机服务,从而降低单机压力,提高系统的吞吐和服务能力
- 当发现一些故障实例时,可以屏蔽这些故障实例,让系统继续工作
- 通过负载均衡来实现实例的伸缩性,在业务膨胀时增加实例,在业务缩减时减少实例
- 负载均衡器可以度量服务的质量,在执行服务调用时,剔除故障多、服务性能差的实例,侧面提升服务调用感知上的成功率和性能
负载均衡的基础有两点:一个是服务实例清单,也就是从哪里选取服务实例执行服务调用;另一个是负载均衡策略,也就是如何从服务实例清单里选取可用的服务实例
在服务调用过程中存在三个角色即服务提供者、服务消费者、服务治理中心
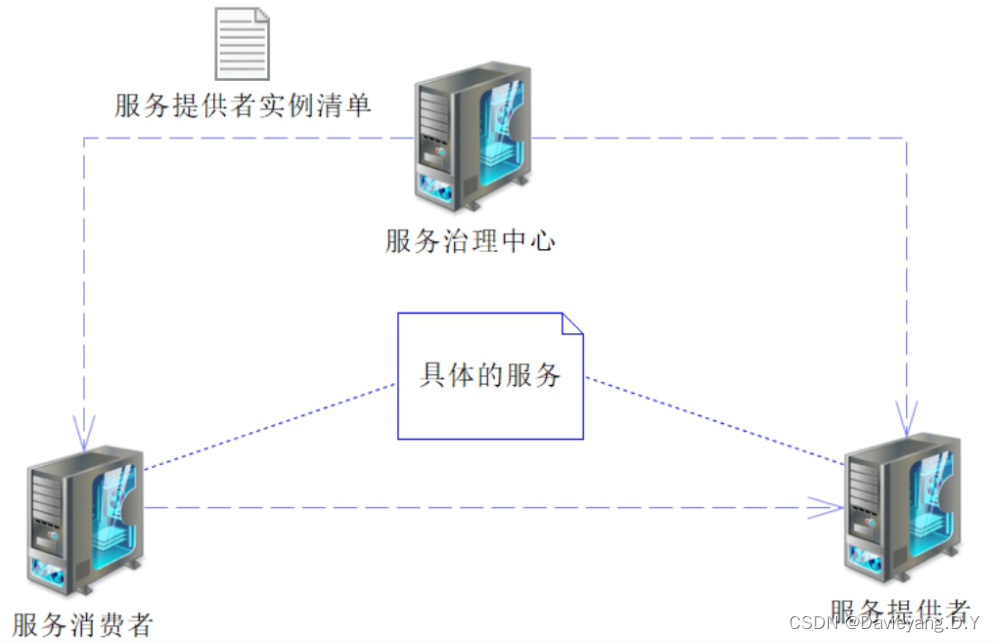
Ribbon实例
引入相关依赖spring-cloud-starter-netflix-ribbon,实际上在引入了spring-cloud-starter-netflix-eureka-client时,项目会自动依赖,无需单独在pom文件中单独添加spring-cloud-starter-netflix-ribbon
在Customer模块中编写controller代码如下所示:
package com.scd.customer.controller;


import com.scd.common.pojo.CustomerPojo;
import org.springframework.web.bind.annotation.*;

import javax.servlet.http.HttpServletRequest;

@RestController
@RequestMapping("/customer")
public class CustomerController {


    @GetMapping("/name/{id}")
    public String getCustomerName(@PathVariable("id") Long id, HttpServletRequest request) {

        String customerName = "customer_name_" + id;
        System.out.println("服务端口:" +request.getServerPort());
        return customerName;
    }
}
修改Goods模块的启动类
package com.scd.goods.main;
import org.springframework.boot.SpringApplication;
import org.springframework.boot.autoconfigure.SpringBootApplication;
import org.springframework.cloud.client.loadbalancer.LoadBalanced;
import org.springframework.context.annotation.Bean;
import org.springframework.web.client.RestTemplate;

import java.time.Duration;

// 定义扫描包
@SpringBootApplication(scanBasePackages = "com.scd.goods")
public class GoodsApplication {

    // 执行负载均衡,启动Ribbon默认的负载均衡策略来选择可用的服务实例完成服务调用
    @LoadBalanced
    // 装配为Bean,方便之后注入
    @Bean
    public RestTemplate restTemplate() {

        return new RestTemplate();
    }

    public static void main(String[] args) {

        SpringApplication.run(GoodsApplication.class, args);
    }
}
然后编写服务接口和服务类
package com.scd.goods.facade;

public interface CustomerFacade {


    public String getCustomerName(Long id);

    public String timeout(Long id);

    public String exception(Long id);
}
package com.scd.goods.facade.impl;

import com.scd.goods.facade.CustomerFacade;
import org.springframework.beans.factory.annotation.Autowired;
import org.springframework.stereotype.Service;
import org.springframework.web.client.RestTemplate;
/**
 * 定义一个服务类,该类用于处理特定的业务逻辑。
 * 使用@Service注解表明该类是一个服务层对象,通常由Spring框架管理其生命周期,
 * 并可以进行依赖注入。这个类的设计是为了提供一系列的服务操作,以支持应用程序的运行。
 */
@Service
public class CustomerFacadeImpl implements CustomerFacade {


    @Autowired
    private RestTemplate restTemplate = null;

    @Override
    public String getCustomerName(Long id) {

        // 这里的BUYER代表客户服务,此时RestTemplate会自动负载均衡
        String url="http://CUSTOMER/customer/name/{id}";
        // 服务REST风格调用
        String name = restTemplate.getForObject(url, String.class, id);
        return name;
    }
}
然后写一个控制器来验证
package com.scd.goods.controller;

import com.scd.goods.facade.CustomerFacade;
import org.springframework.beans.factory.annotation.Autowired;
import org.springframework.web.bind.annotation.GetMapping;
import org.springframework.web.bind.annotation.PathVariable;
import org.springframework.web.bind.annotation.RequestMapping;
import org.springframework.web.bind.annotation.RestController;

@RestController
@RequestMapping("/goods")
public class CustomerCallController {


    @Autowired
    private CustomerFacade customerFacade = null;

    @GetMapping("/customer/name/{id}")
    public String getCustomerName(@PathVariable("id") Long id) {

        return customerFacade.getCustomerName(id);
    }
}
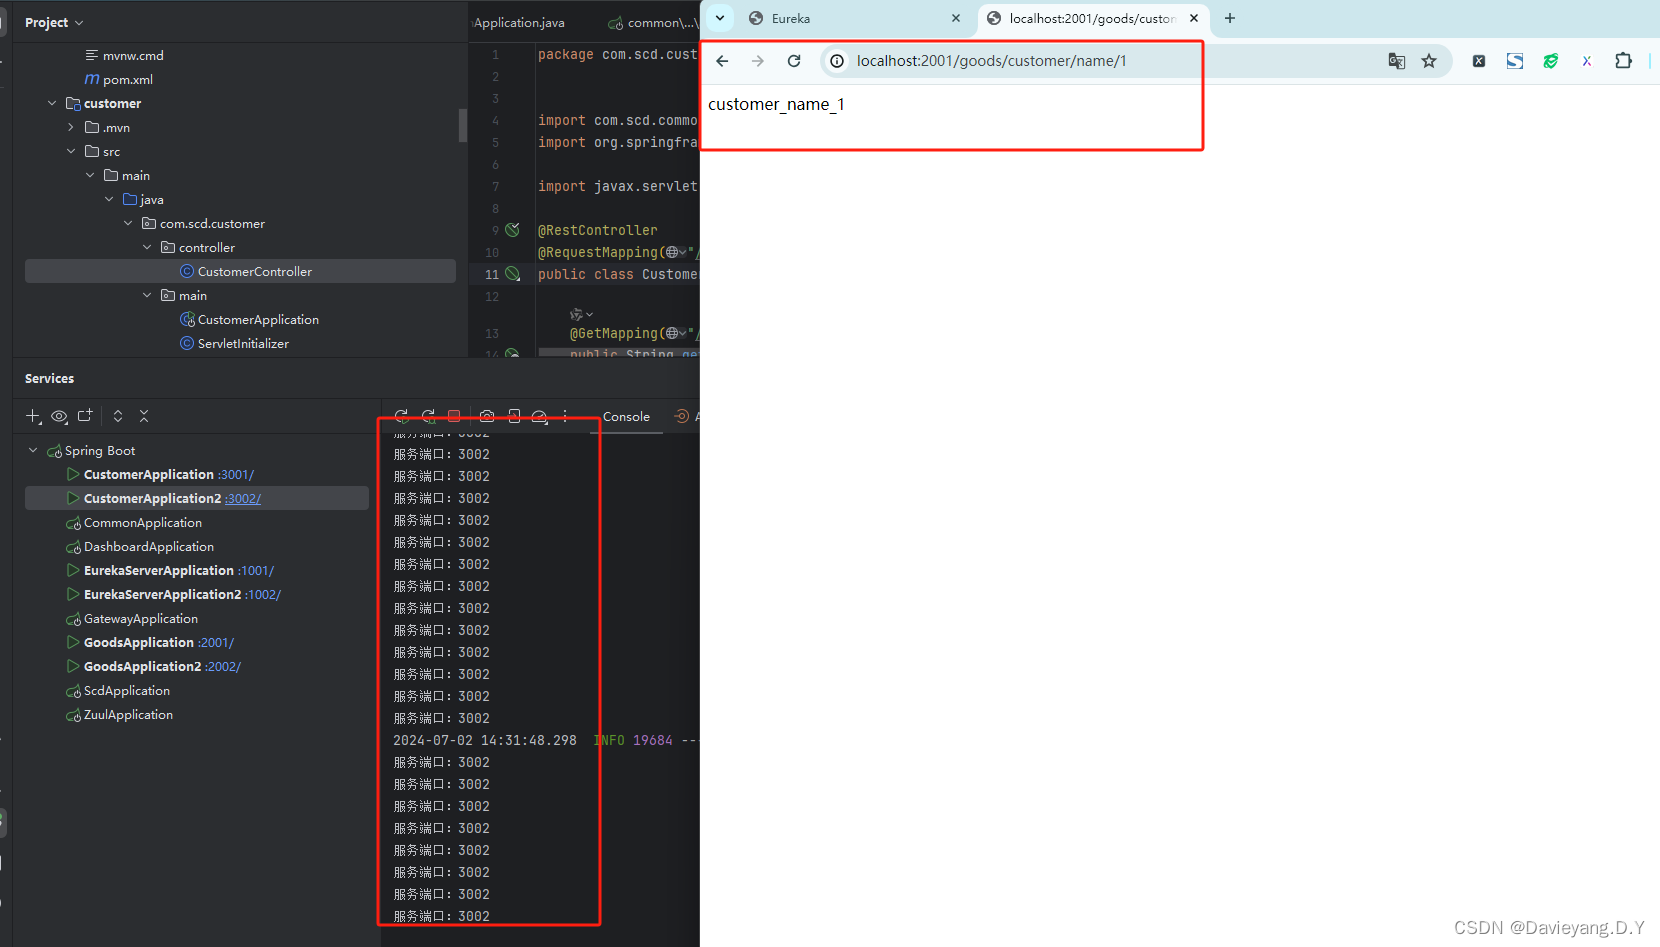
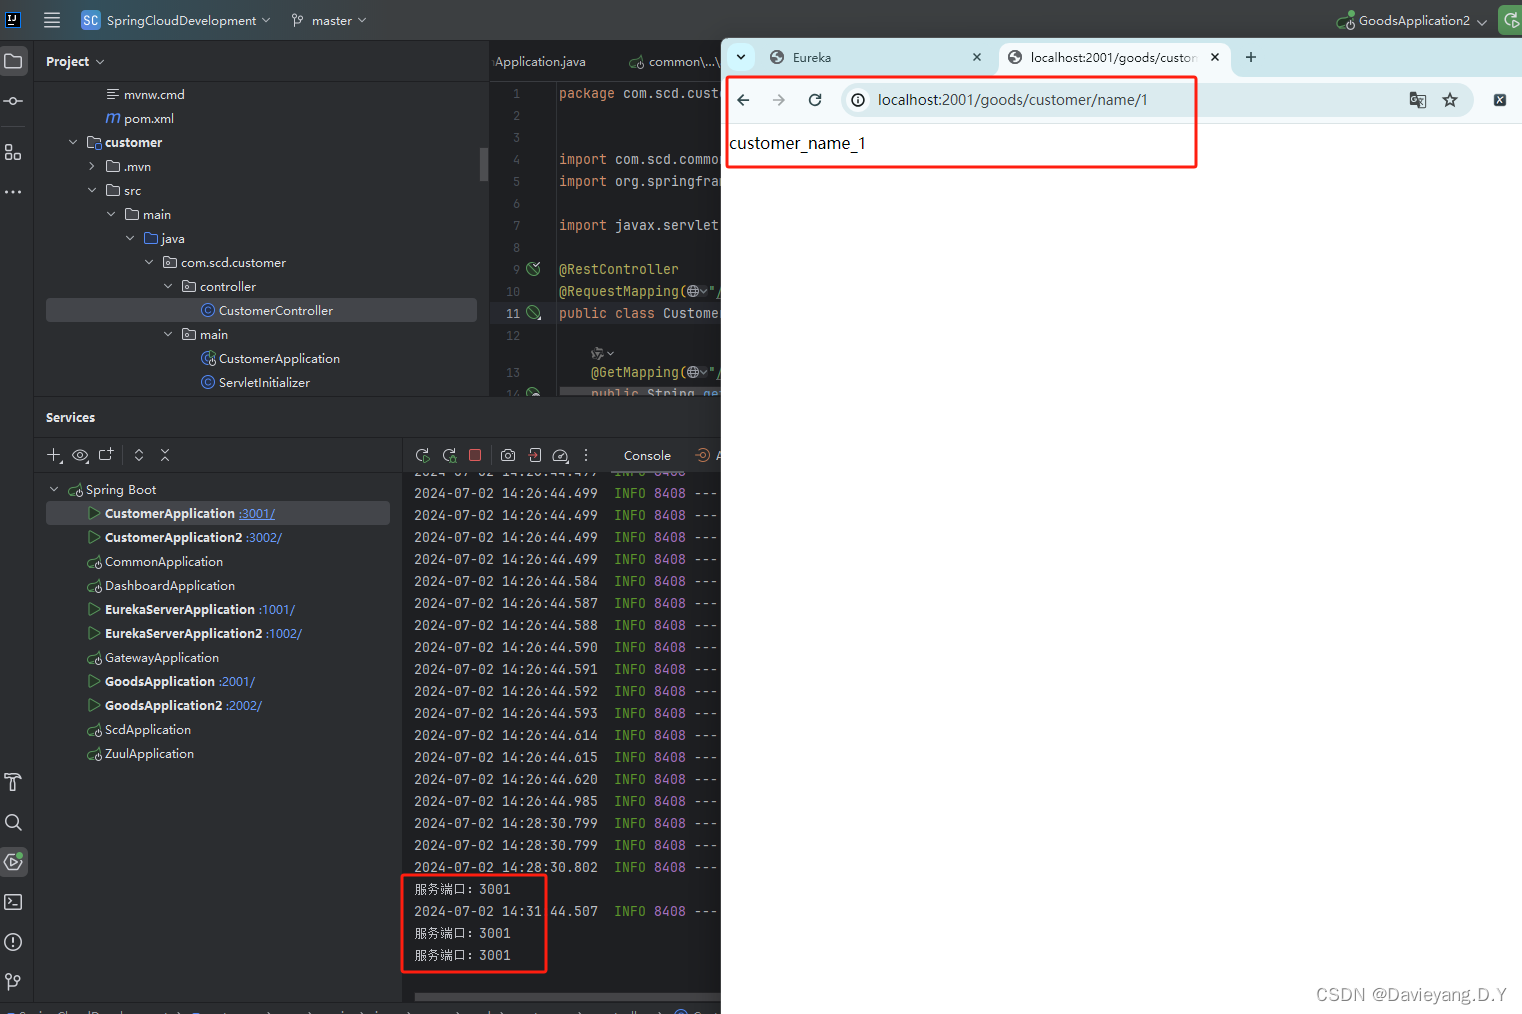
然后重启Goods和Customer服务,访问地址http://localhost:2001/goods/customer/name/1,如下所示被负载均衡了
Ribbon工作原理
前面说到负载均衡需要处理的两个问题一个是从哪里选取服务实例,另一个问题是如何从可选的服务实例中选取,第一个问题很好解释Eureka服务端有可用的服务实例的清单,在Eureka的机制中,客户端默认会每隔30s向Eureka发送请求获取其他服务的实例清单,并将其副本保存在本地,这样就获得了服务清单,也可以通过配置修改eureka.client.fetch-registry:true和eureka.client.registry-fetch-interval-seconds:30每隔30秒获取一次Eureka服务端的服务实例清单,其中包括了可用和不可用的
第二个问题就是如何选取实例的策略问题了,Ribbon中定义了几个主要的接口
IClientConfig:提供客户端配置功能,默认实现类DefaultClientConfigImplIRule:提供具体的负载均衡策略,默认实现类ZoneAvoidanceRuleIPing:通过PING命令验证服务实例是否可用,默认实现类DummyPingServerList<T extends Server>:用于获取服务实例清单,默认实现类ConfigurationBasedServerListServerListFilter<T extends Server>:根据服务的可用性和性能排除一些有故障的和性能低的服务实例,然后得到一个可用性较高的服务实例清单,默认实现类ZonePreferenceServerListFilterILoadBalancer:按照策略选取服务实例,默认实现类ZoneAwareLoadBalancerServerListUpdater: 它会根据一定的策略来更新服务实例清单,默认实现类PollingServerListUpdater
其中大部分是无需定制化的,常变动的是IRule接口,该接口的结构大致如下
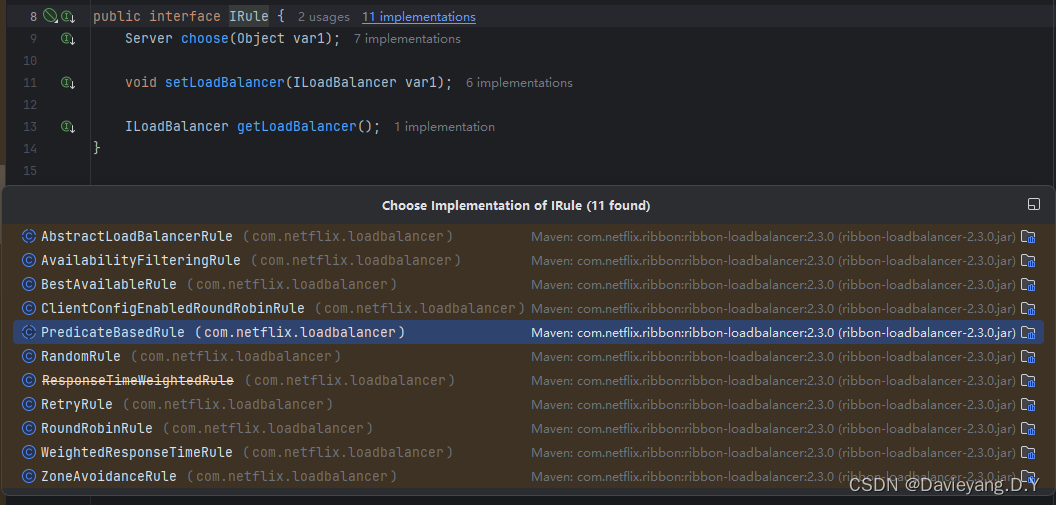
可以看到该接口下有若干策略,其中常用几个如下:
- BestAvailableRule:先探测服务实例是否可用,如果可用,则选择当前被分配请求最少的那个
- WeightedResponseTimeRule:根据数据统计,分析服务实例响应时间,并分配一个权重值(weight),对于响应时间短的服务实例,有更大的概率被分配请求,反之则被分配请求的概率会减少
- RetryRule:重试服务策略,在一个特定的时间戳内,如果当前被分配的服务实例不可用,则通过子策略(默认是轮询)来选定可用的服务实例
- RoundRobinRule:轮询选择服务实例,通过下标,轮询服务实例列表,从而选择一个服务实例
- ZoneAvoidanceRule:默认实现策略,它会通过可用性和性能两重过滤选择可用且性能较高的服务实例
在抽象类CommonClientConfigKey定义了大量配置项,部分代码如下
/**
 * 定义了与负载均衡相关的配置键。
 * <p>
 * NFLoadBalancerClassName: 负载均衡器的类名。
 * NFLoadBalancerRuleClassName: 负载均衡规则的类名。
 * NFLoadBalancerPingClassName: 负载均衡器ping的类名。
 * NFLoadBalancerPingInterval: 负载均衡器ping的间隔时间(单位:秒)。
 * NFLoadBalancerMaxTotalPingTime: 负载均衡器ping的最大总时间(单位:毫秒)。
 * NFLoadBalancerStatsClassName: 负载均衡器统计信息的类名。
 * NIWSServerListClassName: Netty服务器列表的类名。
 * ServerListUpdaterClassName: 服务器列表更新器的类名。
 * NIWSServerListFilterClassName: Netty服务器列表过滤器的类名。
 *
 * @author Unknown
 */
public class ConfigurationKeys {


    /**
     * 负载均衡器的类名配置键。
     */
    public static final IClientConfigKey<String> NFLoadBalancerClassName = new CommonClientConfigKey<>("NFLoadBalancerClassName") {

    };

    /**
     * 负载均衡规则的类名配置键。
     */
    public static final IClientConfigKey<String> NFLoadBalancerRuleClassName = new CommonClientConfigKey<>("NFLoadBalancerRuleClassName") {

    };

    /**
     * 负载均衡器ping的类名配置键。
     */
    public static final IClientConfigKey<String> NFLoadBalancerPingClassName = new CommonClientConfigKey<>("NFLoadBalancerPingClassName") {

    };

    /**
     * 负载均衡器ping的间隔时间配置键(单位:秒)。
     */
    public static final IClientConfigKey<Integer> NFLoadBalancerPingInterval = new CommonClientConfigKey<>("NFLoadBalancerPingInterval") {

    };

    /**
     * 负载均衡器ping的最大总时间配置键(单位:毫秒)。
     */
    public static final IClientConfigKey<Integer> NFLoadBalancerMaxTotalPingTime = new CommonClientConfigKey<>("NFLoadBalancerMaxTotalPingTime") {

    };

    /**
     * 负载均衡器统计信息的类名配置键。
     */
    public static final IClientConfigKey<String> NFLoadBalancerStatsClassName = new CommonClientConfigKey<>("NFLoadBalancerStatsClassName") {

    };

    /**
     * Netty服务器列表的类名配置键。
     */
    public static final IClientConfigKey<String> NIWSServerListClassName = new CommonClientConfigKey<>("NIWSServerListClassName") {

    };

    /**
     * 服务器列表更新器的类名配置键。
     */
    public static final IClientConfigKey<String> ServerListUpdaterClassName = new CommonClientConfigKey<>("ServerListUpdaterClassName") {

    };

    /**
     * Netty服务器列表过滤器的类名配置键。
     */
    public static final IClientConfigKey<String> NIWSServerListFilterClassName = new CommonClientConfigKey<>("NIWSServerListFilterClassName") {

    };
例如商品Goods服务调用客户Customer服务,可以在商品Goods服务中配置如下负载均衡策略
# CUSTOMER为Eureka服务端的另外一个服务名称
CUSTOMER:
  ribbon:
    # 配置负载均衡策略为BestAvailableRule
    NFLoadBalancerRuleClassName: com.netflix.loadbalancer.BestAvailableRule
配置单个客户端可以这样,也可以进行全局配置,编写一个Ribbon配置类,如下代码所示
package com.scd.goods.config;

import com.netflix.loadbalancer.BestAvailableRule;
import com.netflix.loadbalancer.IPing;
import com.netflix.loadbalancer.IRule;
import com.netflix.loadbalancer.PingUrl;
import org.springframework.context.annotation.Bean;
import org.springframework.context.annotation.Configuration;

/**
 * Ribbon配置类,用于设置Ribbon客户端的负载均衡策略和服务器健康检查规则。
 */
@Configuration
public class RibbonConfig {


    /**
     * 配置负载均衡策略,使用{@link BestAvailableRule},该规则会选择最少连接的服务器。
     * @return 返回一个BestAvailableRule实例
     */
    @Bean
    public IRule rule() {

        return new BestAvailableRule();
    }

    /**
     * 配置Ribbon的服务器心跳监测策略,使用{@link PingUrl},通过HTTP GET请求检测服务器是否可用。
     * @return 返回一个PingUrl实例
     */
    @Bean
    public IPing ribbonPing() {

        return new PingUrl();
    }
}
这样就可以配置全局性的Ribbon了,而且这个方式比使用yaml文件的配置级别高,会覆盖yaml文件的相同配置项的配置;Ribbon还提供了注解@RibbonClients
/**
 * 组件扫描并配置多个Ribbon客户端,指定不同的服务名及其对应的自定义配置类,
 * 同时设定默认的全局Ribbon配置类。
 * @RibbonClients 注解用于批量配置RibbonClient,可以为不同的服务定制化负载均衡策略等配置。
 * - value:数组,包含多个@RibbonClient注解,分别定义不同服务的配置,name属性指定了微服务的名称,configuration属性指定了该服务专用的配置类。
 * - defaultConfiguration:指定所有RibbonClient共用的默认配置类。
 */
@RibbonClients(
    value={

        @RibbonClient(name="CUSTOMER", configuration=CustomerRibbonConfig.class), // 定义CUSTOMER服务的特定配置
        @RibbonClient(name="USER", configuration=UserRibbonConfig.class),       // 定义USER服务的特定配置
    },
    defaultConfiguration=RibbonConfig.class // 设置所有RibbonClient的默认全局配置类
)
这样微服务调用就会按照自定义的负载均衡策略来路由服务实例执行服务调用了
断路器Hystrix
Hystrix的使用
通常情况下一个服务调用另一个服务完成某个业务功能,他们之间便产生了依赖,而且是一个普遍现象,系统在运转过程中无法完全保证一个服务实例一直是可用的状态
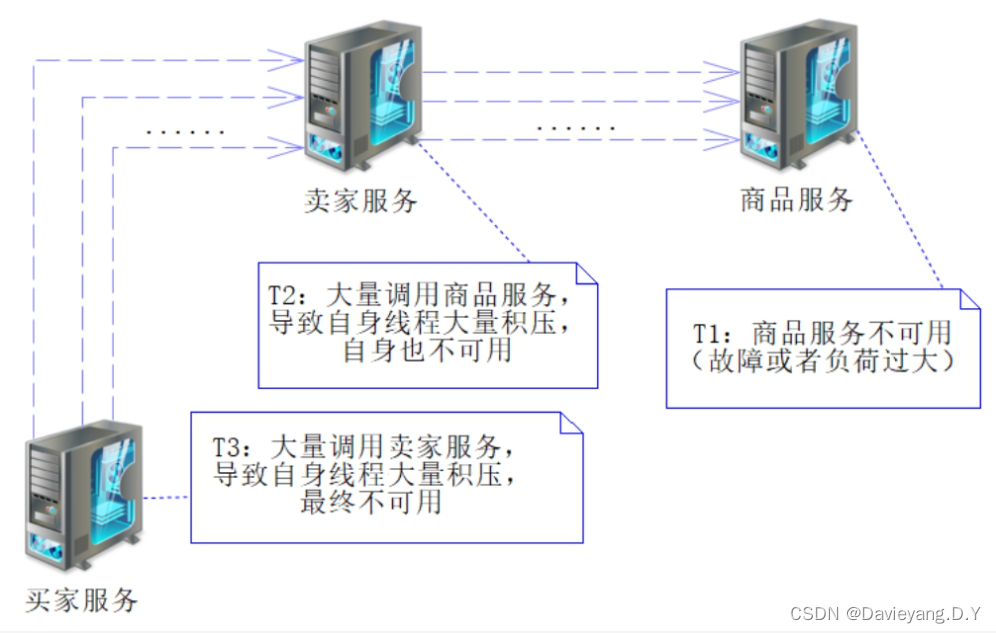
而且如果调用关系设计或者服务划分不合理,往往还会出现因为某一个服务不可用,导致整条调用链路上的服务均出现不可用,再严重一些就是整个服务架构不可用,导致服务器雪崩效应
当服务提供者不可用,而服务消费者仍旧进行大量的调用势必会出现很多请求超时,此时断路器的作用就会将服务熔断,从而阻止服务消费者对服务提供者进行调用,从而避免大量线程积压导致服务消费者自身也变成不可用,从而断路器起到了保护服务消费者的作用
Hystrix的作用之一就是熔断,此外还包括服务降级、缓存、线程池、异步等等
首先在服务消费者(Goods)模块,引入该断路器的依赖
        <!-- 引入Spring Cloud Netflix Hystrix,提供断路器功能,用于容错管理 -->
        <dependency>
            <groupId>org.springframework.cloud</groupId>
            <artifactId>spring-cloud-starter-netflix-hystrix</artifactId>
        </dependency>
引入了该依赖后,便可以使用注解@EnableCircuitBreaker驱动断路器工作
package com.scd.goods.main;

import io.github.resilience4j.timelimiter.TimeLimiterConfig;
import io.github.resilience4j.timelimiter.TimeLimiterRegistry;
import org.springframework.boot.SpringApplication;
import org.springframework.boot.autoconfigure.SpringBootApplication;
import org.springframework.cloud.client.circuitbreaker.EnableCircuitBreaker;
import org.springframework.cloud.client.loadbalancer.LoadBalanced;
import org.springframework.cloud.openfeign.EnableFeignClients;
import org.springframework.context.annotation.Bean;
import org.springframework.web.client.RestTemplate;

import java.time.Duration;

// 定义扫描包
@SpringBootApplication(scanBasePackages = "com.scd.goods")
// 驱动断路器工作(Hystrix)
@EnableCircuitBreaker
public class GoodsApplication {

	... ...
}
这样就可以驱动Hystrix的工作,在Goods模块使用了Hystrix了,只需要加入一个注解@HystrixCommand即可使用Hystrix,这个注解通过Spring AOP技术将方法包装为一个Hystrix命令然后执行
在服务调用过程中常出现的两种故障一个是超时一个是异常,看一下断路器如何使用,首先在Customer模块的CustomerController中加入超时和异常两个方法代码如下
    // 最大休眠时间,为3秒
    private static Long MAX_SLEEP_TIME = 3000L;


    @GetMapping("/timeout/{id}")
    public String testTimeout(@PathVariable("id") Long id)  {

        try {

            // 随机产生不超过3秒的时间戳
            long sleepTime = (long) (Math.random()*MAX_SLEEP_TIME);
            // 线程休眠
            Thread.sleep(sleepTime);
        } catch (Exception ex) {

            ex.printStackTrace();
        }
        return "test timeout";
    }


    @GetMapping("/exception/{id}")
    public String testException(@PathVariable("id") Long id) {

        throw new RuntimeException("当前尚未开发该方法");
    }
在Hystrix中默认超时时间为1s,因此Goods模块在经过Hystrix调用Customer会很大概率出现超时,然后修改Goods模块的调用代码,添加调用方法,如下代码所示
package com.scd.goods.facade.impl;

import com.scd.goods.facade.CustomerFacade;
import com.netflix.hystrix.contrib.javanica.annotation.HystrixCommand;
import org.springframework.beans.factory.annotation.Autowired;
import org.springframework.stereotype.Service;
import org.springframework.web.client.RestTemplate;

/**
 * 定义一个服务类,该类用于处理特定的业务逻辑。
 * 使用@Service注解表明该类是一个服务层对象,通常由Spring框架管理其生命周期,
 * 并可以进行依赖注入。这个类的设计是为了提供一系列的服务操作,以支持应用程序的运行。
 */
@Service
public class CustomerFacadeImpl implements CustomerFacade {


    @Autowired
    private RestTemplate restTemplate = null;

    @Override
    public String getCustomerName(Long id) {

        //这里的CUSTOMER代表客户服务,此时RestTemplate会自动负载均衡
        String url="http://CUSTOMER/customer/name/{id}";
        // 服务REST风格调用
        String name = restTemplate.getForObject(url, String.class, id);
        return name;
    }


    /**
     * 测试超时调用
     * 使用Hystrix,通过Spring AOP将方法捆绑为一个Hystrix命令去执行,并指定了降级方法
     * @param id 参数
     * @return  服务调用结果或者降级结果
     * */
    @Hyst


