Android源码需求
- 定制Android系统
- 将最新版本的Android系统刷入到自己的Android设备中
- 将整个系统源码导入到AndroidStudiozhong
- 动态调试Android系统源码
命令介绍
cd aosp
source build/envsetup.sh
lunch
lunch aosp_x86_64-eng
make -j16 2>&1 | tee build.log
版本介绍
运行lunch,查看可以编译的版本信息
选择编译目标
hman@ubuntu:~/aosp$ lunch

You're building on Linux

Lunch menu... pick a combo:
     1. aosp_arm-eng
     2. aosp_arm64-eng
     3. aosp_blueline-userdebug
     4. aosp_bonito-userdebug
     5. aosp_car_arm-userdebug
     6. aosp_car_arm64-userdebug
     7. aosp_car_x86-userdebug
     8. aosp_car_x86_64-userdebug
     9. aosp_cf_arm64_phone-userdebug
     10. aosp_cf_x86_64_phone-userdebug
    ...

Which would you like? [aosp_arm-eng] aosp_x86_64-eng

============================================
PLATFORM_VERSION_CODENAME=REL
PLATFORM_VERSION=10
TARGET_PRODUCT=aosp_x86_64
TARGET_BUILD_VARIANT=eng
TARGET_BUILD_TYPE=release
TARGET_ARCH=x86_64
TARGET_ARCH_VARIANT=x86_64
TARGET_2ND_ARCH=x86
TARGET_2ND_ARCH_VARIANT=x86_64
HOST_ARCH=x86_64
HOST_2ND_ARCH=x86
HOST_OS=linux
HOST_OS_EXTRA=Linux-4.15.0-142-generic-x86_64-Ubuntu-16.04.7-LTS
HOST_CROSS_OS=windows
HOST_CROSS_ARCH=x86
HOST_CROSS_2ND_ARCH=x86_64
HOST_BUILD_TYPE=release
BUILD_ID=QQ3A.200805.001
OUT_DIR=out
| BUILD TYPE | 备注 |
|---|---|
| user | 编译出的系统有权限限制,适用于生产环境 |
| userdebug | 编译出的系统有 root 权限,调试首选 |
| eng | 优先考虑开发生产力,带有附加调试工具并关闭了优化 |
执行编译命令
编译指令根据使用场景不同有好几种,下表中列出了这些编译指令:
| 编译指令 | 备注 |
|---|---|
| m | 在源码树的根目录执行编译 |
| mm | 编译当前路径下所有模块,但不包含依赖 |
| mmm [module_path] | 编译指定路径下所有模块,但不包含依赖 |
| mma | 编译当前路径下所有模块,并包含依赖 |
| mmma [module_path] | 编译指定路径下所有模块,并包含依赖 |
| make [module_name] | 当不指定参数时则表示编译整个 Android 源码(包含依赖) |
make -j16 2>&1 | tee build.log
这个命令会编译源码,同时会把错误日志全打印到build.log文件中。
- -j16 表示指定线程数,这里要取ubuntu系统创建的时候,设置的大小,不能超。
编译成功后,终端会显示 build completed successfully。同时,在源码根目录下的 /home/airsaid/aosp/out/target/product/<product_name>目录中会出现编译后的产物。其中比较重要的有以下三个镜像文件
- system.img:系统镜像。里面包含了 Android 系统主要的目录和文件,通过 init.c进行解析并 mount挂载到 /system目录下。
- userdata.img:用户镜像。是 Android 系统中存放用户数据的,通过 init.c进行解析并 mount挂载到 /data目录下。
- ramdisk.img:根文件系统镜像。包含一些启动 Android 系统的重要文件,例如 init.rc。
成功
编译输出结果:
Warning: The kernel is still using the old partition table.
The new table will be used at the next reboot.
The operation has completed successfully.
Setting name!
partNum is 1
REALLY setting name!
Warning: The kernel is still using the old partition table.
The new table will be used at the next reboot.
The operation has completed successfully.
output_filename: out/target/product/generic_x86_64/system-qemu.img
Command: dd if=/dev/zero of=out/target/product/generic_x86_64/system-qemu.img ibs=1M count=1
output_filename0: out/target/product/generic_x86_64/system-qemu.img
seek: 1.0 and 1
output_filename0: out/target/product/generic_x86_64/system-qemu.img
seek: 2.0 and 2
output_filename2: out/target/product/generic_x86_64/system-qemu.img
Command2: dd if=/dev/zero of=out/target/product/generic_x86_64/system-qemu.img ibs=1M count=1 seek=3082

#### build completed successfully (02:26:15 (hh:mm:ss)) ####
启动虚拟机
cd aosp
source build/envsetup.sh
lunch aosp_x86_64-eng
emulator
// 或 使用详细模式输出更多调试信息
emulator -verbose -cores 4 -show-kernel
虚拟机启动起来了,但是黑屏。
(真的是,一波三折啊)
报错
- python的运行环境不对
FAILED: out/target/product/generic/system-qemu.img
/bin/bash -c "(export SGDISK=out/host/linux-x86/bin/sgdisk SIMG2IMG=out/host/linux-x86/bin/simg2img;      device/generic/goldfish/tools/mk_combined_img.py -i out/target/product/generic/system-qemu-config.txt -o out/target/product/generic/system-qemu.img)"
  File "device/generic/goldfish/tools/mk_combined_img.py", line 50
    print "'%s' cannot be converted to int" % (line[2])
                                          ^
SyntaxError: invalid syntax
ninja: build stopped: subcommand failed.
03:13:59 ninja failed with: exit status 1
从错误信息上看,是mk_combined_img.py中的打印print出错。原来执行mk_combined_img.py文件的时候,用的python版本是python2。但有些python需要用的python3,即3.几的版本。所以需要建立python指向python2才行。
which python2 # 先检查是否安装了python2,没有则安装
sudo apt install python2
sudo ln -s /usr/bin/python2 /usr/bin/python
我尝试修改,但并不能解决我的问题,我就屏蔽掉错误。
2. "dd: invalid number: ‘1.0’"报错
FAILED: out/target/product/generic_x86_64/system-qemu.img
/bin/bash -c "(export SGDISK=out/host/linux-x86/bin/sgdisk SIMG2IMG=out/host/linux-x86/bin/simg2img;      device/generic/goldfish/tools/mk_combined_img.py -i out/target/product/generic_x86_64/system-qemu-config.txt -o out/target/product/generic_x86_64/system-qemu.img)"
1+0 records in
2048+0 records out
1048576 bytes (1.0 MB, 1.0 MiB) copied, 0.0460221 s, 22.8 MB/s
dd: invalid number: ‘1.0’
ninja: build stopped: subcommand failed.
03:48:54 ninja failed with: exit status 1
从日志上看,是在运动"dd"命令的是,遇到错误无法识别"1.0",打开“device/generic/goldfish/tools/mk_combined_img.py”,找到关于“dd”相关的代码,如下
print(f"seek: {str(offset)} and {int(offset}")
dd_comm = ['dd', 'if='+partition["path"], 'of='+output_file,'conv=notrunc,sync',
                'ibs=1M','obs=1M', 'seek='+str(offset)]
当我直接运行
dd if=/dev/zero of=out/target/product/generic_x86_64/system-qemu.img ibs=1M obs=1M seek=1.0
都能正常输出结果。
hman@ubuntu:~/aosp$ dd if=/dev/zero of=out/target/product/generic/system-qemu.img ibs=1M obs=1M count=1 seek=1.0
dd: invalid number: ‘1.0’
所以原因应该是seek=1.0导致的,修改成str(int(offset))。
有两次都要修改,如下:
dd_comm = ['dd', 'if='+partition["path"], 'of='+output_file,'conv=notrunc,sync',
                'ibs=1M','obs=1M', 'seek='+str(int(offset))]
...
shell_command(['dd', 'if=/dev/zero', 'of='+output_filename,
                'conv=notrunc', 'bs=1M', 'count=1', 'seek='+str(int(offset))])
- 内存
The sum of sizes of [system vendor] is within BOARD_SUPER_PARTITION_SIZE:
1468014592+119820288 == 1587834880 <=  3229614080 == 3229614080
The sum of sizes of [system vendor] is within BOARD_EMULATOR_DYNAMIC_PARTITIONS_SIZE:
1468014592+119820288 == 1587834880 <= 3221225472 == 3221225472
The sum of sizes of [emulator_dynamic_partitions] is within BOARD_SUPER_PARTITION_SIZE:
3221225472 == 3221225472 <= 3229614080 == 3229614080
ninja: build stopped: subcommand failed.
18:43:52 ninja failed with: exit status 1
我下载的源码是Android11,通过找资料,我查到,
/aosp/device/generic/arm64/BoardConfig.mk
- x86_64 emulation currently requires hardware acceleration!
运行:emulator
emulator: WARNING: Couldn't find crash service executable /home/hman/aosp/prebuilts/android-emulator/linux-x86_64/emulator64-crash-service

emulator: ERROR: x86_64 emulation currently requires hardware acceleration!
Please ensure KVM is properly installed and usable.
CPU acceleration status: KVM requires a CPU that supports vmx or svm
是有关硬件加速和 KVM(Kernel-based Virtual Machine)的问题,需要进行一些配置和检查
检查 KVM 是否支持和启用
- 先 检查 CPU 是否支持虚拟化技术(VT-x 或 AMD-V):
egrep -c '(vmx|svm)' /proc/cpuinfo
0
输出结果 > 0 表示支持虚拟化。结果为 0 表示不支持,或者虚拟化功能在 BIOS 中未启用。
- 检查 Ubuntu 版本
hman@ubuntu:~/aosp$ lsb_release -a
No LSB modules are available.
Distributor ID:	Ubuntu
Description:	Ubuntu 16.04.7 LTS
Release:	16.04
Codename:	xenial
- 检查 KVM 模块是否加载
lsmod | grep kvm
应该看到 kvm 和 kvm_intel 或 kvm_amd 模块加载的情况。如果没有,说明 KVM 没有启用。
- 安装和启用 KVM
-- 在 Ubuntu/Debian 上
sudo apt-get update
sudo apt-get install qemu-kvm libvirt-daemon-system libvirt-bin bridge-utils
重启系统后,确认 kvm 已加载:
sudo modprobe kvm
sudo modprobe kvm_intel  # 对于 Intel CPU
sudo modprobe kvm_amd    # 对于 AMD CPU
- 检查kvm报错
hman@ubuntu:~/aosp$ sudo modprobe kvm
[sudo] password for hman:
hman@ubuntu:~/aosp$ sudo modprobe kvm_intel
modprobe: ERROR: could not insert 'kvm_intel': Operation not supported
hman@ubuntu:~/aosp$ sudo modprobe kvm_amd
modprobe: ERROR: could not insert 'kvm_amd': Operation not supported
关闭虚拟机,打开如下设置:
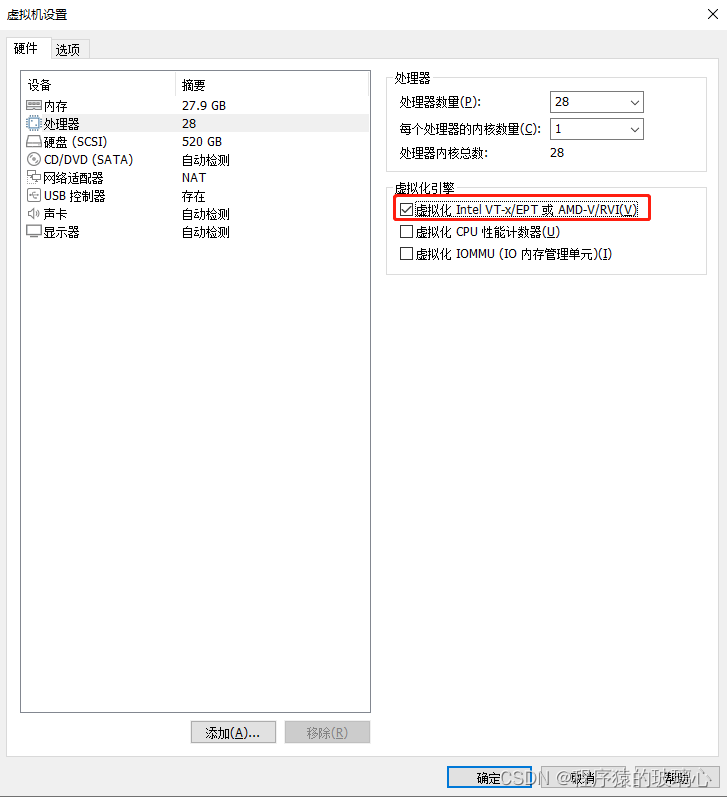
重启虚拟机后,运行命令如下:
hman@ubuntu:~/aosp$ egrep -c '(vmx|svm)' /proc/cpuinfo
28
hman@ubuntu:~/aosp$ lsmod | grep kvm
kvm_intel             217088  0
kvm                   614400  1 kvm_intel
irqbypass              16384  1 kvm
表示正常了。
- 报错 emulator: ERROR: detected a hanging thread ‘QEMU2 CPU1 thread’
运行:emulator -verbose -cores 4 -show-kernel
但是报错:emulator: ERROR: detected a hanging thread 'QEMU2 CPU1 thread'. No response for 15125 ms
Segmentation fault (core dumped)
通过问询GPT,做了如下修改:
emulator -verbose -cores 2 -show-kernel
大概登录十来分钟,终于是完成了。
