文章目录
- 1.Mybatis核心组件
- 1.1 SqlSession
- 1.2 SqlSessionFactory
- 1.3 Mapper
- 1.4 MappedStatement
- 1.5 Executor
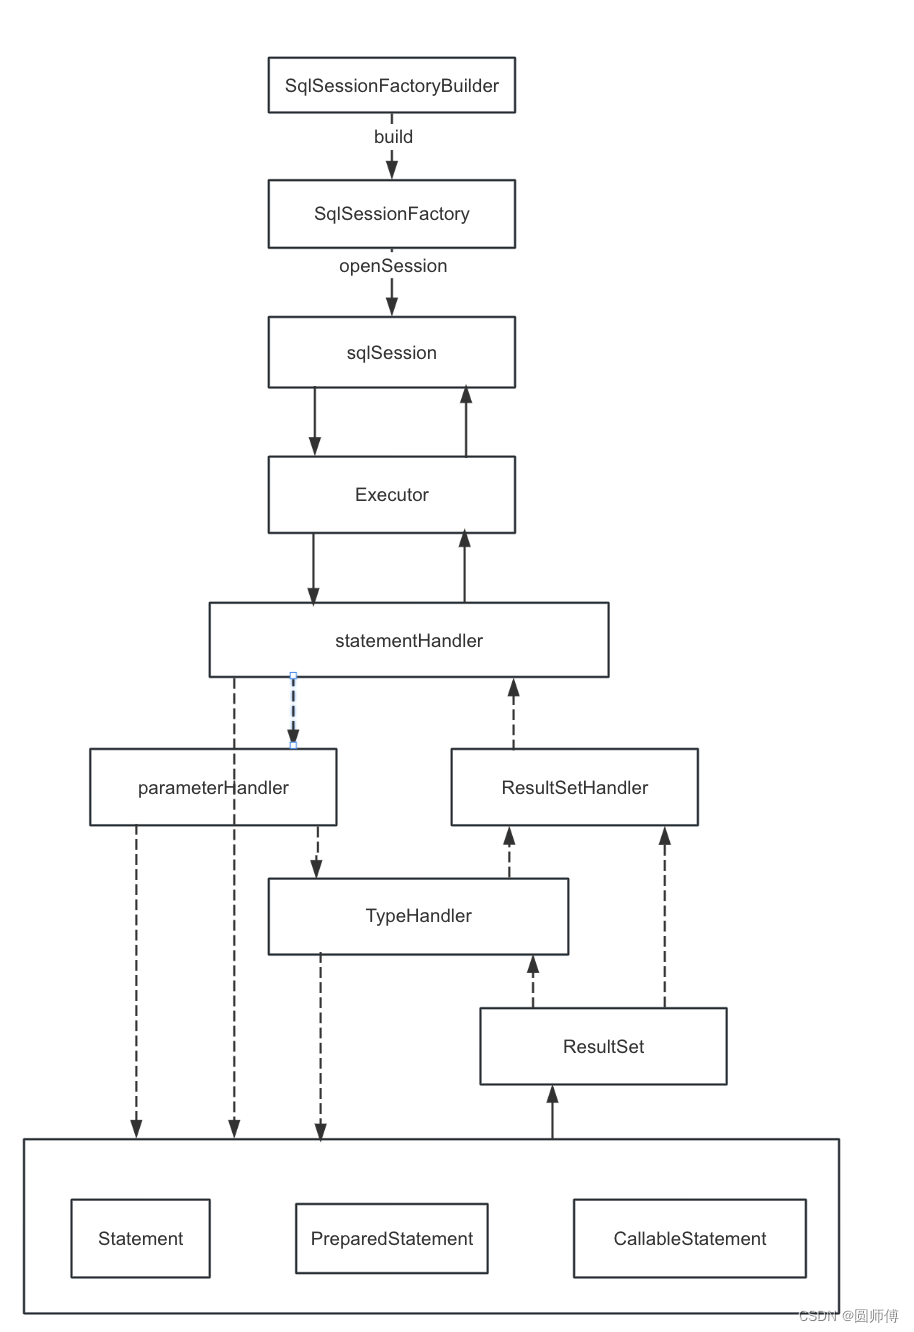
- 2. Mybatis各组件之间关系
- 3. 构建SqlSessionFactory
- 3.1 从XML文件中构建
- 3.2 不使用XML构建SqlSessionFactory
- 4. 如何从SqlSessionFactory获取SqlSession
- 5.获取Mapper
- 缓一下!缓一下! 买杯咖啡好嘛!
- 5.1 解析environments
- 5.2 解析mapper
- 5.2.1 解析配置parameterMap
- 5.2.2 ResultMap
- 5.2.3 SQL
- 5.2.4 select|insert|update|delete
- 6. 总结
Mybatis作为一个优秀的持久层框架,免除了几乎所有的JDBC代码已经设置参数和结果获取的工作。那Mybatis是如何做到的呢?本文主要介绍Mybatis中的一些重要概念。
1.Mybatis核心组件
1.1 SqlSession
类似于JDBC中的Connection,表示和数据库交互的会话。SqlSession提供了一系列的操作数据库的API,包括查询、插入和删除数据等操作。
1.2 SqlSessionFactory
SqlSessionFactory是mybatis的核心组件之一,可以依据配置文件以及JAVA API的方式生成SqlSession对象。
SqlSessionFactory是SqlSession的工厂类,采用工厂模式设计,封装对象创建的过程。
1.3 Mapper
Mapper是Mybatis中的一个抽象概念,表示一类DAO类的接口。每个Mapper接口中定义了对应的SQL操作方法。每个 Mapper 接口中定义了对应 SQL 操作的方法。Mapper 接口中的方法会被 MyBatis 解析成 MappedStatement 对象,与该 SQL 语句对应。
1.4 MappedStatement
MappedStatement 是 MyBatis 用于存储 SQL 语句、入参、出参等相关信息的核心组件。在 MyBatis 中,Mapper 接口中的每个方法都会被解析成一个 MappedStatement 对象。MappedStatement 对象是一个有状态(stateful)对象,包含了 SQL 语句的语法、入参映射、结果映射等相关信息。
1.5 Executor
Executor 是 MyBatis 中的核心组件之一,它主要负责查询语句的执行和结果的返回。Executor 的实现类有三种:SimpleExecutor、ReuseExecutor、BatchExecutor,分别对应于简单执行器、重复执行器和批处理执行器。Executor 提供了追踪和缓存查询结果的功能,能够提高执行效率。
2. Mybatis各组件之间关系
3. 构建SqlSessionFactory
从mybatis官网的入门示例中,可以清楚的看到两种不同的SqlSessionFactory创建方式:
- 从XML中构建SqlSessionFactory
- 不使用XML构建
3.1 从XML文件中构建
既然是从XML文件中构建,那就一定会有xml文件,官网有给出的示例文件,这里我们参照示例,适当修改如下(放在src/test/resource下):
<?xml version="1.0" encoding="UTF-8" ?>
<!DOCTYPE configuration
  PUBLIC "-//mybatis.org//DTD Config 3.0//EN"
  "https://mybatis.org/dtd/mybatis-3-config.dtd">
<configuration>
  <environments default="development">
    <environment id="development">
      <transactionManager type="JDBC"/>
      <dataSource type="POOLED">
        <property name="driver" value="com.mysql.cj.jdbc.Driver"/>
        <property name="url" value="jdbc:mysql://localhost:3306/bookstore?serverTimezone=UTC"/>
        <property name="username" value="root"/>
        <property name="password" value="123456"/>
      </dataSource>
    </environment>
  </environments>
  <mappers>
    <mapper resource="UserMapper.xml"/>
  </mappers>
</configuration>
还是使用之前一篇文章中的数据,创建一个测试用例,来测试sqlSession创建成功,并能查询到数据库的数据。这里还需要这样一个UserMapper.xml文件(也放在src/test/resource下)
<?xml version="1.0" encoding="UTF-8" ?>
<!DOCTYPE mapper
        PUBLIC "-//mybatis.org//DTD Mapper 3.0// EN"
        "http://mybatis.org/dtd/mybatis-3-mapper.dtd">
<mapper namespace="org.example.ssm.mapper.UserMapper">
        <select id="findUserByName">
            select * from user
        </select>
</mapper>
这样就可以编写测试用例了:
@org.junit.jupiter.api.Test
public void testSqlSession() throws IOException {
    String resource = "mybatis-config.xml";
    InputStream inputStream = Resources.getResourceAsStream(resource);
    SqlSessionFactory sqlSessionFactory = new SqlSessionFactoryBuilder().build(inputStream);
    SqlSession sqlSession = sqlSessionFactory.openSession();
    User tom = sqlSession.getMapper(UserMapper.class).findByName("tom");
    sqlSession.close();
    assertEquals(23, tom.getAge());
}
测试通过!通过XML配置文件构建SqlSessionFactory成功。
3.2 不使用XML构建SqlSessionFactory
当然了,配置的内容不仅可以从xml中读取,也可以从JAVA代码中获取。
@org.junit.jupiter.api.Test
    public void testSqlSessionWithoutXml() throws SQLException {
        DataSource dataSource = new SimpleDriverDataSource(new Driver(), "jdbc:mysql://localhost:3306/bookstore?serverTimezone=UTC", "root", "Yuanyao@123");
        JdbcTransactionFactory factory = new JdbcTransactionFactory();
        Environment environment = new Environment("test", factory, dataSource);
        Configuration configuration = new Configuration(environment);
        configuration.addMapper(UserMapper.class);
        SqlSessionFactory sqlSessionFactory = new SqlSessionFactoryBuilder().build(configuration);
        SqlSession sqlSession = sqlSessionFactory.openSession();
        User tom = sqlSession.getMapper(UserMapper.class).findByName("tom");
        sqlSession.close();
        assertEquals(23, tom.getAge());
    }
测试用例也还是一次通过!!
4. 如何从SqlSessionFactory获取SqlSession
在创建完SqlSessionFactory后,通过opensession方法就获取到了sqlSession。那么这个方法里到底包含了哪些内容?
@Override
public SqlSession openSession() {
  return openSessionFromDataSource(configuration.getDefaultExecutorType(), null, false);
}
调用了openSessionFromDataSource方法,还传了3个参数:
private SqlSession openSessionFromDataSource(ExecutorType execType, TransactionIsolationLevel level,
      boolean autoCommit) {
    Transaction tx = null;
    try {
      final Environment environment = configuration.getEnvironment();
      final TransactionFactory transactionFactory = getTransactionFactoryFromEnvironment(environment);
      tx = transactionFactory.newTransaction(environment.getDataSource(), level, autoCommit);
      final Executor executor = configuration.newExecutor(tx, execType);
      return new DefaultSqlSession(configuration, executor, autoCommit);
    } catch (Exception e) {
      closeTransaction(tx); // may have fetched a connection so lets call close()
      throw ExceptionFactory.wrapException("Error opening session.  Cause: " + e, e);
    } finally {
      ErrorContext.instance().reset();
    }
  }
三个参数的含义分别是Executor的类别,事务的隔离级别已经是否自动提交事务。很明显,这里的事务隔离级别是null,不自动提交事务。而ExecutorType则是从Configuration中获取DefaultExecutorType值SIMPLE。
在这个方法中,既然已经有了事务隔离级别的存在,那么事务必然少不了。这里是通过TransactionFactory来获取,而TransactionFactory又是根据environment配置来的:
private TransactionFactory getTransactionFactoryFromEnvironment(Environment environment) {
    if (environment == null || environment.getTransactionFactory() == null) {
      return new ManagedTransactionFactory();
    }
    return environment.getTransactionFactory();
  }
当然了,如果没有配置,那就new一个默认的喽。
现在,有了transaction和execType,那就可以从Configuration中构建出一个Executor了,有了Configuration和Executor,并且也知道了如何处理transaction,那此时就可以构建一个DefaultSqlSession对象了。
5.获取Mapper
然后从SqlSession中获取mapper,这里SqlSession的接口,定义了方法
<T> T getMapper(Class<T> type);
其实现类包括DefaultSqlSession,这里使用的正是这个:
@Override
  public <T> T getMapper(Class<T> type) {
    return configuration.getMapper(type, this);
  }
而Configuration中的getMapper方法是:
@Override
  public <T> T getMapper(Class<T> type) {
    return configuration.getMapper(type, this);
  }
可以看到这里是由configuration的getMapper方法根据mapper的类来获取的。但是这个configuration是什么时候被初始化的呢?
从代码中看,是通过构造函数初始化的:
public DefaultSqlSession(Configuration configuration, Executor executor, boolean autoCommit) {
    this.configuration = configuration;
    this.executor = executor;
    this.dirty = false;
    this.autoCommit = autoCommit;
  }
而构造函数又是什么时候被调用的?
在构建SqlSessionFactory的时候,调用了构造器构建的时候!
public SqlSessionFactory build(InputStream inputStream) {
    return build(inputStream, null, null);
}

public SqlSessionFactory build(InputStream inputStream, String environment, Properties properties) {
    try {
      XMLConfigBuilder parser = new XMLConfigBuilder(inputStream, environment, properties);
      return build(parser.parse());
    } catch (Exception e) {
      throw ExceptionFactory.wrapException("Error building SqlSession.", e);
    } finally {
      ErrorContext.instance().reset();
      try {
        if (inputStream != null) {
          inputStream.close();
        }
      } catch (IOException e) {
        // Intentionally ignore. Prefer previous error.
      }
    }
  }
而在通过构造器构建XMLConfigBuilder的时候
public XMLConfigBuilder(InputStream inputStream, String environment, Properties props) {
    this(Configuration.class, inputStream, environment, props);
}

public XMLConfigBuilder(Class<? extends Configuration> configClass, InputStream inputStream, String environment,
      Properties props) {
    this(configClass, new XPathParser(inputStream, true, props, new XMLMapperEntityResolver()), environment, props);
}

private XMLConfigBuilder(Class<? extends Configuration> configClass, XPathParser parser, String environment,
      Properties props) {
    super(newConfig(configClass));
    ErrorContext.instance().resource("SQL Mapper Configuration");
    this.configuration.setVariables(props);
    this.parsed = false;
    this.environment = environment;
    this.parser = parser;
}
在调用XMLConfigBuilder的时候,传入了一个XPathParser类型的参数。这个参数也是通过构造器传入的:
new XPathParser(inputStream, true, props, new XMLMapperEntityResolver())
public XPathParser(Reader reader, boolean validation, Properties variables, EntityResolver entityResolver) {
    commonConstructor(validation, variables, entityResolver);
    this.document = createDocument(new InputSource(reader));
}

private void commonConstructor(boolean validation, Properties variables, EntityResolver entityResolver) {
    this.validation = validation;
    this.entityResolver = entityResolver;
    this.variables = variables;
    XPathFactory factory = XPathFactory.newInstance();
    this.xpath = factory.newXPath();
 }
这里的构造器设置了一些基本信息:
- validation为true,需要校验数据
- entityResolver就是一个XMLMapperEntityResolver,用来解析这个配置的xml文件
- variables为null,没有设置
- 通过工厂模式,获取一个Xpath实例
然后调用createDocument解析配置的xml配置文件:
private Document createDocument(InputSource inputSource) {
    // important: this must only be called AFTER common constructor
    try {
      DocumentBuilderFactory factory = DocumentBuilderFactory.newInstance();
      factory.setFeature(XMLConstants.FEATURE_SECURE_PROCESSING, true);
      factory.setValidating(validation);

      factory.setNamespaceAware(false);
      factory.setIgnoringComments(true);
      factory.setIgnoringElementContentWhitespace(false);
      factory.setCoalescing(false);
      factory.setExpandEntityReferences(true);

      DocumentBuilder builder = factory.newDocumentBuilder();
      builder.setEntityResolver(entityResolver);
      builder.setErrorHandler(new ErrorHandler() {
        @Override
        public void error(SAXParseException exception) throws SAXException {
          throw exception;
        }

        @Override
        public void fatalError(SAXParseException exception) throws SAXException {
          throw exception;
        }

        @Override
        public void warning(SAXParseException exception) throws SAXException {
          // NOP
        }
      });
      return builder.parse(inputSource);
    } catch (Exception e) {
      throw new BuilderException("Error creating document instance.  Cause: " + e, e);
    }
  }
这里主要是读取并解析mybatis-config.xml文件为一个Document(解析xml文件过程暂时不作深入探讨,如有必要,另开一篇详细探讨)。
XMLConfigBuilder的父类构造器,super(new Config(configuration)),这里new了一个Config对象,传入的参数是一个配置类,这个类的就是org.apache.ibatis.session.Configuration。而这个类里的MapperRegistry参数是这样初始化的
protected final MapperRegistry mapperRegistry = new MapperRegistry(this);
而newConfig(configClass)方法是个静态方法:
private static Configuration newConfig(Class<? extends Configuration> configClass) {
    try {
      return configClass.getDeclaredConstructor().newInstance();
    } catch (Exception ex) {
      throw new BuilderException("Failed to create a new Configuration instance.", ex);
    }
  }
只是将Configuration类实例化了。
在super(newconfig(configuration))方法中只是初始化:
public BaseBuilder(Configuration configuration) {
    this.configuration = configuration;
    this.typeAliasRegistry = this.configuration.getTypeAliasRegistry();
    this.typeHandlerRegistry = this.configuration.getTypeHandlerRegistry();
}
到这里,总算把XMLConfigBuilder构建出来啦!
缓一下!缓一下!
买杯咖啡好嘛!
如果我填坑了,给我也买一杯好嘛!
喝完咖啡继续!
饶了很远,但是目标不能忘,构建SqlSessionFactory!接着看build(parser.parse())方法:
首先看XMLConfigBuilder的pares方法:
public Configuration parse() {
    if (parsed) {
      throw new BuilderException("Each XMLConfigBuilder can only be used once.");
    }
    parsed = true;
    parseConfiguration(parser.evalNode("/configuration"));
    return configuration;
 }
其中
parser.evalNode(“/configuration”)
就是读取Document中configuration节点的内容,然后这个XNode被parseConfiguration用来解析其中的配置:
private void parseConfiguration(XNode root) {
    try {
      // issue #117 read properties first
      propertiesElement(root.evalNode("properties"));
      Properties settings = settingsAsProperties(root.evalNode("settings"));
      loadCustomVfsImpl(settings);
      loadCustomLogImpl(settings);
      typeAliasesElement(root.evalNode("typeAliases"));
      pluginsElement(root.evalNode("plugins"));
      objectFactoryElement(root.evalNode("objectFactory"));
      objectWrapperFactoryElement(root.evalNode("objectWrapperFactory"));
      reflectorFactoryElement(root.evalNode("reflectorFactory"));
      settingsElement(settings);
      // read it after objectFactory and objectWrapperFactory issue #631
      environmentsElement(root.evalNode("environments"));
      databaseIdProviderElement(root.evalNode("databaseIdProvider"));
      typeHandlersElement(root.evalNode("typeHandlers"));
      mappersElement(root.evalNode("mappers"));
    } catch (Exception e) {
      throw new BuilderException("Error parsing SQL Mapper Configuration. Cause: " + e, e);
    }
  }
从这里可以看到,可以配置的内容很多,包括properties、settings、plugins等等。我这里暂时只配置了environments和mappers节点。
5.1 解析environments
environments节点中包含了连接数据所需要的基本信息,主要包括两部分内容,一部分就是transactionManager,一部分是dataSource
private void environmentsElement(XNode context) throws Exception {
    if (context == null) {
      return;
    }
    if (environment == null) {
      environment = context.getStringAttribute("default");
    }
    for (XNode child : context.getChildren()) {
      String id = child.getStringAttribute("id");
      if (isSpecifiedEnvironment(id)) {
        TransactionFactory txFactory = transactionManagerElement(child.evalNode("transactionManager"));
        DataSourceFactory dsFactory = dataSourceElement(child.evalNode("dataSource"));
        DataSource dataSource = dsFactory.getDataSource();
        Environment.Builder environmentBuilder = new Environment.Builder(id).transactionFactory(txFactory)
            .dataSource(dataSource);
        configuration.setEnvironment(environmentBuilder.build());
        break;
      }
    }
  }
我这里配置了transactionManager为JDBC类型,在dataSource下配置了连接数据的地址,用户名和密码。
5.2 解析mapper
private void mappersElement(XNode context) throws Exception {
    if (context == null) {
      return;
    }
    for (XNode child : context.getChildren()) {
      if ("package".equals(child.getName())) {
        String mapperPackage = child.getStringAttribute("name");
        configuration.addMappers(mapperPackage);
      } else {
        String resource = child.getStringAttribute("resource");
        String url = child.getStringAttribute("url");
        String mapperClass = child.getStringAttribute("class");
        if (resource != null && url == null && mapperClass == null) {
          ErrorContext.instance().resource(resource);
          try (InputStream inputStream = Resources.getResourceAsStream(resource)) {
            XMLMapperBuilder mapperParser = new XMLMapperBuilder(inputStream, configuration, resource,
                configuration.getSqlFragments());
            mapperParser.parse();
          }
        } else if (resource == null && url != null && mapperClass == null) {
          ErrorContext.instance().resource(url);
          try (InputStream inputStream = Resources.getUrlAsStream(url)) {
            XMLMapperBuilder mapperParser = new XMLMapperBuilder(inputStream, configuration, url,
                configuration.getSqlFragments());
            mapperParser.parse();
          }
        } else if (resource == null && url == null && mapperClass != null) {
          Class<?> mapperInterface = Resources.classForName(mapperClass);
          configuration.addMapper(mapperInterface);
        } else {
          throw new BuilderException(
              "A mapper element may only specify a url, resource or class, but not more than one.");
        }
      }
    }
  }
可以看到,通过mapper标签配置mybatis至少有2种配置方式:
- 1.配置package,并添加属性name:
<package name=“org.example.ssm.mapper”/>
- 2.配置 resource, url, class,三个其中一个
<mappers>
<mapper resource=“UserMapper.xml”/>
<mapper class=“org.example.ssm.mapper.UserMapper.class”/>
<mapper url=“http://userMapper.xml”/>
</mappers>
这样都可以读取,以resource方式读取为例:
ErrorContext.instance().resource(resource);
try (InputStream inputStream = Resources.getResourceAsStream(resource)) {
  XMLMapperBuilder mapperParser = new XMLMapperBuilder(inputStream, configuration, resource,
      configuration.getSqlFragments());
  mapperParser.parse();
}
这里首先通过构造函数创建了一个XMLMapperBuilder,同样,也会创建一个XPathParser去解析xml文件。
由XMLMapperBuilder.parse()方法来构建mapper:
public void parse() {
    if (!configuration.isResourceLoaded(resource)) {
      configurationElement(parser.evalNode("/mapper"));
      configuration.addLoadedResource(resource);
      bindMapperForNamespace();
    }
    parsePendingResultMaps();
    parsePendingCacheRefs();
    parsePendingStatements();
  }

private void configurationElement(XNode context) {
    try {
      String namespace = context.getStringAttribute("namespace");
      if (namespace == null || namespace.isEmpty()) {
        throw new BuilderException("Mapper's namespace cannot be empty");
      }
      builderAssistant.setCurrentNamespace(namespace);
      cacheRefElement(context.evalNode("cache-ref"));
      cacheElement(context.evalNode("cache"));
      parameterMapElement(context.evalNodes("/mapper/parameterMap"));
      resultMapElements(context.evalNodes("/mapper/resultMap"));
      sqlElement(context.evalNodes("/mapper/sql"));
      buildStatementFromContext(context.evalNodes("select|insert|update|delete"));
    } catch (Exception e) {
      throw new BuilderException("Error parsing Mapper XML. The XML location is '" + resource + "'. Cause: " + e, e);
    }
  }
可以看到,还会去解析mapper这个element下的各个元素:
- cache-ref
- cache
- parameterMap
- resultMap
- sql
- select|insert|update|delete
5.2.1 解析配置parameterMap
ParameterMap 是用来定义 SQL 语句中的参数映射关系的。通过 ParameterMap,可以将 Java 对象中的属性映射到 SQL 语句中的参数,从而实现参数的传递和绑定。
ParameterMap 的作用包括:
-
- 简化 SQL 语句中的参数设置:通过 ParameterMap 可以将 Java 对象中的属性直接映射到 SQL 语句中的参数,避免了在 SQL 语句中重复设置参数。
-
- 提高代码的可维护性:将 SQL 语句中的参数映射关系集中在 ParameterMap 中管理,便于统一维护和修改。
-
- 提高代码的重用性:可以在多个 SQL 语句中重复使用同一个 ParameterMap,减少重复的设置参数的工作。
-
- 支持更复杂的参数映射关系:ParameterMap 可以定义更复杂的参数映射关系,例如多个参数的组合、嵌套对象等。
private void parameterMapElement(List<XNode> list) {
    for (XNode parameterMapNode : list) {
      String id = parameterMapNode.getStringAttribute("id");
      String type = parameterMapNode.getStringAttribute("type");
      Class<?> parameterClass = resolveClass(type);
      List<XNode> parameterNodes = parameterMapNode.evalNodes("parameter");
      List<ParameterMapping> parameterMappings = new ArrayList<>();
      for (XNode parameterNode : parameterNodes) {
        String property = parameterNode.getStringAttribute("property");
        String javaType = parameterNode.getStringAttribute("javaType");
        String jdbcType = parameterNode.getStringAttribute("jdbcType");
        String resultMap = parameterNode.getStringAttribute("resultMap");
        String mode = parameterNode.getStringAttribute("mode");
        String typeHandler = parameterNode.getStringAttribute("typeHandler");
        Integer numericScale = parameterNode.getIntAttribute("numericScale");
        ParameterMode modeEnum = resolveParameterMode(mode);
        Class<?> javaTypeClass = resolveClass(javaType);
        JdbcType jdbcTypeEnum = resolveJdbcType(jdbcType);
        Class<? extends TypeHandler<?>> typeHandlerClass = resolveClass(typeHandler);
        ParameterMapping parameterMapping = builderAssistant.buildParameterMapping(parameterClass, property,
            javaTypeClass, jdbcTypeEnum, resultMap, modeEnum, typeHandlerClass, numericScale);
        parameterMappings.add(parameterMapping);
      }
      builderAssistant.addParameterMap(id, parameterClass, parameterMappings);
    }
  }
可以看到,这里可以配置的属性有很多,有property,javaType,jdbcType等等。
不过从官网得知,这个元素已经被废弃,后序不再使用了。
5.2.2 ResultMap
resultMap 元素是 MyBatis 中最重要最强大的元素。它可以让你从 90% 的 JDBC ResultSets 数据提取代码中解放出来,并在一些情形下允许你进行一些 JDBC 不支持的操作。实际上,在为一些比如连接的复杂语句编写映射代码的时候,一份 resultMap 能够代替实现同等功能的数千行代码。
ResultMap 的设计思想是,对简单的语句做到零配置,对于复杂一点的语句,只需要描述语句之间的关系就行了。
private void resultMapElements(List<XNode> list) {
    for (XNode resultMapNode : list) {
      try {
        resultMapElement(resultMapNode);
      } catch (IncompleteElementException e) {
        // ignore, it will be retried
      }
    }
  }


private ResultMap resultMapElement(XNode resultMapNode) {
    return resultMapElement(resultMapNode, Collections.emptyList(), null);
  }

  private ResultMap resultMapElement(XNode resultMapNode, List<ResultMapping> additionalResultMappings,
      Class<?> enclosingType) {
    ErrorContext.instance().activity("processing " + resultMapNode.getValueBasedIdentifier());
    String type = resultMapNode.getStringAttribute("type", resultMapNode.getStringAttribute("ofType",
        resultMapNode.getStringAttribute("resultType", resultMapNode.getStringAttribute("javaType"))));
    Class<?> typeClass = resolveClass(type);
    if (typeClass == null) {
      typeClass = inheritEnclosingType(resultMapNode, enclosingType);
    }
    Discriminator discriminator = null;
    List<ResultMapping> resultMappings = new ArrayList<>(additionalResultMappings);
    List<XNode> resultChildren = resultMapNode.getChildren();
    for (XNode resultChild : resultChildren) {
      if ("constructor".equals(resultChild.getName())) {
        processConstructorElement(resultChild, typeClass, resultMappings);
      } else if ("discriminator".equals(resultChild.getName())) {
        discriminator = processDiscriminatorElement(resultChild, typeClass, resultMappings);
      } else {
        List<ResultFlag> flags = new ArrayList<>();
        if ("id".equals(resultChild.getName())) {
          flags.add(ResultFlag.ID);
        }
        resultMappings.add(buildResultMappingFromContext(resultChild, typeClass, flags));
      }
    }
    String id = resultMapNode.getStringAttribute("id", resultMapNode.getValueBasedIdentifier());
    String extend = resultMapNode.getStringAttribute("extends");
    Boolean autoMapping = resultMapNode.getBooleanAttribute("autoMapping");
    ResultMapResolver resultMapResolver = new ResultMapResolver(builderAssistant, id, typeClass, extend, discriminator,
        resultMappings, autoMapping);
    try {
      return resultMapResolver.resolve();
    } catch (IncompleteElementException e) {
      configuration.addIncompleteResultMap(resultMapResolver);
      throw e;
    }
  }
官网的解释很到位,这里我不做无用摘抄,直接上链接!mybatis官网
5.2.3 SQL
这里也就是解析配置的内容,挨个按顺序解析:
private void sqlElement(List<XNode> list) {
    if (configuration.getDatabaseId() != null) {
      sqlElement(list, configuration.getDatabaseId());
    }
    sqlElement(list, null);
  }

  private void sqlElement(List<XNode> list, String requiredDatabaseId) {
    for (XNode context : list) {
      String databaseId = context.getStringAttribute("databaseId");
      String id = context.getStringAttribute("id");
      id = builderAssistant.applyCurrentNamespace(id, false);
      if (databaseIdMatchesCurrent(id, databaseId, requiredDatabaseId)) {
        sqlFragments.put(id, context);
      }
    }
  }
5.2.4 select|insert|update|delete
这个是去构建statement,以便可以具体execute语句,可以对数据库进行增删改查。通过statement或者实现类preparedStatement操作已经是JDBC链接操作数据库的基本操作了。
private void buildStatementFromContext(List<XNode> list) {
    if (configuration.getDatabaseId() != null) {
      buildStatementFromContext(list, configuration.getDatabaseId());
    }
    buildStatementFromContext(list, null);
  }

  private void buildStatementFromContext(List<XNode> list, String requiredDatabaseId) {
    for (XNode context : list) {
      final XMLStatementBuilder statementParser = new XMLStatementBuilder(configuration, builderAssistant, context,
          requiredDatabaseId);
      try {
        statementParser.parseStatementNode();
      } catch (IncompleteElementException e) {
        configuration.addIncompleteStatement(statementParser);
      }
    }
  }
至此,我们似乎已经把需要的东西全部准备好了:
- 连接数据库的基本信息,包括数据库地址、用户名、密码、transactionManager
- mapper,定义用什么数据作参数,获得什么样的数据,并如何转化为什么形式。
可别忘了,咱这是在干嘛,是在创建SqlSessionFactory!有了配置文件,就直接调用DefaultSqlSessionFactory的构造函数创建就好了。
public SqlSessionFactory build(Configuration config) {
    return new DefaultSqlSessionFactory(config);
  }
创建好了SqlSessionFactory,那就可以获取SqlSession了,然后就终于可以获取Mapper了!
接着看SqlSession的getMapper方法:
@Override
  public <T> T getMapper(Class<T> type) {
    return configuration.getMapper(type, this);
}
跟到Configuration类中的实现方法:
public <T> T getMapper(Class<T> type, SqlSession sqlSession) {
    return mapperRegistry.getMapper(type, sqlSession);
}
而MapperRegistry的getMapper方法:
public <T> T getMapper(Class<T> type, SqlSession sqlSession) {
    final MapperProxyFactory<T> mapperProxyFactory = (MapperProxyFactory<T>) knownMappers.get(type);
    if (mapperProxyFactory == null) {
      throw new BindingException("Type " + type + " is not known to the MapperRegistry.");
    }
    try {
      return mapperProxyFactory.newInstance(sqlSession);
    } catch (Exception e) {
      throw new BindingException("Error getting mapper instance. Cause: " + e, e);
    }
  }
从knownMappers中根据type获取MapperProxyFactory,然后创建其实例,即UserMapper。
protected T newInstance(MapperProxy<T> mapperProxy) {
    return (T) Proxy.newProxyInstance(mapperInterface.getClassLoader(), new Class[] { mapperInterface }, mapperProxy);
  }
最终获取到这个mapper,然后调用mapper的findByName方法。
6. 总结
mybatis本身看起来并不复杂,学习难度与大名鼎鼎的hibernate相比,要小很多。整体流程非常清晰,其核心就是SqlSession。围绕SqlSession的创建,以及通过mapper定义Sql语句,通过SqlSession创建statement对数据库进行操作,然后对返回数据作映射。



![[单机版架设]新天堂2-死亡骑士338|带AI机器人](https://img-blog.csdnimg.cn/img_convert/17d0000cbf3d9c3b1c36ce1ffa8fcfd8.webp?x-oss-process=image/format,png)


