通义千问最近问鼎开源模型Top 1 ,今天我来分享一下Qwen2系列模型,Qwen2系列模型是Qwen1.5系列模型的重大升级。包括了:
-
5个尺⼨的预训练和指令微调模型, 包括Qwen2-0.5B、Qwen2-1.5B、Qwen2-7B、Qwen2-57B-A14B以及Qwen2-72B;
-
在中⽂英语的基础上,训练数据中增加了27种语⾔相关的⾼质量数据;
-
多个评测基准上的领先表现;
-
代码和数学能⼒显著提升;
-
增⼤了上下⽂⻓度⽀持,最⾼达到128K tokens(Qwen2-72B-Instruct) 。
Qwen2-72B模型
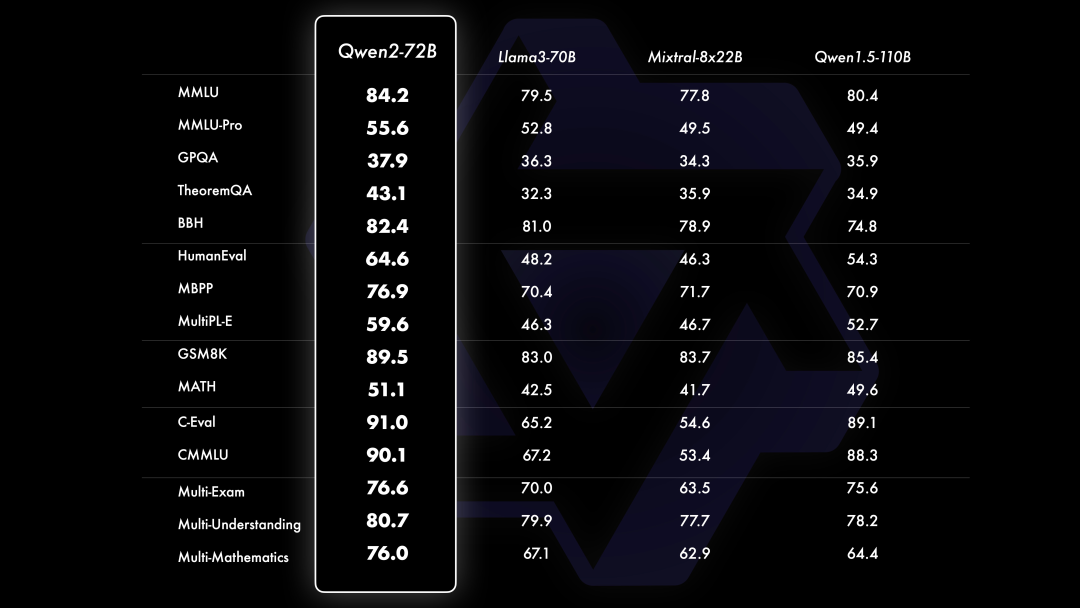
相⽐Qwen1.5,Qwen2在⼤规模模型实现了⾮常⼤幅度的效果提升。如下我们针对Qwen2-72B进⾏评测。在针对预训练语⾔模型的评估中,对⽐当前最优的开源模型,Qwen2-72B在包括⾃然语⾔理解、知识、代码、数学及多语⾔等多项能⼒上均显著超越当前领先的模型,如Llama-3-70B以及Qwen1.5最⼤的模型Qwen1.5-110B。这得益于其预训练数据及训练⽅法的优化。
在⾃然语⾔理解和逻辑推理等⽅⾯,尤其是科学类问题上,Qwen2-72B的优势更为明显。⽽在代码测试中,Qwen2-72B同样取得不俗的成绩,并且在多个编程语⾔上都有较为突出的表现。数学能⼒则由于其预训练数据中数学部分的优化实现了⼤幅度提升。此外,在⼤家较为关注的多语⾔的表现上,Qwen2-72B在多个领域的多语⾔评测上均具有⼀定的优势。这也意味着,Qwen2有潜⼒在更多的国家和地区得到落地应⽤。
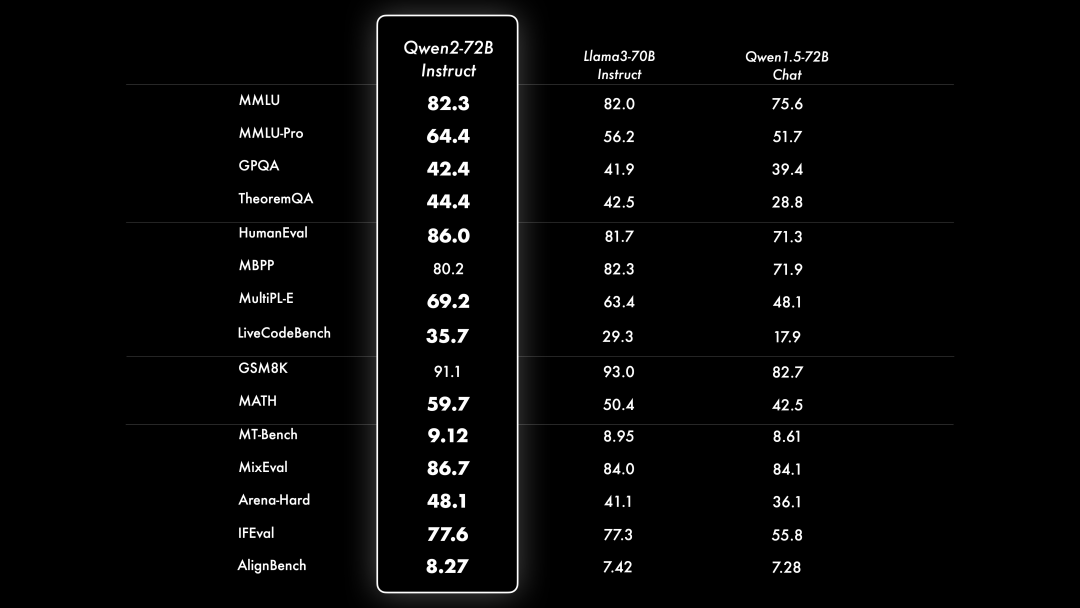
在微调和对⻬上投⼊了⼤量的精⼒进⾏研究。Qwen2的策略包括⼴泛采集指令和提示词,以及利⽤合成数据,如使⽤拒绝采样、代码执⾏反馈、回译等⽅法。为了进⼀步和⼈类偏好对⻬,Qwen2采⽤了DPO的⽅法。除了使⽤常⻅的DPO及DPO的变体如IPO、KTO外,Qwen2还探索了DPO与在线学习的结合,从⽽提升模型能⼒的上限。⽽为了降低对⻬所产⽣的“对⻬税”,Qwen2使⽤模型合并的⽅法来缓解此问题。这⼀系列的努⼒最终帮助我们⼤幅度的提升了指令微调模型的基础能⼒以及智⼒等。结果如下所示:
⽽在较⼩的模型规模上,Qwen2同样是各个模型尺⼨上的佼佼者。详细请关注魔搭社区的每个模型的模型介绍页面。
技术交流&资料
技术要学会分享、交流,不建议闭门造车。一个人可以走的很快、一堆人可以走的更远。
成立了算法面试和技术交流群,相关资料、技术交流&答疑,均可加我们的交流群获取,群友已超过2000人,添加时最好的备注方式为:来源+兴趣方向,方便找到志同道合的朋友。
方式①、微信搜索公众号:机器学习社区,后台回复:加群
方式②、添加微信号:mlc2040,备注:来自CSDN + 技术交流
模型推理
使用Transformers 推理
from modelscope import AutoModelForCausalLM, AutoTokenizer
device = "cuda" # the device to load the model onto

model = AutoModelForCausalLM.from_pretrained(
    "qwen/Qwen2-7B-Instruct",
    torch_dtype="auto",
    device_map="auto"
)
tokenizer = AutoTokenizer.from_pretrained("qwen/Qwen2-7B-Instruct")

prompt = "Give me a short introduction to large language model."
messages = [
    {"role": "system", "content": "You are a helpful assistant."},
    {"role": "user", "content": prompt}
]
text = tokenizer.apply_chat_template(
    messages,
    tokenize=False,
    add_generation_prompt=True
)
model_inputs = tokenizer([text], return_tensors="pt").to(device)

generated_ids = model.generate(
    model_inputs.input_ids,
    max_new_tokens=512
)
generated_ids = [
    output_ids[len(input_ids):] for input_ids, output_ids in zip(model_inputs.input_ids, generated_ids)
]

response = tokenizer.batch_decode(generated_ids, skip_special_tokens=True)[0]
使用vLLM推理
(可选)启用YARN以支持更长的上下文,修改config.json文件,添加以下片段:
    {
        "architectures": [
            "Qwen2ForCausalLM"
        ],
        // ...
        "vocab_size": 152064,

        // adding the following snippets
  "rope_scaling": {
      "factor": 4.0,
      "original_max_position_embeddings": 32768,
      "type": "yarn"
  }
    }
vLLM推理命令
python -m vllm.entrypoints.openai.api_server --served-model-name Qwen2-72B-Instruct --model="/cache_dir/Qwen2-72B-Instruct" --tensor-parallel-size 4
openai格式接口调用
curl http://localhost:8000/v1/chat/completions \
-H "Content-Type: application/json" \
-d '{
"model": "Qwen2-72B-Instruct",
"messages": [
    {"role": "system", "content": "you are a helpful assistant."},
    {"role": "user", "content": "讲一下大语言模型的特点"}
]
}'
使用MLX在苹果端侧推理
安装依赖
pip install mlx-lm mlx -U
from mlx_lm import load, generate
from modelscope import snapshot_download
model_dir = snapshot_download("qwen/Qwen2-0.5B-Instruct-MLX")
model, tokenizer = load(model_dir, tokenizer_config={"eos_token": "<|im_end|>"})

prompt = "Give me a short introduction to large language model."
messages = [
    {"role": "system", "content": "You are a helpful assistant."},
    {"role": "user", "content": prompt}
]
text = tokenizer.apply_chat_template(
    messages,
    tokenize=False,
    add_generation_prompt=True
)

response = generate(model, tokenizer, prompt=text, verbose=True, top_p=0.8, temp=0.7, repetition_penalty=1.05, max_tokens=512)
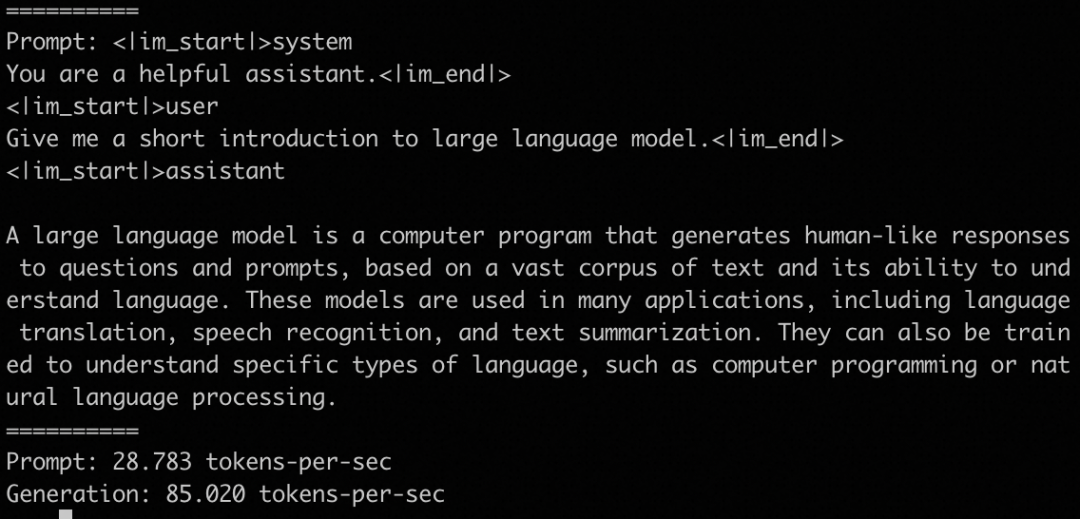
推理速度参考如下:
使用DashInfer CPU推理引擎
支持LLM在包括CPU和ARM处理器等多样化硬件上的高效推理。
python依赖:
pip install modelscope dashinfer jinja2 tabulate torch transformers
推理代码:
import copy
import random

from modelscope import snapshot_download
from dashinfer.helper import EngineHelper, ConfigManager

# You may also choose between "dash-infer/Qwen2-0.5B-Instruct-DI"
# and "dash-infer/Qwen2-1.5B-Instruct-DI" alterantively.
model_path = snapshot_download("dash-infer/Qwen2-7B-Instruct-DI")

config_file = model_path + "/" + "di_config.json"
config = ConfigManager.get_config_from_json(config_file)
config["model_path"] = model_path

## init EngineHelper class
engine_helper = EngineHelper(config)
engine_helper.verbose = True
engine_helper.init_tokenizer(model_path)

## init engine
engine_helper.init_engine()

## prepare inputs and generation configs
user_input = "浙江的省会在哪"
prompt = "<|im_start|>" + "system\n" + "You are a helpful assistant." + "<|im_end|>\n" + \
         "<|im_start|>" + "user\n" + user_input + "<|im_end|>\n" + \
         "<|im_start|>" + "assistant\n"
gen_cfg = copy.deepcopy(engine_helper.default_gen_cfg)
gen_cfg["seed"] = random.randint(0, 10000)
request_list = engine_helper.create_request([prompt], [gen_cfg])

## inference
engine_helper.process_one_request(request_list[0])
engine_helper.print_inference_result_all(request_list)

engine_helper.uninit_engine()
模型微调
在开始微调之前,需要进行环境准备:
# pip 安装
pip install 'ms-swift[llm]' -U

# 或者源码安装
git clone https://github.com/modelscope/swift.git
cd swift
pip install -e '.[llm]'
整个微调过程大约需要30分钟,微调脚本如下:
# Experimental environment: 2 * A100
# 2 * 75GB GPU memory
CUDA_VISIBLE_DEVICES=0,1 \
swift sft \
    --model_id_or_path qwen/Qwen2-72B-Instruct \
    --sft_type lora \
    --dtype AUTO \
    --dataset AI-ModelScope/alpaca-gpt4-data-zh#500 AI-ModelScope/alpaca-gpt4-data-en#500 swift/self-cognition#500 \
    --model_name 小胡 XiaoHu \
    --model_author 魔搭 ModelScope \
    --num_train_epochs 1 \
    --lora_rank 8 \
    --lora_alpha 32 \
    --lora_dropout_p 0.05 \
    --lora_target_modules ALL \
    --gradient_checkpointing true \
    --batch_size 1 \
    --weight_decay 0.1 \
    --learning_rate 1e-4 \
    --gradient_accumulation_steps 16 \
    --use_flash_attn true \
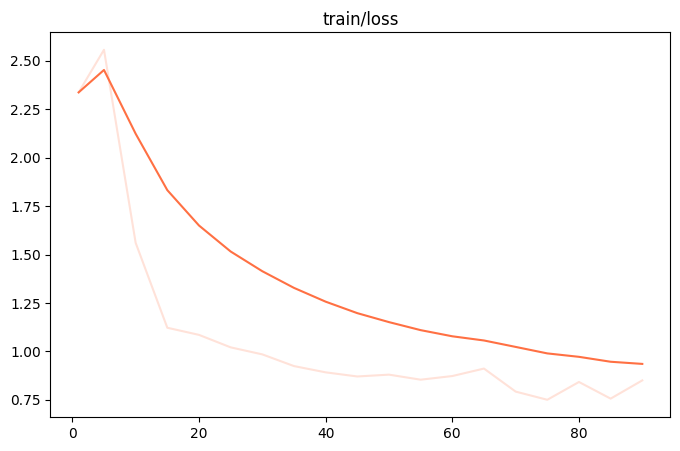
微调过程的loss可视化:
微调显存占用:

微调后推理脚本如下,这里的ckpt_dir需要修改为微调生成的checkpoint文件夹:
# Experimental environment: 2 * A100

# 使用pytorch进行直接推理
CUDA_VISIBLE_DEVICES=0,1 swift infer \
    --ckpt_dir "output/qwen2-72b-instruct/vx-xxx/checkpoint-xxx"


# Merge LoRA并使用vLLM进行推理加速
CUDA_VISIBLE_DEVICES=0,1 swift export \
    --ckpt_dir "output/qwen2-72b-instruct/vx-xxx/checkpoint-xxx" \
    --merge_lora true

pip install vllm -U
RAY_memory_monitor_refresh_ms=0 CUDA_VISIBLE_DEVICES=0,1 swift infer \
    --ckpt_dir "output/qwen2-72b-instruct/vx-xxx/checkpoint-xxx-merged" \
    --infer_backend vllm --tensor_parallel_size 2 \
    --max_model_len 8192 --gpu_memory_utilization 0.95
训练后效果:

部署Qwen2支持function call的API
首先,环境准备,需要modelscope-agent的项目:
git clone https://github.com/modelscope/modelscope-agent.git
cd modelscope-agent
其次,在python命令行中下载qwen2-7b-instruct模型,获取model_dir,用于后续使用
from modelscope import snapshot_download
model_dir = snapshot_download('qwen/Qwen2-7B-Instruct')
print(model_dir)
接下来在shell命令行,根据model_dir拉起具有function calling 的服务,调用的options参数与vllm调用方式对齐。
sh scripts/run_assistant_server.sh --served-model-name Qwen2-7B-Instruct --model path/to/weights
运行命令后,服务会启动在31512端口。此时,用户可以通过标准的tool calling 进行测试调用如下:
curl -X POST 'http://localhost:31512/v1/chat/completions' \
-H 'Content-Type: application/json' \
-d '{
    "tools": [{
        "type": "function",
        "function": {
            "name": "amap_weather",
            "description": "amap weather tool",
            "parameters": [{
                "name": "location",
                "type": "string",
                "description": "城市/区具体名称,如`北京市海淀区`请描述为`海淀区`",
                "required": true
            }]
        }
    }],
    "tool_choice": "auto",
    "model": "Qwen2-7B-Instruct",
    "messages": [
        {"content": "海淀区天气", "role": "user"}
    ]
}'
另外,用户也可以使用openai SDK进行调用,具体使用方式如下:
from openai import OpenAI
api_base = "http://localhost:31512/v1/"
model = 'Qwen2-7B-Instruct'

tools = [{
    "type": "function",
    "function": {
        "name": "amap_weather",
        "description": "amap weather tool",
        "parameters": [{
            "name": "location",
            "type": "string",
            "description": "城市/区具体名称,如`北京市海淀区`请描述为`海淀区`",
            "required": True
        }]
    }
}]

tool_choice = 'auto'

client = OpenAI(
    base_url=api_base,
    api_key="empty",
)
chat_completion = client.chat.completions.create(
    messages=[{
        "role": "user",
        "content": "海淀区天气是什么?"
    }],
    model=model,
    tools=tools,
    tool_choice=tool_choice
)
print(chat_completion)
返回如下结果:
{
  "request_id": "chatcmpl_3f020464-e98d-4c7b-8717-9fca56784fe6",
  "message": "",
  "output": null,
  "id": "chatcmpl_3f020464-e98d-4c7b-8717-9fca56784fe6",
  "choices": [
    {
      "index": 0,
      "message": {
        "role": "assistant",
        "content": "好的,我已经调用了amap_weather工具查询了海淀区的天气情况。现在,让我为您展示一下查询结果吧。\n\n工具调用\nAction: amap_weather\nAction Input: {\"location\": \"海淀区\"}\n",
        "tool_calls": [
          {
            "type": "function",
            "function": {
              "name": "amap_weather",
              "arguments": "{\"location\": \"海淀区\"}"
            }
          }
        ]
      },
      "finish_reason": "tool_calls"
    }
  ],
  "created": 1717485704,
  "model": "Qwen2-7B-Instruct",
  "system_fingerprint": "chatcmpl_3f020464-e98d-4c7b-8717-9fca56784fe6",
  "object": "chat.completion",
  "usage": {
    "prompt_tokens": 237,
    "completion_tokens": 48,
    "total_tokens": 285
  }
}
至此,用户可以快速的利用modelscope-agent为一个模型增加tool calling的能力。
