文章目录
- 一.RemoteAttestation原理介绍
-
- 1.1 远程认证原理
- 1.2 远程认证步骤
- 1.3 远程认证基本流程
- 1.4 IAS通过以下步骤验证报告的签名
- 1.5 关键术语
- 1.6 总结
- 二.源码分析
-
- 2.1 README
-
- 2.1.1 README给出的编译流程
- 2.2 重点代码分析
-
- 2.2.0 主要代码模块交互流程分析
- 2.2.1 isv_app文件夹
-
- 2.2.1.1 isv_app/isv_app.cpp
- 2.2.1.2 ECDSA和EPID两种认证方式对比
- 2.2.2 isv_enclave文件夹
-
- 2.2.2.1 isv_enclave/isv_enclave.cpp
- 2.2.2.2 isv_enclave/isv_enclave.edl
- 2.2.3 service_provider文件夹
-
- 2.2.3.1 service_provider/service_provider.cpp
- 2.3 编译执行
-
- 2.3.1 Makefile文件分析
- 2.3.2 编译问题解决
- 2.3.3 执行
- 2.4 总结
- 三.参考文献
- 四.感谢支持
下面将给出一些sgx源码包中的示例RemoteAttestation分析,从中学习远程认证和SGX的基本使用方法:关于 SGX 开发运行环境的搭建可参考之前的一篇博客:【SGX系列教程】(一)。
一.RemoteAttestation原理介绍
1.1 远程认证原理
远程认证(Remote Attestation)在本地认证机制基础上拓展而成。是指使用Intel SGX技术验证远程Enclave是否可信的过程。它允许服务提供商可以远程验证连接到其服务的客户端Enclave的身份和完整性。
SGX技术使用一个身份公认的特殊Enclave,称为引用Enclave。当目标Enclave收到远程认证请求时,目标Enclave首先会回应清单以及包含回应清单摘要的REPORT结构信息,并与本地平台内的引用Enclave进行相互认证(1.上面本地认证的流程),在相互认证通过后,引用Enclave生成远程认证结果QUOTE,并用处理器私钥进行签名。最后将QUOTE及其签名、相关清单发送给认证请求者。远程认证请求者收到相关数据后,通过目标Enclave平台的公钥证书来验证签名的合法性,2.通过清单内容和摘要认证清单完整性和目标远程平台Enclave的身份。具体认证流程可参考下图。总的来说,远程认证通过以下方式工作:
- 测量:在创建Enclave时,SGX生成一个称为
MRENCLAVE的测量值,用于表示Enclave的代码和初始数据。 - 密钥:每个Enclave会从SGX平台获得一个密钥,该密钥用于加密生成报告。
- 报告:Enclave生成报告(Report)并发送给Attestation Service(通常是Intel的IAS,Intel Attestation Service)。
- 验证:IAS验证这些报告并返回认证结果。

1.2 远程认证步骤
- 初始化并创建Enclave
客户端使用sgx_create_enclave创建客户端Enclave,并生成一个称为测量值的MRENCLAVE。 - 生成报告
客户端Enclave使用sgx_create_report生成一个报告,包含MRENCLAVE和其他身份信息,并使用平台密钥(Enclave_private.pem)进行签名;报告通过一个非可信执行环境(如驱动程序或用户空间程序)发送给远程服务(Verifier)。 - 请求认证
非可信部分将报告发送给Intel的远程认证服务(IAS);IAS验证报告的签名并确认Enclave确实是由可信的SGX处理器创建的。 - 认证响应
IAS返回认证结果,包含报告的验证结果和Enclave的详细信息;非可信部分将认证结果传递回客户端Enclave。 - 验证结果
客户端Enclave处理认证结果。如果认证通过,它可以证明其是可信的,远程服务可以基于此信息信任该Enclave。
1.3 远程认证基本流程
+-----------------+              +-------------------+       +--------------+
|Client Enclave(isv_enclave)|    |Client Non-TEE(isv_app)|   |Remote Server(service_provider)|
+-----------------+              +-------------------+       +--------------+
        |                          |                         |
        | 1. Generate Report       |                         |
        |------------------------->|                         |
        |                          |                         |
        |                          | 2. Send Report          |
        |                          |------------------------>|
        |                          |                         |
        |                          |                         | 3. Send Report
        |                          |                         | to IAS
        |                          |                         |<--------->|
        |                          |                         |
        |                          |                         | 4. Receive
        |                          |                         | Attestation
        |                          |                         | Result from IAS
        |                          |                         |<--------->|
        |                          |                         |
        | 5. Receive Attestation   |                         |
        | Result from IAS          |                         |
        |<-------------------------|                         |
        |                          |                         |
        |                          | 6. (Optional) Establish |
        |                          | Secure Communication    |
        |                          |<----------------------->|
+-----------------+          +----------------+          +--------------+
|  Client Enclave |          | Client Non-TEE |          | Remote Server|
+-----------------+          +----------------+          +--------------+
1.4 IAS通过以下步骤验证报告的签名
- 验证报告的签名
签名验证:通过使用Report中的签名和处理器密钥(封装在SGX硬件中),IAS验证报告签名的真实性。如果签名不匹配或验证失败,说明报告不可信或被篡改。 - 验证Enclave的身份和可信程度
MRSIGNER检查:IAS验证MRSIGNER值是否在白名单中,确保Enclave由可信的签名者签名。
MRENCLAVE检查:验证Enclave的测量值MRENCLAVE与预期是否匹配,确保Enclave的代码内容未被篡改。
属性验证:如果系统在非调试模式下运行,IAS确保Enclave没有设置调试标志。 - 生成认证结果
根据上一步的验证,IAS生成认证结果,包含以下部分:
报告的真实性验证: IAS确保报告是由合法的SGX处理器生成,且未经篡改。
Enclave的可信性验证:
MRENCLAVE:确保代码的完整性。
MRSIGNER:验证签名者的可信性。
属性标志:验证Enclave的状态(如初始化、调试模式等)。
流程图示意:
Client Enclave                            Client Non-TEE                           IAS
     |                                         |                                    |
     | 1. Generate Report                      |                                    |
     |---------------------------------------->|                                    |
     |                                         | 2. Send Report                     |
     |                                         |----------------------------------->|
     |                                         |                                    |
     |                                         |                                    | 3. Decode and Parse Report
     |                                         |                                    |    - Extract MRENCLAVE, MRSIGNER, etc.
     |                                         |                                    |
     |                                         |                                    | 4. Verify Signature
     |                                         |                                    |    - Check signature integrity using
     |                                         |                                    |      processor key
     |                                         |                                    |
     |                                         |                                    | 5. Validate Enclave Identity and Trustworthiness
     |                                         |                                    |    - MRENCLAVE check
     |                                         |                                    |    - MRSIGNER check
     |                                         |                                    |    - Attributes validation
     |                                         |                                    |
     |                                         |                                    | 6. Generate Attestation Result
     |                                         |                                    |    - Attestation passed/failed
     |                                         |                                    |
     |                                         | 7. Return Attestation Result       |
     |                                         |<-----------------------------------|
     | 8. Process Attestation Result           |                                    |
     |<----------------------------------------|                                    |
     |                                         |                                    |
     |                                         |                                    |
Intel的IAS通过验证报告的签名、检查Enclave的测量值和签名者、以及验证Enclave的属性状态来确认Enclave的可信性。通过这些步骤,IAS能够确保远程Enclave是由可信的SGX处理器创建和管理的,从而为远程认证提供安全保障。
1.5 关键术语
MRENCLAVE:Enclave代码和初始数据的测量值。MRSIGNER:签名Enclave的签名者的测量值。IAS:Intel Attestation Service,负责验证Enclave报告的服务。sgx_create_report:生成报告的SGX函数。sgx_ra_proc_msg:处理远程验证消息的SGX函数。
1.6 总结
远程认证是确保一个SGX Enclave在远程环境中是可信的关键步骤。通过Intel的认证服务,远程服务可以验证Enclave的可信性,并基于该信息与Enclave进行安全通信。这一过程依赖于认证报告、IAS验证以及安全通信等组件的协作,确保整体的安全性和完整性。
二.源码分析
2.1 README
----------------------------
Purpose of RemoteAttestation
----------------------------
The project demonstrates:
- How an application enclave can attest to a remote party
- How an application enclave and the remote party can establish a secure session

------------------------------------
How to Build/Execute the Sample Code
------------------------------------
1. Install Intel(R) Software Guard Extensions (Intel(R) SGX) SDK for Linux* OS
2. Enclave test key(two options):
    a. Install openssl first, then the project will generate a test key<isv_enclave_private_test.pem> automatically when you build the project.
    b. Rename your test key(3072-bit RSA private key) to <isv_enclave_private_test.pem> and put it under the <isv_enclave> folder.
3. Make sure your environment is set:
    $ source ${sgx-sdk-install-path}/environment
4. Build the project with the prepared Makefile:
    a. Hardware Mode, Debug build:
        $ make
    b. Hardware Mode, Pre-release build:
        $ make SGX_PRERELEASE=1 SGX_DEBUG=0
    c. Hardware Mode, Release build:
        $ make SGX_DEBUG=0
    d. Simulation Mode, Debug build:
        $ make SGX_MODE=SIM
    e. Simulation Mode, Pre-release build:
        $ make SGX_MODE=SIM SGX_PRERELEASE=1 SGX_DEBUG=0
    f. Simulation Mode, Release build:
        $ make SGX_MODE=SIM SGX_DEBUG=0
5. Execute the binary directly:
    $ LD_LIBRARY_PATH=$LD_LIBRARY_PATH:$PWD/sample_libcrypto ./app
6. Remember to "make clean" before switching build mode

-------------------------------------------------
Launch token initialization
-------------------------------------------------
If using libsgx-enclave-common or sgxpsw under version 2.4, an initialized variable launch_token needs to be passed as the 3rd parameter of API sgx_create_enclave. For example,

sgx_launch_token_t launch_token = {
   0};
sgx_create_enclave(ENCLAVE_FILENAME, SGX_DEBUG_FLAG, launch_token, NULL, &global_eid, NULL);
这个项目演示了:
- 如何通过远程认证(Remote Attestation)让应用程序Enclave对远程方认证;
- 以及如何通过远程认证建立安全会话。
参考上述README内容给出基本构建流程:
2.1.1 README给出的编译流程
- 首先需要安装
SGX sdk,以及等等对SGX的支持测试,具体可参考之前的一篇博客:【SGX系列教程】(一); - 准备Enclave测试密钥(你有两种选择来准备Enclave测试密钥):
-
自动生成测试密钥,首先安装openssl,然后在构建项目时会自动生成一个测试密钥
isv_enclave_private_test.pem。 -
将你现有的测试密钥(一个3072位的RSA私钥)重命名为
isv_enclave_private_test.pem,并将它放在isv_enclave文件夹下。
-
保sdk路径生效(source),基本在安装sdk时会指定安装路径为:
/opt/intel/sgxsdk; -
使用Makefile构建工程:
- 硬件模式, Debug build(通常默认选择这个):
make - 硬件模式, Pre-release build:
make SGX_PRERELEASE=1 SGX_DEBUG=0 - 硬件模式, Release build:
make SGX_DEBUG=0 - 仿真模式, Debug build:
make SGX_MODE=SIM - 仿真模式, Pre-release build:
make SGX_MODE=SIM SGX_PRERELEASE=1 SGX_DEBUG=0 - 仿真模式, Release build:
make SGX_MODE=SIM SGX_DEBUG=0
- 硬件模式, Debug build(通常默认选择这个):
-
执行二进制文件:
在构建完成后,可以直接执行生成的二进制文件,执行过程中需要设置LD_LIBRARY_PATH。(然而实际make编译中发现会报错,因此后续给出的解决方案不需要执行下面库路径设置,将在后面代码执行部分给出)
LD_LIBRARY_PATH=$LD_LIBRARY_PATH:$PWD/sample_libcrypto ./app
- 设备初始化:
如果你使用的是版本2.4以下的libsgx-enclave-common或sgxpsw,那么在调用sgx_create_enclave函数时需要传递一个初始化的启动令牌(最新安装的基本都不需要):
sgx_launch_token_t launch_token = {
   0};
sgx_create_enclave(ENCLAVE_FILENAME, SGX_DEBUG_FLAG, launch_token, NULL, &global_eid, NULL);
2.2 重点代码分析
SGX工程的整个构建流程在之前的文章中已经给出给出了详细教程:【SGX系列教程】(二)第一个 SGX 程序: HelloWorld,因此在此处仅给出部分重点代码分析,主要讲清楚enclave如何实现本地认证,其他通用代码不做展开分析。
2.2.0 主要代码模块交互流程分析
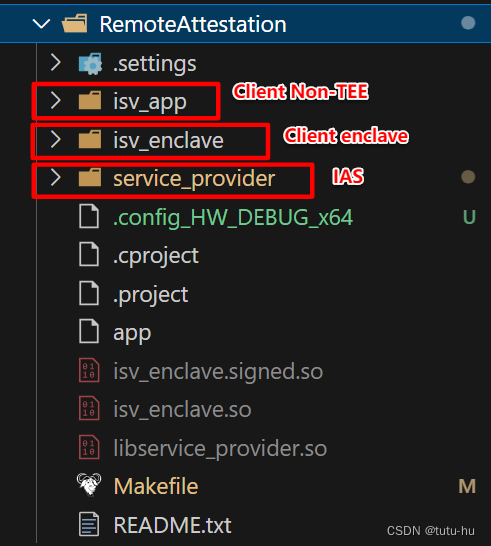
文件目录如下图,主要包括三个文件夹,其中isv_app表示客户端的REE侧程序,isv_enclave表示客户端TEE侧程序,service_provider表示服务端程序,模拟IAS给客户端提供远程认证服务。主要通过三个程序之间的交互完成远程认证流程。
- 初始化阶段
- 客户端(ISV App):
创建Enclave并初始化远程认证上下文,调用enclave_init_ra函数。
enclave_init_ra函数调用了sgx_ra_init或sgx_ra_init_ex函数来创建远程认证上下文。 - 服务提供者(Service Provider):
初始化服务提供者的私钥、公钥和支持的扩展EPID组。
- 消息0交换
- 客户端(ISV App):
生成消息0(包含扩展的EPID组ID)并调用ra_network_send_receive发送给服务提供者。 - 服务提供者(Service Provider):
接收消息0并在sp_ra_proc_msg0_req中处理消息0,验证扩展的EPID组ID是否受支持。
如果未注册则进行注册,并返回相应的认证密钥ID(ECDSA或EPID)。
- 消息1交换
- 客户端(ISV App):
生成消息1(包含客户端的公钥g_a)并调用ra_network_send_receive发送给服务提供者。 - 服务提供者(Service Provider):
接收消息1并在sp_ra_proc_msg1_req中处理消息1获取SigRL。
生成服务提供者的ECDH密钥对(g_b和b)。
计算共享密钥dh_key,并派生出SMK、SK、MK和VK密钥。
生成消息2(包含g_b、SPID、签名和CMAC)并发送给客户端。
- 消息2交换
- 客户端(ISV App):
接收消息2并调用sgx_ra_proc_msg2处理消息2,验证签名和CMAC。
生成消息3(包含认证报告和MAC)并发送给服务提供者。 - Enclave端(ISV Enclave):
在sgx_ra_proc_msg2_trusted中处理消息2,生成消息3。
- 消息3交换
- 服务提供者(Service Provider):
接收消息3并在sp_ra_proc_msg3_req中处理消息3,验证MAC。
验证认证报告中的report_data是否匹配预期值。
使用认证服务器验证认证报告。
生成认证结果消息并发送给客户端。
- 认证验证和共享秘密
- 客户端(ISV App):
接收认证结果消息并调用verify_att_result_mac验证MAC。
如果认证通过,解密共享秘密并进行后续的安全通信。
通过以上步骤,客户端和服务提供者通过一系列消息交换和验证,成功建立了安全通道并完成了远程认证。主要模块之间的交互确保了认证过程的安全性和完整性,最终实现了安全的密钥共享和后续通信。
2.2.1 isv_app文件夹
2.2.1.1 isv_app/isv_app.cpp
// 这个示例代码展示了一个SGX客户端平台和ISV应用服务器之间的通信过程。
#include <stdio.h>
#include <limits.h>
#include <unistd.h>
// 需要远程认证消息的定义。
#include "remote_attestation_result.h"
#include "isv_enclave_u.h"
// 需要调用不可信密钥交换库API,如sgx_ra_proc_msg2。
#include "sgx_ukey_exchange.h"
// 需要获取服务提供商的信息,在实际项目中,你需要与真正的服务器通信。
#include "network_ra.h"
// 需要创建Enclave并进行ecall。
#include "sgx_urts.h"
// 需要查询扩展的epid组ID。
#include "sgx_uae_epid.h"
#include "sgx_uae_quote_ex.h"
#include "service_provider.h"

#ifndef SAFE_FREE
#define SAFE_FREE(ptr) {
     if (NULL != (ptr)) {
     free(ptr); (ptr) = NULL;}}
#endif

// 除了生成和发送消息,该应用程序还可以使用预生成的消息来验证消息的生成和信息流。
#include "sample_messages.h"

#define ENCLAVE_PATH "isv_enclave.signed.so" // Enclave文件路径

// 定义一些预生成的消息样本。
uint8_t* msg1_samples[] = {
    msg1_sample1, msg1_sample2 };
uint8_t* msg2_samples[] = {
    msg2_sample1, msg2_sample2 };
uint8_t* msg3_samples[] = {
    msg3_sample1, msg3_sample2 };
uint8_t* attestation_msg_samples[] =
    {
    attestation_msg_sample1, attestation_msg_sample2 };

// 一些实用函数用于输出ISV应用程序和远程认证服务提供商之间传递的数据结构。
void PRINT_BYTE_ARRAY(FILE *file, void *mem, uint32_t len)
{

    if(!mem || !len)
    {

        fprintf(file, "\n( null )\n");
        return;
    }
    uint8_t *array = (uint8_t *)mem;
    fprintf(file, "%u bytes:\n{\n", len);
    uint32_t i = 0;
    for(i = 0; i < len - 1; i++)
    {

        fprintf(file, "0x%x, ", array[i]);
        if(i % 8 == 7) fprintf(file, "\n");
    }
    fprintf(file, "0x%x ", array[i]);
    fprintf(file, "\n}\n");
}

// 输出远程认证服务响应的实用函数。
void PRINT_ATTESTATION_SERVICE_RESPONSE(
    FILE *file,
    ra_samp_response_header_t *response)
{

    if(!response)
    {

        fprintf(file, "\t\n( null )\n");
        return;
    }
    fprintf(file, "RESPONSE TYPE:   0x%x\n", response->type);
    fprintf(file, "RESPONSE STATUS: 0x%x 0x%x\n", response->status[0],
            response->status[1]);
    fprintf(file, "RESPONSE BODY SIZE: %u\n", response->size);
    if(response->type == TYPE_RA_MSG2)
    {

        sgx_ra_msg2_t* p_msg2_body = (sgx_ra_msg2_t*)(response->body);
        fprintf(file, "MSG2 gb - ");
        PRINT_BYTE_ARRAY(file, &(p_msg2_body->g_b), sizeof(p_msg2_body->g_b));
        fprintf(file, "MSG2 spid - ");
        PRINT_BYTE_ARRAY(file, &(p_msg2_body->spid), sizeof(p_msg2_body->spid));
        fprintf(file, "MSG2 quote_type : %hx\n", p_msg2_body->quote_type);
        fprintf(file, "MSG2 kdf_id : %hx\n", p_msg2_body->kdf_id);
        fprintf(file, "MSG2 sign_gb_ga - ");
        PRINT_BYTE_ARRAY(file, &(p_msg2_body->sign_gb_ga),
                         sizeof(p_msg2_body->sign_gb_ga));
        fprintf(file, "MSG2 mac - ");
        PRINT_BYTE_ARRAY(file, &(p_msg2_body->mac), sizeof(p_msg2_body->mac));
        fprintf(file, "MSG2 sig_rl - ");
        PRINT_BYTE_ARRAY(file, &(p_msg2_body->sig_rl),
                         p_msg2_body->sig_rl_size);
    }
    else if(response->type == TYPE_RA_ATT_RESULT)
    {

        sample_ra_att_result_msg_t *p_att_result =
            (sample_ra_att_result_msg_t *)(response->body);
        fprintf(file, "ATTESTATION RESULT MSG platform_info_blob - ");
        PRINT_BYTE_ARRAY(file, &(p_att_result->platform_info_blob),
                         sizeof(p_att_result->platform_info_blob));
        fprintf(file, "ATTESTATION RESULT MSG mac - ");
        PRINT_BYTE_ARRAY(file, &(p_att_result->mac), sizeof(p_att_result->mac));
        fprintf(file, "ATTESTATION RESULT MSG secret.payload_tag - %u bytes\n",
                p_att_result->secret.payload_size);
        fprintf(file, "ATTESTATION RESULT MSG secret.payload - ");
        PRINT_BYTE_ARRAY(file, p_att_result->secret.payload,
                p_att_result->secret.payload_size);
    }
    else
    {

        fprintf(file, "\nERROR in printing out the response. "
                       "Response of type not supported %d\n", response->type);
    }
}

// 这个示例代码没有任何远程认证的恢复/重试机制。由于Enclave可能会由于S3转换而丢失,
// 易受S3转换影响的应用程序应该有逻辑来在这些情况下重新启动认证。
#define _T(x) x
int main(int argc, char* argv[])
{

    int ret = 0; // 定义返回值变量
    ra_samp_request_header_t *p_msg0_full = NULL; // 定义指向消息0请求头的指针
    ra_samp_response_header_t *p_msg0_resp_full = NULL; // 定义指向消息0响应头的指针
    ra_samp_request_header_t *p_msg1_full = NULL; // 定义指向消息1请求头的指针
    ra_samp_response_header_t *p_msg2_full = NULL; // 定义指向消息2响应头的指针
    sgx_ra_msg3_t *p_msg3 = NULL; // 定义指向消息3的指针
    ra_samp_response_header_t* p_att_result_msg_full = NULL; // 定义指向认证结果消息的指针
    sgx_enclave_id_t enclave_id = 0; // 定义Enclave ID
    int enclave_lost_retry_time = 1; // 定义Enclave丢失重试次数
    int busy_retry_time = 4; // 定义忙等待重试次数
    sgx_ra_context_t context = INT_MAX; // 定义远程认证上下文
    sgx_status_t status = SGX_SUCCESS; // 定义SGX状态
    ra_samp_request_header_t* p_msg3_full = NULL; // 定义指向消息3请求头的指针
    sgx_att_key_id_t selected_key_id = {
   0}; // 定义选定的密钥ID

    int32_t verify_index = -1; // 定义验证索引
    int32_t verification_samples = sizeof(msg1_samples)/sizeof(msg1_samples[0]); // 计算消息1示例的数量

    FILE* OUTPUT = stdout; // 定义输出文件指针,默认指向标准输出

#define VERIFICATION_INDEX_IS_VALID() (verify_index > 0 && \
                                       verify_index <= verification_samples)
#define GET_VERIFICATION_ARRAY_INDEX() (verify_index-1)

    if(argc > 1)
    {

        verify_index = atoi(argv[1]);
        if( VERIFICATION_INDEX_IS_VALID())
        {

            fprintf(OUTPUT, "\nVerifying precomputed attestation messages "
                            "using precomputed values# %d\n", verify_index);
        }
        else
        {

            fprintf(OUTPUT, "\nValid invocations are:\n");
            fprintf(OUTPUT, "\n\tisv_app\n");
            fprintf(OUTPUT, "\n\tisv_app <verification index>\n");
            fprintf(OUTPUT, "\nValid indices are [1 - %d]\n",
                    verification_samples);
            fprintf(OUTPUT, "\nUsing a verification index uses precomputed "
                    "messages to assist debugging the remote attestation "
                    "service provider.\n");
            return -1;
        }
    }

    int i = 2; // 这里将执行两次,第一次是ECDSA引用,第二次是EPID引用
    do
    {

        if (i == 2)
        {

            fprintf(OUTPUT, "\nFirst round, we will try ECDSA algorithm.\n");
        }
        else
        {

            fprintf(OUTPUT, "\nSecond round, we will try EPID algorithm.\n");
        }
        // 通过配置扩展的epid组ID为远程认证做准备。
        {

            uint32_t extended_epid_group_id = 0;
            ret = sgx_get_extended_epid_group_id(&extended_epid_group_id);
            if (SGX_SUCCESS != ret)
            {

                ret = -1;
                fprintf(OUTPUT, "\nError, call sgx_get_extended_epid_group_id fail [%s].",
                    __FUNCTION__);
                return ret;
            }
            fprintf(OUTPUT, "\nCall sgx_get_extended_epid_group_id success.");

            p_msg0_full = (ra_samp_request_header_t*)
                malloc(sizeof(ra_samp_request_header_t)
                +sizeof(uint32_t));
            if (NULL == p_msg0_full)
            {

                ret = -1;
                goto CLEANUP;
            }
            p_msg0_full->type = TYPE_RA_MSG0;
            p_msg0_full->size = sizeof(uint32_t);

            *(uint32_t*)((uint8_t*)p_msg0_full + sizeof(ra_samp_request_header_t)) = extended_epid_group_id;
            {

                fprintf(OUTPUT, "\nMSG0 body generated -\n");
                PRINT_BYTE_ARRAY(OUTPUT, p_msg0_full->body, p_msg0_full->size);
            }
            // ISV应用程序将msg0发送到SP。
            // ISV决定是否支持此扩展的epid组ID。
            fprintf(OUTPUT, "\nSending msg0 to remote attestation service provider.\n");
            ret = ra_network_send_receive("http://SampleServiceProvider.intel.com/",
                p_msg0_full,
                &p_msg0_resp_full);
            if (ret != 0)
            {

                fprintf(OUTPUT, "\nError, ra_network_send_receive for msg0 failed "
                    "[%s].", __FUNCTION__);
                goto CLEANUP;
            }
            fprintf(OUTPUT, "\nSent MSG0 to remote attestation service.\n");

            // 选择认证密钥ID
            ret = sgx_select_att_key_id(p_msg0_resp_full->body, p_msg0_resp_full->size, &selected_key_id);
            if(SGX_SUCCESS != ret)
            {

                ret = -1;
                fprintf(OUTPUT, "\nInfo, call sgx_select_att_key_id fail, current platform configuration doesn't support this attestation key ID. [%s]",
                        __FUNCTION__);
                goto CLEANUP;
            }
            fprintf(OUTPUT, "\nCall sgx_select_att_key_id success.");
        }

        // 如果ISV服务器质疑ISV应用程序或ISV应用程序检测到它没有来自先前认证所需的凭据(共享秘密),将启动远程认证。
        {

            // ISV应用程序创建ISV enclave。
            do
            {

                ret = sgx_create_enclave(_T(ENCLAVE_PATH),
                                         SGX_DEBUG_FLAG,
                                         NULL,
                                         NULL,
                                         &enclave_id, NULL);
                if(SGX_SUCCESS != ret)
                {

                    ret = -1;
                    fprintf(OUTPUT, "\nError, call sgx_create_enclave fail [%s].",
                            __FUNCTION__);
                    goto CLEANUP;
                }
                fprintf(OUTPUT, "\nCall sgx_create_enclave success.");

                ret = enclave_init_ra(enclave_id,
                                      &status,
                                      false,
                                      &context);
            // 理想情况下,此检查应围绕完整的认证流程。
            } while (SGX_ERROR_ENCLAVE_LOST == ret && enclave_lost_retry_time--);

            if(SGX_SUCCESS != ret || status)
            {

                ret = -1;
                fprintf(OUTPUT, "\nError, call enclave_init_ra fail [%s].",



![[鹏城杯 2022]babybit](https://img-blog.csdnimg.cn/img_convert/bbc60706c0869bd064275fd6a8b07c86.png)
