Arduino - OLED
- Arduino - OLED
- Arduino通过u8g2库驱动OLED
- U8g2 驱动oled自定义中文字库
The OLED (Organic Light-Emitting Diode) display is an alternative for LCD display. The OLED is super-light, almost paper-thin, flexible, and produce a brighter and crisper picture.
OLED(有机发光二极管)显示器是LCD显示器的替代品。OLED超轻,几乎像纸一样薄,灵活,可产生更明亮、更清晰的图像。
In this tutorial, we are going to learn:
在本教程中,我们将学习:
- How to use OLED display with Arduino.
如何将OLED显示器与Arduino一起使用。 - How to display text, number on OLED using Arduino
如何使用Arduino在OLED上显示文本,数字 - How to vertical and horizontal center align text, number on OLED
如何在OLED上垂直和水平中心对齐文本,数字 - How to draw on OLED using Arduino
如何使用Arduino在OLED上绘图 - How to display image on OLED using Arduino
如何使用Arduino在OLED上显示图像
About OLED Display 关于OLED显示屏
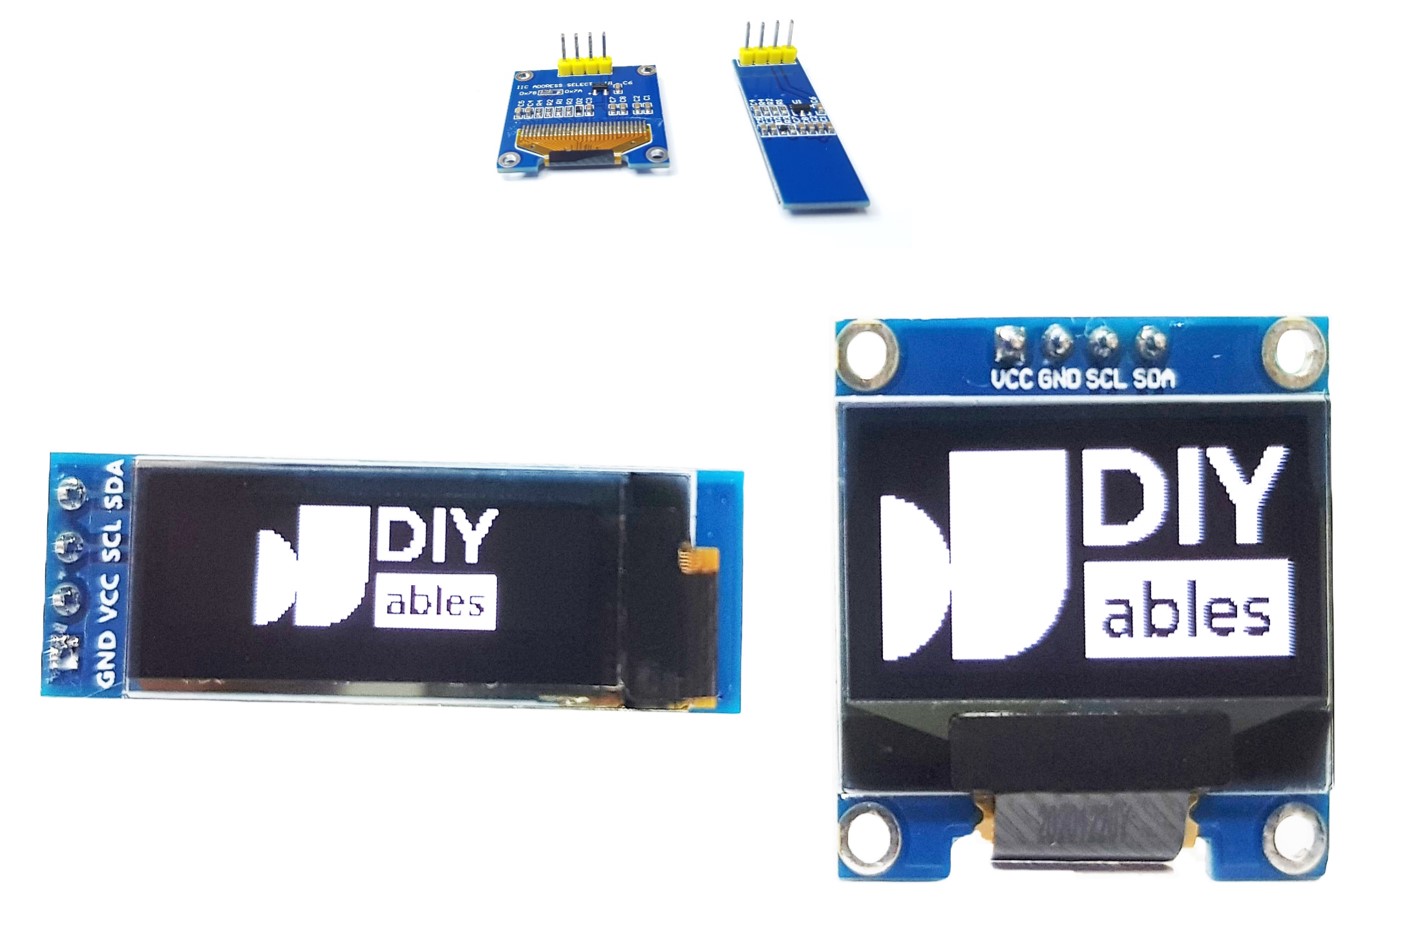
There are many types of OLED display. They differ from each other in communication interface, sizes and colors:
OLED显示器有很多种。它们在通信接口、尺寸和颜色上各不相同:
- Communication interface: I2C, SPI
通讯接口:I2C、SPI - Size: 128x64, 128×32… 尺寸: 128x64, 128×32…
- Color: white, blue, dual color…
颜色:白色、蓝色、双色…

SPI is generally faster than I2C but requires more Arduino pins. While I2C requires only two pins and can be shared with other I2C peripherals. It’s a trade-off between pins and communication speed. The choice is up to you. For OLED with I2C interface, there are several types of driver such as SSD1306, SH1106 driver . This tutorial uses SSD1306 I2C OLED Display 128x64 and 128x32
SPI 通常比 I2C 快,但需要更多的 Arduino 引脚。而 I2C 只需要两个引脚,并且可以与其他 I2C 外设共享。这是引脚和通信速度之间的权衡。选择权在您手中。对于具有I2C接口的OLED,有几种类型的驱动程序,例如SSD1306,SH1106驱动程序。本教程使用SSD1306 I2C OLED 显示屏 128x64 和 128x32
I2C OLED Display Pinout I2C OLED显示引脚排列
- GND pin: should be connected to the ground of Arduino
GND引脚:应接地Arduino的 - VCC pin: is the power supply for the display which we connect the 5 volts pin on the Arduino.
VCC引脚:是显示器的电源,我们将其连接到Arduino上的5伏引脚。 - SCL pin: is a serial clock pin for I2C interface.
SCL引脚:是用于I2C接口的串行时钟引脚。 - SDA pin: is a serial data pin for I2C interface.
SDA引脚:是用于I2C接口的串行数据引脚。
※ NOTE THAT: ※ 注意事项:
- The order of the OLED module’s pins can vary between manufacturers and module types. ALWAYS use the labels printed on the OLED module. Look closely!
OLED模块引脚的顺序可能因制造商和模块类型而异。始终使用印在OLED模块上的标签。仔细看! - This tutorial uses the OLED display that uses the SSD1306 I2C driver. We have tested with the OLED display from DIYables. It works without any issues.
本教程使用使用 SSD1306 I2C 驱动程序的 OLED 显示器。我们已经用DIYables的OLED显示屏进行了测试。它可以毫无问题地工作。
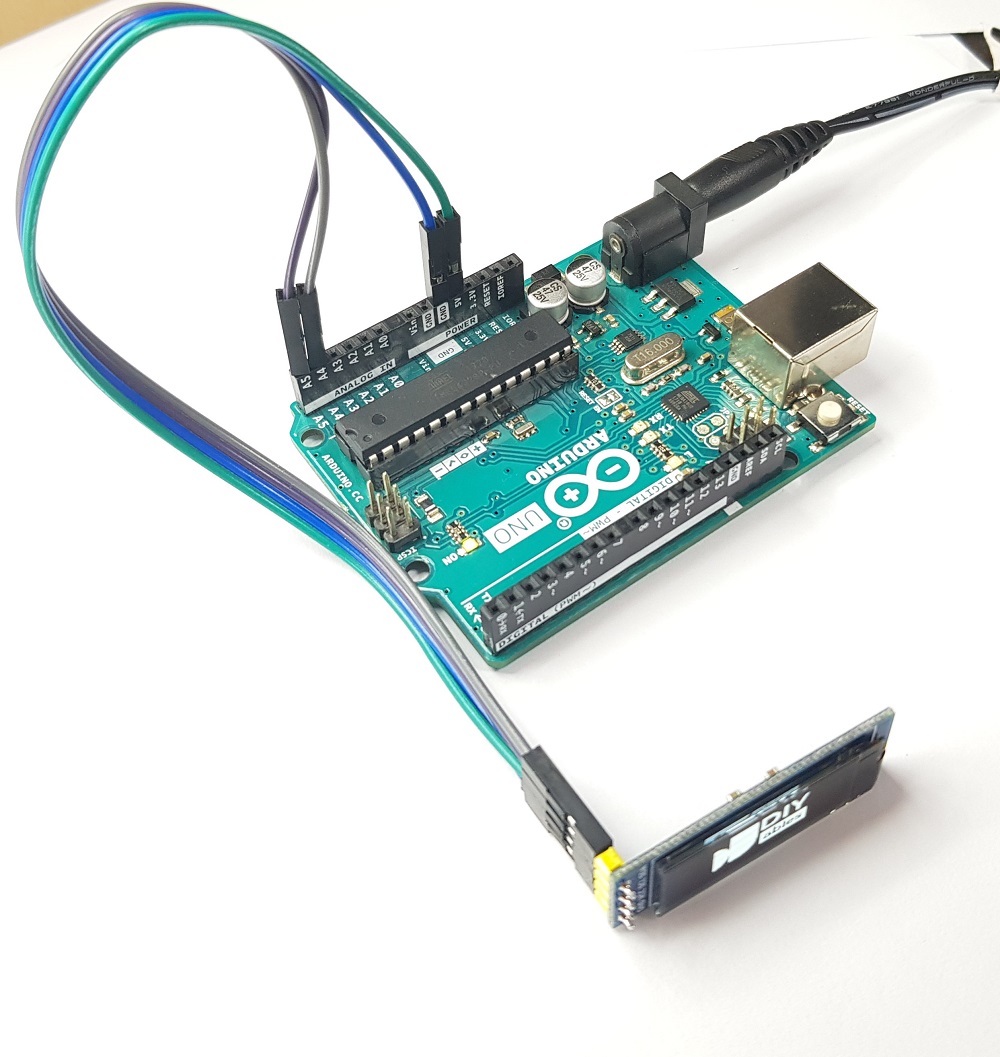
Wiring Diagram 接线图
- Wiring diagram between Arduino and OLED 128x64
Arduino和OLED 128x64之间的接线图

- Wiring diagram between Arduino and OLED 128x32
Arduino和OLED 128x32之间的接线图

- The real wiring diagram between Arduino and OLED 128x64
Arduino和OLED 128x64之间的真实接线图

- The real wiring diagram between Arduino and OLED 128x32
Arduino和OLED 128x32之间的真实接线图
If you use other Arduino other than Uno, the pins are different. Refer below table for other Arduino
如果您使用 Uno 以外的其他 Arduino,则引脚会有所不同。有关其他Arduino,请参阅下表
| OLED Module OLED模块 | Arduino Uno, Nano Arduino Uno,纳米 | Arduino Mega |
|---|---|---|
| Vin | 5V | 5V |
| GND | GND | GND |
| SDA | A4 | 20 |
| SCL | A5 | 21 |
How To Use OLED with Arduino 如何将OLED与Arduino一起使用
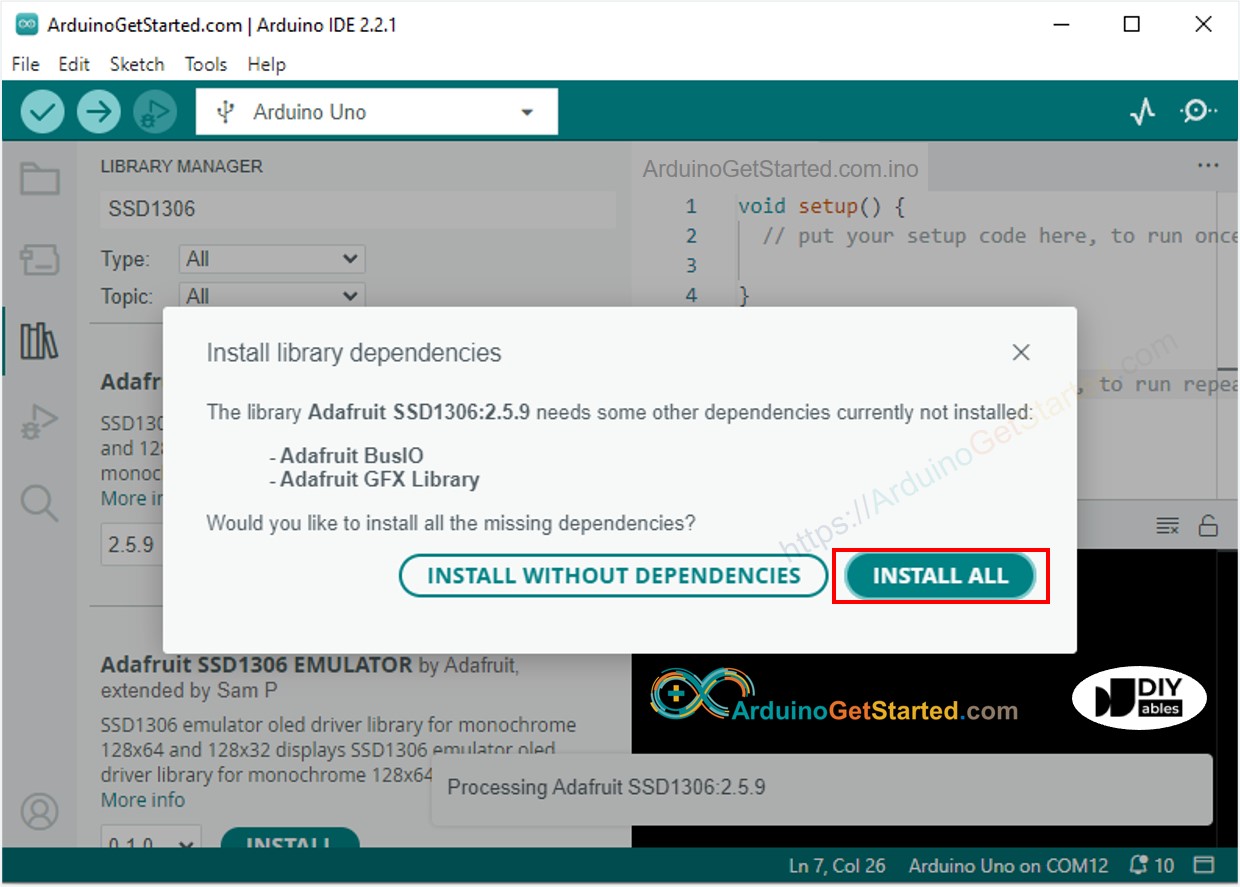
Install SSD1306 OLED library 安装SSD1306 OLED库
- Navigate to the Libraries icon on the left bar of the Arduino IDE.
导航到 Arduino IDE 左侧栏上的 Libraries 图标。 - Search “SSD1306”, then find the SSD1306 library by Adafruit
搜索“SSD1306”,然后找到 Adafruit 的SSD1306库 - Click Install button to install the library.
单击“安装”按钮安装库。

- You will be asked for intalling some other library dependencies
您将被要求安装一些其他库依赖项 - Click Install All button to install all library dependencies.
单击“全部安装”按钮以安装所有库依赖项。
How to program for OLED 如何对OLED进行编程
- Include library 包括库
#include <Wire.h>
#include <Adafruit_GFX.h>
#include <Adafruit_SSD1306.h>
#include < Wire.h>
#include <Adafruit_GFX.h>
#include <Adafruit_SSD1306.h>
- Define the screen size if OLED 123x64
定义 OLED 123x64 的屏幕尺寸
#define SCREEN_WIDTH 128 // OLED display width,  in pixels
#define SCREEN_HEIGHT 64 // OLED display height, in pixels
- Define the screen size if OLED 128x32
定义 OLED 128x32 的屏幕尺寸
#define SCREEN_WIDTH 128 // OLED display width,  in pixels
#define SCREEN_HEIGHT 32 // OLED display height, in pixels
- Declare an SSD1306 OLED object
声明 SSD1306 OLED 对象
// declare an SSD1306 display object connected to I2C
Adafruit_SSD1306 oled(SCREEN_WIDTH, SCREEN_HEIGHT, &Wire, -1);
- In setup() function, initialize OLED display
在setup()函数中,初始化OLED显示器
// initialize OLED display with address 0x3C for 128x64
if (!oled.begin(SSD1306_SWITCHCAPVCC, 0x3C)) {
  Serial.println(F("SSD1306 allocation failed"));
  while (true);
}
- And then you can display text, images, draw line …
然后您可以显示文本、图像、画线…
※ NOTE THAT: ※ 注意事项:
From this point on, all codes are provided for OLED 128x64, but you can easily adapt for OLED 128x32 by changing the screen size and adjusts coordinates if needed
从现在开始,所有代码都适用于 OLED 128x64,但您可以通过更改屏幕尺寸并根据需要调整坐标轻松适应 OLED 128x32
Arduino Code - Display Text on OLED Arduino代码 - 在OLED上显示文本
/*

 * Created by ArduinoGetStarted.com
   *
 * This example code is in the public domain
   *
 * Tutorial page: https://arduinogetstarted.com/tutorials/arduino-oled
   */

#include <Wire.h>
#include <Adafruit_GFX.h>
#include <Adafruit_SSD1306.h>

#define SCREEN_WIDTH 128 // OLED display width,  in pixels
#define SCREEN_HEIGHT 64 // OLED display height, in pixels

// declare an SSD1306 display object connected to I2C
Adafruit_SSD1306 oled(SCREEN_WIDTH, SCREEN_HEIGHT, &Wire, -1);

void setup() {
  Serial.begin(9600);

  // initialize OLED display with address 0x3C for 128x64
  if (!oled.begin(SSD1306_SWITCHCAPVCC, 0x3C)) {
    Serial.println(F("SSD1306 allocation failed"));
    while (true);
  }

  delay(2000);         // wait for initializing
  oled.clearDisplay(); // clear display

  oled.setTextSize(1);          // text size
  oled.setTextColor(WHITE);     // text color
  oled.setCursor(0, 10);        // position to display
  oled.println("Hello World!"); // text to display
  oled.display();               // show on OLED
}

void loop() {
}
The below are some functions that you can use to display text on the OLED:
以下是可用于在OLED上显示文本的一些功能:
- oled.clearDisplay(): all pixels are off
所有像素都关闭 - oled.drawPixel(x,y, color): plot a pixel in the x,y coordinates
在 x,y 坐标中绘制一个像素 - oled.setTextSize(n): set the font size, supports sizes from 1 to 8
设置字体大小,支持1-8大小 - oled.setCursor(x,y): set the coordinates to start writing text
设置坐标开始写入文本 - oled.setTextColor(WHITE): set the text color
设置文本颜色 - oled.setTextColor(BLACK, WHITE): set the text color, background color
设置文本颜色、背景颜色 - oled.println(“message”): print the characters
打印字符 - oled.println(number): print a number
打印一个数字 - oled.println(number, HEX): print a number IN hex format
以十六进制格式打印数字 - oled.display(): call this method for the changes to make effect
调用此方法使更改生效 - oled.startscrollright(start, stop): scroll text from left to right
从左到右滚动文本 - oled.startscrollleft(start, stop): scroll text from right to left
从右向左滚动文本 - oled.startscrolldiagright(start, stop): scroll text from left bottom corner to right upper corner
将文本从左下角滚动到右上角 - oled.startscrolldiagleft(start, stop): scroll text from right bottom corner to left upper corner
将文本从右下角滚动到左上角 - oled.stopscroll(): stop scrolling
停止滚动
How to vertical and horizontal center align text/number on OLED 如何在OLED上垂直和水平中心对齐文本/数字
See How to vertical/horizontal center on OLED
如何在OLED上垂直/水平居中,无论文字大小,下面的代码都会自动将 OLED 上的文字/数字垂直和水平居中对齐。
/*
 * Created by ArduinoGetStarted.com
 *
 * This example code is in the public domain
 *
 * Tutorial page: https://arduinogetstarted.com/faq/how-to-vertical-and-horizontal-center-align-text-number-on-oled
 */

#include <Wire.h>
#include <Adafruit_GFX.h>
#include <Adafruit_SSD1306.h>

#define SCREEN_WIDTH 128 // OLED display width,  in pixels
#define SCREEN_HEIGHT 64 // OLED display height, in pixels

Adafruit_SSD1306 oled(SCREEN_WIDTH, SCREEN_HEIGHT, &Wire, -1); // // create SSD1306 display object connected to I2C

void setup() {
  Serial.begin(9600);

  // initialize OLED display with address 0x3C for 128x64
  if (!oled.begin(SSD1306_SWITCHCAPVCC, 0x3C)) {
    Serial.println(F("SSD1306 allocation failed"));
    while (true);
  }

  delay(2000);         // wait for initializing
  oled.clearDisplay(); // clear display

  oled.setTextSize(2);          // text size
  oled.setTextColor(WHITE);     // text color
  oled.setCursor(0, 10);        // position to display
}

void loop() {
  // display string
  String text = "Hi!";
  oledDisplayCenter(text);
  delay(2000);

  // display number
  int number = 21;
  String str = String(number);
  oledDisplayCenter(str);
  delay(2000);
}

void oledDisplayCenter(String text) {
  int16_t x1;
  int16_t y1;
  uint16_t width;
  uint16_t height;

  oled.getTextBounds(text, 0, 0, &x1, &y1, &width, &height);

  // display on horizontal and vertical center
  oled.clearDisplay(); // clear display
  oled.setCursor((SCREEN_WIDTH - width) / 2, (SCREEN_HEIGHT - height) / 2);
  oled.println(text); // text to display
  oled.display();
}
Arduino Code - Drawing on OLED Arduino代码 - 在OLED上绘图
/*

 * Created by ArduinoGetStarted.com
   *
 * This example code is in the public domain
   *
 * Tutorial page: https://arduinogetstarted.com/tutorials/arduino-oled
   */

#include <Wire.h>
#include <Adafruit_GFX.h>
#include <Adafruit_SSD1306.h>

#define SCREEN_WIDTH 128 // OLED display width,  in pixels
#define SCREEN_HEIGHT 64 // OLED display height, in pixels

// declare an SSD1306 display object connected to I2C
Adafruit_SSD1306 oled(SCREEN_WIDTH, SCREEN_HEIGHT, &Wire, -1);

void setup() {
  Serial.begin(9600);

  // initialize OLED display with address 0x3C for 128x64
  if (!oled.begin(SSD1306_SWITCHCAPVCC, 0x3C)) {
    Serial.println(F("SSD1306 allocation failed"));
    while (true);
  }

  delay(2000); // wait for initializing
  oled.setCursor(0, 0);
}

void loop() {
  // draw rectangle
  oled.clearDisplay();
  oled.drawRect(0, 15, 60, 40, WHITE);
  oled.display();
  delay(2000);

  // fill rectangle
  oled.clearDisplay();
  oled.fillRect(0, 15, 60, 40, WHITE);
  oled.display();
  delay(2000);


  // draw the round rectangle
  oled.clearDisplay();
  oled.drawRoundRect(0, 15, 60, 40, 8, WHITE);
  oled.display();
  delay(2000);

  // fill the round rectangle
  oled.clearDisplay();
  oled.fillRoundRect(0, 15, 60, 40, 8, WHITE);
  oled.display();
  delay(2000);

  // draw circle
  oled.clearDisplay();
  oled.drawCircle(20, 35, 20, WHITE);
  oled.display();
  delay(2000);

  // fill circle
  oled.clearDisplay();
  oled.fillCircle(20, 35, 20, WHITE);
  oled.display();
  delay(2000);

  // draw triangle
  oled.clearDisplay();
  oled.drawTriangle(30, 15, 0, 60, 60, 60, WHITE);
  oled.display();
  delay(2000);

  // fill triangle
  oled.clearDisplay();
  oled.fillTriangle(30, 15, 0, 60, 60, 60, WHITE);
  oled.display();
  delay(2000);
}
Arduino Code – Display Image Arduino代码 - 显示图像
To draw image on OLED, we have to convert the image (any format) to the bitmap array first. The conversion can be done by using this online tool. Please see how to convert image to bitmap array on the below image. I converted the Arduino icon to bitmap array.
要在OLED上绘制图像,我们必须首先将图像(任何格式)转换为位图数组。可以使用此在线工具进行转换。请看如何将图像转换为下图中的位图数组。我将Arduino图标转换为位图数组。

After converting, copy the array code and update the array code in the ArduinoIcon array in the below code
转换完成后,复制数组代码,并在下面的代码中更新ArduinoIcon数组中的数组代码
/*

 * Created by ArduinoGetStarted.com
   *
 * This example code is in the public domain
   *
 * Tutorial page: https://arduinogetstarted.com/tutorials/arduino-oled
   */

#include <Wire.h>
#include <Adafruit_GFX.h>
#include <Adafruit_SSD1306.h>

#define SCREEN_WIDTH 128 // OLED display width,  in pixels
#define SCREEN_HEIGHT 64 // OLED display height, in pixels

// declare an SSD1306 display object connected to I2C
Adafruit_SSD1306 oled(SCREEN_WIDTH, SCREEN_HEIGHT, &Wire, -1);

// bitmap of arduino-icon image
const unsigned char ArduinoIcon [] PROGMEM = {
  // 'arduino-icon', 128x64px
  0xff, 0xff, 0xff, 0xff, 0xff, 0xff, 0xff, 0xff, 0xff, 0xff, 0xff, 0xff, 0xff, 0xff, 0xff, 0xff,
  0xff, 0xff, 0xff, 0xff, 0xff, 0xff, 0xff, 0xff, 0xff, 0xff, 0xff, 0xff, 0xff, 0xff, 0xff, 0xff,
  0xff, 0xff, 0xfe, 0x00, 0x07, 0xff, 0xff, 0xff, 0xff, 0xff, 0xff, 0x80, 0x01, 0xff, 0xff, 0xff,
  0xff, 0xff, 0xe0, 0x00, 0x00, 0xff, 0xff, 0xff, 0xff, 0xff, 0xfc, 0x00, 0x00, 0x3f, 0xff, 0xff,
  0xff, 0xff, 0x80, 0x00, 0x00, 0x1f, 0xff, 0xff, 0xff, 0xff, 0xe0, 0x00, 0x00, 0x07, 0xff, 0xff,
  0xff, 0xfe, 0x00, 0x00, 0x00, 0x07, 0xff, 0xff, 0xff, 0xff, 0x80, 0x00, 0x00, 0x01, 0xff, 0xff,
  0xff, 0xfc, 0x00, 0x00, 0x00, 0x03, 0xff, 0xff, 0xff, 0xff, 0x00, 0x00, 0x00, 0x00, 0xff, 0xff,
  0xff, 0xf0, 0x00, 0x00, 0x00, 0x00, 0xff, 0xff, 0xff, 0xfc, 0x00, 0x00, 0x00, 0x00, 0x3f, 0xff,
  0xff, 0xe0, 0x00, 0x00, 0x00, 0x00, 0x3f, 0xff, 0xff, 0xf0, 0x00, 0x00, 0x00, 0x00, 0x1f, 0xff,
  0xff, 0xc0, 0x00, 0x00, 0x00, 0x00, 0x1f, 0xff, 0xff, 0xe0, 0x00, 0x00, 0x00, 0x00, 0x0f, 0xff,
  0xff, 0x80, 0x00, 0x00, 0x00, 0x00, 0x0f, 0xff, 0xff, 0xc0, 0x00, 0x00, 0x00, 0x00, 0x07, 0xff,
  0xff, 0x00, 0x00, 0x00, 0x00, 0x00, 0x03, 0xff, 0xff, 0x80, 0x00, 0x00, 0x00, 0x00, 0x03, 0xff,
  0xfe, 0x00, 0x00, 0x00, 0x00, 0x00, 0x01, 0xff, 0xfe, 0x00, 0x00, 0x00, 0x00, 0x00, 0x01, 0xff,
  0xfc, 0x00, 0x00, 0xff, 0xf0, 0x00, 0x00, 0xff, 0xfc, 0x00, 0x00, 0x3f, 0xfc, 0x00, 0x00, 0xff,
  0xfc, 0x00, 0x03, 0xff, 0xfc, 0x00, 0x00, 0x7f, 0xf8, 0x00, 0x00, 0xff, 0xff, 0x00, 0x00, 0xff,
  0xf8, 0x00, 0x0f, 0xff, 0xff, 0x00, 0x00, 0x3f, 0xf0, 0x00, 0x03, 0xff, 0xff, 0xc0, 0x00, 0x7f,
  0xf0, 0x00, 0x1f, 0xff, 0xff, 0xc0, 0x00, 0x1f, 0xe0, 0x00, 0x0f, 0xff, 0xff, 0xe0, 0x00, 0x7f,
  0xf0, 0x00, 0x7f, 0xff, 0xff, 0xe0, 0x00, 0x0f, 0xc0, 0x00, 0x1f, 0xff, 0xff, 0xf8, 0x00, 0x3f,
  0xe0, 0x00, 0xff, 0xff, 0xff, 0xf8, 0x00, 0x07, 0x80, 0x00, 0x7f, 0xff, 0xff, 0xfc, 0x00, 0x1f,
  0xe0, 0x00, 0xff, 0xff, 0xff, 0xfc, 0x00, 0x03, 0x80, 0x00, 0xff, 0xff, 0xff, 0xfc, 0x00, 0x1f,
  0xc0, 0x01, 0xff, 0xff, 0xff, 0xfe, 0x00, 0x03, 0x00, 0x01, 0xff, 0xff, 0xff, 0xfe, 0x00, 0x1f,
  0xc0, 0x03, 0xff, 0xff, 0xff, 0xff, 0x00, 0x00, 0x00, 0x03, 0xff, 0xff, 0xff, 0xff, 0x00, 0x0f,
  0xc0, 0x03, 0xff, 0xff, 0xff, 0xff, 0x80, 0x00, 0x00, 0x07, 0xff, 0xf0, 0x7f, 0xff, 0x00, 0x0f,
  0xc0, 0x07, 0xff, 0xff, 0xff, 0xff, 0xc0, 0x00, 0x00, 0x0f, 0xff, 0xf0, 0x7f, 0xff, 0x80, 0x0f,
  0x80, 0x07, 0xff, 0xff, 0xff, 0xff, 0xe0, 0x00, 0x00, 0x1f, 0xff, 0xf0, 0x7f, 0xff, 0x80, 0x07,
  0x80, 0x0f, 0xff, 0xff, 0xff, 0xff, 0xf0, 0x00, 0x00, 0x3f, 0xff, 0xf0, 0x7f, 0xff, 0xc0, 0x07,
  0x80, 0x0f, 0xff, 0xff, 0xff, 0xff, 0xf8, 0x00, 0x00, 0x7f, 0xff, 0xf0, 0x7f, 0xff, 0xc0, 0x07,
  0x80, 0x0f, 0xfe, 0x00, 0x00, 0xff, 0xfc, 0x00, 0x00, 0xff, 0xfc, 0x00, 0x03, 0xff, 0xc0, 0x07,
  0x80, 0x0f, 0xfe, 0x00, 0x00, 0xff, 0xfe, 0x00, 0x01, 0xff, 0xfc, 0x00, 0x01, 0xff, 0xc0, 0x07,
  0x80, 0x0f, 0xfe, 0x00, 0x00, 0xff, 0xff, 0x00, 0x03, 0xff, 0xfc, 0x00, 0x01, 0xff, 0xc0, 0x07,
  0x80, 0x0f, 0xfe, 0x00, 0x00, 0xff, 0xff, 0x00, 0x03, 0xff, 0xfc, 0x00, 0x01, 0xff, 0xc0, 0x07,
  0x80, 0x0f, 0xfe, 0x00, 0x00, 0xff, 0xff, 0x00, 0x03, 0xff, 0xfc, 0x00, 0x01, 0xff, 0xc0, 0x07,
  0x80, 0x0f, 0xff, 0xff, 0xff, 0xff, 0xfe, 0x00, 0x01, 0xff, 0xff, 0xe0, 0x7f, 0xff, 0xc0, 0x07,
  0x80, 0x0f, 0xff, 0xff, 0xff, 0xff, 0xfc, 0x00, 0x00, 0xff, 0xff, 0xf0, 0x7f, 0xff, 0xc0, 0x07,
  0x80, 0x0f, 0xff, 0xff, 0xff, 0xff, 0xfc, 0x00, 0x00, 0xff, 0xff, 0xf0, 0x7f, 0xff, 0xc0, 0x07,
  0x80, 0x0f, 0xff, 0xff, 0xff, 0xff, 0xf8, 0x00, 0x00, 0x7f, 0xff, 0xf0, 0x7f, 0xff, 0xc0, 0x07,
  0x80, 0x0f, 0xff, 0xff, 0xff, 0xff, 0xf0, 0x00, 0x00, 0x3f, 0xff, 0xf0, 0x7f, 0xff, 0x80, 0x07,
  0x80, 0x07, 0xff, 0xff, 0xff, 0xff, 0xe0, 0x00, 0x00, 0x1f, 0xff, 0xf0, 0x7f, 0xff, 0x80, 0x07,
  0xc0, 0x07, 0xff, 0xff, 0xff, 0xff, 0xc0, 0x00, 0x00, 0x0f, 0xff, 0xff, 0xff, 0xff, 0x80, 0x0f,
  0xc0, 0x03, 0xff, 0xff, 0xff, 0xff, 0x80, 0x00, 0x00, 0x07, 0xff, 0xff, 0xff, 0xff, 0x00, 0x0f,
  0xc0, 0x03, 0xff, 0xff, 0xff, 0xff, 0x00, 0x00, 0x00, 0x03, 0xff, 0xff, 0xff, 0xff, 0x00, 0x0f,
  0xe0, 0x01, 0xff, 0xff, 0xff, 0xfe, 0x00, 0x03, 0x00, 0x01, 0xff, 0xff, 0xff, 0xfe, 0x00, 0x1f,
  0xe0, 0x00, 0xff, 0xff, 0xff, 0xfc, 0x00, 0x07, 0x80, 0x00, 0xff, 0xff, 0xff, 0xfc, 0x00, 0x1f,
  0xe0, 0x00, 0x7f, 0xff, 0xff, 0xf0, 0x00, 0x0f, 0xc0, 0x00, 0x3f, 0xff, 0xff, 0xf8, 0x00, 0x3f,
  0xf0, 0x00, 0x3f, 0xff, 0xff, 0xe0, 0x00, 0x1f, 0xe0, 0x00, 0x1f, 0xff, 0xff, 0xf0, 0x00, 0x3f,
  0xf8, 0x00, 0x1f, 0xff, 0xff, 0x80, 0x00, 0x3f, 0xe0, 0x00, 0x07, 0xff, 0xff, 0xe0, 0x00, 0x7f,
  0xf8, 0x00, 0x0f, 0xff, 0xff, 0x00, 0x00, 0x7f, 0xf8, 0x00, 0x03, 0xff, 0xff, 0xc0, 0x00, 0x7f,
  0xfc, 0x00, 0x03, 0xff, 0xf8, 0x00, 0x00, 0xff, 0xfc, 0x00, 0x00, 0xff, 0xff, 0x00, 0x00, 0xff,
  0xfe, 0x00, 0x00, 0x7f, 0xe0, 0x00, 0x01, 0xff, 0xfe, 0x00, 0x00, 0x1f, 0xf8, 0x00, 0x01, 0xff,
  0xfe, 0x00, 0x00, 0x00, 0x00, 0x00, 0x03, 0xff, 0xff, 0x00, 0x00, 0x00, 0x00, 0x00, 0x03, 0xff,
  0xff, 0x00, 0x00, 0x00, 0x00, 0x00, 0x07, 0xff, 0xff, 0x80, 0x00, 0x00, 0x00, 0x00, 0x03, 0xff,
  0xff, 0x80, 0x00, 0x00, 0x00, 0x00, 0x0f, 0xff, 0xff, 0xc0, 0x00, 0x00, 0x00, 0x00, 0x07, 0xff,
  0xff, 0xc0, 0x00, 0x00, 0x00, 0x00, 0x1f, 0xff, 0xff, 0xe0, 0x00, 0x00, 0x00, 0x00, 0x0f, 0xff,
  0xff, 0xe0, 0x00, 0x00, 0x00, 0x00, 0x7f, 0xff, 0xff, 0xf8, 0x00, 0x00, 0x00, 0x00, 0x3f, 0xff,
  0xff, 0xf8, 0x00, 0x00, 0x00, 0x01, 0xff, 0xff, 0xff, 0xfe, 0x00, 0x00, 0x00, 0x00, 0x7f, 0xff,
  0xff, 0xfc, 0x00, 0x00, 0x00, 0x03, 0xff, 0xff, 0xff, 0xff, 0x00, 0x00, 0x00, 0x00, 0xff, 0xff,
  0xff, 0xff, 0x00, 0x00, 0x00, 0x0f, 0xff, 0xff, 0xff, 0xff, 0xc0, 0x00, 0x00, 0x03, 0xff, 0xff,
  0xff, 0xff, 0xc0, 0x00, 0x00, 0x3f, 0xff, 0xff, 0xff, 0xff, 0xf0, 0x00, 0x00, 0x0f, 0xff, 0xff,
  0xff, 0xff, 0xf0, 0x00, 0x01, 0xff, 0xff, 0xff, 0xff, 0xff, 0xfe, 0x00, 0x00, 0x3f, 0xff, 0xff,
  0xff, 0xff, 0xff, 0x00, 0x0f, 0xff, 0xff, 0xff, 0xff, 0xff, 0xff, 0xc0, 0x03, 0xff, 0xff, 0xff,
  0xff, 0xff, 0xff, 0xff, 0xff, 0xff, 0xff, 0xff, 0xff, 0xff, 0xff, 0xff, 0xff, 0xff, 0xff, 0xff,
  0xff, 0xff, 0xff, 0xff, 0xff, 0xff, 0xff, 0xff, 0xff, 0xff, 0xff, 0xff, 0xff, 0xff, 0xff, 0xff,
  0xff, 0xff, 0xff, 0xff, 0xff, 0xff, 0xff, 0xff, 0xff, 0xff, 0xff, 0xff, 0xff, 0xff, 0xff, 0xff,
  0xff, 0xff, 0xff, 0xff, 0xff, 0xff, 0xff, 0xff, 0xff, 0xff, 0xff, 0xff, 0xff, 0xff, 0xff, 0xff
};

void setup() {
  Serial.begin(9600);

  // initialize OLED display with address 0x3C for 128x64
  if (!oled.begin(SSD1306_SWITCHCAPVCC, 0x3C)) {
    Serial.println(F("SSD1306 allocation failed"));
    while (true);
  }

  delay(2000); // wait for initializing
  oled.setCursor(0, 0);
}

void loop() {
  oled.clearDisplay();

  // display bitmap
  oled.drawBitmap(0, 0, ArduinoIcon, 128, 64, WHITE);
  oled.display();
  delay(2000);

  // invert display
  oled.invertDisplay(1);
  delay(2000);
}
※ NOTE THAT: ※ 注意事项:
- The image size should be smaller than or equal to screen size.
图像大小应小于或等于屏幕大小。 - If you want to adapt the above code for OLED 128x32, you need to recale image and change width/ height in oled.drawBitmap(); function
如果要将上述代码改编为OLED 128x32,则需要在oled.drawBitmap()中重新绘制图像并更改宽度/高度;功能
OLED Troubleshooting OLED故障排除
If OLED does not display any thing, please do the following check list:
如果OLED没有显示任何内容,请执行以下检查清单:
- Make sure that your wiring is correct.
确保您的接线正确无误。 - Make sure that your I2C OLED uses SSD1306 Driver.
确保您的 I2C OLED 使用 SSD1306 驱动程序。 - Check the I2C address of OLED by running the below I2C Address Scanner code on Arduino
通过在Arduino上运行以下I2C地址扫描器代码来检查OLED的I2C地址
// I2C address scanner program
#include <Wire.h>

void setup()
{
  Wire.begin();
  Serial.begin(9600);
  Serial.println("I2C Scanner");
}

void loop()
{
  byte error, address;
  int nDevices;

  Serial.println("Scanning...");

  nDevices = 0;
  for(address = 1; address < 127; address++ )
  {
    Wire.beginTransmission(address);
    error = Wire.endTransmission();

    if (error == 0)
    {
      Serial.print("I2C device found at address 0x");
      if (address < 16)
        Serial.print("0");

      Serial.print(address,HEX);
      Serial.println("  !");

      nDevices++;
    }
    else if (error==4)
    {
      Serial.print("Unknown error at address 0x");
      if (address < 16)
        Serial.print("0");

      Serial.println(address,HEX);
    }
  }

  if (nDevices == 0)
    Serial.println("No I2C devices found");
  else
    Serial.println("done");

  delay(5000); // wait 5 seconds for next scan
}