LeetCode链表相关解法
- 1.移除链表元素
- [203. 移除链表元素](https://leetcode.cn/problems/remove-linked-list-elements/)
- 不设置头节点
- 设置虚拟头节点
- 2.设计链表
- [707. 设计链表](https://leetcode.cn/problems/design-linked-list/)
- 3.反转链表
- [206. 反转链表](https://leetcode.cn/problems/reverse-linked-list/)
- 思路
- 代码
- 4.两两交换链表节点
- [24. 两两交换链表中的节点](https://leetcode.cn/problems/swap-nodes-in-pairs/)
- 5.删除链表的倒数第N个节点
- [19. 删除链表的倒数第 N 个结点](https://leetcode.cn/problems/remove-nth-node-from-end-of-list/)
- 思路
- 代码
- 6.链表相交
- [面试题 02.07. 链表相交](https://leetcode.cn/problems/intersection-of-two-linked-lists-lcci/)
- 双指针法
- 思路
- 哈希法
- 7.环形链表II
- [142. 环形链表 II](https://leetcode.cn/problems/linked-list-cycle-ii/)
- 哈希法
- 双指针法
LeetCode一般提供的链表节点结构如下
public class ListNode {
    // 结点的值
    int val;

    // 下一个结点
    ListNode next;

    // 节点的构造函数(无参)
    public ListNode() {
    }

    // 节点的构造函数(有一个参数)
    public ListNode(int val) {
        this.val = val;
    }

    // 节点的构造函数(有两个参数)
    public ListNode(int val, ListNode next) {
        this.val = val;
        this.next = next;
    }
}
1.移除链表元素
203. 移除链表元素
不设置头节点
需要先进行删除,保证第一位不是目标元素
然后再进行后面的遍历
/**
 * Definition for singly-linked list.
 * public class ListNode {
 *     int val;
 *     ListNode next;
 *     ListNode() {}
 *     ListNode(int val) { this.val = val; }
 *     ListNode(int val, ListNode next) { this.val = val; this.next = next; }
 * }
 */
class Solution {
    public ListNode removeElements(ListNode head, int val) {
        //处理第一位,注意是while
        while(head != null && head.val == val){
            head = head.next;
        }

        if(head == null){
            return head;
        }

        ListNode pre = head;
        ListNode current = head.next;

        while(current != null){
            if(current.val == val){
                current = current.next;
                pre.next = current;
            }else{
                current = current.next;
                pre = pre.next;
            }
        }

        return head;
    }
}
设置虚拟头节点
设置一个虚拟头节点,方便操作
/**
 * Definition for singly-linked list.
 * public class ListNode {
 *     int val;
 *     ListNode next;
 *     ListNode() {}
 *     ListNode(int val) { this.val = val; }
 *     ListNode(int val, ListNode next) { this.val = val; this.next = next; }
 * }
 */
class Solution {
    public ListNode removeElements(ListNode head, int val) {
        if(head == null){
            return head;
        }
         //添加一个虚拟头节点
        ListNode VirtualHead = new ListNode(-1, head);
        ListNode pred = VirtualHead;
        ListNode cur = head;
        while(cur != null){
            if(cur.val == val){
                cur = cur.next;
                pred.next = cur;
            }else{
                cur = cur.next;
                pred = pred.next;
            }
        }
        return VirtualHead.next;
    }
}
2.设计链表
707. 设计链表
先找前驱节点
class LinkedNode {
    int val;
    LinkedNode next;
    public LinkedNode(){}
    public LinkedNode(int val){
        this.val = val;
    }
}
class MyLinkedList {
    //size存储链表元素的个数
    int size;
    //虚拟头结点
    ListNode head;

    //初始化链表
    public MyLinkedList() {
        size = 0;
        head = new ListNode(-1);
    }

    public int get(int index) {
        //如果index非法,返回-1
        if (index < 0 || index > size-1) {
            return -1;
        }
        int curIndex = 0;
        ListNode cur = head.next;
        while(cur != null){
            if(curIndex == index){
                return cur.val;
            }
            cur = cur.next;
            curIndex++;
        }
        return -1;
    }

    public void addAtHead(int val) {
        addAtIndex(0, val);
    }

    public void addAtTail(int val) {
        addAtIndex(size, val);
    }

    // 在第 index 个节点之前插入一个新节点,例如index为0,那么新插入的节点为链表的新头节点。
    // 如果 index 等于链表的长度,则说明是新插入的节点为链表的尾结点
    // 如果 index 大于链表的长度,则返回空
    public void addAtIndex(int index, int val) {
        if(index >= size-1){
            return;
        }
        if (index < 0) {
            index = 0;
        }
        //找到要插入节点的前驱
        ListNode pre = head;
        for (int i = 0; i < index; i++) {
            pre = pre.next;
        }
        ListNode newNode = new ListNode(val);
        newNode.next = pre.next;
        pre.next = newNode;
        size++;
    }

    public void deleteAtIndex(int index) {
        if (index < 0 || index > size-1) {
            return;
        }
        if (index == 0) {
            head = head.next;
	        return;
        }
        ListNode pre = head;
        for (int i = 0; i < index ; i++) {
            pre = pre.next;
        }
        pre.next = pre.next.next;
        size--;
    }
}

/**
 * Your MyLinkedList object will be instantiated and called as such:
 * MyLinkedList obj = new MyLinkedList();
 * int param_1 = obj.get(index);
 * obj.addAtHead(val);
 * obj.addAtTail(val);
 * obj.addAtIndex(index,val);
 * obj.deleteAtIndex(index);
 */
3.反转链表
206. 反转链表
思路
利用双指针,将所有的节点的next进行反转
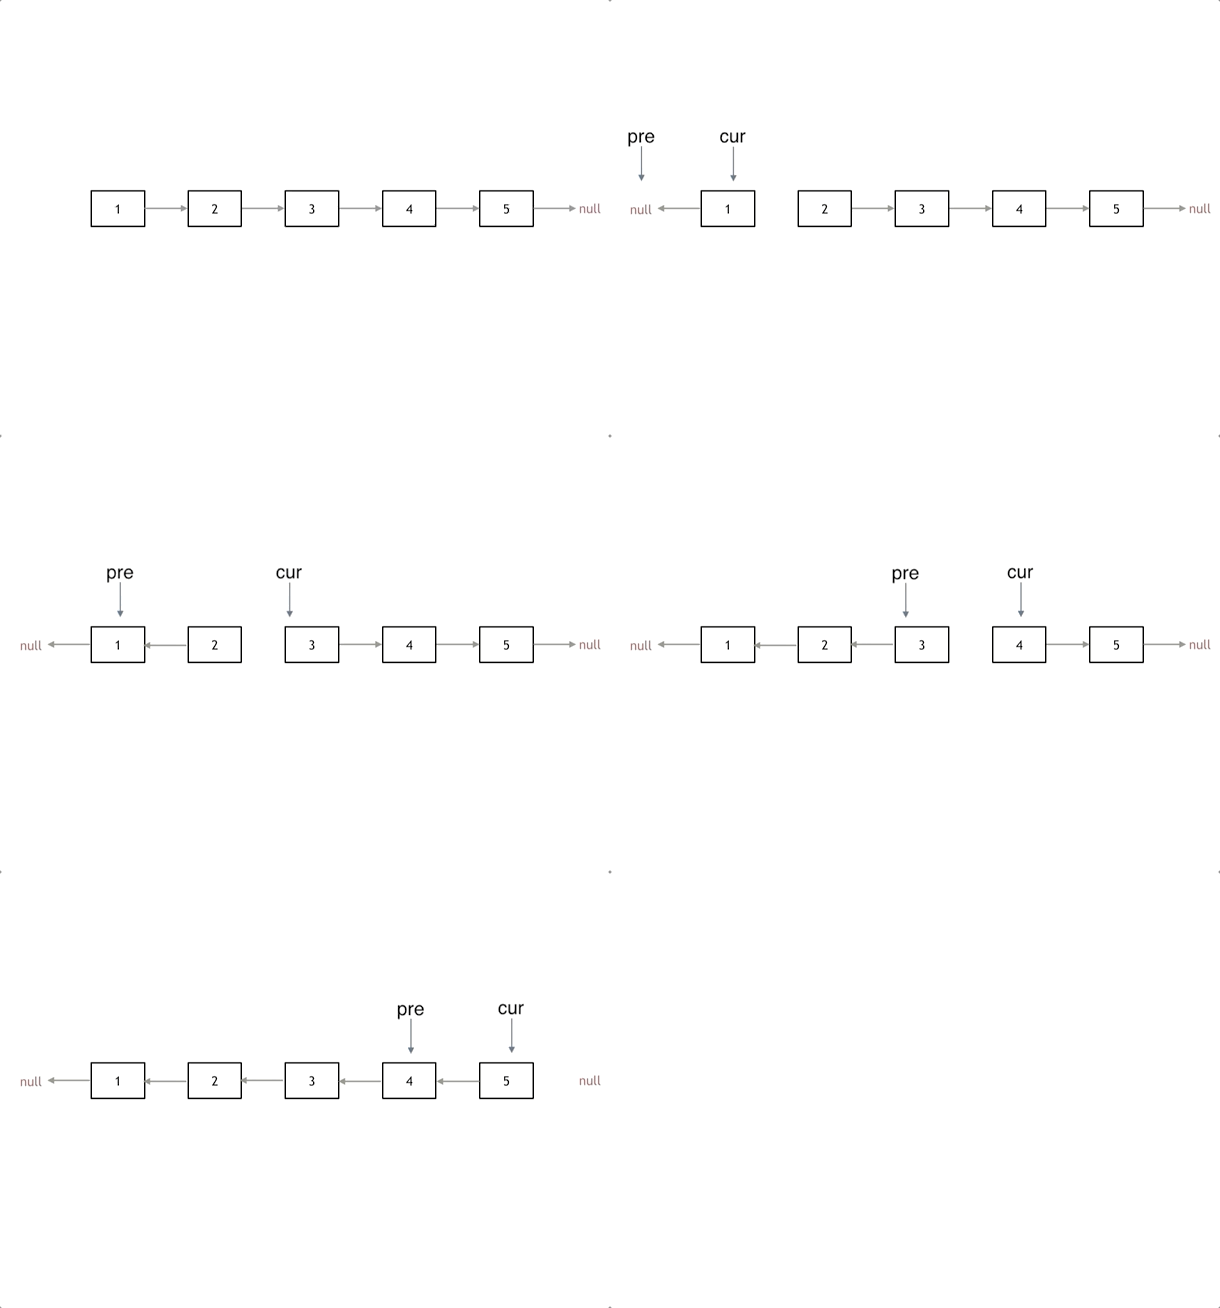
注意点
- 开始的时候pre为null
- 结束条件为cur == null
- 当前节点的next已经被修改了,cur如何到下一个节点? 使用temp临时指针
代码
/**
 * Definition for singly-linked list.
 * public class ListNode {
 *     int val;
 *     ListNode next;
 *     ListNode() {}
 *     ListNode(int val) { this.val = val; }
 *     ListNode(int val, ListNode next) { this.val = val; this.next = next; }
 * }
 */
class Solution {
    public ListNode reverseList(ListNode head) {
        ListNode pred = null;
        ListNode cur = head;

        while(cur != null){
            ListNode temp = cur.next;
            cur.next = pred;
            pred = cur;
            cur = temp;
        }

        return pred;
    }
}
4.两两交换链表节点
24. 两两交换链表中的节点
模拟题,A->B->C->D顺序如下
- 后一个节点B的指针指向前一个节点A
- A指向B的下一个节点C
- 之前的节点连接到B
注意点如下:
- 开始时进行判断.如果节点个数小于2直接返回
- 初始化时,pred和cur都为head,在进入循环后cur再为pred.next,避免空指针
- 结束条件为剩下的节点不足两个
- B节点指向A后,不知道C在哪了,所以需要一个临时指针temp指向C
- B节点到了链表头部后,需要一个连接指针link来把头节点来指向B
/**
 * Definition for singly-linked list.
 * public class ListNode {
 *     int val;
 *     ListNode next;
 *     ListNode() {}
 *     ListNode(int val) { this.val = val; }
 *     ListNode(int val, ListNode next) { this.val = val; this.next = next; }
 * }
 */
class Solution {
    public ListNode swapPairs(ListNode head) {
        if(head == null || head.next == null){
            return head;
        }

        ListNode virtualHead = new ListNode(-1, head);
        ListNode pred = head;
        ListNode cur = head;
        ListNode link = virtualHead; //记录之前连接到哪个节点了
        while(pred != null && pred.next != null){
            //在这里才真正赋值,因为pred!=null可用保证不会空指针
            cur = pred.next;

            //更改连线
            ListNode temp = cur.next;
            cur.next = pred;
            pred.next = temp;
            link.next = cur;

            //移动
            link = pred;
            pred = pred.next;

        }
        return virtualHead.next;

    }
}
5.删除链表的倒数第N个节点
19. 删除链表的倒数第 N 个结点
思路
删除一个节点需要知道这个节点的上一个节点
我们可用定义两个快慢指针
- 快指针先走N步
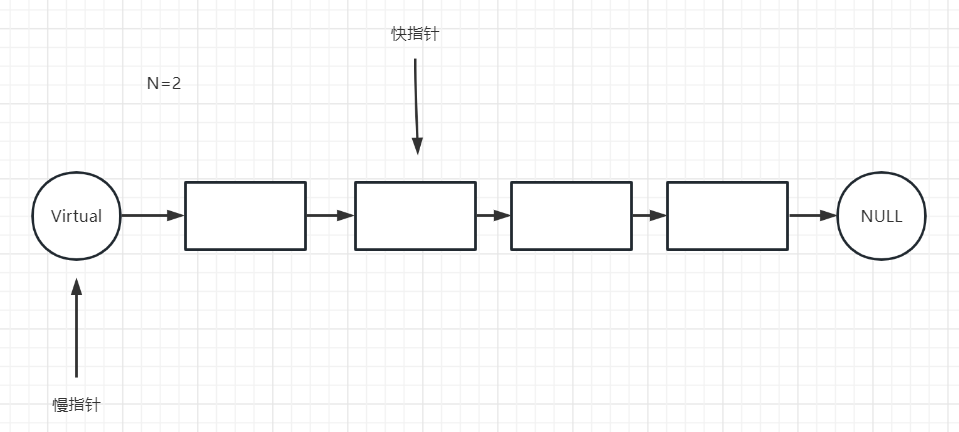
- 然后快慢指针一起走,直到快指针的下一个为null
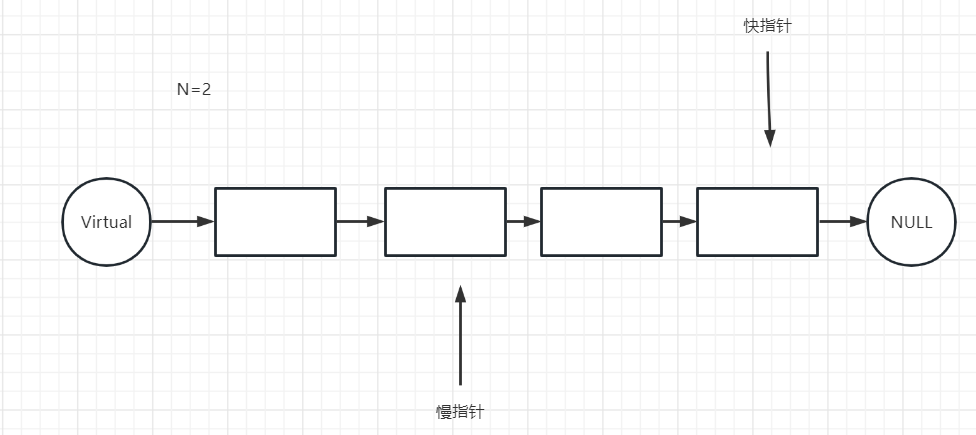
- 这时候慢指针删除下一个节点
代码
/**
 * Definition for singly-linked list.
 * public class ListNode {
 *     int val;
 *     ListNode next;
 *     ListNode() {}
 *     ListNode(int val) { this.val = val; }
 *     ListNode(int val, ListNode next) { this.val = val; this.next = next; }
 * }
 */
class Solution {
    public ListNode removeNthFromEnd(ListNode head, int n) {
        ListNode virtualHead = new ListNode(-1, head);
        ListNode fast = virtualHead;
        ListNode slow = virtualHead;
        for(int i = 0; i < n; i++){
            fast = fast.next;
        }
        while(fast.next != null){
            fast = fast.next;
            slow = slow.next;
        }

        //删除节点
        slow.next = slow.next.next;

        return virtualHead.next;
    }
}
6.链表相交
面试题 02.07. 链表相交
双指针法
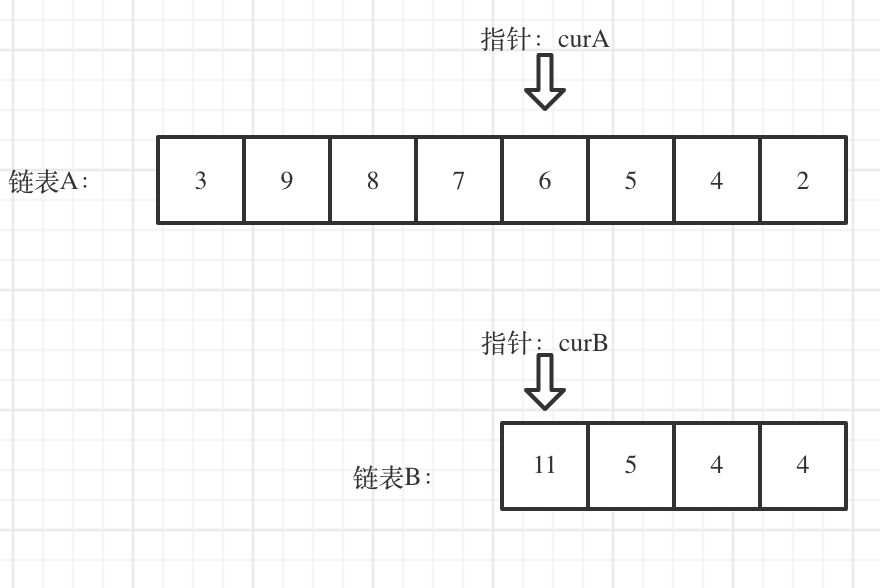
思路
-
先各自获得链表的长度A B
-
假如A长,A链表从A-B的地方开始和B一起遍历
-
依次比较指针是否相等
计算一下两个链表的长度,让长链表先走,等两个链表长度一样的时候再一起走,结点相等直接返回,没有相交返回null
/**
 * Definition for singly-linked list.
 * public class ListNode {
 *     int val;
 *     ListNode next;
 *     ListNode(int x) {
 *         val = x;
 *         next = null;
 *     }
 * }
 */
public class Solution {
    public ListNode getIntersectionNode(ListNode headA, ListNode headB) {
        int lenA = 0, lenB = 0;
        ListNode curA = headA;
        ListNode curB = headB;

        //获取长度
        while(curA != null){
            lenA++;
            curA = curA.next;
        }
        while(curB != null){
            lenB++;
            curB = curB.next;
        }

        //让长的为headA,短的为headB
        if(lenA < lenB){
            int temp = lenA;
            lenA = lenB;
            lenB = temp;
            ListNode tempNode = headA;
            headA = headB;
            headB = tempNode;
        }

        curA = headA;
        curB = headB;
        int gap = lenA - lenB;
        //长的走到和短的相同的地方
        for(int i = 0; i < gap; i++){
            curA = curA.next;
        }

        while(curA != null){
            if(curA == curB){
                return curA;
            }
            curA = curA.next;
            curB = curB.next;
        }

        return null;
    }
}
哈希法
先把其中一个链表的节点都放入HashSet,然后放入另一个链表的节点,如果有包含的话,就说明是同个节点
/**
 * Definition for singly-linked list.
 * public class ListNode {
 *     int val;
 *     ListNode next;
 *     ListNode(int x) {
 *         val = x;
 *         next = null;
 *     }
 * }
 */
public class Solution {
    public ListNode getIntersectionNode(ListNode headA, ListNode headB) {
        HashSet set = new HashSet();
        ListNode curA = headA;
        ListNode curB = headB;

        while(curA != null){
            set.add(curA);
            curA = curA.next;
        }

        while(curB != null){
            if(set.contains(curB)){
                return curB;
            }
            curB = curB.next;
        }

        return null;
    }
}
7.环形链表II
142. 环形链表 II
哈希法
/**
 * Definition for singly-linked list.
 * class ListNode {
 *     int val;
 *     ListNode next;
 *     ListNode(int x) {
 *         val = x;
 *         next = null;
 *     }
 * }
 */
public class Solution {
    public ListNode detectCycle(ListNode head) {
        HashSet set = new HashSet();
        ListNode cur = head;


        while(cur != null){
            if(set.contains(cur)){
                return cur;
            }
            set.add(cur);
            cur = cur.next;
        }

        return null;
    }
}
双指针法
https://programmercarl.com/0142.%E7%8E%AF%E5%BD%A2%E9%93%BE%E8%A1%A8II.html#_142-%E7%8E%AF%E5%BD%A2%E9%93%BE%E8%A1%A8ii






![[Android Studio]Android Studio Logcat日志样式设置](https://img-blog.csdnimg.cn/24b696d76d374a9992017e1625389592.gif)


