Talk is cheap, show me the code。
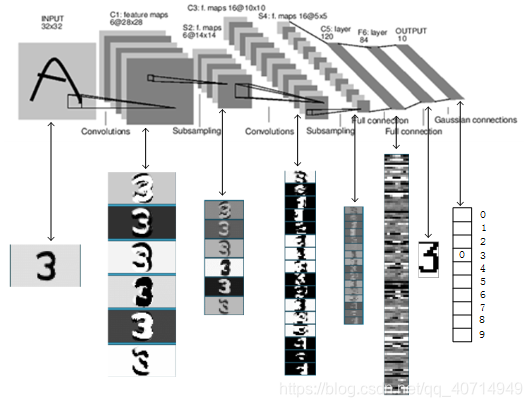
CNN Decoder
如patch设置为32x32,patch_scale设置为3,则先在原图上采样96x96大小的像素块,然后每隔三个取一个像素,降采样成32x32的块。
用这32x32个像素render feature,再经过CNN反卷积预测出96x96的像素,与真值对比。
def _patches_from_centers(
    self,
    image: torch.Tensor,
    patch_center_indices: torch.Tensor,
    rgb_size: int,
    device: Union[torch.device, str] = "cpu",
):
    """Convert patch center coordinates to the full set of ray indices and image patches."""
    offsets = torch.arange(-(rgb_size // 2), (rgb_size // 2) + rgb_size % 2, device=device)
    zeros = offsets.new_zeros((rgb_size, rgb_size))
    relative_indices = torch.stack((zeros, *torch.meshgrid(offsets, offsets, indexing="ij")), dim=-1)[
        None
    ]  # 1xKxKx3,原图采样大小
    rgb_indices = patch_center_indices[:, None, None] + relative_indices  # NxKxKx3
    ray_indices = rgb_indices[
        :, self.patch_scale // 2 :: self.patch_scale, self.patch_scale // 2 :: self.patch_scale
    ]  # NxKfxKfx3,降采样
    ray_indices = ray_indices.reshape(-1, 3)  # (N*Kf*Kf)x3
    img_patches = image[rgb_indices[..., 0], rgb_indices[..., 1], rgb_indices[..., 2]]
    return ray_indices, img_patches
相机位姿优化
参考nerfstudio/cameras/camera_optimizers.py
每迭代一次优化一次
- 初始化
self.pose_adjustment = torch.nn.Parameter(torch.zeros((num_cameras, 6), device=device)) # Nx6,前3维表示平移,后三维表示后3维表示切向量,再通过exp_map_SO3xR3,把6维变量映射为位姿和位移变量。相当于优化的是每个相机的标定参数
- 计算位姿偏移量
def forward(
        self,
        indices: Int[Tensor, "camera_indices"],
    ) -> Float[Tensor, "camera_indices 3 4"]:
    correction_matrices = exp_map_SO3xR3(self._get_pose_adjustment()[indices, :])
- 应用到相机的原始位姿上
def apply_to_raybundle(self, raybundle: RayBundle) -> None:
    """Apply the pose correction to the raybundle"""
    if self.config.mode != "off":
        correction_matrices = self(raybundle.camera_indices.squeeze())  # type: ignore
        raybundle.origins = raybundle.origins + correction_matrices[:, :3, 3]
        raybundle.directions = (
            torch.bmm(correction_matrices[:, :3, :3], raybundle.directions[..., None])
            .squeeze()
            .to(raybundle.origins)
        )
- 可学习的6维向量如何转成旋转矩阵
# nerfstudio/cameras/lie_groups.py
# We make an exception on snake case conventions because SO3 != so3.
def exp_map_SO3xR3(tangent_vector: Float[Tensor, "b 6"]) -> Float[Tensor, "b 3 4"]:
    """Compute the exponential map of the direct product group `SO(3) x R^3`.

    This can be used for learning pose deltas on SE(3), and is generally faster than `exp_map_SE3`.

    Args:
        tangent_vector: Tangent vector; length-3 translations, followed by an `so(3)` tangent vector.
    Returns:
        [R|t] transformation matrices.
    """
    # code for SO3 map grabbed from pytorch3d and stripped down to bare-bones
    log_rot = tangent_vector[:, 3:]
    nrms = (log_rot * log_rot).sum(1)
    rot_angles = torch.clamp(nrms, 1e-4).sqrt()
    rot_angles_inv = 1.0 / rot_angles
    fac1 = rot_angles_inv * rot_angles.sin()
    fac2 = rot_angles_inv * rot_angles_inv * (1.0 - rot_angles.cos())
    skews = torch.zeros((log_rot.shape[0], 3, 3), dtype=log_rot.dtype, device=log_rot.device)
    skews[:, 0, 1] = -log_rot[:, 2]
    skews[:, 0, 2] = log_rot[:, 1]
    skews[:, 1, 0] = log_rot[:, 2]
    skews[:, 1, 2] = -log_rot[:, 0]
    skews[:, 2, 0] = -log_rot[:, 1]
    skews[:, 2, 1] = log_rot[:, 0]
    skews_square = torch.bmm(skews, skews)

    ret = torch.zeros(tangent_vector.shape[0], 3, 4, dtype=tangent_vector.dtype, device=tangent_vector.device)
    ret[:, :3, :3] = (
        fac1[:, None, None] * skews
        + fac2[:, None, None] * skews_square
        + torch.eye(3, dtype=log_rot.dtype, device=log_rot.device)[None]
    )

    # Compute the translation
    ret[:, :3, 3] = tangent_vector[:, :3]
    return ret
Apperance embedding
就是简单的使用torch.nn.Embedding(num_embeds, self.config.appearance_dim)
# Appearance embedding settings
# num_sensor指的是相机个数,如果配置temporal,则每一帧都有单独的embedding
if self.config.use_temporal_appearance:
    self._num_embeds_per_sensor = math.ceil(self._duration * self.config.temporal_appearance_freq)
    num_embeds = num_sensors * self._num_embeds_per_sensor
else:
    num_embeds = num_sensors

# num_embeds=6,self.config.appearance_dim=16,表示6个相机,每个相机有16维的Embedding特征
self.appearance_embedding = torch.nn.Embedding(num_embeds, self.config.appearance_dim)

def _get_appearance_embedding(self, ray_bundle, features):
    sensor_idx = ray_bundle.metadata.get("sensor_idxs")
    if sensor_idx is None:
        assert not self.training, "Sensor sensor_idx must be present in metadata during training"
        sensor_idx = torch.full_like(features[..., :1], self.fallback_sensor_idx.value, dtype=torch.long)

    if self.config.use_temporal_appearance:
        time_idx = ray_bundle.times / self._duration * (embd_per_sensor := self._num_embeds_per_sensor)
        before_idx = time_idx.floor().clamp(0, embd_per_sensor - 1)
        after_idx = (before_idx + 1).clamp(0, embd_per_sensor - 1)
        ratio = time_idx - before_idx
        # unwrap to true embedding indices, which also account for the sensor index, not just the time index
        before_idx, after_idx = (x + sensor_idx * embd_per_sensor for x in (before_idx, after_idx))
        before_embed = self.appearance_embedding(before_idx.squeeze(-1).long())
        after_embed = self.appearance_embedding(after_idx.squeeze(-1).long())
        embed = before_embed * (1 - ratio) + after_embed * ratio
    else:
        embed = self.appearance_embedding(sensor_idx.squeeze(-1))
    return embed
lidar建模和采样
lidar发射射线和camer类似,只需要根据世界坐标系下lidar原点的坐标和点云的坐标,就能确定一条射线了,沿这条射线采样点,真值是这条射线上真正扫描到的点。
采样时,根据每次迭代设置的采样点数N如16384,平均到每帧的每个点上。
采样方式是把全部帧的点云concate起来,每个点有个全局的序号和帧的idx,假设总点数为100万,采样时在0-100万之间随机生成N个随机数。
    def get_lidar_batch_and_ray_bundle(self):
        if not len(self.lidar_dataset.lidars):
            return None, None
        batch = self.point_sampler.sample(self.cached_points)
        ray_indices = batch.pop("indices") # Nx2, 0: lidar index, 1: point index,共采样16384个点,每帧采样点数一样
        ray_bundle: RayBundle = self.lidar_ray_generator(ray_indices, points=batch["lidar"]) #把所有的点都concate起来了
        return batch, ray_bundle # batch存储lidar原始点,ray_bundle存储采样的方向,原点信息
另外,pixel_area的作用没太看懂,有点像是MipNerf里面的用锥形体界面去积分,而不是直接的射线?
    dx = self.horizontal_beam_divergence[lidar_indices.squeeze(-1)]  # ("num_rays":...,)
    dy = self.vertical_beam_divergence[lidar_indices.squeeze(-1)]  # ("num_rays":...,)
    pixel_area = dx * dy  # ("num_rays":..., 1)
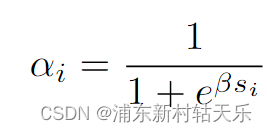
sdf实现
如果使用sdf,直接根据下面公式预测出不透明度α;否则便是先预测出密度density,再根据density积分得到不透明度。
因此两种render weight的方式是不同的。
if self.config.use_sdf:
    signed_distance = geo_out  # 直接把mlp的输出当作signed distance
    outputs[FieldHeadNames.SDF] = signed_distance
    outputs[FieldHeadNames.ALPHA] = self.sdf_to_density(signed_distance)
else:
    outputs[FieldHeadNames.DENSITY] = trunc_exp(geo_out) # 调用了torch.exp(), 为什么不能直接用geo_out作为density?有两个原因:1.因为density的物理意义是大于0的,geo_out不保证大于0  2. 网络输出的值可能非常小,使用epx放大,可以保持数值稳定性

self.sdf_to_density = SigmoidDensity(self.config.sdf_beta, learnable_beta=self.config.learnable_beta)
这个名字应该叫SigmoidAlpha,最后输出的被当做α,不是density了
class SigmoidDensity(nn.Module):
    """Learnable sigmoid density"""

    def __init__(self, init_val, beta_min=0.0001, learnable_beta=False):
        super().__init__()
        self.register_buffer("beta_min", torch.tensor(beta_min))
        self.register_parameter("beta", nn.Parameter(init_val * torch.ones(1), requires_grad=learnable_beta))

    def forward(self, sdf: Tensor, beta: Union[Tensor, None] = None) -> Tensor:
        """convert sdf value to density value with beta, if beta is missing, then use learable beta"""

        if beta is None:
            beta = self.get_beta()

        # negtive sdf will have large density
        return torch.sigmoid(-sdf * beta) #这里就是上面的公式,这里叫α,和density不是一个东西

    def get_beta(self):
        """return current beta value"""
        beta = self.beta.abs() + self.beta_min
        return beta
render_weight_from_alpha()直接处理不透明度,而[render_weight_from_density()]则需要先从密度计算不透明度。
def _render_weights(self, outputs, ray_samples):
    value = outputs[FieldHeadNames.ALPHA if self.config.field.use_sdf else                 FieldHeadNames.DENSITY].squeeze(-1)
    if self.device.type in ("cpu", "mps"):
        # Note: for debugging on devices without cuda
        weights = torch.zeros_like(value) + 0.5
    elif self.config.field.use_sdf:
        weights, _ = nerfacc.render_weight_from_alpha(value)
    else:
        weights, _, _ = nerfacc.render_weight_from_density(
            t_ends=ray_samples.frustums.ends.squeeze(-1),
            t_starts=ray_samples.frustums.starts.squeeze(-1),
            sigmas=value,
        )
    return weights