蜂鸣器:基础(1)
原文:
In this tutorial, we are going to learn how to use the buzzer with Arduino, In detail, we will learn:
在本教程中,我们将学习如何将蜂鸣器与Arduino一起使用,将学习:
- Active buzzer vs passive buzzer
有源蜂鸣器与无源蜂鸣器 - How buzzer works 蜂鸣器的工作原理
- How to connect the piezo buzzer to Arduino
如何将压电蜂鸣器连接到Arduino - How to program Arduino to control piezo buzzer to generate sound, melody
如何对Arduino进行编程以控制压电蜂鸣器以产生声音,旋律

Hardware Required 所需硬件
| 1 | × | Arduino UNO or Genuino UNO | |
|---|---|---|---|
| 1 | × | USB 2.0 cable type A/B | |
| 1 | × | Piezo Buzzer 压电蜂鸣器 | |
| 1 | × | Breadboard 面包板 | |
| 跳线 | |||
| 1 | × | (可选)用于Arduino的9V电源适配器 | |
| 1 | × | 用于Arduino Uno的螺钉接线端子屏蔽层 | |
| 1 | × | (可选)Arduino Uno透明亚克力外壳 |
关于蜂鸣器
The buzzers are used to generate sound, beep or even melody of a song. They come in several types, categorized by distinct characteristics. Let’s explore these categories based on the following characteristics:
蜂鸣器用于产生歌曲的声音、蜂鸣声甚至旋律。它们有几种类型,按不同的特征分类。让我们根据以下特征来探索这些类别:
-
Control Method: 控制方法:
- Active Buzzers 有源蜂鸣器
- Passive Buzzers 无源蜂鸣器
-
Sound-Generating Mechanism:
发声机制:- Piezo Buzzers 压电蜂鸣器
- Regular Buzzers 常规蜂鸣器
-
Operating Voltage: 工作电压:
- Low Voltage (3-5V) 低电压 (3-5V)
- High Voltage (12V) 高压 (12V)
Let’s see more detail. 让我们看看更多细节。
-
Active Buzzer vs Passive Buzzer
有源蜂鸣器与无源蜂鸣器 -
Active Buzzer: 有源蜂鸣器:
-
- Produces sound when voltage is applied.
施加电压时发出声音。 - Needs a continuous electrical signal to make sound.
需要连续的电信号才能发出声音。 - Easier to use, requiring only a voltage source.
更易于使用,只需要一个电压源。 - Typically used in basic alerting applications.
通常用于基本警报应用程序。
- Produces sound when voltage is applied.
-
Passive Buzzer: 无源蜂鸣器:
-
- Requires an external oscillating signal to create sound.
需要外部振荡信号才能发出声音。 - Can produce different tones by changing the input frequency.
可以通过改变输入频率产生不同的音调。 - Requires more complex circuitry to operate.
需要更复杂的电路才能运行。 - Commonly used in musical applications and tone generation tasks.
常用于音乐应用和音调生成任务。
- Requires an external oscillating signal to create sound.
Piezo Buzzer vs Regular Buzzer 压电蜂鸣器与普通蜂鸣器
-
- Piezo Buzzer: 压电蜂鸣器:
- Uses piezoelectric crystals.
使用压电晶体。 - Produces high-pitched, clear sounds.
产生高亢、清晰的声音。 - Versatile with various tones and frequencies.
用途广泛,具有各种音调和频率。 - Efficient and commonly used in alarms and musical devices.
高效,常用于闹钟和音乐设备。
- Uses piezoelectric crystals.
- Regular Buzzer: 常规蜂鸣器:
- Uses electromagnetic coils.
使用电磁线圈。 - Produces basic, buzzy sounds.
产生基本的嗡嗡声。 - Limited tone variation. 有限的音调变化。
- Used in simpler applications like doorbells and basic alarms.
用于更简单的应用,如门铃和基本警报器。
- Uses electromagnetic coils.
- Piezo Buzzer: 压电蜂鸣器:
In the market, there is a 3V-24V active buzzer, which you can use as 3-5V active buzzer or high voltage buzzer (12V…),
市面上有3V-24V有源蜂鸣器,可以作为3-5V有源蜂鸣器或高压蜂鸣器(12V…),
-
- When you connect this buzzer directly to Arduino pin, it will create a normal sound ⇒ suitable for sound indicator like keypad sound
当您将此蜂鸣器直接连接到Arduino引脚时,它将产生正常的声音⇒适用于键盘声音等声音指示器 - When you connect this buzzer to a high-voltage via a relay, it will create a loud sound ⇒ suitable for the warning sound.
当您通过继电器将此蜂鸣器连接到高压时,它会发出适合警告声音⇒响亮的声音。
- When you connect this buzzer directly to Arduino pin, it will create a normal sound ⇒ suitable for sound indicator like keypad sound
-
In this tutorial, we will learn 3-5V active and passive piezo buzzer. For 12V buzzer, please refer to the Arduino - 12V buzzer tutorial
在本教程中,我们将学习 3-5V 有源和无源压电蜂鸣器。对于12V蜂鸣器,请参考Arduino-12V蜂鸣器教程
Pinout 引脚排列
-
A buzzer usually has two pins:
蜂鸣器通常有两个引脚: -
- Negative (-) pin: needs to be connected to GND (0V)
负极(-)引脚:需要接GND(0V) - Positive (+) pin: receive the control signal from Arduino (directly, or indirectly via relay)
正极(+)引脚:接收来自Arduino的控制信号(直接或间接通过继电器) 
- Negative (-) pin: needs to be connected to GND (0V)
How an Active Buzzer Works有源蜂鸣器的工作原理
-
- If connecting VCC to the positive pin, piezo buzzer generates the constant sound
如果将 VCC 连接到正极引脚,压电蜂鸣器会产生恒定的声音 
- If generating a square wave of the specified frequency (and 50% duty cycle) on the positive pin, the piezo buzzer generates tones. The different frequency makes a different tone. By changing the frequency of the signal on the positive pin, we can create the melody of a song.
如果在正极引脚上产生指定频率(和 50% 占空比)的方波,压电蜂鸣器会产生音调。不同的频率产生不同的音调。通过改变正极引脚上的信号频率,我们可以创建歌曲的旋律。 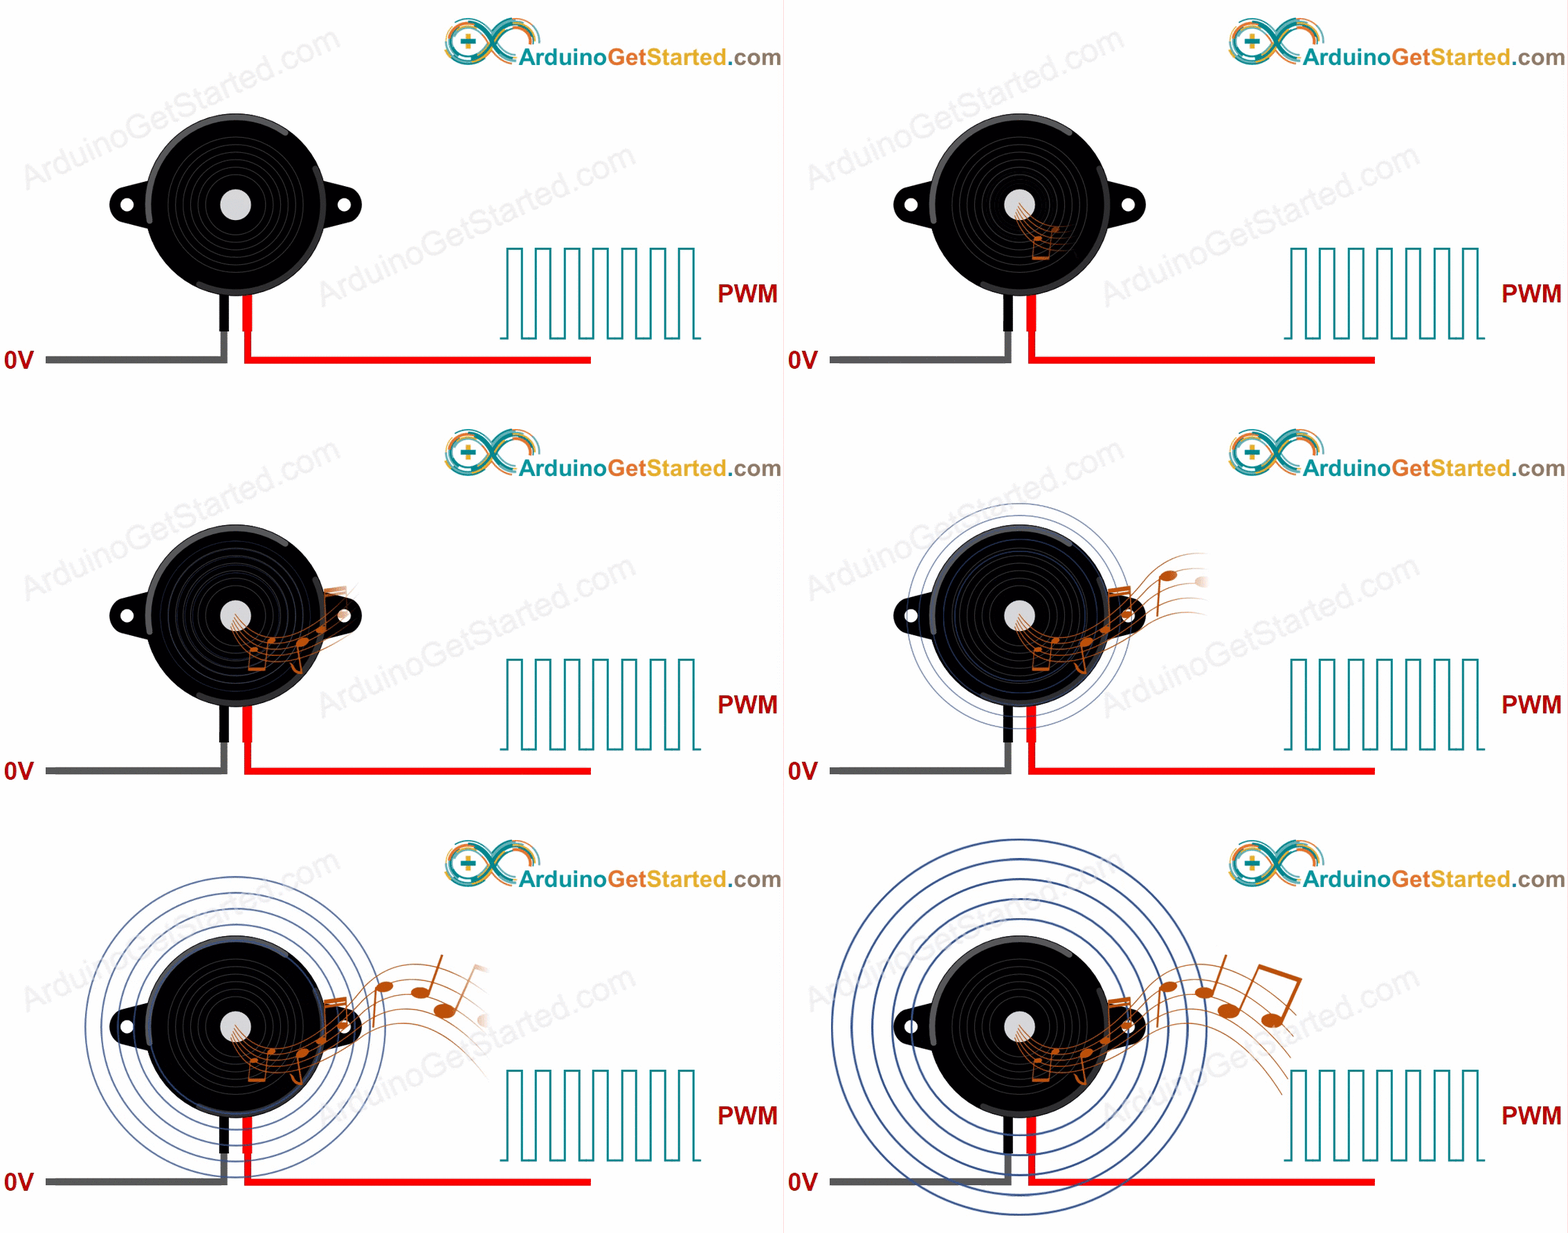
- If connecting VCC to the positive pin, piezo buzzer generates the constant sound
How an Passive Buzzer Works无源蜂鸣器的工作原理
-
- Unlike the active buzzer, if just connecting VCC to the positive pin, the passive buzzer does NOT generates the constant sound
与有源蜂鸣器不同,如果只是将 VCC 连接到正极引脚,则无源蜂鸣器不会产生恒定的声音 - Just like the active buzzer, If generating a square wave of the specified frequency (and 50% duty cycle) on the positive pin, the piezo buzzer generates tones. The different frequency makes a different tone. By changing the frequency of the signal on the positive pin, we can create the melody of a song
就像有源蜂鸣器一样,如果在正极引脚上产生指定频率(和 50% 占空比)的方波,压电蜂鸣器会产生音调。不同的频率产生不同的音调。通过改变正极引脚上的信号频率,我们可以创作出一首歌的旋律
- Unlike the active buzzer, if just connecting VCC to the positive pin, the passive buzzer does NOT generates the constant sound
Wiring Diagram 接线图
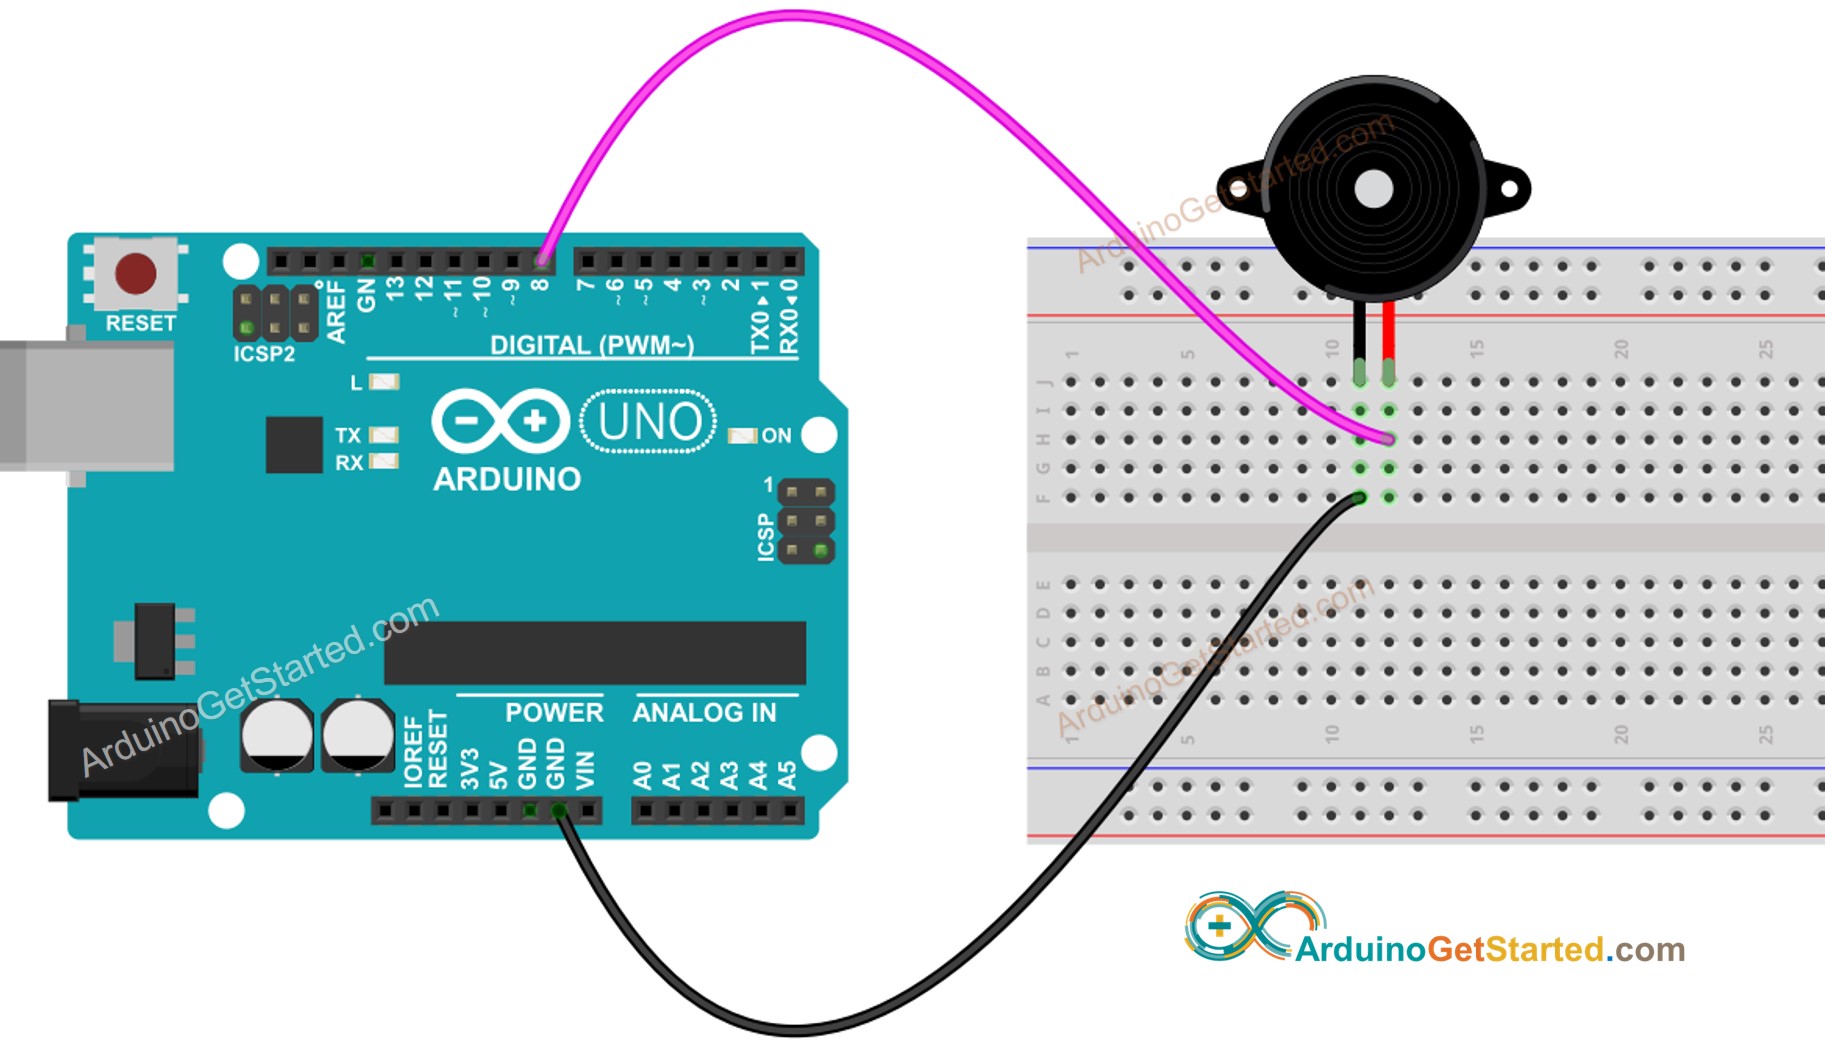
This image is created using Fritzing. Click to enlarge image
此图像是使用 Fritzing 创建的。点击放大图片
 How To Program For Buzzer 如何为蜂鸣器编程
Thanks to the Arduino library, playing a melody is easy. We do NOT need to know how to generate the square wave. We just need to use two functions: tone() and noTone() the library.
多亏了Arduino库,演奏旋律很容易。我们不需要知道如何生成方波。我们只需要使用两个函数:tone() 和 noTone() 库。
 Arduino Code Arduino代码
/*

 * Created by ArduinoGetStarted.com
   *
 * This example code is in the public domain
   *
 * Tutorial page: https://arduinogetstarted.com/tutorials/arduino-piezo-buzzer
   */

#include "pitches.h"

#define BUZZER_PIN 8 // The Arduino pin connected to the buzzer

// notes in the melody:旋律中的音符:
int melody[] = {
  NOTE_C4, NOTE_G3, NOTE_G3, NOTE_A3, NOTE_G3, 0, NOTE_B3, NOTE_C4
};

// note durations: 4 = quarter note, 8 = eighth note, etc.:
// 音符持续时间:4 = 四分音符,8 = 八分音符等:
int noteDurations[] = {
  4, 8, 8, 4, 4, 4, 4, 4
};

void setup() {
  // iterate over the notes of the melody:遍历旋律的音符:
  for (int thisNote = 0; thisNote < 8; thisNote++) {

    // to calculate the note duration, take one second divided by the note type.计算音符持续时间,请将一秒除以音符类型。
    //e.g. quarter note = 1000 / 4, eighth note = 1000/8, etc.例如,四分音符 = 1000 / 4,八分音符 = 1000/8 等。
    int noteDuration = 1000 / noteDurations[thisNote];
    tone(BUZZER_PIN, melody[thisNote], noteDuration);

    // to distinguish the notes, set a minimum time between them. 要区分音符,请设置它们之间的最短时间。
    // the note's duration + 30% seems to work well:音符的持续时间 + 30% 似乎效果很好:
    int pauseBetweenNotes = noteDuration * 1.30;
    delay(pauseBetweenNotes);
    // stop the tone playing:
    noTone(BUZZER_PIN);
  }
}

void loop() {
  // no need to repeat the melody.
}
 Quick Steps 快速步骤
-
Connect Arduino to PC via USB cable
通过USB线将Arduino连接到PC -
Open Arduino IDE, select the right board and port
打开Arduino IDE,选择正确的板卡和端口 -
Copy the above code and open with Arduino IDE
复制上面的代码并使用Arduino IDE打开 -
Create the pitches.h file On Arduino IDE by:
在Arduino IDE上创建pitches.h文件:- Either click on the button just below the serial monitor icon and choose New Tab, or use Ctrl+Shift+N keys.
单击串行监视器图标下方的按钮并选择“新建选项卡”,或使用 Ctrl+Shift+N 键。
- Either click on the button just below the serial monitor icon and choose New Tab, or use Ctrl+Shift+N keys.
-

Give file’s name pitches.h and click OK button
提供文件名 pitches.h,然后单击“确定”按钮 -

Copy the below code and paste it to the created pitches.h file.
复制以下代码并将其粘贴到创建的 pitches.h 文件中。
/*************************************************
 * Public Constants
 *************************************************/

#define NOTE_B0  31
#define NOTE_C1  33
#define NOTE_CS1 35
#define NOTE_D1  37
#define NOTE_DS1 39
#define NOTE_E1  41
#define NOTE_F1  44
#define NOTE_FS1 46
#define NOTE_G1  49
#define NOTE_GS1 52
#define NOTE_A1  55
#define NOTE_AS1 58
#define NOTE_B1  62
#define NOTE_C2  65
#define NOTE_CS2 69
#define NOTE_D2  73
#define NOTE_DS2 78
#define NOTE_E2  82
#define NOTE_F2  87
#define NOTE_FS2 93
#define NOTE_G2  98
#define NOTE_GS2 104
#define NOTE_A2  110
#define NOTE_AS2 117
#define NOTE_B2  123
#define NOTE_C3  131
#define NOTE_CS3 139
#define NOTE_D3  147
#define NOTE_DS3 156
#define NOTE_E3  165
#define NOTE_F3  175
#define NOTE_FS3 185
#define NOTE_G3  196
#define NOTE_GS3 208
#define NOTE_A3  220
#define NOTE_AS3 233
#define NOTE_B3  247
#define NOTE_C4  262
#define NOTE_CS4 277
#define NOTE_D4  294
#define NOTE_DS4 311
#define NOTE_E4  330
#define NOTE_F4  349
#define NOTE_FS4 370
#define NOTE_G4  392
#define NOTE_GS4 415
#define NOTE_A4  440
#define NOTE_AS4 466
#define NOTE_B4  494
#define NOTE_C5  523
#define NOTE_CS5 554
#define NOTE_D5  587
#define NOTE_DS5 622
#define NOTE_E5  659
#define NOTE_F5  698
#define NOTE_FS5 740
#define NOTE_G5  784
#define NOTE_GS5 831
#define NOTE_A5  880
#define NOTE_AS5 932
#define NOTE_B5  988
#define NOTE_C6  1047
#define NOTE_CS6 1109
#define NOTE_D6  1175
#define NOTE_DS6 1245
#define NOTE_E6  1319
#define NOTE_F6  1397
#define NOTE_FS6 1480
#define NOTE_G6  1568
#define NOTE_GS6 1661
#define NOTE_A6  1760
#define NOTE_AS6 1865
#define NOTE_B6  1976
#define NOTE_C7  2093
#define NOTE_CS7 2217
#define NOTE_D7  2349
#define NOTE_DS7 2489
#define NOTE_E7  2637
#define NOTE_F7  2794
#define NOTE_FS7 2960
#define NOTE_G7  3136
#define NOTE_GS7 3322
#define NOTE_A7  3520
#define NOTE_AS7 3729
#define NOTE_B7  3951
#define NOTE_C8  4186
#define NOTE_CS8 4435
#define NOTE_D8  4699
#define NOTE_DS8 4978
Click Upload button on Arduino IDE to upload code to Arduino
单击Arduino IDE上的“上传”按钮,将代码上传到Arduino
-

Enjoy the melody 享受旋律

Modifying Arduino Code 修改Arduino代码
Now, we are going to modidy the code to play “Jingle Bells” song.
现在,我们将修改代码以播放“铃儿响叮当”歌曲。
We only need to change value of two arrays: int melody[] and int noteDurations[].
我们只需要更改两个数组的值:int melody[] 和 int noteDurations[]。
/*
 * Created by ArduinoGetStarted.com
 *
 * This example code is in the public domain
 *
 * Tutorial page: https://arduinogetstarted.com/tutorials/arduino-piezo-buzzer
 */

#include "pitches.h"

#define BUZZER_PIN 8 // The Arduino pin connected to the buzzer

// notes in the melody:
int melody[] = {
  NOTE_E5, NOTE_E5, NOTE_E5,
  NOTE_E5, NOTE_E5, NOTE_E5,
  NOTE_E5, NOTE_G5, NOTE_C5, NOTE_D5,
  NOTE_E5,
  NOTE_F5, NOTE_F5, NOTE_F5, NOTE_F5,
  NOTE_F5, NOTE_E5, NOTE_E5, NOTE_E5, NOTE_E5,
  NOTE_E5, NOTE_D5, NOTE_D5, NOTE_E5,
  NOTE_D5, NOTE_G5
};

// note durations: 4 = quarter note, 8 = eighth note, etc, also called tempo:
int noteDurations[] = {
  8, 8, 4,
  8, 8, 4,
  8, 8, 8, 8,
  2,
  8, 8, 8, 8,
  8, 8, 8, 16, 16,
  8, 8, 8, 8,
  4, 4
};

void setup() {
  // iterate over the notes of the melody:
  int size = sizeof(noteDurations) / sizeof(int);

  for (int thisNote = 0; thisNote < size; thisNote++) {

    // to calculate the note duration, take one second divided by the note type.
    //e.g. quarter note = 1000 / 4, eighth note = 1000/8, etc.
    int noteDuration = 1000 / noteDurations[thisNote];
    tone(BUZZER_PIN, melody[thisNote], noteDuration);

    // to distinguish the notes, set a minimum time between them.
    // the note's duration + 30% seems to work well:
    int pauseBetweenNotes = noteDuration * 1.30;
    delay(pauseBetweenNotes);
    // stop the tone playing:
    noTone(BUZZER_PIN);
  }
}

void loop() {
  // no need to repeat the melody.
}
※ NOTE THAT: ※ 注意事项:
The above code using delay() function. This blocks other code during playing melody. To avoid blocking other code, use the ezBuzzer library instead. This library is designed for buzzer to beep or play memody without blocking other code.
上面的代码使用了delay()函数。这会在播放旋律时阻止其他代码。若要避免阻塞其他代码,请改用 ezBuzzer 库。该库旨在让蜂鸣器发出哔哔声或播放记忆,而不会阻塞其他代码。

Challenge Yourself 挑战自我
- Use Piezo Buzzer to play the song you love
使用压电蜂鸣器播放您喜欢的歌曲 - Automatically make alarm when someone approaches your valuable stuff. Hint: Refer to Arduino - Motion Sensor.
当有人接近您的贵重物品时,自动发出警报。提示:请参阅Arduino - 运动传感器。
Piezo Buzzer on Commercial Products
Piezo Buzzer on commercial products is usually very small in size, which can be integrated into small devices.
商业产品上的压电蜂鸣器通常尺寸非常小,可以集成到小型设备中。
- TrackR bravo - Bluetooth Tracking Device
TrackR bravo - 蓝牙跟踪设备 - Key Finder Smart Anti-Lost Tracker
Key Finder 智能防丢失追踪器
Function References 函数参考
- tone()
- noTone()
See Also 另见
- Arduino - Buzzer Arduino - 蜂鸣器
- Arduino - Button - Piezo Buzzer
Arduino - 按钮 - 压电蜂鸣器 - Arduino - Potentiometer Triggers Piezo Buzzer
Arduino - 电位器触发压电蜂鸣器 - Arduino - Ultrasonic Sensor - Piezo Buzzer
Arduino - 超声波传感器 - 压电蜂鸣器 - Arduino - Motion Sensor - Piezo Buzzer
Arduino - 运动传感器 - 压电蜂鸣器 - Arduino - Keypad - Beep
Arduino - 键盘 - 哔声 - Arduino - Keypad - Buzzer
Arduino - 键盘 - 蜂鸣器 - Arduino - Touch Sensor - Piezo Buzzer
Arduino - 触摸传感器 - 压电蜂鸣器 - Arduino - Door Sensor - Piezo Buzzer
Arduino - 门传感器 - 压电蜂鸣器 - Arduino - Rain Sensor - Buzzer
Arduino - 雨量传感器 - 蜂鸣器


