网格布局
GridPane通常用于布局:表单布局
GridPane可以在行,列或单元格级别指定约束。
例如,我们可以设置包含输入文本字段的第二列,以在窗口调整大小时调整大小。
使用Java FX创建表格的时候,这个布局非常方便。
包javafx.scene.layout名为GridPane这个类提供了 11 个属性,它们是 -
- alignment- 此属性可以设置位置,使用方式setAlignment()方法设置此属性的值。
放置在顶部,底部,左侧,右侧和中心区域中的节点的默认对齐方式如下:
-
-
- 顶部: Pos.TOP_LEFT
- 底部: Pos.BOTTOM_LEFT
- 左侧: Pos.TOP_LEFT
- 右侧: Pos.TOP_RIGHT
- 中心: Pos.CENTER
-
- hgap- 此属性的类型为double,表示列之间的水平差距。
- vgap- 属性的类型为double,它表示行之间的垂直间距。
- gridLinesVisible- 此属性是布尔类型,显示表格线
import javafx.application.Application;
import javafx.geometry.HPos;
import javafx.geometry.Insets;
import javafx.scene.Scene;
import javafx.scene.control.Button;
import javafx.scene.control.Label;
import javafx.scene.control.TextField;
import javafx.scene.layout.BorderPane;
import javafx.scene.layout.ColumnConstraints;
import javafx.scene.layout.GridPane;
import javafx.scene.layout.Priority;
import javafx.scene.paint.Color;
import javafx.stage.Stage;

public class Main extends Application {
    public static void main(String[] args) {
        Application.launch(args);
    }

    @Override
    public void start(Stage primaryStage) {
        BorderPane root = new BorderPane();
        Scene scene = new Scene(root, 380, 300, Color.WHITE);

        GridPane gridpane = new GridPane();
        //表格实线
        gridpane.setGridLinesVisible(true);
        gridpane.setPadding(new Insets(5));
        //水平间距
        gridpane.setHgap(5);
        //垂直间距
        gridpane.setVgap(50);
        ColumnConstraints column1 = new ColumnConstraints(100);
        ColumnConstraints column2 = new ColumnConstraints(50, 150, 300);
        column2.setHgrow(Priority.ALWAYS);
        gridpane.getColumnConstraints().addAll(column1, column2);

        Label fNameLbl = new Label("First Name");
        TextField fNameFld = new TextField();
        Label lNameLbl = new Label("Last Name");
        TextField lNameFld = new TextField();

        Button saveButt = new Button("Save");

        // First name label
        GridPane.setHalignment(fNameLbl, HPos.RIGHT);
        gridpane.add(fNameLbl, 0, 0);

        // Last name label
        GridPane.setHalignment(lNameLbl, HPos.RIGHT);
        gridpane.add(lNameLbl, 0, 1);

        // First name field
        GridPane.setHalignment(fNameFld, HPos.LEFT);
        gridpane.add(fNameFld, 1, 0);

        // Last name field
        GridPane.setHalignment(lNameFld, HPos.LEFT);
        gridpane.add(lNameFld, 1, 1);

        // Save button
        GridPane.setHalignment(saveButt, HPos.RIGHT);
        gridpane.add(saveButt, 1, 2);

        root.setCenter(gridpane);
        primaryStage.setScene(scene);
        primaryStage.show();
    }
}

示例
以下代码演示使用GridPane布局的简单表单应用程序。它有以下布局。
+------------------------+
| [label ] [   field   ] |
| [label ] [   field   ] |
|             [ button ] |
+------------------------+
完整的代码实现如下所示 -
import javafx.application.Application;
import javafx.geometry.HPos;
import javafx.geometry.Insets;
import javafx.scene.Scene;
import javafx.scene.control.Button;
import javafx.scene.control.Label;
import javafx.scene.control.TextField;
import javafx.scene.layout.BorderPane;
import javafx.scene.layout.ColumnConstraints;
import javafx.scene.layout.GridPane;
import javafx.scene.layout.Priority;
import javafx.scene.paint.Color;
import javafx.stage.Stage;

public class Main extends Application {
    public static void main(String[] args) {
        Application.launch(args);
    }

    @Override
    public void start(Stage primaryStage) {
        BorderPane root = new BorderPane();
        Scene scene = new Scene(root, 380, 150, Color.WHITE);

        GridPane gridpane = new GridPane();
        gridpane.setPadding(new Insets(5));
        gridpane.setHgap(5);
        gridpane.setVgap(5);
        ColumnConstraints column1 = new ColumnConstraints(100);
        ColumnConstraints column2 = new ColumnConstraints(50, 150, 300);
        column2.setHgrow(Priority.ALWAYS);
        gridpane.getColumnConstraints().addAll(column1, column2);

        Label fNameLbl = new Label("First Name");
        TextField fNameFld = new TextField();
        Label lNameLbl = new Label("Last Name");
        TextField lNameFld = new TextField();

        Button saveButt = new Button("Save");

        // First name label
        GridPane.setHalignment(fNameLbl, HPos.RIGHT);
        gridpane.add(fNameLbl, 0, 0);

        // Last name label
        GridPane.setHalignment(lNameLbl, HPos.RIGHT);
        gridpane.add(lNameLbl, 0, 1);

        // First name field
        GridPane.setHalignment(fNameFld, HPos.LEFT);
        gridpane.add(fNameFld, 1, 0);

        // Last name field
        GridPane.setHalignment(lNameFld, HPos.LEFT);
        gridpane.add(lNameFld, 1, 1);

        // Save button
        GridPane.setHalignment(saveButt, HPos.RIGHT);
        gridpane.add(saveButt, 1, 2);

        root.setCenter(gridpane);
        primaryStage.setScene(scene);
        primaryStage.show();
    }
}
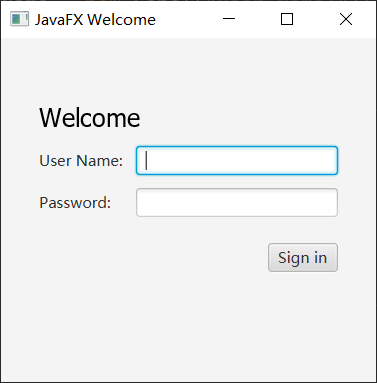
示例-登录
以下是一个实现登录窗口的代码 -
import javafx.application.Application;
import javafx.event.ActionEvent;
import javafx.event.EventHandler;
import javafx.geometry.Insets;
import javafx.geometry.Pos;
import javafx.scene.Scene;
import javafx.scene.control.Button;
import javafx.scene.control.Label;
import javafx.scene.control.PasswordField;
import javafx.scene.control.TextField;
import javafx.scene.layout.GridPane;
import javafx.scene.layout.HBox;
import javafx.scene.paint.Color;
import javafx.scene.text.Font;
import javafx.scene.text.FontWeight;
import javafx.scene.text.Text;
import javafx.stage.Stage;

public class Main extends Application {

    public static void main(String[] args) {
        launch(args);
    }

    @Override
    public void start(Stage stage) {
        //舞台名称
        stage.setTitle("JavaFX Welcome");
        GridPane grid = new GridPane();
        //GridPane内容居中
        grid.setAlignment(Pos.CENTER);
        //水平间距
        grid.setHgap(10);
        //垂直间距
        grid.setVgap(10);
        //填充:距离上下左右外框
        grid.setPadding(new Insets(25, 25, 25, 25));

        Text scenetitle = new Text("Welcome");
        scenetitle.setFont(Font.font("Tahoma", FontWeight.NORMAL, 20));
        //0行
        //0列
        //占用2列
        //占用1行
        grid.add(scenetitle, 0, 0, 2, 1);

        Label userName = new Label("User Name:");
        grid.add(userName, 0, 1);

        TextField userTextField = new TextField();
        grid.add(userTextField, 1, 1);

        Label pw = new Label("Password:");
        grid.add(pw, 0, 2);

        PasswordField pwBox = new PasswordField();
        grid.add(pwBox, 1, 2);

        Button btn = new Button("Sign in");
        //登录按钮放到水平布局HBox中方便控制左右
        HBox hbBtn = new HBox(10);
        hbBtn.setAlignment(Pos.BOTTOM_RIGHT);
        hbBtn.getChildren().add(btn);
        grid.add(hbBtn, 1, 4);

        final Text actiontarget = new Text();
        grid.add(actiontarget, 1, 6);

        btn.setOnAction(new EventHandler<ActionEvent>() {

            @Override
            public void handle(ActionEvent e) {
                actiontarget.setFill(Color.FIREBRICK);
                actiontarget.setText("Sign in button pressed");
            }
        });

        Scene scene = new Scene(grid, 300, 275);
        stage.setScene(scene);
        stage.show();
    }
}