It's now easier than ever to create your own AI Assistant that can handle a lot of computing tasks for you. See how you can get started with the OpenAI AI Assistant API.
现在比以往任何时候都更容易创建您自己的AI助手,它可以为您处理许多计算任务。了解如何使用OpenAI AI助手API开始操作。
New updates on 17th of April 2024 from OpenAI
来自OpenAI的2024年4月17日最新更新
OpenAI announced significant updates to the Assistants API. The update includes enhancements aimed at improving the capabilities and performance of the assistant.
OpenAI宣布了对Assistants API的重大更新。此次更新包括旨在提高助手功能和性能的改进。
- Knowledge retrieval now supports up to 10,000 files. 知识检索支持高达10,000个文件
- More control over token and model configuration. 对令牌和模型配置拥有更多的控制权。
- Streaming support. 流式传输支持。
It's been a few days since OpenAI's DevDay and lots of interesting features and updates have been announced. Today, we're specifically interested in the new AI Assistant feature. So without further ado, let's get started!
OpenAI的开发者日已经过去几天了,宣布了许多有趣的功能和更新。今天,我们特别关注新的AI助手功能。那么,让我们开始吧!
"You just ask the computer for what you need, and it'll do all of these tasks for you." - Sam Altman - CEO, OpenAI
“你只需要向电脑提出你需要什么,它就会为你完成所有这些任务。”——萨姆·阿尔特曼(Sam Altman),OpenAI 首席执行官
AI Assistants AI助手
An AI Assistant performs actions based on a given set of instructions and tools. You can think of an AI Assistant as a digital assistant (or agent) that you hire to solve specific problems for your use case.
AI助手根据给定的一组指令和工具来执行操作。你可以将AI助手视为你雇用的数字助手(或代理),用于解决特定用例中的特定问题。
AI Assistants are hosted within the OpenAI platform and use a chosen large language model to think, communicate, and take action.
AI助手托管在OpenAI平台上,并使用选定的大型语言模型进行思考、交流和采取行动。
We're going to see how to create an AI Assistant that reads a PDF file and converts it to a Twitter thread.
我们将学习如何创建一个AI助手,该助手可以读取PDF文件并将其转换为Twitter帖子。
We'll call it X Threads Converter. 我们将它称为“X线程转换器”。
How do I create an AI Assistant? 我如何创建一个AI助手?
There are two ways to do this: 有2种方式
-
- Using the OpenAI Web Interface 使用OpenAI的Web界面
- Using the OpenAI Assistants API 使用OpenAI Assistants API
Method 1: Using the OpenAI Web Interface 方法1:使用OpenAI的Web界面
For this method, we do not need to write any code since everything will be done using the Web Interface provided by the OpenAI platform.
对于这种方法,我们不需要编写任何代码,因为所有操作都将通过OpenAI平台提供的Web界面来完成。
Let's go ahead and create our X Threads Converter AI Assistant using the Web Interface. Follow the steps below:
让我们继续使用Web界面来创建我们的X线程转换器AI助手。请按照以下步骤操作:
Step 1: Log into your OpenAI account 登录openai 账号
Step 2: On the left side navigation bar, you'll see the new Assistants tab:
步骤2:在左侧的导航栏中,您将看到新的“助手”选项卡:

Step 3: Click on the Assistants tab: 点击 助手 页签
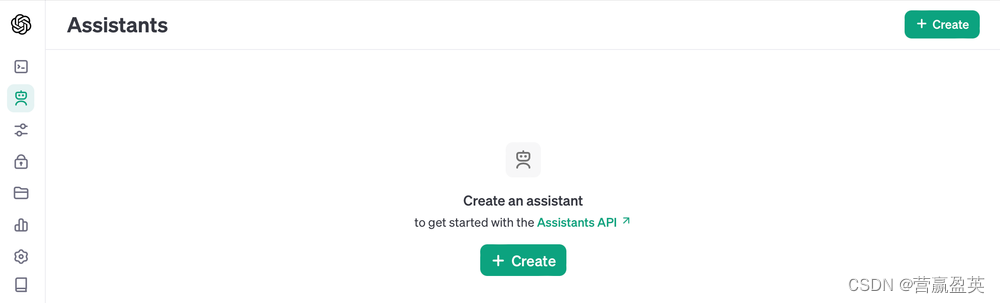
As you can see, I don't have any assistants yet. We're going to create a new one.
如您所见,我还没有任何助手。我们将创建一个新的。
Step 4: Click on Create. You'll see the following options:
步骤4:点击“创建”。您将看到以下选项:
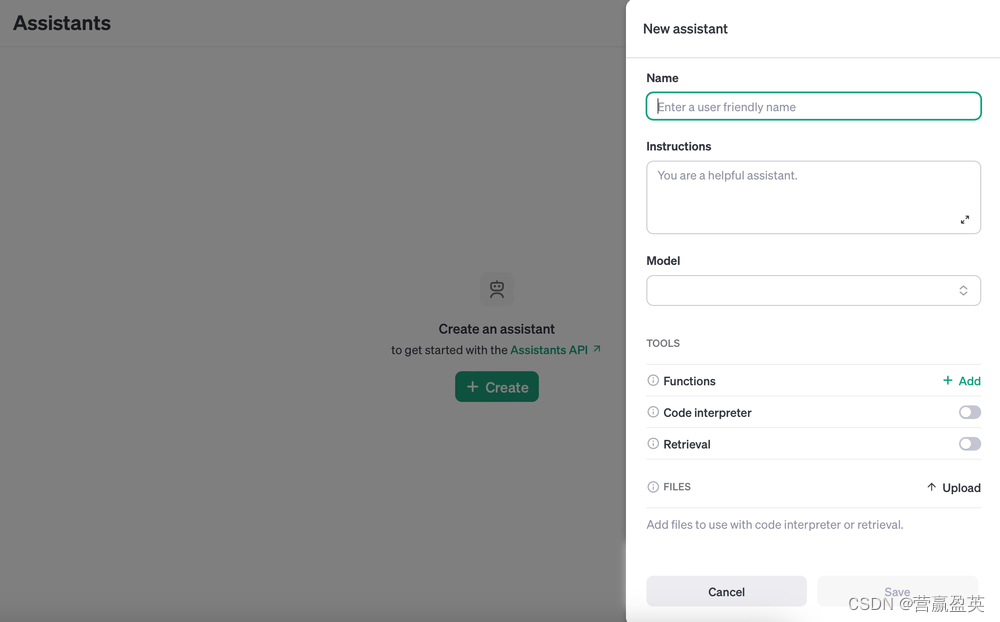
To create a new assistant, we'll need to enter the following:
要创建一个新的助手,我们需要输入以下内容:
- Name: Let's call it
X Threads Converter. 名称:让我们将其命名为“X线程转换器”。 - Instructions: Use the following instructions: "You are a helpful assistant. Given a set of files, you extract the most interesting information and restructure it into Threads format for Twitter."
指令:使用以下指令:“你是一个有用的助手。给定一组文件,你提取最有趣的信息,并将其重新组织成Twitter帖子串的格式。”
- Model: Select one of the supported OpenAI models. I will choose the new
gpt-4-1106-previewmodel.
模型:选择支持的OpenAI模型之一。我将选择新的gpt-4-1106-preview模型。
- Tools: We're just going to enable
Retrievalfor this example. This is because our assistant will need to retrieve the contents from the uploaded files.
工具:对于这个示例,我们只需要启用检索功能。这是因为我们的助手需要从上传的文件中检索内容。
- Files: You can upload any supported file here. I uploaded a PDF version of this post. If you want to do the same, just open the link in your browser and save it as PDF.
文件:您可以在此处上传任何支持的文件。我上传了这篇帖子的PDF版本。如果您也想这样做,只需在浏览器中打开链接并将其保存为PDF即可。
Step 5: Click on Save. Your configuration should look like this:
步骤5:点击“保存”。您的配置应该如下所示:
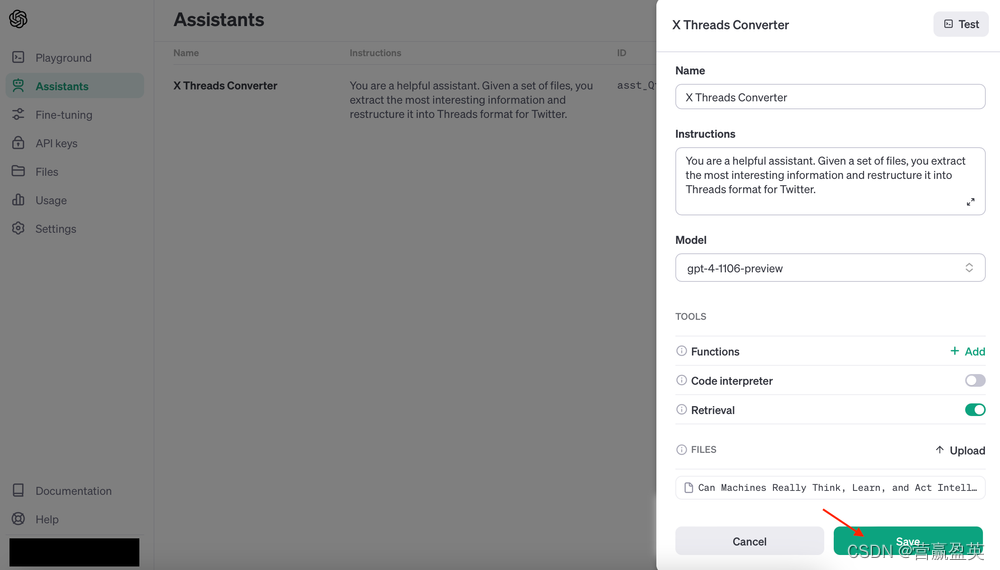
That's it! Go ahead and click on the Save button. Our X Threads Converter will be ready in a few seconds.
就是这样!继续并点击“保存”按钮。我们的X线程转换器将在几秒钟内准备就绪。
Step 6: Try it out in the Playground: 步骤6:在测试区尝试一下:
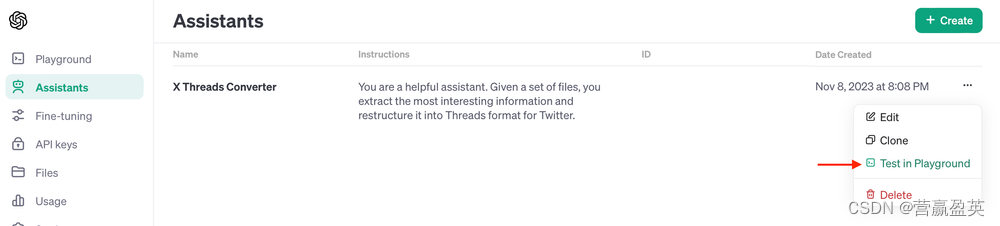
Click on the "Test in Playground" button. The Playground is a chat interface where you can test and optimize your Assistant.
点击“在测试区测试”按钮。测试区是一个聊天界面,您可以在其中测试和优化您的助手。
Let's ask our shiny new assistant to "Create the X Threads Post" click "Add and run" and see what happens.
让我们向这个闪亮的新助手发出“创建X Threads帖子”的请求,点击“添加并运行”,看看会发生什么。

The AI Assistant will take a few seconds to think and process your request.
AI助手会花几秒钟的时间来思考和处理您的请求。
Behind the scenes, the following is happening:
在幕后,正在发生以下事情:
- The contents of the PDF are converted to Vector Embeddings
PDF的内容被转换为向量嵌入(Vector Embeddings)
- Our Vector Embeddings are stored in a Vector Database
我们的向量嵌入(Vector Embeddings)被存储在向量数据库中。
- The Query is used to find relevant and similar embeddings
查询用于查找相关和相似的嵌入
- The relevant parts are sent to the chosen large language model
相关的部分被发送到所选的大型语言模型
- The LLM will process and return the final output
大型语言模型(LLM)将处理并返回最终输出
You should end up with something like this:
您应该会得到类似这样的结果:
X Threads Converter X 线程转换器
Based on the text extracted from the uploaded PDF, I will create a Twitter thread format for you. However, due to the length limitations of Twitter posts (280 characters each), the thread will summarize the content in concise tweets.
基于从上传的PDF中提取的文本,我将为您创建Twitter线程格式。但是,由于Twitter帖子的长度限制(每条280个字符),线程将以简洁的推文形式总结内容。
That's impressive! In no time we were able to build an assistant that can create a Twitter Thread given any PDF file. More importantly, we wrote exactly zero lines of code.
太令人印象深刻了!我们很快就构建了一个助手,可以根据任何PDF文件创建Twitter线程。更重要的是,我们一行代码都没有写。
Method 2: Using the OpenAI Assistants API 方法2:使用OpenAI助手API
Let's go ahead and create our X Threads Converter AI Assistant using the OpenAI Assistants API:
让我们继续使用OpenAI助手API来创建我们的X Threads Converter AI助手:
Step 1: Install the Official OpenAI Python SDK 步骤1:安装官方OpenAI Python SDK
In your terminal, type the below and hit return: 在您的终端中,输入以下命令并按下回车键:
pip install openaiTo verify that the OpenAI SDK has been successfully installed, run the following command:
为了验证OpenAI SDK已成功安装,请运行以下命令:
pip show openaiStep 2: Import Required Packages 步骤2:导入所需的包
Great, now we can create a new directory for our project. In your terminal type the following commands:
很好,现在我们可以为我们的项目创建一个新目录。在您的终端中输入以下命令:
- Create a new directory:
mkdir openai-ai-assistant-demo
创建一个新目录:mkdir openai-ai-assistant-demo
cdinto the new directory and createassistant.pyfile:cd openai-ai-assistant-demo && touch assistant.py
进入新目录并创建assistant.py文件:cd openai-ai-assistant-demo && touch assistant.py
- Open the
assistant.pyfile and import theOpenAI SDK
打开assistant.py文件并导入OpenAI SDK
from openai import OpenAIStep 3: Create the OpenAI Client 步骤3:创建OpenAI客户端
We'll now create the OpenAI client. Make sure to replace with your own OpenAI API Key.
现在我们将创建OpenAI客户端。请确保使用您自己的OpenAI API密钥进行替换。
client = OpenAI(
    api_key="YOUR_API_KEY",
)
Step 4: Prepare the PDF File for Upload 步骤4:准备PDF文件以进行上传
Next, place the PDF file in the openai-ai-assistant-demo directory. In my case, the file name is document.pdf.
接下来,将PDF文件放在openai-ai-assistant-demo目录中。在我的情况下,文件名是document.pdf。
Let's create the file using the OpenAI SDK using client.files.create:
让我们使用client.files.create通过OpenAI SDK创建文件:
file = client.files.create(
  file=open("document.pdf", "rb"),
  purpose='assistants'
)

file_id = file.id
Here, we specify the purpose property as 'assistants' so that the file becomes accessible by the Assistants API.
在这里,我们将purpose属性指定为'assistants',以便文件可通过助手API进行访问。
Step 5: Define the Required AI Assistant Tools 步骤5:定义所需的AI助手工具
We create our tools variable which is a list of required tools that the AI Assistant will have access to. In this case, we only need the retrieval tool.
我们创建一个名为“tools”的变量,它是一个列表,包含AI助手可以访问的所需工具。在这种情况下,我们只需要检索工具。
tools = [
    {
        "type": "retrieval"
    }
]
Step 6: Create our AI Assistant using client.beta.assistants.create:
步骤6:使用client.beta.assistants.create创建我们的AI助手:
Finally, we'll use the client.beta.assistants.create and pass the following parameters:
最后,我们将使用client.beta.assistants.create并传递以下参数:
assistant = client.beta.assistants.create(
    name="X Threads Converter",
    instructions="You are a helpful assistant. Given a set of files, you extract the most interesting information and restructure it into Threads format for Twitter.",
    model="gpt-4-1106-preview",
    tools=tools,
    file_ids=[file.id]
)

assistant_id = assistant.id
The values used in the above code are exactly the same as the ones used to create the AI Assistant using the web interface in the previous example (Method 1).
上述代码中使用的值与在前面的示例(方法1)中使用网页界面创建AI助手时使用的值完全相同。
Step 7: Run the Code 步骤7:运行代码
To create our X Threads Converter AI Assistant, execute the assistant.py file:
创建我们的X Threads Converter AI助手,执行assistant.py文件:
python assistant.py
Once done, refresh the Assistants page and we can see our new X Threads Converter AI Assistant in the Assistants list.
一旦完成,刷新助手页面,我们就可以在助手列表中看到我们新的X Threads Converter AI助手了。

Once AI Assistant is up and running. We can take it for a spin in the Playground just like we did in Method 1.
一旦AI助手启动并运行。我们可以像在方法1中一样,在测试场上试用它。
How do I Use an AI Assistant? 我如何使用AI助手?
The Playground provided by OpenAI is a great tool to test our AI Assistant quickly. But, how do you actually use the AI Assistant using the API?
OpenAI提供的测试场是一个快速测试我们的AI助手的绝佳工具。但是,你如何实际使用API来使用AI助手呢?
Let's explore how AI Assistants work and go over two important concepts: Threads and Runs.
让我们探索AI助手是如何工作的,并介绍两个重要的概念:线程和运行。
What are Threads? 什么是线程?
Each thread represents a conversation. A thread contains a list of messages each belonging to the user and the large language model.
每个线程都代表一次对话。一个线程包含一系列消息,这些消息分别属于用户和大型语言模型。
That conversation with your spouse on WhatsApp? That's a thread.
你在WhatsApp上与配偶的对话?那就是一个线程。
The task we want to send to our assistant: "Create the X Threads Post." is represented as a message within a thread.
我们想要发送给助手的任务:“创建X Threads帖子。”在线程中表示为一条消息。
What are Runs? 什么是运行?
A Run represents the execution of a thread. A Run also needs to know which AI Assistant to use for that execution. Once initialized, the Run will determine which steps are needed to complete the task.
一个“运行”表示一个线程的执行。一个“运行”还需要知道应该使用哪个AI助手来执行这个任务。一旦初始化,“运行”将确定完成该任务需要哪些步骤。
To create a run we'll need to supply the thread_id and assistant_id parameters.
要创建一个运行,我们需要提供thread_id和assistant_id参数。
Creating a Thread 创建一个线程
To create a Thread, we'll need to initialize it with a list of messages. For our example, there's only one message, which is: "Create the X Threads Post.".
要创建一个线程,我们需要用消息列表来初始化它。对于我们的示例,只有一条消息,即:“Create the X Threads Post.”。
Since our AI Assistant needs to process data from a PDF file, we'll also need to specify the file that it needs to use. We can find the file id on this page. Alternatively, the id property is accessible after you initialize the file object in Step 4 by calling file.id.
由于我们的AI助手需要处理PDF文件中的数据,我们还需要指定它需要使用哪个文件。我们可以在这个页面上找到文件ID。或者,在步骤4中初始化文件对象后,通过调用file.id也可以访问id属性。
Let's create our thread using client.beta.threads.create:
让我们使用client.beta.threads.create来创建我们的线程:
thread = client.beta.threads.create(
  messages=[
    {
      "role": "user",
      "content": "Create the X Thread Post.",
      "file_ids": [file_id]
    }
  ]
)

thread_id = thread.id
We'll need the thread_id property below when creating the Run.
在创建“运行”时,我们需要使用下面的thread_id属性。
Creating a Run 创建一个运行
Let's create our Run using the client.beta.threads.runs.create method:
让我们使用client.beta.threads.runs.create方法来创建我们的“运行”:
run = client.beta.threads.runs.create(
  thread_id=thread_id,
  assistant_id=assistant_id
)

run_id = run.id
The assistant_id could be accessed using the id property after the assistant variable is created in Step 6.
在步骤6中创建助手(assistant)变量后,可以通过访问其id属性来获取assistant_id。
Note: Using the API, you can retrieve all required IDs. For instance, the assistant_id could be retrieved by listing all the assistants and choosing the correct one using the client.beta.assistants.list method.
注意:通过API,您可以检索所有必需的ID。例如,可以通过列出所有助手并选择正确的一个,使用client.beta.assistants.list方法来检索assistant_id。
Checking Run Status 检查运行状态
Our run will take a few seconds to complete. This is because the AI Assistant needs to determine the steps needed to complete the task. It also needs to process, store, and retrieve information from the PDF file and talk to the LLM for further processing.
我们的运行将需要几秒钟来完成。这是因为AI助手需要确定完成任务所需的步骤。它还需要处理、存储和从PDF文件中检索信息,并与LLM(大型语言模型)进行通信以进行进一步处理。
When using other tools such as the code_interpreter the Run may take even more time as it generates and runs Python code iteratively.
当使用其他工具(如code_interpreter)时,运行可能需要更长时间,因为它会迭代地生成和运行Python代码。
Therefore, we'll need to periodically check if the Run is completed. We can do this by checking its status property by calling the client.beta.threads.runs.retrieve method, as shown below:
因此,我们需要定期检查运行是否已完成。我们可以通过调用client.beta.threads.runs.retrieve方法来检查其状态属性,如下所示:
run = client.beta.threads.runs.retrieve(
  thread_id=thread_id,
  run_id=run_id
)
Once the status property changes to completed, we can see the model's response by retrieving the messages within our thread:
一旦状态属性更改为“已完成”,我们就可以通过检索线程中的消息来查看模型的响应:
thread_messages = client.beta.threads.messages.list(thread_id)
print(thread_messages.data)
Closing thoughts 总结
As we've seen, this should get you up and running with the new OpenAI AI Assistants in no time. It is now easier than ever to create your AI Assistant that can help you perform a variety of tasks useful to your business.
正如我们所见,这将使您很快上手新的OpenAI AI助手。现在比以往任何时候都更容易创建AI助手,帮助您执行各种对业务有用的任务。
You may also want to think about the fact that your application will be locked into the OpenAI platform. This means that if you decide to migrate to another LLM, storage, and vector database at a later time it may not be a simple task.
您可能还需要考虑到,您的应用程序将被锁定在OpenAI平台上。这意味着如果您决定在将来迁移到另一个大型语言模型(LLM)、存储和向量数据库,这可能不是一项简单的任务。