Vue在线签名
- 一、目的
- 二、样式
- 三、代码
- 1、依赖
- 2、代码
- 2.1 在线签名组件
- 2.1.1 基础的
- 2.1.2 携带时间水印的
- 2.2父组件
一、目的
又来了一个问题,直接让我在线签名(还不能存储base64),并且还得上传,我直接***违禁词。
好家伙又回来了,这次增加了一个加入时间水印的要求,我***。
二、样式
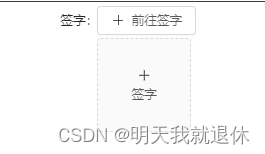
初始样式
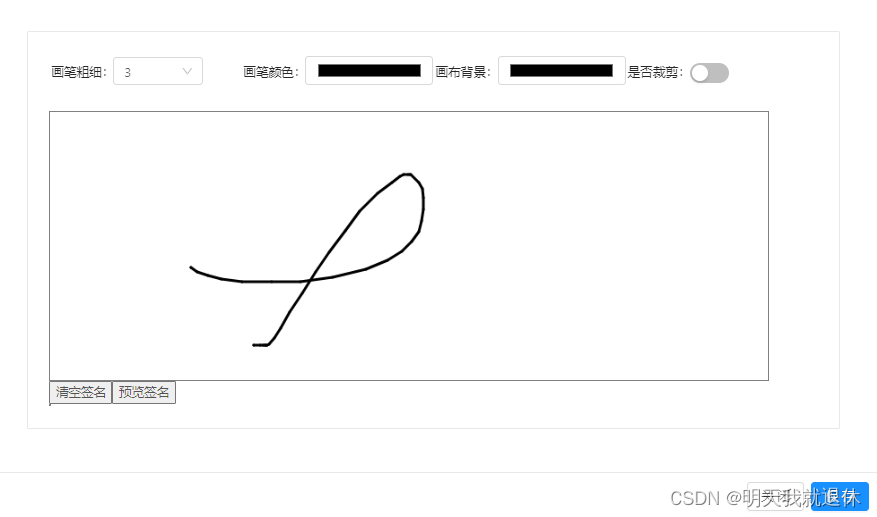
点击前往组件(忽略写的什么样)
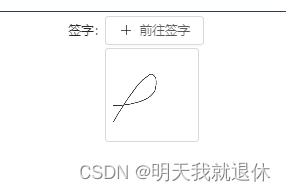
这里可以调节画笔,颜色什么的,也能进行预览,点击保存之后(
1、这里点击保存按钮我也走了一遍预览签名,不走的话这边直接保存了,签名图片还在上传,无法进行回显了;
2、也可以在保存的方法使用延迟调用setTimeout,但是怕无法把握这个时间,所以就用了方法1)
三、代码
1、依赖
npm install vue-esign --save
2、代码
因为使用的jeecg框架,这里是按照框架进行写的,原生的其他版本,等有时间在更新一下,毕竟cv工程师。
下面的生成图片逻辑和上一篇Vue中使用图片编辑器 tui-image-editor 实现在线编辑保存最后的base转换差不多都是一样的,这里也是使用了组件调用。
2.1 在线签名组件
2.1.1 基础的
在线编辑的组件,名称我这里是
Esignature.vue
<template>
  <j-modal
    :title="title"
    :width="width"
    :visible="visible"
    switchFullscreen
    :okButtonProps="{ class:{'jee-hidden': false} }"
    @ok="handleOk"
    okText="保存"
    @cancel="handleCancel"
    cancelText="关闭"

  >
    <a-card :bordered="false">
      <a-col :span="24">
        <a-card :bordered="true" style="width: 100%;">
          <a-row>
            <a-col :span="6">
              <a-form-model-item label="画笔粗细" :labelCol="labelCol" :wrapperCol="wrapperCol">
                <a-select style="width:100px;" v-model="lineWidth" placeholder="请选择">
                  <a-radio :value="1">1</a-radio>
                  <a-radio :value="3">3</a-radio>
                  <a-radio :value="6">6</a-radio>
                  <a-radio :value="9">9</a-radio>
                </a-select>
              </a-form-model-item>
            </a-col>
            <a-col :span="6">
              <a-form-model-item label="画笔颜色" :labelCol="labelCol" :wrapperCol="wrapperCol">
                <!-- input颜色回显必须要六位的颜色值 -->
                <a-input v-model="lineColor" type="color" placeholder="" placeholder-class="input-placeholder" />
              </a-form-model-item>
            </a-col>
            <a-col :span="6">
              <a-form-model-item label="画布背景" :labelCol="labelCol" :wrapperCol="wrapperCol">
                <a-input v-model="bgColor" type="color" placeholder="" placeholder-class="input-placeholder" />
              </a-form-model-item>
            </a-col>
            <a-col :span="6">
                <a-form-model-item label="是否裁剪" :labelCol="labelCol" :wrapperCol="wrapperCol">
                  <j-switch v-model="isCrop" :options="[true,false]" ></j-switch>
                </a-form-model-item>
              </a-col>
            <vue-esign
              style="border: 1px solid #808080;"
              ref="esignRef"
              :width="canWidth"
              :height="canHeight"
              :isCrop="isCrop"
              :lineWidth="lineWidth"
              :lineColor="lineColor"
              :bgColor.sync="bgColor"
              :isClearBgColor="isClearBgColor" />
            <button @click="handleReset">清空画板</button>
            <button @click="handleGenerate(false)">预览图片</button>
            <div>
              <img style="float:left;border: 1px solid #808080" :src="imgBase" alt="">
            </div>
          </a-row>
        </a-card>
      </a-col>
    </a-card>
  </j-modal>
</template>

<script>

  import { getAction, httpAction } from '@api/manage'
  import VueEsign from 'vue-esign'

  export default {
    name: 'Esign',
    components: {
      VueEsign
    },
    data () {
      return {
        canWidth: 800,//画布宽度--是不会超出父元素的宽度的--设置也不行
        canHeight: 300,

        lineWidth: 3,//画笔粗细
        lineColor: '#000000',//画笔颜色
        bgColor: '#ffffff',//画布背景
        isCrop: false,//是否裁剪
        isClearBgColor: true,//是否清空背景色

        imgBase: '',//生成签名图片-base64
        imgUrl: '',//生成签名图片-base64
        labelCol: {
          xs: { span: 24 },
          sm: { span: 8 }
        },
        wrapperCol: {
          xs: { span: 24 },
          sm: { span: 16 }
        },
        title: '',
        width: 1000,
        visible: false,
        disableSubmit: false,
      }
    },
    methods: {
      //调用组件
      handleSign(){
        this.visible = true
        this.$nextTick(()=>{
          // console.log("调用=========>"+this.$refs.esignRef)
          this.handleReset()
        })
      },
      //保存
      handleOk() {
        this.handleGenerate(true)
        // setTimeout(() =>{
        //   this.$emit('getSign',this.imgUrl);
        //   this.close()
        // },100); // 延迟0.1秒
      },
      //关闭
      close() {
        this.$emit('close')
        this.visible = false
      },
      //关闭按钮
      handleCancel() {
        this.close()
      },
      //重置
      handleReset () {
        ////清空画布内容
        this.lineWidth = 3
        this.lineColor = '#000000'
        this.bgColor = '#ffffff'
        this.isCrop = false
        this.imgBase = ''
        this.$refs.esignRef.reset();
      },
      //生成图片
      handleGenerate (flag) {
        // console.log("生成图片=========>"+this.$refs.esignRef)
        this.$refs.esignRef.generate().then(res => {
          // console.log('base64地址', res)
          this.imgBase = res
          if (flag){
            //进行base64转换的操作,因为后台文件都会加上随机后缀,这里使用sign.png了
            const form = this.base64ChangePicForm(res,'sign.png')
            httpAction('/sys/common/upload', form, 'post').then((uploadRes) => {
              // console.log("============>"+JSON.stringify(uploadRes))
              if (uploadRes.success){
                this.imgUrl = uploadRes.message
                this.$emit('getSign',this.imgUrl);
                this.close()
              }
            })
          }
        }).catch(error=> {
          // console.log('错误:', error)
          this.$message.warning('请先签字!');
        })
      },
      //转换图片
      base64ChangePicForm(base64String,fileName){
        const data = window.atob(base64String.split(",")[1]);
        const ia = new Uint8Array(data.length);
        for (let i = 0; i < data.length; i++) {
          ia[i] = data.charCodeAt(i);
        }
        const blob = new Blob([ia], { type: "image/png" }); // blob 文件
        const file = new File([blob], fileName, { type: blob.type });
        const form = new FormData();
        form.append("file", file);
        form.append("biz", 'web/sign');
        return form
      },
    }
  }
</script>
2.1.2 携带时间水印的
<template>
  <j-modal
    :title="title"
    :width="width"
    :visible="visible"
    switchFullscreen
    :okButtonProps="{ class:{'jee-hidden': false} }"
    @ok="handleOk"
    okText="保存"
    @cancel="handleCancel"
    cancelText="关闭"

  >
    <a-card :bordered="false">
      <a-col :span="24">
        <a-card :bordered="true" style="width: 100%;">
          <a-row>
            <a-col :span="6">
              <a-form-model-item label="画笔粗细" :labelCol="labelCol" :wrapperCol="wrapperCol">
                <a-select style="width:100px;" v-model="lineWidth" placeholder="请选择">
                  <a-radio :value="1">1</a-radio>
                  <a-radio :value="3">3</a-radio>
                  <a-radio :value="6">6</a-radio>
                  <a-radio :value="9">9</a-radio>
                </a-select>
              </a-form-model-item>
            </a-col>
            <a-col :span="6">
              <a-form-model-item label="画笔颜色" :labelCol="labelCol" :wrapperCol="wrapperCol">
                <!-- input颜色回显必须要六位的颜色值 -->
                <a-input v-model="lineColor" type="color" placeholder="" placeholder-class="input-placeholder" />
              </a-form-model-item>
            </a-col>
            <a-col :span="6">
              <a-form-model-item label="画布背景" :labelCol="labelCol" :wrapperCol="wrapperCol">
                <a-input v-model="bgColor" type="color" placeholder="" placeholder-class="input-placeholder" />
              </a-form-model-item>
            </a-col>
            <a-col :span="6">
                <a-form-model-item label="是否裁剪" :labelCol="labelCol" :wrapperCol="wrapperCol">
                  <j-switch v-model="isCrop" :options="[true,false]" ></j-switch>
                </a-form-model-item>
              </a-col>
            <vue-esign
              style="border: 1px solid #808080;"
              ref="esignRef"
              :width="canWidth"
              :height="canHeight"
              :isCrop="isCrop"
              :lineWidth="lineWidth"
              :lineColor="lineColor"
              :bgColor.sync="bgColor"
              :isClearBgColor="isClearBgColor" />
            <button @click="handleReset">清空签名</button>
            <button @click="handleGenerate(false)">预览签名</button>
            <div>
              <img style="float:left;border: 1px solid #808080" :src="imgBase" alt="">
            </div>
          </a-row>
        </a-card>
      </a-col>
    </a-card>
  </j-modal>
</template>

<script>

  import { getAction, httpAction } from '@api/manage'
  import VueEsign from 'vue-esign'
  import { formatDate } from '@/utils/dateNumber'

  export default {
    name: 'Esign',
    components: {
      VueEsign
    },
    data () {
      return {
        canWidth: 800,//画布宽度--是不会超出父元素的宽度的--设置也不行
        canHeight: 300,

        lineWidth: 3,//画笔粗细
        lineColor: '#000000',//画笔颜色
        bgColor: '#ffffff',//画布背景
        isCrop: false,//是否裁剪
        isClearBgColor: true,//是否清空背景色

        imgBase: '',//生成签名图片-base64
        imgUrl: '',//生成签名图片-base64
        labelCol: {
          xs: { span: 24 },
          sm: { span: 8 }
        },
        wrapperCol: {
          xs: { span: 24 },
          sm: { span: 16 }
        },
        title: '',
        width: 1000,
        visible: false,
        disableSubmit: false,
      }
    },
    methods: {
      //调用组件
      handleSign(){
        this.visible = true
        this.$nextTick(()=>{
          // console.log("调用=========>"+this.$refs.esignRef)
          this.handleReset()
        })
      },
      //保存
      handleOk() {
        this.handleGenerate(true)
        // setTimeout(() =>{
        //   this.$emit('getSign',this.imgUrl);
        //   this.close()
        // },100); // 延迟0.1秒
      },
      //关闭
      close() {
        this.$emit('close')
        this.visible = false
      },
      //关闭按钮
      handleCancel() {
        this.close()
      },
      //重置
      handleReset () {
        ////清空画布内容
        this.lineWidth = 3
        this.lineColor = '#000000'
        this.bgColor = '#ffffff'
        this.isCrop = false
        this.imgBase = ''
        this.$refs.esignRef.reset();
      },
      //生成图片
      handleGenerate (flag) {
        // console.log("生成图片=========>"+this.$refs.esignRef)
        this.$refs.esignRef.generate().then(res => {
          // console.log('base64地址', res)
          // this.imgBase = res
          //加入时间水印
          this.addWatermark(res,formatDate(new Date(),'yyyy-MM-dd hh:mm:ss')).then((rmarkRes)=>{
            this.imgBase = rmarkRes
            //判断是保存还是预览,保存上传,预览不上传
            if (flag){
      		  //进行base64转换的操作,因为后台文件都会加上随机后缀,这里使用sign.png了
              const form = this.base64ChangePicForm(rmarkRes,'sign.png')
              httpAction('/sys/common/upload', form, 'post').then((uploadRes) => {
                // console.log("============>"+JSON.stringify(uploadRes))
                if (uploadRes.success){
                  this.imgUrl = uploadRes.message
                  this.$emit('getSign',this.imgUrl);
                  this.close()
                }else {
                  this.$message.warning(uploadRes.message);
                }
              }).catch((error) => {
                this.$message.warning(error);
              })
            }
          })
        }).catch(error => {
          // console.log('错误:', error)
          this.$message.warning('请先签字!');
        })
      },
      //转换图片
      base64ChangePicForm(base64String,fileName){
        const data = window.atob(base64String.split(",")[1]);
        const ia = new Uint8Array(data.length);
        for (let i = 0; i < data.length; i++) {
          ia[i] = data.charCodeAt(i);
        }
        const blob = new Blob([ia], { type: "image/png" }); // blob 文件
        const file = new File([blob], fileName, { type: blob.type });
        const form = new FormData();
        form.append("file", file);
        form.append("biz", 'web/sign');
        return form
      },
      //加入水印
      addWatermark(base64String, watermarkText) {
        return new Promise((resolve, reject) => {
          const image = new Image();
          image.onload = () => {
            const canvas = document.createElement('canvas');
            const context = canvas.getContext('2d');
            canvas.width = image.width;
            canvas.height = image.height;

            // 绘制原始图片
            context.drawImage(image, 0, 0);

            // 添加水印
            context.font = '20px Arial';
            context.fillStyle = 'rgba(128,128,128,0.5)';
            context.textAlign = 'center';

            context.fillText(watermarkText, canvas.width / 2, canvas.height);

            // 将 Canvas 转换为 Base64 图片
            const watermarkedImage = canvas.toDataURL('image/png');
            resolve(watermarkedImage);
          };
          image.onerror = (error) => {
            reject(error);
          };
          image.src = base64String;
        });
      }
    }
  }
</script>

<style>
</style>
2.2父组件
这里就简单一写,反正都是差不多的,这里使用button按钮的
userSign1方法进行调用在线签名组件,然后使用getSign1方法进行回调,将上传后的图片赋值给本页面的signFiles1进行显示。
<a-col :span="12" :style="formDisabled?(model.signFile1?'':'display: none;'):''">
            <a-form-model-item label="签字"  :labelCol="labelCol" :wrapperCol="wrapperCol" prop="signFiles1">
              <a-button  @click="userSign1" icon="edit">前往签字</a-button>
              <esignature ref="signFormTo1" @getSign="getSign1"/>
              <j-image-upload text="上传签字" bizPath="web/sign" v-model="signFiles1" :is-multiple="false" disabled/>
            </a-form-model-item>
          </a-col>
方法知己简单明了
//签名
userSign1(){
  this.$refs.signFormTo1.handleSign();
},

getSign1(res) {
  this.signFiles1 = res
},


