目录
1.概述
2.创建应用
创建app01
在settings.py里引用app01
3.定义模型
在app01\models.py里创建模型
数据库迁移
4.创建视图
引用头
部门列表视图
部门添加视图
部门编辑视图
部门删除视图
5.创建Template
在app01下创建目录templates
部门列表模板depart.html
源代码
{% for depart in departs %}
确认删除的代码
删除按钮
确认框Modal
删除按钮的js代码
分页
外观
部门新增模板depart_add.html
源代码
外观
部门编辑模板depart_edit.html
源代码
外观
6.URL配置
1.概述
在Django中创建一个简单的应用app01,以部门管理为例,演示了部门的增删改查(CRUD)功能,可以按照以下步骤进行:
- 创建应用
- 定义模型
- 数据库迁移
- 创建视图
- 创建Template
- URL配置
2.创建应用
创建app01
python manage.py startapp app01创建成功后,有下面的目录,templates是手动创建。

在settings.py里引用app01

3.定义模型
在app01\models.py里创建模型
这里可以创建任意多个模型。
from django.db import models

# Create your models here.

class Department(models.Model):
    name = models.CharField(verbose_name='部门名称', max_length=200,)
    description = models.TextField(verbose_name='部门描述', blank=True, null=True)
    parent = models.IntegerField(verbose_name='父部门', blank=True, null=True, default=0)
    is_active = models.BooleanField(verbose_name='是否启用', default=True)
    is_locked = models.BooleanField(verbose_name='是否锁定', default=False)
    is_deleted = models.BooleanField(verbose_name='是否删除', default=False)
    created_by = models.CharField(verbose_name='创建人', max_length=200, blank=True, null=True)
    updated_by = models.CharField(verbose_name='更新人', max_length=200, blank=True, null=True)
    created_at = models.DateTimeField(verbose_name='创建时间',auto_now=True)
    updated_at = models.DateTimeField(verbose_name='更新时间',auto_now=True)
- models.CharField是字段类型,大家基本上能看懂。
- verbose_name 是Django模型字段和模型类的一个属性,用于提供一个人类可读的字段或模型名称。这在Django的管理界面和表单中尤其有用,可以使得字段或模型的显示更加友好和直观。
- max_length是CharField字段类型必须,指定长度。
其它的属性查看django文档基本都能找到说明。
数据库迁移
还是那两个命令
python manage.py makemigrations

python manage.py migrate
4.创建视图
这里写了部门增删改查的方法,并没有做项目上那种严谨的逻辑判断,例如,新增部门时,都没有判断部门名称是否为空等,这些常规的操作,自己去做吧。
引用头
from django.shortcuts import render, redirect
from app01 import models
from django.utils import timezone
from django.http import JsonResponse
# Create your views here.
部门列表视图
models.Department.objects.all()下面有很多方法可以使用,用起来还挺方便。具体项目上,可能有更复杂的需求,未必能否满足。
queryset[obj,obj,obj] = models.Department.objects.all().order_by('id')
queryset[obj,obj,obj] = models.Department.objects.all().filter(id=0)
object = models.Department.objects.all().filter(id=0) .first()
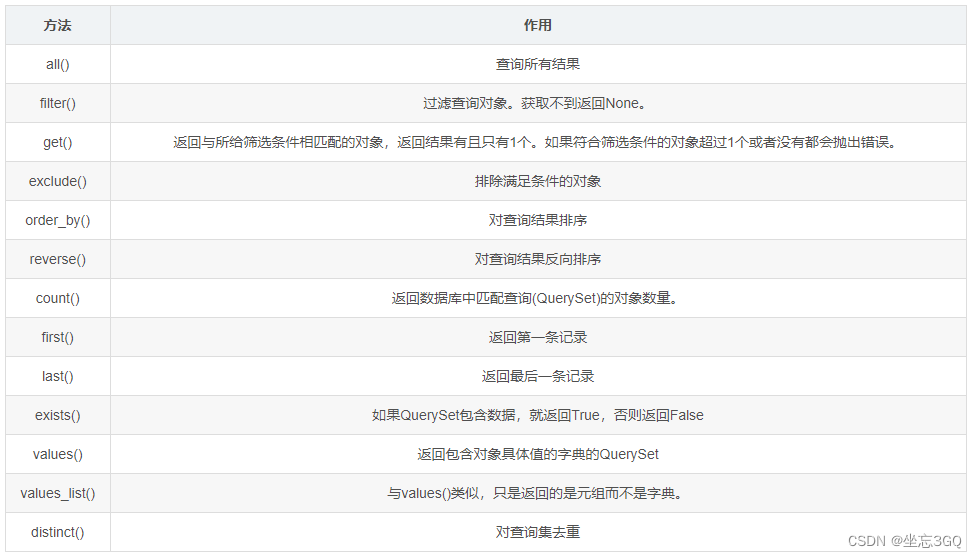
注意查询方法的返回结果的类型,这很重要。前台在template里会用到。
django还支持自己写sql去查询,具体请看教程:
43.django里写自定义的sql进行查询-CSDN博客
def depart(request):
    departs = models.Department.objects.all().order_by('id')
    # print(departs)
    # return HttpResponse('部门管理')
    return render(request, 'depart.html' , {'departs' : departs })
部门添加视图
def depart_add(request):

    if request.method == 'GET':
        departs = models.Department.objects.all().filter(parent=0)
        return render(request, 'depart_add.html', {'departs' : departs })
    elif request.method == 'POST':
        name = request.POST.get('name')
        desc = request.POST.get('description')
        parent = request.POST.get('parent')
        user = request.user
        is_active = request.POST.get('is_active')
        if is_active == 'on':
            is_active = True
        else:
            is_active = False
        is_locked = request.POST.get('is_locked')
        if is_locked is not None and is_locked == 'on':
            is_locked = True
        else:
            is_locked = False
        models.Department.objects.create(name=name, description=desc, parent=parent,  is_active=is_active, is_locked=is_locked,created_by=user.username, updated_by=user.username)
        return redirect('/depart/')
部门编辑视图
def depart_edit(request):
    if request.method == 'GET':
        id = request.GET.get('id')
        depart = models.Department.objects.all().filter(id=id).first()
        print(depart.parent)
        if depart.parent == 0:
            departs = None
        else:
            departs = models.Department.objects.all().filter(parent=0)
        return render(request, 'depart_edit.html', {'depart' : depart ,'departs' : departs })
    elif request.method == 'POST':
        id = request.POST.get('id')
        name = request.POST.get('name')
        desc = request.POST.get('description')
        parent = request.POST.get('parent')
        is_active = request.POST.get('is_active')
        if is_active == 'on':
            is_active = True
        else:
            is_active = False
        is_locked = request.POST.get('is_locked')
        if is_locked is not None and is_locked == 'on':
            is_locked = True
        else:
            is_locked = False
        user = request.user
        now = timezone.now()
        models.Department.objects.filter(id=id).update(name=name, description=desc, parent=parent, is_active=is_active, is_locked=is_locked, created_by=user.username, updated_by=user.username, updated_at=now)
        return redirect('/depart/')
部门删除视图
def depart_del(request):

    if request.method == 'POST':
        id = request.POST.get('id')
        try:
            models.Department.objects.filter(id=id).delete()        #物理删除,也可以自己做逻辑删除
            return JsonResponse({'success': True})
        except:
            return JsonResponse({'success': False, 'error': 'Object not found'})
5.创建Template
在app01下创建目录templates
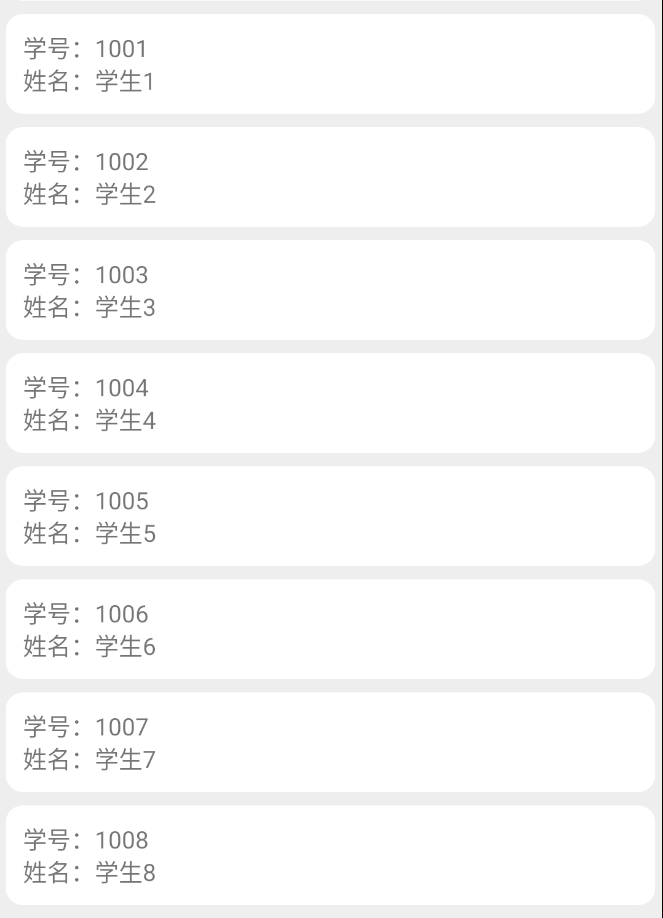
部门列表模板depart.html
源代码
<!DOCTYPE html>
{% load static %}
<html lang="en">
<head>
<meta charset="UTF-8">
<title>部门管理</title>
<link rel="stylesheet" href="{% static 'bootstrap5/css/bootstrap.min.css' %}">
<script src="{% static 'bootstrap5/js/bootstrap.bundle.min.js' %}"></script>
<script src="{% static 'jquery-3.7.1.min.js' %}"></script>
</head>
<body>
<div class="container">
<div style="margin: 10px 0">
<a href="../depart/add/" class="btn btn-primary">添加部门</a>
</div>
<table class="table table-striped table-hover ">
<thead>
<tr>
<th scope="col">#</th>
<th scope="col">部门名称</th>
<th scope="col">部门描述</th>
<th scope="col">父部门</th>
<th scope="col">是否启用</th>
<th scope="col">是否锁定</th>
<th scope="col">创建人</th>
<th scope="col">创建时间</th>
<th scope="col">更新人</th>
<th scope="col">更新时间</th>
<th scope="col">操作</th>
</tr>
</thead>
<tbody>
{% for depart in departs %}
<tr>
<td scope="row">{{ depart.id }}</td>
<td>{{ depart.name }}</td>
<td>{{ depart.description }}</td>
<td>{{ depart.parent }}</td>
<td>{{ depart.is_active }}</td>
<td>{{ depart.is_locked }}</td>
<td>{{ depart.created_by }}</td>
<td>{{ depart.created_at }}</td>
<td>{{ depart.updated_by }}</td>
<td>{{ depart.updated_at }}</td>
<td><a href="../depart/edit/?id={{depart.id}}" class="btn btn-primary btn-sm">编辑</a>
<button id="deleteBtn" type="button" class="btn btn-danger btn-sm delete-btn" data-id="{{ depart.id }}">删除</button ></td>
</tr>
{% endfor %}
</tbody>
</table>
<!-- 确认删除的模态框 -->
<div class="modal fade" id="deleteModal" tabindex="-1" role="dialog" aria-labelledby="exampleModalLabel" aria-hidden="true">
<div class="modal-dialog" role="document">
<div class="modal-content">
<div class="modal-header">
<h5 class="modal-title" id="exampleModalLabel">确认删除</h5>
<button type="button" class="close" data-dismiss="modal" aria-label="Close">
<span aria-hidden="true">×</span>
</button>
</div>
<div class="modal-body">
确定要删除这条记录吗?
</div>
<div class="modal-footer">
<button type="button" class="btn btn-secondary" data-dismiss="modal">取消</button>
<form id="deleteForm" method="post">
{% csrf_token %}
<input type="hidden" name="id" id="object_id">
<button type="submit" class="btn btn-danger">确定删除</button>
</form>
</div>
</div>
</div>
</div>
<nav aria-label="Page navigation example">
<ul class="pagination">
<li class="page-item">
<a class="page-link" href="#" aria-label="Previous">
<span aria-hidden="true">«</span>
</a>
</li>
<li class="page-item"><a class="page-link" href="#">1</a></li>
<li class="page-item active" ><a class="page-link" href="#">2</a></li>
<li class="page-item"><a class="page-link" href="#">3</a></li>
<li class="page-item">
<a class="page-link" href="#" aria-label="Next">
<span aria-hidden="true">»</span>
</a>
</li>
</ul>
</nav>
</div>
</body>
<script>
    document.querySelectorAll('.delete-btn').forEach(button => {
      button.addEventListener('click', function() {
        const objectId = this.getAttribute('data-id');
        // 设置隐藏输入框的值
        document.getElementById('object_id').value = objectId;
        // 显示模态框
        $('#deleteModal').modal('show');
      });
    });

    // 提交删除表单时,使用Ajax发送请求
        $('#deleteForm').on('submit', function(event) {
          event.preventDefault(); // 阻止表单默认提交行为
          const formData = $(this).serialize(); // 序列化表单数据
          $.ajax({
            type: 'POST',
            url: '/depart/delete/', // 替换为你的删除视图URL
            data: formData,
            success: function(response) {
              if (response.success) {
                // alert('删除成功!');
                location.reload(); // 刷新页面
              } else {
                alert('删除失败,请重试!');
              }
            },
            error: function(xhr, status, error) {
              console.error(error);
              alert('发生错误,请检查控制台日志。');
            }
          });
        });
</script>
</html>{% for depart in departs %}
在Django模板语言中,{% for ... in ... %} 是一个循环标签,用于迭代一个集合(如列表、元组或字典等)。你提供的代码片段 {% for depart in departs %} 意味着将对名为 departs 的集合进行遍历,其中每个元素临时赋值给 depart 变量,在循环体内可以访问这个变量来进行操作或展示数据。
确认删除的代码
确认删除使用了Bootstrap Modal(模态框),是一种覆盖在当前页面上的对话框,用于显示信息、警告、确认对话或复杂的交互形式,而不需要离开当前页面或重新加载页面。
删除按钮
<button id="deleteBtn" type="button" class="btn btn-danger btn-sm delete-btn" data-id="{{ depart.id }}">删除</button ></td>确认框Modal
<!-- 确认删除的模态框 -->
<div class="modal fade" id="deleteModal" tabindex="-1" role="dialog" aria-labelledby="exampleModalLabel" aria-hidden="true">
<div class="modal-dialog" role="document">
<div class="modal-content">
<div class="modal-header">
<h5 class="modal-title" id="exampleModalLabel">确认删除</h5>
<button type="button" class="close" data-dismiss="modal" aria-label="Close">
<span aria-hidden="true">×</span>
</button>
</div>
<div class="modal-body">
确定要删除这条记录吗?
</div>
<div class="modal-footer">
<button type="button" class="btn btn-secondary" data-dismiss="modal">取消</button>
<form id="deleteForm" method="post">
{% csrf_token %}
<input type="hidden" name="id" id="object_id">
<button type="submit" class="btn btn-danger">确定删除</button>
</form>
</div>
</div>
</div>
</div>删除按钮的js代码
<script>
document.querySelectorAll('.delete-btn').forEach(button => {
button.addEventListener('click', function() {
const objectId = this.getAttribute('data-id');
// 设置隐藏输入框的值
document.getElementById('object_id').value = objectId;
// 显示模态框
$('#deleteModal').modal('show');
});
});
// 提交删除表单时,使用Ajax发送请求
$('#deleteForm').on('submit', function(event) {
event.preventDefault(); // 阻止表单默认提交行为
const formData = $(this).serialize(); // 序列化表单数据
$.ajax({
type: 'POST',
url: '/depart/delete/', // 替换为你的删除视图URL
data: formData,
success: function(response) {
if (response.success) {
// alert('删除成功!');
location.reload(); // 刷新页面
} else {
alert('删除失败,请重试!');
}
},
error: function(xhr, status, error) {
console.error(error);
alert('发生错误,请检查控制台日志。');
}
});
});
</script>分页
这里只写了前台的分页控件放在这里,后台并没有写相应的逻辑。
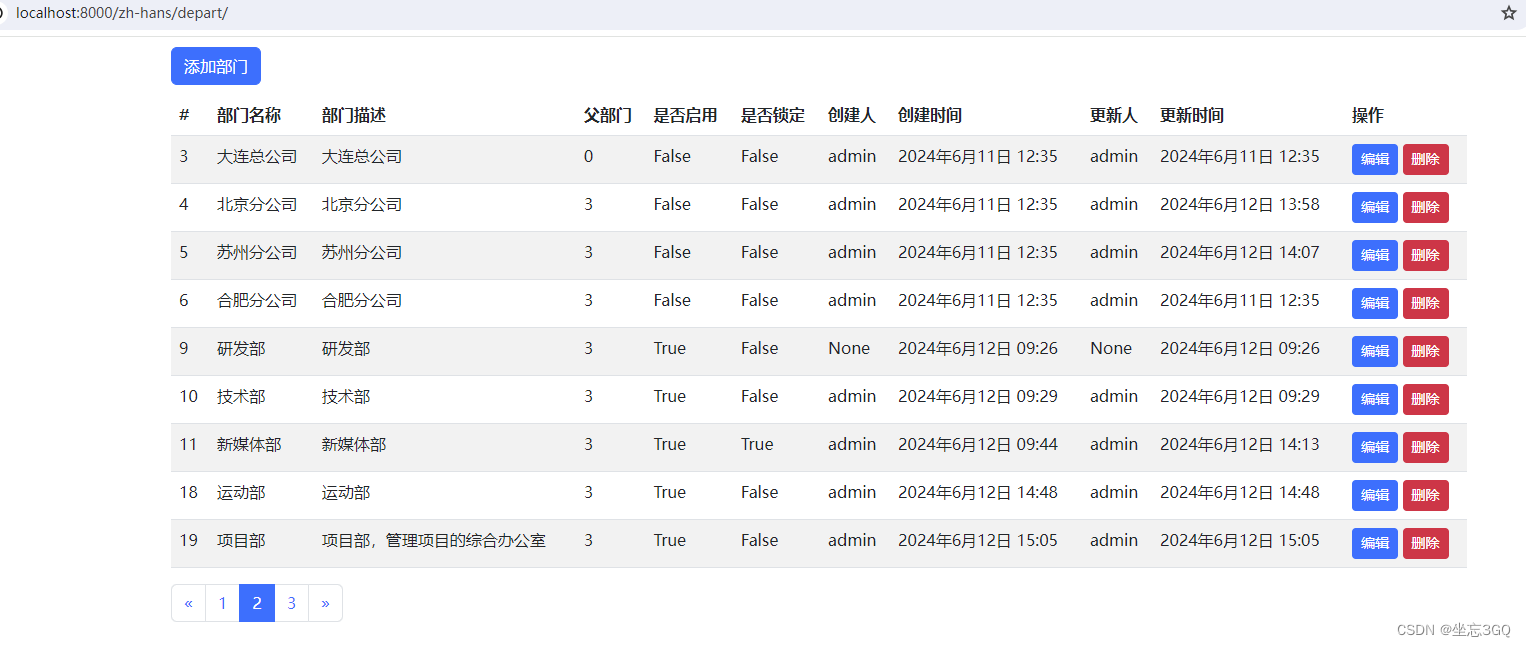
外观
部门新增模板depart_add.html
源代码
<!DOCTYPE html>
{% load static %}
<html lang="en">
<head>
    <meta charset="UTF-8">
    <title>部门管理</title>
    <link rel="stylesheet" href="{% static 'bootstrap5/css/bootstrap.min.css' %}">
</head>
<body>

<div class="container">
    <nav aria-label="breadcrumb" style="margin: 10px 0">
      <ol class="breadcrumb">
        <li class="breadcrumb-item"><a href="/depart/">部门管理</a></li>
        <li class="breadcrumb-item active" aria-current="page">添加部门</li>
      </ol>
    </nav>
     <form method="post" action="/depart/add/">
    {% csrf_token %}
        <div class="mb-3 row">
          <label for="formGroupExampleInput" class="col-sm-2 col-form-label">部门名称</label>
            <div class="col-sm-10">
                <input type="text" class="form-control" placeholder="部门名称" name="name">
            </div>
        </div>
        <div class="mb-3 row">
          <label for="formGroupExampleInput2" class="col-sm-2 col-form-label">部门描述</label>
            <div class="col-sm-10">
                    <input type="text" class="form-control" placeholder="部门描述" name="description">
                </div>
        </div>
         <div class="mb-3 row">
          <label for="formGroupExampleInput2" class="col-sm-2 col-form-label">父部门</label>
              <div class="col-sm-10">
             <select  class="form-select" name="parent">
                <option value="0">请选择部门</option>
                    {% for depart in departs %}
                    <option value="{{ depart.id }}">{{ depart.name }}</option>
                    {% endfor %}
                 </select>
                  </div>
        </div>
         <div class="mb-3 row">
             <label for="formGroupExampleInput2" class="col-sm-2 col-form-label">属性设定</label>
          <div class="form-check col-sm-2">
              <input class="form-check-input" type="checkbox" name="is_active" checked>
              <label class="form-check-label" for="gridCheck">
                是否启用
              </label>
            </div>
             <div class="form-check col-sm-2">
              <input class="form-check-input" type="checkbox" name="is_locked" >
              <label class="form-check-label" for="gridCheck">
                是否锁定
              </label>
            </div>
        </div>


       <button type="submit" class="btn btn-primary" >保存并返回</button>
    </form>

</div>
</body>
</html>
外观

部门编辑模板depart_edit.html
源代码
<!DOCTYPE html>
{% load static %}
<html lang="en">
<head>
    <meta charset="UTF-8">
    <title>部门管理</title>
    <link rel="stylesheet" href="{% static 'bootstrap5/css/bootstrap.min.css' %}">
</head>
<body>

<div class="container">
    <nav aria-label="breadcrumb" style="margin: 10px 0">
      <ol class="breadcrumb">
        <li class="breadcrumb-item"><a href="/depart/">部门管理</a></li>
        <li class="breadcrumb-item active" aria-current="page">编辑部门</li>
      </ol>
    </nav>
     <form method="post" action="/depart/edit/">
    {% csrf_token %}
        <div class="mb-3 row">
          <label for="formGroupExampleInput" class="col-sm-2 col-form-label">部门ID</label>
            <div class="col-sm-10">
                <input type="text" class="form-control" readonly placeholder="" name="id" value="{{depart.id}}">
            </div>
        </div>
        <div class="mb-3 row">
          <label for="formGroupExampleInput" class="col-sm-2 col-form-label">部门名称</label>
            <div class="col-sm-10">
                <input type="text" class="form-control" placeholder="部门名称" name="name"  value="{{depart.name}}">
            </div>
        </div>
        <div class="mb-3 row">
          <label for="formGroupExampleInput2" class="col-sm-2 col-form-label">部门描述</label>
            <div class="col-sm-10">
                    <input type="text" class="form-control" placeholder="部门描述" name="description"  value="{{depart.description}}">
                </div>
        </div>
         <div class="mb-3 row">
          <label for="formGroupExampleInput2" class="col-sm-2 col-form-label">父部门</label>
              <div class="col-sm-10">
             <select  class="form-select" name="parent">
                <option  value="-1">请选择部门</option>
                    {% for depart1 in departs %}
                    {% if depart1.id == depart.parent %}
                        <option selected value="{{ depart1.id }}">{{ depart1.name }}(id={{ depart1.id }})</option>
                    {% else %}
                        <option value="{{ depart1.id }}">{{ depart1.name }}(id={{ depart1.id }})</option>
                    {% endif %}
                    {% endfor %}
                 </select>
                  </div>
        </div>
         <div class="mb-3 row">
             <label for="formGroupExampleInput2" class="col-sm-2 col-form-label">属性设定</label>
              <div class="form-check col-sm-2">
                  <input class="form-check-input" type="checkbox" name="is_active"
                         {% if depart.is_active %}
                         checked
                         {% endif %}
                  >
                  <label class="form-check-label" for="gridCheck">
                    是否启用
                  </label>
              </div>
                <div class="form-check col-sm-2">
                  <input class="form-check-input" type="checkbox" name="is_locked"
                   {% if depart.is_locked %}
                         checked
                         {% endif %}
                  >
                  <label class="form-check-label" for="gridCheck">
                    是否锁定
                  </label>
             </div>

        </div>


       <button type="submit" class="btn btn-primary" >保存并返回</button>
    </form>

</div>
</body>
</html>
外观

6.URL配置
from django.contrib import admin
from django.urls import path,include
from django.conf.urls.i18n import i18n_patterns
from django.utils.translation import gettext_lazy as _
from app01 import views


urlpatterns = [
    # path('admin/', admin.site.urls),
    # path('depart/', views.depart),
    # path('depart/add/', views.depart_add),
    # path('depart/edit/', views.depart_edit),
    # path('depart/delete/', views.depart_del),
]
urlpatterns += i18n_patterns(
    path('admin/', admin.site.urls),
    path('depart/', views.depart),
    path('depart/add/', views.depart_add),
    path('depart/edit/', views.depart_edit),
    path('depart/delete/', views.depart_del),
)