- 1. 环境准备
- 2. 创建项目
- 3. Vue配置
- 步骤一: 安装包
- 步骤二: 配置文件
- 步骤三: 页面文件
- 4. 后台配置
在本教程中,我将利用Visual Studio 2022的强大集成开发环境,结合Vue.js前端框架和ASP.NET Core后端框架,从头开始创建一个具备用户登录与权限验证功能的Web应用程序。我们将充分利用Visual Studio的内置工具和模板来简化开发流程。
1. 环境准备
Visual Studio 2022,Vue3
2. 创建项目
打开Visual Studio 2022,选择“创建新项目”。在项目模板搜索框中输入“Vue and ASP.NET Core”,选择模板后点击“下一步”。
按照图中配置:
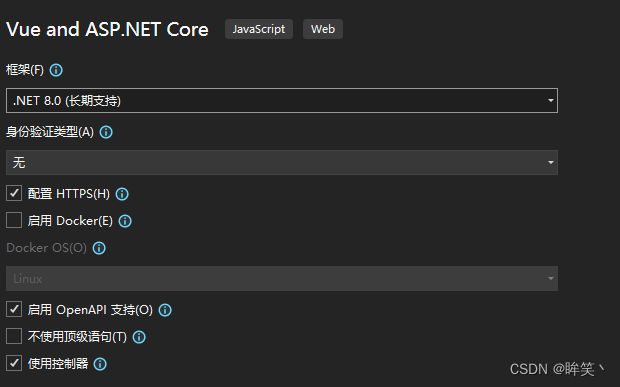
生成目录如下:

3. Vue配置
步骤一: 安装包
右键npm->安装新的npm包
element-plusUI包@element-plus/icons-vueUI图标包axios发送请求的包qs发送请求时序列化的包vue-routervue路由jwt-decode令牌解码
步骤二: 配置文件
-
封装
axios
新建axios.js文件,内容如下:// axios.js import axios from 'axios'; import PLATFROM_CONFIG from '../public/config'; const instance = axios.create({ baseURL: PLATFROM_CONFIG.baseURL, // 替换为实际的 API 地址 timeout: 10000, }); instance.defaults.headers.post['Content-Type'] = 'application/json'; // 添加请求拦截器 axios.interceptors.request.use((config) => { // 在发送请求之前做些什么 return config; }, function (error) { // 对请求错误做些什么 return Promise.reject(error); }); // 添加响应拦截器 axios.interceptors.response.use(function (response) { // 对响应数据做点什么 if (response.status === 200) { return Promise.resolve(response); } else { return Promise.reject(response); } }, function (error) { // 对响应错误做点什么 return Promise.reject(error); }); export const get = (url, params) => { return instance.get(url, { params }); }; export const post = (url, data) => { // data = QS.stringify(data); return instance.post(url, data); }; -
创建路由
新建router文件夹,并新建router.js文件
import { createRouter, createWebHashHistory } from 'vue-router'

import qs from 'qs';
import { ElMessage } from 'element-plus'

import { post } from '../axios';

import Home from '../components/Home.vue'
import Setting from '../components/Setting.vue'
import Login from '../components/Login.vue'
import LoginOut from '../components/LoginOut.vue'

// 路由配置
const routes = [
    { path: '/', component: Home },
    { path: '/Login', component: Login },
    { path: '/Setting', component: Setting, meta: { requiresAuth: true, role: 'ShortcutManage;' } },
    { path: '/LoginOut', component: LoginOut },
]

const router = createRouter({
    history: createWebHashHistory(),
    routes,
})
// 路由守卫,在这里创建验证的流程
router.beforeEach((to, from, next) => {
    const accessToken = localStorage.getItem('accessToken');
    if (to.meta.requiresAuth && !accessToken) {
        // 如果需要认证并且没有令牌,则重定向到登录页
        next('/Login');
    } else {
        if (to.meta.requiresAuth) {
            // 如果有令牌判断令牌是否过期
            //判断令牌是否过期
            const decodedToken = jwtDecode(accessToken);
            const expirationTime = decodedToken.exp * 1000;
            const isTokenExpired = expirationTime < Date.now();
            // 已经过期
            if (isTokenExpired) {
                next('/LoginOut');
            } else { // 没有过期
                // 判断是否需要指定权限
                if (typeof (to.meta.role) !== 'undefined' && to.meta.role != null) {
                    let USER_INFO = qs.parse(localStorage.getItem("userInfo"))
                    post("Login/ValidPerm", { username: USER_INFO.ad, userPowr: to.meta.role }).then(res => {
                        next();
                    }).catch(err => {
                        console.log(err)
                        ElMessage({
                            message: '您没有权限,请联系管理员!',
                            type: 'warning',
                        })
                    })
                } else {
                    next();
                }
            }
        } else {
            next();
        }


    }
});

export default router
- 配置
main.js
import './assets/main.css'

import { createApp } from 'vue'
import ElementPlus from 'element-plus'
import { ElMessage} from 'element-plus'
import 'element-plus/dist/index.css'
import router from './router/router'
import * as ElementPlusIconsVue from '@element-plus/icons-vue'
import { get, post } from './axios';
import App from './App.vue'
import * as utils from './utils';
import qs from 'qs'

import ELHeader from './components/custom/ElHeader.vue'
import ElAside from './components/custom/ElAside.vue'

const app = createApp(App)
for (const [key, component] of Object.entries(ElementPlusIconsVue)) {
    app.component(key, component)
}

Object.entries(utils).forEach(([key, value]) => {
    app.config.globalProperties[`$${key}`] = value;
});


app.config.globalProperties.$get = get;
app.config.globalProperties.$qs = qs;
app.config.globalProperties.$post = post;
app.config.globalProperties.$message = ElMessage;

app.config.globalProperties.$USER_INFO = qs.parse(localStorage.getItem("userInfo"))

app.use(ElementPlus)
app.use(router)

app.component('ELHeader', ELHeader).component('ELAside',ElAside);


app.mount('#app')
步骤三: 页面文件
- 登陆页面
Login.vue
<template>
    <el-form :model="loginForm" ref="loginForm" :inline="false" size="large">
        <el-form-item prop="Username" :rules="{
    required: true,
    message: 'Username can not be null',
    trigger: 'blur',
}">
            <el-input v-model="loginForm.Username" placeholder="Okta Account">
                <template #prepend><el-icon>
                        <User />
                    </el-icon></template>
            </el-input>
        </el-form-item>
        <el-form-item prop="Password" :rules="{
    required: true,
    message: 'Password can not be null',
    trigger: 'blur',
}">
            <el-input type="password" v-model="loginForm.Password" placeholder="Okta Password">
                <template #prepend><el-icon>
                        <Lock />
                    </el-icon></template>
            </el-input>
        </el-form-item>
        <el-form-item>
            <el-button class="login-btn" type="primary" @click="loginOn">登陆</el-button>
        </el-form-item>
    </el-form>
</template>
<script lang="js">
import { defineComponent } from 'vue';
export default defineComponent({
    data() {
        return {
            loginForm: {
                Username: '',
                Password: '',
                auth: "ShortcutLinks"
            }
        }
    },
    methods: {
        loginOn() {
            this.$refs.loginForm.validate((valid) => {
                if (valid) {
                    let that = this
                    this.$post("/Login/LoginVerify", this.loginForm).then(res => {
                        if (res.data.success) {
                        	// 检测是否有Token
                            localStorage.setItem('accessToken', res.data.data.token)
                            let userInfo = res.data.data
                            userInfo.token = null
                            localStorage.setItem('userInfo', this.$qs.stringify(userInfo))
                            that.$router.push('/')
                        } else {
                            this.$message({
                                showClose: true,
                                message: res.data.message,
                                type: 'warning',
                            })
                        }
                    }).catch(err => {
                        console.error(err)
                    })
                } else {
                    console.log('error submit!')
                    return false
                }
            })

        }
    },mounted(){
        this.Yaer = new Date().getFullYear()
    }
})
</script>
- 注销界面
LoginOut.vue
<template>
    <div>退出登陆成功!</div>
</template>

<script lang="js">
import { defineComponent } from 'vue';

export default defineComponent({
    data() {
        return {

        }
    }, mounted() {
        localStorage.removeItem('userInfo');
        localStorage.removeItem('accessToken');
        this.$router.push('/Login');
    }
})
</script>
- 修改App.vue
<template>
   <router-view></router-view>
</template>

<style scoped>

</style>
4. 后台配置
创建一个生成Token的工具类TokenService
    public class TokenService
    {
        private readonly string _secretKey;
        private readonly string _issuer;
        private readonly string _audience;

        public TokenService(string secretKey, string issuer, string audience)
        {
            _secretKey = secretKey;
            _issuer = issuer;
            _audience = audience;
        }

        public string GenerateToken(string username)
        {
            var securityKey = new SymmetricSecurityKey(Encoding.UTF8.GetBytes(_secretKey));
            var credentials = new SigningCredentials(securityKey, SecurityAlgorithms.HmacSha256);

            var claims = new[]
            {
            new Claim(ClaimTypes.Name, username),
            // Add additional claims as needed
        };

            var token = new JwtSecurityToken(
                _issuer,
                _audience,
                claims,
                expires: DateTime.Now.AddMonths(1), // Token expiration time
                signingCredentials: credentials
            );

            return new JwtSecurityTokenHandler().WriteToken(token);
        }
    }
配置跨域Program.cs`
在Buidl()之前增加:
var MyAllowSpecificOrigins = "_myAllowSpecificOrigins";

builder.Services.AddCors(options =>
{
    options.AddPolicy(name: MyAllowSpecificOrigins, policy =>
    {
        policy.WithOrigins("*").AllowAnyOrigin()
        .AllowAnyHeader().AllowAnyMethod();
    });
});
登陆验证
LoginController.cs
 [HttpPost("LoginVerify")]
 public async Task<Result<LoginInfo>> LoginVerify([FromBody] LoginModel loginModel)
 {
     if (string.IsNullOrEmpty(loginModel.Username) || string.IsNullOrEmpty(loginModel.Password))
     {
         return Result<LoginInfo>.Fail("用户名或密码不能为空!");
     }
     if (string.IsNullOrEmpty(loginModel.Auth) || !"ShortcutLinks".Equals(loginModel.Auth))
     {
         return Result<LoginInfo>.Fail("令牌识别错误!");
     }
     string responseContent = await IsValidUser(loginModel.Username, loginModel.Password);
     if ("Unauthorized".Equals(responseContent))
     {
         return Result<LoginInfo>.Fail("验证失败!");
     }
     if ("The user name or password is incorrect.".Equals(responseContent))
     {
         return Result<LoginInfo>.Fail("用户名或密码错误!");
     }

     try
     {
         // 加密秘钥,可以自定义
         string key = "Ns9XoAdW7Pb3Cv9Fm2Zq4t6w8y/B?E(H+MbQeThWmZq4t7w9z$C&F)J@NcRfUjXn2r5u8x/A%D*G-KaPdSgVkYp3s6v9y";
         // 我自己的登陆验证方法,根据实际情况可以修改
         LoginInfo loginInfo = JsonConvert.DeserializeObject<LoginInfo>(responseContent);
         // 生成验证的Token
         var tokenService = new TokenService(key, "ShortcutLinksServer", "ShortcutLinksClient");
         // 为Token添加一个标识,我这里使用的用户的AD
         var token = tokenService.GenerateToken(loginInfo.AD);
         loginInfo.token = token;
         // 生成的信息返回前天
         return Result<LoginInfo>.Suc(loginInfo);

     }
     catch (Exception)
     {

         return Result<LoginInfo>.Fail("登陆失败!");
     }
 }

