8、获取用户认证信息
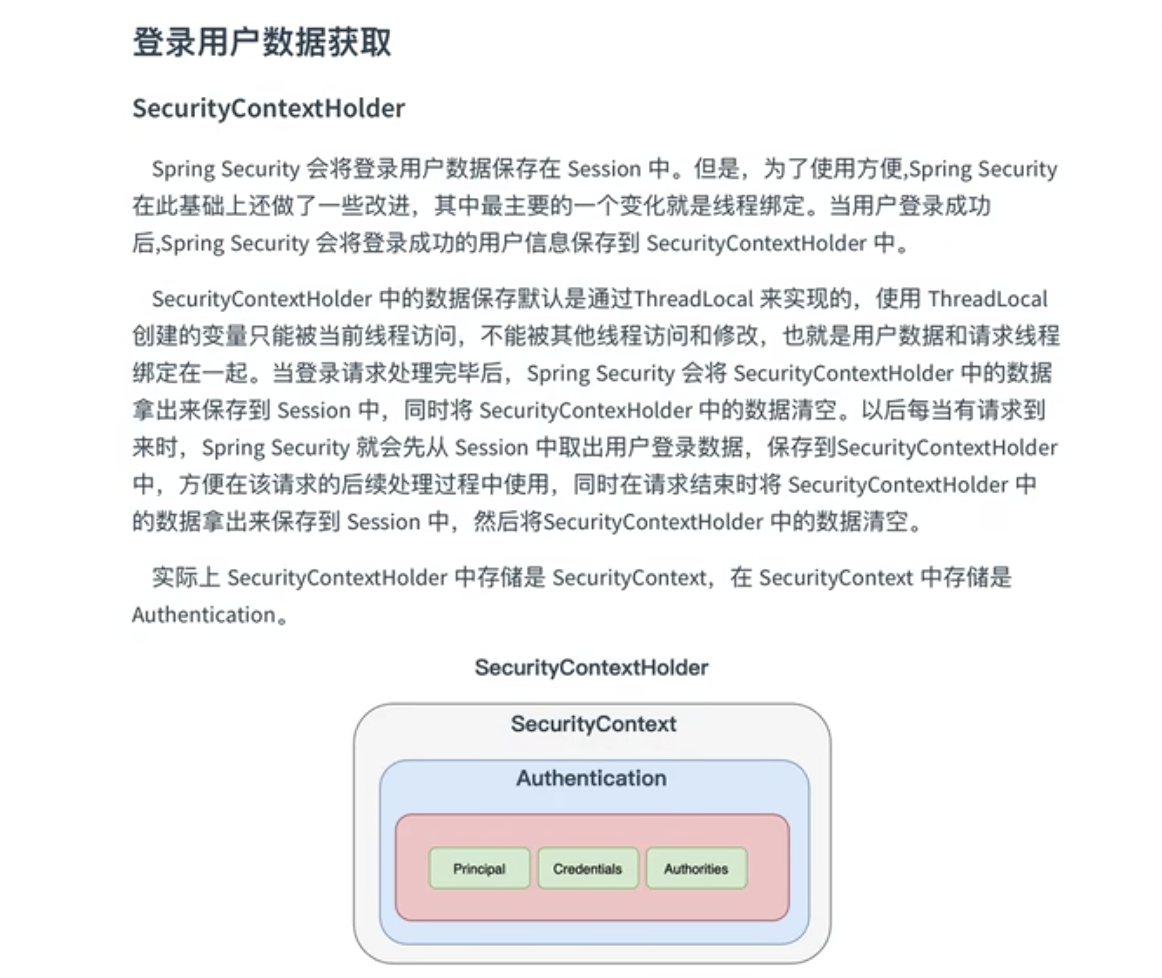
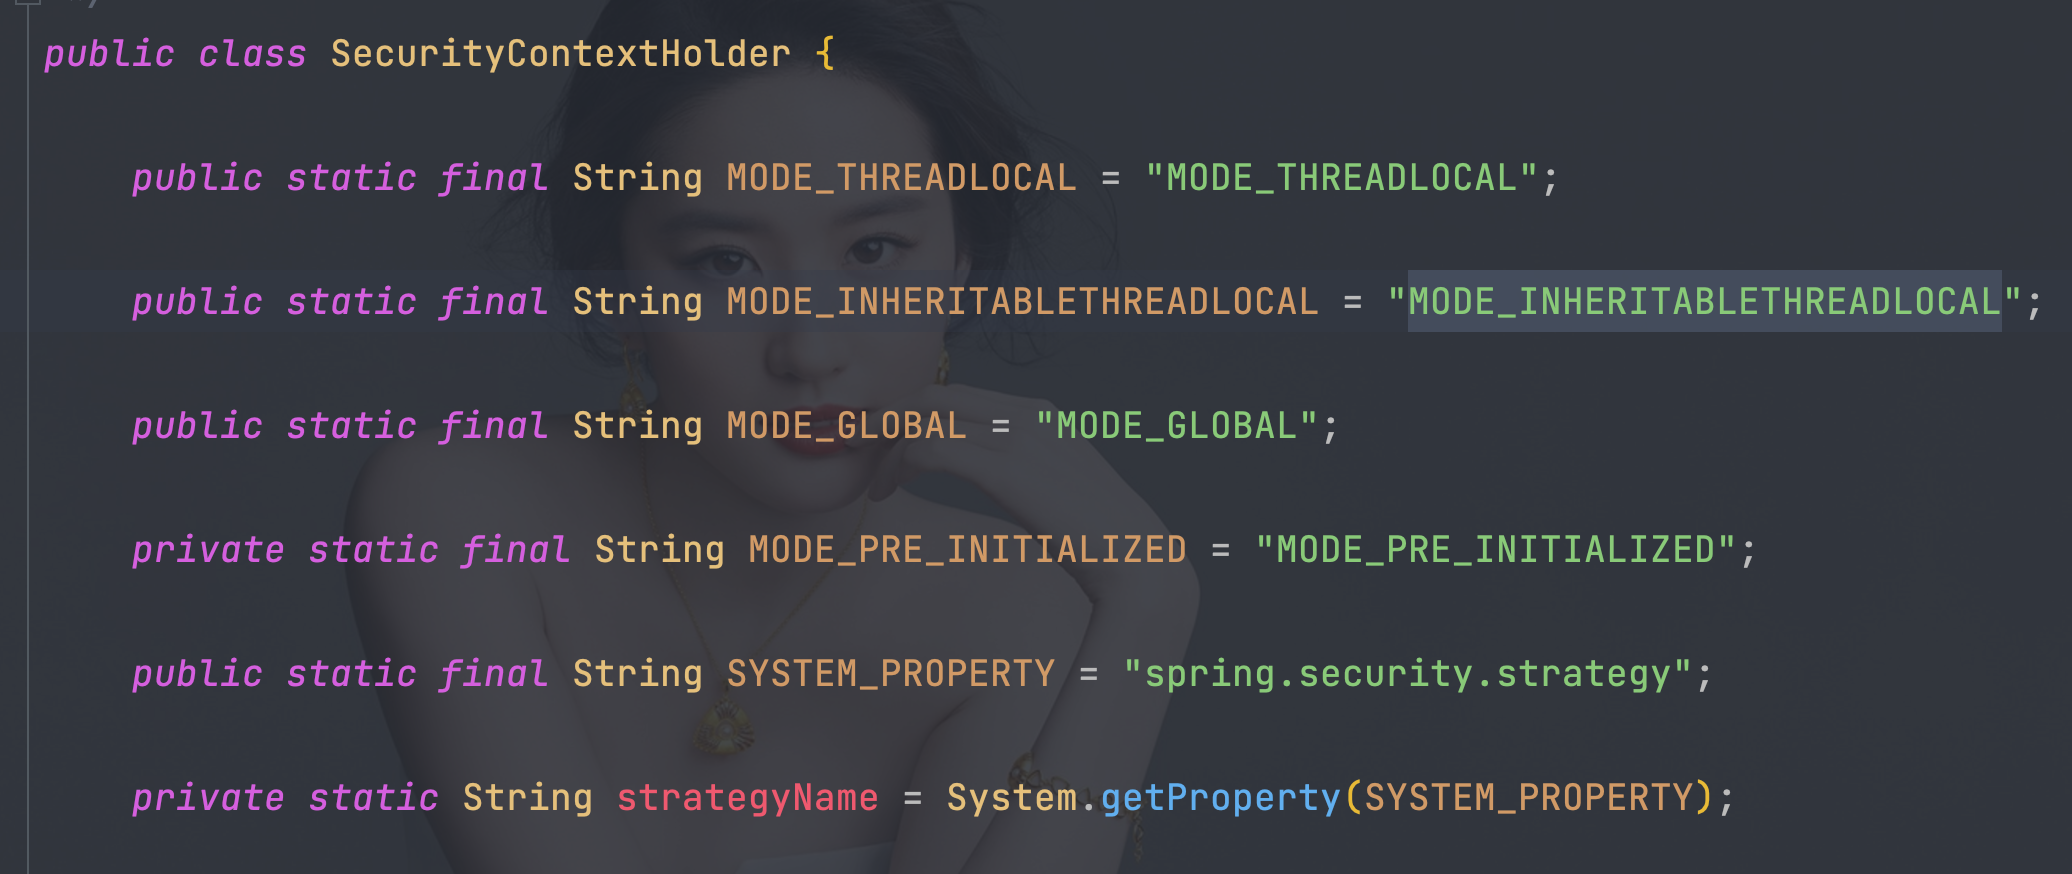
- 三种策略模式,调整通过修改VM options
// 如果没有设置自定义的策略,就采用MODE_THREADLOCAL模式
public static final String MODE_THREADLOCAL = "MODE_THREADLOCAL";
// 采用InheritableThreadLocal,它是ThreadLocal的一个子类,适用多线程的环境
public static final String MODE_INHERITABLETHREADLOCAL = "MODE_INHERITABLETHREADLOCAL";
// 全局策略,实现方式就是static SecurityContext contextHolder
public static final String MODE_GLOBAL = "MODE_GLOBAL";
-Dspring.security.strategy=MODE_INHERITABLETHREADLOCAL

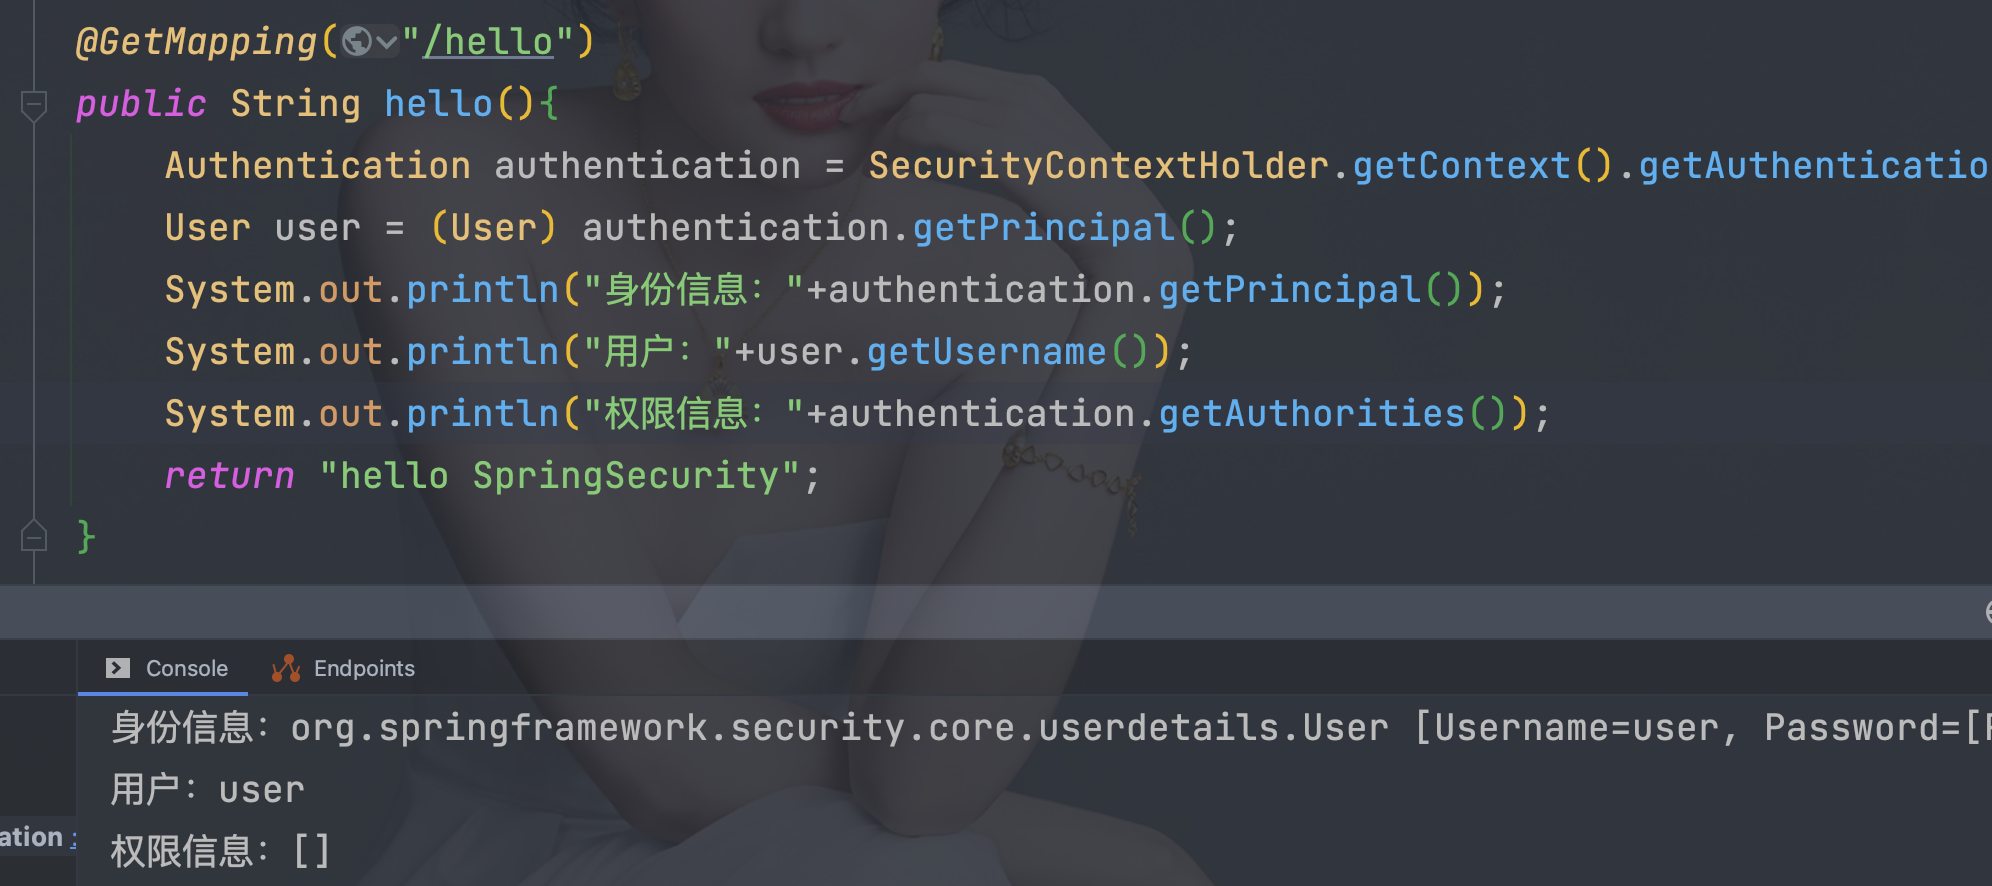
8.1、 使用代码获取
Authentication authentication = SecurityContextHolder.getContext().getAuthentication();
User user = (User) authentication.getPrincipal();
System.out.println("身份信息:" + authentication.getPrincipal());
System.out.println("用户:" + user.getUsername());
System.out.println("权限信息:" + authentication.getAuthorities());
8.2、 前端页面获取
8.2.1、 引入依赖
- 不需要版本号
        <dependency>
            <groupId>org.thymeleaf.extras</groupId>
            <artifactId>thymeleaf-extras-springsecurity5</artifactId>
        </dependency>
8.2.2、 导入命名空间,获取数据
<!DOCTYPE html>
<html lang="en" xmlns:th="http://www.thymeleaf.org"
      xmlns:sec="http://www.thymeleaf.org/extras/spring-security">
<head>
    <meta charset="UTF-8">
    <title>login</title>
</head>
<body>
<form th:action="@{/bb}" method="post">
    <p>
        <input type="submit" value="注销登陆">
    </p>
</form>

<hr>

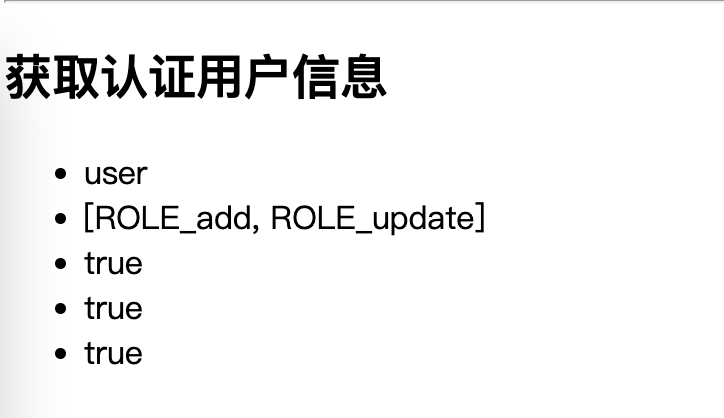
<h2>获取认证用户信息</h2>

<ul>
<!--     <li sec:authentication="name"></li>-->
<!--     <li sec:authentication="authorities"></li>-->
<!--     <li sec:authentication="credentials"></li>-->
<!--     <li sec:authentication="authenticated"></li>-->
     <li sec:authentication="principal.username"></li>
     <li sec:authentication="principal.authorities"></li>
     <li sec:authentication="principal.accountNonExpired"></li>
     <li sec:authentication="principal.accountNonLocked"></li>
     <li sec:authentication="principal.credentialsNonExpired"></li>
</ul>


</body>
</html>
9、 自定义数据源
9.1、 流程分析
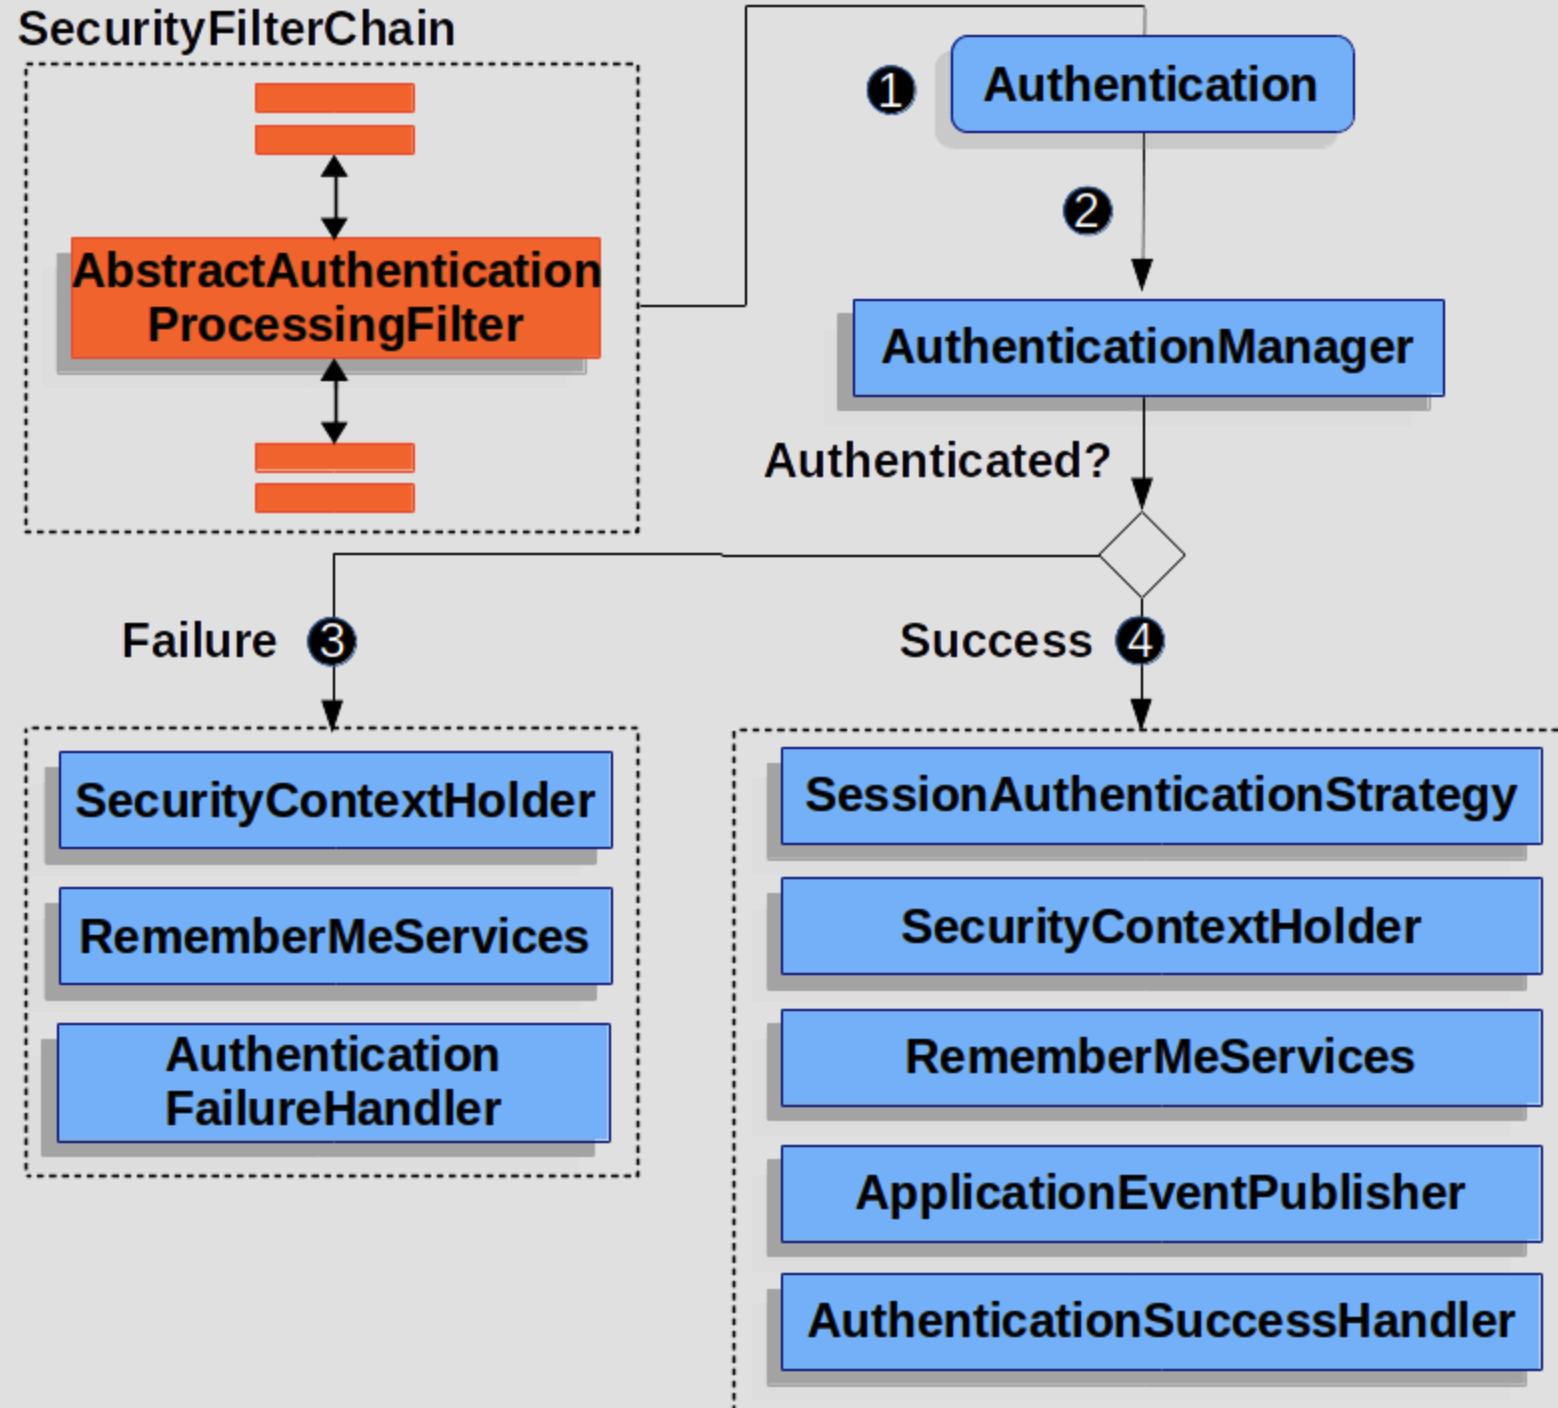
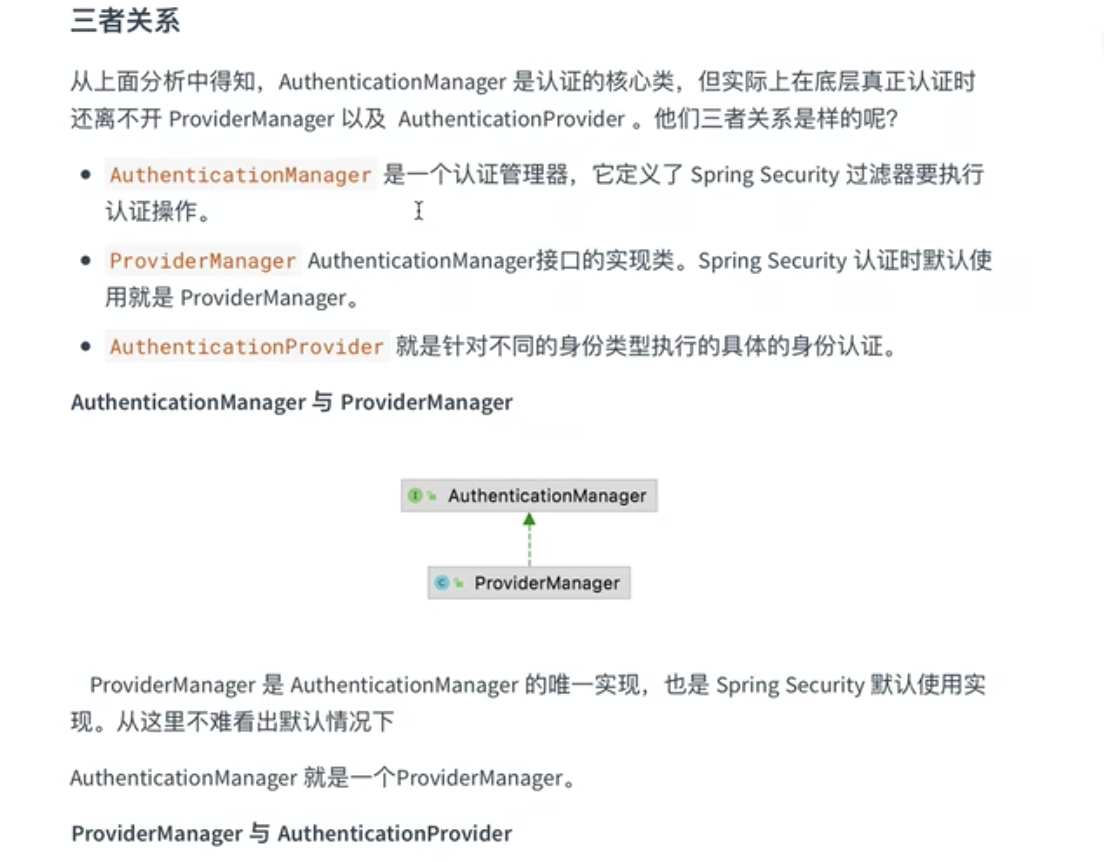
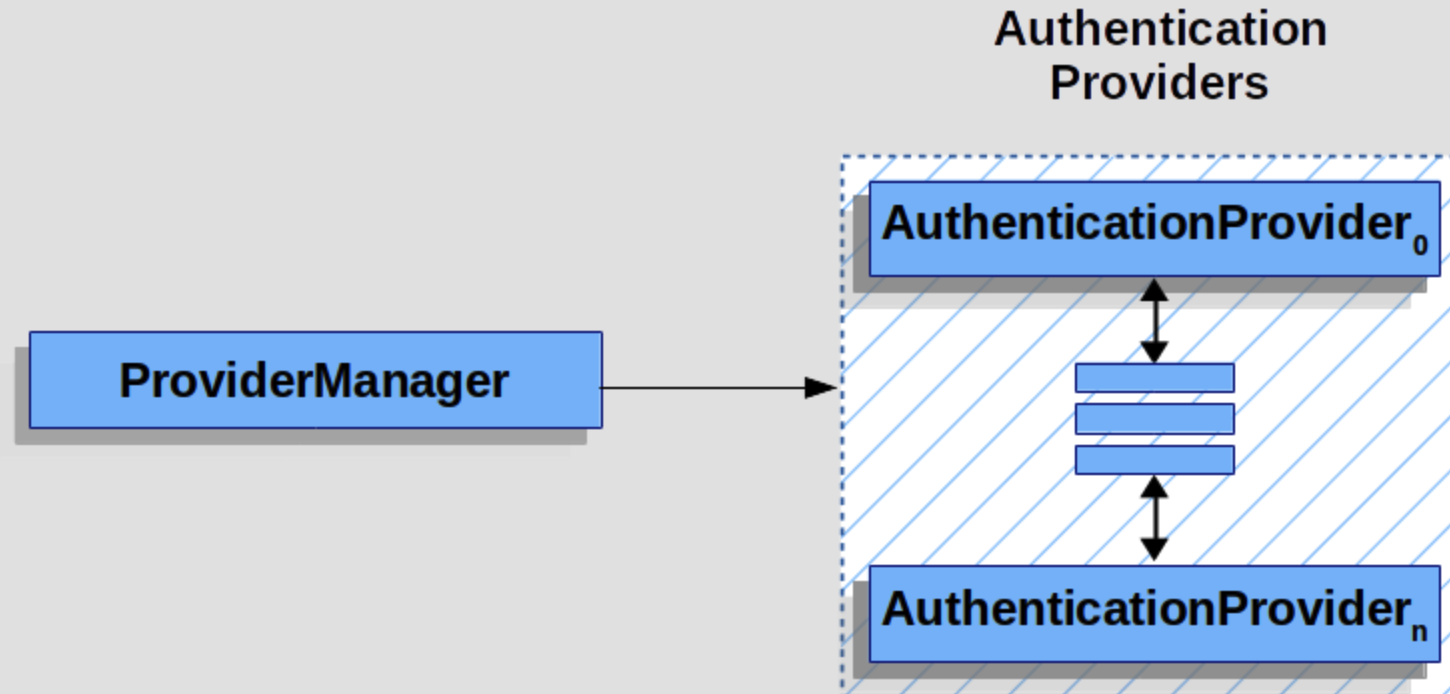
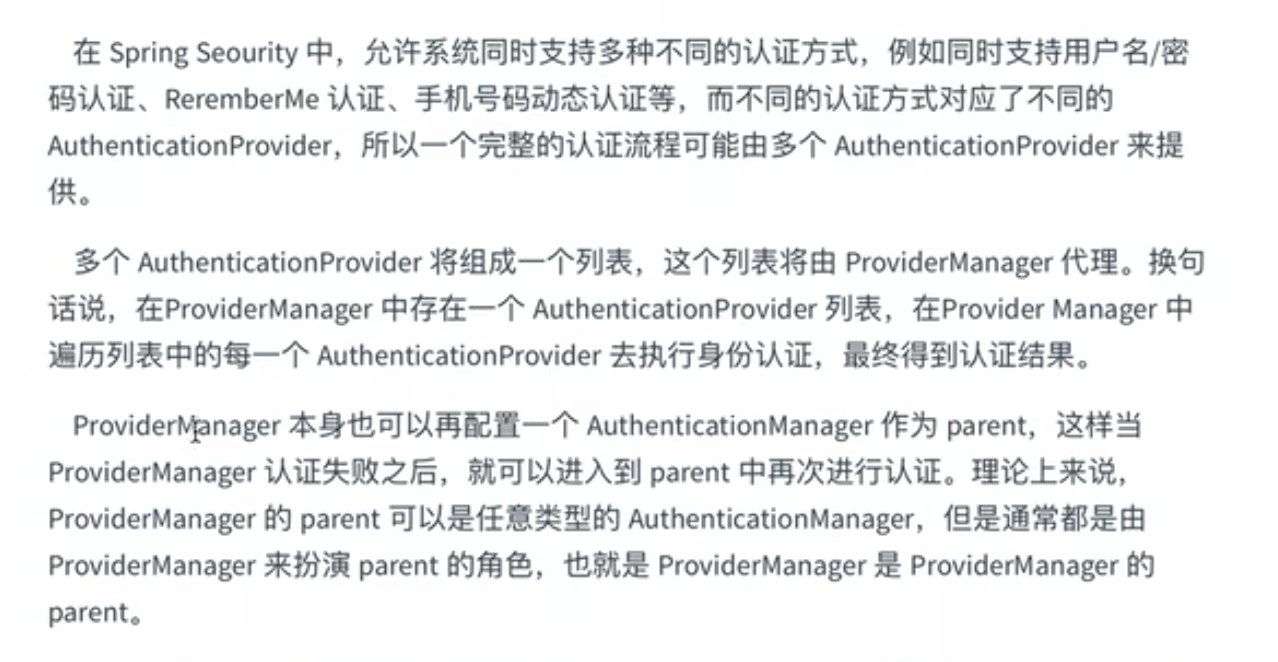
 When the user submits their credentials, the AbstractAuthenticationProcessingFilter creates an Authentication from the HttpServletRequest to be authenticated. The type of Authentication created depends on the subclass of AbstractAuthenticationProcessingFilter. For example, UsernamePasswordAuthenticationFilter creates a UsernamePasswordAuthenticationToken from a username and password that are submitted in the HttpServletRequest.
 Next, the Authentication is passed into the AuthenticationManager to be authenticated.
 If authentication fails, then Failure
- The SecurityContextHolder is cleared out.
- RememberMeServices.loginFail is invoked. If remember me is not configured, this is a no-op.
- AuthenticationFailureHandler is invoked.
 If authentication is successful, then Success.
- SessionAuthenticationStrategy is notified of a new log in.
- The Authentication is set on the SecurityContextHolder. Later the SecurityContextPersistenceFilter saves the SecurityContext to the HttpSession.
- RememberMeServices.loginSuccess is invoked. If remember me is not configured, this is a no-op.
- ApplicationEventPublisher publishes an InteractiveAuthenticationSuccessEvent.
- AuthenticationSuccessHandler is invoked.
9.2、 修改WebSecurityConfigurer
  @Autowired
    DataSource dataSource;


    @Bean
    public PasswordEncoder bcryptPasswordEncoder() {
        return PasswordEncoderFactories.createDelegatingPasswordEncoder();
    }


    public UserDetailsService users(PasswordEncoder encoder) {
        // The builder will ensure the passwords are encoded before saving in memory
        UserDetails user = User.withUsername("user")
                .password(encoder.encode("123"))
                .roles("USER")
                .build();
        UserDetails admin = User.withUsername("admin")
                .password(encoder.encode("123"))
                .roles("USER", "ADMIN")
                .build();
        return new InMemoryUserDetailsManager(user, admin);
    }


    public UserDetailsService users() {
        JdbcUserDetailsManager users = new JdbcUserDetailsManager(dataSource);
//        UserDetails admin = User.withUsername("齐丰")
//                .password(encoder.encode("123456"))
//                .roles("USER")
//                .build();
//        users.createUser(admin);
        System.out.println(dataSource.getClass());
        return users;
    }
9.3、 In-Memory Authentication
- 修改SecurityFilterChain
- 通过指定userDetailsService来切换不同的认证数据储存方式
    @Bean
    @SuppressWarnings("all")
    SecurityFilterChain filterChain(HttpSecurity httpSecurity) throws Exception {
        return
                //开启权限验证
                httpSecurity
                        .authorizeRequests()
                        //permitAll直接放行,必须在anyRequest().authenticated()前面
                        .mvcMatchers("/toLogin").permitAll()
                        .mvcMatchers("/index").permitAll()
                        //anyRequest所有请求都需要认证
                        .anyRequest().authenticated()
                        .and()
                        //使用form表单验证
                        .formLogin()
                        //自定义登陆页面
                        .loginPage("/toLogin")
                        //自定义登陆页面后必须指定处理登陆请求的url
                        .loginProcessingUrl("/doLogin")
//               自定义接收用户名的参数名为uname
                        .usernameParameter("uname")
//               自定义接收密码的参数名为pwd
                        .passwordParameter("pwd")
//               登陆认证成功后跳转的页面(转发),必须使用POST请求
//                .successForwardUrl("/test")
//               陆认证成功后跳转的页面(转发),必须使用GET请求
//                 .defaultSuccessUrl("/test",true)
                        //不会每次都跳转定义的页面,默认会记录认证拦截的请求,如果是拦截的受限资源会优先跳转到之前被拦截的请求。需要每次都跳转使defaultSuccessUrl("/test",true)
//                 .defaultSuccessUrl("/test")
//                前后端分离时代自定义认证成功处理
                        .successHandler(new MyAuthenticationSuccessHandler())
//               认证失败跳转页面,必须使用POST请求
//                .failureForwardUrl("/toLogin")
//               认证失败跳转页面,必须使用GET请求
//                 .failureUrl("/toLogin")
//               前后端分离时代自定义认证失败处理
                        .failureHandler(new MyAuthenticationFailureHandler())
                        .and()
//               注销
                        .logout()
//               指定默认注销url,默认请求方式GET
//                .logoutUrl("/logout")
//               自定义注销url
                        .logoutRequestMatcher(new OrRequestMatcher(
                                new AntPathRequestMatcher("/aa", "GET"),
                                new AntPathRequestMatcher("/bb", "POST")
                        ))
//               销毁session,默认为true
                        .invalidateHttpSession(true)
//               清除认证信息,默认为true
                        .clearAuthentication(true)
//               注销成功后跳转页面
//                .logoutSuccessUrl("/toLogin")
                        .logoutSuccessHandler(new MyLogoutSuccessHandler())
                        .and()
                        .userDetailsService(users(bcryptPasswordEncoder()))
                        // .userDetailsService(users())
                        //禁止csrf跨站请求保护
                        .csrf().disable()
                        .build();
    }
9.4、 JDBC Authentication
9.3.1、 引入依赖
        <dependency>
            <groupId>mysql</groupId>
            <artifactId>mysql-connector-java</artifactId>
        </dependency>
        <dependency>
            <groupId>com.alibaba</groupId>
            <artifactId>druid-spring-boot-starter</artifactId>
            <version>1.2.11</version>
        </dependency>
        <dependency>
            <groupId>org.springframework</groupId>
            <artifactId>spring-jdbc</artifactId>
        </dependency>
9.3.2、 数据库表及连接地址配置
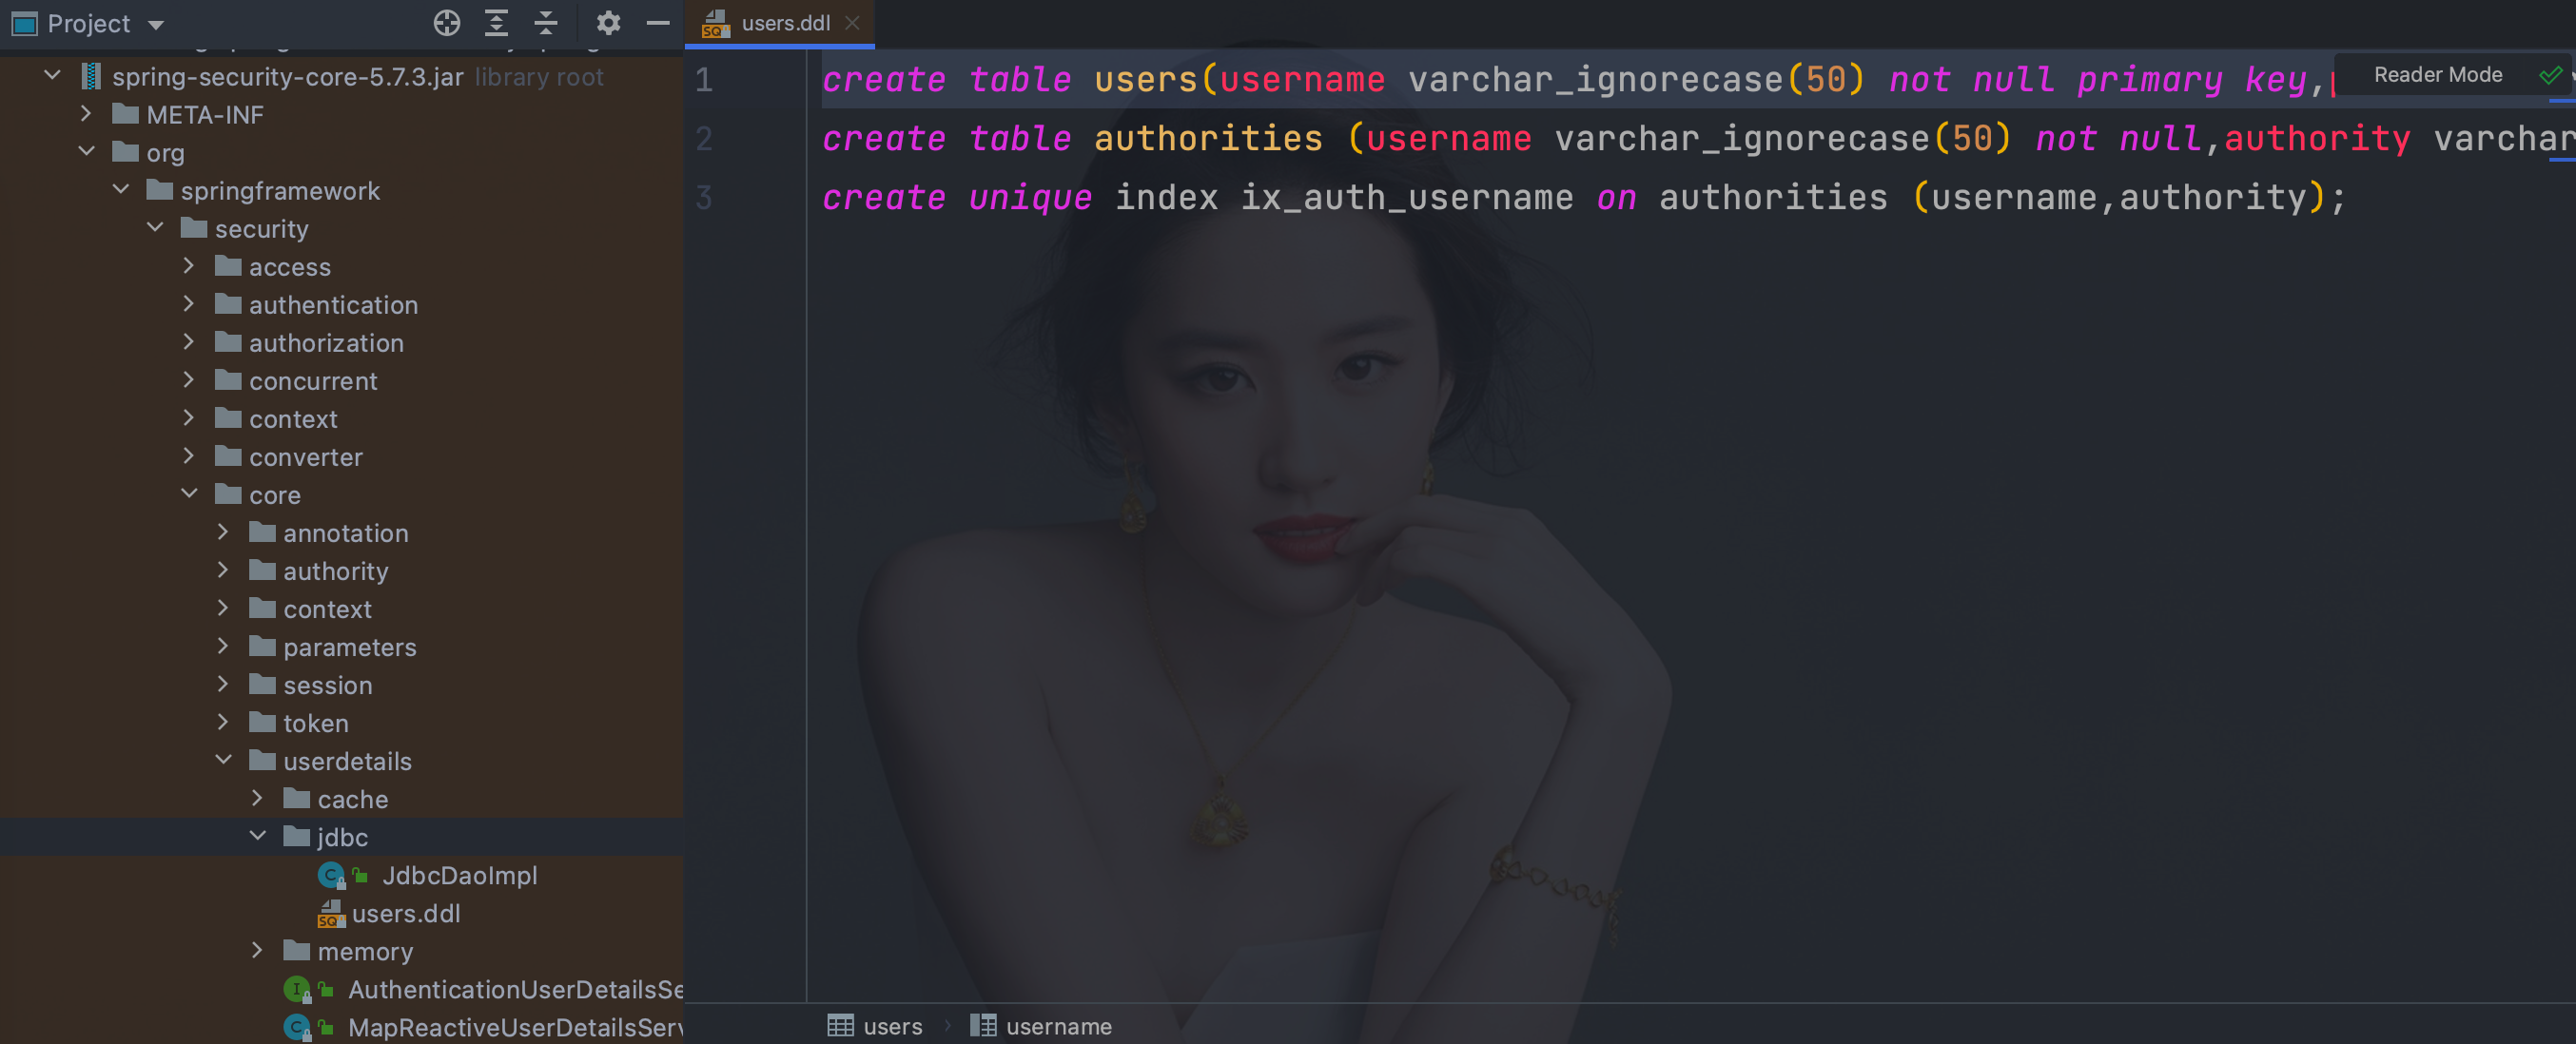
- 表结构官方文档
org/springframework/security/core/userdetails/jdbc/users.ddl
- 数据库连连配置
spring:
  datasource:
    type: com.alibaba.druid.pool.DruidDataSource
    driver-class-name: com.mysql.cj.jdbc.Driver
    url: jdbc:mysql://192.0.0.128:3306/test
    username: wq
    password: 123456
9.3.3、 修改SecurityFilterChain
- 通过指定userDetailsService来切换不同的认证数据储存方式
@Configuration
    public class WebSecurityConfigurer {

        @Autowired
        DataSource dataSource;

        @Bean
        public PasswordEncoder bcryptPasswordEncoder() {
            return PasswordEncoderFactories.createDelegatingPasswordEncoder();
        }

        public UserDetailsService inMemoryUsers(PasswordEncoder encoder) {
            // The builder will ensure the passwords are encoded before saving in memory
            UserDetails user = User.withUsername("user")
                .password(encoder.encode("123"))
                .roles("USER")
                .build();
            UserDetails admin = User.withUsername("admin")
                .password(encoder.encode("123"))
                .roles("USER", "ADMIN")
                .build();
            return new InMemoryUserDetailsManager(user, admin);
        }


        public UserDetailsService jdbcUsers(PasswordEncoder encoder) {
            JdbcUserDetailsManager users = new JdbcUserDetailsManager(dataSource);
            //        UserDetails admin = User.withUsername("齐丰")
            //                .password(encoder.encode("123456"))
            //                .roles("USER")
            //                .build();
            //        users.deleteUser(admin.getUsername());
            //        users.createUser(admin);
            System.out.println(dataSource.getClass());
            return users;
        }


        @Bean
        @SuppressWarnings("all")
        SecurityFilterChain filterChain(HttpSecurity httpSecurity) throws Exception {
            return
                //开启权限验证
                httpSecurity
                .authorizeRequests()
                //permitAll直接放行,必须在anyRequest().authenticated()前面
                .mvcMatchers("/toLogin").permitAll()
                .mvcMatchers("/index").permitAll()
                //anyRequest所有请求都需要认证
                .anyRequest().authenticated()
                .and()
                //使用form表单验证
                .formLogin(login ->
                           login
                           //自定义登陆页面
                           .loginPage("/toLogin")
                           //自定义登陆页面后必须指定处理登陆请求的url
                           .loginProcessingUrl("/doLogin")
                           // 自定义接收用户名的参数名为uname
                           .usernameParameter("uname")
                           //自定义接收密码的参数名为pwd
                           .passwordParameter("pwd")
                           // 认证成功后跳转的页面(转发),必须使用POST请求
                           //.successForwardUrl("/test")
                           // 证成功后跳转的页面(重定向),必须使用GET请求
                           //.defaultSuccessUrl("/test")
                           //不会每次都跳转定义的页面,默认会记录认证拦截的请求,如果是拦截的受限资源会优先跳转到之前被拦截的请求。需要每次都跳转使defaultSuccessUrl("/test",true)
                           //.defaultSuccessUrl("/test",true)
                           //前后端分离时代自定义认证成功处理
                           .successHandler(new MyAuthenticationSuccessHandler())
                           //前后端分离时代自定义认证失败处理
                           .failureHandler(new MyAuthenticationFailureHandler())
                          )
                //注销
                .logout(logout -> {
                    logout
                        //指定默认注销url,默认请求方式GET
                        //.logoutUrl("/logout")
                        .logoutRequestMatcher(
                            //自定义注销url
                            new OrRequestMatcher(
                                new AntPathRequestMatcher("/aa", "GET"),
                                new AntPathRequestMatcher("/bb", "POST")))
                        //注销成功后跳转页面
                        //.logoutSuccessUrl("/toLogin")
                        //前后端分离时代自定义注销登录处理器
                        .logoutSuccessHandler(new MyLogoutSuccessHandler())
                        //销毁session,默认为true
                        .invalidateHttpSession(true)
                        //清除认证信息,默认为true
                        .clearAuthentication(true);
                })
                //指定UserDetailsService来切换认证信息不同的存储方式(数据源)
                .userDetailsService(inMemoryUsers(bcryptPasswordEncoder()))
                .userDetailsService(jdbcUsers(bcryptPasswordEncoder()))
                //禁止csrf跨站请求保护
                .csrf().disable()
                .build();
        }
    }
方式一:通过指定userDetailsService来切换不同的认证数据储存方式,也可同时指定多个如:
.userDetailsService(users(bcryptPasswordEncoder()))
.userDetailsService(users())
方式二:在指定自定义的UserDetailsService上加上@Bean注解,或者实现UserDetailsService接口

9.5、扩展JDBC Authentication之mysql
表设计
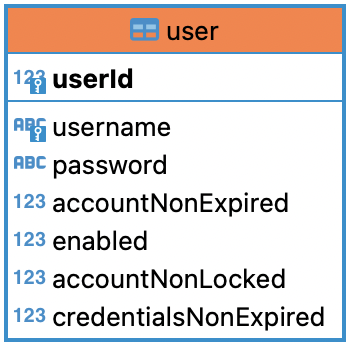
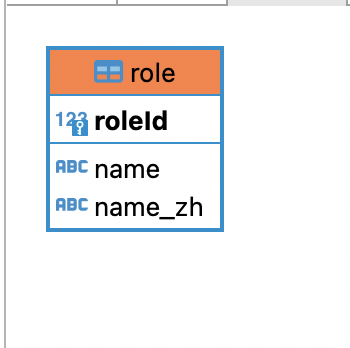
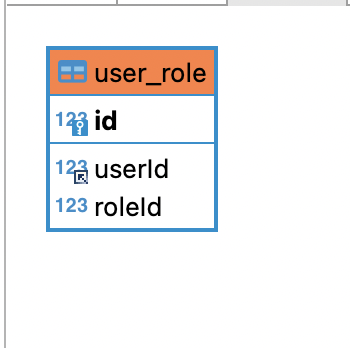
-- test1.`user` definition

CREATE TABLE `user` (
  `userId` bigint(20) NOT NULL AUTO_INCREMENT,
  `username` varchar(100) NOT NULL COMMENT '用户名',
  `password` varchar(500) NOT NULL COMMENT '密码',
  `accountNonExpired` tinyint(1) NOT NULL,
  `enabled` tinyint(1) NOT NULL,
  `accountNonLocked` tinyint(1) NOT NULL,
  `credentialsNonExpired` tinyint(1) NOT NULL,
  PRIMARY KEY (`userId`),
  UNIQUE KEY `user_UN` (`username`)
) ENGINE=InnoDB AUTO_INCREMENT=4 DEFAULT CHARSET=utf8;

-- test1.`role` definition

CREATE TABLE `role` (
  `roleId` bigint(20) NOT NULL AUTO_INCREMENT,
  `name` varchar(100) NOT NULL,
  `name_zh` varchar(100) NOT NULL,
  PRIMARY KEY (`roleId`)
) ENGINE=InnoDB AUTO_INCREMENT=4 DEFAULT CHARSET=utf8;

-- test1.`role` definition

CREATE TABLE `role` (
  `roleId` bigint(20) NOT NULL AUTO_INCREMENT,
  `name` varchar(100) NOT NULL,
  `name_zh` varchar(100) NOT NULL,
  PRIMARY KEY (`roleId`)
) ENGINE=InnoDB AUTO_INCREMENT=4 DEFAULT CHARSET=utf8;

INSERT INTO test1.`user` (username,password,accountNonExpired,enabled,accountNonLocked,credentialsNonExpired) VALUES
	 ('root','{noop}123',1,1,1,1),
	 ('admin','{noop}123',1,1,1,1),
	 ('qifeng','{noop}123',1,1,1,1);

INSERT INTO test1.`role` (name,name_zh) VALUES
	 ('ROLE_product','商品管理员'),
	 ('ROLE_admin','系统管理员'),
	 ('ROLE_user','用户管理员');

INSERT INTO test1.user_role (userId,roleId) VALUES
	 (1,1),
	 (1,2),
	 (2,2),
	 (3,3);
9.5.1、引入依赖
        <dependency>
            <groupId>org.springframework.boot</groupId>
            <artifactId>spring-boot-starter-security</artifactId>
        </dependency>
        <dependency>
            <groupId>org.springframework.boot</groupId>
            <artifactId>spring-boot-starter-thymeleaf</artifactId>
        </dependency>
        <dependency>
            <groupId>org.springframework.boot</groupId>
            <artifactId>spring-boot-starter-web</artifactId>
        </dependency>
        <dependency>
            <groupId>org.mybatis.spring.boot</groupId>
            <artifactId>mybatis-spring-boot-starter</artifactId>
            <version>2.2.2</version>
        </dependency>
        <dependency>
            <groupId>org.thymeleaf.extras</groupId>
            <artifactId>thymeleaf-extras-springsecurity5</artifactId>
        </dependency>
        <dependency>
            <groupId>com.alibaba</groupId>
            <artifactId>druid-spring-boot-starter</artifactId>
            <version>1.2.11</version>
        </dependency>

        <dependency>
            <groupId>mysql</groupId>
            <artifactId>mysql-connector-java</artifactId>
            <scope>runtime</scope>
        </dependency>
9.5.2、配置数据库连接
server:
  port: 8081
spring:
  datasource:
    type: com.alibaba.druid.pool.DruidDataSource
    driver-class-name: com.mysql.cj.jdbc.Driver
    url: jdbc:mysql://192.0.0.128:3306/test1
    username: wq
    password: 123456
mybatis:
  type-aliases-package: com.wanqi.pojo
  mapper-locations: classpath:mapper/*.xml
9.5.3、编写实体类与Mapper
User
- User继承UserDetails方便扩展
public class User implements UserDetails {
    private Long userId;
    private String username;
    private String password;
    /** 账户是否过期 */
    private Boolean accountNonExpired;
    /** 账户是否激活 */
    private Boolean enabled;
    /** 账户是否被锁定 */
    private Boolean accountNonLocked;
    /** 密码是否过期 */
    private Boolean credentialsNonExpired;
    private List<Role> roles = new ArrayList<>();

    public User() {
    }

    public User(String username, String password, Boolean accountNonExpired, Boolean enabled, Boolean accountNonLocked, Boolean credentialsNonExpired, List<Role> roles) {
        this.username = username;
        this.password = password;
        this.accountNonExpired = accountNonExpired;
        this.enabled = enabled;
        this.accountNonLocked = accountNonLocked;
        this.credentialsNonExpired = credentialsNonExpired;
        this.roles = roles;
    }

    @Override
    public Collection<? extends GrantedAuthority> getAuthorities() {
        Set<SimpleGrantedAuthority> authorities = new HashSet<>();
        roles.forEach(role -> authorities.add(new SimpleGrantedAuthority(role.getName())));
        return authorities;
    }

    @Override
    public String getPassword() {
        return password;
    }

    @Override
    public String getUsername() {
        return username;
    }

    @Override
    public boolean isAccountNonExpired() {
        return accountNonExpired;
    }

    @Override
    public boolean isAccountNonLocked() {
        return accountNonLocked;
    }

    @Override
    public boolean isCredentialsNonExpired() {
        return credentialsNonExpired;
    }

    @Override
    public boolean isEnabled() {
        return enabled;
    }

    public Long getUserId() {
        return userId;
    }

    public void setUserId(Long userId) {
        this.userId = userId;
    }

    public List<Role> getRoles() {
        return roles;
    }

    public void setRoles(List<Role> roles) {
        this.roles = roles;
    }

    public void setUsername(String username) {
        this.username = username;
    }

    public void setPassword(String password) {
        this.password = password;
    }

    public void setAccountNonExpired(Boolean accountNonExpired) {
        this.accountNonExpired = accountNonExpired;
    }

    public void setEnabled(Boolean enabled) {
        this.enabled = enabled;
    }

    public void setAccountNonLocked(Boolean accountNonLocked) {
        this.accountNonLocked = accountNonLocked;
    }

    public void setCredentialsNonExpired(Boolean credentialsNonExpired) {
        this.credentialsNonExpired = credentialsNonExpired;
    }
}
@Mapper
public interface UserMapper {
   /**
    * 根据用户名查询用户
    */
   User loadUserByUsername(@Param("username") String username);
}
<?xml version="1.0" encoding="UTF-8" ?>
<!DOCTYPE mapper
        PUBLIC "-//mybatis.org//DTD Mapper 3.0//EN"
        "http://mybatis.org/dtd/mybatis-3-mapper.dtd">
<mapper namespace="com.wanqi.mapper.UserMapper">
<select id="loadUserByUsername" parameterType="String" resultType="user">
    select * from user where username=#{username}
</select>
</mapper>
Role
public class Role {
    private Long roleId;
    private String name;
    private String name_zh;

    public Long getRoleId() {
        return roleId;
    }

    public void setRoleId(Long roleId) {
        this.roleId = roleId;
    }

    public String getName() {
        return name;
    }

    public void setName(String name) {
        this.name = name;
    }

    public String getName_zh() {
        return name_zh;
    }

    public void setName_zh(String name_zh) {
        this.name_zh = name_zh;
    }

    public Role() {
    }

    public Role(String name, String name_zh) {
        this.name = name;
        this.name_zh = name_zh;
    }
}
@Mapper
public interface RoleMapper {
    /**
     * 根据用户编号查询角色信息
     */
    List<Role> getRoleByUserId(@Param("userId") Long userId);
}
<?xml version="1.0" encoding="UTF-8" ?>
<!DOCTYPE mapper
        PUBLIC "-//mybatis.org//DTD Mapper 3.0//EN"
        "http://mybatis.org/dtd/mybatis-3-mapper.dtd">
<mapper namespace="com.wanqi.mapper.RoleMapper">

<select id="getRoleByUserId" parameterType="Long" resultType="com.wanqi.pojo.Role">
    select r.roleId,
           r.name,
           r.name_zh
    from role r,user_role ur
    where r.roleId = ur.roleId
    and  ur.userId= #{userId}
</select>
</mapper>
9.5.4、实现UserDetailsService接口
@Component("userDetailsImpl")
public class UserDetailsImpl implements UserDetailsService {
    @Autowired
   private UserMapper userMapper;
    @Autowired
   private RoleMapper roleMapper;

    @Override
    public org.springframework.security.core.userdetails.UserDetails loadUserByUsername(String username) throws UsernameNotFoundException {
        User user = userMapper.loadUserByUsername(username);
        if(user == null){
            throw new UsernameNotFoundException("用户名不存在");
        }
        List<Role> roles = roleMapper.getRoleByUserId(user.getUserId());
        user.setRoles(roles);
        return user;
    }
}
9.5.5、指定认证数据源
- 通过 httpSecurity.userDetailsService(userDetailsImpl)
@Configuration
    public class MyWebSecurityConfigurer {

        private UserDetailsImpl userDetailsImpl;

        @Autowired
        public void setUserDetailsImpl(UserDetailsImpl userDetailsImpl) {
            this.userDetailsImpl = userDetailsImpl;
        }

        @Bean
        @SuppressWarnings("all")
        SecurityFilterChain filterChain(HttpSecurity httpSecurity) throws Exception {
            return
                //开启权限验证
                httpSecurity
                .authorizeRequests()
                //permitAll直接放行,必须在anyRequest().authenticated()前面
                .mvcMatchers("/toLogin").permitAll()
                .mvcMatchers("/index").permitAll()
                //anyRequest所有请求都需要认证
                .anyRequest().authenticated()
                .and()
                //使用form表单验证
                .formLogin(login ->
                           login
                           //自定义登陆页面
                           .loginPage("/toLogin")
                           //自定义登陆页面后必须指定处理登陆请求的url
                           .loginProcessingUrl("/doLogin")
                           // 自定义接收用户名的参数名为uname
                           .usernameParameter("uname")
                           //自定义接收密码的参数名为pwd
                           .passwordParameter("pwd")
                           // 认证成功后跳转的页面(转发),必须使用POST请求
                           //.successForwardUrl("/test")
                           // 证成功后跳转的页面(重定向),必须使用GET请求
                           //.defaultSuccessUrl("/test")
                           //不会每次都跳转定义的页面,默认会记录认证拦截的请求,如果是拦截的受限资源会优先跳转到之前被拦截的请求。需要每次都跳转使defaultSuccessUrl("/test",true)
                           //.defaultSuccessUrl("/test",true)
                           //前后端分离时代自定义认证成功处理
                           .successHandler(new MyAuthenticationSuccessHandler())
                           //前后端分离时代自定义认证失败处理
                           .failureHandler(new MyAuthenticationFailureHandler())
                          )
                //注销
                .logout(logout -> {
                    logout
                        //指定默认注销url,默认请求方式GET
                        //.logoutUrl("/logout")
                        .logoutRequestMatcher(
                            //自定义注销url
                            new OrRequestMatcher(
                                new AntPathRequestMatcher("/aa", "GET"),
                                new AntPathRequestMatcher("/bb", "POST")))
                        //注销成功后跳转页面
                        //.logoutSuccessUrl("/toLogin")
                        //前后端分离时代自定义注销登录处理器
                        .logoutSuccessHandler(new MyLogoutSuccessHandler())
                        //销毁session,默认为true
                        .invalidateHttpSession(true)
                        //清除认证信息,默认为true
                        .clearAuthentication(true);
                })
                //指定UserDetailsService来切换认证信息不同的存储方式(数据源)
                .userDetailsService(userDetailsImpl)
                //禁止csrf跨站请求保护
                .csrf().disable()
                .build();
        }
    }
10、自定义JSON认证,前后端分离
10.1、HttpSecurity过滤器方法介绍
/*
* at:用指定的filter替换过滤器链中的指定filter
* before:放在过滤器链中哪一个filter之前
* after:放在过滤器链中哪一个filter之后
* httpSecurity.addFilterAt();
* httpSecurity.addFilterBefore(, );
* httpSecurity.addFilterAfter();
* */
10.2、自定义登录处理filter
public class JsonLoginFilter extends UsernamePasswordAuthenticationFilter {

    public JsonLoginFilter(AuthenticationManager authenticationManager) {
        super(authenticationManager);
    }

    @Override
    public Authentication attemptAuthentication(HttpServletRequest request, HttpServletResponse response) throws AuthenticationException {
        System.out.println("JosnLoginFilter");
        if (!request.getMethod().equals("POST")) {
            throw new AuthenticationServiceException("Authentication method not supported: " + request.getMethod());
        }
        if (request.getContentType().equalsIgnoreCase(MediaType.APPLICATION_JSON_VALUE)) {
            try {
                Map<String,String> map = new ObjectMapper().readValue(request.getInputStream(), Map.class);
                String username = map.get(getUsernameParameter());
                username = (username != null) ? username.trim() : "";
                String password = map.get(getPasswordParameter());
                password = (password != null) ? password : "";
                UsernamePasswordAuthenticationToken authRequest = UsernamePasswordAuthenticationToken.unauthenticated(username,
                        password);
                System.out.println(username);
                System.out.println(password);
                setDetails(request, authRequest);
                return getAuthenticationManager().authenticate(authRequest);
            } catch (IOException e) {
                e.printStackTrace();
            }
        }
        return super.attemptAuthentication(request, response);
    }
}
10.3、配置文件编写
@Configuration
@EnableWebSecurity
public class WebSecurityConfigurer {

    private UserDetailsImpl userDetailsImpl;

    @Autowired
    public void setUserDetailsImpl(UserDetailsImpl userDetailsImpl) {
        this.userDetailsImpl = userDetailsImpl;
    }

    @Bean
    public PasswordEncoder bcryptPasswordEncoder() {
        return PasswordEncoderFactories.createDelegatingPasswordEncoder();
    }

    @Autowired
    AuthenticationConfiguration authenticationConfiguration;
    /**
     * 获取AuthenticationManager(认证管理器),登录时认证使用
     * @return
     * @throws Exception
     */
    @Bean
    public AuthenticationManager authenticationManager() throws Exception {
        return authenticationConfiguration.getAuthenticationManager();
    }

    @Bean
    public JsonLoginFilter josnLoginFilter() throws Exception {
        System.out.println("setAuthenticationManager");
        JsonLoginFilter filter = new JsonLoginFilter(authenticationManager());
        filter.setUsernameParameter("uname");
        filter.setPasswordParameter("pwd");
        //前后端分离时代自定义认证成功处理
        filter.setAuthenticationSuccessHandler(new MyAuthenticationSuccessHandler());
        //前后端分离时代自定义认证失败处理
        filter.setAuthenticationFailureHandler(new MyAuthenticationFailureHandler());
        return filter;
    }

    @Bean
    SecurityFilterChain filterChain(HttpSecurity httpSecurity) throws Exception {
        return
                //开启权限验证
                httpSecurity
                        .authorizeRequests()
                        //permitAll直接放行,必须在anyRequest().authenticated()前面
                        .mvcMatchers("/index").permitAll()
                        //anyRequest所有请求都需要认证
                        .anyRequest().authenticated()
                        .and()
                        //使用form表单验证
                        .formLogin()
                        .and()
                        .addFilterAt(josnLoginFilter(),UsernamePasswordAuthenticationFilter.class)
                        //注销
                        .logout(logout -> {
                            logout
                                    .logoutRequestMatcher(
                                            //自定义注销url
                                            new OrRequestMatcher(
                                                    new AntPathRequestMatcher("/aa", "GET"),
                                                    new AntPathRequestMatcher("/bb", "POST")))
                                    //前后端分离时代自定义注销登录处理器
                                    .logoutSuccessHandler(new MyLogoutSuccessHandler())
                                    //销毁session,默认为true
                                    .invalidateHttpSession(true)
                                    //清除认证信息,默认为true
                                    .clearAuthentication(true);
                        })
                        //指定UserDetailsService来切换认证信息不同的存储方式(数据源)
                        .userDetailsService(userDetailsImpl)
                        .exceptionHandling()
                        .authenticationEntryPoint((request, response, authException) -> {
//                            response.setContentType(MediaType.APPLICATION_JSON_UTF8_VALUE);
                            response.setHeader("content-type", "application/json;charset=UTF-8");
                            response.setStatus(HttpStatus.UNAUTHORIZED.value());
                            response.getWriter().write("请先认证后重试!");
                        })
                        .and()
                        //禁止csrf跨站请求保护
                        .csrf().disable()
                        .build();
    }
}
10.4、使用自定义filter注意事项
httpSecurity.formLogin()必须使用无参的
11、实现kaptcha图片验证码
引入依赖
<dependency>
    <groupId>com.github.penggle</groupId>
    <artifactId>kaptcha</artifactId>
    <version>2.3.2</version>
</dependency>
1、编写kaptcha配置类
@Configuration
public class KaptchaConfig {
    @Bean
    public Producer kaptchaProducer() {
        Properties properties = new Properties();
        //图片的宽度
        properties.setProperty("kaptcha.image.width", "150");
        //图片的高度
        properties.setProperty("kaptcha.image.height", "50");
        //字体大小
        properties.setProperty("kaptcha.textproducer.font.size", "32");
        //字体颜色(RGB)
        properties.setProperty("kaptcha.textproducer.font.color", "0,0,0");
        //验证码字符的集合
        properties.setProperty("kaptcha.textproducer.char.string", "0123456789");
        //验证码长度(即在上面集合中随机选取几位作为验证码)
        properties.setProperty("kaptcha.textproducer.char.length", "4");
        //图片的干扰样式
        properties.setProperty("kaptcha.noise.impl", "com.google.code.kaptcha.impl.NoNoise");

        DefaultKaptcha Kaptcha = new DefaultKaptcha();
        Config config = new Config(properties);
        Kaptcha.setConfig(config);
        return Kaptcha;
    }
}
2、自定义异常
public class KaptchaNotMatchException extends AuthenticationException {

    public KaptchaNotMatchException(String msg, Throwable cause) {
        super(msg, cause);
    }

    public KaptchaNotMatchException(String msg) {
        super(msg);
    }
}
11.1、传统web开发方式
3、自定义Filter
public class VerifyCodeFilter extends UsernamePasswordAuthenticationFilter {

    public static final String VERIFY_CODE_KEY = "kaptcha";
    private String kaptchaParameter = VERIFY_CODE_KEY;

    public void setKaptchaParameter(String kaptchaParameter) {
        this.kaptchaParameter = kaptchaParameter;
    }

    public String getKaptchaParameter() {
        return kaptchaParameter;
    }

    public VerifyCodeFilter(AuthenticationManager authenticationManager) {
        super(authenticationManager);
    }

    @Override
    public Authentication attemptAuthentication(HttpServletRequest request, HttpServletResponse response) throws AuthenticationException {
        if (!request.getMethod().equals("POST")) {
            throw new AuthenticationServiceException("Authentication method not supported: " + request.getMethod());
        }
        String verifyCode = request.getParameter(getKaptchaParameter());
        String verifyCodeOld = (String) request.getSession().getAttribute("verifyCode");
        if (StringUtils.hasLength(verifyCode) && StringUtils.hasLength(verifyCodeOld)
                && verifyCode.equalsIgnoreCase(verifyCodeOld)) {
            return super.attemptAuthentication(request, response);
        }
        throw new KaptchaNotMatchException("验证码错误");
    }
}
4、提供生成验证码的接口
private Producer producer;

@Autowired
    public void setProducer(Producer producer) {
    this.producer = producer;
}

@RequestMapping("/vc.img")
    public void img(HttpSession session, HttpServletResponse response) throws IOException {
    String verifyCode = producer.createText();
    BufferedImage image = producer.createImage(verifyCode);
    session.setAttribute("verifyCode",verifyCode);
    ServletOutputStream outputStream = response.getOutputStream();
    response.setContentType(MediaType.IMAGE_JPEG_VALUE);
    ImageIO.write(image, "jpg", outputStream);
}
5、登录页面添加验证码
<!DOCTYPE html>
<html lang="en" xmlns:th="http://www.thymeleaf.org"
      xmlns:sec="http://www.thymeleaf.org/extras/spring-security">
<head>
    <meta charset="UTF-8">
    <title>login</title>
</head>
<body>
<p th:text="${session.SPRING_SECURITY_LAST_EXCEPTION}"></p>
<form th:action="@{/doLogin}" method="post">
    <p>用户名:<label>
        <input name="uname" type="text"/>
    </label></p>
    <p>密码:<label>
        <input name="pwd" type="password"/>
    </label></p>
    <p>验证码:<label>
        <input name="yzm" type="text"/>
        <img th:src="@{/vc.img}" alt=""/>
    </label></p>
    <p>
        <input type="submit">
    </p>
    <p th:text="${SPRING_SECURITY_LAST_EXCEPTION}"></p>
</form>

</body>
</html>
6、配置WebSecurityConfigurer
	@Configuration
    @EnableWebSecurity
    public class MyWebSecurityConfigurer {

        private UserDetailsImpl userDetailsImpl;

        @Autowired
        public void setUserDetailsImpl(UserDetailsImpl userDetailsImpl) {
            this.userDetailsImpl = userDetailsImpl;
        }
        @Autowired
        AuthenticationConfiguration authenticationConfiguration;

        @Bean
        public PasswordEncoder bcryptPasswordEncoder() {
            return PasswordEncoderFactories.createDelegatingPasswordEncoder();
        }

        /**
        * 获取AuthenticationManager(认证管理器),登录时认证使用
        * @return
        * @throws Exception
        */
        @Bean
        public AuthenticationManager authenticationManager() throws Exception {
            return authenticationConfiguration.getAuthenticationManager();
        }

        public VerifyCodeFilter verifyCodeFilter() throws Exception {
            VerifyCodeFilter filter = new VerifyCodeFilter(authenticationManager());
            // 自定义接收用户名的参数名为uname
            filter.setUsernameParameter("uname");
            //自定义接收密码的参数名为pwd
            filter.setPasswordParameter("pwd");
            filter.setKaptchaParameter("yzm");
            filter.setFilterProcessesUrl("/doLogin");
            //前后端分离时代自定义认证成功处理
            filter.setAuthenticationSuccessHandler(new MyAuthenticationSuccessHandler());
            //前后端分离时代自定义认证失败处理
            filter.setAuthenticationFailureHandler(new MyAuthenticationFailureHandler());
            return filter;
        }


        @Bean
        @SuppressWarnings("all")
        SecurityFilterChain filterChain(HttpSecurity httpSecurity) throws Exception {
            return
                //开启权限验证
                httpSecurity
                .authorizeRequests()
                //permitAll直接放行,必须在anyRequest().authenticated()前面
                .mvcMatchers("/toLogin").permitAll()
                .mvcMatchers("/vc.img").permitAll()
                //anyRequest所有请求都需要认证
                .anyRequest().authenticated()
                .and()
                //使用form表单验证
                .formLogin()
                .loginPage("/toLogin")
                .and()
                .addFilterAt(verifyCodeFilter(), UsernamePasswordAuthenticationFilter.class)
                //注销
                .logout(logout -> {
                    logout
                        //指定默认注销url,默认请求方式GET
                        //.logoutUrl("/logout")
                        .logoutRequestMatcher(
                            //自定义注销url
                            new OrRequestMatcher(
                                new AntPathRequestMatcher("/aa", "GET"),
                                new AntPathRequestMatcher("/bb", "POST")))
                        //注销成功后跳转页面
                        .logoutSuccessUrl("/toLogin")
                        //前后端分离时代自定义注销登录处理器
                        //                                    .logoutSuccessHandler(new MyLogoutSuccessHandler())
                        //销毁session,默认为true
                        .invalidateHttpSession(true)
                        //清除认证信息,默认为true
                        .clearAuthentication(true)
                        ;})
                //指定UserDetailsService来切换认证信息不同的存储方式(数据源)
                .userDetailsService(userDetailsImpl)
                //禁止csrf跨站请求保护
                .csrf().disable()
                .build();
        }
    }
11.2、前后端分离方式
3、提供生成验证码的接口
private Producer producer;

@Autowired
    public void setProducer(Producer producer) {
    this.producer = producer;
}

@RequestMapping("/cv.img")
    public String verifyCoder(HttpSession session, HttpServletResponse response) throws IOException {
    String verifyCode = producer.createText();
    BufferedImage image = producer.createImage(verifyCode);
    session.setAttribute("verifyCode",verifyCode);
    FastByteArrayOutputStream outputStream = new FastByteArrayOutputStream();
    ImageIO.write(image, "jpg", outputStream);
    return Base64Utils.encodeToString(outputStream.toByteArray());
}
4、自定义Filter
public class JsonLoginFilter extends UsernamePasswordAuthenticationFilter {
    public static final String VERIFY_CODE_KEY = "kaptcha";
    private String kaptchaParameter = VERIFY_CODE_KEY;

    public void setKaptchaParameter(String kaptchaParameter) {
        this.kaptchaParameter = kaptchaParameter;
    }

    public String getKaptchaParameter() {
        return kaptchaParameter;
    }

    public JsonLoginFilter(AuthenticationManager authenticationManager) {
        super(authenticationManager);
    }

    @Override
    public Authentication attemptAuthentication(HttpServletRequest request, HttpServletResponse response) throws AuthenticationException {
        if (!request.getMethod().equals("POST")) {
            throw new AuthenticationServiceException("Authentication method not supported: " + request.getMethod());
        }
        if (request.getContentType().equalsIgnoreCase(MediaType.APPLICATION_JSON_VALUE)) {
            try {
                Map<String, String> map = new ObjectMapper().readValue(request.getInputStream(), Map.class);
                String verifyCode = map.get(getKaptchaParameter());
                String verifyCodeOld = (String) request.getSession().getAttribute("verifyCode");
                if (!ObjectUtils.isEmpty(verifyCode) && !ObjectUtils.isEmpty(verifyCodeOld)
                        && verifyCode.equalsIgnoreCase(verifyCodeOld)) {
                    String username = map.get(getUsernameParameter());
                    username = (username != null) ? username.trim() : "";
                    String password = map.get(getPasswordParameter());
                    password = (password != null) ? password : "";
                    UsernamePasswordAuthenticationToken authRequest = UsernamePasswordAuthenticationToken.unauthenticated(username,
                            password);
                    System.out.println(username);
                    System.out.println(password);
                    setDetails(request, authRequest);
                    return getAuthenticationManager().authenticate(authRequest);
                }
            } catch (IOException e) {
                e.printStackTrace();
            }
        }
        throw new KaptchaNotMatchException("验证码错误");
    }
}
5、配置WebSecurityConfigurer
@Configuration
@EnableWebSecurity
public class WebSecurityConfigurer {

    private UserDetailsImpl userDetailsImpl;

    @Autowired
    public void setUserDetailsImpl(UserDetailsImpl userDetailsImpl) {
        this.userDetailsImpl = userDetailsImpl;
    }

    @Bean
    public PasswordEncoder bcryptPasswordEncoder() {
        return PasswordEncoderFactories.createDelegatingPasswordEncoder();
    }

    @Autowired
    AuthenticationConfiguration authenticationConfiguration;
    /**
     * 获取AuthenticationManager(认证管理器),登录时认证使用
     * @return
     * @throws Exception
     */
    @Bean
    public AuthenticationManager authenticationManager() throws Exception {
        return authenticationConfiguration.getAuthenticationManager();
    }

    @Bean
    public JsonLoginFilter jsonLoginFilter() throws Exception {
        JsonLoginFilter filter = new JsonLoginFilter(authenticationManager());
        filter.setUsernameParameter("uname");
        filter.setPasswordParameter("pwd");
        filter.setKaptchaParameter("yzm");
        //前后端分离时代自定义认证成功处理
        filter.setAuthenticationSuccessHandler(new MyAuthenticationSuccessHandler());
        //前后端分离时代自定义认证失败处理
        filter.setAuthenticationFailureHandler(new MyAuthenticationFailureHandler());
        return filter;
    }

    @Bean
    SecurityFilterChain filterChain(HttpSecurity httpSecurity) throws Exception {
        return
                //开启权限验证
                httpSecurity
                        .authorizeRequests()
                        //permitAll直接放行,必须在anyRequest().authenticated()前面
                        .mvcMatchers("/cv.img").permitAll()
                        //anyRequest所有请求都需要认证
                        .anyRequest().authenticated()
                        .and()
                        //使用form表单验证
                        .formLogin()
                        .and()
                        .addFilterAt(jsonLoginFilter(),UsernamePasswordAuthenticationFilter.class)
                        //注销
                        .logout(logout -> {
                            logout
                                    .logoutRequestMatcher(
                                            //自定义注销url
                                            new OrRequestMatcher(
                                                    new AntPathRequestMatcher("/aa", "GET"),
                                                    new AntPathRequestMatcher("/bb", "POST")))
                                    //前后端分离时代自定义注销登录处理器
                                    .logoutSuccessHandler(new MyLogoutSuccessHandler())
                                    //销毁session,默认为true
                                    .invalidateHttpSession(true)
                                    //清除认证信息,默认为true
                                    .clearAuthentication(true);
                        })
                        //指定UserDetailsService来切换认证信息不同的存储方式(数据源)
                        .userDetailsService(userDetailsImpl)
                        .exceptionHandling()
                        .authenticationEntryPoint((request, response, authException) -> {
                            //response.setContentType(MediaType.APPLICATION_JSON_UTF8_VALUE);
                            response.setHeader("content-type", "application/json;charset=UTF-8");
                            response.setStatus(HttpStatus.UNAUTHORIZED.value());
                            response.getWriter().write("请先认证后重试!");
                        })
                        .and()
                        //禁止csrf跨站请求保护
                        .csrf().disable()
                        .build();
    }
}
相关文章
SpringSecurity入门(一)
SpringSecurity入门(三)
SpringSecurity入门(四)
未完待续
