1 springboot介绍
1)springboot是什么?
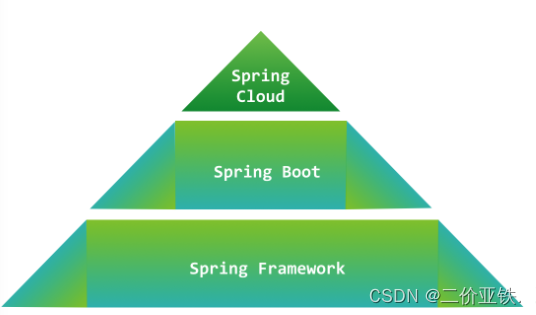
Spring Boot是一个用于简化Java应用程序开发的框架。它基于Spring框架,继承了Spring框架原有的优秀特性,比如IOC、AOP等, 他并不是用来代替Spring的解决方案,而是和Spring框架紧密结合,进一步简化了Spring应用的整个搭建和开发过程通过自动配置和约定优于配置的原则,提供了一种快速构建独立、可部署的Spring应用程序的方式。
Spring Boot减少了开发人员在配置上的工作量,使得开发者能够更专注于业务逻辑的实现。它还提供了丰富的功能和插件,可以轻松集成到各种开发环境和工具中。
再来详细解释一下,如果我们基于SSM框架进行过开发,我们可以理解,Spring在集成SpringMVC、Mybatis时,需要做大量的xml文件配置,在集成其他框架或中间件时,也是同样的道理。而再对比一下SpringBoot开发,我们可以发现,我们只需要引入不同的Starters的maven依赖,就可以开箱即用的进行开发。这就是SpringBoot为我们做的:提供默认的配置方式让我们更容易使用。
2)springboot的发展史
- 2003年Rod Johnson成立Interface公司,产品是SpringFramework
- 2004年,Spring框架开源,公司改名为Spring Source
- 2008年,收购Apache Servlet、Tomcat,为SpringBoot内嵌Web容器奠定基础,整个生态自己掌握
- 2009年,公司被VMWare以4.6亿美金收购被收购后,Spring公司接连收购了很多优秀的开源中间件,比如RabbitMQ、Redis
- 2013年,VMWare、EMC、通用电气三者联合成立Pivotal公司,从这开始,Spring开始一路暴走
- 2014年,推出SpringBoot1.0,基于Spring4.0开发
- 2015年,推出SpringCloud
- 2018年,Pivotal公司上市
- 2018年3月,SpringBoot2.0发布,基于Spring5.0开发
3)为什么要用springboot
优点:
- 快速构建一个独立的 Spring 应用程序 ;
- 嵌入的 Tomcat 、 Jetty 或者 Undertow,无须部署 WAR 文件;
- 提供starter POMs来简化Maven配置和减少版本冲突所带来的问题;
- 对Spring和第三方库提供默认配置,也可修改默认值,简化框架配置;
- 提供生产就绪型功能,如指标、健康检查和外部配置;
- 无需配置XML,无代码生成,开箱即用;
2 springboot的基本使用
1)springboot项目创建
a)快速创建
b)maven项目创建
2) spring的配置文件
a)默认配置文件
application.properties:
mydatasources.user-name=root
mydatasources.pass-word=123456
mydatasources.url=mysql:jdbc://127.0.0.1:3306/goods
mydatasources.map.aaa=123
mydatasources.map.bbb=222
mydatasources.map.ccc=333
mydatasources.student.sno=${server.port}
application.yml:
mydatasources:
    password: 123456
    username: root
    url: mysql:jdbc://127.0.0.1:3306/goods
    nums: 1,3,5,6,8,8,9
b)多环境下配置文件
配置文件命名: application-{profile}.properties
默认的配置文件中指定运行环境: spring.profiles.active=pro
profile的值和spring.profiles.active的值相同:
pro: 生产环境 dev: 开发环境 test: 测试环境
3)常用的注解
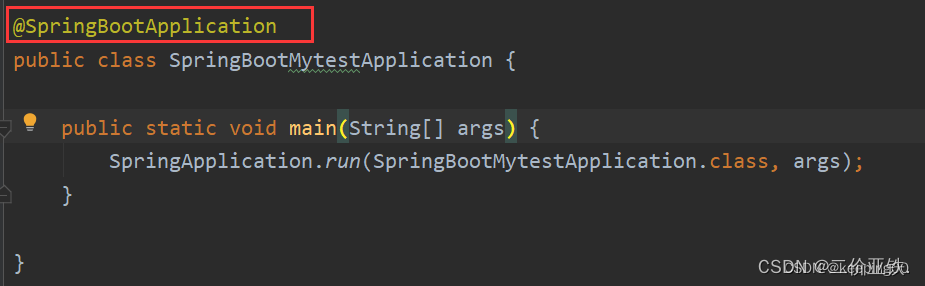
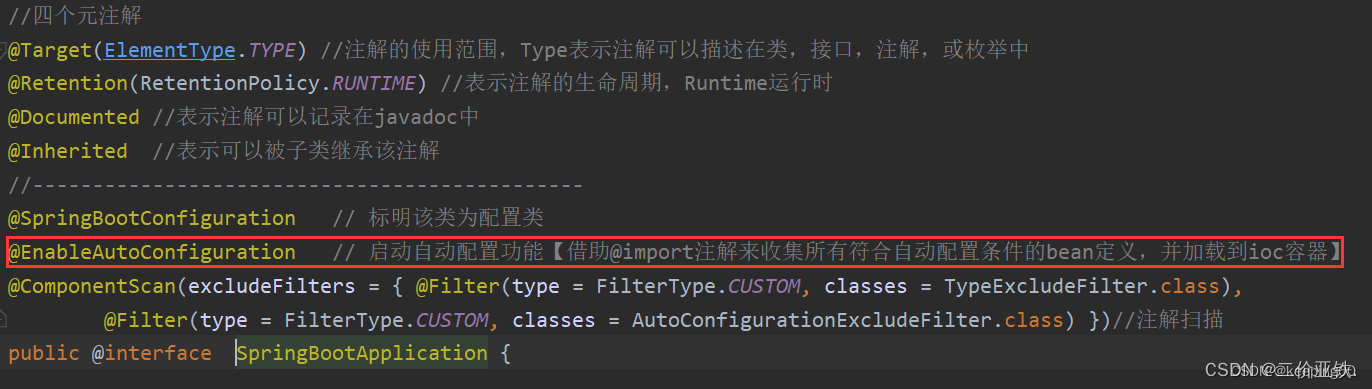
@SpringBootApplication: 这个注解标记一个主要的Spring Boot应用程序类。它组合了@SpringBootConfiguration、@EnableAutoConfiguration和@ComponentScan三个注解,使得应用程序能够自动配置并扫描所需的组件;
@EnableAutoConfiguration: 开启springboot的自动配置;
@ComponentScan: 扫描指定路径下的类上的注解, 交给spring容器管理; 等于spring中xml文件的: context:component-scan/>
@Configuration注解; 声明该类是一个配置类;
@Bean注解: 往spring容器中注入bean, 对应的是spring中xml文件中的bean标签;
@ConfigurationProperties: 只要将类交给spring容器管理, 那么spring容器会自动去配置文件中读取对应的prefix + 属性的值, 封装到对应的属性中; 所以通常搭配, @bean注解或者@Conponent注解,或者@EnableConfigurationProperties注解使用;

出现以上警告, 导入对应依赖:
<dependency>
   <groupId>org.springframework.boot</groupId>
   <artifactId>spring-boot-configuration-processor</artifactId>
</dependency>
同样是从配置文件中取值, 对比之前学过的@Value注解:
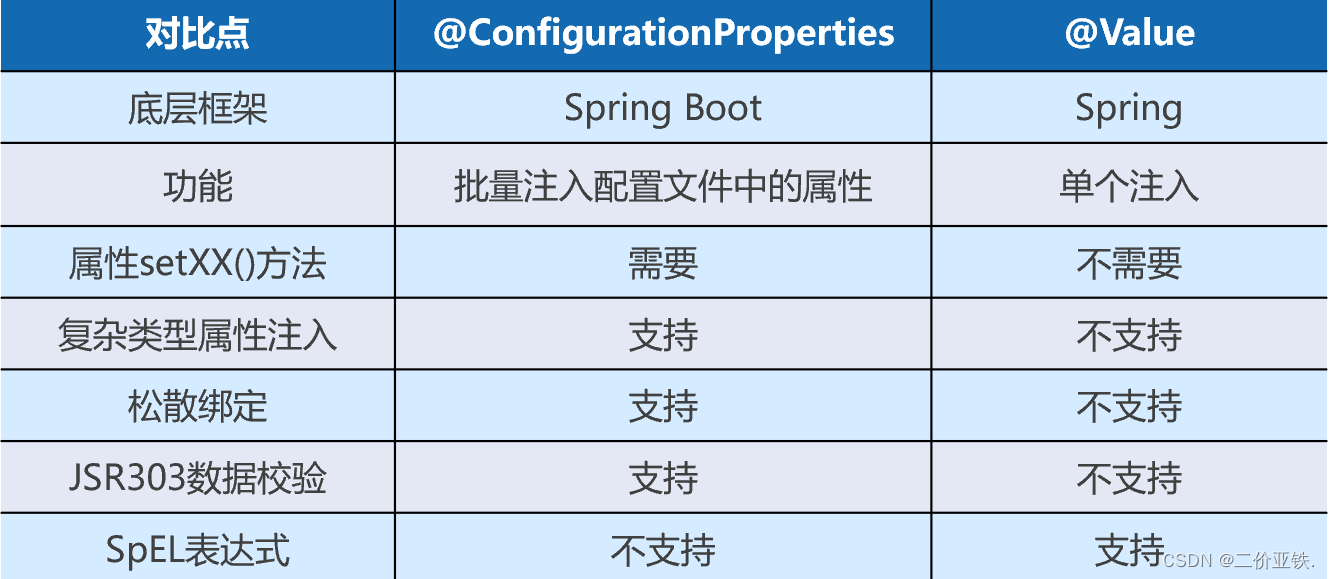
复杂类型数据的注入方式;
随机数以及${xx}的使用:
my.secret=${random.value}
my.number=${random.int}
my.bignumber=${random.long}
my.uuid=${random.uuid}
my.number.less.than.ten=${random.int(10)}
my.number.in.range=${random.int[1024,65536]}
app.name=MyApp
app.description=${app.name} is a Spring Boot application
@EnableConfigurationProperties: 可以将使用@ConfigurationProperties注解对应的类加入Spring容器;
注意:@EnableConfigurationProperties与@Component不能同时使用
@PropertySource: 加载指定的非application.properties默认配置文件;
@profile 注解的作用是指定类或方法在特定的 Profile 环境生效,任何@Component或@Configuration注解的类都可以使用@Profile注解。在使用DI来依赖注入的时候,能够根据@profile标明的环境,将注入符合当前运行环境的相应的bean。
@ImportResource: 加载XML配置文件;
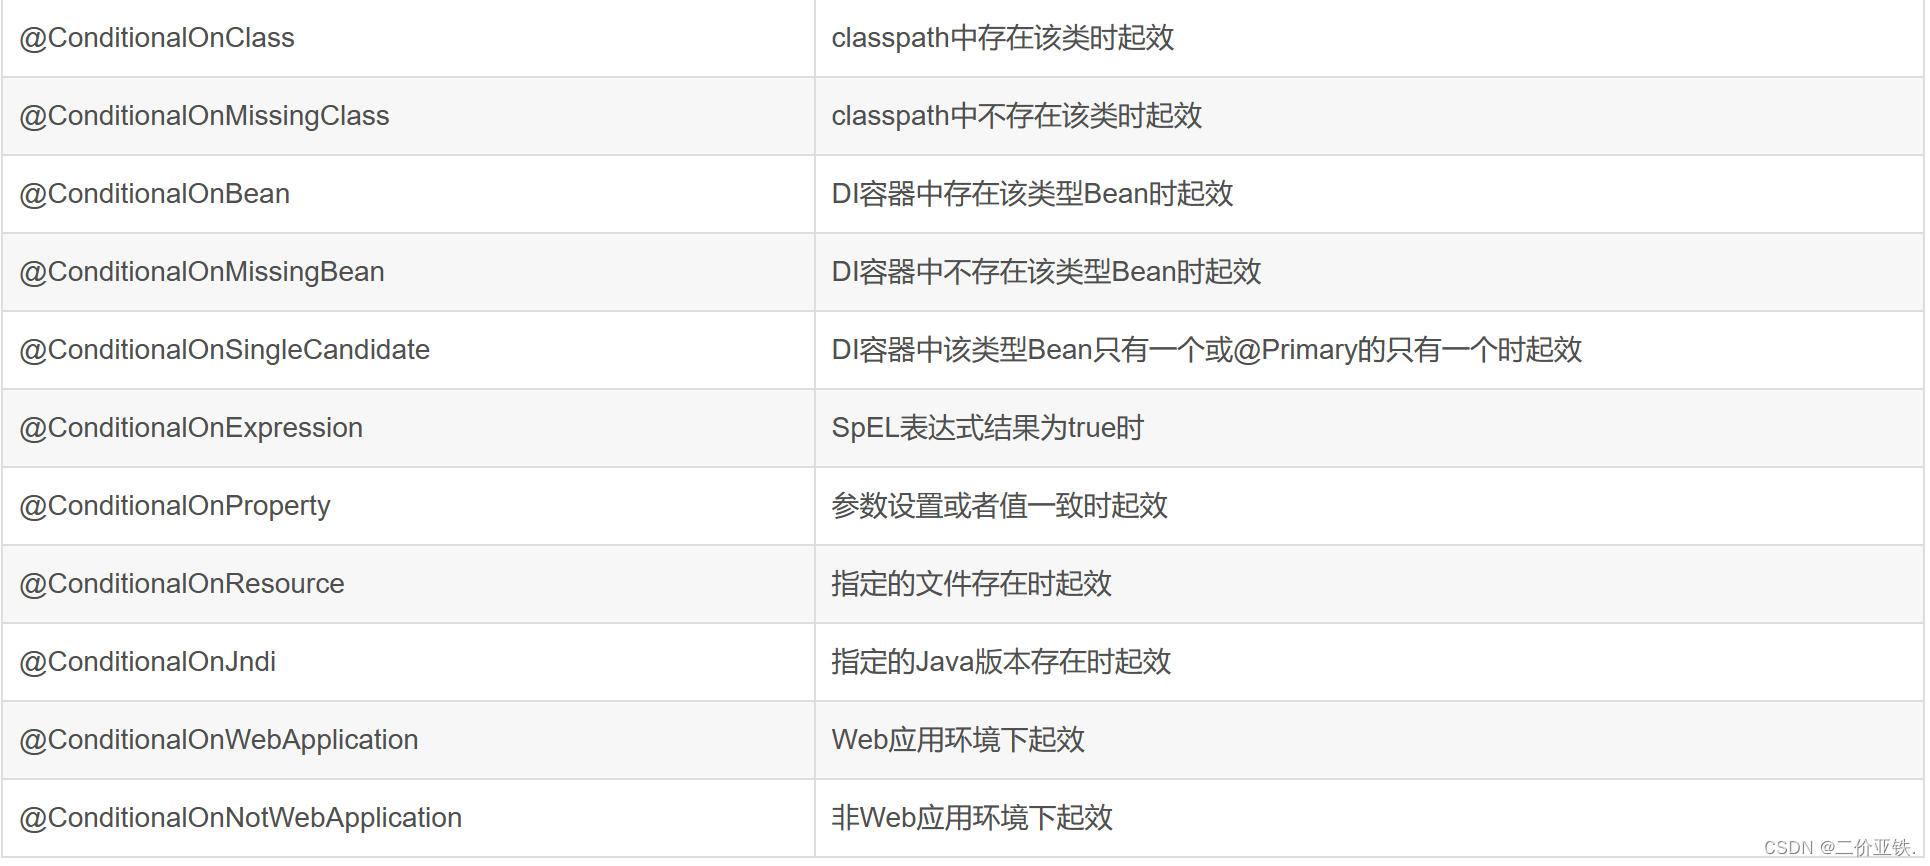
@ConditionalOn相关注解: 根据某些条件决定这个类或者这个方法是否交由spring的ioc去管理;
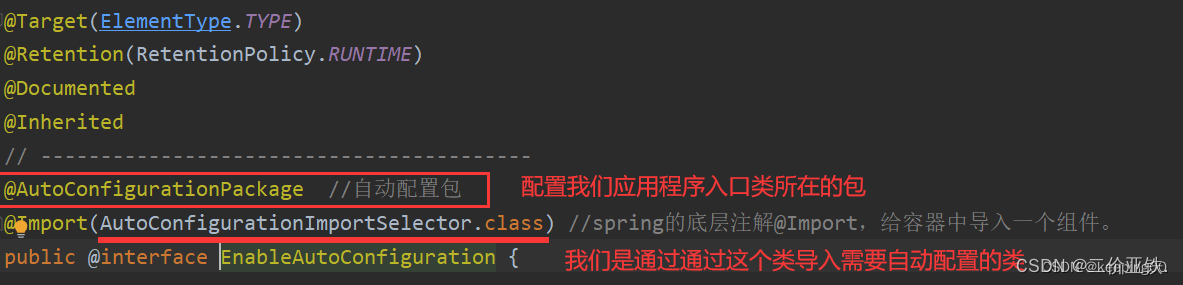
4)自动配置原理
1)运行启动类:
2)通过启动类上的注解, 开启自动配置
3)通过AutoConfigurationImportSelector,导入需要自动配置的类
AutoConfigurationImportSelector中的重要方法:
process方法()【在该方法中调getAutoConfigurationEntry()方法来得到自动配置类放入autoConfigurationEntry对象中】
      public void process(AnnotationMetadata annotationMetadata, DeferredImportSelector deferredImportSelector) {

		// 【1】deferredImportSelector强转为具体的AutoConfigurationImportSelector类型,
// 并调用getAutoConfigurationEntry方法得到自动配置类放入autoConfigurationEntry对象中
			AutoConfigurationEntry autoConfigurationEntry = ((AutoConfigurationImportSelector) deferredImportSelector)
					.getAutoConfigurationEntry(getAutoConfigurationMetadata(), annotationMetadata);

//			【2】又将封装了自动配置类的autoConfigurationEntry对象撞见autoConfigurationEntries集合
			this.autoConfigurationEntries.add(autoConfigurationEntry);

//			【3】遍历刚刚获取的自动配置类
			for (String importClassName : autoConfigurationEntry.getConfigurations()) {

//				这里将符合条件的自动配置类作为key,annotationMetadata作为值存放金enrties集合
				this.entries.putIfAbsent(importClassName, annotationMetadata);
			}


        }
getAutoConfigurationEntry()方法
 protected AutoConfigurationEntry getAutoConfigurationEntry(AnnotationMetadata annotationMetadata) {


//       【1】得到spring.factories文件配置的所有的自动配置类
		List<String> configurations = getCandidateConfigurations(annotationMetadata, attributes);

//		利用LinkedHashSet移除重复的配置类【不同的spring.factories中配置了相同的自动配置类】
		configurations = removeDuplicates(configurations);

//		得到要排除的自动配置类,比如注解属性exclude的配置类
//		比如:@SpringBootApplication(exclude= FreeMarkerAutoConfiguration.class)
//		将会获取到exclude = FreeMarkerAutoConfiguration.class的元注解数据
		Set<String> exclusions = getExclusions(annotationMetadata, attributes);

//		检查要被排除的配置类,因为有些不是自动配置类,故要抛出异常
		checkExcludedClasses(configurations, exclusions);

//		【2】将要排除的配置类移除
		configurations.removeAll(exclusions);

//		【3】因为从spring.factories文件获取的自动配置类太多。如果有些不必要的自动配置类都加载进内存,会造成内存浪费。
//		因此将一些不必要的配置类移除
		configurations = filter(configurations, autoConfigurationMetadata);

//		【4】获取了符合条件的自动配置类后,此时触发AutoConfigurationImportEvent事件
//		目的是告诉ConditionEvaluationReport条件评估报告器对象来记录符合条件的自动配置类
		fireAutoConfigurationImportEvents(configurations, exclusions);

//		【5】将符合条件和要排除的自动配置类封装进AutoConfigurationEntry对象
		return new AutoConfigurationEntry(configurations, exclusions);

    }
自动配置的入口方法: 调用了 process方法还有selectImport方法
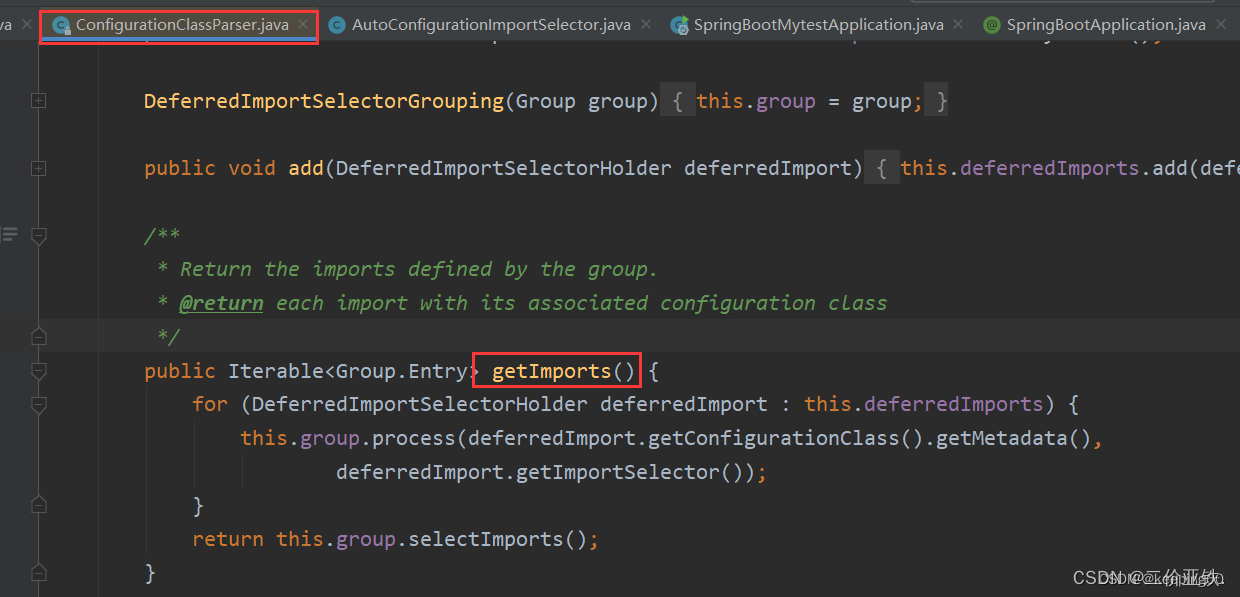
process()方法上面已经详细讲解了,下面看一下selectImport()方法
selectImport()方法详解:
public Iterable<Entry> selectImports() {


//			这里得到所有要排除的自动配置类的set集合
			Set<String> allExclusions = this.autoConfigurationEntries.stream()
					.map(AutoConfigurationEntry::getExclusions).flatMap(Collection::stream).collect(Collectors.toSet());

//			这里得到经过滤后符合条件的自动配置类的set集合
			Set<String> processedConfigurations = this.autoConfigurationEntries.stream()
					.map(AutoConfigurationEntry::getConfigurations).flatMap(Collection::stream)
					.collect(Collectors.toCollection(LinkedHashSet::new));

//			移除掉要排除的自动配置类【exclude】
			processedConfigurations.removeAll(allExclusions);

//			将标有@Order注解的自动配置类进行排序
			return sortAutoConfigurations(processedConfigurations, getAutoConfigurationMetadata()).stream()
					.map((importClassName) -> new Entry(this.entries.get(importClassName), importClassName))
					.collect(Collectors.toList());
		}
下面我们以一个springboot帮我自动配置的类,进行演示:
使用过ssm框架的小伙伴们大概都有这样一个疑问,之前我们使用ssm框架的时候都要在web.xml文件中配置一个Filter用来处理post请求的乱码问题,但是使用springnboot却不会发生这种问题。
这是为什么呢?答案:因为springboot帮助我们自动配置了编码为UTF-8
HttpEncodingAutoConfiguration:这个类,用于帮助我们解决post请求的乱码问题。
HttpEncodingAutoConfiguration源码【详解】:
//表示这是一个配置类,和以前编写的配置文件一样,也可以给容器中添加组件
@Configuration(proxyBeanMethods = false)

//启动指定类【HttpProperties】的ConfigurationProperties功能:将配置文件中对应的值和HttpEncodingProperties绑定起来
@EnableConfigurationProperties(HttpProperties.class)

//spring底层@Conditional注解,根据不同的条件,如果满足指定的条件,整个配置类里面的配置就会生效。
//判断当前应用是否是web应用,如果是,当前配置类生效
@ConditionalOnWebApplication(type = ConditionalOnWebApplication.Type.SERVLET)

//判断当前项目中有没有这个CharacterEncodingFilter:springmvc中解决乱码的乱码的过滤器
@ConditionalOnClass(CharacterEncodingFilter.class)

//判断配置文件中是否存在某个配置 spring.http.encoding.enabled   如果不存在,判断也是成立的
//matchIfMissing=true  表示即使我们配置文件中不配置spring.http.encoding.enabled=true  也是默认生效的
@ConditionalOnProperty(prefix = "spring.http.encoding", value = "enabled", matchIfMissing = true)
public class HttpEncodingAutoConfiguration {


//	它已经和springboot配置文件中的值进行映射了
	private final HttpProperties.Encoding properties;

//	只有有参构造器的情况下,参数的值就会从容器中拿
	public HttpEncodingAutoConfiguration(HttpProperties properties) {

		this.properties = properties.getEncoding();
	}

	@Bean //给容器添加一个组件,这个组件中的某些值需要从properties中获取
	@ConditionalOnMissingBean //判断容器中有没有这个组件
	public CharacterEncodingFilter characterEncodingFilter() {

		CharacterEncodingFilter filter = new OrderedCharacterEncodingFilter();
		filter.setEncoding(this.properties.getCharset().name());
		filter.setForceRequestEncoding(this.properties.shouldForce(Type.REQUEST));
		filter.setForceResponseEncoding(this.properties.shouldForce(Type.RESPONSE));
		return filter;
	}
5)项目部署
jar包的方式部署
a)添加Maven打包插件(不添加一定打包,但是找不到启动类和入口方法)
<build>
		<plugins>
			<plugin>
				<groupId>org.springframework.boot</groupId>
				<artifactId>spring-boot-maven-plugin</artifactId>
			</plugin>
		</plugins>
	</build>
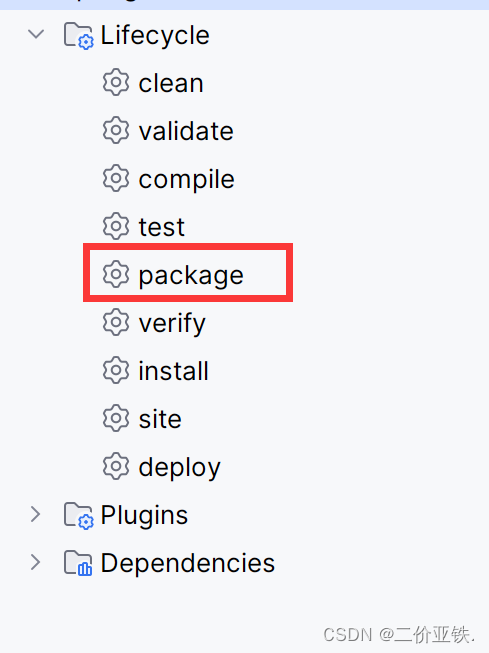
b)使用IDEA开发工具进行打包
c)运行
java -jar *****.jar
war包方式部署
a)手动声明打包方式
<packaging>war</packaging>
b)声明使用外部的tomcat
<dependency>
	<groupId>org.springframework.boot</groupId>
	<artifactId>spring-boot-starter-tomcat</artifactId>
	<scope>provided</scope>
</dependency>
c)提供springboot启动的servlet初始化器
@ServletComponentScan
@SpringBootApplication
public class Chapter05Application extends SpringBootServletInitializer {

     @Override
      protected SpringApplicationBuilder configure(SpringApplicationBuilder builder) {

		return builder.sources(Chapter05Application.class);
	}
      public static void main(String[] args) {

		SpringApplication.run(Chapter05Application.class, args);
	}
}
d) 使用idea打包
e) 将打包的war包发布到tomcat上
6)单元测试
a)在pom文件中添加spring-boot-starter-test测试启动器
<dependency>
	<groupId>org.springframework.boot</groupId>
	<artifactId>spring-boot-starter-test</artifactId>
	<scope>test</scope>
</dependency>
b)编写单元测试类
@RunWith(SpringRunner.class)     //加载spring相关的注解
@SpringBootTest                  //加载项目的上下文
public class App2 {


		@Autowired
        private HelloController helloController;    //输入spring容器对象

        @Test
        public void helloControllerTest() {

            String hello = helloController.hello();
            System.out.println(hello);
        }
}
7)springmvc功能扩展
在Spring Boot项目中,一旦引入了Web依赖启动器spring-boot-starter-web,那么Spring Boot整合Spring MVC框架默认实现的一些XxxAutoConfiguration自动配置类就会自动生效,几乎可以在无任何额外配置的情况下进行Web开发。
那么帮我们自动配置了哪些东西呢?
  1)  内置了两个视图解析器:ContentNegotiatingViewResolver和BeanNameViewResolver;
  2)  支持静态资源以及WebJars
  3)  自动注册了转换器和格式化器
  4)  支持Http消息转换器和消息代码解析器;
  5)  自动初始化Web数据绑定器ConfigurableWebBindingInitializer;
  6)  支持静态项目首页index.html
  7)  支持定制应用图标favicon.ico;
a) 注册视图控制器:
@Configuration
public class MyMVCconfig implements WebMvcConfigurer {


    @Override
    public void addViewControllers(ViewControllerRegistry registry) {

        registry.addViewController("/toLoginPage").setViewName("login");
        registry.addViewController("/login.html").setViewName("login");
    }

}
b)注册自定义拦截器,
实现HandlerInterceptor 接口,在该类中编写如下方法
@Override
public boolean preHandle(HttpServletRequest request, HttpServletResponse response,
                             Object handler) throws Exception {

    String uri = request.getRequestURI();
    Object loginUser = request.getSession().getAttribute("loginUser");
    if (uri.startsWith("/admin") && null == loginUser) {

        response.sendRedirect("/toLoginPage");
        return false;
    }
    return true;
}
在自定义配置类MyMVCconfig中,重写addInterceptors()方法注册自定义的拦截器
@Autowired
private MyInterceptor myInterceptor;
@Override
public void addInterceptors(InterceptorRegistry registry) {

	registry.addInterceptor(myInterceptor)
	             .addPathPatterns("/**")
                             .excludePathPatterns("/login.html");
}
c) 注册servlet
@Component
public class MyServlet extends HttpServlet {

    @Override
    protected void doGet(HttpServletRequest req, HttpServletResponse resp)
		throws ServletException, IOException {

        		this.doPost(req, resp); }
    @Override
    protected void doPost(HttpServletRequest req, HttpServletResponse resp)
		throws ServletException, IOException {

       		 resp.getWriter().write("hello MyServlet");
  }}
@Configuration
public class ServletConfig {

    @Bean
    public ServletRegistrationBean getServlet(MyServlet myServlet){

        ServletRegistrationBean registrationBean =
                                     new ServletRegistrationBean(myServlet,"/myServlet");
        return registrationBean;
    }
}
d) 注册过滤器
@Component
public class MyFilter implements Filter {

    @Override
    public void init(FilterConfig filterConfig) throws ServletException {
      }
    @Override
    public void doFilter(ServletRequest servletRequest, ServletResponse servletResponse,
                           FilterChain filterChain) throws IOException, ServletException {

        System.out.println("hello MyFilter");
        filterChain.doFilter(servletRequest,servletResponse);}
    @Override
    public void destroy() {
   }
}
@Bean
public FilterRegistrationBean getFilter(MyFilter filter){

	FilterRegistrationBean registrationBean = new FilterRegistrationBean(filter);
	registrationBean.setUrlPatterns(Arrays.asList("/toLoginPage","/myFilter"));
	return registrationBean;
}
e)注册监听器
@Component
public class MyListener implements ServletContextListener {

    @Override
    public void contextInitialized(ServletContextEvent servletContextEvent) {

        System.out.println("contextInitialized ..."); }
    @Override
    public void contextDestroyed(ServletContextEvent servletContextEvent) {

        System.out.println("contextDestroyed ...");  }
}
@Bean
public ServletListenerRegistrationBean getServletListener(MyListener myListener){

	ServletListenerRegistrationBean registrationBean =
	new ServletListenerRegistrationBean(myListener);
	return registrationBean;
}
f) 使用路径扫描注册三大件
在对应组件上分别使用@WebServlet(“/annotationServlet”)注解来映射“/annotationServlet”请求的Servlet类,
使用@WebFilter(value = {“/antionLogin”,“/antionMyFilter”})注解来映射“/antionLogin”和“/antionMyFilter”请求的Filter类,
使用@WebListener注解来标注Listener类。
@WebServlet("/annotationServlet")
public class MyServlet extends HttpServlet {

    @Override
    protected void doGet(HttpServletRequest req, HttpServletResponse resp)
                                         throws ServletException, IOException {

        			this.doPost(req, resp); }
    @Override
    protected void doPost(HttpServletRequest req, HttpServletResponse resp)
                                          throws ServletException, IOException {

        			resp.getWriter().write("hello MyServlet"); }}
===================================================================

 @WebFilter(value = {
   "/antionLogin","/antionMyFilter"})
 public class MyFilter implements Filter {

     @Override
     public void init(FilterConfig filterConfig) throws ServletException {
      }
     @Override
     public void doFilter(ServletRequest servletRequest, ServletResponse servletResponse,
                             FilterChain filterChain) throws IOException, ServletException {

         System.out.println("hello MyFilter");
         filterChain.doFilter(servletRequest,servletResponse);}
     @Override
     public void destroy() {
      } }
===================================================================

@WebListener
public class MyListener implements ServletContextListener {

    @Override
    public void contextInitialized(ServletContextEvent servletContextEvent) {

        System.out.println("contextInitialized ..."); }
    @Override
    public void contextDestroyed(ServletContextEvent servletContextEvent) {

        System.out.println("contextDestroyed ..."); }
}
@SpringBootApplication
@ServletComponentScan  // 开启基于注解方式的Servlet组件扫描支持
public class Chapter05Application {

	public static void main(String[] args) {

		SpringApplication.run(Chapter05Application.class, args);
	}
}
3 thymeleaf视图
1)thymeleaf的配置
spring.thymeleaf.cache = true
spring.thymeleaf.encoding = UTF-8
spring.thymeleaf.mode = HTML5
spring.thymeleaf.prefix = classpath:/templates/
spring.thymeleaf.suffix = .html
2)thymeleaf的基本使用
ssm框架中已经学过
3)thymleaf国际化
a)准备国际化文件
login.properties, login_zh_CN.properties
login.tip=请登录
login.username=用户名
login.password=密码
login.rememberme=记住我
login.button=登录
login_en_US.properties
login.tip=Please sign in
login.username=Username
login.password=Password
login.rememberme=Remember me
login.button=Login
b) 配置国际化基础名
# 配置国际化文件基础名
spring.messages.basename=i18n.login
e) 定制区域化解析器
@Configuration
public class MyLocaleResovel implements LocaleResolver {


    @Override
    public Locale resolveLocale(HttpServletRequest httpServletRequest) {

        //获取请求的utl地址后拼接的l的值
        String l = httpServletRequest.getParameter("l");
        //获取到请求头中Accept-Language的值
        String header = httpServletRequest.getHeader("Accept-Language");
        Locale locale=null;
        //如果请求的url中带了l
        if(!StringUtils.isEmpty(l)){

            //使用_分割  第一个参数是语言  第二个参数是国家
            String[] split = l.split("_");
            locale=new Locale(split[0],split[1]);
        }else {

            //如果请求url地址中不带l 从请求头中分割出语言  和  国家
            String[] splits = header.split(",");
            String[] split = splits[0].split("-");
            locale=new Locale(split[0],split[1]);}
        return locale;
    }
    @Override
    public void setLocale(HttpServletRequest httpServletRequest, HttpServletResponse httpServletResponse, Locale locale) {


    }
    @Bean
    public LocaleResolver localeResolver(){

        return new MyLocaleResovel();
    }
}
f)国际化页面 login.html
<!DOCTYPE html>
<html lang="en" xmlns:th="http://www.thymeleaf.org">
<head>
    <meta http-equiv="Content-Type" content="text/html; charset=UTF-8">
    <meta name="viewport" content="width=device-width, initial-scale=1,shrink-to-fit=no">
    <title>用户登录界面</title>
    <link th:href="@{/login/css/bootstrap.min.css}" rel="stylesheet">
    <link th:href="@{/login/css/signin.css}" rel="stylesheet">
</head>
<body class="text-center">
<!--  用户登录form表单 -->
<form class="form-signin">
    <img class="mb-4" th:src="@{/login/img/login.jpg}" width="72" height="72">
    <h1 class="h3 mb-3 font-weight-normal" th:text="#{login.tip}">请登录</h1>
    <input type="text" class="form-control"
           th:placeholder="#{login.username}" required="" autofocus="">
    <input type="password" class="form-control"
           th:placeholder="#{login.password}" required="">
    <div class="checkbox mb-3">
        <label>
            <input type="checkbox" value="remember-me"> [[#{login.rememberme}]]
        </label>
    </div>
    <button class="btn btn-lg btn-primary btn-block" type="submit" th:text="#{login.button}">登录</button>
    <p class="mt-5 mb-3 text-muted">© <span th:text="${currentYear}">2018</span>-<span th:text="${currentYear}+1">2019</span></p>
    <a class="btn btn-sm" th:href="@{/login(l='zh_CN')}">中文</a>
    <a class="btn btn-sm" th:href="@{/login(l='en_US')}">English</a>
</form>
</body>
</html>
4)动态页面静态化
a)准备工作: 点击某个商品, 可以跳转到该商品对应的详情页面
b)修改controller中取到详情页面的控制器
 @GetMapping("/goods/{id}.html")
        public String goods(Model model,@PathVariable Integer id) throws Exception {

                //判断是否生成过该商品的静态页面
                if(!goodsService.isExists(id)){
     //如果没有生成  就直接去生成静态页面
                    Goods goods =   goodsService.createHTML(id);
                    model.addAttribute("goods",goods);
                    return "detail";
                }else {
     //如果已经生成过, 那么就直接返回静态页面
                        return id.toString();
         }
 }
c)使用模板引擎生成静态页面
thymeleaf.static.path=E:\\wsj\\springboot\\springboot-thymeleaf\\src\\main\\resources\\templates\\
    @Value("${thymeleaf.static.path}")
    private String htmlPath;

    @Autowired