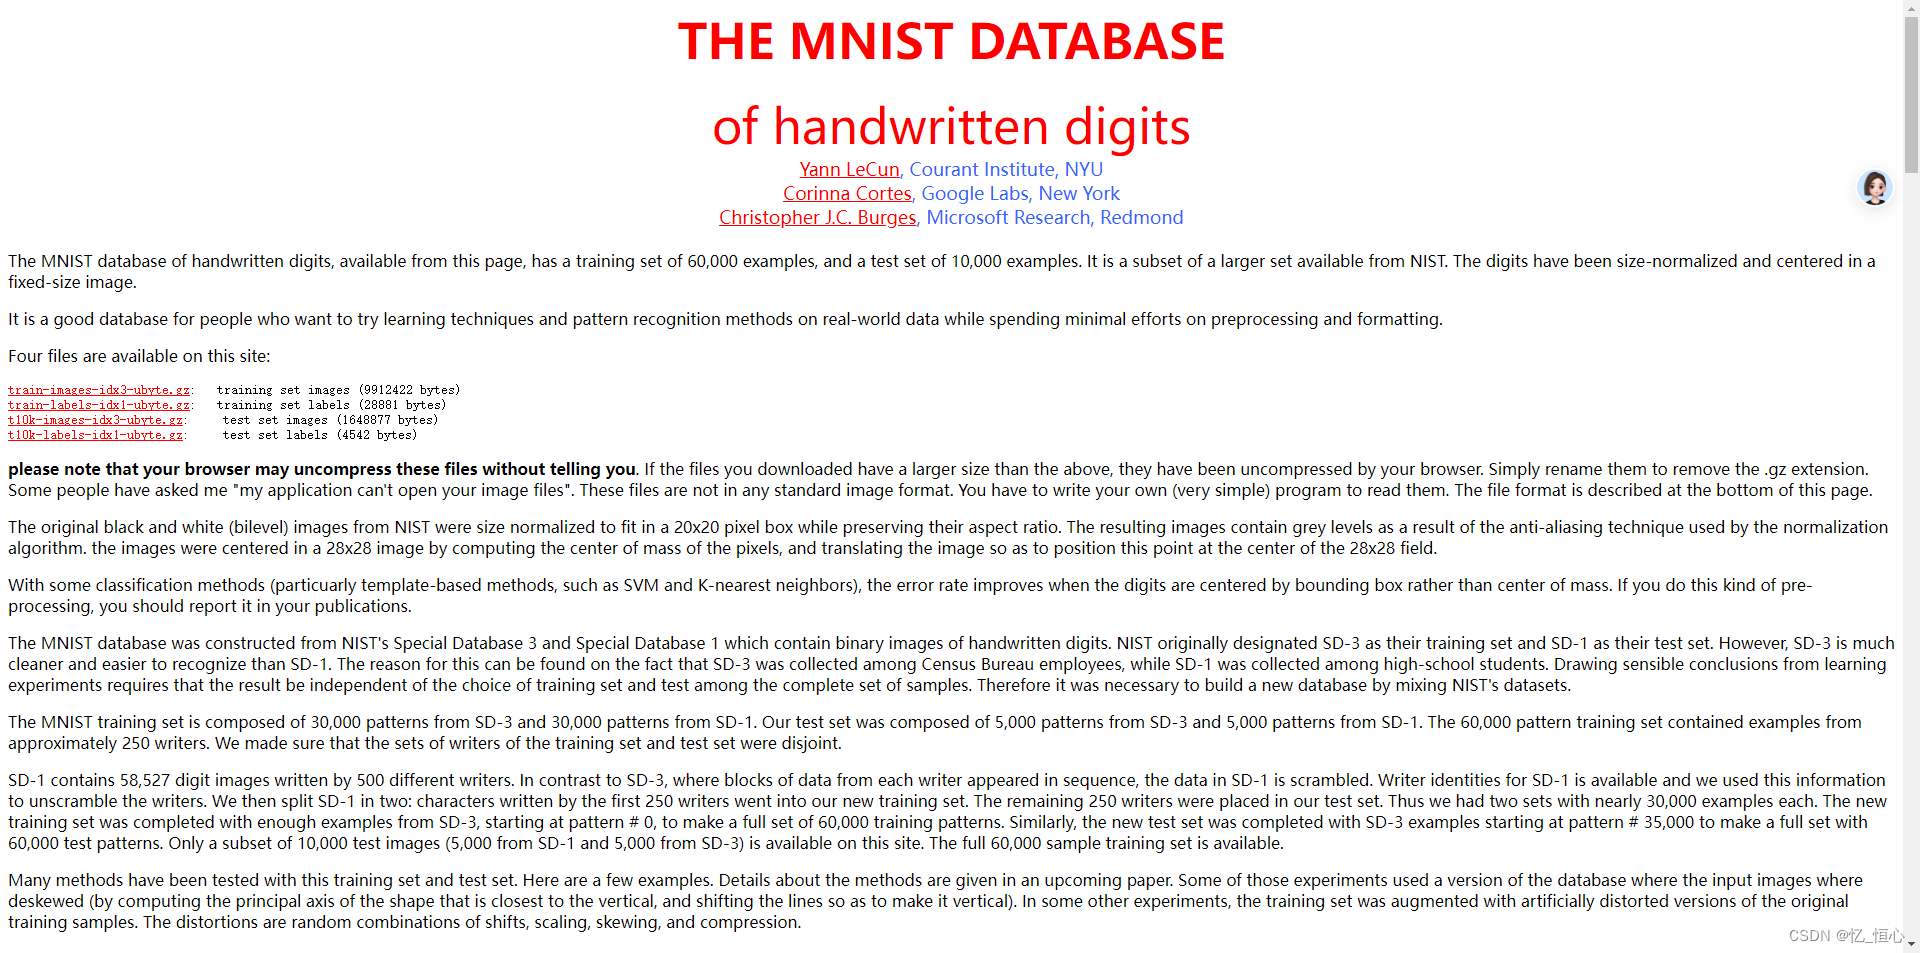
[spring] Spring MVC & Thymeleaf(上)
本章内容主要过一下简单的 Spring MVC 的案例
简单来说,spring mvc 就是比较传统的网页开发流程,目前 boot 是可以比较轻松的配置 thymeleaf——毕竟 spring boot 内置对 thymeleaf 的支持
thymeleaf 是一个模板引擎,目前看起来是简单很多——我还依稀记得当年使用 JSP 写 spring mvc 的日子,那写的是真的很痛苦……
简单的 demo
这里就放一个超简单的 demo,能让页面跑起来就行
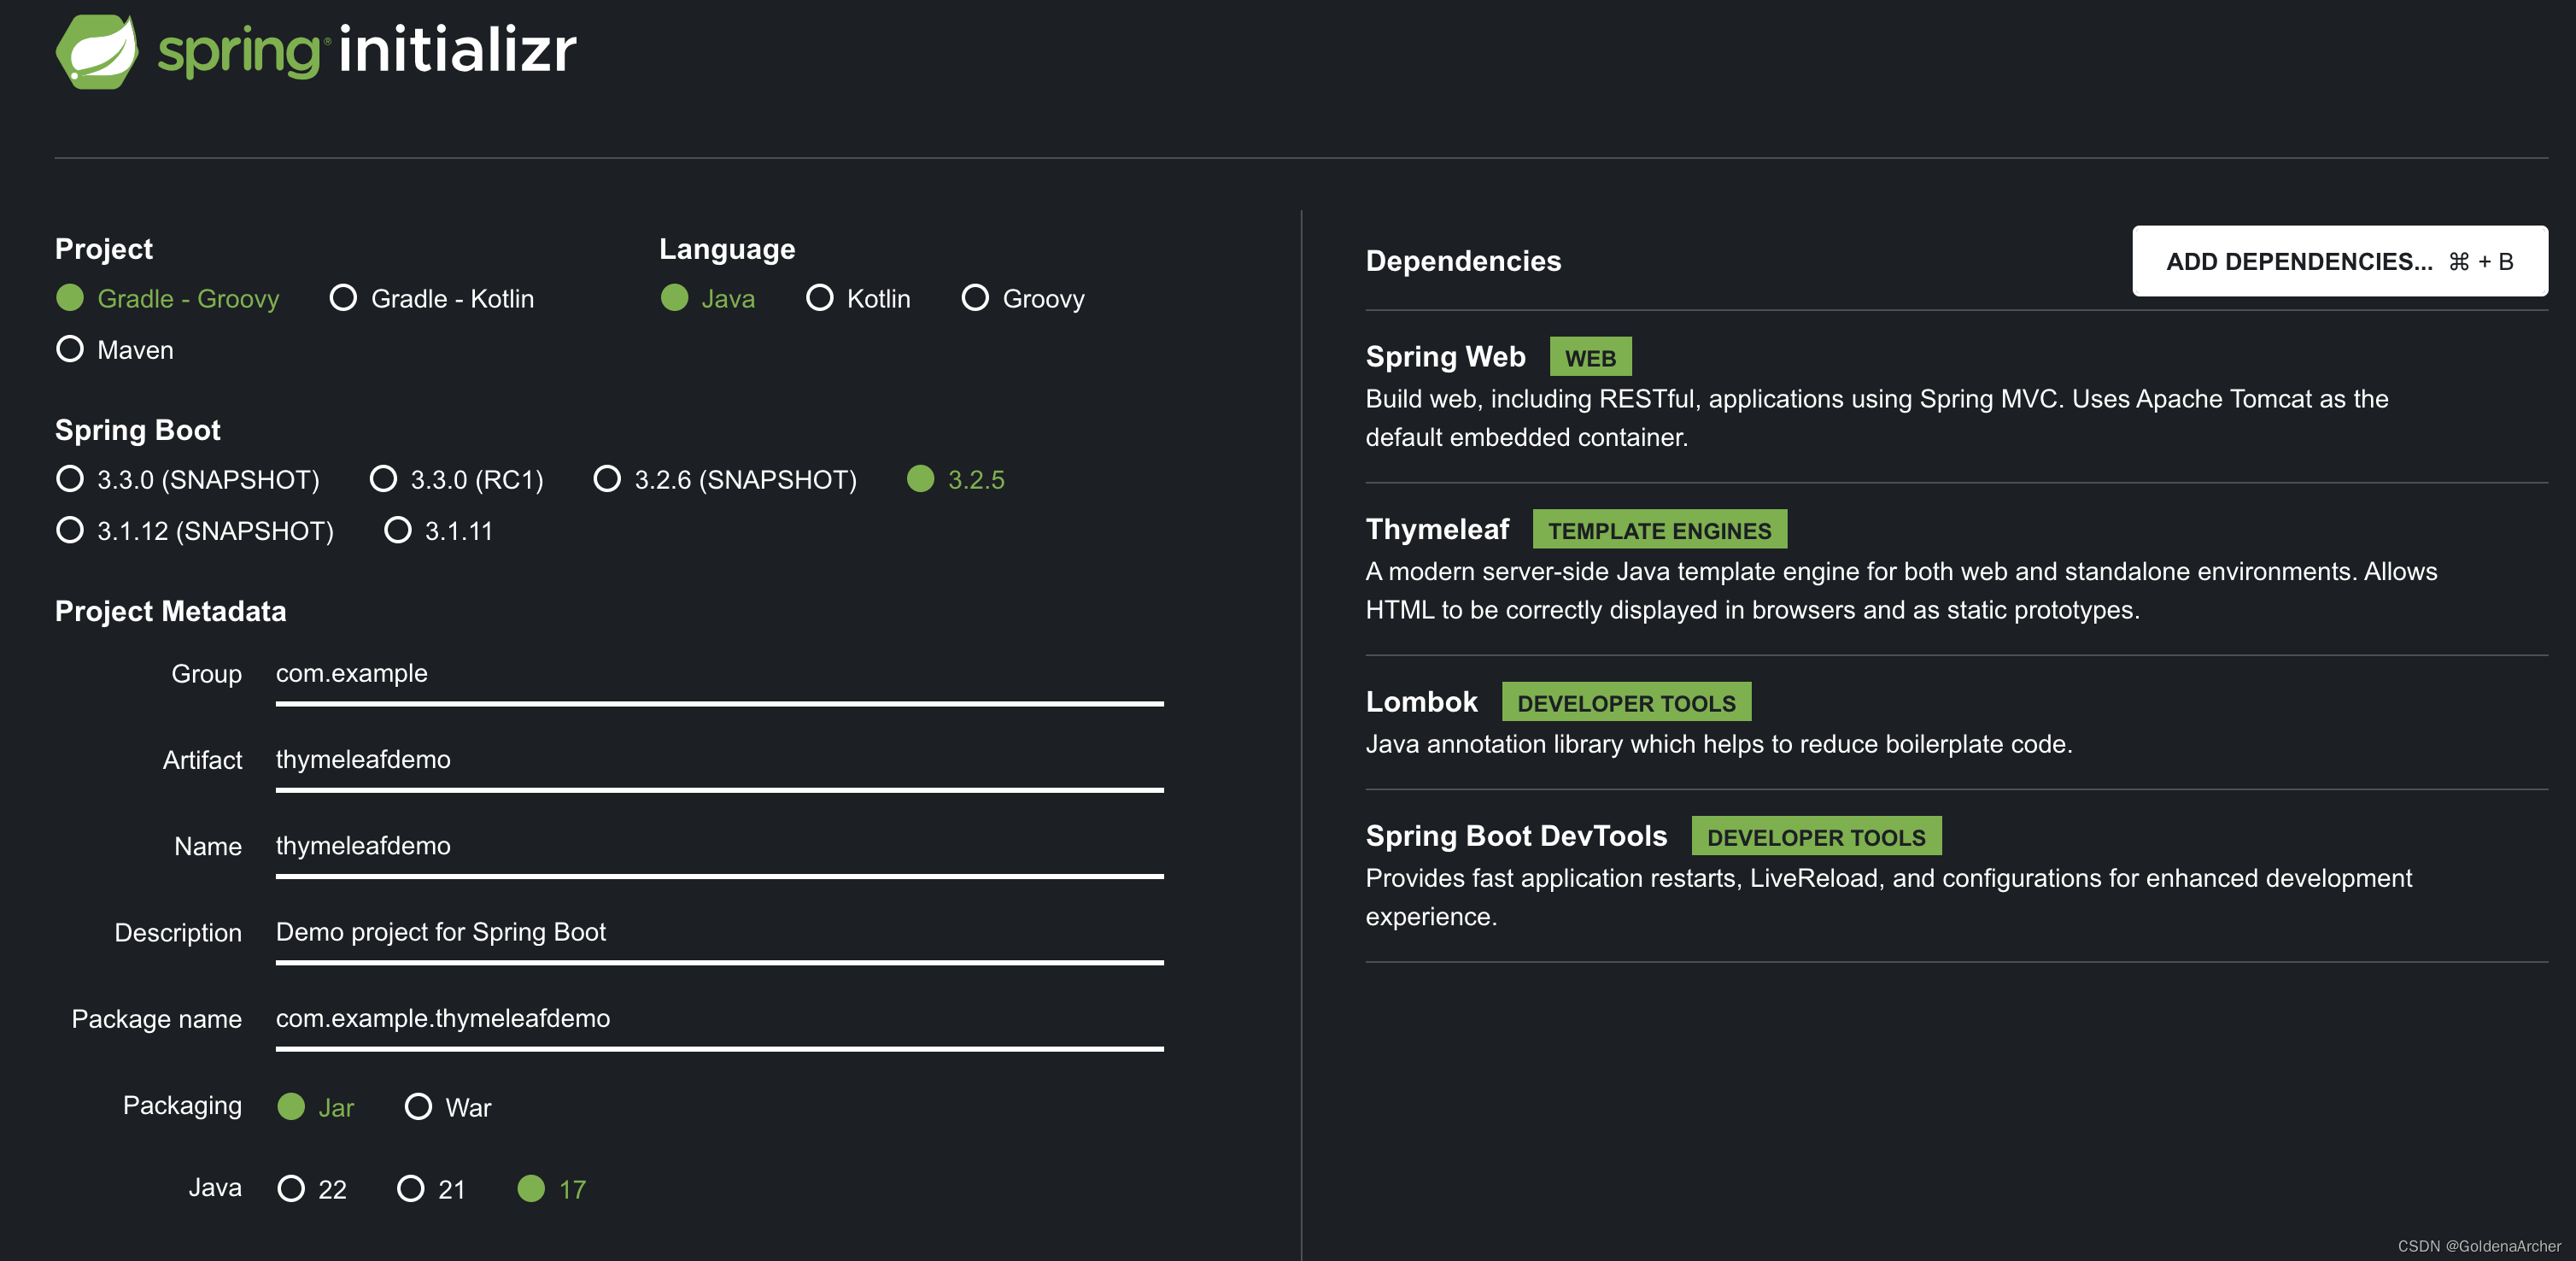
spring boot initializer
这里主要用的就是这 4 个包,下里用的案例会多一个依赖
实现简单 demo
因为是 spring mvc,所以肯定是需要有 Mocel-View-Controller 三个实现的。不过这个 demo 里面因为不涉及到数据的交互,所以没有 model
具体实现如下:
-
controller
package com.example.thymeleafdemo.controller; import org.springframework.stereotype.Controller; import org.springframework.ui.Model; import org.springframework.web.bind.annotation.GetMapping; @Controller public class DemoController { // create a mapping for "/hello" @GetMapping("/hello") public String sayHello(Model model) { model.addAttribute("date", java.time.LocalDateTime.now()); return "helloworld"; } }-
@Controller的实现都比较熟悉了,这代表这是一个 Controller 的注解。因为这不是一个前后端分离的 rest api 实现,所以这里不需要使用@RestController,也不需要做 request mapping -
@GetMapping这个就比较熟悉了,当用户访问http://localhost:8080/hello是就会调用当前方法 -
sayHello是方法名,它返回的是一个字符串,而这个字符串代表着 view 的名字。以 thymeleaf 为例,spring mvc 会找到对应的模板渲染 view 层,这个也是下面会提到的实现的模板引擎的文件名为这里返回的字符串,即
helloworld.html -
Model model是 spring 在察觉到当前方法是 controller 的方法时,自动进行绑定的参数。view 层可以直接调用 model 里被添加的属性——model.addAttribute("date", java.time.LocalDateTime.now());,也就是date这个属性
-
-
view
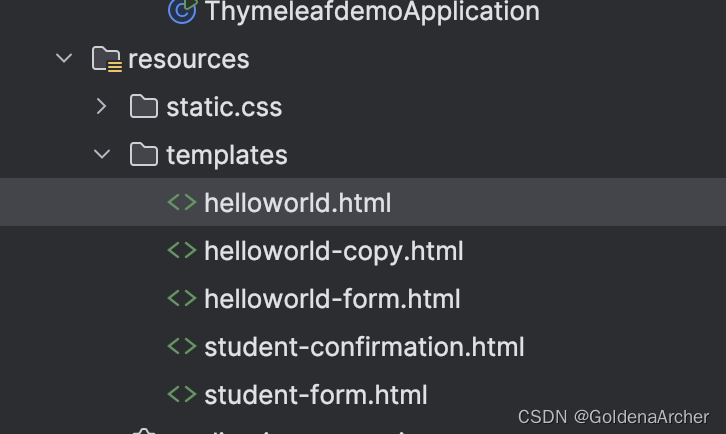
view 层具体在的位置位于 resources/templates 下:
实现为:
<!DOCTYPE html>
<html lang="en" xmlns:th="http://www.thymeleaf.org">
  <head>
    <meta charset="UTF-8" />
    <link rel="stylesheet" th:href="@{/css/demo.css}" />
    <title>Title</title>
  </head>
  <body>
    <p th:text="'Time on the server is ' + ${date}" class="funny"></p>

    <script src="http://localhost:35729/livereload.js"></script>
  </body>
</html>
这里的的视线相对比较简单,基础的 HTML 就不谈了
-
xmlns:th="http://www.thymeleaf.org是 thymeleaf 的命名空间,也就是说下面都可以通过th:<attr>使用 thymeleaf 特有的属性 -
<link rel="stylesheet" th:href="@{/css/demo.css}" />使用的就是 thymeleaf 的语法,这里会自动解析路径去寻找对应的 css 文件,也就是在static/css/demo.css这个文件 -
<p th:text="'Time on the server is ' + ${date}" class="funny"></p>这里用的是一个新的 thymeleaf 的语法,th:text可以将后面的表达式,也就是'Time on the server is ' + ${date}写入到 element 中${date}就是在 controller 中传到 model 的属性,可以通过${}的方式获得 -
<script src="http://localhost:35729/livereload.js"></script>是一个热更新的脚本,在开启了 devtool 之后可以实现保存后 HTML 页面自动更新的功能换言之不需要刷新页面,也不需要重启服务器……就是稍微有些慢……
-
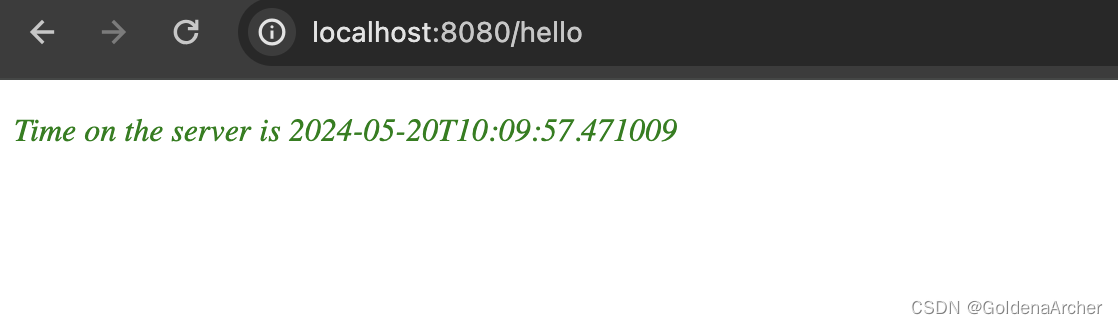
效果如下:
简述 MVC 的工作原理
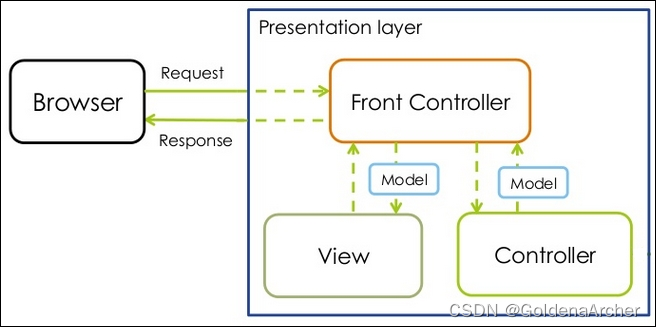
这张图可以描述 spring mvc 的流程是什么样的
首先,浏览器会访问 front controller 组件——spring mvc 中一般指的是 DispatcherServlet,它会:
- 集中处理所有的 HTTP 请求,并通过 URL mapping,将对应的 http 请求委托给对应的 handler/controller 进行处理
- 解析 view 层
- 处理 model,并与 model 和 view 层进行交互,实现 MVC 整体的数据交互
一般来说,front controller, controller, model, view 是四个比较高度抽象化的概念,它们的实施可以通过具体的组件去实现,如:
DispatcherServlet是 front controller 的组件@Controller&@RestController是 controller 的 bean/class@Model显而易见的是 model 的组件- JSP/Thymeleaf 是 view 的组件等
- spring 配置文件,如 XML,注解,java 配置文件等,也是 spring 的组件
总体来说,这些组件 spring 队伍已经进行实现完毕,并且内部完成了对应的配置,所以开发需要做的事情就是使用这些组件,将具体的业务填写完毕即可,如:
-
model
声明必要的 entity 并添加对应的属性;通过 front controller 进行 controller 层和 view 层的沟通
-
view
实现 thymeleaf/jsp 等支持的引擎模板,从 front controller 获取数据,并进行对应的处理以完成 UI 层面的渲染
-
controller
与 service 层进行沟通,获取并处理对应的数据,并将其处理为 view 层所需的 model 送到 front controller 去
一般来说,业务逻辑会从 controller 中抽离出来,以保证 SPR 和代码的低耦合性,不过这篇笔记不会涉及到 crud 的操作,因此可以暂时忽略 service 层
表单 demo
下面写一个 MVC 之间互动的 demo,这样可以更好理解上一个部分中比较抽象的概念
业务逻辑如下:
这里省略掉了 front controller 的存在,毕竟这部分是 spring 已经实现好并且封装起来的功能
具体的实现流程如下:
-
创建 controller
-
展示 view 层,即渲染引擎模板
这里具体要实现的功能也分为两步:
- 创建对应的 controller 方法去显示 html 表单
- 创建 HTML 模板去显示页面
这两步必须要全部实现,才能通过访问对应的 URL 渲染对应的模板引擎
-
处理 HTML 表单
根据上面的流程图所说,view 需要通过
/processForm去和 controller 进行交互,这个过程中,view 会将用户填写的数据传给 controller这一步处理的过程和上面大致是一样的逻辑:
-
创建对应的 controller 方法去处理传来的数据,并显示处理完的页面
-
创建 HTML 模板去显示页面
-
controller 初始代码
package com.example.thymeleafdemo.controller;

import org.springframework.stereotype.Controller;
import org.springframework.web.bind.annotation.RequestMapping;

@Controller
public class HelloWorldController {
    // need a controller method to show initial HTML form
    @RequestMapping("/showForm")
    public String showForm() {
        return "helloworld-form";
    }

    // need a controller method to process HTML form
    @RequestMapping("/processForm")
    public String processForm() {
        return "helloworld";
    }
}
这里没有什么特别复杂的地方,和上面简单 demo 提到的一样
模板引擎初始代码
这里要实现的是两个模板引擎,一个是 helloworld-form.html,用来显示表单,让用户填写数据;一个是 helloworld,这是 controller 收集了用户提交的数据后,新定向的页面,这里将会显示用户输入的数据
具体实现如下:
-
helloworld-form
<!DOCTYPE html> <html lang="en" xmlns:th="http://www.thymeleaf.org"> <head> <meta charset="UTF-8" /> <title>Hello World - Input Form</title> </head> <body> <form th:action="@{/processForm}" method="get"> <input type="text" name="studentName" placeholder="Student Name" /> <input type="submit" value="Submit" /> </form> <script src="http://localhost:35729/livereload.js"></script> </body> </html> -
helloworld
<!DOCTYPE html>
<html lang="en" xmlns:th="http://www.thymeleaf.org">
  <head>
    <meta charset="UTF-8" />
    <title>Title</title>
  </head>
  <body>
    Hello World of Spring!
    <br />
    <br />

    Student name: <span th:text="${param.studentName}"></span>

    <script src="http://localhost:35729/livereload.js"></script>
  </body>
</html>
这里简单的过一遍两个模板都做了什么,第一个 helloworld-form 会渲染一个表单,用户可以通过表单输入数据,并且提交数据。这里提交的方式是 get,所以提交的数据会添加到 URL 路径上;同时 action 中的路径是 @{/processForm},这也是 thymeleaf 的语法,表示会 map 到对应的 /processForm,也就是 controller 中的 @RequestMapping("/processForm") 对应的方法
helloworld 会渲染已经处理好的数据,并且通过 URL 获取用户提交的数据并将其渲染到页面上,效果如下:

使用 model
之前是直接使用 query parameter 通过 URL 去进行数据传递,不过这只能用在 GET 方法上,如果要使用 POST,那么就需要使用 request body 进行和 controller 的沟通
这个情况下,controller 可以通过 HttpServletRequest 或者 @RequestParam("attributeName") 的方式,从模板引擎那里获取对应的资料,具体实现方式如下:
controller 修改:
    // need a controller method to read from data and add data to the model
    @RequestMapping("/processFormV2")
    public String formWithModel(HttpServletRequest request, Model model) {
        // read req param from html form
        String name = request.getParameter("studentName");
        // convert data to all caps
        name = name.toUpperCase();
        // create the message
        String result = "Yo! " + name;
        // add message to the model
        model.addAttribute("message", result);
        return "helloworld";
    }
注意这里是通过 HttpServletRequest 获取对应的数据,HttpServletRequest 通过 dependency injection 动态完成注入的。在使用 GetMapping 的情况下,HttpServletRequest 会从 URL 的 query string 上获取对应数据;在 PostMapping 的情况下,HttpServletRequest 会从 request body 中动态获取,默认的格式为 Content-Type: application/x-www-form-urlencoded
⚠️:我这里用的是 @RequestMapping("/processFormV2"),最好是使用单独的 PostMapping 或 GetMapping 去增强安全性
HTML 部分省略了,主要就是修改一下 form 请求的地址,变更为 processFormV2,随后就是获取信息的方式为 The message: <span th:text="${message}"></span>
完成修改后的结果如下:

绑定 request params
这是上面提到的,使用注解的方式获取信息:
    // need a controller method to read from data and add data to the model
    @RequestMapping("/processFormV3")
    public String formWithModel(@RequestParam("studentName") String name, Model model) {
        // convert data to all caps
        name = name.toUpperCase();
        // create the message
        String result = "Using Annotation! " + name;
        // add message to the model
        model.addAttribute("message", result);
        return "helloworld";
    }
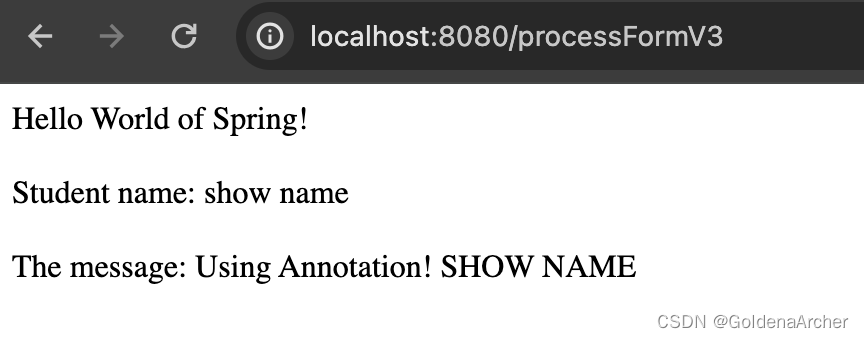
HTML 模板方面,同样将指向的地址从 v2 修改到 v3 就可以,效果如下:

GetMapping & PostMapping
这是上面提到的安全性问题,从开发实现的角度来说,其实不太需要特别在意 spring 底层是怎么完成依赖注入的。不过从语义化开发和安全性的角度,分别使用 @PostMapping 和 @GetMapping 还是挺重要的,一般来说:
-
GET是用来获取数据的(Retrieve),而POST是用来发送数据的(Create, Update, Delete) -
GET的数据传送通过 URL Query Param,而POST通过 body request -
GET的安全性更低,而POST安全性更高 -
GET可以被用来保存书签,而POST不可以 -
GET长度限制比较大,而POST的长度限制比较小一般情况下
GET是够用的,毕竟好像有 8000 个左右的字符,我只遇到过一个情况被后台拒绝了……那就是老板想要穷举一堆 AND/OR 的操作让后台可以直接拼接到数据库了去搜索,结果就……超过限制了……
目前 HTML 模板中使用的都是 GET ,如果 Spring 这里使用 @PostMapping 的话,那么 spring 就会抛出 method not allow 的错:

所以这部分还是要注意的,如果特地规范了 @PostMapping 或 @GetMapping,那么 HTML 部分也要进行对应的更新,如:
    @PostMapping("/showForm")
    public String showForm() {
        return "helloworld-form";
    }
以及
    @GetMapping("/processFormV3")
    public String formWithModel(@RequestParam("studentName") String name, Model model) {
        // convert data to all caps
        name = name.toUpperCase();
        // create the message
        String result = "Using Annotation! " + name;
        // add message to the model
        model.addAttribute("message", result);
        return "helloworld";
    }
更换成 POST 的效果展现如下:
这里数据就不会从 URL 中传递,反而是通过 request body:

数据绑定
前面一直手动获取 request body 中的数据,不过,其实 spring 也提供数据绑定,回顾一下这张图:
数据绑定就是直接对数据进行一个预处理,将数据绑定到对应的 POJO 上,省去了很多的手动操作。下面是具体的实现:
实现一个 POJO:
package com.example.thymeleafdemo.model;

import lombok.Data;
import lombok.NoArgsConstructor;
import lombok.ToString;

@Data
@NoArgsConstructor
@ToString
public class Student {
    private String firstName;
    private String lastName;
}
更新 controller,使用新注解 @ModelAttribute
package com.example.thymeleafdemo.controller;
import com.example.thymeleafdemo.model.Student;
import org.springframework.stereotype.Controller;
import org.springframework.ui.Model;
import org.springframework.web.bind.annotation.GetMapping;
import org.springframework.web.bind.annotation.ModelAttribute;
import org.springframework.web.bind.annotation.PostMapping;
@Controller
public class StudentController {
@GetMapping("/showStudentForm")
public String showForm(Model model) {
// create a student obj
Student student = new Student();
// add student obj to the model
model.addAttribute("student", student);
return "student-form";
}
@PostMapping("/processStudentForm")
public String processForm(@ModelAttribute("student") Student student) {
// log the input data
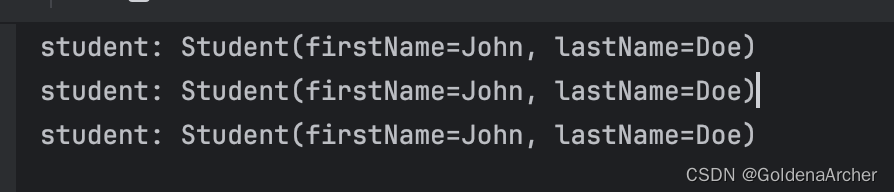
System.out.println("student: " + student.toString());
return "student-confirmation";
}
}
⚠️:这里 @ModelAttribute("student") 的名字,必须要和下面 thymeleaf 中的 object 一致
更新 HTML 模板:
<!DOCTYPE html>
<html lang="en" xmlns:th="http://www.thymeleaf.org">
  <head>
    <meta charset="UTF-8" />
    <title>Student Form</title>
  </head>
  <body>
    <h3>Student Registration Form</h3>

    <form
      th:action="@{/processStudentForm}"
      th:object="${student}"
      method="post"
    >
      First Name: <input type="text" th:field="*{firstName}" />

      <br /><br />

      Last Name: <input type="text" th:field="${student.lastName}" />

      <br /><br />

      <input type="submit" value="Submit" />

      <script src="http://localhost:35729/livereload.js"></script>
    </form>
  </body>
</html>
⚠️:这里的 th:object="${student}" 就是 @ModelAttribute("student") 中的 student,这里的名字必须一致
<!DOCTYPE html>
<html lang="en" xmlns:th="http://www.thymeleaf.org">
  <head>
    <meta charset="UTF-8" />
    <title>Student Confirmation</title>
  </head>
  <body>
    <h3>Student Confirmation</h3>

    The student is confirmed:
    <span th:text="${student.firstName} + ' ' + ${student.lastName}"></span>

    <script src="http://localhost:35729/livereload.js"></script>
  </body>
</html>
⚠️:这里的 student 是手动通过 model.addAttribute("student", student); 进行绑定的
最终效果如下:

thymeleaf 属性
这里新增一些比较常用的 thymeleaf 的表单属性的用法
下拉框
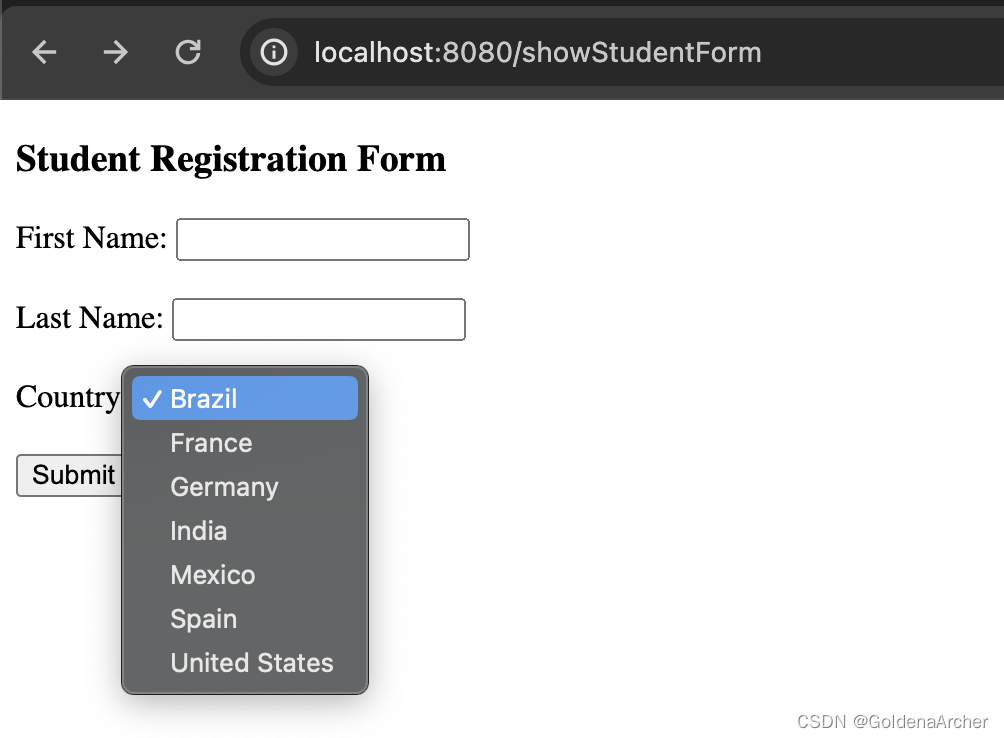
即 dropdown,一个比较死板的写法如下:
<select th:field="*{country}">
  <option th:value="Brazil">Brazil</option>
  <option th:value="France">France</option>
  <option th:value="Germany">Germany</option>
  <option th:value="India">India</option>
</select>
在显示的页面新增代码:
<br /><br />

Country: <span th:text="${student.country}"></span>
这时候更新一下 学生 这个 POJO,新增一个 country 的属性:
public class Student {
    private String firstName;
    private String lastName;
    private String country;
}
因为使用了数据绑定,所以 controller 部分的代码不需要进行任何的变动,实现效果如下:

动态获取下拉框
上面的代码是写死的,不过有的情况下,可能需要通过 properties 文件获取一些数据,这个时候就没有办法在 thymeleaf 写死所有的选项了
properties 文件更新如下:
countries=Brazil,France,Germany,India,Mexico,Spain,United States
这里新增的是一个关于国家的数组
这个时候就需要更新 controller 了,需要从 properties 文件中获取对应的国家,并且将其传到模板引擎中:
    @Value("${countries}")
    private List<String> countries;

    @GetMapping("/showStudentForm")
    public String showForm(Model model) {
        // create a student obj
        Student student = new Student();
        // add student obj to the model
        model.addAttribute("student", student);

        // add the list of countries to the model
        model.addAttribute("countries", countries);
        return "student-form";
    }
HTML 部分更新如下:
<select th:field="*{country}">
  <option
    th:each="tempCountry : ${countries}"
    th:value="${tempCountry}"
    th:text="${tempCountry}"
  ></option>
</select>
这里使用的是一个 thymeleaf 的 for 循环,最终展示效果如下:
单选
即 radio button,这里也通过两个方式实现,一个就是写死值的方式,另一个是通过 properties 文件导入
写死的方式如下:
Favorite Programming Language:

<label>
  <input type="radio" th:field="*{favoriteLanguage}" th:value="Go" />
  Go
</label>
<label>
  <input type="radio" th:field="*{favoriteLanguage}" th:value="Java" />
  Java
</label>
<label>
  <input type="radio" th:field="*{favoriteLanguage}" th:value="Python" />
  Python
</label>
其余需要更新的地方也只有 POJO,这里略过不提,展现效果如下:

动态获取单选
实现方法类似,这里也不多赘述
properties 文件更新:
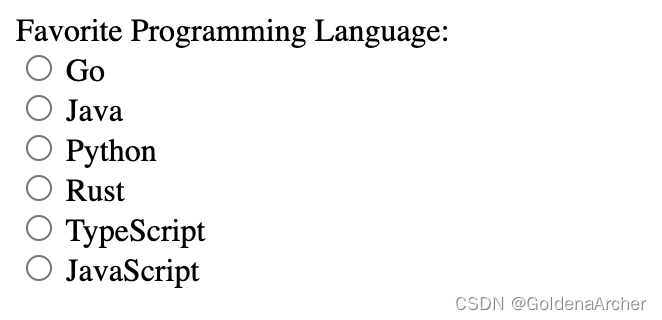
languages=Go,Java,Python,Rust,TypeScript,JavaScript
controller 部分略过不提,下面是 HTML 的修改:
Favorite Programming Language:

<div th:each="language : ${languages}">
  <label>
    <input type="radio" th:field="*{favoriteLanguage}" th:value="${language}" />
    <span th:text="${language}"></span>
  </label>
</div>
⚠️:这里的 for 循环是绑定在一个外部的 div 上,如果直接迭代 label,那就代表着一个 label 会对应不同的 input,就会影响具体的功能实现
最终渲染效果:
多选
也就是 checkbox,具体不多赘述,丢代码即可
两个 HTML 的修改:
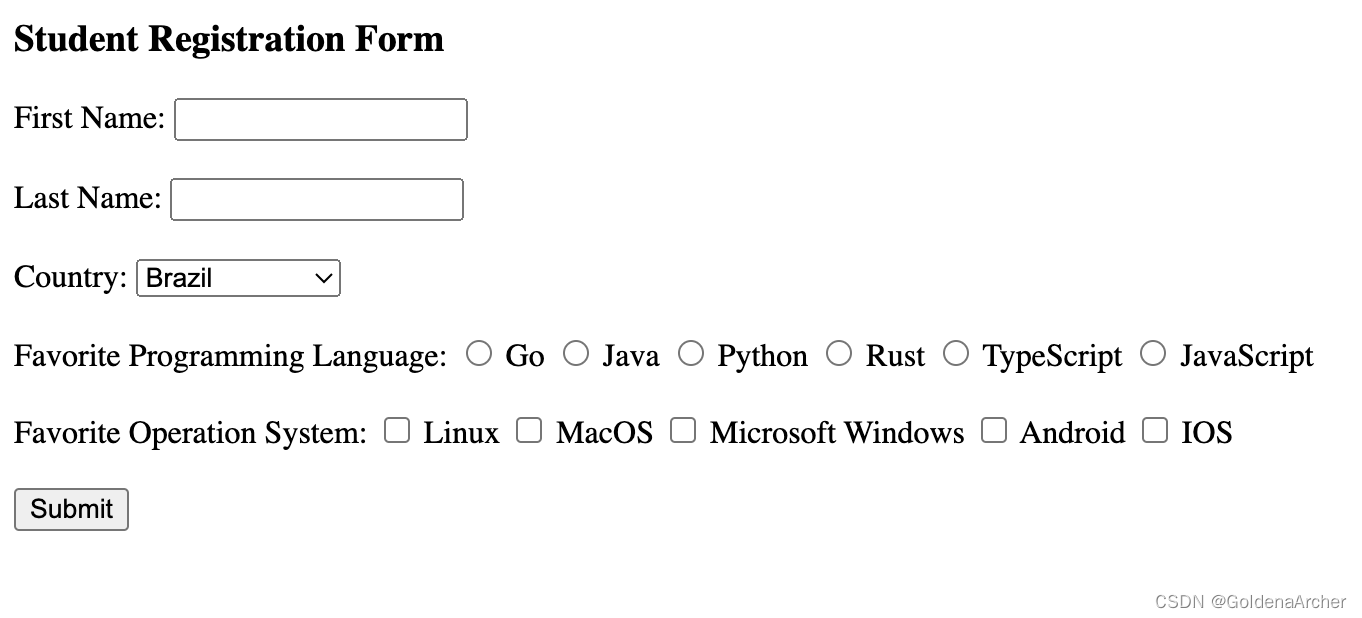
Favorite Operation System:

<input
  type="checkbox"
  id="Linux"
  th:field="*{favoriteOSs}"
  th:value="Linux"
/><label for="Linux">Linux</label>
<input
  type="checkbox"
  id="MacOS"
  th:field="*{favoriteOSs}"
  th:value="MacOS"
/><label for="MacOS">MacOS</label>
<input
  type="checkbox"
  id="ms"
  th:field="*{favoriteOSs}"
  th:value="'Microsoft Windows'"
/><label for="ms">Microsoft Windows</label>
Favorite Operating Systems: <span th:text="${student.favoriteOSs}"></span>
POJO:
private List<String> favoriteOSs;
效果如下:

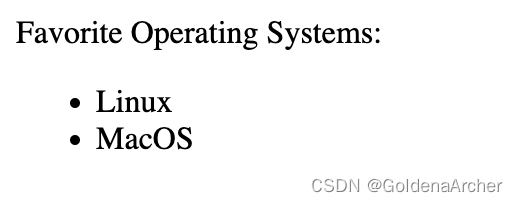
循环渲染结果
这里的格式还是稍微有点奇怪的,因为多选的保存格式为 List<String>,尽管 toString() 的默认实现不是很奇怪,不过也可以稍微优化一下:
<ul>
  <li th:each="favOs: ${student.favoriteOSs}" th:text="${favOs}"></li>
</ul>
动态渲染多选
具体实现也略过了,和之前的实现一样:
systems=Linux,MacOS,Microsoft Windows,Android,IOS
public class StudentController {
    @Value("${systems}")
    private List<String> systems;

    @GetMapping("/showStudentForm")
    public String showForm(Model model) {
        // ...
        model.addAttribute("systems", systems);
        // ...
    }
}
Favorite Operation System:

<span th:each="system: ${systems}">
  <input
    type="checkbox"
    id="${system}"
    th:field="*{favoriteOSs}"
    th:value="${system}"
  />
  <label for="${system}" th:text="${system}"></label>
</span>
最终效果如下:


![[大模型]Gemma-2B-Instruct FastApi 部署调用](https://img-blog.csdnimg.cn/direct/6c096a2329b64b2badfd7a6bba28d6ec.png#pic_center)