这一篇我们来看看Java代码怎么操作zip文件(jar文件),然后SpringBoot的特殊处理,文章分为2部分
- Zip API解释,看看我们工具箱里有哪些工具能用
- SpringBoot的特殊处理,看看SpringBoot Jar和普通Jar的不同
1. Zip API解释
1. ZipFile
我们先通过ZipFile来读取jar文件,通过ZipFile#entries()方法返回Zip内的每一个元素,每个元素可能是目录或文件,如果是目录则在目标文件夹下创建对应目录,否则拷贝文件到目标位置
private static void unzipByZipFile(String org, String dest) throws IOException {
    clean(dest);
    ZipFile zip = new ZipFile(org);
    Enumeration<? extends ZipEntry> ez = zip.entries();
    while (ez.hasMoreElements()) {
        ZipEntry ze = ez.nextElement();
        if (ze.isDirectory()) {
            Files.createDirectories(Path.of(dest, ze.getName()));
        } else {
            Path target = Path.of(dest, ze.getName());
            try (InputStream is = zip.getInputStream(ze)) {
                Files.copy(is, target);
            }
        }
    }
}
接下来在main方法内调用unzipByZipFile来查看测试效果,并查看输出的目录
public static void main(String[] args) throws IOException {
    unzipByZipFile("D:\\Workspace\\yangsi\\target\\yangsi-0.0.1-SNAPSHOT.jar", "d:/temp");
}
2. ZipInputStream
使用ZipInputStream读取和ZipFile读取基本类似,通过getNextEntry先获取一个ZipEntry,读取完毕后用closeEntry编译当前ZipEntry。
private static void unzipByZipInputStream(String org, String dest) throws IOException {
    clean(dest);
    try (ZipInputStream zis = new ZipInputStream(new FileInputStream(org))) {
        ZipEntry ze = null;
        while ((ze = zis.getNextEntry()) != null) {
            if (ze.isDirectory()) {
                Files.createDirectories(Path.of(dest, ze.getName()));
            } else {
                Files.copy(zis, Path.of(dest, ze.getName()));
            }
            zis.closeEntry();
        }
    }
}
3. ZipOuputStream
现在我们使用ZipOutputStream将之前解压出来的文件重新打包成jar,代码如下
private static void zipByZipOutputStream(String dir, String dst) throws IOException {
    Files.deleteIfExists(Path.of(dst));
    try (ZipOutputStream zos = new ZipOutputStream(new FileOutputStream(dst))) {
        Path root = Path.of(dir);
        for (Path x : Files.list(root).toList()) {
            addToZip(root, x, zos);
        }
    }
}

private static void addToZip(Path root, Path file, ZipOutputStream zos) throws IOException {
    if (Files.isDirectory(file)) {
        for (Path x : Files.list(file).toList()) {
            addToZip(root, x, zos);
        }
    } else {
        ZipEntry e = new ZipEntry(root.relativize(file).toString());
        zos.putNextEntry(e);
        Files.copy(file, zos);
        zos.closeEntry();
    }
}
2. SpringBoot的特殊处理
1. 对比文件
到现在为止,一切都看起来很没好,我们通过ZipInputStream解压了jar包,然后又通过ZipOutputStream重新打成可执行jar。 直到我们尝试执行这个通过ZipOutputStream打包的jar,才发现了问题。
~$ java -jar temp.jar
Error: Invalid or corrupt jarfile temp.jar
问题发生在哪呢?处在ZipOutputStream的压缩级别上,SpringBoot的jar对文件压缩做了特殊处理。如果我们有3个压缩文件,分别标号为1、2、3
- 文件1,是正常SpringBoot项目通过Maven打包后的结果
- 文件2,是将文件1中的jar解压后,通过ZipOutputStream采用0压缩级别(不压缩)打包的文件
- 文件3,是将文件1中的jar解压后,采用默认压缩级别打包的文件
可以看到org、META-INF在文件1、文件3中的文件大小是完全一致的,所以这部分文件在SpringBoot JAR也是被压缩的。

而BOOT-INF却3中方式都不同,我们进入BOOT-INF看看,文件1、文件3中的普通文件(classes、idx)文件是一样的,也就是普通文件不做压缩。而文件1、文件2的lib文件夹是一样的。
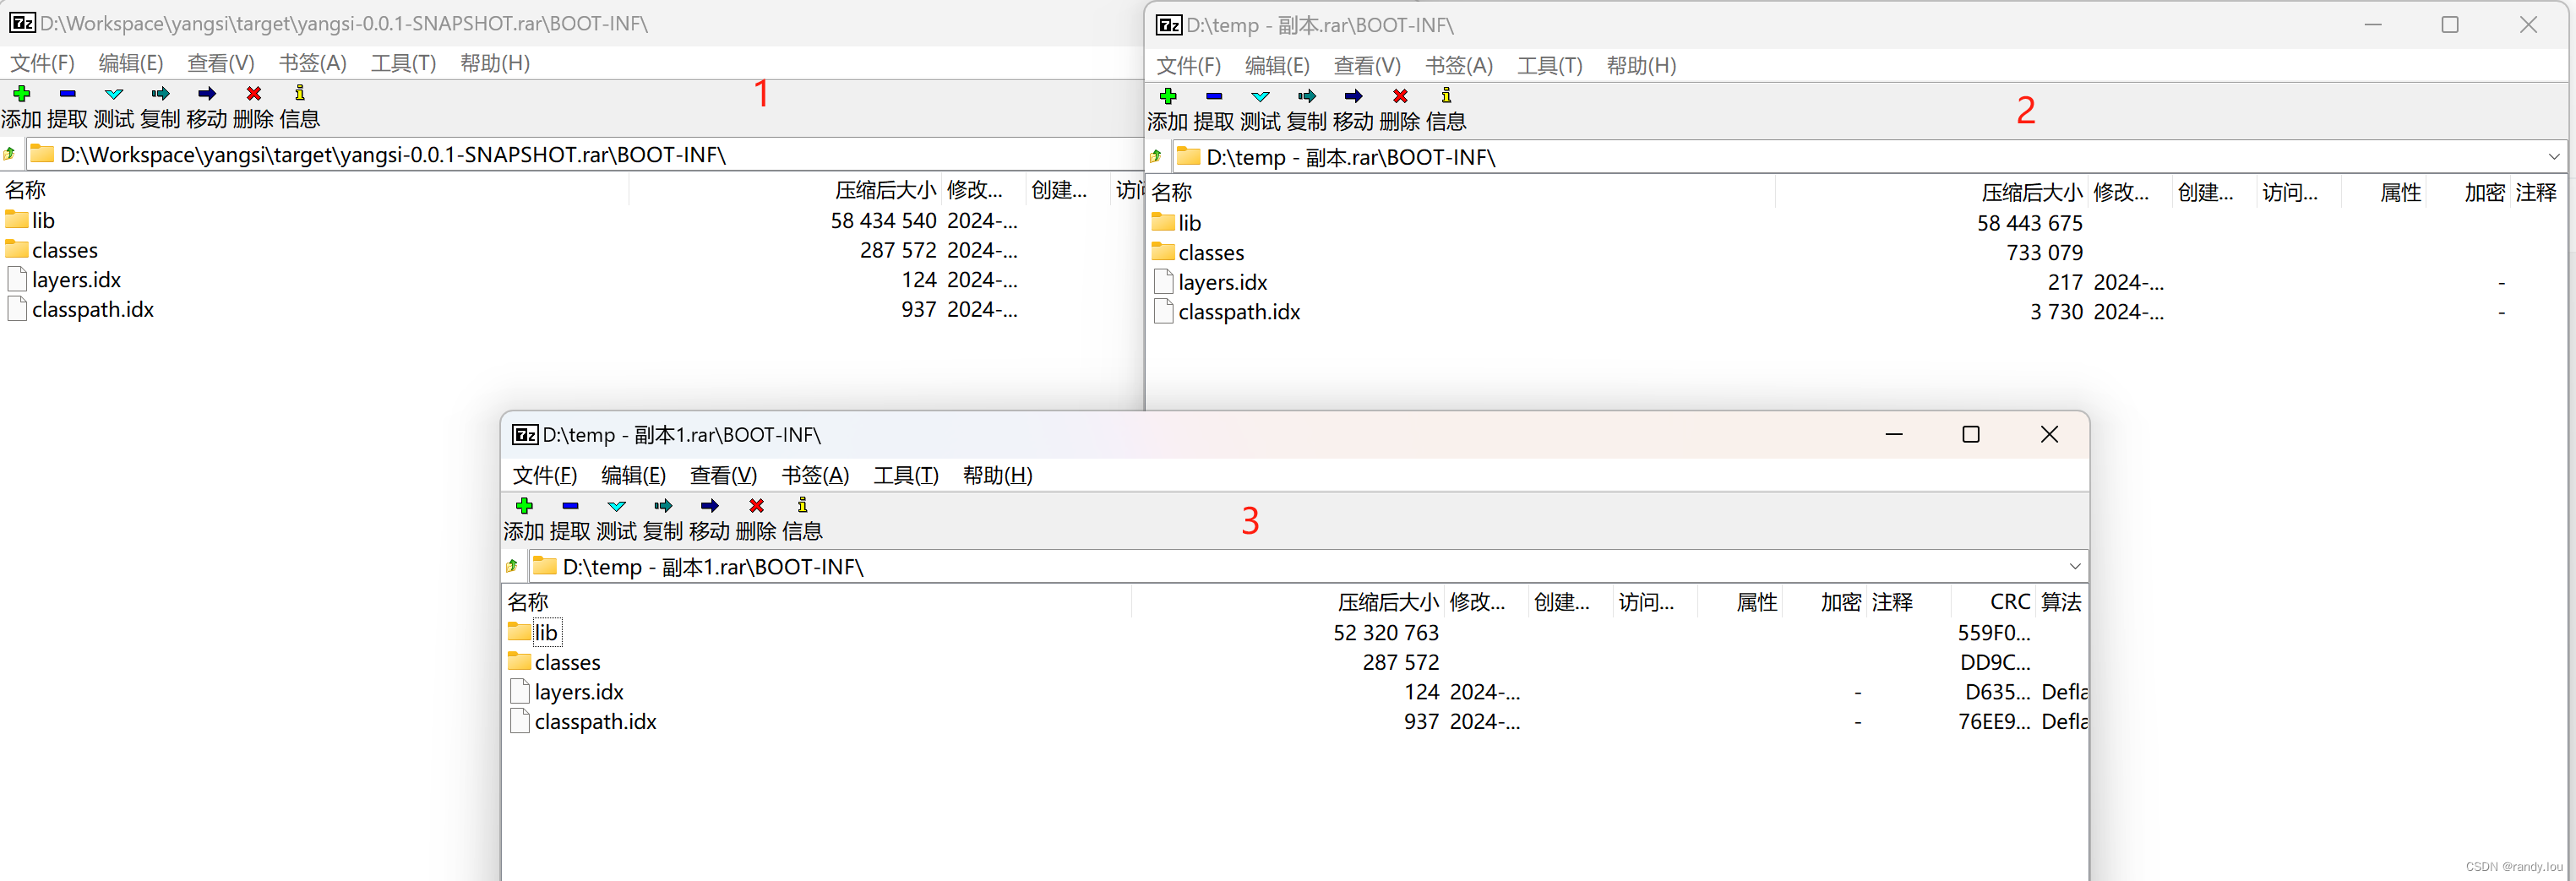
所以总结下来,Spring Boot Maven Plugin打成的可执行jar,对普通文件采用了压缩,而jar文件仅仅打包而不压缩。这也是为什么我们执行java -jar temp.jar时报错的原因。
2. 设置jar不压缩
现在我们要修改ZipOutputStream的输出,jar文件仅存储不压缩,需要在代码中设置jar的ZipEntry.setMethod(ZipEntry.STORED),同时要自己计算crc和文件大小。
private static void zipByZipOutputStream(String dir, String dst) throws IOException {
    Files.deleteIfExists(Path.of(dst));
    try (ZipOutputStream zos = new ZipOutputStream(new FileOutputStream(dst))) {
        Path root = Path.of(dir);
        for (Path x : Files.list(root).toList()) {
            addToZip(root, x, zos);
        }
    }
}

private static void addToZip(Path root, Path file, ZipOutputStream zos) throws IOException {
    if (Files.isDirectory(file)) {
        for (Path x : Files.list(file).toList()) {
            addToZip(root, x, zos);
        }
    } else if (isJar(file)) {
        ZipEntry e = new ZipEntry(root.relativize(file).toString());
        long size = Files.size(file);
        e.setSize(size);
        e.setCompressedSize(size);
        e.setMethod(ZipEntry.STORED);
        try (InputStream fis = Files.newInputStream(file, StandardOpenOption.READ); CheckedInputStream cis = new CheckedInputStream(fis, new CRC32()); ByteArrayOutputStream bos = new ByteArrayOutputStream();) {
            cis.transferTo(bos);
            long crc = cis.getChecksum().getValue();
            e.setCrc(crc & 0xFFFFFFFF);
        }
        zos.putNextEntry(e);
        Files.copy(file, zos);
        zos.closeEntry();
    } else {
        ZipEntry e = new ZipEntry(root.relativize(file).toString());
        zos.putNextEntry(e);
        Files.copy(file, zos);
        zos.closeEntry();
    }
}

private static boolean isJar(Path file) {
    return file.getFileName().toString().toLowerCase().endsWith(".jar");
}
再次打包后可以看到(文件4),我们打包的文件大小和原始文件是一摸一样的了。

应该说Spring Boot的这种特殊处理是合理且必要的,jar文件本身已经做过压缩,再次压缩意义不大。
现在我们有足够的背景知识了,下一篇我们来看看SpringBoot可执行Jar是怎么引导并启动我们的应用的。









![[office] excel工作表数据分级显示 #其他#笔记](https://img-blog.csdnimg.cn/img_convert/d80c080c4c822cf38f9244dcfa33c347.jpeg)
