文章目录
- 写在前面
- 关于组件
- 开源仓库和项目上线
- 其他文档说明
- 项目亮点
- 使用技术和环境
- 项目宏观结构
- 模块实现
- compiler模块
- runner模块
- compile_run模块
- compile_server模块
- 基于MVC结构的OJ服务
- 什么是MVC?
- 用户请求服务路由功能
- Model模块
- view模块
- Control模块
写在前面
关于组件
本项目使用的是一个仿RabbitMQ消息队列组件,关于该组件的细节内容在下面的链接中:
项目:仿RabbitMQ实现的消息队列组件
开源仓库和项目上线
本项目已开源到下面链接下的仓库当中
负载均衡式在线OJ
并且项目已经部署在了Linux服务器上,具体访问方式可以点击下面链接进行访问:
111.230.81.226:8080
其他文档说明
针对于日志的信息,我采用了之前写的一份利用可变参数实现日志的代码,具体链接如下
C++:可变参数实现日志系统
项目:仿RabbitMQ实现的消息队列组件
项目亮点
从技术栈的角度来讲,用的比较多,这里实现了两个版本,一个是httplib版本,在将请求从服务端发送到编译模块的部分是采用了httplib来进行发送的,而第二个版本采用的是消息队列的方式,服务端作为的是生产者,把数据推送到指定的队列,而编译模块作为消费者,来把数据进行编译后写入到Redis中,这样服务端只需要从Redis中获取数据即可
使用技术和环境
本项目使用的技术主要有:
- C++STL
- Boost标准库
- cpp-httplib网络库
- JSON序列化反序列化库
- Redis
- 消息队列
开发环境:
- Ubuntu22.04云服务器
- vscode
项目宏观结构
对于项目来说,核心的部分其实就是三个模块:
- common:存储的是一些公共的功能
- compile_server:编译运行模块
- oj_server:获取题目列表,查看界面,负载均衡等功能
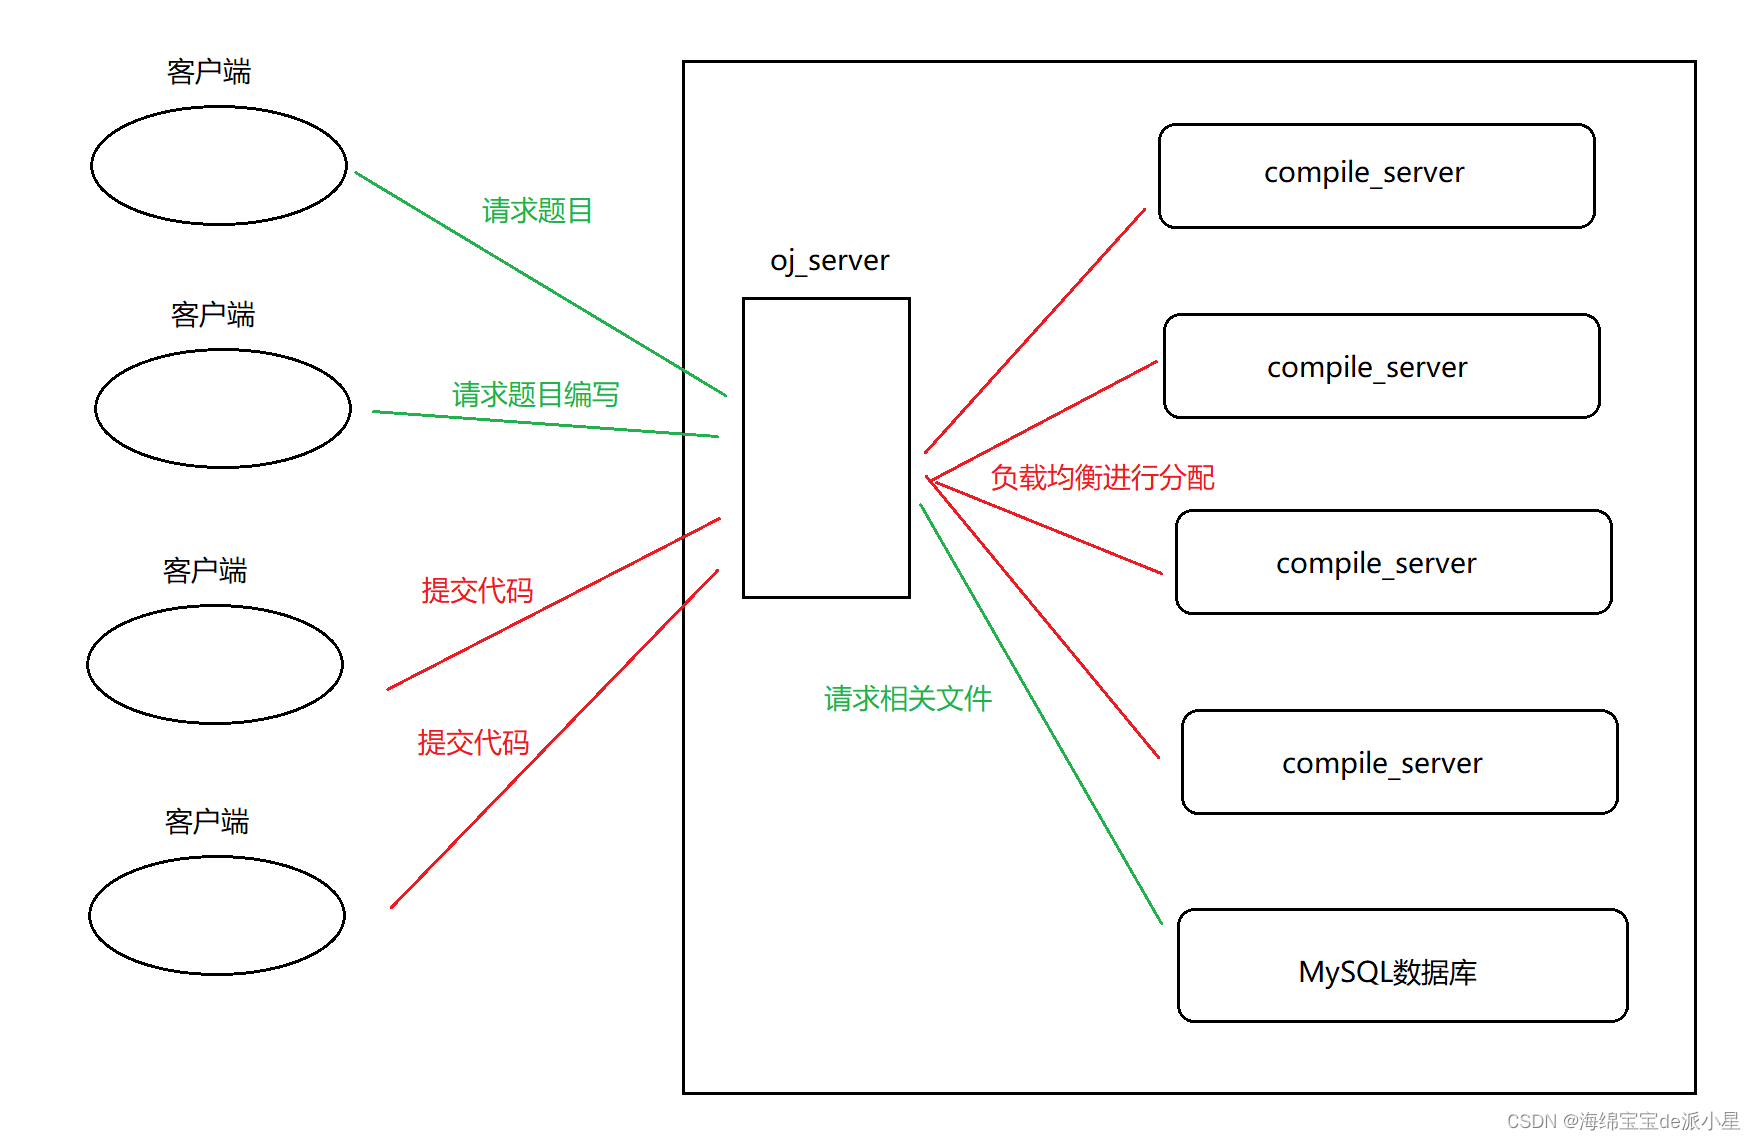
具体的逻辑图如下所示:
对于客户端来说,会把所有的请求都发布到oj_server上,而oj_server就会把这些请求进行合理的分配,分配到各个地方进行各自的处理,其中对于请求题目和编写这样的内容不算特别吃资源,因此直接正常进行使用即可,而对于进行判定这样的操作,对于CPU的占用比较大,因此就需要使用负载均衡这样的策略,分配到各自的服务器主机上进行判定,达到一个负载均衡的效果
模块实现
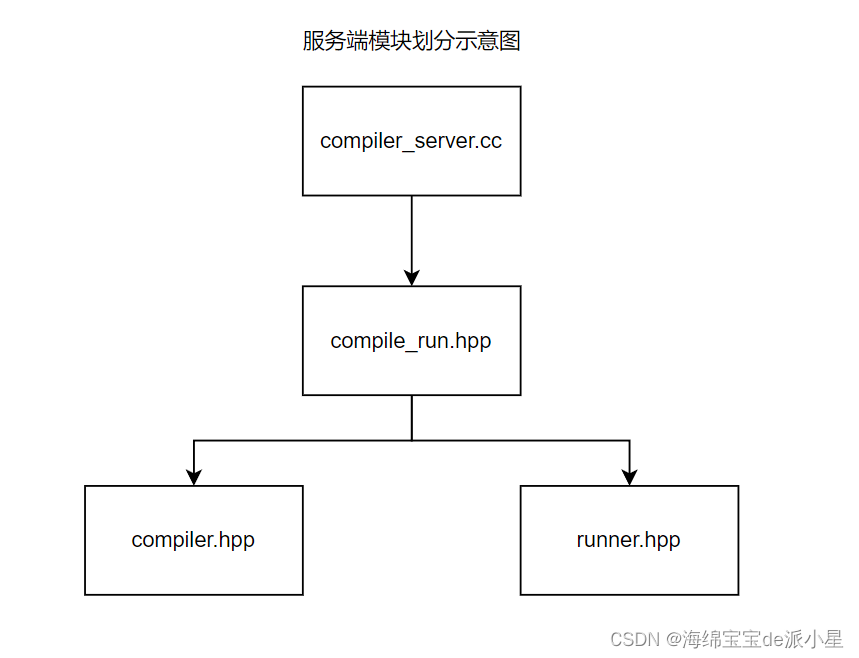
下面进行模块的介绍实现,先说服务端,服务端主要包含下面的几个模块:
compiler模块
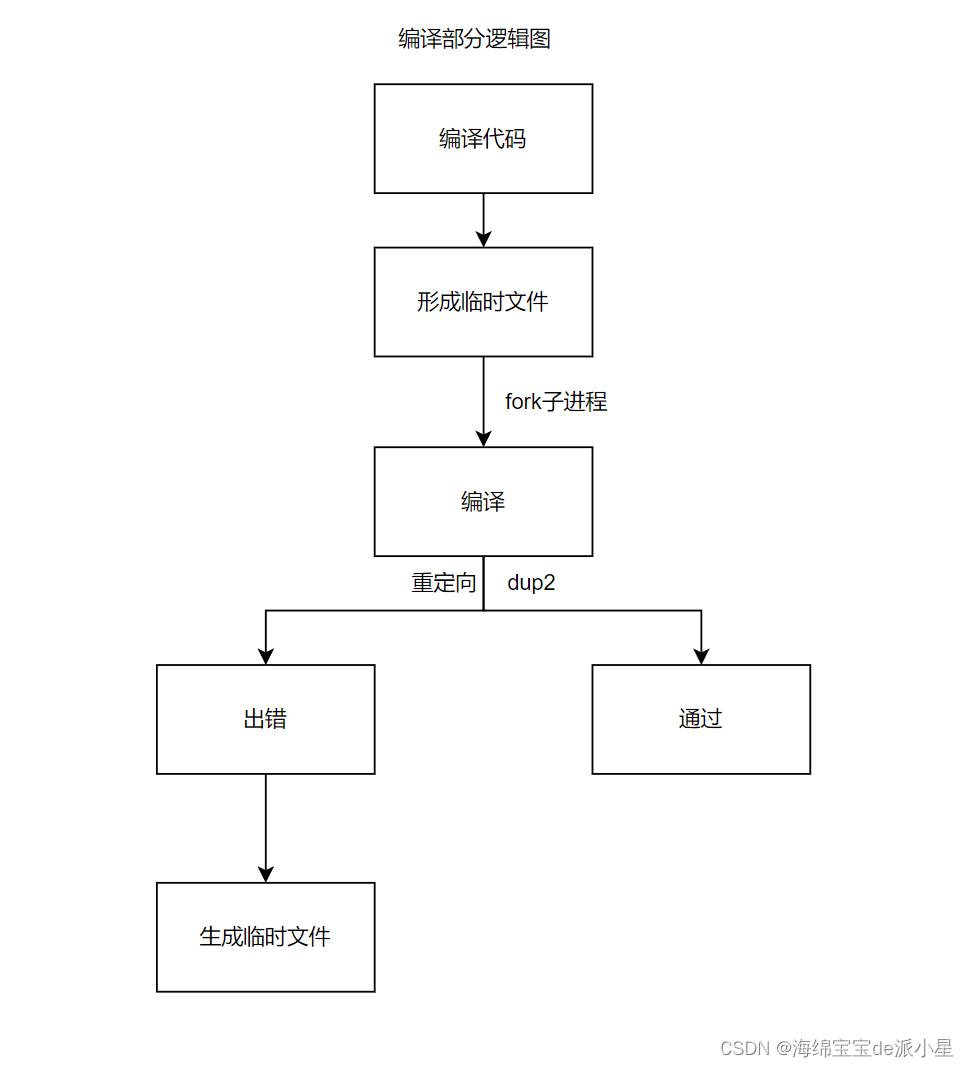
对于在线OJ来说,编译模块是必不可少的,那对于编译的具体逻辑,简单来说就是远端把代码提交到后端,此时会生成一个临时文件,而对于临时文件来说,就会进行编译的操作,编译失败,就把失败的信息生成,如果编译成功就继续执行,具体流程可以总结如下:
具体实现如下所示:
#pragma once
#include <unistd.h>
#include <sys/wait.h>
#include <sys/types.h>
#include <sys/stat.h>
#include <fcntl.h>
#include "../common/util.hpp"
#include "../common/Log.hpp"

// 只负责进行代码的编译
class Compiler
{
public:
    Compiler()
    {}
    ~Compiler()
    {}
    static bool Compile(const string &file_name)
    {
        pid_t pid = fork();
        if(pid < 0)
        {
            lg(Error, "内部错误,创建子进程失败");
            return false;
        }
        else if (pid == 0)
        {
            umask(0);
            int _stderr = open(PathUtil::CompilerError(file_name).c_str(), O_CREAT | O_WRONLY, 0644);
            if(_stderr < 0)
            {
                lg(Warning, "没有生成stderr文件");
                exit(1);
            }
            dup2(_stderr, 2);
            //g++ -o target src -std=c++11
            execlp("g++", "g++", "-o", PathUtil::Exe(file_name).c_str(),\
            PathUtil::Src(file_name).c_str(), "-D", "COMPILER_ONLINE","-std=c++11",  nullptr);
            lg(Error, "启动编译器失败");
            exit(2);
        }
        else
        {
            waitpid(pid, nullptr, 0);
            // 编译是否成功,就看有没有形成对应的可执行程序
            if(FileUtil::IsFileExists(PathUtil::Exe(file_name)))
            {
                lg(Info, "%s:编译成功", PathUtil::Src(file_name).c_str());
                return true;
            }
        }
        lg(Error, "编译失败");
        return false;
    }
};
runner模块
编译了之后,就要运行了,因此下面这个模块就是运行模块
进程占用资源
对于在线OJ来说,其实是有时间复杂度和空间复杂度的需求的,因此我们也需要设置对应的接口,想要对于资源进行限制,需要用到的系统调用是setrlimit

对于这个接口来说,比较重要的参数就是这个结构体了:

这个结构体就是做出了对于软件和硬件的限制,总的来说这个系统调用还是比较简单的,我们需要限定CPU的时长和内存大小,需要用到的参数是RLIMIT_CPU和RLIMIT_AS
//提供设置进程占用资源大小的接口
static void SetProcLimit(int _cpu_limit, int _mem_limit)
{
    // 设置CPU时长
    struct rlimit cpu_rlimit;
    cpu_rlimit.rlim_max = RLIM_INFINITY;
    cpu_rlimit.rlim_cur = _cpu_limit;
    setrlimit(RLIMIT_CPU, &cpu_rlimit);

    // 设置内存大小
    struct rlimit mem_rlimit;
    mem_rlimit.rlim_max = RLIM_INFINITY;
    mem_rlimit.rlim_cur = _mem_limit * 1024; //转化成为KB
    setrlimit(RLIMIT_AS, &mem_rlimit);
}
程序运行
接下来就是让程序进行运行了,程序运行主要有三种情况:
- 代码跑完,结果正确
- 代码跑完,结果不正确
- 代码没跑完,异常了
那在运行模块,我们只管新的是程序有没有正常跑完,只要跑完了就可以,至于结果正确还是不正确,并不是这里关心的重点,因此在这个模块中,其实也需要有标准输出和标准错误两个模块,这两个模块当中记录的是到底有没有正常结束的信息
static int Run(const string &file_name, int cpu_limit, int mem_limit)
{
    string _execute = PathUtil::Exe(file_name);
    string _stdin   = PathUtil::Stdin(file_name);
    string _stdout  = PathUtil::Stdout(file_name);
    string _stderr  = PathUtil::Stderr(file_name);

    umask(0);
    int _stdin_fd = open(_stdin.c_str(), O_CREAT|O_RDONLY, 0644);
    int _stdout_fd = open(_stdout.c_str(), O_CREAT|O_WRONLY, 0644);
    int _stderr_fd = open(_stderr.c_str(), O_CREAT|O_WRONLY, 0644);

    if(_stdin_fd < 0 || _stdout_fd < 0 || _stderr_fd < 0)
    {
        lg(Error, "打开标准文件失败");
        return -1; //代表打开文件失败
    }

    pid_t pid = fork();
    if (pid < 0)
    {
        lg(Error, "创建子进程失败");
        close(_stdin_fd);
        close(_stdout_fd);
        close(_stderr_fd);
        return -2; //代表创建子进程失败
    }
    else if (pid == 0)
    {
        dup2(_stdin_fd, 0);
        dup2(_stdout_fd, 1);
        dup2(_stderr_fd, 2);
        SetProcLimit(cpu_limit, mem_limit);
        execl(_execute.c_str()/*执行谁*/, _execute.c_str()/*如何执行该程序*/, nullptr);
        exit(1);
    }
    else
    {
        close(_stdin_fd);
        close(_stdout_fd);
        close(_stderr_fd);
        int status = 0;
        waitpid(pid, &status, 0);
        // 输出信号信息
        lg(Info, "运行结束,info:%d", (status & 0x7F));
        return status & 0x7F;
    }
}
compile_run模块
下面是进行compile_run模块,这个模块就是对于之前内容的整合,同时借助JSON完成序列化和反序列化的内容
对于序列化和反序列化来说,要传递的参数其实比较简单:
输入
- code:用户提交的代码
- input:用户给代码做的输入
- cpu_limit:时间要求
- mem_limit:空间要求
输出
- status:状态码
- reason:请求结果
- stdout:运行结果
- stderr:错误结果
所以在JSON中,它的组织形式更像是:
in_json: {"code": "#include...", "input": "","cpu_limit":1, "mem_limit":10240}
out_json: {"status":"0", "reason":"","stdout":"","stderr":"",}
资源清理
在本项目中的策略是把创建的临时文件都放到一个temp文件夹路径下,而当运行结果结束之后,也就没有存在的必要了,因此就需要显示的把这些临时文件都清理掉,所以是需要一个垃圾回收的机制存在的
代码实现如下:
#pragma once
#include "compiler.hpp"
#include "runner.hpp"
#include "../common/util.hpp"
#include <signal.h>
#include <unistd.h>
#include <jsoncpp/json/json.h>
using namespace std;

class CompileAndRun
{
public:
    static void RemoveTempFile(const string &file_name)
    {
        // 清理文件的个数是不确定的,但是有哪些我们是知道的
        string _src = PathUtil::Src(file_name);
        if(FileUtil::IsFileExists(_src))
            unlink(_src.c_str());

        string _compiler_error = PathUtil::CompilerError(file_name);
        if(FileUtil::IsFileExists(_compiler_error))
            unlink(_compiler_error.c_str());

        string _execute = PathUtil::Exe(file_name);
        if(FileUtil::IsFileExists(_execute))
            unlink(_execute.c_str());

        string _stdin = PathUtil::Stdin(file_name);
        if(FileUtil::IsFileExists(_stdin))
            unlink(_stdin.c_str());

        string _stdout = PathUtil::Stdout(file_name);
        if(FileUtil::IsFileExists(_stdout))
            unlink(_stdout.c_str());

        string _stderr = PathUtil::Stderr(file_name);
        if(FileUtil::IsFileExists(_stderr))
            unlink(_stderr.c_str());
    }
    // code > 0 : 进程收到了信号导致异常奔溃
    // code < 0 : 整个过程非运行报错(代码为空,编译报错等)
    // code = 0 : 整个过程全部完成
    static string CodeToDesc(int code, const string &file_name)
    {
        string desc;
        switch (code)
        {
        case 0:
            desc = "编译运行成功";
            break;
        case -1:
            desc = "提交的代码是空";
            break;
        case -2:
            desc = "未知错误";
            break;
        case -3:
            // desc = "代码编译的时候发生了错误";
            FileUtil::ReadFile(PathUtil::CompilerError(file_name), &desc, true);
            break;
        case SIGABRT: // 6
            desc = "内存超过范围";
            break;
        case SIGXCPU: // 24
            desc = "CPU使用超时";
            break;
        case SIGFPE: // 8
            desc = "浮点数溢出";
            break;
        default:
            desc = "未知: " + to_string(code);
            break;
        }
        return desc;
    }

    static void Start(const string &in_json, string *out_json)
    {
        Json::Value in_value;
        Json::Reader reader;
        reader.parse(in_json, in_value);

        string code = in_value["code"].asString();
        string input = in_value["input"].asString();
        int cpu_limit = in_value["cpu_limit"].asInt();
        int mem_limit = in_value["mem_limit"].asInt();

        int status_code = 0;
        Json::Value out_value;
        int run_result = 0;
        string file_name;

        if (code.size() == 0)
        {
            status_code = -1;
            goto END;
        }
        file_name = FileUtil::UniqFileName();
        //形成临时src文件
        if (!FileUtil::WriteFile(PathUtil::Src(file_name), code))
        {
            status_code = -2; //未知错误
            goto END;
        }

        if (!Compiler::Compile(file_name))
        {
            //编译失败
            status_code = -3; //代码编译的时候发生了错误
            goto END;
        }

        run_result = Runner::Run(file_name, cpu_limit, mem_limit);
        if (run_result < 0)
        {
            status_code = -2; //未知错误
        }
        else if (run_result > 0)
        {
            //程序运行崩溃了
            status_code = run_result;
        }
        else
        {
            //运行成功
            status_code = 0;
        }
    END:
        out_value["status"] = status_code;
        out_value["reason"] = CodeToDesc(status_code, file_name);
        if (status_code == 0)
        {
            // 整个过程全部成功
            string _stdout;
            FileUtil::ReadFile(PathUtil::Stdout(file_name), &_stdout, true);
            out_value["stdout"] = _stdout;

            string _stderr;
            FileUtil::ReadFile(PathUtil::Stderr(file_name), &_stderr, true);
            out_value["stderr"] = _stderr;
        }
        Json::StyledWriter writer;
        *out_json = writer.write(out_value);
        RemoveTempFile(file_name);
    }
};
compile_server模块
下面借助httplib,实现一个基础版本的服务器,httplib是一个简单的封装好的服务器库,这里直接进行使用:
#include "../common/httplib.h"
#include "compile_run.hpp"
using namespace std;

void Usage(std::string proc)
{
    std::cerr << "Usage: " << "\n\t" << proc << " port" << std::endl;
}

//./compile_server port
int main(int argc, char *argv[])
{
    if(argc != 2)
    {
        Usage(argv[0]);
        return 1;
    }
    httplib::Server svr;

    svr.Post("/compile_and_run", [](const httplib::Request &req, httplib::Response &resp){
        // 用户请求的服务正文是我们想要的json string
        std::string in_json = req.body;
        std::string out_json;
        if(!in_json.empty())
        {
            CompileAndRun::Start(in_json, &out_json);
            resp.set_content(out_json, "application/json;charset=utf-8");
        }
    });
    svr.listen("0.0.0.0", atoi(argv[1]));
    return 0;
}
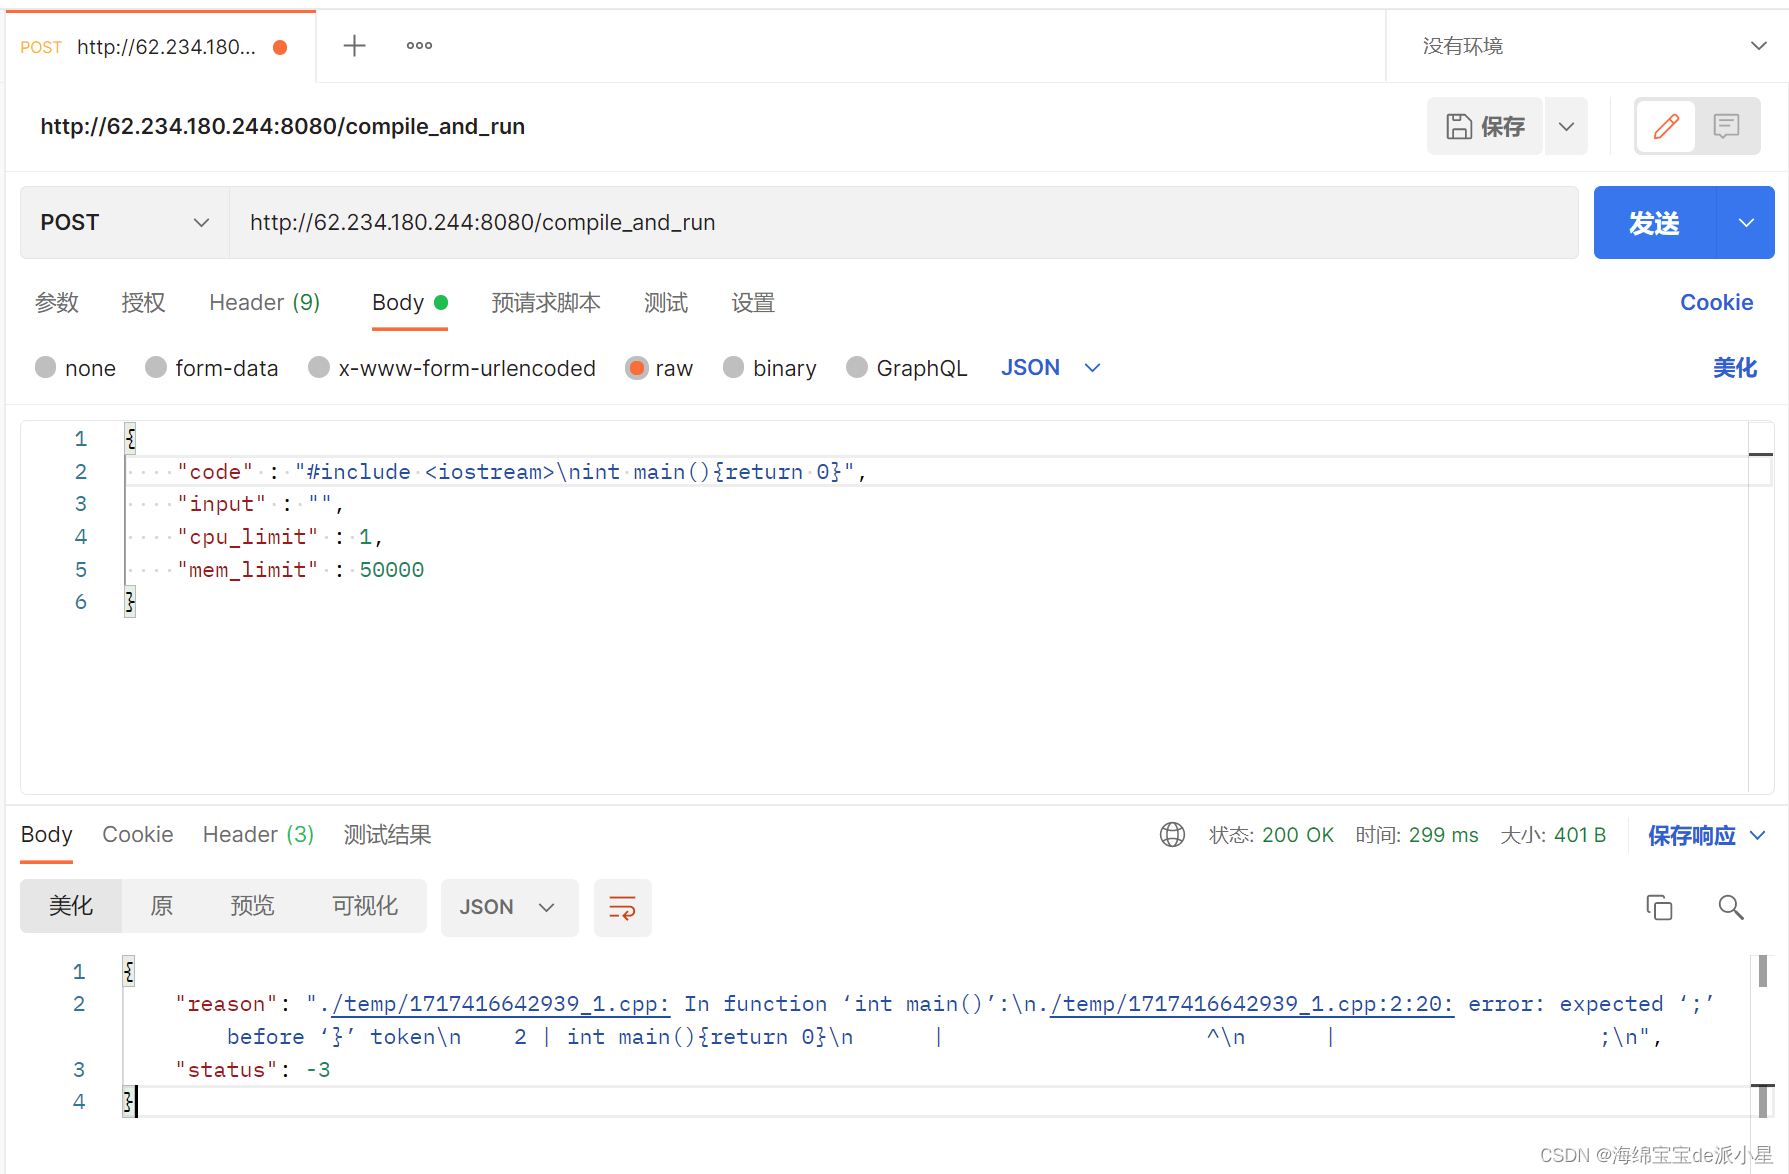
利用postman尝试进行测试,发现测试是可以通过的,代码正常运行:
基于MVC结构的OJ服务
什么是MVC?
对于MVC来说,M的意思是Model,通常是和数据进行交互的模块,比如对于题库进行增删改查,而V的意思是View,意思是利用数据进行构建网页和渲染网页内容,展示给用户对应的信息,最后C的意思是Control,控制器控制的是核心业务逻辑
下面的步骤,是要搭建一个小型网站,具体步骤如下:
- 获取首页信息
- 编辑区域页面
- 提交判题功能
下面就基于这些内容,进行代码的编写
用户请求服务路由功能
这个部分内容相对简单,就是借助httplib进行服务的调用
#include <iostream>
#include "../common/httplib.h"

using namespace std;

int main()
{
    httplib::Server svr;

    svr.Get("/all_questions", [](const httplib::Request &req, httplib::Response &resp){
        resp.set_content("这是所有题⽬的列表", "text/plain; charset=utf-8");
    });

    svr.Get(R"(/question/(\d+))", [](const httplib::Request &req, httplib::Response &resp){
        std::string number = req.matches[1];
        resp.set_content("这是指定的⼀道题: " + number, "text/plain; charset=utf-8");
    });

    svr.Get(R"(/judge/(\d+))", [](const httplib::Request &req, httplib::Response &resp){
        std::string number = req.matches[1];
        resp.set_content("指定题⽬的判题: " + number, "text/plain; charset=utf-8");
    });

    svr.set_base_dir("./wwwroot");
    svr.listen("0.0.0.0", 8080);
    return 0;
}
上述只是进行了一个最基础的操作,进行了一个框架的搭建,那么下面就进入MVC的模块
Model模块
Model模块,提供对于数据的一系列操作
对于这个项目的数据来说,最重要的就是题目的一些数据,这里枚举出题目的细节信息:
struct Question
{
    string number;
    string title;
    string star;
    int cpu_limit;
    int mem_limit;
    string desc;
    // 题目预设给用户在线编辑器的代码
    string header;
    // 题目的测试用例,需要和header拼接,形成完整代码
    string tail;
};
实际上,在进行OJ的过程中,基本的逻辑思路很简单,把用户提交上来的代码和测试用例进行拼接,再执行,把执行的结果和测试用例进行比较,即可得到结果,这就是项目的底层逻辑
那么有了这样的思想,实现出Model模块逻辑就很轻松了,下面进行具体的实现过程:
class Model
{
private:
    //题号 : 题目细节
    unordered_map<string, Question> questions;
public:
    Model();
    bool LoadQuestionList(const string &question_list);

    bool GetAllQuestions(vector<Question> *out);

    bool GetOneQuestion(const string &number, Question *q);

    ~Model()
    {}
};
view模块
view模块这里采取的是ctemplate中的渲染网页部分,它的基本思想就是实现一个key,value的值替换,达到渲染网页的目的
#pragma once
#include <iostream>
#include <string>
#include <ctemplate/template.h>
#include "oj_model.hpp"
using namespace std;

const string template_path = "./template_html/";

class View
{
public:
    View(){}
    ~View(){}
public:
    void AllExpandHtml(const vector<struct Question> &questions, string *html)
    {
        // 题目的编号 题目的标题 题目的难度
        // 推荐使用表格显示
        // 1. 形成路径
        string src_html = template_path + "all_questions.html";
        // 2. 形成数字典
        ctemplate::TemplateDictionary root("all_questions");
        for (const auto& q : questions)
        {
            ctemplate::TemplateDictionary *sub = root.AddSectionDictionary("question_list");
            sub->SetValue("number", q.number);
            sub->SetValue("title", q.title);
            sub->SetValue("star", q.star);
        }

        //3. 获取被渲染的html
        ctemplate::Template *tpl = ctemplate::Template::GetTemplate(src_html, ctemplate::DO_NOT_STRIP);

        //4. 开始完成渲染功能
        tpl->Expand(html, &root);
    }

    void OneExpandHtml(const struct Question &q, string *html)
    {
        // 1. 形成路径
        string src_html = template_path + "one_question.html";

        // 2. 形成数字典
        ctemplate::TemplateDictionary root("one_question");
        root.SetValue("number", q.number);
        root.SetValue("title", q.title);
        root.SetValue("star", q.star);
        root.SetValue("desc", q.desc);
        root.SetValue("pre_code", q.header);

        //3. 获取被渲染的html
        ctemplate::Template *tpl = ctemplate::Template::GetTemplate(src_html, ctemplate::DO_NOT_STRIP);

        //4. 开始完成渲染功能
        tpl->Expand(html, &root);
    }
};
Control模块
最后进入Control模块
对于Control模块来说,基本的调用逻辑为:
- 把in_json进行反序列化,得到题目id和源代码,input等
- 重新拼接用户代码和测试代码,可以得到一个新的代码
- 把新的代码给负载最低的主机,发起http请求把结果传输过去
- 把结果赋值给out_json即可
选择主机
主机如何选择呢?
在本项目中,提供的方法是使用轮询方式实现的负载均衡,对比所有的主机寻找一个负载最少的进行判断即可
由于要实现负载均衡,所以在进行实际的使用过程中,要对于负载均衡有体现,在实际的运行中,理应拥有几个服务器一起进行负载均衡,那对于这些服务器的管理是有必要的,所以就要先对提供服务的主机进行管理:
// 提供服务的主机
class Machine
{
public:
    string ip;       //编译服务的ip
    int port;        //编译服务的port
    uint64_t load;   //编译服务的负载
    mutex *mtx;      // mutex禁止拷贝的,使用指针
public:
    Machine() : ip(""), port(0), load(0), mtx(nullptr)
    {
    }
    ~Machine()
    {
    }

public:
    // 提升主机负载
    void IncLoad()
    {
        if (mtx)
            mtx->lock();
        ++load;
        if (mtx)
            mtx->unlock();
    }

    // 减少主机负载
    void DecLoad()
    {
        if (mtx)
            mtx->lock();
        --load;
        if (mtx)
            mtx->unlock();
    }

    void ResetLoad()
    {
        if(mtx)
            mtx->lock();
        load = 0;
        if(mtx)
            mtx->unlock();
    }

    // 获取主机负载
    uint64_t Load()
    {
        uint64_t _load = 0;
        if (mtx)
            mtx->lock();
        _load = load;
        if (mtx)
            mtx->unlock();
        return _load;
    }
};
之后,实现负载均衡,由于篇幅的原因这里把最核心的展示出来:
// 选择主机和机器
bool SmartChoice(int *id, Machine **m)
{
    // 1. 使用选择好的主机(更新该主机的负载)
    // 2. 需要可能离线该主机
    mtx.lock();
    // 负载均衡的算法: 轮询
    int online_num = online.size();
    if (online_num == 0)
    {
        mtx.unlock();
        lg(Fatal, "后端所有主机离线");
        return false;
    }
    // 通过遍历的方式,找到所有负载最小的机器
    *id = online[0];
    *m = &machines[online[0]];
    uint64_t min_load = machines[online[0]].Load();
    for (int i = 1; i < online_num; i++)
    {
        // 获取主机的负载,如果负载小就更新
        uint64_t curr_load = machines[online[i]].Load();
        if (min_load > curr_load)
        {
            min_load = curr_load;
            *id = online[i];
            *m = &machines[online[i]];
        }
    }
    mtx.unlock();
    return true;
}
有了这两个模块,就可以去实现出Control模块了,这个是整个业务最核心的模块,它用到了Model模块来提供业务数据,view实现html渲染,还有负载均衡
// 这是我们的核心业务逻辑的控制器
class Control
{
    void RecoveryMachine()
    {
        load_blance_.OnlineMachine();
    }
    //根据题目数据构建网页
    // html: 输出型参数
    bool AllQuestions(string *html);
    bool Question(const string &number, string *html);
    // code: #include...
    // input: ""
    void Judge(const string &number, const string in_json, string *out_json)
    {
        // 0. 根据题目编号,直接拿到对应的题目细节
        // 1. in_json进行反序列化,得到题目的id,得到用户提交源代码,input
        // 2. 重新拼接用户代码+测试用例代码,形成新的代码
        // 3. 选择负载最低的主机(差错处理)
        // 规则: 一直选择,直到主机可用,否则,就是全部挂掉
        // 4. 然后发起http请求,得到结果
        // 5. 将结果赋值给out_json
    }
};
这样,整个项目的最基础的业务逻辑就使用结束了
