Android引入约束布局的目的是为了减少布局层级的嵌套,从而提升渲染性能。约束布局综合线性布局、相对布局、帧布局的部分功能,缺点也很明显,就是可能要多写几行代码。所以约束布局使用时,还得综合考虑代码量。提升性能也并不一定非得使用约束布局,也可以在ViewGroup上dispatchDraw。你需要根据业务的具体情况选择最合适的实现方式。我知道很多人一开始很不习惯使用约束布局,但既然你诚心诚意问我怎么使用了?于是我就大发慈悲告诉你怎么使用呗。
链式约束
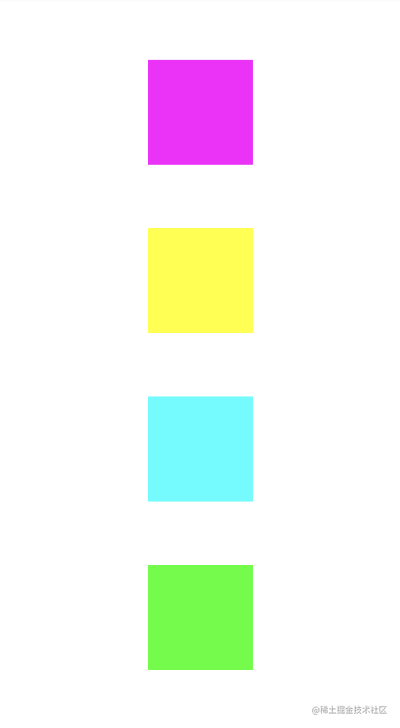
用得最多的非链式约束莫属了。这看起来是不是类似于相对布局?那么有人问了,既然相对布局写法这么简洁,都不用强制你写另一个方向的占满屏幕的约束,为什么还要使用约束布局呢?约束布局它还是有它过布局之处的,比如以下一些功能,相对布局是做不到的。
<?xml version="1.0" encoding="utf-8"?>
<androidx.constraintlayout.widget.ConstraintLayout xmlns:android="http://schemas.android.com/apk/res/android"
    xmlns:app="http://schemas.android.com/apk/res-auto"
    xmlns:tools="http://schemas.android.com/tools"
    android:layout_width="match_parent"
    android:layout_height="match_parent">
    <ImageView
        android:id="@+id/iv1"
        android:layout_width="100dp"
        android:layout_height="100dp"
        android:background="#F0F"
        app:layout_constraintVertical_chainStyle="spread"
        app:layout_constraintTop_toTopOf="parent"
        app:layout_constraintEnd_toEndOf="parent"
        app:layout_constraintStart_toStartOf="parent"
        app:layout_constraintBottom_toTopOf="@+id/iv2"/>

    <ImageView
        android:id="@+id/iv2"
        android:layout_width="100dp"
        android:layout_height="100dp"
        android:background="#FF0"
        app:layout_constraintBottom_toTopOf="@id/iv3"
        app:layout_constraintEnd_toEndOf="parent"
        app:layout_constraintStart_toStartOf="parent"
        app:layout_constraintTop_toBottomOf="@+id/iv1"/>
    <ImageView
        android:id="@+id/iv3"
        android:layout_width="100dp"
        android:layout_height="100dp"
        android:background="#0FF"
        app:layout_constraintBottom_toTopOf="@id/iv4"
        app:layout_constraintEnd_toEndOf="parent"
        app:layout_constraintStart_toStartOf="parent"
        app:layout_constraintTop_toBottomOf="@+id/iv2"/>
    <ImageView
        android:id="@+id/iv4"
        android:layout_width="100dp"
        android:layout_height="100dp"
        android:background="#0F0"
        app:layout_constraintBottom_toBottomOf="parent"
        app:layout_constraintEnd_toEndOf="parent"
        app:layout_constraintStart_toStartOf="parent"
        app:layout_constraintTop_toBottomOf="@+id/iv3"/>
</androidx.constraintlayout.widget.ConstraintLayout>
我们可以在链首的控件添加一个layout_constraintVertical_chainStyle属性为spread,翻译成展开,在我看来就是排队,要保持间距一样,而且边缘不能站,默认不写也是指定的spread。
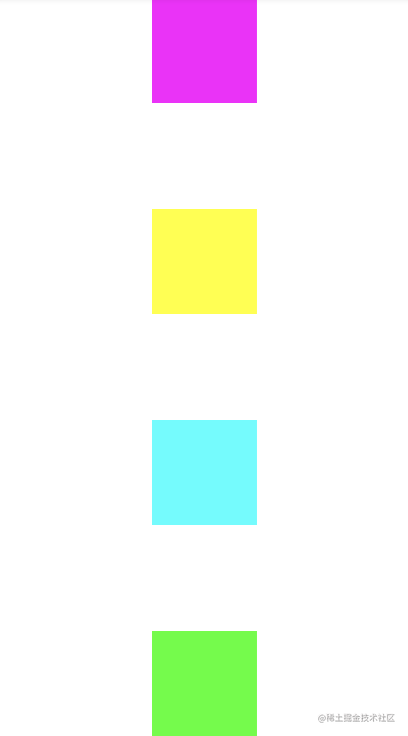
如果你改成spread_inside,就会变成可以靠墙的情况。
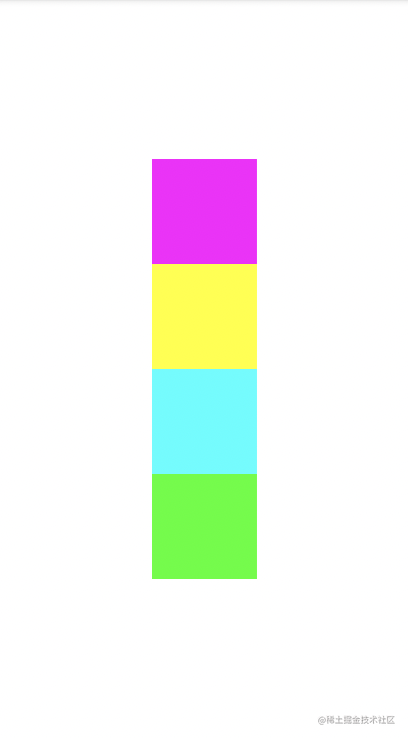
那如果你改成packed,就会贴在一起了。
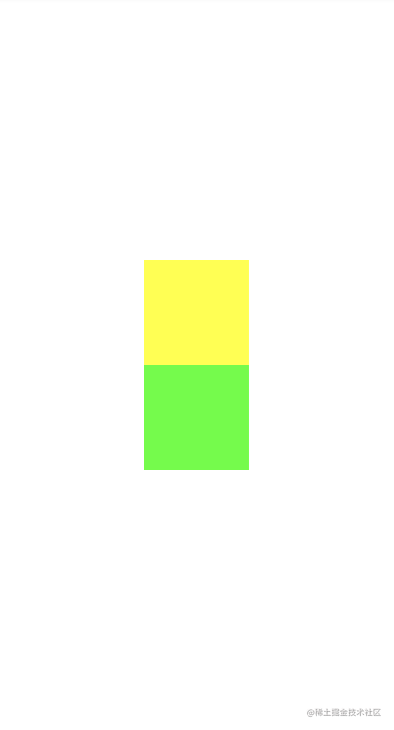
使用Group分组进行显示和隐藏
而如果你添加以下代码在布局中,就会将id为iv1和iv3点色块去掉,这样iv2和iv4就贴在一起了。
<androidx.constraintlayout.widget.Group
    android:id="@+id/group"
    android:layout_width="wrap_content"
    android:layout_height="wrap_content"
    android:visibility="gone"
    app:constraint_referenced_ids="iv1,iv3" />
Guideline引导线
<androidx.constraintlayout.widget.Guideline
    android:layout_width="wrap_content"
    android:layout_height="wrap_content"
    android:orientation="vertical"
    app:layout_constraintGuide_percent="0.5"/>
使用引导线,可以在预览布局的时候看到,在运行时是看不到的,可以作为布局的参考线。
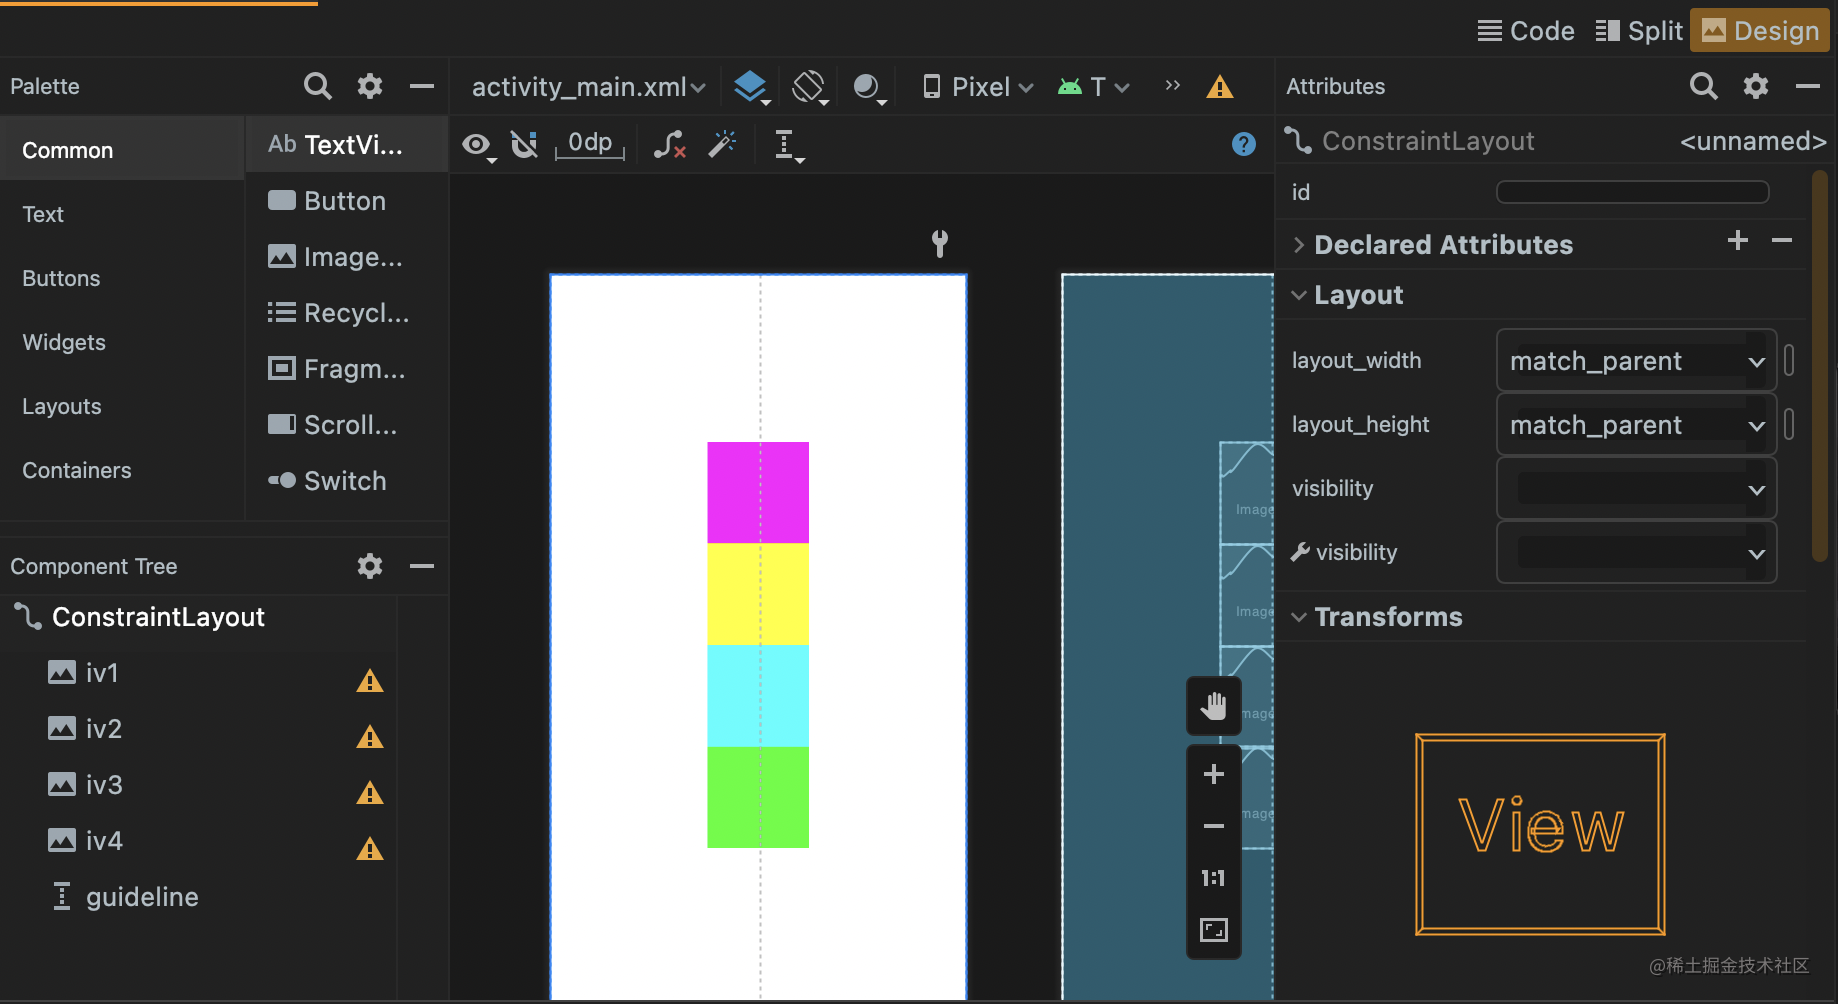
切换到Design的选项卡你就能看到了。
引导线的另外两个属性是layout_constraintGuide_begin和layout_constraintGuide_end,一看就知道这个是使用边距定位的。
角度约束
角度约束的以下三个属性是一起使用的。
layout_constraintCircle
layout_constraintCircleAngle
layout_constraintCircleRadius
<androidx.constraintlayout.widget.ConstraintLayout xmlns:android="http://schemas.android.com/apk/res/android"
    xmlns:app="http://schemas.android.com/apk/res-auto"
    xmlns:tools="http://schemas.android.com/tools"
    android:layout_width="match_parent"
    android:layout_height="match_parent">

    <ImageView
        android:id="@+id/iv1"
        android:layout_width="100dp"
        android:layout_height="100dp"
        android:background="#FFC0C0"
        app:layout_constraintTop_toTopOf="parent"
        app:layout_constraintEnd_toEndOf="parent"
        app:layout_constraintStart_toStartOf="parent"
        app:layout_constraintBottom_toBottomOf="parent"/>

    <ImageView
        android:id="@+id/iv2"
        android:layout_width="100dp"
        android:layout_height="100dp"
        android:background="#FF0"
        app:layout_constraintCircle="@id/iv1"
        app:layout_constraintCircleAngle="30"
        app:layout_constraintCircleRadius="150dp"/>
    <androidx.constraintlayout.widget.Guideline
        android:layout_width="wrap_content"
        android:layout_height="wrap_content"
        android:orientation="horizontal"
        app:layout_constraintGuide_percent="0.5"/>
    <androidx.constraintlayout.widget.Guideline
        android:layout_width="wrap_content"
        android:layout_height="wrap_content"
        android:orientation="vertical"
        app:layout_constraintGuide_percent="0.5"/>

</androidx.constraintlayout.widget.ConstraintLayout>
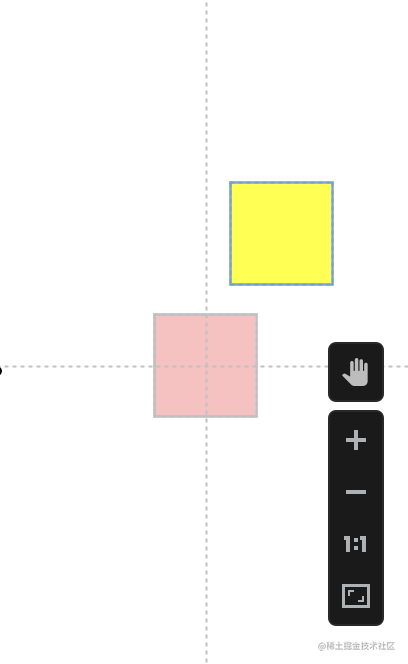
知道你们喜欢粉嫩的,所以特地把色块的颜色换了一下。旋转角是以垂直向上为0度角,顺时针旋转30度。距离则是计算两控件重心的连线。在矩形区域中,重心就在对角线的交叉点。
位置百分比偏移
<?xml version="1.0" encoding="utf-8"?>
<androidx.constraintlayout.widget.ConstraintLayout xmlns:android="http://schemas.android.com/apk/res/android"
    xmlns:app="http://schemas.android.com/apk/res-auto"
    xmlns:tools="http://schemas.android.com/tools"
    android:layout_width="match_parent"
    android:layout_height="match_parent">

    <ImageView
        android:id="@+id/iv1"
        android:layout_width="100dp"
        android:layout_height="100dp"
        android:background="#FFC0C0"
        app:layout_constraintStart_toStartOf="parent"
        app:layout_constraintEnd_toEndOf="parent"
        app:layout_constraintHorizontal_bias="0.5"
        app:layout_constraintTop_toTopOf="parent"
        app:layout_constraintBottom_toTopOf="@+id/iv2"/>

    <ImageView
        android:id="@+id/iv2"
        android:layout_width="100dp"
        android:layout_height="100dp"
        android:background="#FF0"
        app:layout_constraintStart_toStartOf="parent"
        app:layout_constraintEnd_toEndOf="parent"
        app:layout_constraintHorizontal_bias="0.4"
        app:layout_constraintBottom_toBottomOf="parent"
        app:layout_constraintTop_toBottomOf="@+id/iv1"/>
    <androidx.constraintlayout.widget.Guideline
        android:layout_width="wrap_content"
        android:layout_height="wrap_content"
        android:orientation="vertical"
        app:layout_constraintGuide_percent="0.5"/>
</androidx.constraintlayout.widget.ConstraintLayout>
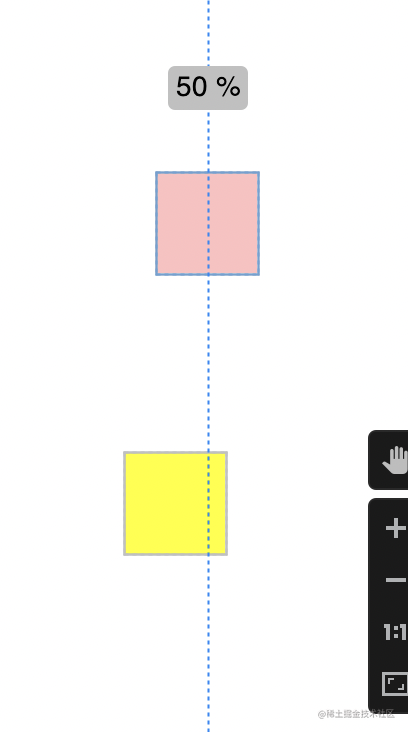
这里需要注意,不是只使用layout_constraintHorizontal_bias就可以了,原有该方向的约束也不能少。
使用goneMargin设置被依赖的控件gone时,依赖控件的边距
goneMargin有以下属性:
layout_goneMarginStart
layout_goneMarginEnd
layout_goneMarginTop
layout_goneMarginBottom
<?xml version="1.0" encoding="utf-8"?>
<androidx.constraintlayout.widget.ConstraintLayout xmlns:android="http://schemas.android.com/apk/res/android"
    xmlns:app="http://schemas.android.com/apk/res-auto"
    xmlns:tools="http://schemas.android.com/tools"
    android:layout_width="match_parent"
    android:layout_height="match_parent"
    tools:context=".MainActivity">

    <ImageView
        android:id="@+id/iv1"
        android:layout_width="100dp"
        android:layout_height="100dp"
        android:background="#FFC0C0"
        android:visibility="gone"
        app:layout_constraintTop_toTopOf="parent"
        app:layout_constraintEnd_toEndOf="parent"
        app:layout_constraintStart_toStartOf="parent"
        app:layout_constraintBottom_toTopOf="@+id/iv2"/>

    <ImageView
        android:id="@+id/iv2"
        android:layout_width="100dp"
        android:layout_height="100dp"
        android:background="#FF0"
        app:layout_goneMarginTop="10dp"
        app:layout_constraintTop_toBottomOf="@+id/iv1"
        app:layout_constraintEnd_toEndOf="parent"
        app:layout_constraintStart_toStartOf="parent"/>

    <androidx.constraintlayout.widget.Guideline
        android:layout_width="wrap_content"
        android:layout_height="wrap_content"
        android:orientation="horizontal"
        app:layout_constraintGuide_begin="10dp"/>
</androidx.constraintlayout.widget.ConstraintLayout>
约束宽高比
<?xml version="1.0" encoding="utf-8"?>
<androidx.constraintlayout.widget.ConstraintLayout xmlns:android="http://schemas.android.com/apk/res/android"
    xmlns:app="http://schemas.android.com/apk/res-auto"
    xmlns:tools="http://schemas.android.com/tools"
    android:layout_width="match_parent"
    android:layout_height="match_parent">

    <ImageView
        android:id="@+id/iv1"
        android:layout_width="0dp"
        android:layout_height="100dp"
        app:layout_constraintDimensionRatio="1:1"
        android:background="#FFC0C0"
        app:layout_constraintStart_toStartOf="parent"
        app:layout_constraintEnd_toEndOf="parent"
        app:layout_constraintTop_toTopOf="parent"
        app:layout_constraintBottom_toTopOf="@id/iv2"/>

    <ImageView
        android:id="@+id/iv2"
        android:layout_width="100dp"
        android:layout_height="0dp"
        android:background="#FF0"
        app:layout_constraintDimensionRatio="H,3:2"
        app:layout_constraintStart_toStartOf="parent"
        app:layout_constraintEnd_toEndOf="parent"
        app:layout_constraintTop_toBottomOf="@id/iv1"
        app:layout_constraintBottom_toBottomOf="parent"/>
</androidx.constraintlayout.widget.ConstraintLayout>
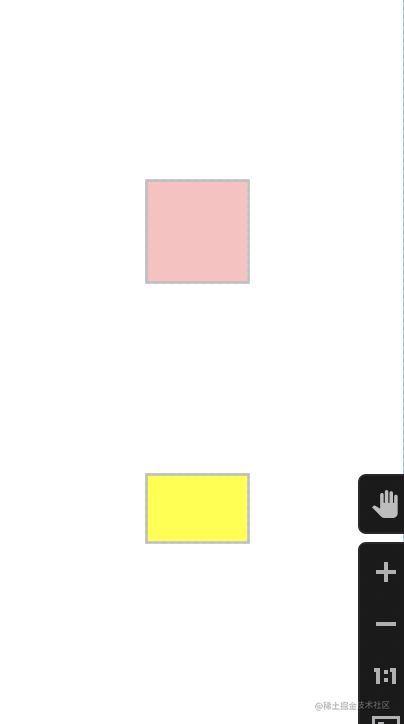
我们可以将宽高的其中一个设置为0dp,然后这个宽或高根据相对于另一个的比例来。如果高度为0dp,需要根据宽度来确认高度,你可以直接赋值为3:2,也可以赋值为H,3:2,这也是推荐的写法,我一般省略W和H。如果高度为0dp,你本应该写H,而你写成了W,那就要把比例反过来看宽高比。
权重约束
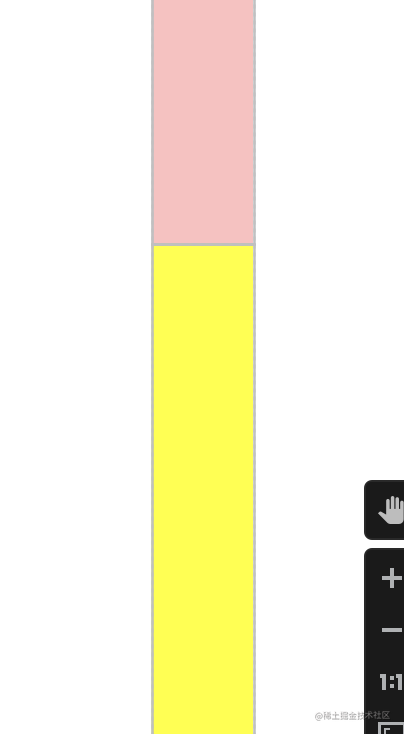
这个类似于线性布局的权重功能。
<?xml version="1.0" encoding="utf-8"?>
<androidx.constraintlayout.widget.ConstraintLayout xmlns:android="http://schemas.android.com/apk/res/android"
    xmlns:app="http://schemas.android.com/apk/res-auto"
    xmlns:tools="http://schemas.android.com/tools"
    android:layout_width="match_parent"
    android:layout_height="match_parent">

    <ImageView
        android:id="@+id/iv1"
        android:layout_width="100dp"
        android:layout_height="0dp"
        app:layout_constraintVertical_weight="1"
        android:background="#FFC0C0"
        app:layout_constraintStart_toStartOf="parent"
        app:layout_constraintEnd_toEndOf="parent"
        app:layout_constraintTop_toTopOf="parent"
        app:layout_constraintBottom_toTopOf="@id/iv2"/>

    <ImageView
        android:id="@+id/iv2"
        android:layout_width="100dp"
        android:layout_height="0dp"
        app:layout_constraintVertical_weight="2"
        android:background="#FF0"
        app:layout_constraintStart_toStartOf="parent"
        app:layout_constraintEnd_toEndOf="parent"
        app:layout_constraintTop_toBottomOf="@id/iv1"
        app:layout_constraintBottom_toBottomOf="parent"/>
</androidx.constraintlayout.widget.ConstraintLayout>




![代码解读 | Hybrid Transformers for Music Source Separation[02]](https://img-blog.csdnimg.cn/direct/1b2eab28f1f14dfba4c186937f998177.png)

