文章目录
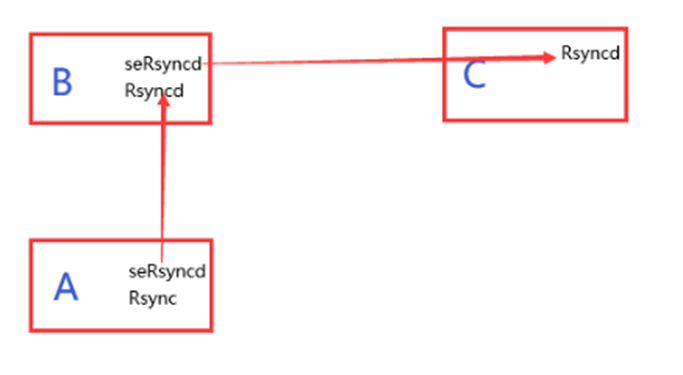
- 1,结构图
- 2,节点A
- 2.1 安装rsync
- 2.2 安装seRsync
- 2.3, 创建seRsync的守护进程用systemd管理并启动
- 2.4,上传rsync.pass密码文件到配置文件目录:/etc/
- 2.5 ,重新加载systemd,启动sersyncd守护进程并配置开机自启
- 3,节点B
- 3.1 ,安装Rsync
- 3.2创建Rsync配置文件`rsyncd.conf`、密码文件`rsync.pass`到配置文件目录:`/etc/`
- 3.3,启动Rsyncd
- 3.4, 安装seRsync
- 3.5 创建seRsync的守护进程用systemd管理并启动
- 上传sersyncd4tomcat.service和sersyncd4www.service到systemd配置文件路径:`/usr/lib/systemd/system/`
- 4,节点C
- 4.1 安装Rsync
- 4.2、配置Rsync
- 4.3、启动Rsync
1,结构图
2,节点A
2.1 安装rsync
yum install -y rsync
2.2 安装seRsync
下载这个压缩包sersync2.5.4_64bit_binary_stable_final.tar.gz
解压后,将sersync2复制到系统可执行程序路径:/usr/local/bin/;创建sersync配置目录,并在里面创建配置文件tomcat.xml 和www.xml并写入数据
tar -xvzf sersync2.5.4_64bit_binary_stable_final.tar.gz
cp ./GNU-Linux-x86/sersync2 /usr/local/bin/
mkdir /etc/sersync
vim /etc/sersync/tomcat.xml
vim /etc/sersync/www.xml
- tomcat.xml具体内容
<?xml version="1.0" encoding="ISO-8859-1"?>
<head version="2.5">
    <host hostip="localhost" port="8008"></host>
    <debug start="true"/>
    <fileSystem xfs="false"/>
    <filter start="true">
    <exclude expression="^logs/*"></exclude>
    <exclude expression="^webapps/pcPublish/*"></exclude>
    </filter>
    <inotify>
    <delete start="true"/>
    <createFolder start="true"/>
    <createFile start="true"/>
    <closeWrite start="true"/>
    <moveFrom start="true"/>
    <moveTo start="true"/>
    <attrib start="false"/>
    <modify start="false"/>
    </inotify>


    <sersync>
    <localpath watch="/vdb/eastmoney/apache-tomcat-8.5.27/">
        <remote ip="10.195.24.97" name="tomcat"/>
        <!--<remote ip="192.168.8.39" name="tongbu"/>-->
        <!--<remote ip="192.168.8.40" name="tongbu"/>-->
    </localpath>
    <rsync>
        <commonParams params="-artuz"/>
        <auth start="true" users="rsync" passwordfile="/etc/rsync.pass"/>
        <userDefinedPort start="false" port="873"/><!-- port=874 -->
        <timeout start="false" time="100"/><!-- timeout=100 -->
        <ssh start="false"/>
    </rsync>
    <failLog path="/tmp/rsync_fail_log.sh" timeToExecute="60"/><!--default every 60mins execute once-->
    <crontab start="false" schedule="720"><!--600mins-->
        <crontabfilter start="true">
            <exclude expression="^logs/*"></exclude>
            <exclude expression="^webapps/pcPublish/*"></exclude>
        </crontabfilter>
    </crontab>
    <plugin start="false" name="command"/>
    </sersync>
</head>
-www.xml具体内容
<?xml version="1.0" encoding="ISO-8859-1"?>
<head version="2.5">
    <host hostip="localhost" port="8008"></host>
    <debug start="true"/>
    <fileSystem xfs="false"/>
    <filter start="true">
    <exclude expression="^load-control.html*"></exclude>
    </filter>
    <inotify>
    <delete start="true"/>
    <createFolder start="true"/>
    <createFile start="true"/>
    <closeWrite start="true"/>
    <moveFrom start="true"/>
    <moveTo start="true"/>
    <attrib start="false"/>
    <modify start="false"/>
    </inotify>


    <sersync>
    <localpath watch="/vdb/eastmoney/data0/htdocs/www/">
        <remote ip="10.195.24.97" name="www"/>
        <!--<remote ip="192.168.8.39" name="tongbu"/>-->
        <!--<remote ip="192.168.8.40" name="tongbu"/>-->
    </localpath>
    <rsync>
        <commonParams params="-artuz"/>
        <auth start="true" users="rsync" passwordfile="/etc/rsync.pass"/>
        <userDefinedPort start="false" port="873"/><!-- port=874 -->
        <timeout start="false" time="100"/><!-- timeout=100 -->
        <ssh start="false"/>
    </rsync>
    <failLog path="/tmp/rsync_fail_log.sh" timeToExecute="60"/><!--default every 60mins execute once-->
    <crontab start="false" schedule="720"><!--600mins-->
        <crontabfilter start="true">
            <exclude expression="^load-control.html*"></exclude>
        </crontabfilter>
    </crontab>
    <plugin start="false" name="command"/>
    </sersync>
</head>
2.3, 创建seRsync的守护进程用systemd管理并启动
创建sersyncd4tomcat.service 和 sersyncd4www.service到systemd配置文件路径:/usr/lib/systemd/system/
sersyncd4tomcat.service具体内容
[Unit]
Description=Client for rsync
After=network.target
[Service]
Type=forking
ExecStart=/usr/local/bin/sersync2 -rdo /etc/sersync/tomcat.xml
ExecReload=pidof sersync2|xargs kill -1
ExecStop=pidof sersync2|xargs kill -3
[Install]
WantedBy=multi-user.target
sersyncd4www.service具体内容
[Unit]
Description=Client for rsync
After=network.target
[Service]
Type=forking
ExecStart=/usr/local/bin/sersync2 -rdo /etc/sersync/www.xml
ExecReload=pidof sersync2|xargs kill -1
ExecStop=pidof sersync2|xargs kill -3
[Install]
WantedBy=multi-user.target
2.4,上传rsync.pass密码文件到配置文件目录:/etc/
rsync.pass密码文件具体内容是
r_SynC-2021#@2021-RsyN_c
密码文件中,“r_SynC-2021#@2021-RsyN_c”与同步逻辑下游节点B的rsync配置文件相对应。
为节点B的rsyncd.conf中“auth users”字段配置的同步用rsync用户密码,节点B的密码保存在节点B的rsync.pass密码文件中。(非操作系统用户)
rsync.pass权限应为600
chmod 600 /etc/rsync.pass
2.5 ,重新加载systemd,启动sersyncd守护进程并配置开机自启
systemctl daemon-reload
systemctl enable sersyncd4tomcat
systemctl enable sersyncd4www
systemctl start sersyncd4tomcat
systemctl start sersyncd4www
3,节点B
3.1 ,安装Rsync
yum install rsync -y
vim /etc/rsyncd.conf
vim /etc/rsync.pass
3.2创建Rsync配置文件rsyncd.conf、密码文件rsync.pass到配置文件目录:/etc/
rsyncd.conf内容长这样:
pid file = /var/run/rsyncd.pid
log file = /var/log/rsyncd.log
lock file = /var/run/rsyncd.lock
motd file = /etc/rsyncd.motd
dont compress = *.gz *.tgz *.zip *.z *.Z *.rpm *.deb *.bz2
uid = root
gid = root
port = 873
read only = no
write only = yes
list = no
auth users = rsync
secrets file = /etc/rsync.pass
use chroot = no
max connections = 300
hosts allow = 10.195.24.97
hosts deny = 0.0.0.0/0
timeout = 300
[tomcat]
path = /vdb/eastmoney/apache-tomcat-8.5.27/
exclude = logs/ webapps/load-control.html* webapps/pcPublish
[www]
path = /vdb/eastmoney/data0/htdocs/www/
exclude = load-control.html*
-rsync.pass内容长这样:
r_SynC-2021#@2021-RsyN_c
rsync:r_SynC-2021#@2021-RsyN_c
- 密码文件中,第1行的“r_SynC-2021#@2021-RsyN_c”与同步逻辑下游节点C的rsync配置文件相对应。为节点C的rsyncd.conf中“auth users”字段配置的同步用rsync用户密码,节点C的密码保存在节点C的rsync.pass密码文件中。(非操作系统用户)
- 密码文件中,第2行的“rsync:r_SynC-2021#@2021-RsyN_c”与同步逻辑上游节点A的sersync配置文件相对应。为节点A的tomcat.xml和www.xml中head.rsync.auth的user用户和passoredfile指定密码文件中的密码。
写法为<上游同步用用户>:<上游同步用用户密码>(非操作系统用户)
rsync.pass权限应为600
chmod 600 /etc/rsync.pass
3.3,启动Rsyncd
启动rsyncd守护进程并配置开机自启。
systemctl enable rsyncd
systemctl start rsyncd
3.4, 安装seRsync
同样地把刚才解压的那个sersync2文件复制到节点B的系统可执行程序路径:/usr/local/bin/;创建sersync配置目录/etc/sersync/并上传配置文件tomcat.xml 和www.xml。
tomcat.xml内容长这样:
<?xml version="1.0" encoding="ISO-8859-1"?>
<head version="2.5">
    <host hostip="localhost" port="8008"></host>
    <debug start="true"/>
    <fileSystem xfs="false"/>
    <filter start="true">
    <exclude expression="^logs/*"></exclude>
    <exclude expression="^webapps/pcPublish/*"></exclude>
    </filter>
    <inotify>
    <delete start="true"/>
    <createFolder start="true"/>
    <createFile start="true"/>
    <closeWrite start="true"/>
    <moveFrom start="true"/>
    <moveTo start="true"/>
    <attrib start="false"/>
    <modify start="false"/>
    </inotify>


    <sersync>
    <localpath watch="/vdb/eastmoney/apache-tomcat-8.5.27/">
        <remote ip="10.205.204.199" name="tomcat"/>
        <!--<remote ip="192.168.8.39" name="tongbu"/>-->
        <!--<remote ip="192.168.8.40" name="tongbu"/>-->
    </localpath>
    <rsync>
        <commonParams params="-artuz"/>
        <auth start="true" users="rsync" passwordfile="/etc/rsync.pass"/>
        <userDefinedPort start="false" port="873"/><!-- port=874 -->
        <timeout start="false" time="100"/><!-- timeout=100 -->
        <ssh start="false"/>
    </rsync>
    <failLog path="/tmp/rsync_fail_log.sh" timeToExecute="60"/><!--default every 60mins execute once-->
    <crontab start="false" schedule="720"><!--600mins-->
        <crontabfilter start="true">
            <exclude expression="^logs/*"></exclude>
            <exclude expression="^webapps/pcPublish/*"></exclude>
        </crontabfilter>
    </crontab>
    <plugin start="false" name="command"/>
    </sersync>
</head>
-www.xml 内容长这样
<?xml version="1.0" encoding="ISO-8859-1"?>
<head version="2.5">
    <host hostip="localhost" port="8008"></host>
    <debug start="true"/>
    <fileSystem xfs="false"/>
    <filter start="true">
    <exclude expression="^load-control.html*"></exclude>
    </filter>
    <inotify>
    <delete start="true"/>
    <createFolder start="true"/>
    <createFile start="true"/>
    <closeWrite start="true"/>
    <moveFrom start="true"/>
    <moveTo start="true"/>
    <attrib start="false"/>
    <modify start="false"/>
    </inotify>


    <sersync>
    <localpath watch="/vdb/eastmoney/data0/htdocs/www/">
        <remote ip="10.205.204.199" name="www"/>
        <!--<remote ip="192.168.8.39" name="tongbu"/>-->
        <!--<remote ip="192.168.8.40" name="tongbu"/>-->
    </localpath>
    <rsync>
        <commonParams params="-artuz"/>
        <auth start="true" users="rsync" passwordfile="/etc/rsync.pass"/>
        <userDefinedPort start="false" port="873"/><!-- port=874 -->
        <timeout start="false" time="100"/><!-- timeout=100 -->
        <ssh start="false"/>
    </rsync>
    <failLog path="/tmp/rsync_fail_log.sh" timeToExecute="60"/><!--default every 60mins execute once-->
    <crontab start="false" schedule="720"><!--600mins-->
        <crontabfilter start="true">
            <exclude expression="^load-control.html*"></exclude>
        </crontabfilter>
    </crontab>
    <plugin start="false" name="command"/>
    </sersync>
</head>
3.5 创建seRsync的守护进程用systemd管理并启动
上传sersyncd4tomcat.service和sersyncd4www.service到systemd配置文件路径:/usr/lib/systemd/system/
sersyncd4tomcat.service内容长这样:
[Unit]
Description=Client for rsync
After=network.target
[Service]
Type=forking
ExecStart=/usr/local/bin/sersync2 -rdo /etc/sersync/tomcat.xml
ExecReload=pidof sersync2|xargs kill -1
ExecStop=pidof sersync2|xargs kill -3
[Install]
WantedBy=multi-user.target
sersyncd4www.service内容长这样:
[Unit]
Description=Client for rsync
After=network.target
[Service]
Type=forking
ExecStart=/usr/local/bin/sersync2 -rdo /etc/sersync/www.xml
ExecReload=pidof sersync2|xargs kill -1
ExecStop=pidof sersync2|xargs kill -3
[Install]
WantedBy=multi-user.target
- 重新加载systemd,启动sersyncd守护进程并配置开机自启。
systemctl daemon-reload
systemctl enable sersyncd4tomcat
systemctl enable sersyncd4www
systemctl start sersyncd4tomcat
systemctl start sersyncd4www
4,节点C
4.1 安装Rsync
yum install -y rsync
4.2、配置Rsync
上传Rsync配置文件rsyncd.conf 、密码文件rsync.pass 到配置文件目录:/etc/。
rsyncd.conf内容长这样:
pid file = /var/run/rsyncd.pid
log file = /var/log/rsyncd.log
lock file = /var/run/rsyncd.lock
motd file = /etc/rsyncd.motd
dont compress = *.gz *.tgz *.zip *.z *.Z *.rpm *.deb *.bz2
uid = root
gid = root
port = 873
read only = no
write only = yes
list = no
auth users = rsync
secrets file = /etc/rsync.pass
use chroot = no
max connections = 300
hosts allow = 10.195.24.97
hosts deny = 0.0.0.0/0
timeout = 300
[tomcat]
path = /vdb/eastmoney/apache-tomcat-8.5.27/
exclude = logs/ webapps/load-control.html* webapps/pcPublish
[www]
path = /vdb/eastmoney/data0/htdocs/www/
exclude = load-control.html*
rsync.pass内容长这样:
rsync:r_SynC-2021#@2021-RsyN_c
rsync.pass权限应为600
chmod 600 /etc/rsync.pass
密码文件中,“rsync:r_SynC-2021#@2021-RsyN_c”与同步逻辑上游节点B的sersync配置文件相对应。为节点B的tomcat.xml和www.xml中head.rsync.auth的user用户和passoredfile指定密码文件中的密码。
写法为<上游同步用用户>:<上游同步用用户密码>(非操作系统用户)
4.3、启动Rsync
启动rsyncd守护进程并配置开机自启。
systemctl enable rsyncd
systemctl start rsyncd