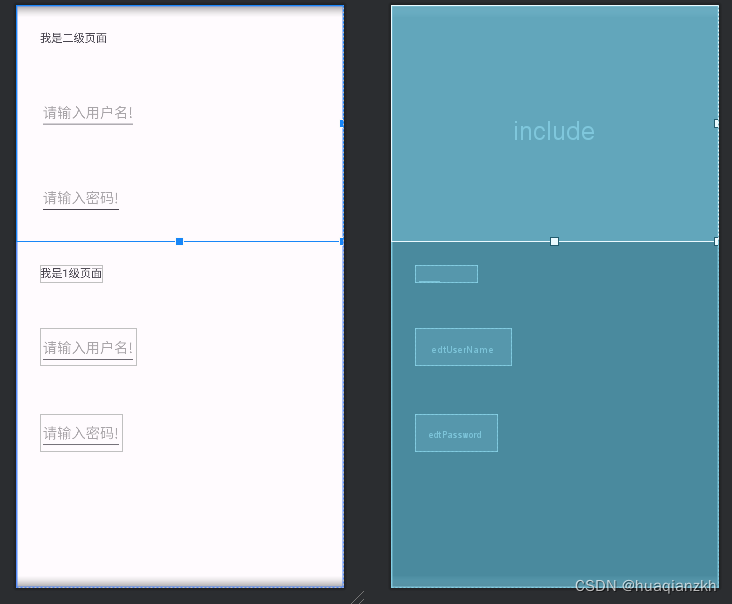
本篇介绍数据源从activity_main(1级页面)传递给include布局(2级页面)。
1.实现步骤
step1.修改build.gradle文件
修改app模块下的build.gradle文件,增加如下内容:
    dataBinding {
        enabled = true
    }
step2.创建模型类User类。
package com.gaoting.databindingtosecondpage;

public class User {
    public String userName;
    public String password;
}
step3.修改activity_main.xml 布局文件
在<data>标签页下面创建变量user。
<?xml version="1.0" encoding="utf-8"?>
<layout xmlns:android="http://schemas.android.com/apk/res/android"
    xmlns:tools="http://schemas.android.com/tools">

    <data>
        <variable
            name="user"
            type="com.gaoting.databindingtosecondpage.User" />
    </data>

    <LinearLayout
        android:layout_width="match_parent"
        android:layout_height="match_parent"
        android:orientation="vertical"
        tools:context=".MainActivity">

        <TextView
            android:layout_margin="30dp"
            android:text="我是1级页面"
            android:layout_width="wrap_content"
            android:layout_height="wrap_content" />
        <EditText
            android:layout_margin="30dp"
            android:text="@{user.userName}"
            android:id="@+id/edtUserName"
            android:layout_width="wrap_content"
            android:layout_height="wrap_content"
            android:hint="请输入用户名!" />

        <EditText
            android:layout_margin="30dp"
            android:text="@{user.password}"
            android:id="@+id/edtPassword"
            android:layout_width="wrap_content"
            android:layout_height="wrap_content"
            android:hint="请输入密码!" />

    </LinearLayout>
</layout>
在MainActivity中使用ActivityMainBingding对象就可以操控UI控件。
package com.gaoting.databindingtosecondpage;

import android.os.Bundle;

import androidx.activity.EdgeToEdge;
import androidx.appcompat.app.AppCompatActivity;
import androidx.core.graphics.Insets;
import androidx.core.view.ViewCompat;
import androidx.core.view.WindowInsetsCompat;
import androidx.databinding.DataBindingUtil;

import com.gaoting.databindingtosecondpage.databinding.ActivityMainBinding;

public class MainActivity extends AppCompatActivity {

    ActivityMainBinding activityMainBinding;

    @Override
    protected void onCreate(Bundle savedInstanceState) {
        super.onCreate(savedInstanceState);

        activityMainBinding = DataBindingUtil.setContentView(this,R.layout.activity_main);
        User user = new User();
        user.userName="gaoting";
        user.password="123456";
        activityMainBinding.setUser(user);
    }
}
step4.创建second_include.xml布局文件
创建second_include.xml布局文件,把XML布局文件转换为DataBinding可以识别和绑定的布局文件。(选中根节点LinearLayout,按Alt+Enter弹出快捷菜单Convert to data binding layout。),在<data>节点下要引入变量user,代码如下:
<?xml version="1.0" encoding="utf-8"?>
<layout xmlns:android="http://schemas.android.com/apk/res/android">

    <data>
        <variable
            name="user"
            type="com.gaoting.databindingtosecondpage.User" />
    </data>

    <LinearLayout
        android:orientation="vertical"
        android:layout_width="match_parent"
        android:layout_height="wrap_content">

        <TextView
            android:layout_margin="30dp"
            android:text="我是二级页面"
            android:layout_width="wrap_content"
            android:layout_height="wrap_content" />

        <EditText
            android:layout_margin="30dp"
            android:text="@{user.userName}"
            android:id="@+id/edtUserName"
            android:layout_width="wrap_content"
            android:layout_height="wrap_content"
            android:hint="请输入用户名!" />

        <EditText
            android:layout_margin="30dp"
            android:text="@{user.password}"
            android:id="@+id/edtPassword"
            android:layout_width="wrap_content"
            android:layout_height="wrap_content"
            android:hint="请输入密码!" />

    </LinearLayout>
</layout>
step5.关键步骤,引入app命名空间
引入app命名空间xmlns:app="http://schemas.android.com/apk/res-auto",然后把1级界面定义的变量传递给2级页面。方法如下:
<include layout="@layout/second_include" app:user="@{user}">
【注】include的用法:在开发Android布局时,我们常将一些通用的视图提取到一个单独的layout文件中,然后使用标签在需要使用的其他layout布局文件中加载进来,比如我们自己App导航栏等。这样,便于对相同视图内容进行统一的控制管理,提高布局重用性。
    <LinearLayout
        android:layout_width="match_parent"
        android:layout_height="match_parent"
        android:orientation="vertical"
        tools:context=".MainActivity">
        <include layout="@layout/second_include"
            app:user="@{user}">

        </include>
2.代码示例
完整的代码如下:
1)activity_main.xml
<?xml version="1.0" encoding="utf-8"?>
<layout xmlns:android="http://schemas.android.com/apk/res/android"
    xmlns:tools="http://schemas.android.com/tools"
    xmlns:app="http://schemas.android.com/apk/res-auto">

    <data>
        <variable
            name="user"
            type="com.gaoting.databindingtosecondpage.User" />
    </data>

    <LinearLayout
        android:layout_width="match_parent"
        android:layout_height="match_parent"
        android:orientation="vertical"
        tools:context=".MainActivity">
        <include layout="@layout/second_include"
            app:user="@{user}">

        </include>

        <TextView
            android:layout_margin="30dp"
            android:text="我是1级页面"
            android:layout_width="wrap_content"
            android:layout_height="wrap_content" />
        <EditText
            android:layout_margin="30dp"
            android:text="@{user.userName}"
            android:id="@+id/edtUserName"
            android:layout_width="wrap_content"
            android:layout_height="wrap_content"
            android:hint="请输入用户名!" />

        <EditText
            android:layout_margin="30dp"
            android:text="@{user.password}"
            android:id="@+id/edtPassword"
            android:layout_width="wrap_content"
            android:layout_height="wrap_content"
            android:hint="请输入密码!" />

    </LinearLayout>
</layout>
2)second_include.xml
<?xml version="1.0" encoding="utf-8"?>
<layout xmlns:android="http://schemas.android.com/apk/res/android">

    <data>
        <variable
            name="user"
            type="com.gaoting.databindingtosecondpage.User" />
    </data>

    <LinearLayout
        android:orientation="vertical"
        android:layout_width="match_parent"
        android:layout_height="wrap_content">

        <TextView
            android:layout_margin="30dp"
            android:text="我是二级页面"
            android:layout_width="wrap_content"
            android:layout_height="wrap_content" />

        <EditText
            android:layout_margin="30dp"
            android:text="@{user.userName}"
            android:id="@+id/edtUserName"
            android:layout_width="wrap_content"
            android:layout_height="wrap_content"
            android:hint="请输入用户名!" />

        <EditText
            android:layout_margin="30dp"
            android:text="@{user.password}"
            android:id="@+id/edtPassword"
            android:layout_width="wrap_content"
            android:layout_height="wrap_content"
            android:hint="请输入密码!" />

    </LinearLayout>
</layout>
3)MainActivity.java
package com.gaoting.databindingtosecondpage;

import android.os.Bundle;

import androidx.activity.EdgeToEdge;
import androidx.appcompat.app.AppCompatActivity;
import androidx.core.graphics.Insets;
import androidx.core.view.ViewCompat;
import androidx.core.view.WindowInsetsCompat;
import androidx.databinding.DataBindingUtil;

import com.gaoting.databindingtosecondpage.databinding.ActivityMainBinding;

public class MainActivity extends AppCompatActivity {

    ActivityMainBinding activityMainBinding;

    @Override
    protected void onCreate(Bundle savedInstanceState) {
        super.onCreate(savedInstanceState);

        activityMainBinding = DataBindingUtil.setContentView(this,R.layout.activity_main);
        User user = new User();
        user.userName="gaoting";
        user.password="123456";
        activityMainBinding.setUser(user);
    }
}
4)User.java
package com.gaoting.databindingtosecondpage;

public class User {
    public String userName;
    public String password;
}
UI控件: