窗口布局在onCreate方法中通过setContentView(R.layout.xxx)加载,但窗口的显示并不是在wm_on_create_called中, 而是在wm_on_resume_called后,也就是说应用onResume时此窗口是不可见的,真正可见是当此window窗口的mDrawState变化状态从NO_SURFACE -> DRAW_PENDING -> COMMIT_DRAW_PENDING -> HAS_DRAWN-> READY_TO_SHOW,然后才会将图层置为可见状态,这个在后面会讲解到。设置为可见的log如下:
05-25 10:56:31.956 1915 1973 V WindowManager: performShow on Window{f4647f5 u0 com.android.settings/com.android.settings.homepage.SettingsHomepageActivity}: mDrawState=READY_TO_SHOW readyForDisplay=true starting=false during animation: policyVis=true parentHidden=false tok.visibleRequested=true tok.visible=true animating=false tok animating=false Callers=com.android.server.wm.WindowState.performShowLocked:4372 com.android.server.wm.WindowStateAnimator.commitFinishDrawingLocked:256 com.android.server.wm.DisplayContent.lambda$new$8:1082 com.android.server.wm.DisplayContent.$r8$lambda$NJwM1ysKPNyOazqyI2QXlp2I4yA:0
05-25 10:56:31.962 1915 1973 V WindowManager: Showing Window{f4647f5 u0 com.android.settings/com.android.settings.homepage.SettingsHomepageActivity}: mDrawState=READY_TO_SHOW readyForDisplay=true starting=false during animation: policyVis=true parentHidden=false tok.visibleRequested=true tok.visible=true animating=true tok animating=false Callers=com.android.server.wm.WindowState.performShowLocked:4387 com.android.server.wm.WindowStateAnimator.commitFinishDrawingLocked:256 com.android.server.wm.DisplayContent.lambda$new$8:1082 com.android.server.wm.DisplayContent.$r8$lambda$NJwM1ysKPNyOazqyI2QXlp2I4yA:0
1. ActivityThread#handleResumeActivity
Activity启动时一开始都是置为不可见INVISIBLE的,然后才置为可见VISIBLE。
ActivityThread.java - OpenGrok cross reference for /frameworks/base/core/java/android/app/ActivityThread.java
@Override
public void handleResumeActivity(ActivityClientRecord r, boolean finalStateRequest,
boolean isForward, boolean shouldSendCompatFakeFocus, String reason) {
// If we are getting ready to gc after going to the background, well
// we are back active so skip it.
unscheduleGcIdler();
mSomeActivitiesChanged = true;
// TODO Push resumeArgs into the activity for consideration
// skip below steps for double-resume and r.mFinish = true case.
//这个是activity resume很重要的一步,会调用到activity本身的onResume方法,后面会做详细解释
if (!performResumeActivity(r, finalStateRequest, reason)) {
return;
}
//如果mActivitiesToBeDestroyed集合包含此acitivity,则不往下执行resume操作。
//mActivitiesToBeDestroyed是即将 要销毁的activity集合
if (mActivitiesToBeDestroyed.containsKey(r.token)) {
// Although the activity is resumed, it is going to be destroyed. So the following
// UI operations are unnecessary and also prevents exception because its token may
// be gone that window manager cannot recognize it. All necessary cleanup actions
// performed below will be done while handling destruction.
return;
}
final Activity a = r.activity;
if (localLOGV) {
Slog.v(TAG, "Resume " + r + " started activity: " + a.mStartedActivity
+ ", hideForNow: " + r.hideForNow + ", finished: " + a.mFinished);
}
...
//如果这个window没有被add进window manager,并且这个activity没有执行finish操作,或者启动其他activity,则首先要将此window添加进window manager中。
boolean willBeVisible = !a.mStartedActivity;
if (!willBeVisible) {
willBeVisible = ActivityClient.getInstance().willActivityBeVisible(
a.getActivityToken());
}
//这里代表这是首次启动这个activity
//如果window为空,并且不要执行finish,并且申请可见,则进入如下逻辑
if (r.window == null && !a.mFinished && willBeVisible) {
r.window = r.activity.getWindow();
View decor = r.window.getDecorView();
//先将根布局设置为不可见
decor.setVisibility(View.INVISIBLE);
//获取当前window manager对象
ViewManager wm = a.getWindowManager();
//获取当前window属性
WindowManager.LayoutParams l = r.window.getAttributes();
a.mDecor = decor;
//将window type类型设置为普通APP类型
l.type = WindowManager.LayoutParams.TYPE_BASE_APPLICATION;
l.softInputMode |= forwardBit;
if (r.mPreserveWindow) {
a.mWindowAdded = true;
r.mPreserveWindow = false;
// Normally the ViewRoot sets up callbacks with the Activity
// in addView->ViewRootImpl#setView. If we are instead reusing
// the decor view we have to notify the view root that the
// callbacks may have changed.
//获取ViewRootImpl
ViewRootImpl impl = decor.getViewRootImpl();
if (impl != null) {
impl.notifyChildRebuilt();
}
}
if (a.mVisibleFromClient) {
if (!a.mWindowAdded) {
a.mWindowAdded = true;
//如果此window没有被add进window manager过,则将此根view(decor)add进window manager中
wm.addView(decor, l);
} else {
// The activity will get a callback for this {@link LayoutParams} change
// earlier. However, at that time the decor will not be set (this is set
// in this method), so no action will be taken. This call ensures the
// callback occurs with the decor set.
a.onWindowAttributesChanged(l);
}
}
// If the window has already been added, but during resume
// we started another activity, then don't yet make the
// window visible.
} else if (!willBeVisible) {//如果这个activity已经被add进window manager过了,并且在resume期间又起了其他activity,那么我们就不会将这个window设置为可见
if (localLOGV) Slog.v(TAG, "Launch " + r + " mStartedActivity set");
//设置立即hide的flag为true
r.hideForNow = true;
}
// Get rid of anything left hanging around.
cleanUpPendingRemoveWindows(r, false /* force */);
// The window is now visible if it has been added, we are not
// simply finishing, and we are not starting another activity.
//这里代表这个activity已经被添加进window manager了,并非首次启动
if (!r.activity.mFinished && willBeVisible && r.activity.mDecor != null && !r.hideForNow) {
if (localLOGV) Slog.v(TAG, "Resuming " + r + " with isForward=" + isForward);
//获取ViewRootImpl
ViewRootImpl impl = r.window.getDecorView().getViewRootImpl();
//获取窗口属性
WindowManager.LayoutParams l = impl != null
? impl.mWindowAttributes : r.window.getAttributes();
if ((l.softInputMode
& WindowManager.LayoutParams.SOFT_INPUT_IS_FORWARD_NAVIGATION)
!= forwardBit) {
l.softInputMode = (l.softInputMode
& (~WindowManager.LayoutParams.SOFT_INPUT_IS_FORWARD_NAVIGATION))
| forwardBit;
if (r.activity.mVisibleFromClient) {
ViewManager wm = a.getWindowManager();
View decor = r.window.getDecorView();
wm.updateViewLayout(decor, l);
}
}
r.activity.mVisibleFromServer = true;
mNumVisibleActivities++;
if (r.activity.mVisibleFromClient) {
r.activity.makeVisible();
}
...
}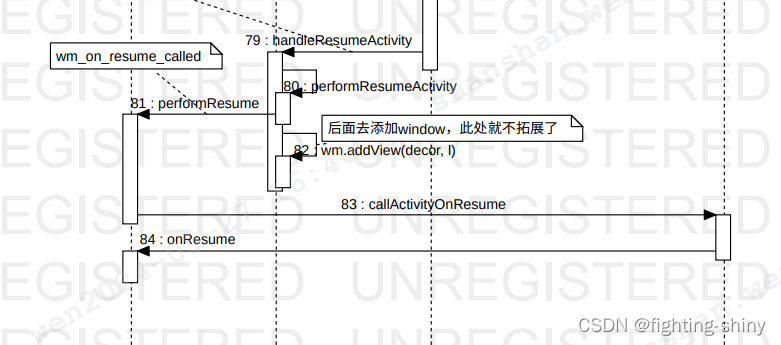 这块大概的流程图如上所示,在执行handleResumeActivity的时候,会先去执行activity的onResume方法,然后再将当前的window add进window manager。
这块有个地方拓展下,就是窗口类型,普通apk启动的窗口类型都是TYPE_BASE_APPLICATION
l.type = WindowManager.LayoutParams.TYPE_BASE_APPLICATION;
Android系统三大窗口类型
Android系统中共有三大窗口类型,分别是Application类型, 子窗口类型,以及系统窗口类型:
| 窗口类型 | Vlaue | 含义 |
|---|---|---|
| 以下窗口类型为普通APPLICAT窗口类型,范围1-99 | ||
| FIRST_APPLICATION_WINDOW | 1 | App的初始值 |
| TYPE_BASE_APPLICATION | 1 | 所有App的基础值 |
| TYPE_APPLICATION | 2 | 普通应用程序窗口 |
| TYPE_APPLICATION_STARTING | 3 | starting窗口 |
| TYPE_DRAWN_APPLICATION | 4 | 等待绘制完成的窗口 |
| LAST_APPLICATION_WINDOW | 99 | App的最大值 |
| 以下窗口类型为子窗口类型,范围1000-1999 | ||
| FIRST_SUB_WINDOW | 1000 | 子窗口的初始值 |
| TYPE_APPLICATION_PANEL | FIRST_SUB_WINDOW | 应用程序窗口顶部的面板。这些窗口出现在它们的附属窗口的顶部。 |
| TYPE_APPLICATION_MEDIA | FIRST_SUB_WINDOW +1 | media子窗口 |
| TYPE_APPLICATION_SUB_PANEL | FIRST_SUB_WINDOW +2 | 子窗口之上的子窗口 |
| TYPE_APPLICATION_ATTACHED _DIALOG | FIRST_SUB_WINDOW +3 | Dialog子窗口 |
| TYPE_APPLICATION_MEDIA _OVERLAY | FIRST_SUB_WINDOW +4 | media子窗口之上的子窗口 |
| TYPE_APPLICATION_ABOVE_ SUB_PANEL | FIRST_SUB_WINDOW +5 | 在SUB_PANEL之上的子窗口 |
| LAST_SUB_WINDOW | 1999 | 子窗口的最大值 |
| 以下为系统窗口类型,范围2000-2999 | ||
| FIRST_SYSTEM_WINDOW | 2000 | 系统窗口的初始值 |
| TYPE_STATUS_BAR | FIRST_SYSTEM_WINDOW | 系统状态栏窗口 |
| TYPE_SEARCH_BAR | FIRST_SYSTEM_WINDOW+1 | 搜索条窗口 |
| TYPE_PHONE | FIRST_SYSTEM_WINDOW+2 | 通话窗口,位于状态栏之上 |
| TYPE_SYSTEM_ALERT | FIRST_SYSTEM_WINDOW+3 | Alert窗口,如电量不足提示,显示在APP之上窗口 |
| TYPE_KEYGUARD | FIRST_SYSTEM_WINDOW+4 | 锁屏窗口 |
| TYPE_TOAST | FIRST_SYSTEM_WINDOW+5 | 短暂的提示框窗口 |
| TYPE_SYSTEM_OVERLAY | FIRST_SYSTEM_WINDOW+6 | 系统覆盖窗口,不能接受input焦点,否则会与屏保发生冲突 |
| TYPE_PRIORITY_PHONE | FIRST_SYSTEM_WINDOW+7 | 电话优先窗口,如屏保状态下显示来电窗口 |
| TYPE_SYSTEM_DIALOG | FIRST_SYSTEM_WINDOW+8 | 系统Dialog窗口 |
| TYPE_KEYGUARD_DIALOG | FIRST_SYSTEM_WINDOW+9 | keyguard Dialog窗口 |
| TYPE_SYSTEM_ERROR | FIRST_SYSTEM_WINDOW+10 | 系统报错窗口 |
| TYPE_INPUT_METHOD | FIRST_SYSTEM_WINDOW+11 | 输入法窗口 |
| TYPE_INPUT_METHOD_DIALOG | FIRST_SYSTEM_WINDOW+12 | 输入法Dialog窗口 |
| TYPE_WALLPAPER | FIRST_SYSTEM_WINDOW+13 | 壁纸窗口 |
| TYPE_STATUS_BAR_PANEL | FIRST_SYSTEM_WINDOW+14 | 从状态栏滑出的面板在多用户系统中显示在所有用户的窗口上。 |
| TYPE_SECURE_SYSTEM_OVERLAY | FIRST_SYSTEM_WINDOW+15 | @hide |
| TYPE_DRAG | FIRST_SYSTEM_WINDOW+16 | @hide拖拽窗口 |
| TYPE_STATUS_BAR_SUB_PANEL | FIRST_SYSTEM_WINDOW+17 | @hide,status bar之上的子窗口 |
| TYPE_POINTER | FIRST_SYSTEM_WINDOW+18 | @hide |
| TYPE_NAVIGATION_BAR | FIRST_SYSTEM_WINDOW+19 | @hide导航栏窗口 |
| TYPE_VOLUME_OVERLAY | FIRST_SYSTEM_WINDOW+20 | @hide系统音量条 |
| TYPE_BOOT_PROGRESS | FIRST_SYSTEM_WINDOW+21 | @hide启动时的进度条窗口 |
| TYPE_INPUT_CONSUMER | FIRST_SYSTEM_WINDOW+22 | @hide消耗input事件的窗口 |
| TYPE_NAVIGATION_BAR_PANEL | FIRST_SYSTEM_WINDOW+24 | @hide |
| TYPE_DISPLAY_OVERLAY | FIRST_SYSTEM_WINDOW+26 | @hide用于模拟第二个Display显示屏 |
| TYPE_MAGNIFICATION_OVERLAY | FIRST_SYSTEM_WINDOW+27 | @hide |
| TYPE_PRIVATE_PRESENTATION | FIRST_SYSTEM_WINDOW+30 | |
| TYPE_VOICE_INTERACTION | FIRST_SYSTEM_WINDOW+31 | @hide |
| TYPE_ACCESSIBILITY_OVERLAY | FIRST_SYSTEM_WINDOW+32 | |
| TYPE_VOICE_INTERACTION_STARTING | FIRST_SYSTEM_WINDOW+33 | @hide |
| TYPE_DOCK_DIVIDER | FIRST_SYSTEM_WINDOW+34 | @hide |
| TYPE_QS_DIALOG | FIRST_SYSTEM_WINDOW+35 | @hide |
| TYPE_SCREENSHOT | FIRST_SYSTEM_WINDOW+36 | @hide在锁屏之上,该层保留截图动画,区域选择和UI。 |
| TYPE_PRESENTATION | FIRST_SYSTEM_WINDOW+37 | @hide用于在外部显示器上显示的窗口(多个屏幕情况下) |
| TYPE_APPLICATION_OVERLAY | FIRST_SYSTEM_WINDOW+38 | |
| TYPE_ACCESSIBILITY_MAGNIFICATION _OVERLAY | FIRST_SYSTEM_WINDOW+39 | @hide |
| TYPE_NOTIFICATION_SHADE | FIRST_SYSTEM_WINDOW+40 | @hide |
| TYPE_STATUS_BAR_ADDITIONAL | FIRST_SYSTEM_WINDOW+41 | @hide |
| LAST_SYSTEM_WINDOW | 2999 | 系统窗口的最大值 |
1.1. ActivityThread#performResumeActivity
    @VisibleForTesting
    public boolean performResumeActivity(ActivityClientRecord r, boolean finalStateRequest,
            String reason) {
        if (localLOGV) {
            Slog.v(TAG, "Performing resume of " + r + " finished=" + r.activity.mFinished);
        }
//如果activity将要finish,则直接return掉,不执行resume操作了
        if (r.activity.mFinished) {
            return false;
        }
//如果activity已经on_resume了,则不继续往下执行,return
        if (r.getLifecycleState() == ON_RESUME) {
            if (!finalStateRequest) {
                final RuntimeException e = new IllegalStateException(
                        "Trying to resume activity which is already resumed");
...
            }
            return false;
        }
...
//执行activity的onResume操作
            r.activity.performResume(r.startsNotResumed, reason);

            r.state = null;
            r.persistentState = null;
//设置activity状态为on_resume
            r.setState(ON_RESUME);
//将会打印出event log---wm_on_top_resumed_gained_called相关信息
            reportTopResumedActivityChanged(r, r.isTopResumedActivity, "topWhenResuming");
        } catch (Exception e) {
            if (!mInstrumentation.onException(r.activity, e)) {
                throw new RuntimeException("Unable to resume activity "
                        + r.intent.getComponent().toShortString() + ": " + e.toString(), e);
            }
        }
        return true;
    }
本小节介绍了activity启动过程中其他的知识,下文再继续接着讲怎么添加窗口流程的,下面接着1.1中的addView方法。
2. WindowManager#addView
wm的获取方法如下,可以看到最后是获得到了一个WindowManager对象,
    private WindowManager mWindowManager;
    public WindowManager getWindowManager() {
        return mWindowManager;
    }
那就来到了WindowManager中的addView方法
查看WindowManager中没有addView方法,但是ViewManager中有,那我们再看下谁实现了WindowManager呢
public interface WindowManager extends ViewManager {
-------------------------------------------------------------
public interface ViewManager
{
    public void addView(View view, ViewGroup.LayoutParams params);
    public void updateViewLayout(View view, ViewGroup.LayoutParams params);
    public void removeView(View view);
}
可找到是WindowManagerImpl中实现此addView方法,因为WindowManagerImpl继承了WindowManager:
/*
 * @see WindowManager
 * @see WindowManagerGlobal
 * @hide
 */
public final class WindowManagerImpl implements WindowManager {
...
    @Override
    public void addView(@NonNull View view, @NonNull ViewGroup.LayoutParams params) {
        applyTokens(params);
        mGlobal.addView(view, params, mContext.getDisplayNoVerify(), mParentWindow,
                mContext.getUserId());
    }
此方法又调用了 WindowManagerGlobal中的addView方法,并将view,窗口属性,要显示的屏幕,父window,以及user id传入
WindowManagerGlobal.java - OpenGrok cross reference for /frameworks/base/core/java/android/view/WindowManagerGlobal.java
    public void addView(View view, ViewGroup.LayoutParams params,
            Display display, Window parentWindow, int userId) {
        if (view == null) {
            throw new IllegalArgumentException("view must not be null");
        }
        if (display == null) {
            throw new IllegalArgumentException("display must not be null");
        }
        if (!(params instanceof WindowManager.LayoutParams)) {
            throw new IllegalArgumentException("Params must be WindowManager.LayoutParams");
        }
//获取窗口布局属性
        final WindowManager.LayoutParams wparams = (WindowManager.LayoutParams) params;
        if (parentWindow != null) {
//如果父窗口不为空,则调整当前父窗口下所有子窗口布局的属性
            parentWindow.adjustLayoutParamsForSubWindow(wparams);
        } else {
            // If there's no parent, then hardware acceleration for this view is
            // set from the application's hardware acceleration setting.
            final Context context = view.getContext();
            if (context != null
                    && (context.getApplicationInfo().flags
                            & ApplicationInfo.FLAG_HARDWARE_ACCELERATED) != 0) {
                wparams.flags |= WindowManager.LayoutParams.FLAG_HARDWARE_ACCELERATED;
            }
        }

        ViewRootImpl root;
        View panelParentView = null;

        synchronized (mLock) {
            // Start watching for system property changes.
            if (mSystemPropertyUpdater == null) {
                mSystemPropertyUpdater = new Runnable() {
                    @Override public void run() {
                        synchronized (mLock) {
                            for (int i = mRoots.size() - 1; i >= 0; --i) {
                                mRoots.get(i).loadSystemProperties();
                            }
                        }
                    }
                };
                SystemProperties.addChangeCallback(mSystemPropertyUpdater);
            }

            int index = findViewLocked(view, false);
            if (index >= 0) {
                if (mDyingViews.contains(view)) {
                    // Don't wait for MSG_DIE to make it's way through root's queue.
                    mRoots.get(index).doDie();
                } else {
                    throw new IllegalStateException("View " + view
                            + " has already been added to the window manager.");
                }
                // The previous removeView() had not completed executing. Now it has.
            }

            // If this is a panel window, then find the window it is being
            // attached to for future reference.
//如果是子窗口
            if (wparams.type >= WindowManager.LayoutParams.FIRST_SUB_WINDOW &&
                    wparams.type <= WindowManager.LayoutParams.LAST_SUB_WINDOW) {
                final int count = mViews.size();
                for (int i = 0; i < count; i++) {
                    if (mRoots.get(i).mWindow.asBinder() == wparams.token) {
                        panelParentView = mViews.get(i);
                    }
                }
            }

            IWindowSession windowlessSession = null;
            // If there is a parent set, but we can't find it, it may be coming
            // from a SurfaceControlViewHost hierarchy.
//如果token不为空并且不是子窗口
            if (wparams.token != null && panelParentView == null) {
                for (int i = 0; i < mWindowlessRoots.size(); i++) {
                    ViewRootImpl maybeParent = mWindowlessRoots.get(i);
                    if (maybeParent.getWindowToken() == wparams.token) {
//获取WindowSession
                        windowlessSession = maybeParent.getWindowSession();
                        break;
                    }
                }
            }

            if (windowlessSession == null) {
//如果windowlessSession为空
                root = new ViewRootImpl(view.getContext(), display);
            } else {
//如果windowlessSession不为空,则在此处传入windowlessSession
                root = new ViewRootImpl(view.getContext(), display,
                        windowlessSession, new WindowlessWindowLayout());
            }
//将窗口布局属性设置进view
            view.setLayoutParams(wparams);
//将此view添加进mViews
            mViews.add(view);
//将此root添加进MRoots
            mRoots.add(root);
//将此窗口布局属性添加进mParams
            mParams.add(wparams);

            // do this last because it fires off messages to start doing things
            try {
//将view,窗口属性和子窗口,user id 设置进ViewRootImpl
                root.setView(view, wparams, panelParentView, userId);
            } catch (RuntimeException e) {
                final int viewIndex = (index >= 0) ? index : (mViews.size() - 1);
                // BadTokenException or InvalidDisplayException, clean up.
                if (viewIndex >= 0) {
                    removeViewLocked(viewIndex, true);
                }
                throw e;
            }
        }
    }
3. ViewRootImpl#setView
然后就从WindowManagerGlobal走到了ViewRootImpl中
http://aospxref.com/android-14.0.0_r2/xref/frameworks/base/core/java/android/view/ViewRootImpl.java#1214
    final IWindowSession mWindowSession;

    public void setView(View view, WindowManager.LayoutParams attrs, View panelParentView) {
        setView(view, attrs, panelParentView, UserHandle.myUserId());
    }

    public void setView(View view, WindowManager.LayoutParams attrs, View panelParentView, int userId) {
        synchronized (this) {
//这个mView和上一个方法中的可不一样,当窗口detach后,这个mView会被置为空
            if (mView == null) {
                mView = view;
...

                mWindowAttributes.copyFrom(attrs)
...
                // Schedule the first layout -before- adding to the window
                // manager, to make sure we do the relayout before receiving
                // any other events from the system.
//首先需要layout
                requestLayout();
...
//这个是很重要的一步
                    res = mWindowSession.addToDisplayAsUser(mWindow, mWindowAttributes,
                            getHostVisibility(), mDisplay.getDisplayId(), userId,
                            mInsetsController.getRequestedVisibleTypes(), inputChannel, mTempInsets, mTempControls, attachedFrame, compatScale);
...
                mPendingAlwaysConsumeSystemBars = mAttachInfo.mAlwaysConsumeSystemBars;
                mInsetsController.onStateChanged(mTempInsets);
                mInsetsController.onControlsChanged(mTempControls.get());
                final InsetsState state = mInsetsController.getState();
                final Rect displayCutoutSafe = mTempRect;
                state.getDisplayCutoutSafe(displayCutoutSafe);
                final WindowConfiguration winConfig = getCompatWindowConfiguration();
                mWindowLayout.computeFrames(mWindowAttributes, state,
                        displayCutoutSafe, winConfig.getBounds(), winConfig.getWindowingMode(),
                        UNSPECIFIED_LENGTH, UNSPECIFIED_LENGTH,
                        mInsetsController.getRequestedVisibleTypes(), 1f /* compactScale */, mTmpFrames);
                setFrame(mTmpFrames.frame, true /* withinRelayout */);
...
    }
接着往下走,就会讲到WindowSession.addToDisplayAsUser方法
4. WindowSession.addToDisplayAsUser
这里是涉及到AIDL通信,因为mWindowSession是final IWindowSession mWindowSession;
用到的AIDL文件如下:
frameworks/base/core/java/android/view/IWindowSession.aidl
http://aospxref.com/android-14.0.0_r2/xref/frameworks/base/core/java/android/view/IWindowSession.aidl
在Client端,WindowlessWindowManager实现了IWindowSession
public class WindowlessWindowManager implements IWindowSession {
    /**
     * IWindowSession implementation. Currently this class doesn't need to support for multi-user.
     */
    @Override
    public int addToDisplayAsUser(IWindow window, WindowManager.LayoutParams attrs,
            int viewVisibility, int displayId, int userId, @InsetsType int requestedVisibleTypes,
            InputChannel outInputChannel, InsetsState outInsetsState,
            InsetsSourceControl.Array outActiveControls, Rect outAttachedFrame,
            float[] outSizeCompatScale) {
        return addToDisplay(window, attrs, viewVisibility, displayId, requestedVisibleTypes,
                outInputChannel, outInsetsState, outActiveControls, outAttachedFrame,
                outSizeCompatScale);
    }

    @Override
    public int addToDisplay(IWindow window, WindowManager.LayoutParams attrs,
            int viewVisibility, int displayId, @InsetsType int requestedVisibleTypes,
            InputChannel outInputChannel, InsetsState outInsetsState,
            InsetsSourceControl.Array outActiveControls, Rect outAttachedFrame,
            float[] outSizeCompatScale) {
// setParent方法作用如下
// Set a parent surface for our new SurfaceControl.
// 给我们的new SurfaceControl设置父surface
// Child surfaces are constrained to the onscreen region of their parent.
//子surfaces被限制在它们的父surface之上
// Furthermore they stack relatively in Z order, and inherit the transformation of the parent.
//此外这些stack按照Z值排序,并继承父级的transformation

//window leash 图层创建
        final SurfaceControl leash = new SurfaceControl.Builder(mSurfaceSession)
                .setName(attrs.getTitle().toString() + "Leash")
                .setCallsite("WindowlessWindowManager.addToDisplay")
                .setParent(getParentSurface(window, attrs))
                .build();
//window图层创建
        final SurfaceControl sc = new SurfaceControl.Builder(mSurfaceSession)
                .setFormat(attrs.format)
                .setBLASTLayer()
                .setName(attrs.getTitle().toString())
                .setCallsite("WindowlessWindowManager.addToDisplay")
                .setHidden(false)
                .setParent(leash)
                .build();
//在当前文件的最上面有State的定义,主要就是将入参赋值给State的全局变量
        final State state = new State(sc, attrs, displayId, window, leash, /* frame= */ new Rect());
        synchronized (this) {
            State parentState = mStateForWindow.get(attrs.token);
            if (parentState != null) {
                state.mAttachedFrame = parentState.mFrame;
            }

            // Give the first window the mFocusGrantToken since that's the token the host can use
            // to give focus to the embedded.
            if (mStateForWindow.isEmpty()) {
                state.mFocusGrantToken = mFocusGrantToken;
            } else {
                state.mFocusGrantToken = new Binder();
            }

            mStateForWindow.put(window.asBinder(), state);
        }

        if (state.mAttachedFrame == null) {
            outAttachedFrame.set(0, 0, -1, -1);
        } else {
            outAttachedFrame.set(state.mAttachedFrame);
        }
        outSizeCompatScale[0] = 1f;

        if (((attrs.inputFeatures &
                WindowManager.LayoutParams.INPUT_FEATURE_NO_INPUT_CHANNEL) == 0)) {
            try {
                if (mRealWm instanceof IWindowSession.Stub) {
                    mRealWm.grantInputChannel(displayId,
                            new SurfaceControl(sc, "WindowlessWindowManager.addToDisplay"),
                            window, mHostInputToken, attrs.flags, attrs.privateFlags,
                            attrs.inputFeatures, attrs.type,
                            attrs.token, state.mFocusGrantToken, attrs.getTitle().toString(), outInputChannel);
                } else {
                    mRealWm.grantInputChannel(displayId, sc, window, mHostInputToken, attrs.flags, attrs.privateFlags, attrs.inputFeatures, attrs.type, attrs.token,
                  state.mFocusGrantToken, attrs.getTitle().toString(), outInputChannel);
                }
                state.mInputChannelToken =
                        outInputChannel != null ? outInputChannel.getToken() : null;
            } catch (RemoteException e) {
                Log.e(TAG, "Failed to grant input to surface: ", e);
            }
        }

        final int res = WindowManagerGlobal.ADD_OKAY | WindowManagerGlobal.ADD_FLAG_APP_VISIBLE |
                        WindowManagerGlobal.ADD_FLAG_USE_BLAST;

        // Include whether the window is in touch mode.
        return isInTouchModeInternal(displayId) ? res | WindowManagerGlobal.ADD_FLAG_IN_TOUCH_MODE
                : res;
    }
这里我们来看一下mRealWm的赋值过程
public class WindowlessWindowManager implements IWindowSession {
    ...
//全局变量声明
    private final IWindowSession mRealWm;
    public WindowlessWindowManager(Configuration c, SurfaceControl rootSurface,
            IBinder hostInputToken) {
        mRootSurface = rootSurface;
        mConfiguration = new Configuration(c);
//赋值
        mRealWm = WindowManagerGlobal.getWindowSession();
        mHostInputToken = hostInputToken;
    }
然后就走到了WindowManagerGlobal这里去获取WindowSession
WindowManagerGlobal.java - OpenGrok cross reference for /frameworks/base/core/java/android/view/WindowManagerGlobal.java
    @UnsupportedAppUsage
    public static IWindowSession getWindowSession() {
        synchronized (WindowManagerGlobal.class) {
            if (sWindowSession == null) {
                try {
// Emulate the legacy behavior.  The global instance of InputMethodManager
// was instantiated here.
// TODO(b/116157766): Remove this hack after cleaning up @UnsupportedAppUsage
                    InputMethodManager.ensureDefaultInstanceForDefaultDisplayIfNecessary();
//第一步
                    IWindowManager windowManager = getWindowManagerService();
//第二步
                    sWindowSession = windowManager.openSession(
                            new IWindowSessionCallback.Stub() {
                                @Override
                                public void onAnimatorScaleChanged(float scale) {
                                    ValueAnimator.setDurationScale(scale);
                                }
                            });
                } catch (RemoteException e) {
                    throw e.rethrowFromSystemServer();
                }
            }
            return sWindowSession;
        }
    }
在第一步中,通过getWindowManagerService方法获取了server端binder对象,即获取了WMS服务, 看代码是单例模式,可以看出来这个sWindowSession是一个单例,也就是一个应用的所有ViewRootImpl的WindowSession都是同一个,也就是一个应用只有一个WindowSession,用于与WMS进行通信。
    @UnsupportedAppUsage
    public static IWindowManager getWindowManagerService() {
        synchronized (WindowManagerGlobal.class) {
            if (sWindowManagerService == null) {
//获取server端binder对象,即获取WMS服务
                sWindowManagerService = IWindowManager.Stub.asInterface(
                        ServiceManager.getService("window"));
...
            return sWindowManagerService;
        }
    }
在第二步中,则调用到了Server端服务WMS中的方法,这里也是单例模式的写法,sWindowManagerService 在Client端也只有一个对象。
WindowManagerService.java - OpenGrok cross reference for /frameworks/base/services/core/java/com/android/server/wm/WindowManagerService.java
    @Override
    public IWindowSession openSession(IWindowSessionCallback callback) {
        return new Session(this, callback);
    }
然后在WMS中new了一个Session,Session实例化相关如下
Session.java - OpenGrok cross reference for /frameworks/base/services/core/java/com/android/server/wm/Session.java
class Session extends IWindowSession.Stub implements IBinder.DeathRecipient {
    final WindowManagerService mService;
    final IWindowSessionCallback mCallback;
    final int mUid;
    final int mPid;
  ...
    public Session(WindowManagerService service, IWindowSessionCallback callback) {
        mService = service;
        mCallback = callback;
        mUid = Binder.getCallingUid();
        mPid = Binder.getCallingPid();
...
来看看WMS,其实也是继承了 IWindowSession.Stub
/** {@hide} */
public class WindowManagerService extends IWindowManager.Stub implements Watchdog.Monitor, WindowManagerPolicy.WindowManagerFuncs {
从上我们总结出:
一个应用只有一个WindowSession, 用于与WMS进行通信。
5. Session#grantInputChannel
接着讲上文中的 grantInputChannel方法
Session.java - OpenGrok cross reference for /frameworks/base/services/core/java/com/android/server/wm/Session.java
    @Override
    public void grantInputChannel(int displayId, SurfaceControl surface,
            IWindow window, IBinder hostInputToken, int flags, int privateFlags, int type, int inputFeatures, IBinder windowToken, IBinder focusGrantToken, String inputHandleName,
            InputChannel outInputChannel) {
...
//这里会调用Server端的grantInputChannel方法
            mService.grantInputChannel(this, mUid, mPid, displayId, surface, window, hostInputToken, flags, mCanAddInternalSystemWindow ? privateFlags : 0,
                    type, inputFeatures, windowToken, focusGrantToken, inputHandleName,
                    outInputChannel);
...
    }
下面是一个关于以上流程的setting主页面启动流程
05-25 12:58:21.791  1909  2175 I wm_task_created: 441
05-25 12:58:21.795  1909  2175 I wm_task_moved: [441,441,0,1,2]
05-25 12:58:21.795  1909  2175 I wm_task_to_front: [0,441,0]
05-25 12:58:21.795  1909  2175 I wm_create_task: [0,441,441,0]
05-25 12:58:21.795  1909  2175 I wm_create_activity: [0,232997572,441,com.android.settings/.homepage.SettingsHomepageActivity,android.settings.SETTINGS,NULL,NULL,335544320]
05-25 12:58:21.795  1909  2175 I wm_task_moved: [441,441,0,1,2]
05-25 12:58:22.265  1909  3494 I wm_restart_activity: [0,232997572,441,com.android.settings/.homepage.SettingsHomepageActivity]
05-25 12:58:22.267  1909  3494 I wm_set_resumed_activity: [0,com.android.settings/.homepage.SettingsHomepageActivity,minimalResumeActivityLocked - onActivityStateChanged]
05-25 12:58:22.363  2518  2518 I wm_on_create_called: [232997572,com.android.settings.homepage.SettingsHomepageActivity,performCreate,66]
05-25 12:58:22.457  2518  2518 I wm_on_start_called: [232997572,com.android.settings.homepage.SettingsHomepageActivity,handleStartActivity,92]
05-25 12:58:22.460  2518  2518 V ActivityThread: Performing resume of ActivityRecord{a4a98fc token=android.os.BinderProxy@c7155ef {com.android.settings/com.android.settings.homepage.SettingsHomepageActivity}} finished=false
05-25 12:58:22.460  2518  2518 I wm_on_resume_called: [232997572,com.android.settings.homepage.SettingsHomepageActivity,RESUME_ACTIVITY,0]
05-25 12:58:22.525  2518  2518 V ActivityThread: Resume ActivityRecord{a4a98fc token=android.os.BinderProxy@c7155ef {com.android.settings/com.android.settings.homepage.SettingsHomepageActivity}} started activity: false, hideForNow: false, finished: false
05-25 12:58:22.545  1909  2175 V WindowManager: Attaching Window{a90e6ab u0 com.android.settings/com.android.settings.homepage.SettingsHomepageActivity} token=ActivityRecord{de342c4 u0 com.android.settings/.homepage.SettingsHomepageActivity t441}
05-25 12:58:22.552  2518  2518 V ActivityThread: Resuming ActivityRecord{a4a98fc token=android.os.BinderProxy@c7155ef {com.android.settings/com.android.settings.homepage.SettingsHomepageActivity}} with isForward=true
05-25 12:58:22.552  2518  2518 V ActivityThread: Scheduling idle handler for ActivityRecord{a4a98fc token=android.os.BinderProxy@c7155ef {com.android.settings/com.android.settings.homepage.SettingsHomepageActivity}}
05-25 12:58:22.553  2518  2518 I wm_on_top_resumed_gained_called: [232997572,com.android.settings.homepage.SettingsHomepageActivity,topStateChangedWhenResumed]
05-25 12:58:22.769  1909  1971 I wm_activity_launch_time: [0,232997572,com.android.settings/.homepage.SettingsHomepageActivity,970]
6. WindowManagerService#grantInputChannel
这里就到了Server端,以上都是Client端。
由于本篇文章已经过长,故Server端的另起一篇文章分析。