软件安装步骤可以在docker的官网查找:
https://hub.docker.com/
1.安装tomcat
这里演示用的最新版,版本是10.0.14
1.拉取镜像
docker pull tomcat
直接下载最新版
[root@localhost ~]# docker pull tomcat
Using default tag: latest
latest: Pulling from library/tomcat
0e29546d541c: Pull complete
9b829c73b52b: Pull complete
cb5b7ae36172: Pull complete
6494e4811622: Pull complete
668f6fcc5fa5: Pull complete
dc120c3e0290: Pull complete
8f7c0eebb7b1: Pull complete
77b694f83996: Pull complete
0f611256ec3a: Pull complete
4f25def12f23: Pull complete
Digest: sha256:9dee185c3b161cdfede1f5e35e8b56ebc9de88ed3a79526939701f3537a52324
Status: Downloaded newer image for tomcat:latest
docker.io/library/tomcat:latest
查看
[root@localhost ~]# docker images
REPOSITORY                                         TAG       IMAGE ID       CREATED       SIZE
tomcat                                             latest    fb5657adc892   2 years ago   680MB
redis                                              latest    7614ae9453d1   2 years ago   113MB
[root@localhost ~]#
2.运行实例
docker run -d -p 8080:8080 --name tomcat1 tomcat
注意用小写p做端口映射,大写会分配随机端口
[root@localhost ~]# docker run -d -p 8080:8080 --name tomcat1 tomcat
ec0c5c6551d27dd9d16a19d4a1969cb33fdcad3300b1d7880728cc8ca7357da7
[root@localhost ~]# docker ps
CONTAINER ID   IMAGE     COMMAND             CREATED         STATUS         PORTS                                       NAMES
ec0c5c6551d2   tomcat    "catalina.sh run"   2 minutes ago   Up 2 minutes   0.0.0.0:8080->8080/tcp, :::8080->8080/tcp   tomcat1
启动成功后,这时访问localhost:8080会404,需要按如下步骤修改 (如果外部访问,防火墙也要开放端口)
先执行docker exec进入tomcat,找到webapps与webapps.dist
这里进入webapps中看到total为0,代表其是个空文件夹
[root@localhost ~]# docker exec -it ec0c5c6551d2 /bin/bash
root@ec0c5c6551d2:/usr/local/tomcat# pwd
/usr/local/tomcat
root@ec0c5c6551d2:/usr/local/tomcat# ls -l
total 132
-rw-r--r--. 1 root root 18994 Dec  2  2021 BUILDING.txt
-rw-r--r--. 1 root root  6210 Dec  2  2021 CONTRIBUTING.md
-rw-r--r--. 1 root root 60269 Dec  2  2021 LICENSE
-rw-r--r--. 1 root root  2333 Dec  2  2021 NOTICE
-rw-r--r--. 1 root root  3378 Dec  2  2021 README.md
-rw-r--r--. 1 root root  6905 Dec  2  2021 RELEASE-NOTES
-rw-r--r--. 1 root root 16517 Dec  2  2021 RUNNING.txt
drwxr-xr-x. 2 root root  4096 Dec 22  2021 bin
drwxr-xr-x. 1 root root    22 Apr 16 11:48 conf
drwxr-xr-x. 2 root root  4096 Dec 22  2021 lib
drwxrwxrwx. 1 root root    80 Apr 16 11:48 logs
drwxr-xr-x. 2 root root   159 Dec 22  2021 native-jni-lib
drwxrwxrwx. 2 root root    30 Dec 22  2021 temp
drwxr-xr-x. 2 root root     6 Dec 22  2021 webapps
drwxr-xr-x. 7 root root    81 Dec  2  2021 webapps.dist
drwxrwxrwx. 2 root root     6 Dec  2  2021 work
root@ec0c5c6551d2:/usr/local/tomcat# cd webapps
root@ec0c5c6551d2:/usr/local/tomcat/webapps# ls -l
total 0
第一步,删除这个为空的webapps文件夹
root@ec0c5c6551d2:/usr/local/tomcat/webapps# cd ..
root@ec0c5c6551d2:/usr/local/tomcat# rm -r webapps
root@ec0c5c6551d2:/usr/local/tomcat# ls -l
total 132
-rw-r--r--. 1 root root 18994 Dec  2  2021 BUILDING.txt
-rw-r--r--. 1 root root  6210 Dec  2  2021 CONTRIBUTING.md
-rw-r--r--. 1 root root 60269 Dec  2  2021 LICENSE
-rw-r--r--. 1 root root  2333 Dec  2  2021 NOTICE
-rw-r--r--. 1 root root  3378 Dec  2  2021 README.md
-rw-r--r--. 1 root root  6905 Dec  2  2021 RELEASE-NOTES
-rw-r--r--. 1 root root 16517 Dec  2  2021 RUNNING.txt
drwxr-xr-x. 2 root root  4096 Dec 22  2021 bin
drwxr-xr-x. 1 root root    22 Apr 16 11:48 conf
drwxr-xr-x. 2 root root  4096 Dec 22  2021 lib
drwxrwxrwx. 1 root root    80 Apr 16 11:48 logs
drwxr-xr-x. 2 root root   159 Dec 22  2021 native-jni-lib
drwxrwxrwx. 2 root root    30 Dec 22  2021 temp
drwxr-xr-x. 7 root root    81 Dec  2  2021 webapps.dist
drwxrwxrwx. 2 root root     6 Dec  2  2021 work
第二步,将webapps.dist改名为webapps
root@ec0c5c6551d2:/usr/local/tomcat# mv webapps.dist webapps
root@ec0c5c6551d2:/usr/local/tomcat# ls -l
total 132
-rw-r--r--. 1 root root 18994 Dec  2  2021 BUILDING.txt
-rw-r--r--. 1 root root  6210 Dec  2  2021 CONTRIBUTING.md
-rw-r--r--. 1 root root 60269 Dec  2  2021 LICENSE
-rw-r--r--. 1 root root  2333 Dec  2  2021 NOTICE
-rw-r--r--. 1 root root  3378 Dec  2  2021 README.md
-rw-r--r--. 1 root root  6905 Dec  2  2021 RELEASE-NOTES
-rw-r--r--. 1 root root 16517 Dec  2  2021 RUNNING.txt
drwxr-xr-x. 2 root root  4096 Dec 22  2021 bin
drwxr-xr-x. 1 root root    22 Apr 16 11:48 conf
drwxr-xr-x. 2 root root  4096 Dec 22  2021 lib
drwxrwxrwx. 1 root root   112 Apr 16 11:56 logs
drwxr-xr-x. 2 root root   159 Dec 22  2021 native-jni-lib
drwxrwxrwx. 2 root root    30 Dec 22  2021 temp
drwxr-xr-x. 7 root root    81 Dec  2  2021 webapps
drwxrwxrwx. 1 root root    22 Apr 16 11:56 work
root@ec0c5c6551d2:/usr/local/tomcat#
这时再访问,就可以了
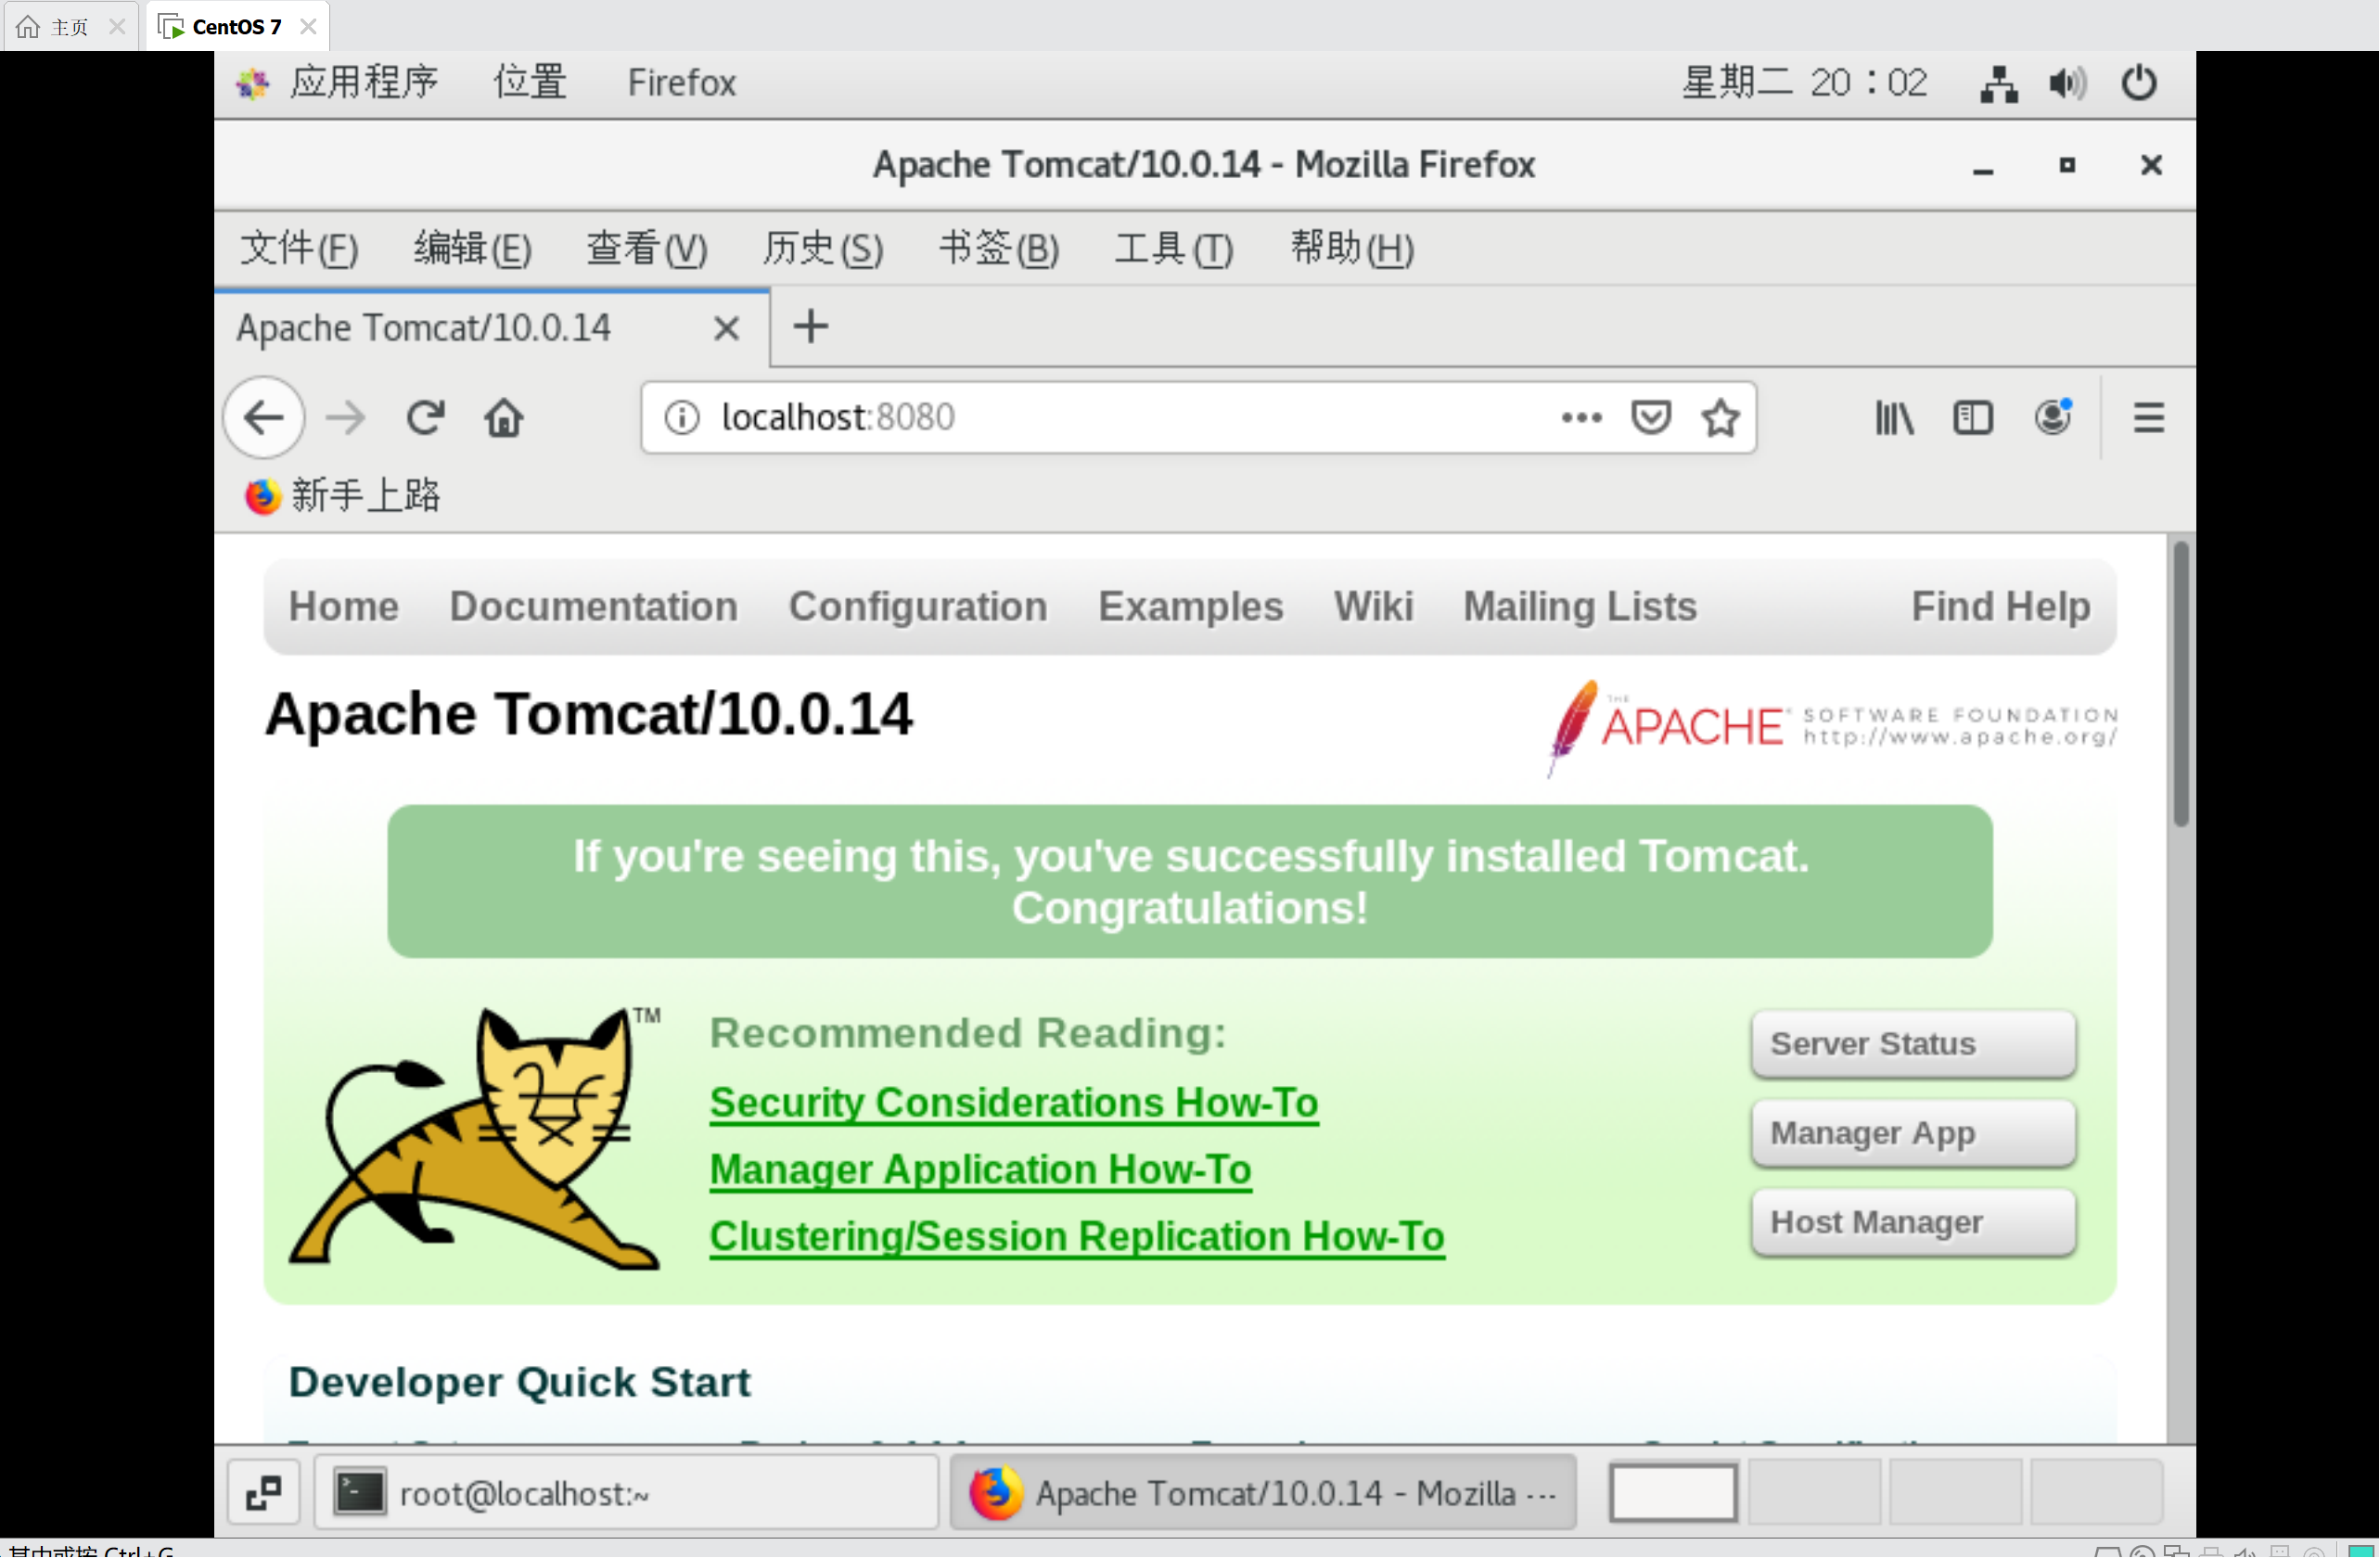
如果不想执行上面的修改,可以用下面图中的命令,下载tomcat8,注意把原有的删除掉

2.安装MySQL
1.拉取镜像
拉取镜像(此文档编写时下载的最新版本为8.0.27,最后一步有展示)
[root@localhost ~]# docker pull mysql
Using default tag: latest
latest: Pulling from library/mysql
72a69066d2fe: Pull complete
93619dbc5b36: Pull complete
99da31dd6142: Pull complete
626033c43d70: Pull complete
37d5d7efb64e: Pull complete
ac563158d721: Pull complete
d2ba16033dad: Pull complete
688ba7d5c01a: Pull complete
00e060b6d11d: Pull complete
1c04857f594f: Pull complete
4d7cfa90e6ea: Pull complete
e0431212d27d: Pull complete
Digest: sha256:e9027fe4d91c0153429607251656806cc784e914937271037f7738bd5b8e7709
Status: Downloaded newer image for mysql:latest
docker.io/library/mysql:latest

[root@localhost ~]# docker images
REPOSITORY                                         TAG       IMAGE ID       CREATED       SIZE
ubuntu                                             latest    efb62633a173   11 days ago   72.8MB
tomcat                                             latest    fb5657adc892   2 years ago   680MB
redis                                              latest    7614ae9453d1   2 years ago   113MB
mysql                                              latest    3218b38490ce   2 years ago   516MB
[root@localhost ~]#
2.运行容器
先创建三个目录,用于mysql容器卷,存放配置文件、数据文件和日志文件
使用 -p 创建多级目录,即 wzy 目录下创建 mysql 目录, mysql 目录下又创建 log 、data 、conf 三个目录:
[root@localhost ~]# mkdir -p /wzy/mysql/log
[root@localhost ~]# mkdir -p /wzy/mysql/data
[root@localhost ~]# mkdir -p /wzy/mysql/conf
在
/wzy/mysql/conf/目录下创建自定义的custom.cnf配置文件。文件名随意,文件格式必须为 .cnf。
[root@localhost ~]# vim /wzy/mysql/conf/custom.cnf
添加容器运行的配置参数,主要是设置编码集
[mysqld]
init-connect="SET collation_connection=utf8mb4_0900_ai_ci"
init_connect="SET NAMES utf8mb4"
skip-character-set-client-handshake
创建容器并运行
docker run --name mysql -v /wzy/mysql/log:/var/log/mysql -v /wzy/mysql/data:/var/lib/mysql -v /wzy/mysql/conf:/etc/mysql/conf.d -p 3306:3306 -e MYSQL_ROOT_PASSWORD=123456 -d mysql
下面是个参数解释:
--name
容器名称
-v
--volume list 的简写,将指定的文件夹挂载为容器的卷(Volume),用来共享文件(日志文件、配置文件、数据文件)。
log对应的是日志目录。data对应的是数据目录。conf对应的是配置文件目录。

配置此处的容器卷映射后,即使mysql实例被删除,在重新运行一个新的时,数据会被自动恢复。
-p 3306:3306
--publish list 的简写,将3306端口映射到容器的3306端口,对外提供端口。如果同时启动多个mysql容器,对外端口号可以不同,服务之间不会冲突。
-e MYSQL_ROOT_PASSWORD=123456
参数 -e 是 --env list 的简写,设置环境变量,将 root 用户的密码变量(MYSQL_ROOT_PASSWORD)设置为 123456。
-d mysql
参数 -d 是 --detach 的简写,指的是容器运行在后台并打印容器ID。后面的mysql可以加版本号,例如mysql:latest、mysql:8.0.31 等等。
运行结果
[root@localhost ~]# docker run --name mysql -v /wzy/mysql/log:/var/log/mysql -v /wzy/mysql/data:/var/lib/mysql -v /wzy/mysql/conf:/etc/mysql/conf.d -p 3306:3306 -e MYSQL_ROOT_PASSWORD=123456 -d mysql
f165aa014e646f9608a144c27054ba844161365e702580f9a7830b73a8271450
[root@localhost ~]# docker ps
CONTAINER ID   IMAGE     COMMAND                   CREATED          STATUS          PORTS                                                  NAMES
f165aa014e64   mysql     "docker-entrypoint.s…"   13 seconds ago   Up 11 seconds   0.0.0.0:3306->3306/tcp, :::3306->3306/tcp, 33060/tcp   mysql
[root@localhost ~]#
3.进入运行的mysql实例
exec命令进入
在进入后登录mysql,使用mysql -u root -p,然后输入上一步设置的root账号密码,
然后使用 show variables like 'character%'; 与 show variables like 'collation%'; 查看字符集
[root@localhost ~]# docker exec -it f165aa014e64 /bin/bash
root@f165aa014e64:/# mysql -u root -p
Enter password:
Welcome to the MySQL monitor.  Commands end with ; or \g.
Your MySQL connection id is 8
Server version: 8.0.27 MySQL Community Server - GPL

Copyright (c) 2000, 2021, Oracle and/or its affiliates.

Oracle is a registered trademark of Oracle Corporation and/or its
affiliates. Other names may be trademarks of their respective
owners.

Type 'help;' or '\h' for help. Type '\c' to clear the current input statement.


mysql> show variables like 'character%';
+--------------------------+--------------------------------+
| Variable_name            | Value                          |
+--------------------------+--------------------------------+
| character_set_client     | utf8mb4                        |
| character_set_connection | utf8mb4                        |
| character_set_database   | utf8mb4                        |
| character_set_filesystem | binary                         |
| character_set_results    | utf8mb4                        |
| character_set_server     | utf8mb4                        |
| character_set_system     | utf8mb3                        |
| character_sets_dir       | /usr/share/mysql-8.0/charsets/ |
+--------------------------+--------------------------------+
8 rows in set (0.15 sec)

mysql> show variables like 'collation%';
+----------------------+--------------------+
| Variable_name        | Value              |
+----------------------+--------------------+
| collation_connection | utf8mb4_0900_ai_ci |
| collation_database   | utf8mb4_0900_ai_ci |
| collation_server     | utf8mb4_0900_ai_ci |
+----------------------+--------------------+
3 rows in set (0.01 sec)
4.创建用户
使用
CREATE 创建账户,例如对应mysql.user表中,字段user为 wzy,字段host为 % ,账号密码为 wzy&123 ,“%”代表任何主机。使用GRANT 授予账户特定权限。
创建用户:
CREATE USER 'wzy'@'%' IDENTIFIED BY 'wzy&123';
授予账户特定权限。ALL 和 ALL PRIVILEGES 是一样的,可简写为 ALL
GRANT ALL ON *.* TO 'wzy'@'%' WITH GRANT OPTION;
刷新账号权限:
FLUSH PRIVILEGES;
执行效果:
mysql> CREATE USER 'wzy'@'%' IDENTIFIED BY 'wzy&123';
Query OK, 0 rows affected (0.01 sec)

mysql> GRANT ALL ON *.* TO 'wzy'@'%' WITH GRANT OPTION;
Query OK, 0 rows affected (0.01 sec)

mysql> FLUSH PRIVILEGES;
Query OK, 0 rows affected (0.01 sec)
设置容器自启动,即启动容器一并启动mysql
docker update --restart=always mysql
要先在mysql内执行exit,然后在实例中执行exit,然后再运行上面命令:
mysql> exit
Bye
root@f165aa014e64:/# exit
[root@localhost ~]# docker ps
CONTAINER ID   IMAGE     COMMAND                   CREATED          STATUS          PORTS                                                  NAMES
f165aa014e64   mysql     "docker-entrypoint.s…"   27 minutes ago   Up 27 minutes   0.0.0.0:3306->3306/tcp, :::3306->3306/tcp, 33060/tcp   mysql
[root@localhost ~]# docker update --restart=always mysql
mysql
[root@localhost ~]#
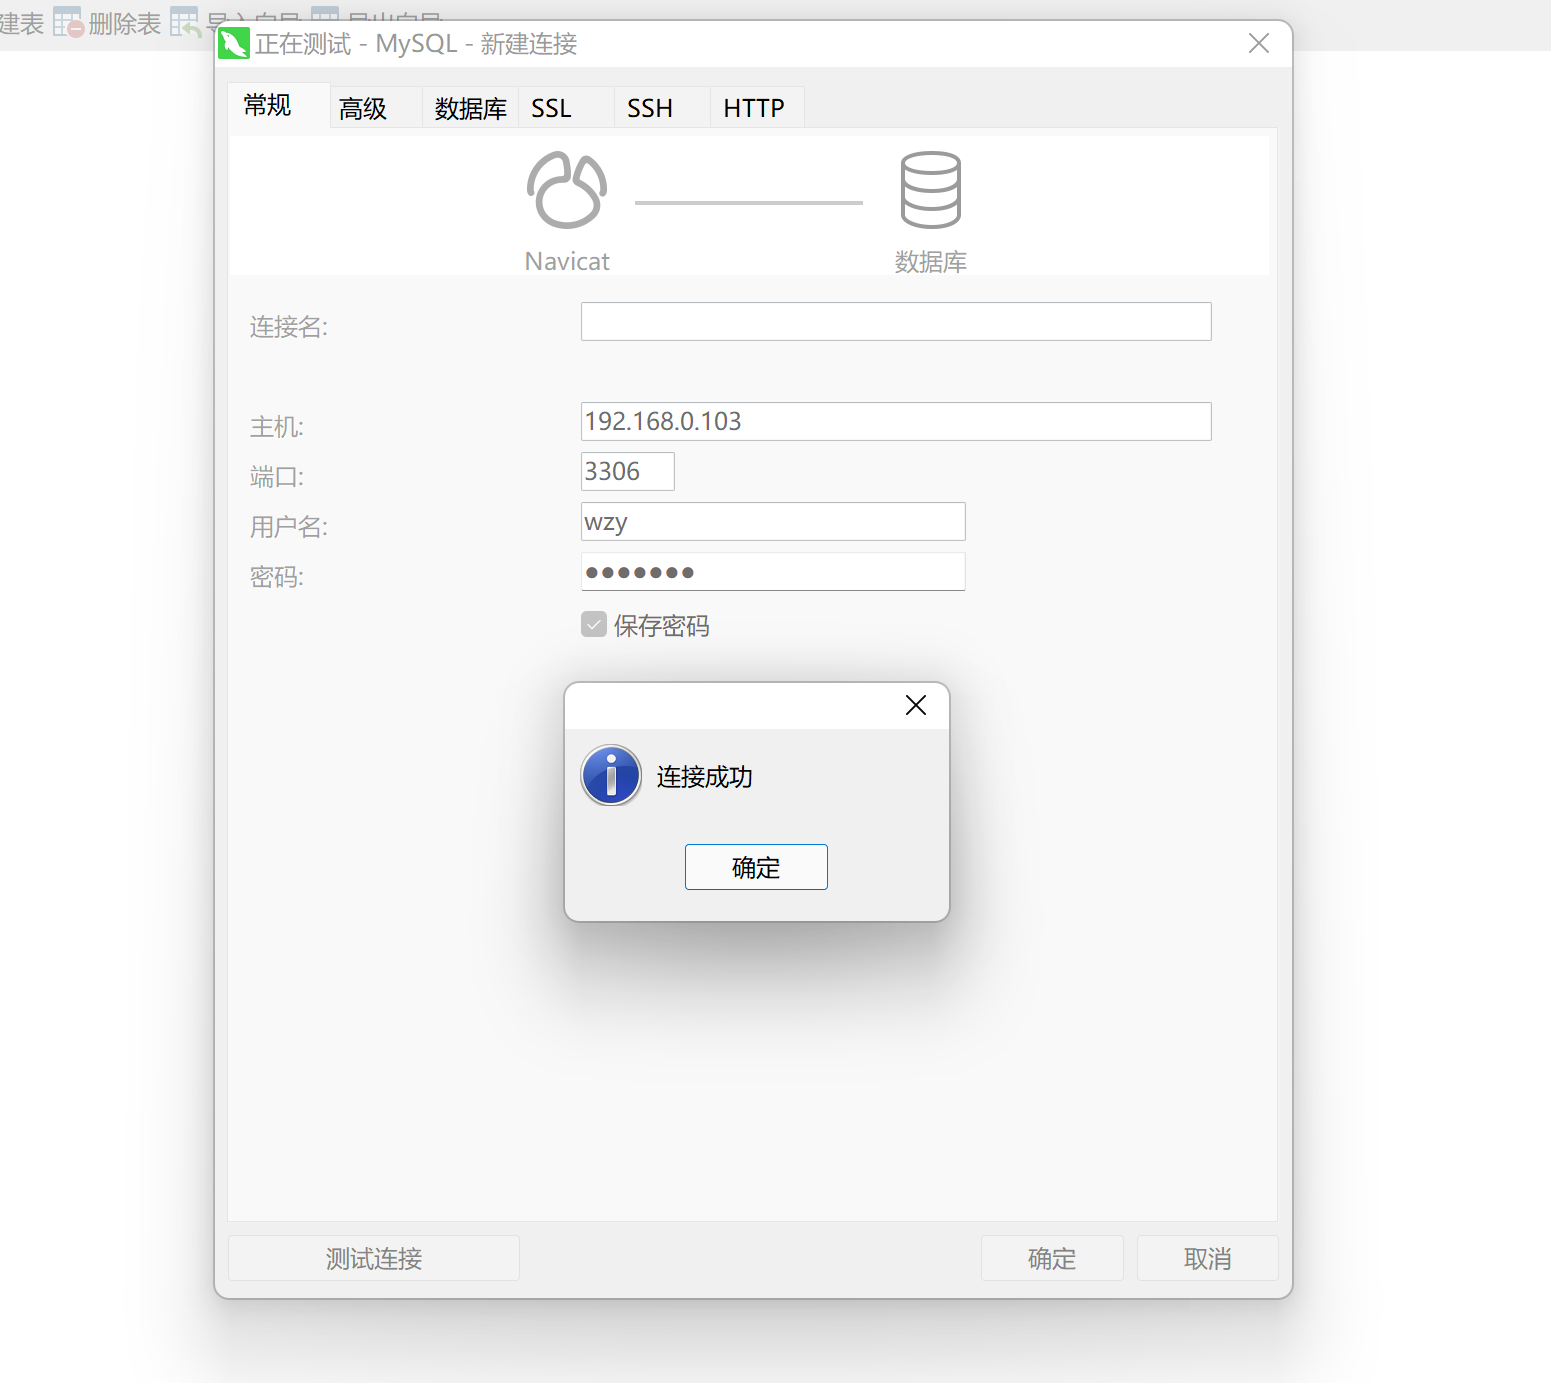
然后在windows的navicat上登陆这个数据库,如果有防火墙,记得开放端口
5.验证
查看版本
show variables like 'version';
效果:
mysql> show variables like 'version';
+---------------+--------+
| Variable_name | Value  |
+---------------+--------+
| version       | 8.0.27 |
+---------------+--------+
1 row in set (0.00 sec)

mysql>
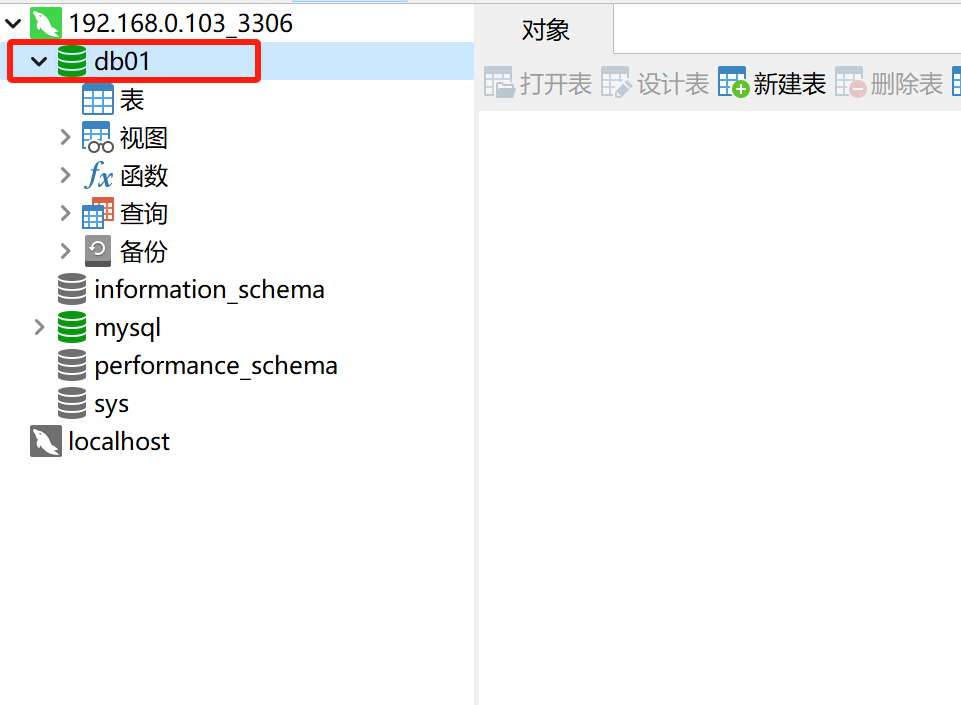
在容器实例中创建一个库
mysql> CREATE DATABASE db01;
Query OK, 1 row affected (0.01 sec)
navicat查看:
在navicat中创建一个表

然后在容器中查看一下
mysql> use db01;
Reading table information for completion of table and column names
You can turn off this feature to get a quicker startup with -A

Database changed
mysql> select * from user_test;
+----+-----------+------+
| id | name      | sex  |
+----+-----------+------+
|  1 | 艾露恩 | 女  |
|  2 | 艾萨拉 | 女  |
+----+-----------+------+
2 rows in set (0.00 sec)

mysql>
3.mysql主从复制
1.配置修改
找到上一步安装mysql时创建的conf文件
在
/wzy/mysql/conf/目录下创建的custom.cnf配置文件
在里面添加如下内容:
[mysqld]
## 设置server_id,同一局域网中需要唯一
server_id=101
## 指定不需要同步的数据库名称
binlog-ignore-db=mysql
## 开启二进制日志功能
log-bin=mall-mysql-bin
## 设置二进制日志使用内存大小(事务)
binlog_cache_size=1M
## 设置使用的二进制日志格式(mixed,statement,row)
binlog_format=mixed
## 二进制日志过期清理时间。默认值为0,表示不自动清理。
expire_logs_days=7
## 跳过主从复制中遇到的所有错误或指定类型的错误,避免slave端复制中断。
## 如:1062错误是指一些主键重复,1032错误是因为主从数据库数据不一致
slave_skip_errors=1062
# 设置默认时区
default-time_zone='+8:00'
然后重启mysql容器
[root@localhost ~]# docker restart mysql
mysql
[root@localhost ~]# docker ps
CONTAINER ID   IMAGE         COMMAND                   CREATED      STATUS          PORTS                                                  NAMES
1b8225f9abbc   redis:6.2.6   "docker-entrypoint.s…"   2 days ago   Up 46 minutes   0.0.0.0:6379->6379/tcp, :::6379->6379/tcp              redis
f165aa014e64   mysql         "docker-entrypoint.s…"   7 days ago   Up 2 seconds    0.0.0.0:3306->3306/tcp, :::3306->3306/tcp, 33060/tcp   mysql
[root@localhost ~]#
2.创建数据同步用户
mysql 8 版本,需要手动设置密码校验为
mysql_native_password
-- 创建slave用户以及设置密码
CREATE USER 'slave'@'%' IDENTIFIED WITH mysql_native_password BY 'wangziyu123';
-- 授权slave
GRANT REPLICATION SLAVE, REPLICATION CLIENT ON *.* TO 'slave'@'%';
先登录,然后再创建用户
接上一步,ps后拿到实例id,进入容器中,然后再登录:
[root@localhost ~]# docker exec -it f165aa014e64 /bin/bash
root@f165aa014e64:/# mysql -u root -p
Enter password:
Welcome to the MySQL monitor.  Commands end with ; or \g.
Your MySQL connection id is 11
Server version: 8.0.27 MySQL Community Server - GPL

Copyright (c) 2000, 2021, Oracle and/or its affiliates.

Oracle is a registered trademark of Oracle Corporation and/or its
affiliates. Other names may be trademarks of their respective
owners.

Type 'help;' or '\h' for help. Type '\c' to clear the current input statement.

mysql>
之后创建用户:
mysql> CREATE USER 'slave'@'%' IDENTIFIED WITH mysql_native_password BY 'wangziyu123';
Query OK, 0 rows affected (0.02 sec)

mysql> GRANT REPLICATION SLAVE, REPLICATION CLIENT ON *.* TO 'slave'@'%';
Query OK, 0 rows affected (0.01 sec)

mysql>
3.运行从库容器实例
先从上一步退出主库与容器实例
mysql> exit
Bye
root@f165aa014e64:/# exit
exit
[root@localhost ~]#
创建三个目录,用于mysql从库容器卷,存放配置文件、数据文件和日志文件
使用 -p 创建多级目录,即 wzy 目录下创建 mysql 目录, mysql 目录下又创建 log 、data 、conf 三个目录:
[root@localhost ~]# mkdir -p /wzy/mysqlslave/log
[root@localhost ~]# mkdir -p /wzy/mysqlslave/data
[root@localhost ~]# mkdir -p /wzy/mysqlslave/conf
[root@localhost ~]# cd /wzy
[root@localhost wzy]# ll
总用量 0
drwxr-xr-x. 2 root root 42 4月  11 20:05 docker_data
drwxr-xr-x. 2 root root  6 4月  10 19:21 myregistry
drwxr-xr-x. 5 root root 41 4月  18 19:12 mysql
drwxr-xr-x. 5 root root 41 4月  25 20:24 mysqlslave
drwxr-xr-x. 3 root root 36 4月  23 20:10 redis
[root@localhost wzy]# cd mysqlslave/
[root@localhost mysqlslave]# ll
总用量 0
drwxr-xr-x. 2 root root 6 4月  25 20:24 conf
drwxr-xr-x. 2 root root 6 4月  25 20:24 data
drwxr-xr-x. 2 root root 6 4月  25 20:23 log
[root@localhost mysqlslave]#
在
/wzy/mysqlslave/conf/目录下创建自定义的custom.cnf配置文件。文件名随意,文件格式必须为 .cnf。
[root@localhost ~]# vim /wzy/mysqlslave/conf/custom.cnf
添加容器运行的配置参数,设置编码集,还有出从复制的参数:
[mysqld]
init-connect="SET collation_connection=utf8mb4_0900_ai_ci"
init_connect="SET NAMES utf8mb4"
skip-character-set-client-handshake
## 设置server_id,同一局域网中需要唯一
server_id=102
## 指定不需要同步的数据库名称
binlog-ignore-db=mysql
## 开启二进制日志功能,以备Slave作为其它数据库实例的Master时使用
log-bin=mall-mysql-slave1-bin
## 设置二进制日志使用内存大小(事务)
binlog_cache_size=1M
## 设置使用的二进制日志格式(mixed,statement,row)
binlog_format=mixed
## 二进制日志过期清理时间。默认值为0,表示不自动清理。
expire_logs_days=7
## 跳过主从复制中遇到的所有错误或指定类型的错误,避免slave端复制中断。
## 如:1062错误是指一些主键重复,1032错误是因为主从数据库数据不一致
slave_skip_errors=1062
## relay_log配置中继日志
relay_log=mall-mysql-relay-bin
## log_slave_updates表示slave将复制事件写进自己的二进制日志
log_slave_updates=1
## slave从库设置为只读(具有super权限的用户除外)
read_only=1
# 设置默认时区
default-time_zone='+8:00'
创建容器并运行
docker run --name mysql_slave -v /wzy/mysqlslave/log:/var/log/mysql -v /wzy/mysqlslave/data:/var/lib/mysql -v /wzy/mysqlslave/conf:/etc/mysql/conf.d -p 3307:3306 -e MYSQL_ROOT_PASSWORD=123456 -d mysql
执行结果
[root@localhost mysqlslave]# docker run --name mysql_slave -v /wzy/mysqlslave/log:/var/log/mysql -v /wzy/mysqlslave/data:/var/lib/mysql -v /wzy/mysqlslave/conf:/etc/mysql/conf.d -p 3307:3306 -e MYSQL_ROOT_PASSWORD=123456 -d mysql
c7b0458076f3f13725c853a4d0b3415bd34910d05f29e863506993e00b3c5423
[root@localhost mysqlslave]# docker ps
CONTAINER ID   IMAGE         COMMAND                   CREATED              STATUS              PORTS                                                  NAMES
c7b0458076f3   mysql         "docker-entrypoint.s…"   About a minute ago   Up About a minute   33060/tcp, 0.0.0.0:3307->3306/tcp, :::3307->3306/tcp   mysql_slave
1b8225f9abbc   redis:6.2.6   "docker-entrypoint.s…"   2 days ago           Up About an hour    0.0.0.0:6379->6379/tcp, :::6379->6379/tcp              redis
f165aa014e64   mysql         "docker-entrypoint.s…"   7 days ago           Up 25 minutes       0.0.0.0:3306->3306/tcp, :::3306->3306/tcp, 33060/tcp   mysql
[root@localhost mysqlslave]#
4.在主库查看同步状态
开启新终端窗口,进入主库容器并登录,然后执行
show master status;,如下即为成功
[root@localhost ~]# docker exec -it f165aa014e64 /bin/bash
root@f165aa014e64:/# mysql -u root -p
Enter password:
Welcome to the MySQL monitor.  Commands end with ; or \g.
Your MySQL connection id is 12
Server version: 8.0.27 MySQL Community Server - GPL

Copyright (c) 2000, 2021, Oracle and/or its affiliates.

Oracle is a registered trademark of Oracle Corporation and/or its
affiliates. Other names may be trademarks of their respective
owners.

Type 'help;' or '\h' for help. Type '\c' to clear the current input statement.

mysql> show master status;
+-----------------------+----------+--------------+------------------+-------------------+
| File                  | Position | Binlog_Do_DB | Binlog_Ignore_DB | Executed_Gtid_Set |
+-----------------------+----------+--------------+------------------+-------------------+
| mall-mysql-bin.000001 |      681 |              | mysql            |                   |
+-----------------------+----------+--------------+------------------+-------------------+
1 row in set (0.00 sec)

mysql>
5.在从数据库配置主从复制
还是进入从库实例并登录
[root@localhost mysqlslave]# docker exec -it c7b0458076f3 /bin/bash
root@c7b0458076f3:/# mysql -u root -p
Enter password:
Welcome to the MySQL monitor.  Commands end with ; or \g.
Your MySQL connection id is 8
Server version: 8.0.27 MySQL Community Server - GPL

Copyright (c) 2000, 2021, Oracle and/or its affiliates.

Oracle is a registered trademark of Oracle Corporation and/or its
affiliates. Other names may be trademarks of their respective
owners.

Type 'help;' or '\h' for help. Type '\c' to clear the current input statement.

mysql>
配置
change master to
master_host='主库主机ip地址',
master_user='步骤4创建的账号',
master_password='步骤4创建的密码',
master_port=3306, --主库的映射端口
master_log_file='mall-mysql-bin.000001',  --show master status查看的File字段数据
master_log_pos=2625,  --show master status查看的Position字段数据
master_connect_retry=30;
参数说明:
master_host:主数据库的IP地址;
master_port:主数据库的运行端口;
master_user:在主数据库创建的用于同步数据的用户账号;
master_password:在主数据库创建的用于同步数据的用户密码;
master_log_file:指定从数据库要复制数据的日志文件,通过查看主数据的状态,获取File参数;
master_log_pos:指定从数据库从哪个位置开始复制数据,通过查看主数据的状态,获取Position参数;
master_connect_retry:连接失败重试的时间间隔,单位为秒。
这里我的配置是:
change master to master_host='192.168.0.104', master_user='slave', master_password='wangziyu123', master_port=3306, master_log_file='mall-mysql-bin.000001', master_log_pos=681, master_connect_retry=30;
执行,并使用
show slave status \G;查看从库同步状态,如下即为成功
发现Slave_IO_Running与Slave_SQL_Running为 NO状态,这里是因为从库还没有开启主从复制,下一步进行
mysql> change master to master_host='192.168.0.104', master_user='slave', master_password='wangziyu123', master_port=3306, master_log_file='mall-mysql-bin.000001', master_log_pos=681, master_connect_retry=30;
Query OK, 0 rows affected, 10 warnings (0.06 sec)

mysql> show slave status \G;
*************************** 1. row ***************************
               Slave_IO_State:
                  Master_Host: 192.168.0.104
                  Master_User: slave
                  Master_Port: 3306
                Connect_Retry: 30
              Master_Log_File: mall-mysql-bin.000001
          Read_Master_Log_Pos: 681
               Relay_Log_File: mall-mysql-relay-bin.000001
                Relay_Log_Pos: 4
        Relay_Master_Log_File: mall-mysql-bin.000001
             Slave_IO_Running: No
            Slave_SQL_Running: No
              Replicate_Do_DB:
          Replicate_Ignore_DB:
           Replicate_Do_Table:
       Replicate_Ignore_Table:
      Replicate_Wild_Do_Table:
  Replicate_Wild_Ignore_Table:
                   Last_Errno: 0
                   Last_Error:
                 Skip_Counter: 0
          Exec_Master_Log_Pos: 681
              Relay_Log_Space: 156
              Until_Condition: None
               Until_Log_File:
                Until_Log_Pos: 0
           Master_SSL_Allowed: No
           Master_SSL_CA_File:
           Master_SSL_CA_Path:
              Master_SSL_Cert:
            Master_SSL_Cipher:
               Master_SSL_Key:
        Seconds_Behind_Master: NULL
Master_SSL_Verify_Server_Cert: No
                Last_IO_Errno: 0
                Last_IO_Error:
               Last_SQL_Errno: 0
               Last_SQL_Error:
  Replicate_Ignore_Server_Ids:
             Master_Server_Id: 0
                  Master_UUID:
             Master_Info_File: mysql.slave_master_info
                    SQL_Delay: 0
          SQL_Remaining_Delay: NULL
      Slave_SQL_Running_State:
           Master_Retry_Count: 86400
                  Master_Bind:
      Last_IO_Error_Timestamp:
     Last_SQL_Error_Timestamp:
               Master_SSL_Crl:
           Master_SSL_Crlpath:
           Retrieved_Gtid_Set:
            Executed_Gtid_Set:
                Auto_Position: 0
         Replicate_Rewrite_DB:
                 Channel_Name:
           Master_TLS_Version:
       Master_public_key_path:
        Get_master_public_key: 0
            Network_Namespace:
1 row in set, 1 warning (0.00 sec)

ERROR:
No query specified

mysql>
6.从库开启主从复制
在上一步接着执行
start slave
mysql> start slave;
Query OK, 0 rows affected, 1 warning (0.04 sec)
注意点
start slave命令启动后可能会发现错误
此类报错和max_allowed_packet相关。首先max_allowed_packet控制着主从复制过程中,一个语句产生的二进制binlog event大小,它的值必须是1024的倍数 。
1.该参数在主备库的配置大小不一样,主库的配置值大于从库的配置值。 从主库传递到备库的binlog event大小超过了主库或者备库的max_allowed_packet大小。
2.主库有大量数据写入时,比如在主库上执行 laod data,insert into … select 语句,产生大事务。
Got fatal error 1236 from master when reading data from binary log: 'binlog truncated in the middle of event; consider out of disk space on master; the first event 'mall-mysql-bin. 000001' at 1146, the last event read from './mall-mysql-bin. 000001' at 125, the last byte read from './mall-mysql-bin. 000001' at 1446.'
设置一下同步日志允许大小就行了
在主从数据库上均执行:
set global max_allowed_packet =1*1024*1024*1024;
-- 重启
stop slave;
start slave;
r如果没有问题,再次查看从库的同步状态
发现Slave_IO_Running与Slave_SQL_Running变为YES状态
mysql> start slave;
Query OK, 0 rows affected, 1 warning (0.04 sec)

mysql> show slave status \G;
*************************** 1. row ***************************
               Slave_IO_State: Waiting for source to send event
                  Master_Host: 192.168.0.104
                  Master_User: slave
                  Master_Port: 3306
                Connect_Retry: 30
              Master_Log_File: mall-mysql-bin.000001
          Read_Master_Log_Pos: 681
               Relay_Log_File: mall-mysql-relay-bin.000002
                Relay_Log_Pos: 329
        Relay_Master_Log_File: mall-mysql-bin.000001
             Slave_IO_Running: Yes
            Slave_SQL_Running: Yes
              Replicate_Do_DB:
          Replicate_Ignore_DB:
           Replicate_Do_Table:
       Replicate_Ignore_Table:
      Replicate_Wild_Do_Table:
  Replicate_Wild_Ignore_Table:
                   Last_Errno: 0
                   Last_Error:
                 Skip_Counter: 0
          Exec_Master_Log_Pos: 681
              Relay_Log_Space: 543
              Until_Condition: None
               Until_Log_File:
                Until_Log_Pos: 0
           Master_SSL_Allowed: No
           Master_SSL_CA_File:
           Master_SSL_CA_Path:
              Master_SSL_Cert:
            Master_SSL_Cipher:
               Master_SSL_Key:
        Seconds_Behind_Master: 0
Master_SSL_Verify_Server_Cert: No
                Last_IO_Errno: 0
                Last_IO_Error:
               Last_SQL_Errno: 0
               Last_SQL_Error:
  Replicate_Ignore_Server_Ids:
             Master_Server_Id: 101
                  Master_UUID: 0fb28453-fd77-11ee-b093-0242ac110002
             Master_Info_File: mysql.slave_master_info
                    SQL_Delay: 0
          SQL_Remaining_Delay: NULL
      Slave_SQL_Running_State: Replica has read all relay log; waiting for more updates
           Master_Retry_Count: 86400
                  Master_Bind:
      Last_IO_Error_Timestamp:
     Last_SQL_Error_Timestamp:
               Master_SSL_Crl:
           Master_SSL_Crlpath:
           Retrieved_Gtid_Set:
            Executed_Gtid_Set:
                Auto_Position: 0
         Replicate_Rewrite_DB:
                 Channel_Name:
           Master_TLS_Version:
       Master_public_key_path:
        Get_master_public_key: 0
            Network_Namespace:
1 row in set, 1 warning (0.01 sec)
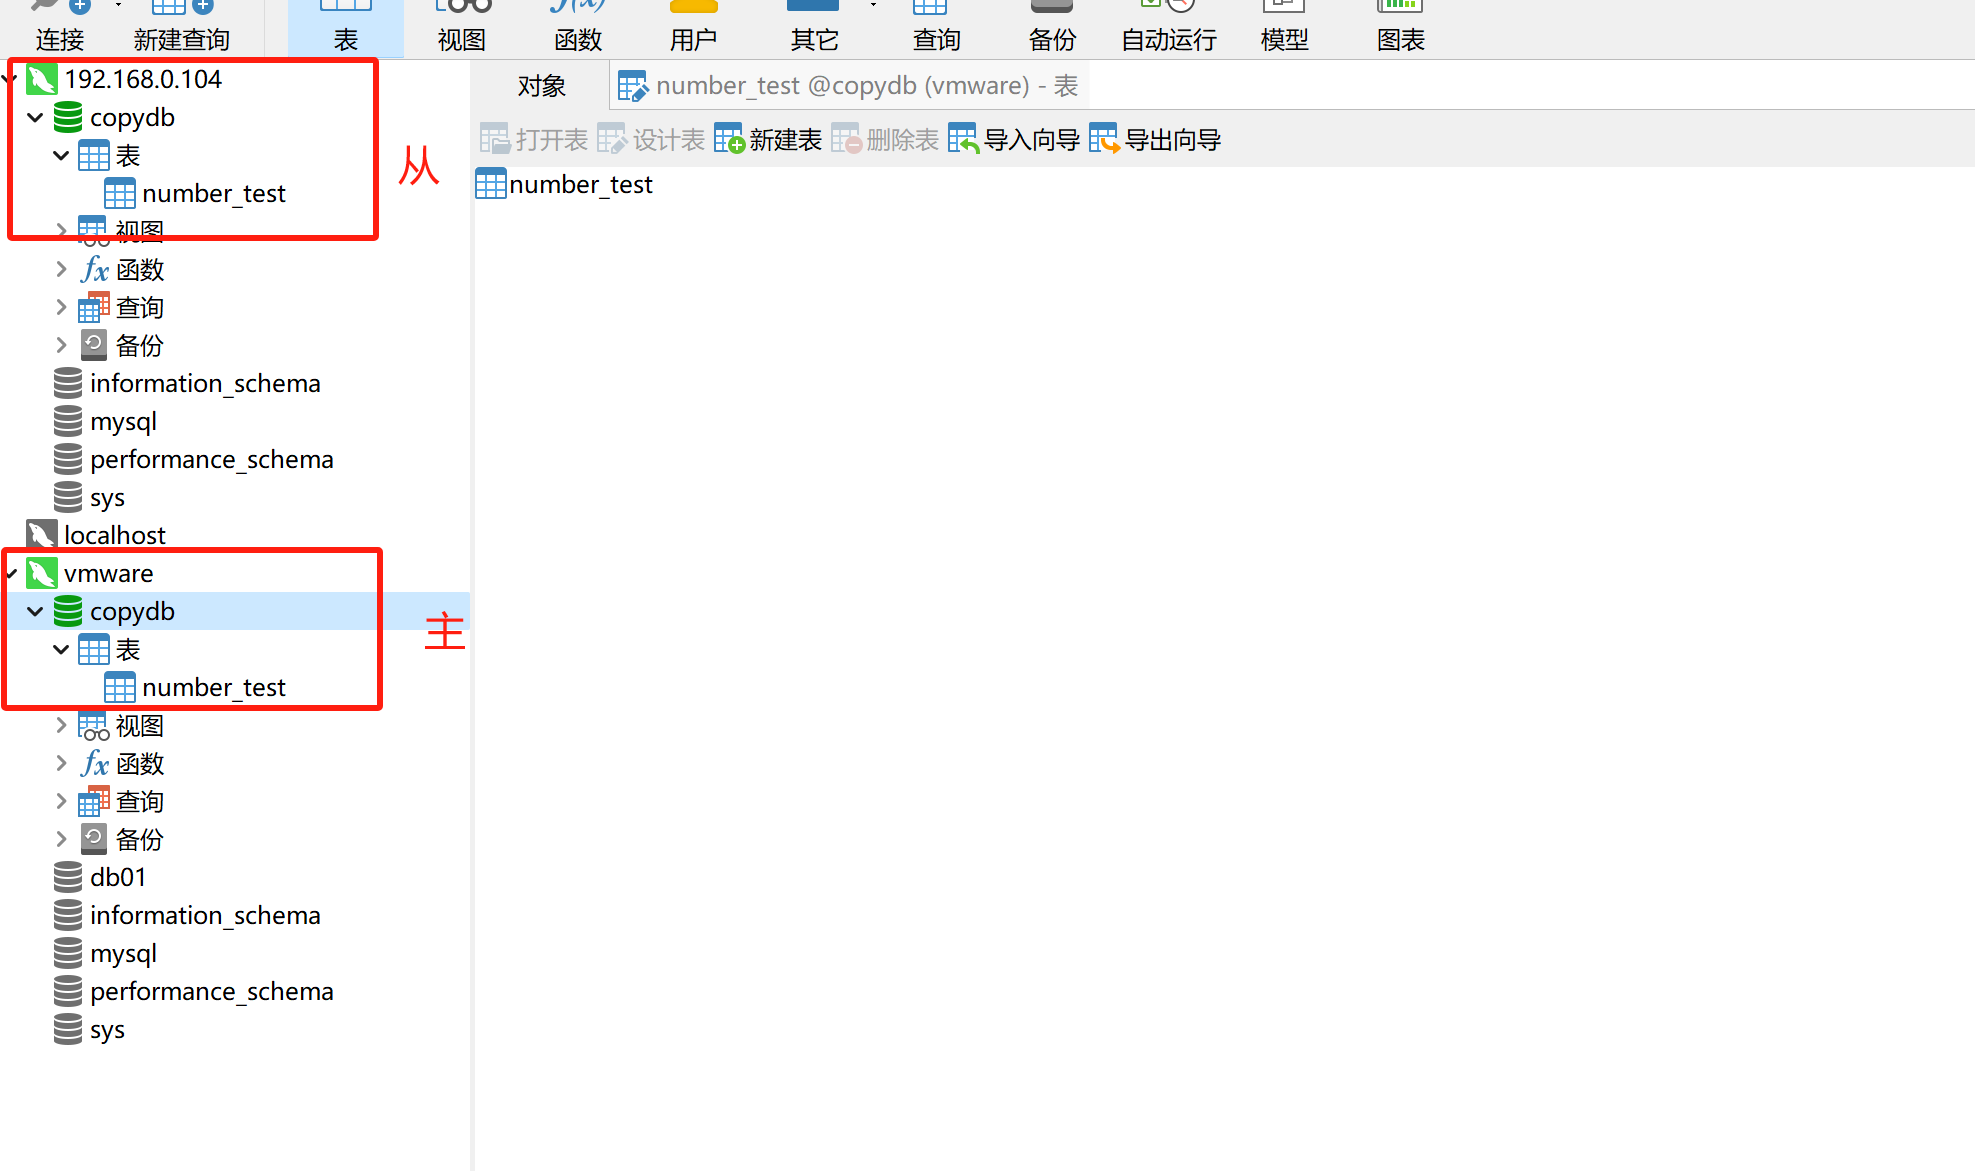
然后用navicat分别连接3306的主库和3307的从库,在主库创建库和表后,可以看到从库会将其自动同步过去
7.设置自动启动
如果需要,可以设置从库容器自启动,即启动容器一并启动从mysql
docker update --restart=always mysql-slave
执行如下:
mysql> exit
Bye
root@c7b0458076f3:/# exit
exit
[root@localhost mysqlslave]# docker ps
CONTAINER ID   IMAGE         COMMAND                   CREATED          STATUS          PORTS                                                  NAMES
c7b0458076f3   mysql         "docker-entrypoint.s…"   35 minutes ago   Up 35 minutes   33060/tcp, 0.0.0.0:3307->3306/tcp, :::3307->3306/tcp   mysql_slave
1b8225f9abbc   redis:6.2.6   "docker-entrypoint.s…"   2 days ago       Up 2 hours      0.0.0.0:6379->6379/tcp, :::6379->6379/tcp              redis
f165aa014e64   mysql         "docker-entrypoint.s…"   7 days ago       Up 59 minutes   0.0.0.0:3306->3306/tcp, :::3306->3306/tcp, 33060/tcp   mysql
[root@localhost mysqlslave]# docker update --restart=always mysql_slave
mysql_slave
[root@localhost mysqlslave]#
4.安装redis
1.拉取
docker pull redis
2.运行
docker run -d -p 6379:6379 redis
docker exec -it 实例id /bin/bash
redis-cli
2.1 容器卷
先建立容器卷映射文件夹
[root@localhost ~]# cd /wzy
[root@localhost wzy]# mkdir redis
[root@localhost wzy]# ll
总用量 0
drwxr-xr-x. 2 root root 42 4月  11 20:05 docker_data
drwxr-xr-x. 2 root root  6 4月  10 19:21 myregistry
drwxr-xr-x. 5 root root 41 4月  18 19:12 mysql
drwxr-xr-x. 2 root root  6 4月  23 19:04 redis
[root@localhost wzy]#
2.2 配置文件
拷贝redis.conf
先查看redis最新版的版本
[root@localhost wzy]# docker image inspect redis:latest | grep -i version
        "DockerVersion": "20.10.7",
                "GOSU_VERSION=1.12",
                "REDIS_VERSION=6.2.6",
[root@localhost wzy]#
在如下地址找到对应版本的包,下载下来之后用360压缩打开就可以找到redis.conf文件,
https://download.redis.io/releases/
修改其中的部分内容(我这里是6.2.6版本,其他版本行数可能不一致
)。改完放到上面建立的
/wzy/redis中,或者放进去再改也可以
是否开启验证,开启则每次连接需要密码,在901行,我这里不开启,即不放开注解
requirepass 密码
允许外部连接,将文件中的如下代码前加#号注释掉,在75行
bind 127.0.0.1 -::1
后台启动参数改为no,257行.因为yes是后台启动,会与docker的-d冲突
daemonize no
保护模式关闭,94行,目的是为了让外部可以连redis:
protected-mode no
2.3 运行容器
命令
docker run -d -p 6379:6379 --name redis --privileged=true --restart=always -v /wzy/redis/redis.conf:/etc/redis/redis.conf -v /wzy/redis/data:/data redis:6.2.6 redis-server /etc/redis/redis.conf
参数说明
-d :表示以后台运行方式启动容器。

-p 6379:6379 :将主机的 6379 端口映射到容器的 6379 端口,用于访问 Redis 服务。

–name redis :给容器指定一个名称,这里是 “redis”。

–privileged=true :以特权模式启动容器,拥有更高的权限。

–restart=always :配置容器在退出时自动重启。

-v /wzy/redis/redis.conf:/etc/redis/redis.conf :将主机上的 /wzy/redis/redis.conf 文件挂载到容器内的 /etc/redis/redis.conf 路径,用于指定 Redis
的配置文件。

-v /app/redis/data:/data :将主机上的 /app/redis/data 目录挂载到容器内的 /data 路径,用于指定 Redis 数据的持久化存储路径。

redis:6.2.6 :表示使用的 Redis 镜像的名称和版本。

redis-server /etc/redis/redis.conf :在容器启动时执行的命令,即运行 Redis 服务,并指定配置文件为 /etc/redis/redis.conf
运行结果
docker exec -it 1b8225f9abbc /bin/bash进入验证
[root@localhost ~]# docker run -d -p 6379:6379 --name redis --privileged=true --restart=always -v /wzy/redis/redis.conf:/etc/redis/redis.conf -v /wzy/redis/data:/data redis:6.2.6 redis-server /etc/redis/redis.conf
1b8225f9abbc293754f04ad7798817f5f573f2cad1f49933742c4d41658f9526
[root@localhost ~]# docker ps
CONTAINER ID   IMAGE         COMMAND                   CREATED         STATUS          PORTS                                                  NAMES
1b8225f9abbc   redis:6.2.6   "docker-entrypoint.s…"   5 seconds ago   Up 3 seconds    0.0.0.0:6379->6379/tcp, :::6379->6379/tcp              redis
f165aa014e64   mysql         "docker-entrypoint.s…"   5 days ago      Up 23 minutes   0.0.0.0:3306->3306/tcp, :::3306->3306/tcp, 33060/tcp   mysql
[root@localhost ~]# docker exec -it 1b8225f9abbc /bin/bash
root@1b8225f9abbc:/data# redis-cli
127.0.0.1:6379>

