静态语言和动态语言的在相互吸收对方的优秀特性,取人之长补己之短。脚本引擎和动态编译就是其中一个关键特性,扩展了Java的能力边界。这一篇我们主要讲两个东西:
- ScriptEngine,执行脚本语言代码,如JavaScript、Groovy
- JavaCompiler,动态编译Java代码,加载Class对象并使用
1. 脚本引擎
1. 获取引擎
Java通过ScriptEngine接口提供脚本引擎的支持。在ScriptEngineManager里,通过Java SPI加载所有的ScriptEngine的实现。在Java 17中没有自带任何ScriptEngine实现,从侧面反映,其实ScriptEngine并不是一个主流或官方推荐的操作。下面的代码能够获取当前环境下支持的所有脚本引擎。
ScriptEngineManager manager = new ScriptEngineManager();
List<ScriptEngineFactory> factoryList = manager.getEngineFactories();
System.out.println(factoryList.size()); // 默认size = 0,需要自己引用ScriptEngine的实现

factoryList.forEach(x -> {
    System.out.println(x.getEngineName());
    System.out.println(x.getNames());
    System.out.println(x.getMimeTypes());
    System.out.println(x.getExtensions());
});
OpenJDK一个JavaScript的脚本引擎: nashorn,要使用它,需要引入Maven依赖,Maven依赖如下:
<dependency>
    <groupId>org.openjdk.nashorn</groupId>
    <artifactId>nashorn-core</artifactId>
    <version>15.4</version>
</dependency>
引入依赖后,重新执行获取所有可用的脚本引擎代码,我们能看到如下输出,这里主要关心的是ScriptEngine的getNames、getMimeTypes、getExtensions这3个方法的输出

对应这三种输出,我们可以通过ScriptEngineManager中的三个方法,以输出值的一个元素为入参,获取对应的ScriptEngine对象,代码如下
ScriptEngine engine = manager.getEngineByName("nashorn");

engine = manager.getEngineByMimeType("application/javascript");
engine = manager.getEngineByExtension("js");
这里我们提供一个工具方法,用于获取ScriptEngine,供后续测试使用,本文中我们只会使用到nashorn脚本引擎
private static ScriptEngine getEngineByName(String name) {
    ScriptEngineManager manager = new ScriptEngineManager();
    return manager.getEngineByName(name);
}
2. 简单脚本
拿到ScriptEngine对象后,我们就能用它执行脚本了。下面是一个极简的例子,对两个数个数字1和2求和,返回结果3
private static void basicEval() throws ScriptException {
    ScriptEngine engine = getEngineByName("javascript");
    Integer i = (Integer) engine.eval(" 1 + 2");
    System.out.println(i.getClass().getSimpleName() + ":" + i);  // 输出:  Integer: 3
}
这样执行脚本的话,每次都需要我们生成完整的脚本,如果逻辑完全相同,只是其中部分字段值不同,我们能否复用之前的代码呢?ScriptEngine支持在脚本内使用外部定义的变量,有2种方式定义变量:
- 引擎变量,同一个ScriptEngine实例下共享变量
- 局部变量,同一个Bindings实例下共享变量
我们来看一个引擎变量的例子,调用ScriptEngine.put能设置一个变量的值,并在脚本内使用。这里有一点陷阱是,使用变量后,eval方法返回的类型变成了Double类型。
private static void engineBindEval() throws ScriptException {
    ScriptEngine engine = getEngineByName("javascript");
    engine.put("a", Integer.valueOf(1));
    Object i = engine.eval(" 1 + 2");
    System.out.println(i.getClass().getSimpleName() + ":" + i);  // 返回Integer

    i = engine.eval(" a + 2");
    System.out.println(i.getClass().getSimpleName() + ":" + i);  // 返回Double
}
引擎变量是全局的,更常用的场景是局部变量,Bindings类提供了局部变量的支持,不同Bindings内定义的变量互不干扰
private static void bindEval() throws ScriptException {
    ScriptEngine engine = getEngineByName("javascript");

    Bindings scope = engine.createBindings();        // 局部变量,a=1
    scope.put("a", 1);

    Bindings anotherScope = engine.createBindings(); // 局部变量,a=2
    anotherScope.put("a", 2);

    i = engine.eval("a + 2", scope);
    System.out.println(i.getClass().getSimpleName() + ":" + i);  // a=1,返回3

    i = engine.eval("a + 2", anotherScope);
    System.out.println(i.getClass().getSimpleName() + ":" + i);  // a=2,返回4
}
3. 函数调用
通过在脚本内使用变量,使用不同的变量值,确实支持了脚本的部分逻辑复用。对于复杂的逻辑,可能需要定义多个函数,判断和组合不同的函数来实现。ScriptEngine提供了函数调用的支持,可以事先定义函数,后续反复调用这个函数。来看个实例,我们定义sum函数,实现了两个入参a、b的+操作。
private static void callFunction() throws ScriptException, NoSuchMethodException {
    ScriptEngine engine = getEngineByName("javascript");
    engine.eval("function sum(a,b) {return a + b; }");

    Object r = ((Invocable) engine).invokeFunction("sum", "hello", " world");
    System.out.println(r.getClass().getSimpleName() + ": " + r);

    r = ((Invocable) engine).invokeFunction("sum", 1, 2);
    System.out.println(r.getClass().getSimpleName() + ": " + r);
}
4. 方法调用
很多脚本语言也支持面向对象的编程,比如JavaScript通过prototype能支持对象方法的定义。下面的例子,我们定义了一个Rectangle类,支持方法volume传入一个高(height)配合Rectangle计算体积
private static void callMethod() throws ScriptException, NoSuchMethodException {
    ScriptEngine engine = getEngineByName("javascript");
    engine.eval("function Rectangle(width,length) {this.width=width;this.length=length;}");
    engine.eval("Rectangle.prototype.volume = function(height) {return this.width * this.length * height;}");  // 定义一个Rectangle类

    Object rectangle = engine.eval("new Rectangle(2,3)");                                                      // 创建一个Rectangle实例
    System.out.println(rectangle.getClass().getSimpleName() + ": " + rectangle);
    ScriptObjectMirror mirror = (ScriptObjectMirror) rectangle;
    System.out.println("mirror, width: " + mirror.get("width") + ", length: " + mirror.get("length"));         // 通过ScriptObjectMirror读取字段

    Object volume = ((Invocable) engine).invokeMethod(rectangle, "volume", 4);                                 // 调用实例的方法
    System.out.println(volume.getClass().getSimpleName() + ": " + volume);
}
5. 接口调用
通过方法调用、函数调用,我们已经能复用代码了,但是对于使用者来说还必须使用脚本引擎的API。通过Invocable.getInterface(),我们能拿到一个接口的实例,对使用者来说,只需要关系这个接口即可。Invocable.getInterface()同样也支持两种形式,函数调用和方法调用。下面是一个函数调用的例子,Invocable.getInterface的入参直接是一个Class对象
public static interface NumericFunction {
    public int sum(int a, int b);

    public int multiply(int a, int b);
}

private static void callInterface() throws ScriptException, NoSuchMethodException {
    ScriptEngine engine = getEngineByName("javascript");
    engine.eval("function sum(a,b) { return a + b; }");
    engine.eval("function multiply(a,b) { return a * b; }");

    NumericFunction numeric = ((Invocable) engine).getInterface(NumericFunction.class);  // 获取NumericFunction的实例
    int sum = numeric.sum(1, 2);
    System.out.println("sum: " + sum);
    int product = numeric.multiply(2, 3);
    System.out.println("product: " + product);
}
如果是方法调用,需要在Invocable.getInterface中额外传入一个隐式参数(Java里的this)
public static interface Numeric {
    public int sum(int b);

    public int multiply(int b);
}

private static void callInterfaceMethod() throws ScriptException, NoSuchMethodException {
    ScriptEngine engine = getEngineByName("javascript");
    engine.eval("function Numeric(a) {this.num = a;}");
    engine.eval("Numeric.prototype.sum = function(b) { return this.num + b; }");
    engine.eval("Numeric.prototype.multiply = function(b) { return this.num * b; }");

    Object num = engine.eval("new Numeric(1)");
    Numeric numeric = ((Invocable) engine).getInterface(num, Numeric.class);
   // 方法调用的隐式参数: this=num

    int sum = numeric.sum(2);
    System.out.println("sum: " + sum);
    int product = numeric.multiply(3);
    System.out.println("product: " + product);
}
6. 编译脚本
到现在ScriptEngine已经够好用了,我们来看看它的执行效率。对比Java原生代码、脚本引擎、编译脚本执行相同的逻辑,来对比差异。我们先准备测试环境,预定义ScriptEngine、CompiledScript
private static ScriptEngine engine = getEngineByName("nashorn");
private static Bindings params = engine.createBindings();
private static CompiledScript script;

static {
    try {
        script = ((Compilable) engine).compile("a+b");
    } catch (Exception e) {
    }
}
private static volatile Object result;
然后定义一个模板方法(abTest),生成100w个数字,执行BiFunction操作,赋值给result(避免编译器优化),来看看响应时间
private static void abTest(BiFunction<Integer, Integer, Object> func) throws ScriptException {
    Instant now = Instant.now();
    IntStream.range(0, 100_0000).forEach(i -> {
        result = func.apply(i, i + 1);
    });
    Instant finish = Instant.now();
    System.out.println("duration: " + Duration.between(now, finish).toMillis());
}
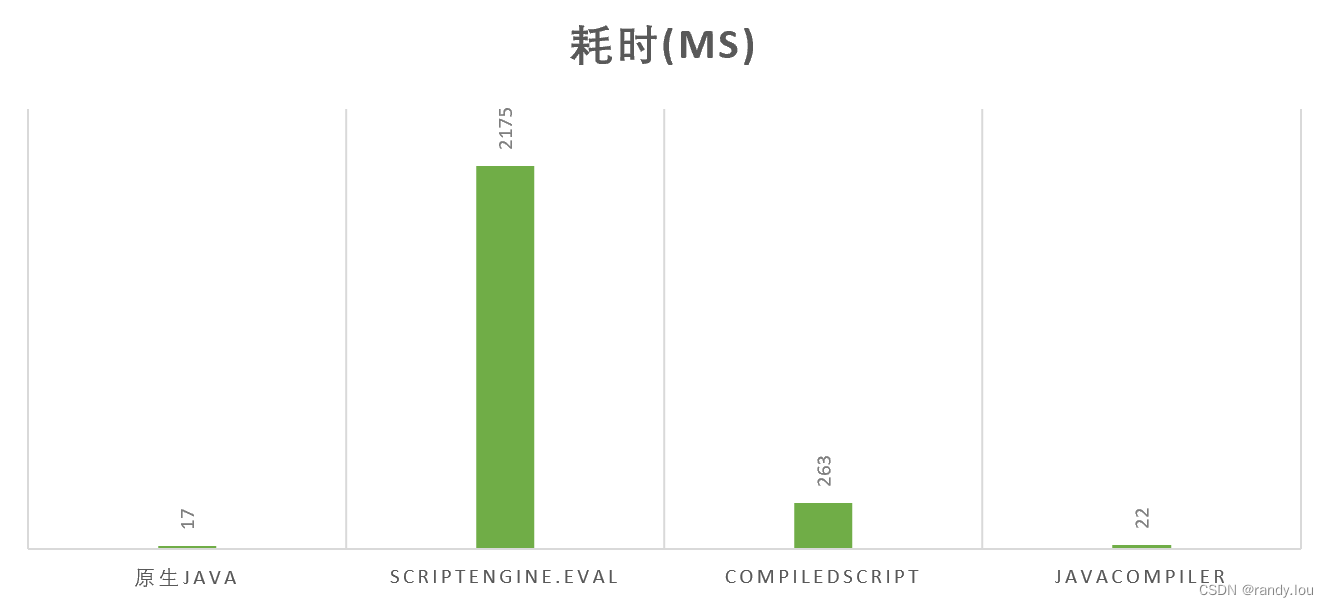
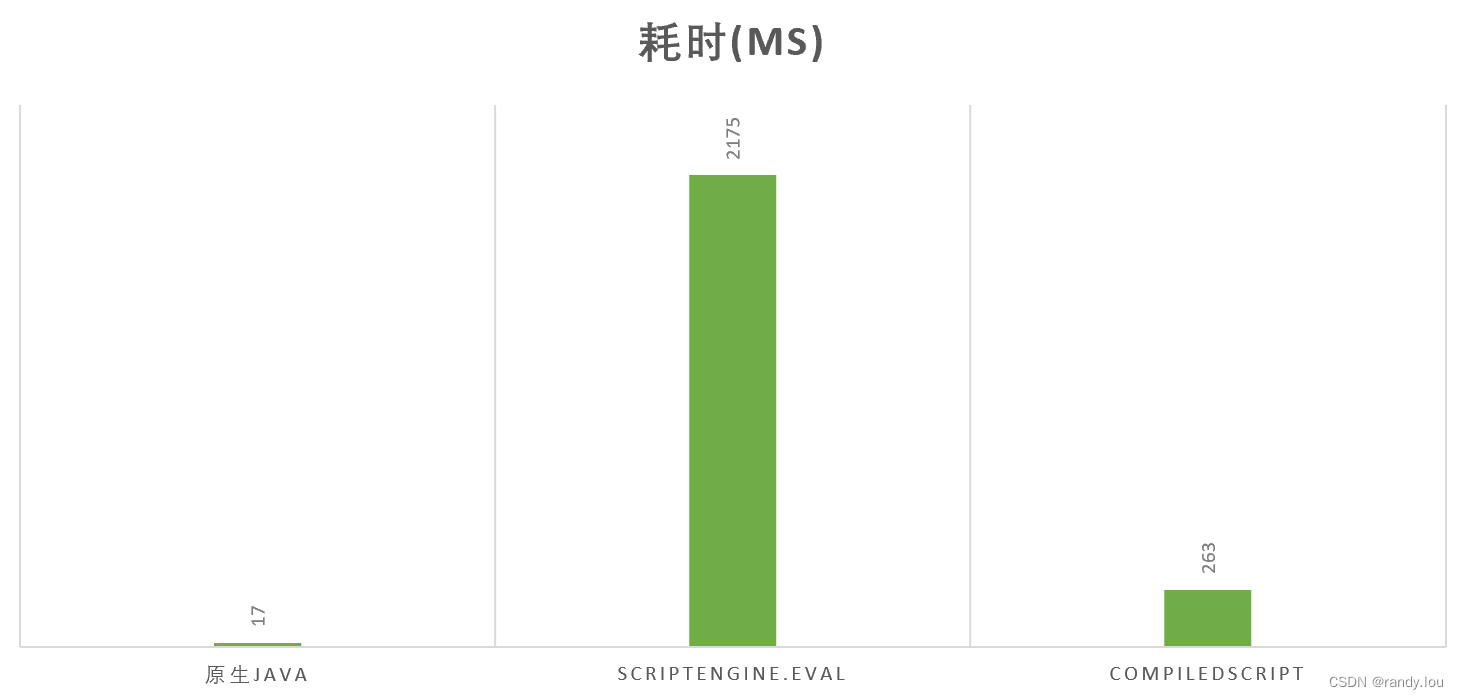
首先我们使用原生Java来执行求和操作,作为基准测试,代码如下,耗时17ms
abTest((Integer i, Integer j) -> i + j);然后使用ScriptEngine.eval来执行相同的求和操作,代码如下,耗时2175ms
private static Object eval(Integer a, Integer b) {
    params.put("a", a);
    params.put("b", b);
    try {
        return engine.eval("a+b", params);
    } catch (ScriptException e) {
        throw new RuntimeException(e);
    }
}
// 测试代码
abTest(TestSplit::eval);
然后使用事先编译的脚本CompiledScript做求和操作,代码如下,耗时263ms
private static Object evalCompiled(Integer a, Integer b) {
    params.put("a", a);
    params.put("b", b);
    try {
        return script.eval(params);
    } catch (ScriptException e) {
        throw new RuntimeException(e);
    }
}
// 测试代码
abTest(TestSplit::evalCompiled);
可以看到原生Java的速度要变脚本引擎快将近100倍,使用编译后脚本的速度是为编译版本的10倍。应该说ScriptEngine对性能是有明显的影响的,如无必要尽量不要使用脚本引擎。
2. 在线编译
上一节说到,使用ScriptEngine对性能有负面的影响,而且使用脚本我们需要额外的学习脚本语法。Java提供了JavaCompiler支持动态的编译和执行Java代码,正好能解决上述两个问题。
1. 编译文件
通过JavaCompiler可以编译本地文件,下面是一个简单的示例,值得注意的是,如果使用文件的相对路径,是当前进程的工作目录出发的,通过Path.of("")能拿到进程的工作目录
private static void testCompileFile() throws UnsupportedEncodingException {
    Path path = Path.of("");
    System.out.println(path.toAbsolutePath()); // 打印工作目录,本地文件的相对路径是从工作目录出发的

    JavaCompiler compiler = ToolProvider.getSystemJavaCompiler();
    ByteArrayOutputStream os = new ByteArrayOutputStream();
    int result = compiler.run(null, os, os, "src/main/java/com/keyniu/compiler/Demo.java");
    System.out.println("compileResult: " + result + " ,message: " + new String(os.toByteArray(), "utf-8"));
}
如果编译成功,会在.java文件所在目录生成对应的.class文件。JavaCompiler.run返回值0表示编译成功,否则都是编译失败,支持4个入参,分别如下:
| 参数 | |
| InputStream in | |
| OutputStream out | |
| OutputStream err | |
| String...arguments |
2. 错误信息
调用JavaCompiler.run能通过输出流打印编译的进展和错误信息,然而这些信息适合于人类阅读,并不适合程序分析。CompilationTask增强了JavaCompiler的能力,支持调用者提供DiagnosticListener实例,在编译发生错误时,将错误信息传递给report方法,调用report方法的入参是一个Diagnostic对象,通过Diagnostic对象能取到错误信息、错误代码、错误发生的行和列
private static class MyDiagnostic implements DiagnosticListener {
    public void report(Diagnostic d) {
        System.out.println(d.getKind());
        System.out.println(d.getMessage(Locale.getDefault()));
        System.out.println(d.getCode());
        System.out.println(d.getLineNumber());
        System.out.println(d.getColumnNumber());
    }
}

// 使用CompileTask编译,支持内存文件、错误处理
private static void testCompileTask() {
    JavaCompiler compiler = ToolProvider.getSystemJavaCompiler();
    StandardJavaFileManager fileManager = compiler.getStandardFileManager(new MyDiagnostic(), null, null);
    Iterable<? extends JavaFileObject> sources = fileManager.getJavaFileObjectsFromStrings(List.of("src/main/java/com/keyniu/compiler/Demo.java"));

    JavaCompiler.CompilationTask task = compiler.getTask(null, null, new MyDiagnostic(), List.of(), null, sources);
    Boolean success = task.call();
    System.out.println("compile success: " + success);
}
Java提供了DiagnosticListener的内置实现类DiagnosticCollector,DiagnosticController会收集所有的Diagnostic对象,供后续分析处理
private static void testUseDiagnosticCollector() {
    DiagnosticCollector<JavaFileObject> collector = new DiagnosticCollector<>();

    JavaCompiler compiler = ToolProvider.getSystemJavaCompiler();
    StandardJavaFileManager fileManager = compiler.getStandardFileManager(collector, null, null);
    Iterable<? extends JavaFileObject> sources = fileManager.getJavaFileObjectsFromStrings(List.of("src/main/java/com/keyniu/compiler/Demo1.java"));

    JavaCompiler.CompilationTask task = compiler.getTask(null, null, collector, List.of(), null, sources);
    Boolean success = task.call();
    System.out.println("compile success: " + success);

    for (Diagnostic<? extends JavaFileObject> d : collector.getDiagnostics()) { // 遍历错误信息
        System.out.println(d);
    }
}
3. 动态代码
如果只能编译本地文件的话,JavaCompiler对应用开发者来价值不大,通过程序调用javac命令能达到类似效果。如果能编译内存中的代码的话,想象空间就大了。通过实现自己的JavaFileObject,我们能让JavaCompiler支持编译存储在内存中(比如String)中的代码。我们来看一个简单的JavaFileObject,覆写getCharContent方法,返回类的代码。
private static class JavaCodeInString extends SimpleJavaFileObject {
    private String code;
    public JavaCodeInString(String name, String code) {
        super(URI.create("string:///" + name.replace('.', '/') + ".java"), Kind.SOURCE);
        this.code = code;
    }
    @Override
    public CharSequence getCharContent(boolean ignoreEncodingErrors) throws IOException {
        return this.code;
    }
}
剩下来要做的就是在CompilationTask中使用这个JavaFileObject实现。我们将代码放到局部变量code中,创建JavaCodeInString对象,并传递给CompilationTask.run方法的sources参数
private static void testCodeInString() {
    String code = """
            package com.keyniu.compiler;
            public class Demo {
                private static final int VALUE = 10;
                public static void main(String[] args) {
                    System.out.println(VALUE);
                }

            }
            """;
    List<? extends JavaFileObject> sources = List.of(new JavaCodeInString("com.keyniu.compiler.Demo", code));  // 字符串中的代码

    DiagnosticCollector<JavaFileObject> collector = new DiagnosticCollector<>();
    JavaCompiler compiler = ToolProvider.getSystemJavaCompiler();
    StandardJavaFileManager fileManager = compiler.getStandardFileManager(collector, null, null);

    JavaCompiler.CompilationTask task = compiler.getTask(null, null, collector, List.of(), null, sources);
    Boolean success = task.call();
    System.out.println("compile success: " + success);
}
4. 字节码数组
上一节中我们做到了编译保存在String中的代码,而编译结果仍然会写入到.class文件。我们可以将.class文件放入到classpath的路径中,使用时就能通过Class.forName来加载它。其实还有一个选择,将编译后的字节码直接放在内存里,然后使用Class.define获取对应的Class实例。通过定义一个JavaFileObject,覆写openOutputStream方法,能通过这个输出流接受编译后的字节码
public static class ByteCodeInMemory extends SimpleJavaFileObject {
    private ByteArrayOutputStream bos;
    public ByteCodeInMemory(String name) {
        super(URI.create("bytes:///" + name.replace('.', '/') + ".class"), Kind.CLASS);
    }
    public byte[] getCode() {
        return bos.toByteArray();
    }
    @Override
    public OutputStream openOutputStream() throws IOException {
        bos = new ByteArrayOutputStream();
        return bos;
    }
}
通过覆写JavaFileManager的实现,在getJavaFileForOutput时返回ByteCodeInMemory将这个自定义的JavaFileObject实现传递给框架使用
private static List<ByteCodeInMemory> testByteCodeInMemory() {
    String code = """
            package com.keyniu.compiler;
            public class Demo {
                private static final int VALUE = 10;
                public static void main(String[] args) {
                    System.out.println(VALUE);
                }

            }
            """;
    List<? extends JavaFileObject> sources = List.of(new JavaCodeInString("com.keyniu.compiler.Demo", code));

    DiagnosticCollector<JavaFileObject> collector = new DiagnosticCollector<>();
    JavaCompiler compiler = ToolProvider.getSystemJavaCompiler();

    List<ByteCodeInMemory> classes = new ArrayList<>();

    StandardJavaFileManager fileManager = compiler.getStandardFileManager(collector, null, null);
    JavaFileManager byteCodeInMemoryFileManager = new ForwardingJavaFileManager<JavaFileManager>(fileManager) {
        public JavaFileObject getJavaFileForOutput(Location location, String className, JavaFileObject.Kind kind, FileObject sibling) throws IOException {
            if (kind == JavaFileObject.Kind.CLASS) { // 如果输出的是class,使用ByteCodeInMemory
                ByteCodeInMemory outfile = new ByteCodeInMemory(className);
                classes.add(outfile);
                return outfile;
            } else {
                return super.getJavaFileForOutput(location, className, kind, sibling);
            }
        }
    };

    JavaCompiler.CompilationTask task = compiler.getTask(null, byteCodeInMemoryFileManager, collector, List.of(), null, sources);
    Boolean success = task.call();
    System.out.println("compile success: " + success);

    System.out.println("classCount: " + classes.size());

    return classes;
}
5. 加载Class
使用自定义个JavaFileObject类ByteCodeInMemory,我们拿到了Java编译后的字节码,只需要将它加载成Class对象,接下来就可以正常的使用这个类。直接使用ClassLoader.defineClass就能根据字节码创建Class实例。为了这里动态加载的Class对象后续的更新和回收,这里我们选择一个自定义ClassLoader。下面是一个极简的代码示例
public static class ByteCodeClassLoader extends ClassLoader {
    private List<ByteCodeInMemory> codes;

    public ByteCodeClassLoader(List<ByteCodeInMemory> codes) {
        this.codes = codes;
    }

    public Class<?> findClass(String name) throws ClassNotFoundException {
        for (ByteCodeInMemory cl : codes) {
            if (cl.getName().equals("/" + name.replace('.', '/') + ".class")) {
                byte[] bs = cl.getCode();
                return defineClass(name, bs, 0, bs.length);
            }
        }
        throw new ClassNotFoundException(name);
    }
}
接着要做的就是使用ClassLoader加载Class对象,后续就可以像正常的Class对象一样使用了。
private static void testClassLoader(List<ByteCodeInMemory> bytecodes) throws ClassNotFoundException {
    ByteCodeClassLoader classLoader = new ByteCodeClassLoader(bytecodes);
    Class<?> clazz = classLoader.findClass("com.keyniu.compiler.Demo");
    Field[] fs = clazz.getDeclaredFields();
    for (Field f : fs) {
        System.out.println(f.getName() + ":" + f.getType());
    }
}
6. 性能测试
现在我们使用JavaCompiler来创建一个第1.6做的性能测试的案例,生成一个BiFunction<Integer,Integer,Object>的实现类
public static BiFunction<Integer, Integer, Object> getSumFunction() throws ClassNotFoundException, InstantiationException, IllegalAccessException {
    List<ByteCodeInMemory> bytecodes = compileStringCode();
    ByteCodeClassLoader classLoader = new ByteCodeClassLoader(bytecodes);
    Class<?> clazz = classLoader.findClass("com.keyniu.stream.test.MyNativeSum");
    BiFunction<Integer, Integer, Object> sum = (BiFunction<Integer, Integer, Object>) clazz.newInstance();
    return sum;
}


private static List<ByteCodeInMemory> compileStringCode() {
    String code = """
            package com.keyniu.stream.test;

            import java.util.function.BiFunction;

            public class MyNativeSum implements BiFunction<Integer, Integer, Object> {
                @Override
                public Object apply(Integer i1, Integer i2) {
                    return i1 + i2;
                }
            }
            """;
    List<? extends JavaFileObject> sources = List.of(new JavaCodeInString("com.keyniu.stream.test.MyNativeSum", code));

    DiagnosticCollector<JavaFileObject> collector = new DiagnosticCollector<>();
    JavaCompiler compiler = ToolProvider.getSystemJavaCompiler();

    List<ByteCodeInMemory> classes = new ArrayList<>();

    StandardJavaFileManager fileManager = compiler.getStandardFileManager(collector, null, null);
    JavaFileManager byteCodeInMemoryFileManager = new ForwardingJavaFileManager<JavaFileManager>(fileManager) {
        public JavaFileObject getJavaFileForOutput(Location location, String className, JavaFileObject.Kind kind, FileObject sibling) throws IOException {
            if (kind == JavaFileObject.Kind.CLASS) {
                ByteCodeInMemory outfile = new ByteCodeInMemory(className);
                classes.add(outfile);
                return outfile;
            } else {
                return super.getJavaFileForOutput(location, className, kind, sibling);
            }
        }
    };

    JavaCompiler.CompilationTask task = compiler.getTask(null, byteCodeInMemoryFileManager, collector, List.of(), null, sources);
    Boolean success = task.call();

    return classes;
}
使用getSumFunction返回的BiFunction<Integer,Integer,Object>的时间耗时22ms,基本接近Java原生代码实现
