🔥 本文由 程序喵正在路上 原创,CSDN首发!
💖 系列专栏:Flutter学习
🌠 首发时间:2024年5月25日
🦋 欢迎关注🖱点赞👍收藏🌟留言🐾
目录
- AspectRatio组件
- Card组件
- Card实现一个通讯录的卡片
- Card实现一个图文列表
- 按钮组件
- 按钮组件的属性
- ElevatedButton、TextButton、OutlinedButton、IconButton
- 带图标的按钮
- 修改按钮的宽度高度
- 自适应按钮
- 配置圆角圆形按钮
- 修改OutlinedButton边框
- Wrap组件
- 自定义一个按钮组件
- Wrap组件的简单使用
- Wrap组件搜索页面布局
AspectRatio组件
AspectRatio 的作用是根据设置调整子元素 child 的宽高比。
AspectRatio 首先会在布局限制条件允许的范围内尽可能的扩展,widget 的高度是由宽度和比率决定的,类似于 BoxFit 中的 contain,按照固定比率去尽量占满区域。
如果在满足所有限制条件过后无法找到一个可行的尺寸,AspectRatio 最终将会去优先适应布局限制条件,而忽略所设置的比率。
| 属性 | 说明 |
|---|---|
| aspectRatio | 宽高比,最终可能不会根据这个值去布局,具体要看综合因素,外层是否允许按照这种比率进行布局,这只是一个参考值 |
| chlid | 子组件 |
class MyApp extends StatelessWidget {
const MyApp({super.key});
Widget build(BuildContext context) {
return AspectRatio(
aspectRatio: 3 / 1, //宽度为屏幕的宽度,高度为宽度的三分之一
child: Container(
color: Colors.blue,
));
}
}

Card组件
Card 是卡片组件块,内容可以由大多数类型的 Widget 构成,Card 具有圆角和阴影,这让它看起来有立体感。
| 属性 | 说明 |
|---|---|
| margin | 外边距 |
| child | 子组件 |
| elevation | 阴影值的深度 |
| color | 背景颜色 |
| shadowColor | 阴影颜色 |
| clipBehavior | 内容溢出的剪切方式,Clip.none:不剪切;Clip.hardEdge:剪切但不应用抗锯齿;Clip.antiAlias:剪切而且抗锯齿;Clip.antiAliasWithSaveLayer:带有抗锯齿的剪辑,并在剪辑之后立即保存 saveLayer |
| Shape | Card 的阴影效果,默认的阴影效果为圆角的长方形边 |
Card实现一个通讯录的卡片
实现如下效果:
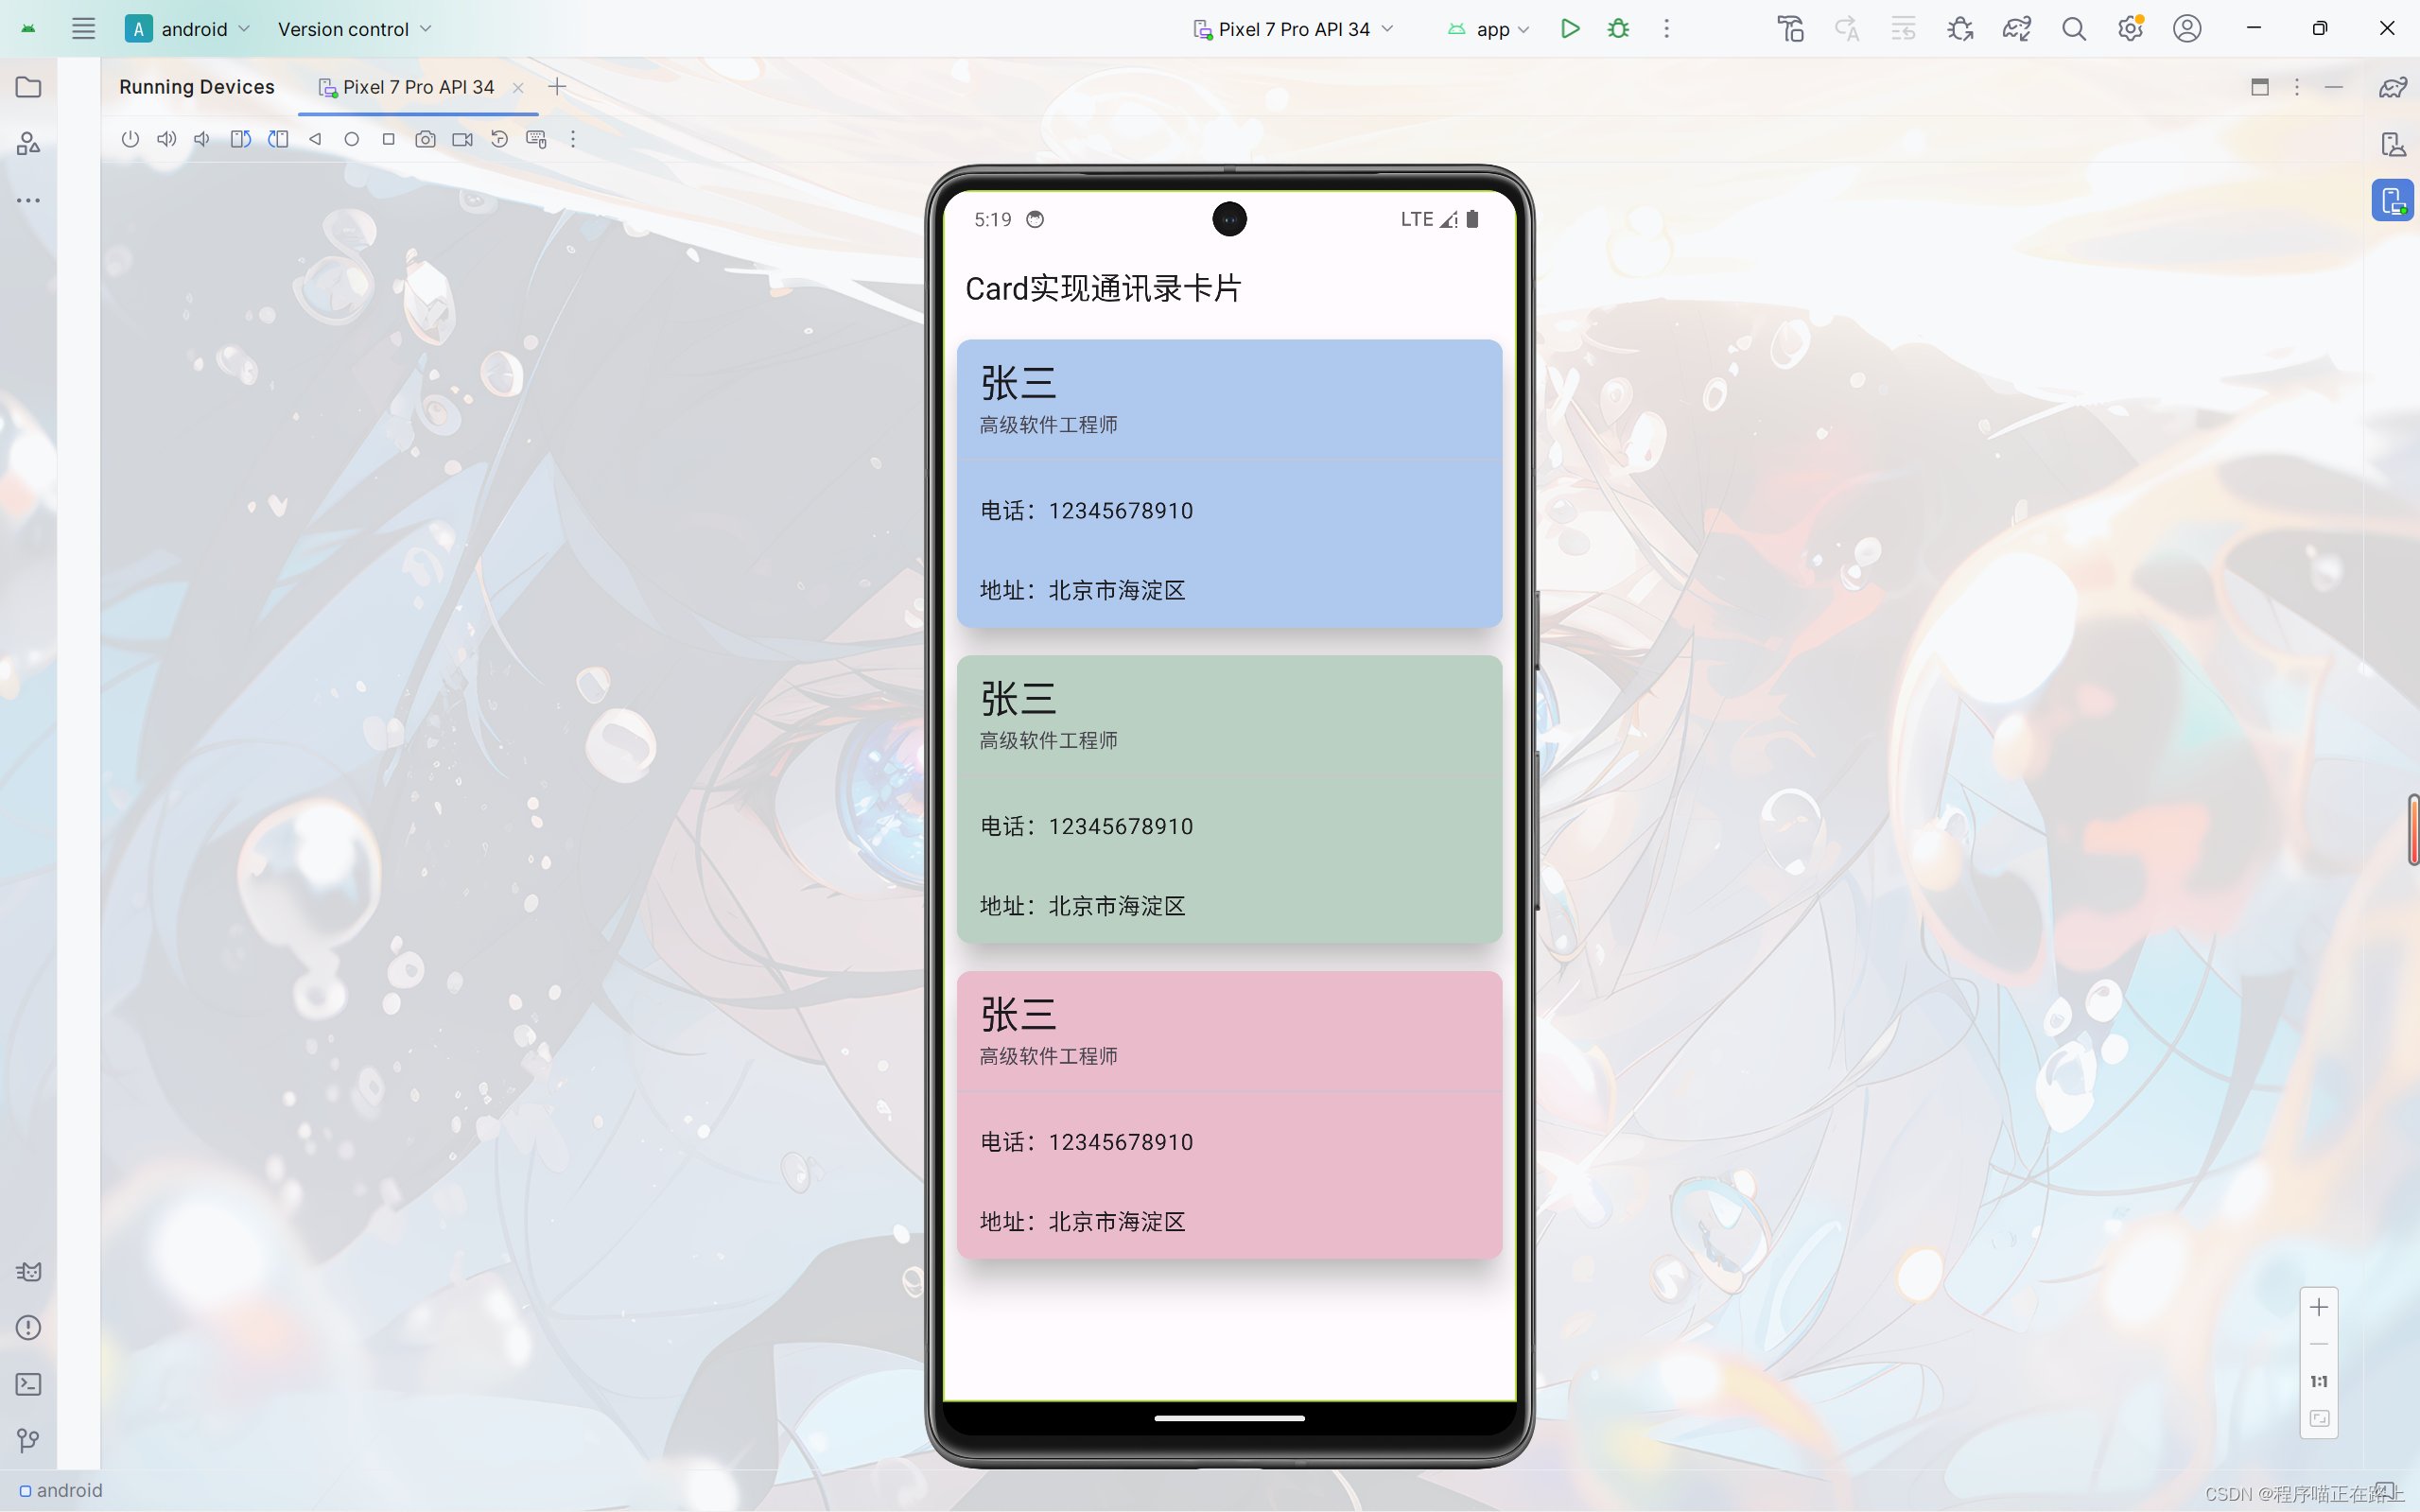
class MyApp extends StatelessWidget {
const MyApp({super.key});
Widget build(BuildContext context) {
return ListView(
children: [
Card(
shape: RoundedRectangleBorder(
borderRadius: BorderRadius.circular(10),
),
elevation: 20, //阴影深度
color: Colors.blue.shade100,
margin: const EdgeInsets.all(10),
child: const Column(
children: [
ListTile(
title: Text(
"张三",
style: TextStyle(fontSize: 28),
),
subtitle: Text("高级软件工程师"),
),
Divider(),
ListTile(title: Text("电话:12345678910")),
ListTile(title: Text("地址:北京市海淀区"))
],
),
),
Card(
shape: RoundedRectangleBorder(
borderRadius: BorderRadius.circular(10),
),
elevation: 20, //阴影深度
color: Colors.green.shade100,
margin: const EdgeInsets.all(10),
child: const Column(
children: [
ListTile(
title: Text(
"张三",
style: TextStyle(fontSize: 28),
),
subtitle: Text("高级软件工程师"),
),
Divider(),
ListTile(title: Text("电话:12345678910")),
ListTile(title: Text("地址:北京市海淀区"))
],
),
),
Card(
shape: RoundedRectangleBorder(
borderRadius: BorderRadius.circular(10),
),
elevation: 20, //阴影深度
color: Colors.red.shade100,
margin: const EdgeInsets.all(10),
child: const Column(
children: [
ListTile(
title: Text(
"张三",
style: TextStyle(fontSize: 28),
),
subtitle: Text("高级软件工程师"),
),
Divider(),
ListTile(title: Text("电话:12345678910")),
ListTile(title: Text("地址:北京市海淀区"))
],
),
),
],
);
}
}
Card实现一个图文列表
实现如下效果:
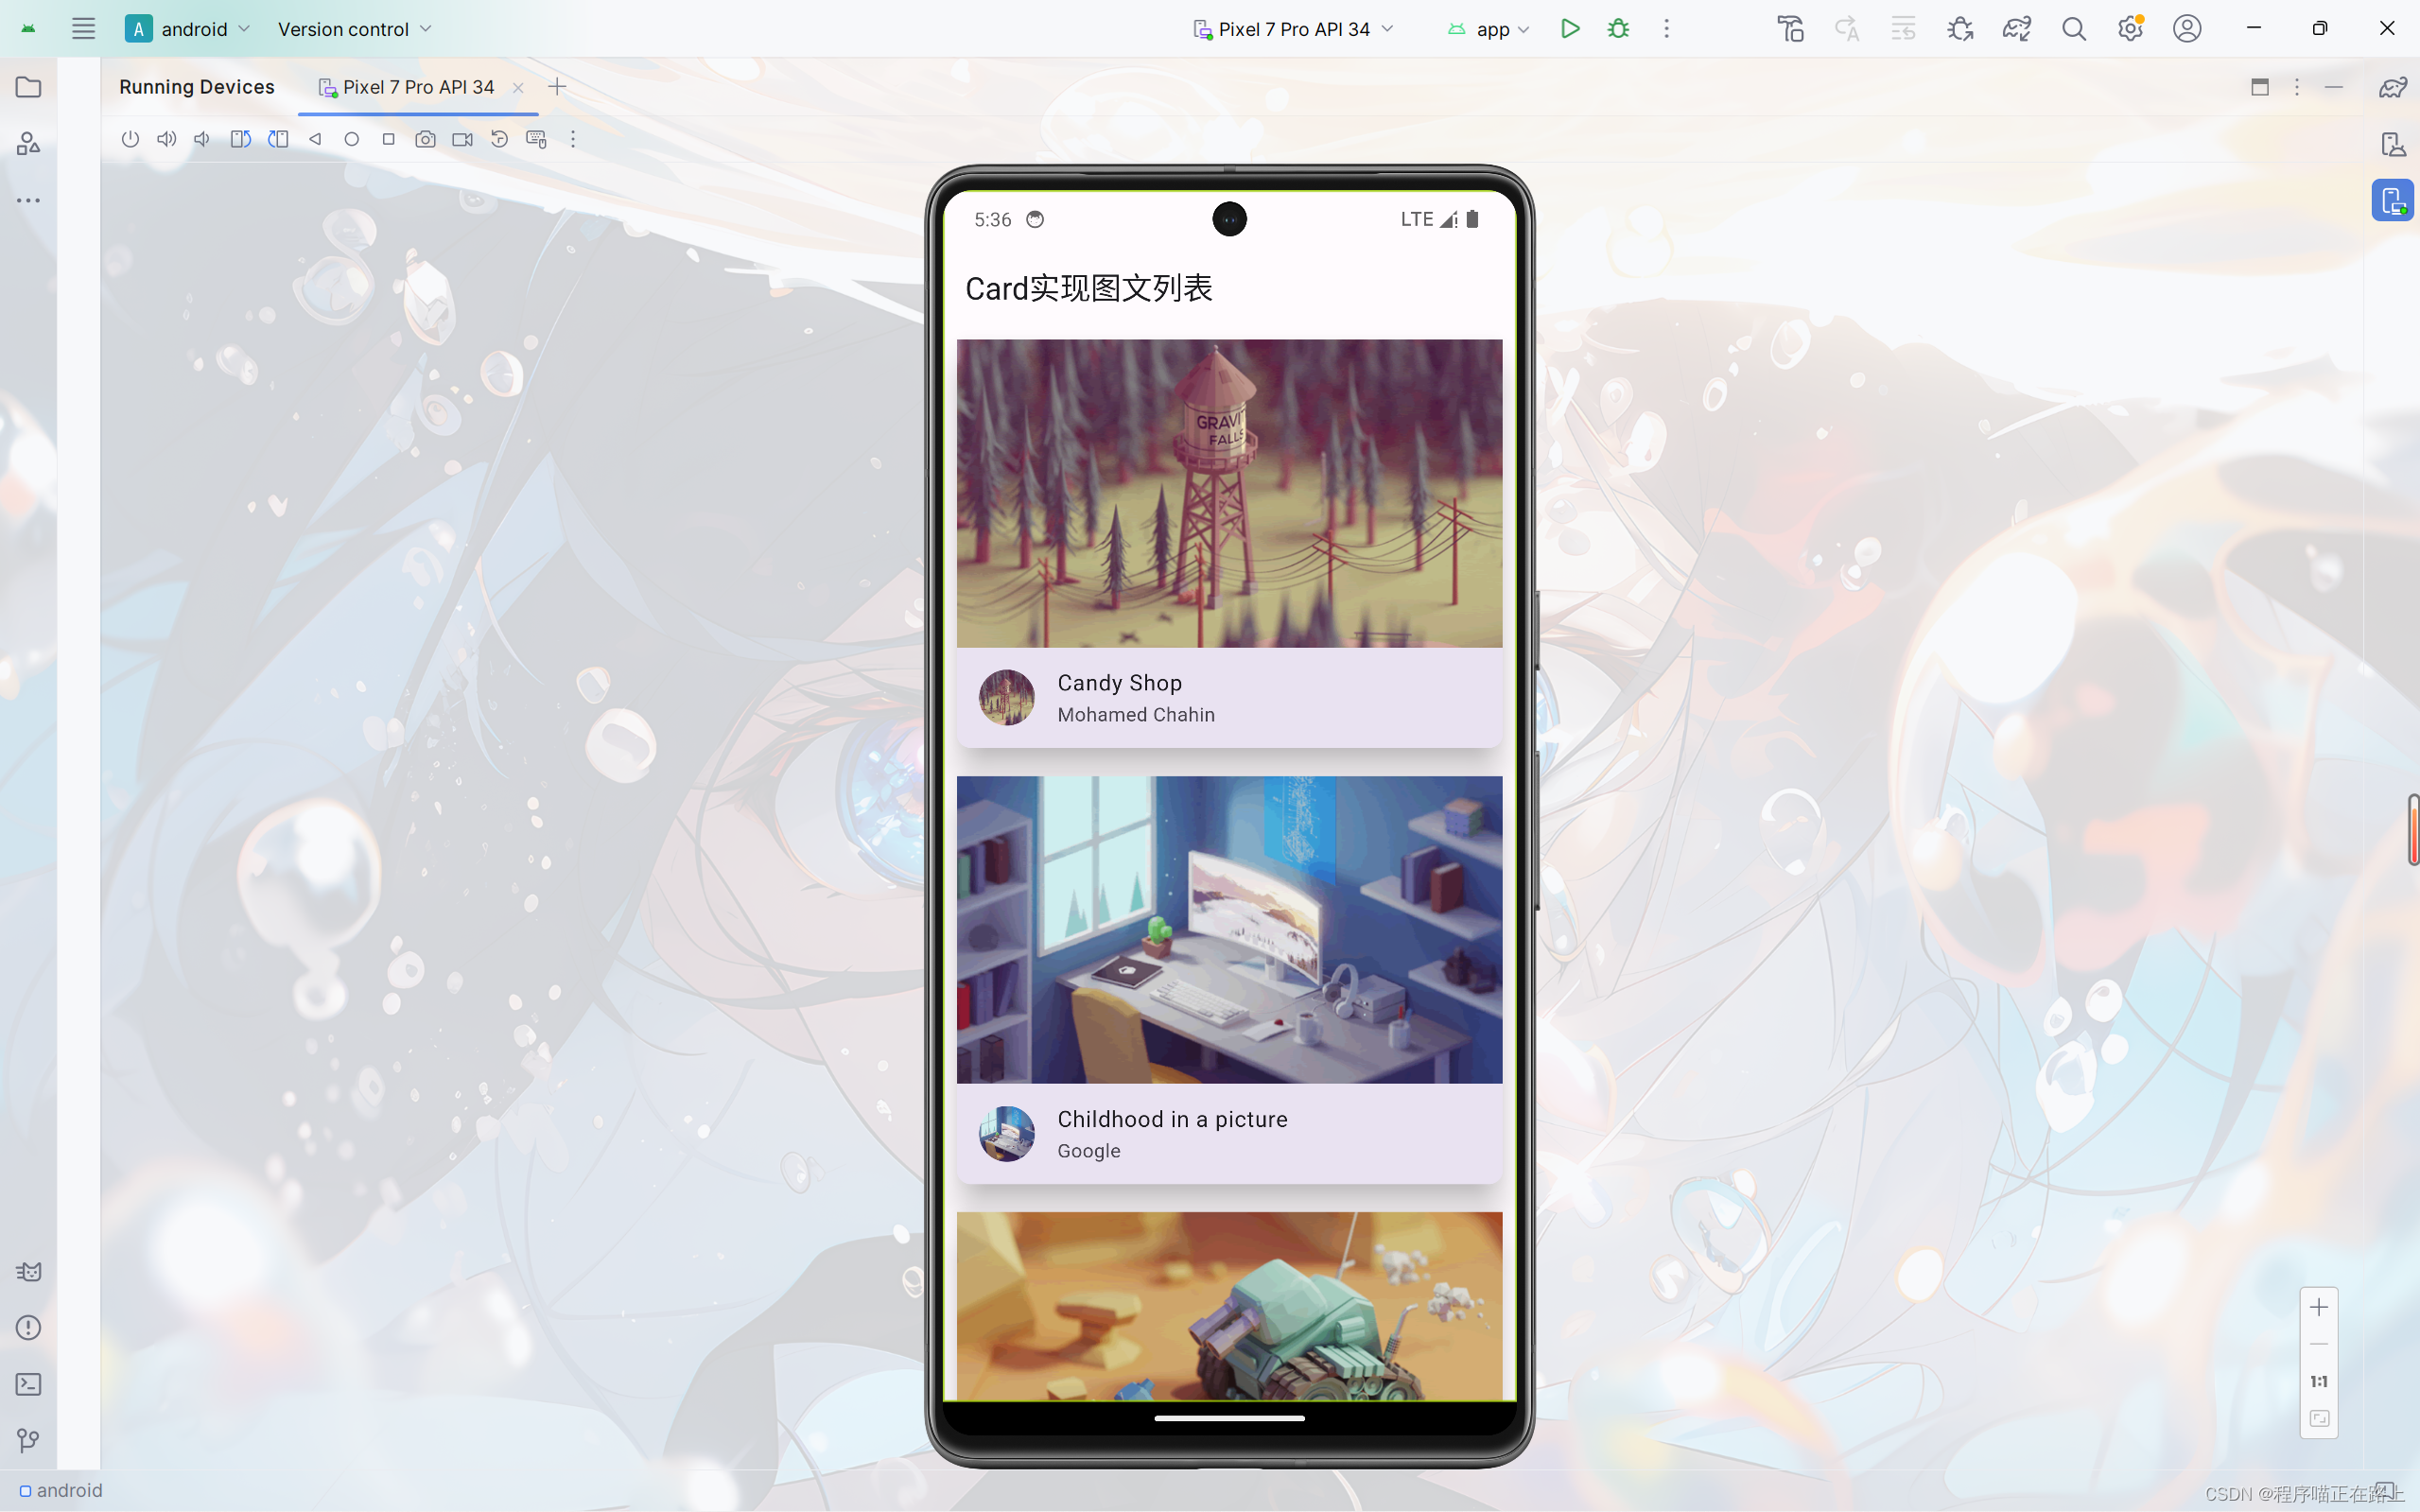
import 'package:flutter/material.dart';
import './res/listData.dart';
void main() {
runApp(MaterialApp(
debugShowCheckedModeBanner: false,
home: Scaffold(
appBar: AppBar(title: const Text("Card实现图文列表")),
body: const MyApp(),
),
));
}
class MyApp extends StatelessWidget {
const MyApp({super.key});
List<Widget> _initCardData() {
var tempList = listData.map((value) {
return Card(
elevation: 20,
shape: RoundedRectangleBorder(borderRadius: BorderRadius.circular(10)),
margin: const EdgeInsets.all(10),
child: Column(
children: [
AspectRatio(
aspectRatio: 16 / 9,
child: Image.network(
value["imageUrl"],
fit: BoxFit.cover,
)),
ListTile(
leading: CircleAvatar(
backgroundImage: NetworkImage(value["imageUrl"]),
),
title: Text(value["title"]),
subtitle: Text(value["author"]),
),
],
),
);
});
return tempList.toList();
}
Widget build(BuildContext context) {
return ListView(
children: _initCardData(),
);
}
}
按钮组件
按钮组件的属性
| 属性 | 说明 |
|---|---|
| onPressed | 必填参数,按下按钮时触发的回调,接收一个方法,传 null 表示按钮禁用,会显示禁用相关样式 |
| child | 子组件 |
| style | 通过 ButtonStyle 装饰 |
ButtonStylee里面的常用的参数
| 属性名称 | 值类型 | 属性值 |
|---|---|---|
| foregroundColor | Color | 文本颜色 |
| backgroundColor | Color | 按钮颜色 |
| shadowColor | Color | 阴影颜色 |
| elevation | double | 阴影的范围,值越大阴影范围越大 |
| padding | 内边距 | |
| shape | 设置按钮的形状 | |
| side | 设置按钮边框 |
ElevatedButton、TextButton、OutlinedButton、IconButton
ElevatedButton即 “凸起” 按钮,它默认带有阴影和灰色背景。按下后,阴影会变大TextButton即文本按钮,默认背景透明并不带阴影。按下后,会有背景色OutlineButton默认有一个边框,不带阴影且背景透明。按下后,边框颜色会变亮、同时出现背景和阴影IconButton是一个可点击的Icon,不包括文字,默认没有背景,点击后会出现背景
class MyApp extends StatelessWidget {
const MyApp({super.key});
Widget build(BuildContext context) {
return ListView(children: [
Row(
mainAxisAlignment: MainAxisAlignment.spaceAround,
children: [
ElevatedButton(
onPressed: () {
print("ElevatedButton");
},
child: const Text("普通按钮")),
TextButton(onPressed: () {}, child: const Text("文本按钮")),
OutlinedButton(onPressed: () {}, child: const Text("边框按钮")),
IconButton(onPressed: () {}, icon: const Icon(Icons.thumb_up))
],
),
]);
}
}

带图标的按钮
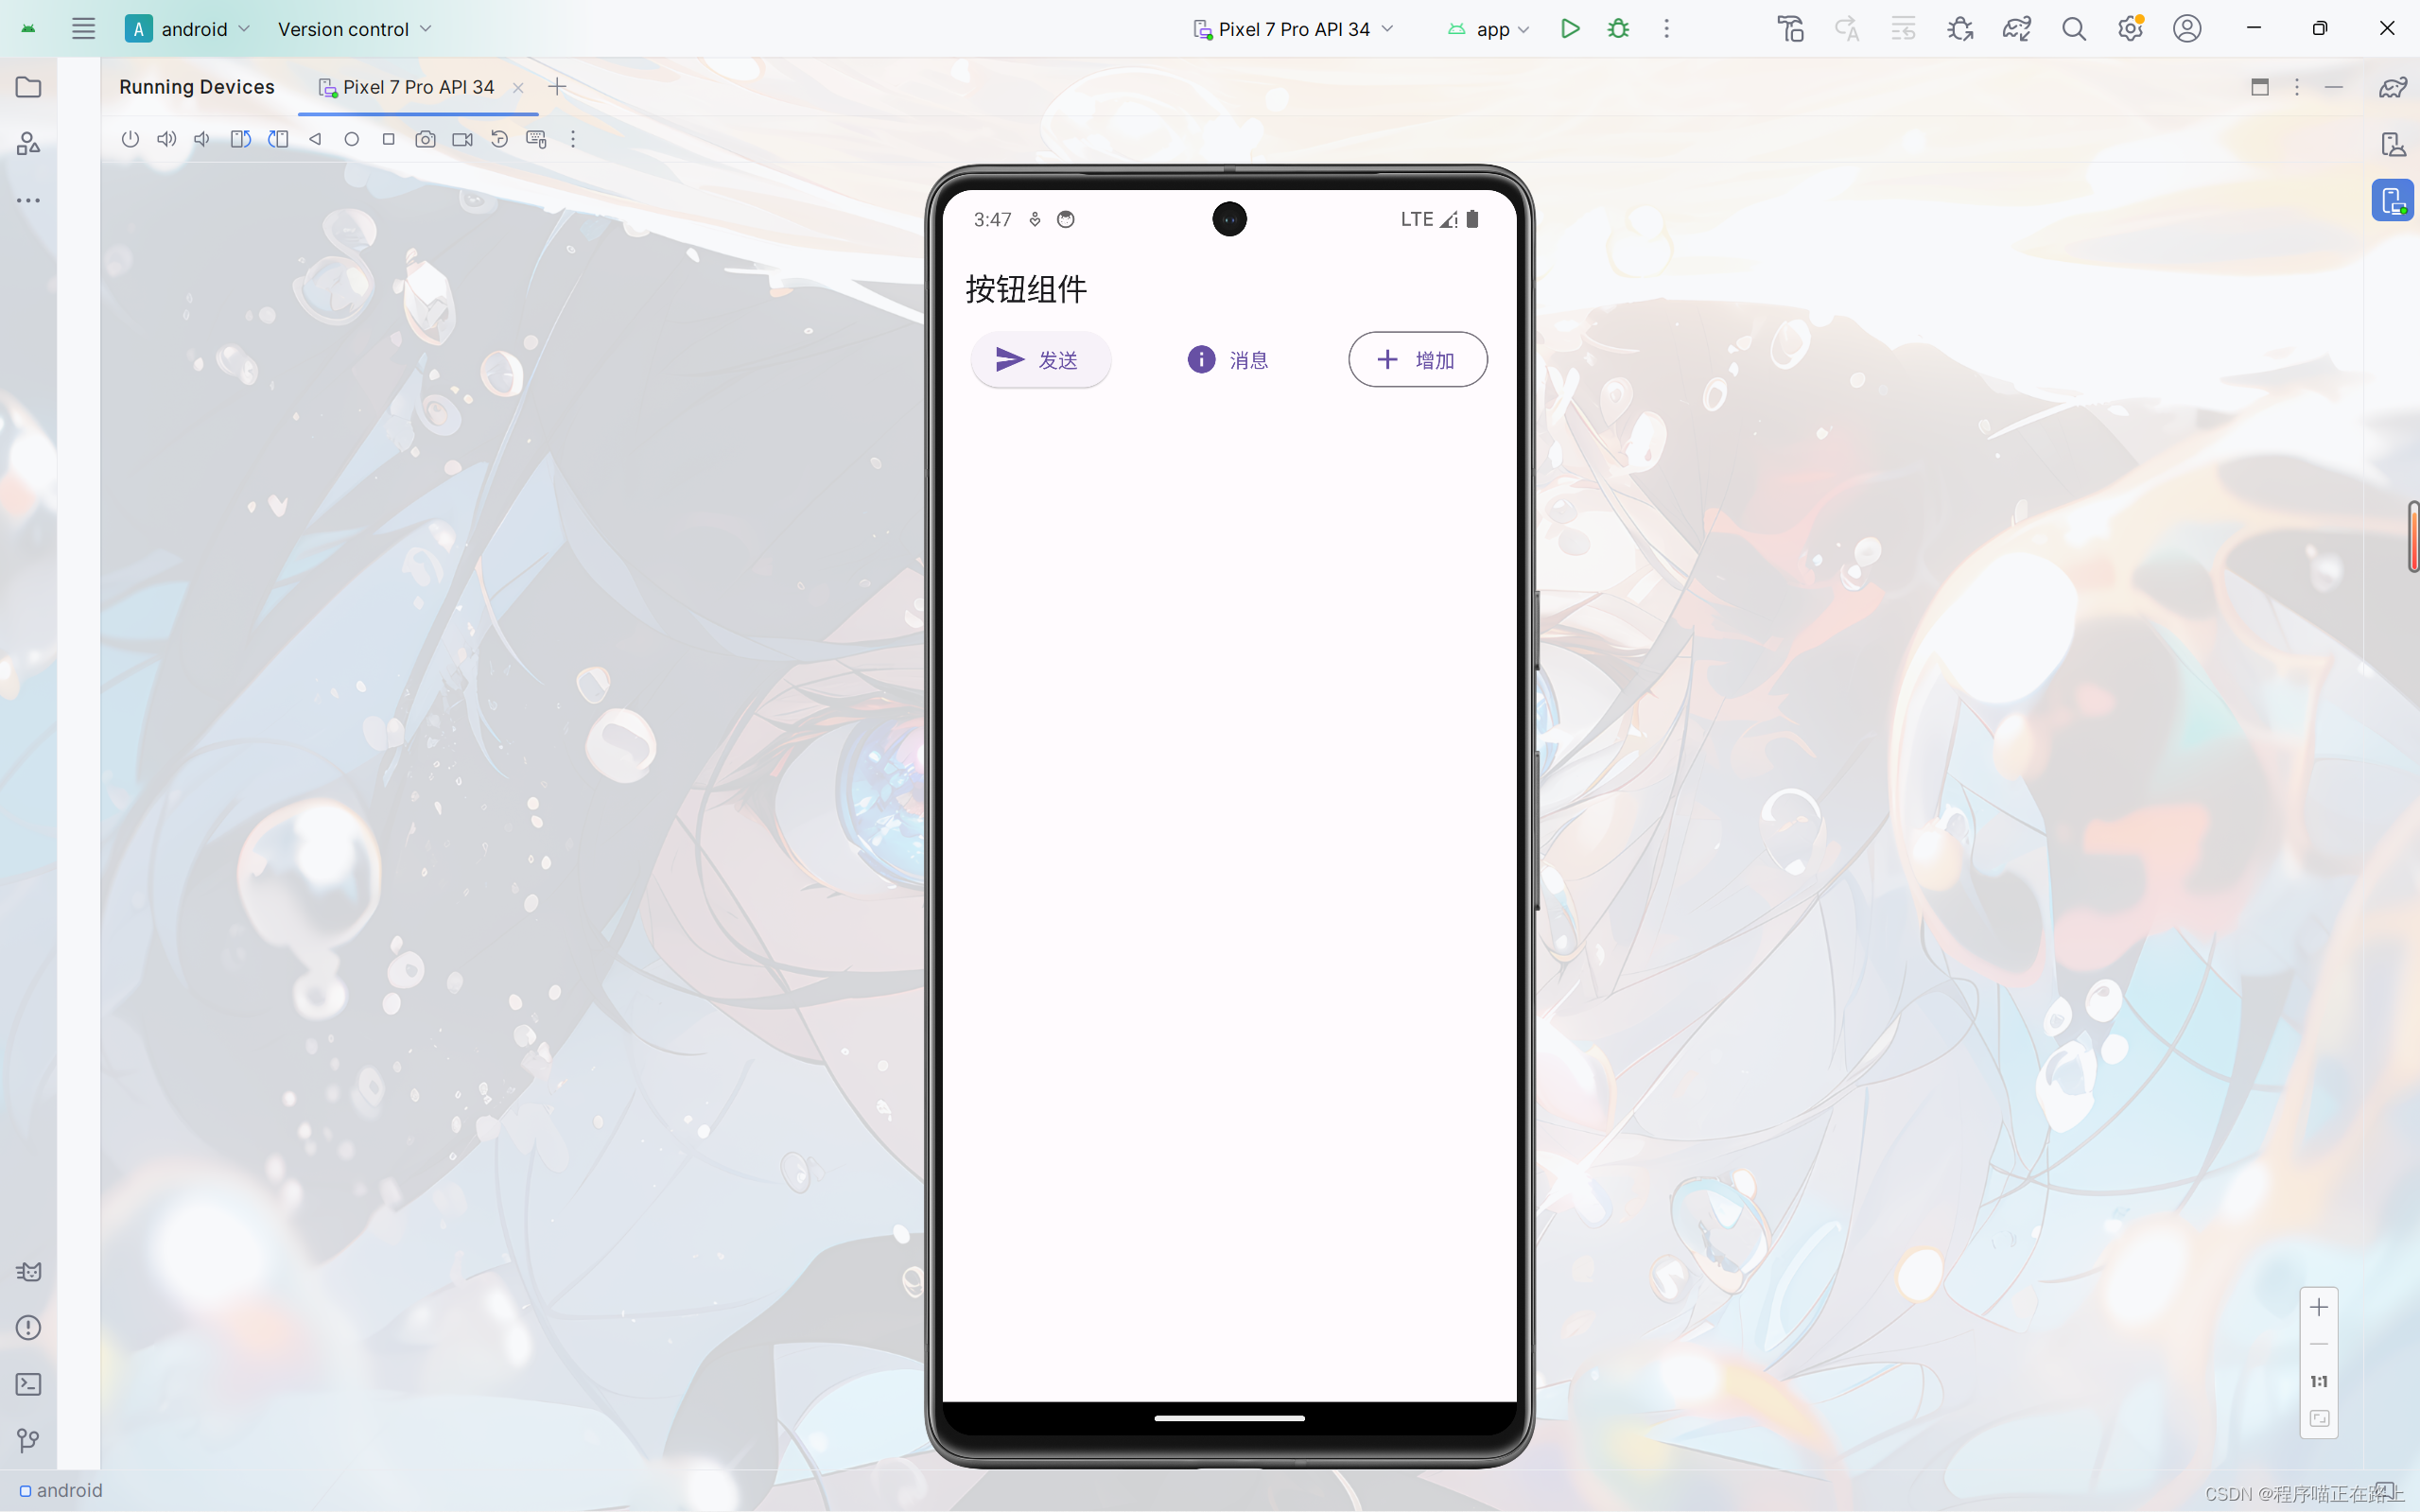
ElevatedButton、TextButton、OutlineButton 都有一个 icon 构造函数,通过它可以轻松创建带图标的按钮。
class MyApp extends StatelessWidget {
const MyApp({super.key});
Widget build(BuildContext context) {
return ListView(children: [
Row(mainAxisAlignment: MainAxisAlignment.spaceAround, children: [
ElevatedButton.icon(
onPressed: () {},
icon: const Icon(Icons.send),
label: const Text("发送")),
TextButton.icon(
onPressed: () {},
icon: const Icon(Icons.info),
label: const Text("消息")),
OutlinedButton.icon(
onPressed: () {},
icon: const Icon(Icons.add),
label: const Text("增加"))
]),
]);
}
}
修改按钮的宽度高度
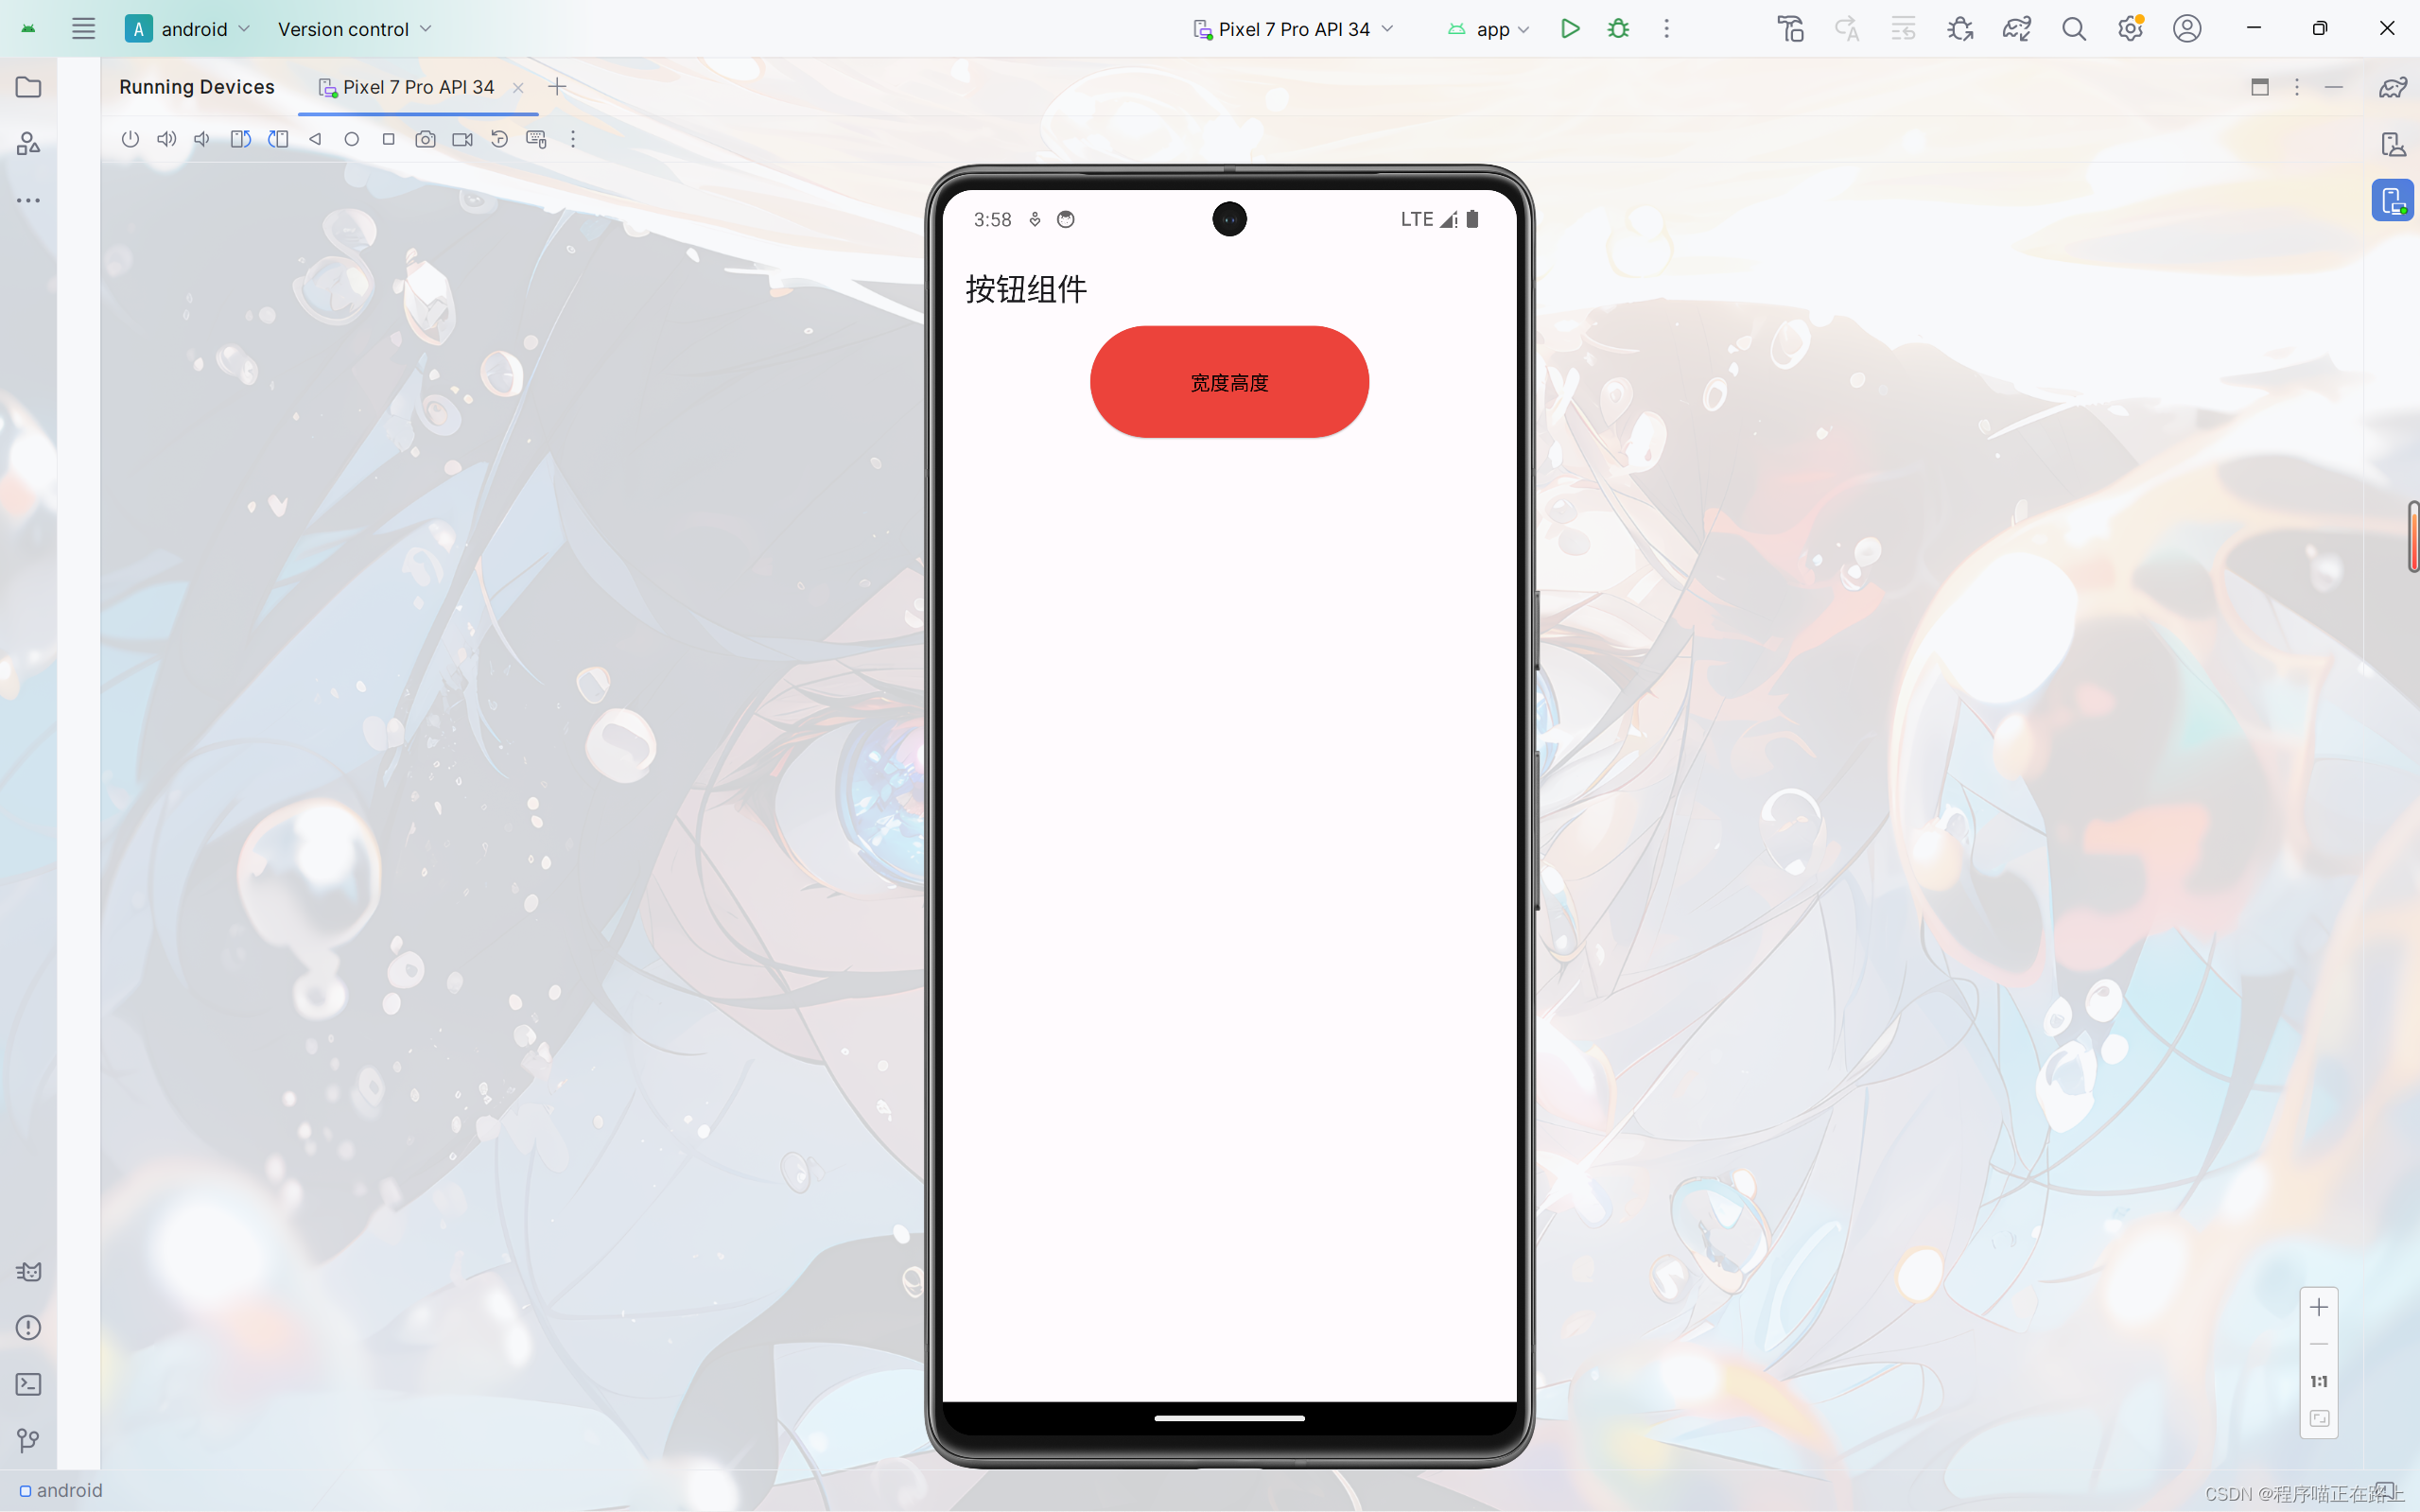
按钮组件中没有属性可以让我们直接修改宽度和高度,但是我们可以将按钮写在一个 Container 或者 SizeBox 里面,以此来控制按钮的宽高。
class MyApp extends StatelessWidget {
const MyApp({super.key});
Widget build(BuildContext context) {
return ListView(children: [
Column(
mainAxisAlignment: MainAxisAlignment.spaceAround,
children: [
SizedBox(
height: 80,
width: 200,
child: ElevatedButton(
style: ButtonStyle(
backgroundColor: MaterialStateProperty.all(Colors.red),
foregroundColor: MaterialStateProperty.all(Colors.black)),
onPressed: () {},
child: const Text('宽度高度'),
),
),
],
),
]);
}
}
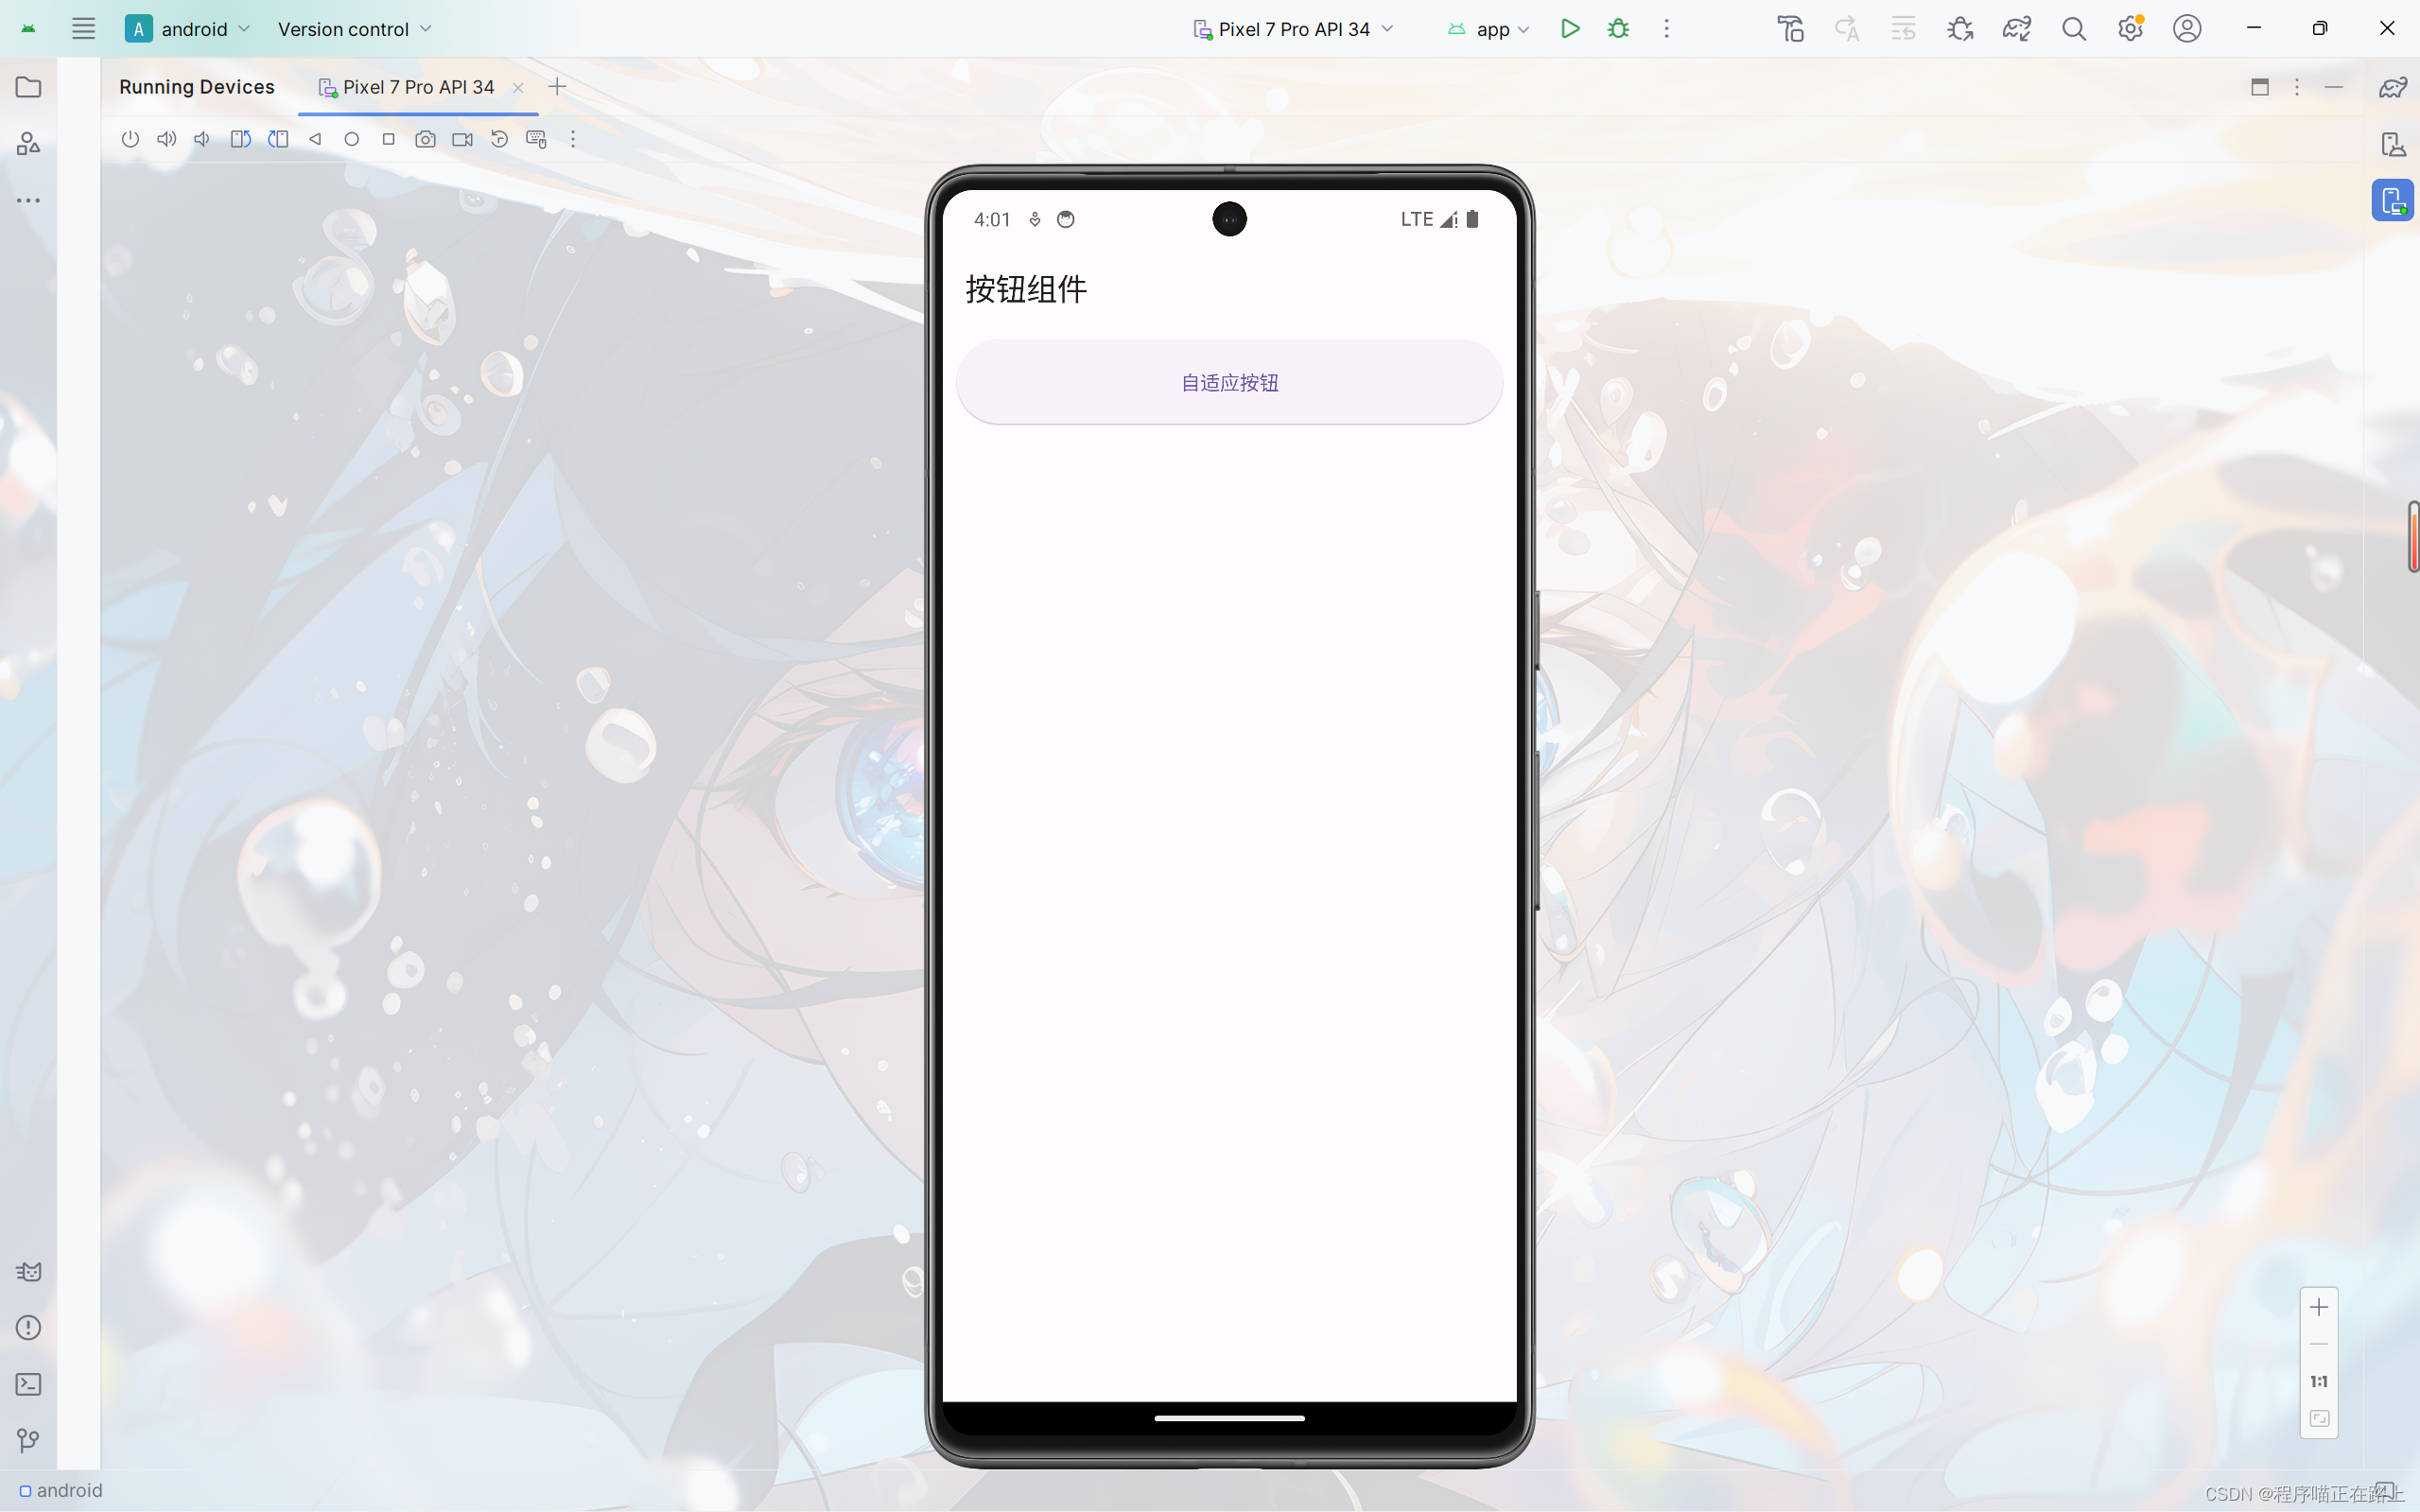
自适应按钮
将按钮写在 Expanded 组件中,可以让按钮自适应,当还有其它组件时,按钮会根据屏幕自动调节大小
class MyApp extends StatelessWidget {
const MyApp({super.key});
Widget build(BuildContext context) {
return ListView(children: [
Row(
mainAxisAlignment: MainAxisAlignment.center,
children: <Widget>[
Expanded(
child: Container(
height: 60,
margin: const EdgeInsets.all(10),
child: ElevatedButton(
child: const Text('自适应按钮'),
onPressed: () {
print("自适应按钮");
},
),
),
),
],
)
]);
}
}
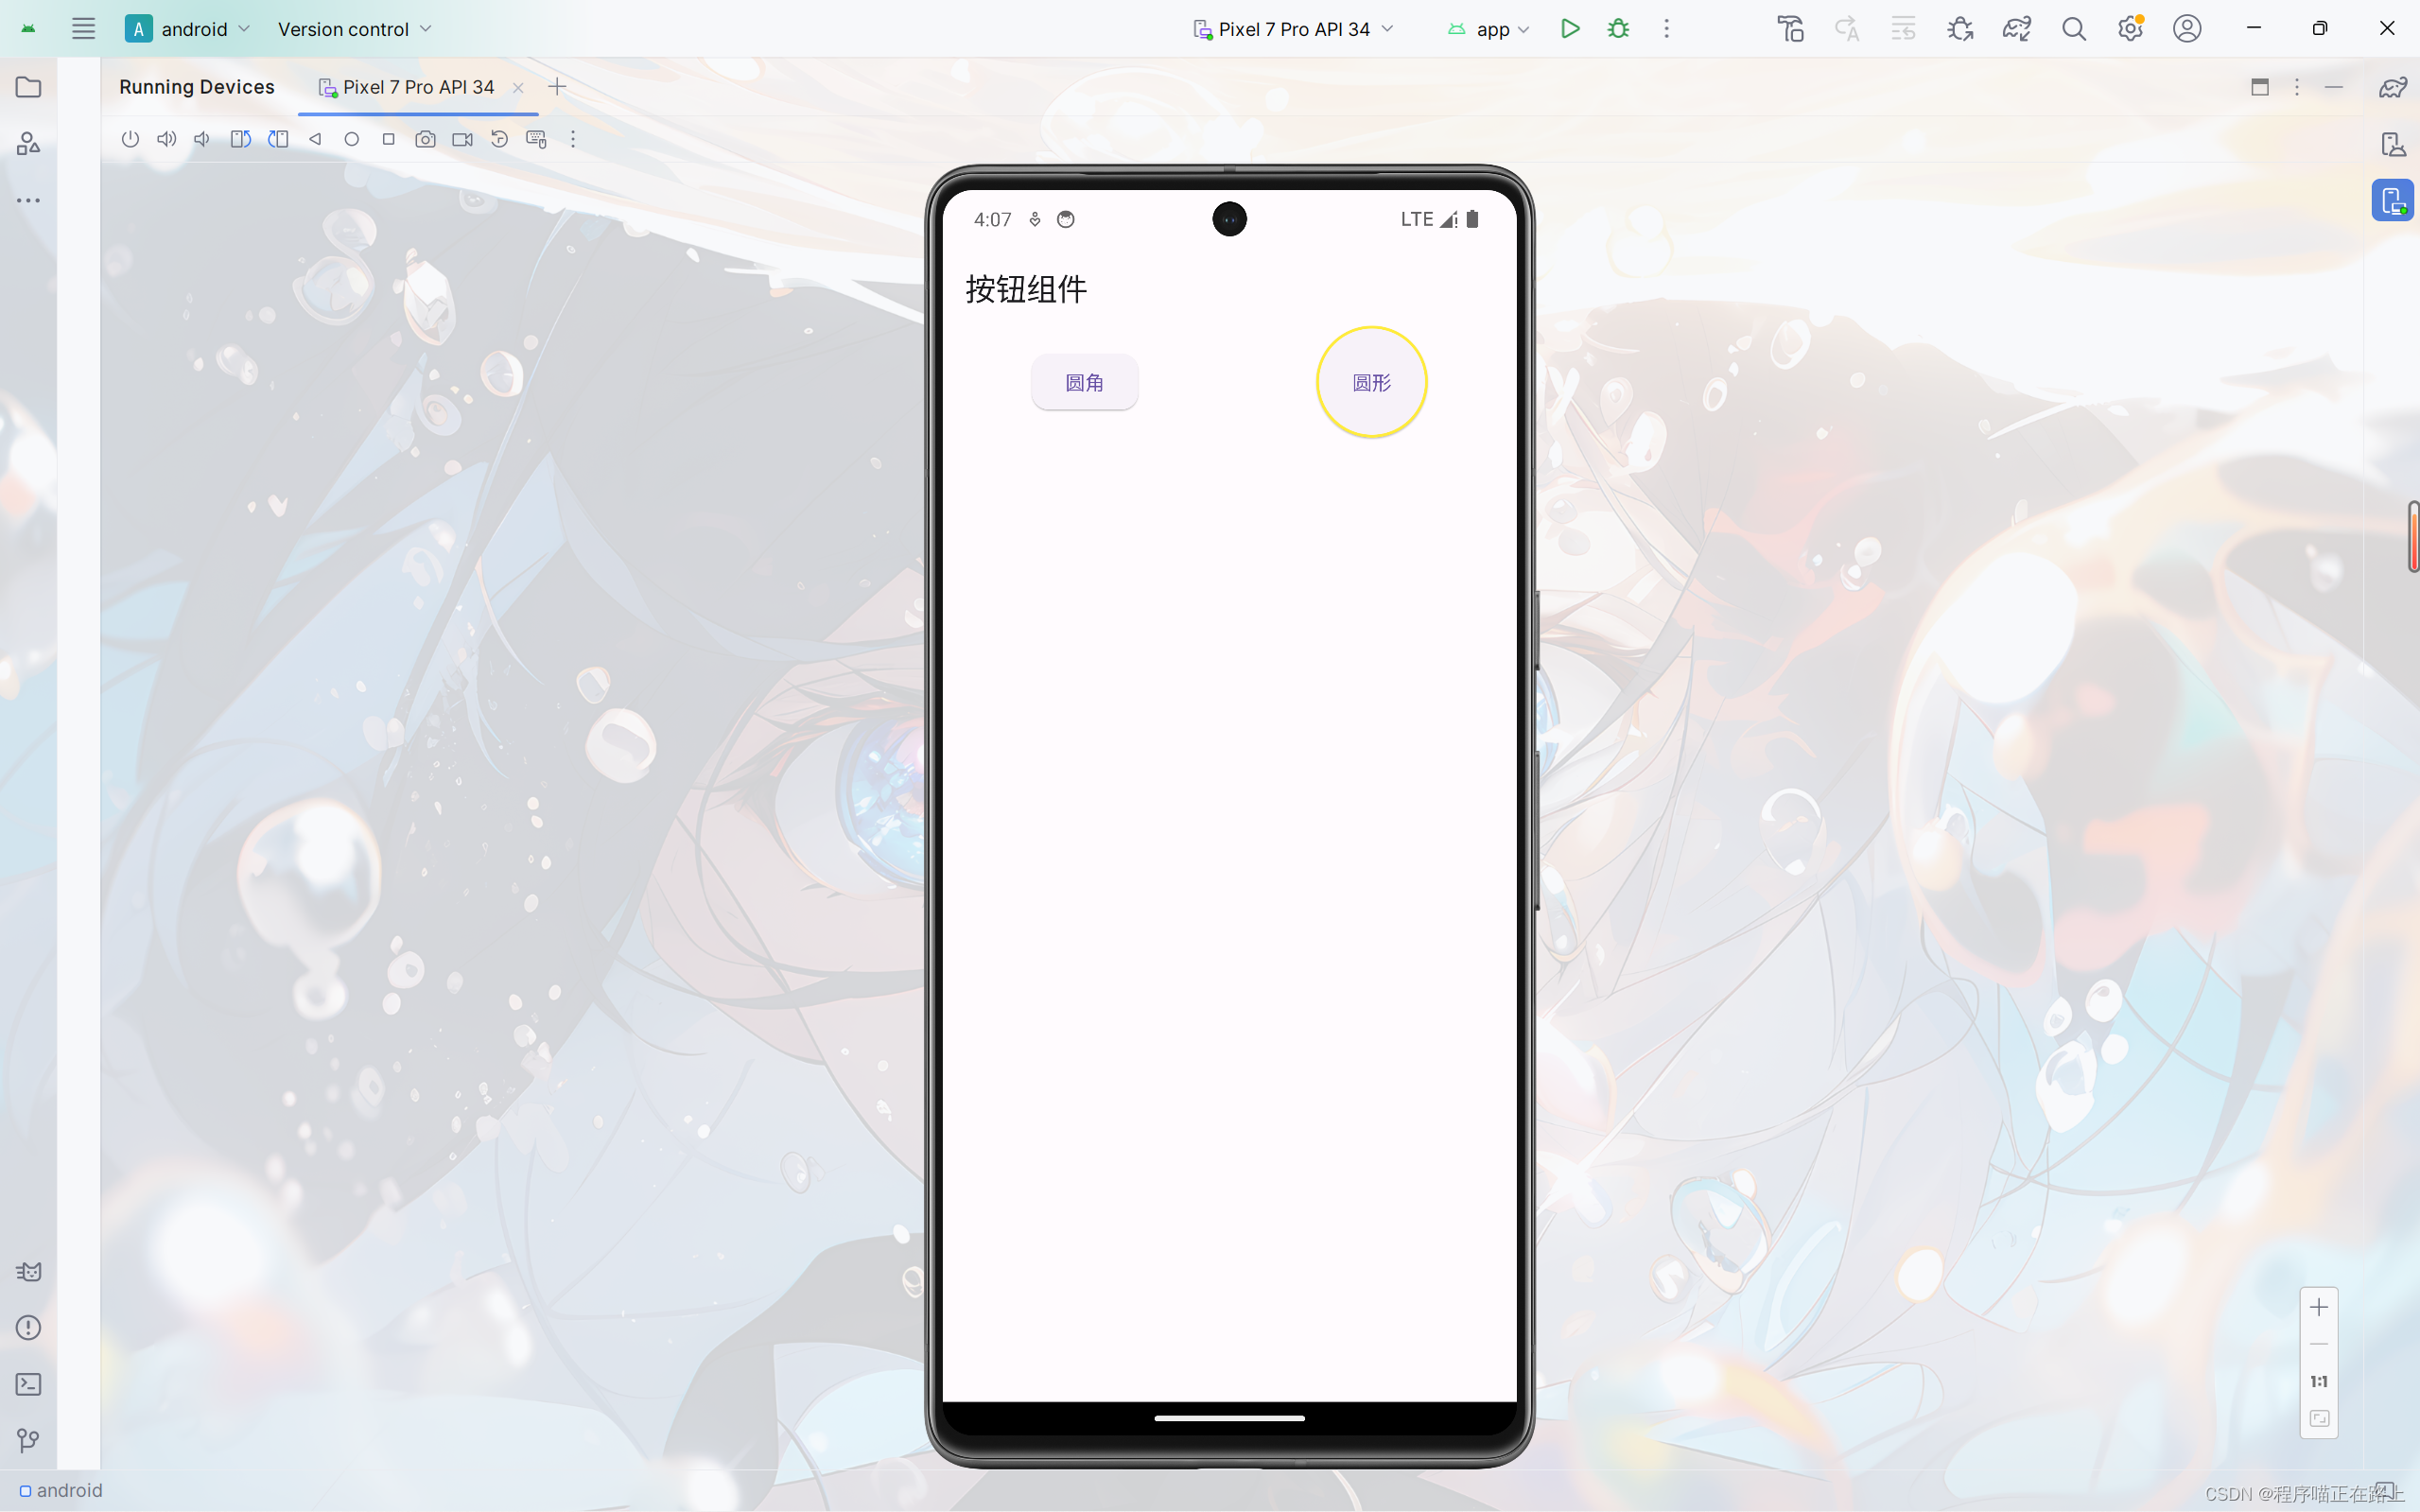
配置圆角圆形按钮
class MyApp extends StatelessWidget {
const MyApp({super.key});
Widget build(BuildContext context) {
return ListView(children: [
Row(
mainAxisAlignment: MainAxisAlignment.spaceAround,
children: [
ElevatedButton(
style: ButtonStyle(
shape: MaterialStateProperty.all(//圆角
RoundedRectangleBorder(
borderRadius: BorderRadius.circular(12)))),
onPressed: () {},
child: const Text("圆角")),
SizedBox(
height: 80,
width: 80,
child: ElevatedButton(
style: ButtonStyle(
shape: MaterialStateProperty.all(//圆形
const CircleBorder(
side: BorderSide(width: 2, color: Colors.yellow)))),
onPressed: () {},
child: const Text("圆形")),
),
],
),
]);
}
}
修改OutlinedButton边框
class MyApp extends StatelessWidget {
const MyApp({super.key});
Widget build(BuildContext context) {
return ListView(children: [
Row(
mainAxisAlignment: MainAxisAlignment.center,
children: <Widget>[
Expanded(
child: Container(
margin: const EdgeInsets.all(20),
height: 50,
child: OutlinedButton(
style: ButtonStyle(
foregroundColor: MaterialStateProperty.all(Colors.black),
side: MaterialStateProperty.all(
const BorderSide(width: 1, color: Colors.blue))),
onPressed: () {},
child: const Text("修改边框")),
),
)
],
)
]);
}
}

Wrap组件
自定义一个按钮组件
Wrap 可以实现流布局,单行的 Wrap 跟 Row 表现几乎一致,单列的 Wrap 则跟 Column 表现几乎一致。但 Row 与 Column 都是单行单列的,Wrap 则突破了这个限制,mainAxis 上空间不足时,则向 crossAxis 上
去扩展显示。
| 属性 | 说明 |
|---|---|
| direction | 主轴的方向,默认水平 |
| alignment | 主轴的对齐方式 |
| spacing | 主轴方向上的间距 |
| textDirection | 文本方向 |
| verticalDirection | 定义了 children 的摆放顺序,默认是 down,见 Flex 相关属性介绍 |
| runAlignment | run 的对齐方式,run 可以理解为新的行或者列,如果是水平方向布局的话,run 可以理解为新的一行 |
| runSpacing | run 的间距 |
下面我们通过实现一个案例来介绍 Wrap 组件的使用:
//自定义按钮
class MyButton extends StatelessWidget {
String text; //按钮上的文本
void Function()? onPressed;
MyButton(this.text, {super.key, required this.onPressed});
Widget build(BuildContext context) {
return ElevatedButton(
onPressed: onPressed,
style: ButtonStyle(
backgroundColor:
MaterialStateProperty.all(const Color.fromARGB(255, 239, 237, 237)),
foregroundColor: MaterialStateProperty.all(Colors.black45),
),
child: Text(text),
);
}
}
Wrap组件的简单使用
class MyApp extends StatelessWidget {
const MyApp({super.key});
Widget build(BuildContext context) {
return Padding(
padding: const EdgeInsets.all(10),
child: Wrap(
spacing: 5, //水平方向间隔
runSpacing: 5, //垂直方向间隔
children: [
MyButton("第1集", onPressed: () {}),
MyButton("第2集", onPressed: () {}),
MyButton("第3集", onPressed: () {}),
MyButton("第4集", onPressed: () {}),
MyButton("第5集", onPressed: () {}),
MyButton("第6集", onPressed: () {}),
MyButton("第7集", onPressed: () {}),
MyButton("第8集", onPressed: () {}),
MyButton("第9集", onPressed: () {}),
MyButton("第10集", onPressed: () {}),
],
),
);
}
}

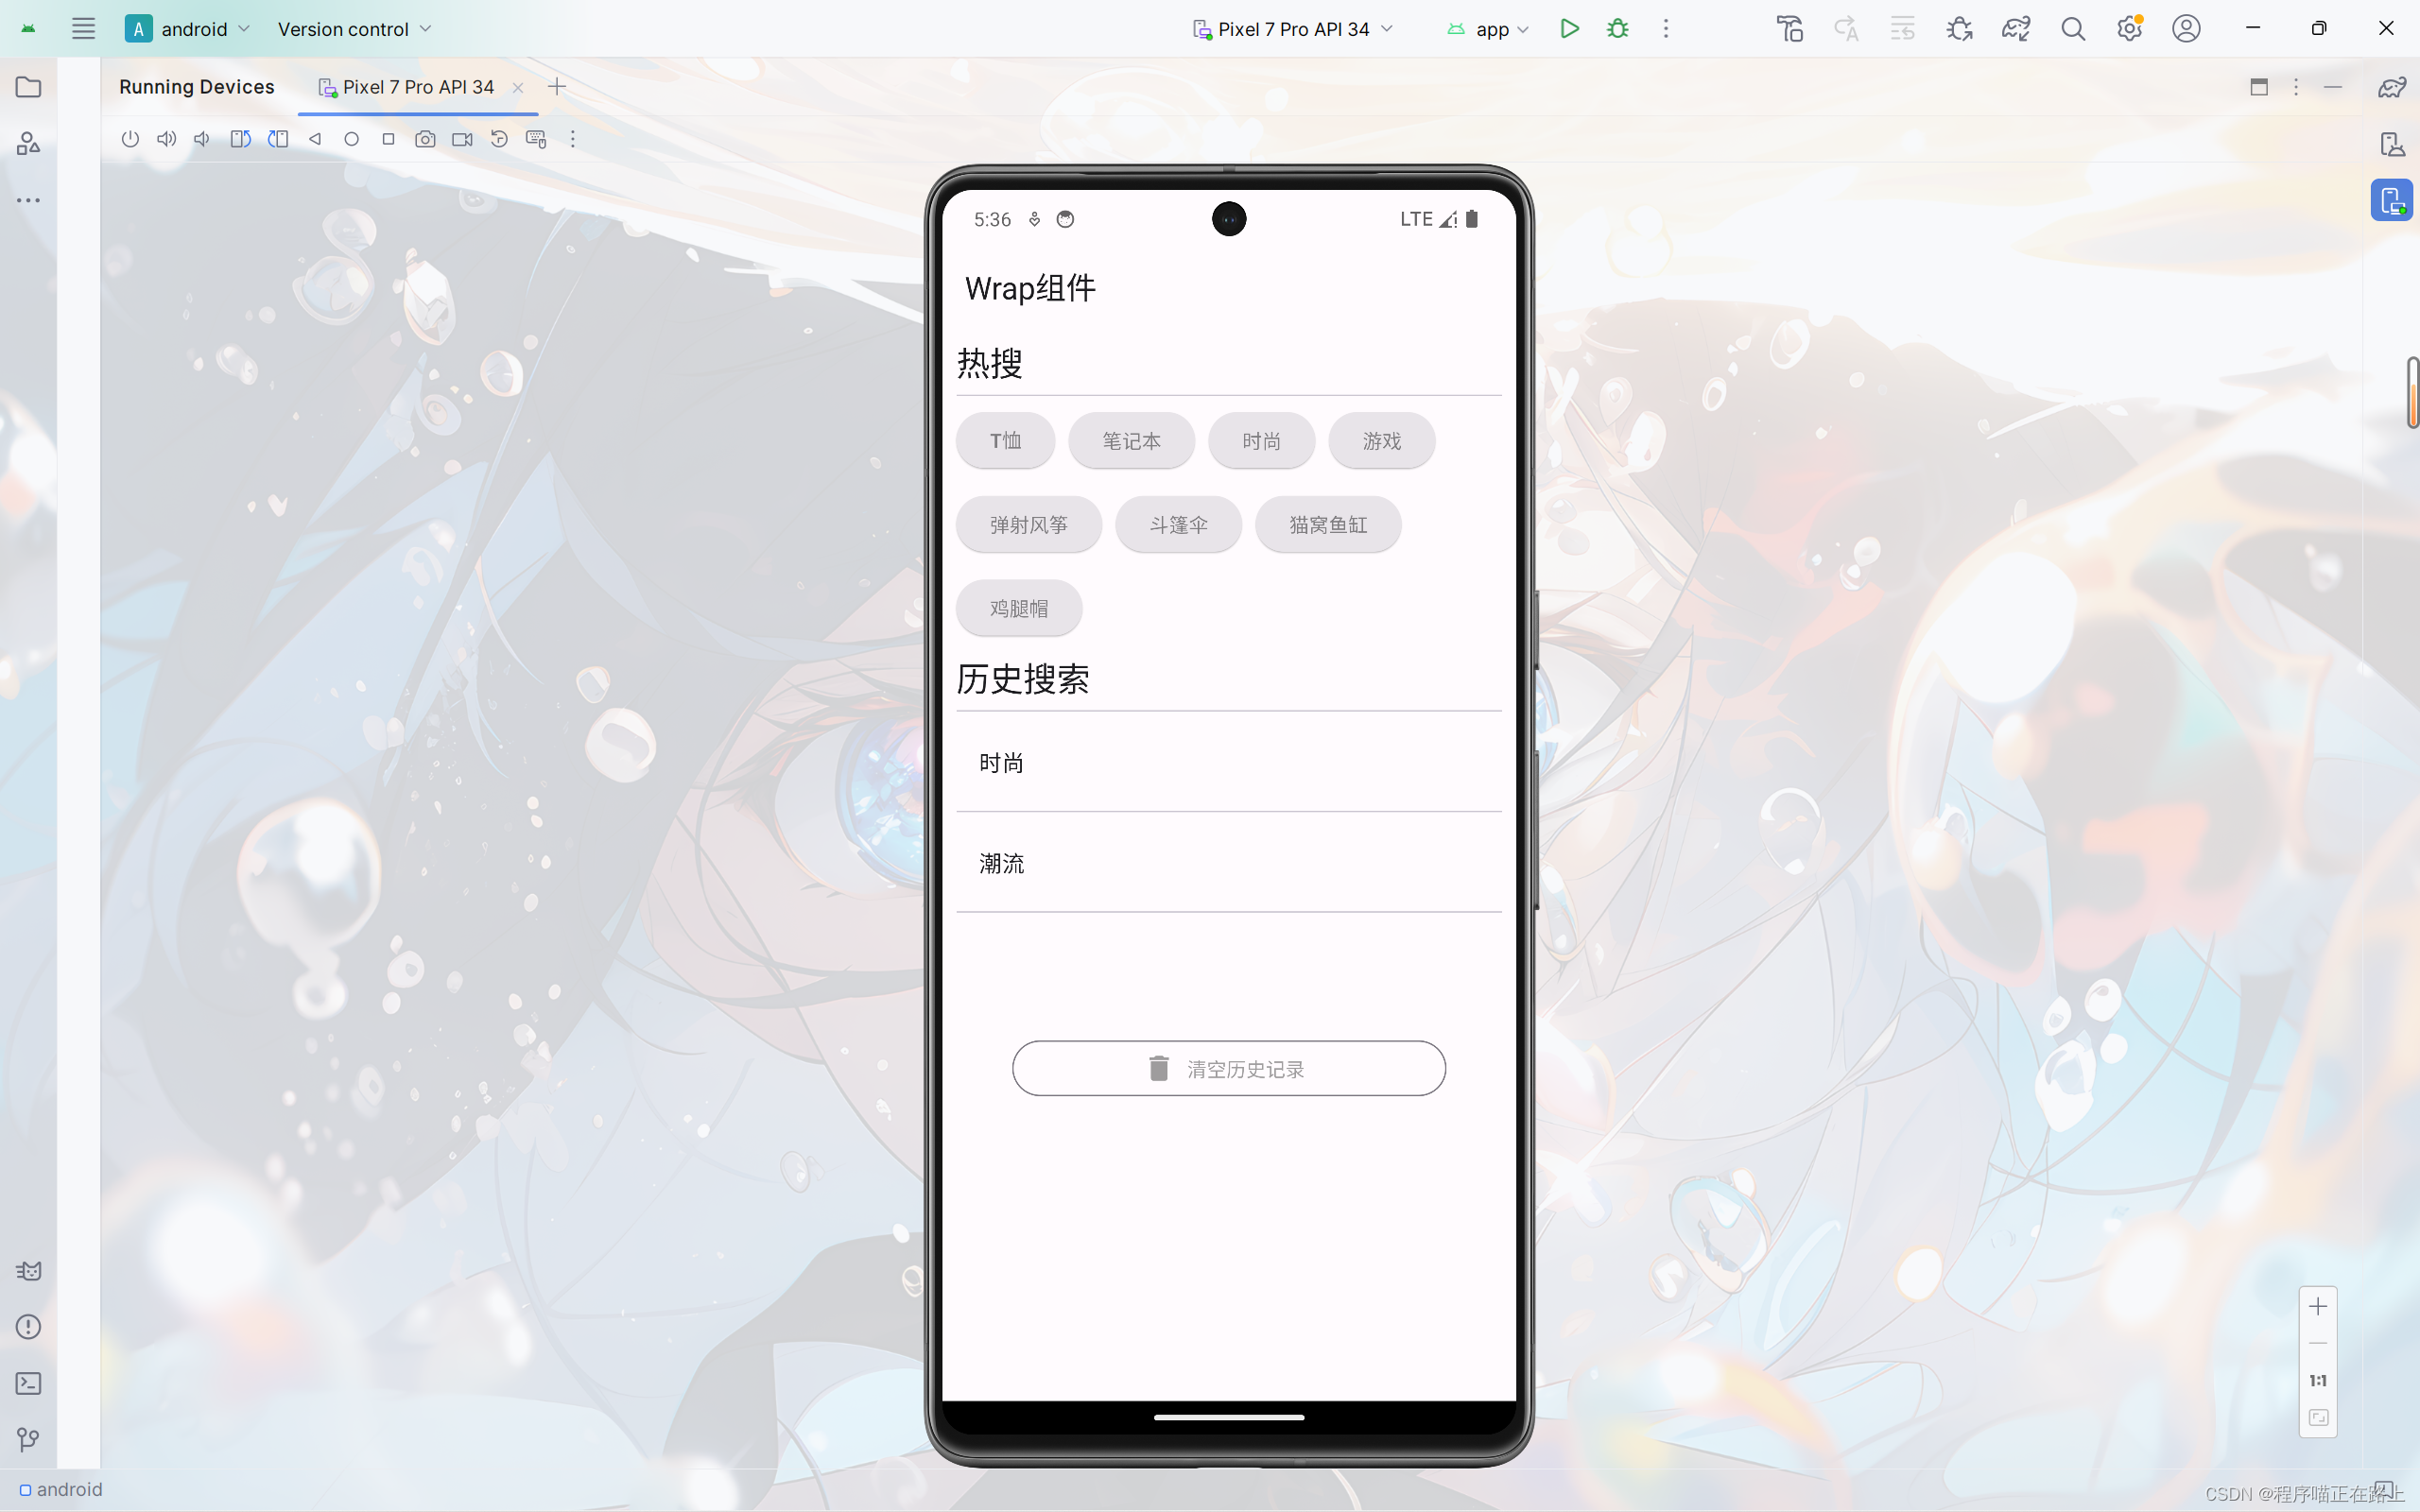
Wrap组件搜索页面布局
实现如下效果:
class MyApp extends StatelessWidget {
const MyApp({super.key});
Widget build(BuildContext context) {
return Padding(
padding: const EdgeInsets.all(10),
child: ListView(
children: [
Row(
children: [
Text("热搜", style: Theme.of(context).textTheme.headlineSmall)
],
),
const Divider(),
Wrap(
spacing: 10,
runSpacing: 12,
children: [
MyButton("T恤", onPressed: () {}),
MyButton("笔记本", onPressed: () {}),
MyButton("时尚", onPressed: () {}),
MyButton("游戏", onPressed: () {}),
MyButton("弹射风筝", onPressed: () {}),
MyButton("斗篷伞", onPressed: () {}),
MyButton("猫窝鱼缸", onPressed: () {}),
MyButton("鸡腿帽", onPressed: () {}),
],
),
const SizedBox(height: 10),
Row(
children: [
Text("历史搜索", style: Theme.of(context).textTheme.headlineSmall)
],
),
const Divider(),
const Column(
children: [
ListTile(title: Text("时尚")),
Divider(),
ListTile(title: Text("潮流")),
Divider(),
],
),
const SizedBox(height: 40),
Padding(
padding: const EdgeInsets.all(40),
child: OutlinedButton.icon(
onPressed: () {},
icon: const Icon(Icons.delete),
label: const Text("清空历史记录"),
style: ButtonStyle(
foregroundColor: MaterialStateProperty.all(Colors.black38)),
),
)
],
),
);
}
}









![[数据结构] -- 单链表](https://img-blog.csdnimg.cn/direct/163e35fd21504739b9f9cb0eb343b545.png)


