前言
之前看了些App启动流程的文章,但是看得很浅显,隔了没多久就忘了,自己抓耳挠腮的终于看完了,看得头疼哦。因为很多是个人理解,大哥们主打一个7分信,2分思考,1分怀疑哈。
主要看的源码是Android 9 的源码,因为很多framework的代码在AS里面看需要配置,我没配好,于是找了几个网站,最后综合下来用的这个
Android社区 - https://www.androidos.net.cn
一、启动方式
App启动分为冷启动和热启动
- 冷启动:点击桌面图标,手机系统不存在该应用进程,这时系统会重新fork一个子进程来加载Application并启动Activity,这个启动方式就是冷启动。
- 热启动:应用的热启动比冷启动简单得多,开销也更低。在热启动中,因为系统里已有该应用的进程,所以系统的所有工作就是将您的 Activity 带到前台。
二、App冷启动的简要流程
这是找的网上的图片: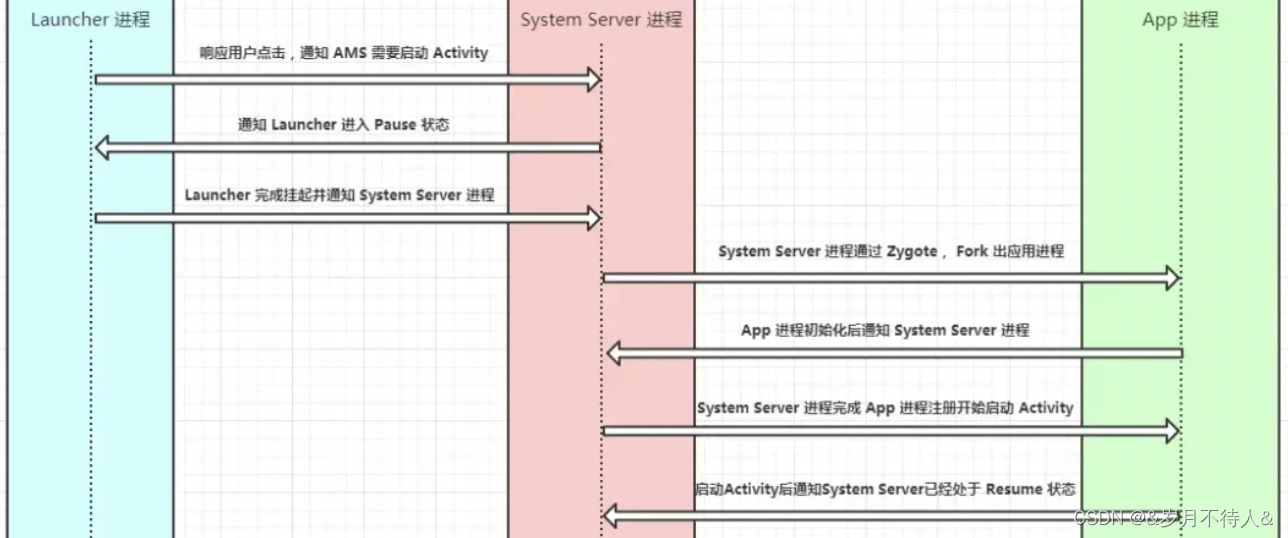
如果只是了解,纯应付简单的面试,上面这张图就够了。
简单地讲,从 用户手指触摸点击桌面图标到 Activity启动 可以用下面 4 步概括:
1.启动进程
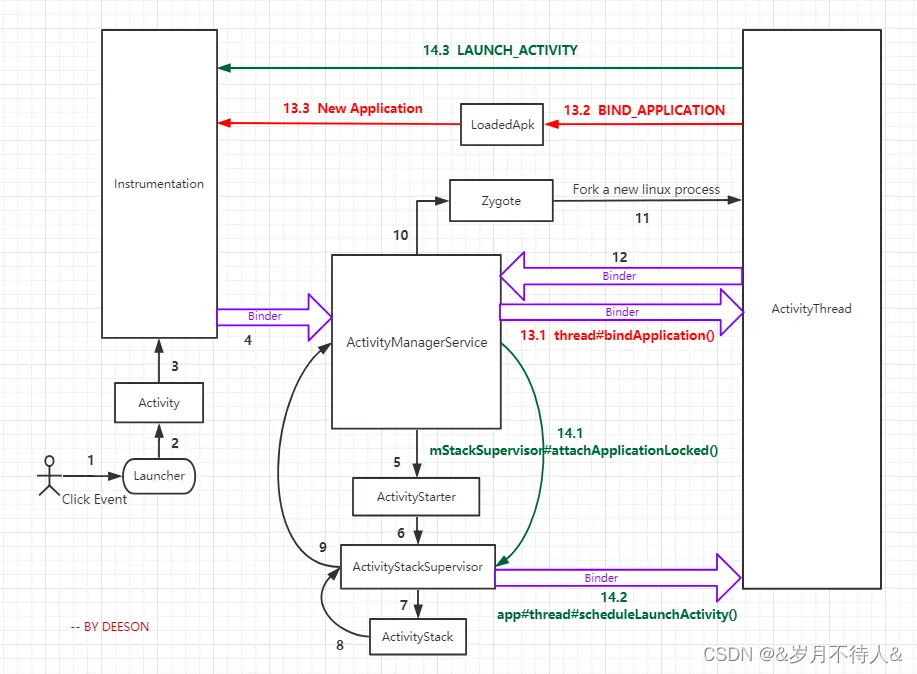
点击图标发生在Launcher应用的进程,startActivity()函数最终是由Instrumentation通过Android的Binder跨进程通信机制 发送消息给 system_server 进程; 在 system_server 中,启动进程的操作在ActivityManagerService。AMS发现ProcessRecord不存在时,就会执行Process.start(),最终是通过 socket 通信告知 Zygote 进程 fork 子进程(app进程,这儿用的Socket)
第一步:Activity的startActivity方法
源码位置:

源码
@Override
public void startActivity(Intent intent) {
        this.startActivity(intent, null);
    }

@Override
public void startActivity(Intent intent, @Nullable Bundle options) {
        if (options != null) {
            startActivityForResult(intent, -1, options);
        } else {
            // Note we want to go through this call for compatibility with
            // applications that may have overridden the method.
            startActivityForResult(intent, -1);
        }
    }
    @Override
    public void startActivityForResult(
            String who, Intent intent, int requestCode, @Nullable Bundle options) {
        Uri referrer = onProvideReferrer();
        if (referrer != null) {
            intent.putExtra(Intent.EXTRA_REFERRER, referrer);
        }
        options = transferSpringboardActivityOptions(options);
        Instrumentation.ActivityResult ar =
            mInstrumentation.execStartActivity(
                this, mMainThread.getApplicationThread(), mToken, who,
                intent, requestCode, options);//关键代码
        if (ar != null) {
            mMainThread.sendActivityResult(
                mToken, who, requestCode,
                ar.getResultCode(), ar.getResultData());
        }
        cancelInputsAndStartExitTransition(options);
    }
第二步:Instrumnetation调用ActivityManager.getService().startActivity()方法
源码位置:
    public ActivityResult execStartActivity(
            Context who, IBinder contextThread, IBinder token, Activity target,
            Intent intent, int requestCode, Bundle options) {
        ···
        try {
            intent.migrateExtraStreamToClipData();
            intent.prepareToLeaveProcess(who);
            int result = ActivityManager.getService()//关键代码
                .startActivity(whoThread, who.getBasePackageName(), intent,
                        intent.resolveTypeIfNeeded(who.getContentResolver()),
                        token, target != null ? target.mEmbeddedID : null,
                        requestCode, 0, null, options);
            checkStartActivityResult(result, intent);
        } catch (RemoteException e) {
            throw new RuntimeException("Failure from system", e);
        }
        return null;
    }
ActivityManager.java
    public static IActivityManager getService() {
        return IActivityManagerSingleton.get();
    }

    private static final Singleton<IActivityManager> IActivityManagerSingleton =
            new Singleton<IActivityManager>() {
                @Override
                protected IActivityManager create() {
                    final IBinder b = ServiceManager.getService(Context.ACTIVITY_SERVICE);
                    final IActivityManager am = IActivityManager.Stub.asInterface(b);
                    return am;
                }
            };
第三步:ActivityManagerService里的调用
    @Override
    public final int startActivity(IApplicationThread caller, String callingPackage,
            Intent intent, String resolvedType, IBinder resultTo, String resultWho, int requestCode,
            int startFlags, ProfilerInfo profilerInfo, Bundle bOptions) {
        return startActivityAsUser(caller, callingPackage, intent, resolvedType, resultTo,
                resultWho, requestCode, startFlags, profilerInfo, bOptions,
                UserHandle.getCallingUserId());
    }

    @Override
    public final int startActivityAsUser(IApplicationThread caller, String callingPackage,
            Intent intent, String resolvedType, IBinder resultTo, String resultWho, int requestCode,
            int startFlags, ProfilerInfo profilerInfo, Bundle bOptions, int userId) {
        enforceNotIsolatedCaller("startActivity");
        userId = mUserController.handleIncomingUser(Binder.getCallingPid(), Binder.getCallingUid(),
                userId, false, ALLOW_FULL_ONLY, "startActivity", null);
        // TODO: Switch to user app stacks here.
        return mActivityStarter.startActivityMayWait(caller, -1, callingPackage, intent,
                resolvedType, null, null, resultTo, resultWho, requestCode, startFlags,
                profilerInfo, null, null, bOptions, false, userId, null, null,
                "startActivityAsUser");
    }
第四步:mActivityStarter.startActivityMayWait()方法
    final int startActivityMayWait(IApplicationThread caller, int callingUid,
            String callingPackage, Intent intent, String resolvedType,
            IVoiceInteractionSession voiceSession, IVoiceInteractor voiceInteractor,
            IBinder resultTo, String resultWho, int requestCode, int startFlags,
            ProfilerInfo profilerInfo, WaitResult outResult,
            Configuration globalConfig, Bundle bOptions, boolean ignoreTargetSecurity, int userId,
            IActivityContainer iContainer, TaskRecord inTask, String reason) {
        ···
            int res = startActivityLocked(caller, intent, ephemeralIntent, resolvedType,
                    aInfo, rInfo, voiceSession, voiceInteractor,
                    resultTo, resultWho, requestCode, callingPid,
                    callingUid, callingPackage, realCallingPid, realCallingUid, startFlags,
                    options, ignoreTargetSecurity, componentSpecified, outRecord, container,
                    inTask, reason);

        ···
    }

    int startActivityLocked(IApplicationThread caller, Intent intent, Intent ephemeralIntent,
            String resolvedType, ActivityInfo aInfo, ResolveInfo rInfo,
            IVoiceInteractionSession voiceSession, IVoiceInteractor voiceInteractor,
            IBinder resultTo, String resultWho, int requestCode, int callingPid, int callingUid,
            String callingPackage, int realCallingPid, int realCallingUid, int startFlags,
            ActivityOptions options, boolean ignoreTargetSecurity, boolean componentSpecified,
            ActivityRecord[] outActivity, ActivityStackSupervisor.ActivityContainer container,
            TaskRecord inTask, String reason) {

        ···

        mLastStartActivityResult = startActivity(caller, intent, ephemeralIntent, resolvedType,
                aInfo, rInfo, voiceSession, voiceInteractor, resultTo, resultWho, requestCode,
                callingPid, callingUid, callingPackage, realCallingPid, realCallingUid, startFlags,
                options, ignoreTargetSecurity, componentSpecified, mLastStartActivityRecord,
                container, inTask);

       ···
        return mLastStartActivityResult;
    }

    private int startActivity(IApplicationThread caller, Intent intent, Intent ephemeralIntent,
            String resolvedType, ActivityInfo aInfo, ResolveInfo rInfo,
            IVoiceInteractionSession voiceSession, IVoiceInteractor voiceInteractor,
            IBinder resultTo, String resultWho, int requestCode, int callingPid, int callingUid,
            String callingPackage, int realCallingPid, int realCallingUid, int startFlags,
            ActivityOptions options, boolean ignoreTargetSecurity, boolean componentSpecified,
            ActivityRecord[] outActivity, ActivityStackSupervisor.ActivityContainer container,
            TaskRecord inTask) {
        ···

        return startActivity(r, sourceRecord, voiceSession, voiceInteractor, startFlags, true,
                options, inTask, outActivity);
    }

    private int startActivity(final ActivityRecord r, ActivityRecord sourceRecord,
            IVoiceInteractionSession voiceSession, IVoiceInteractor voiceInteractor,
            int startFlags, boolean doResume, ActivityOptions options, TaskRecord inTask,
            ActivityRecord[] outActivity) {
        ···
        try {
            mService.mWindowManager.deferSurfaceLayout();
            result = startActivityUnchecked(r, sourceRecord, voiceSession, voiceInteractor,
                    startFlags, doResume, options, inTask, outActivity);
        } finally {
           ···
        }
        ···
    }

    private int startActivityUnchecked(final ActivityRecord r, ActivityRecord sourceRecord,
            IVoiceInteractionSession voiceSession, IVoiceInteractor voiceInteractor,
            int startFlags, boolean doResume, ActivityOptions options, TaskRecord inTask,
            ActivityRecord[] outActivity) {

        ···
        if (mDoResume) {
            final ActivityRecord topTaskActivity =
                    mStartActivity.getTask().topRunningActivityLocked();
            if (!mTargetStack.isFocusable()
                    || (topTaskActivity != null && topTaskActivity.mTaskOverlay
                    && mStartActivity != topTaskActivity)) {
                ···
            } else {
               ···
                mSupervisor.resumeFocusedStackTopActivityLocked(mTargetStack, mStartActivity,
                        mOptions);
            }
        } else {
            ···
        }
        ···
    }
这里面最后调用了mSupervisor.resumeFocusedStackTopActivityLocked方法,这个mSupervisor就是ActivityStackSupervisor,在后面systemserver通知创建activity时也会用到。
第五步:resumeFocusedStackTopActivityLocked方法里调用targetStack.resumeTopActivityUncheckedLocked,然后又在ActivityStack的代码里回调到 ActivityStackSupervisor ;
    boolean resumeFocusedStackTopActivityLocked(
            ActivityStack targetStack, ActivityRecord target, ActivityOptions targetOptions) {
        if (targetStack != null && isFocusedStack(targetStack)) {
            return targetStack.resumeTopActivityUncheckedLocked(target, targetOptions);
        }
       ···
        return false;
    }
    //ActivityStack
boolean resumeTopActivityUncheckedLocked(ActivityRecord prev, ActivityOptions options) {
       ···
        try {
            ···
            result = resumeTopActivityInnerLocked(prev, options);
        } finally {
            ···
        }
        ···
        return result;
    }

    private boolean resumeTopActivityInnerLocked(ActivityRecord prev, ActivityOptions options) {
        ···
        if (next.app != null && next.app.thread != null) {
           ···
        } else {
            ···
            mStackSupervisor.startSpecificActivityLocked(next, true, true);
        }
        ···
    }
第六步:ActivityStackSupervisor 回调到 ActivityManagerService,这里会判断要启动 App 的进程是否存在,存在则通知进程启动 Activity,否则就先将进程创建出来;
    void startSpecificActivityLocked(ActivityRecord r,
            boolean andResume, boolean checkConfig) {
       ···
        if (app != null && app.thread != null) {
            try {
               ···
                // 如果进程已存在,则通知进程启动组件,然后return
                realStartActivityLocked(r, app, andResume, checkConfig);
                return;
            } catch (RemoteException e) {
                ···
            }
        }
        // 否则先将进程创建出来
        mService.startProcessLocked(r.processName, r.info.applicationInfo, true, 0,
                "activity", r.intent.getComponent(), false, false, true);
    }
致此,热启动就走到这里,但是我们主要看冷启动,接着往下走
第七步:Process#start()启动进程
    final ProcessRecord startProcessLocked(String processName,
            ApplicationInfo info, boolean knownToBeDead, int intentFlags,
            String hostingType, ComponentName hostingName, boolean allowWhileBooting,
            boolean isolated, boolean keepIfLarge) {
        return startProcessLocked(processName, info, knownToBeDead, intentFlags, hostingType,
                hostingName, allowWhileBooting, isolated, 0 /* isolatedUid */, keepIfLarge,
                null /* ABI override */, null /* entryPoint */, null /* entryPointArgs */,
                null /* crashHandler */);
    }

    final ProcessRecord startProcessLocked(String processName, ApplicationInfo info,
            boolean knownToBeDead, int intentFlags, String hostingType, ComponentName hostingName,
            boolean allowWhileBooting, boolean isolated, int isolatedUid, boolean keepIfLarge,
            String abiOverride, String entryPoint, String[] entryPointArgs, Runnable crashHandler) {
        ···
        startProcessLocked(
                app, hostingType, hostingNameStr, abiOverride, entryPoint, entryPointArgs);
        ···
    }

    private final void startProcessLocked(ProcessRecord app, String hostingType,
            String hostingNameStr, String abiOverride, String entryPoint, String[] entryPointArgs) {
        ···
            ProcessStartResult startResult;
            if (hostingType.equals("webview_service")) {
                ···
            } else {
                startResult = Process.start(entryPoint,
                        app.processName, uid, uid, gids, debugFlags, mountExternal,
                        app.info.targetSdkVersion, seInfo, requiredAbi, instructionSet,
                        app.info.dataDir, invokeWith, entryPointArgs);
            }
            ···
    }
ActivityManagerService 通过 socket 通信告知 Zygote 进程 fork 子进程,即 app 进程;到这儿,启动进程的代码就完成了。
关于如何fork进程,我下面对Zygote进程会详细说。
2.开启主线程
app进程创建后,首先是反射调用android.app.ActivityThread类的main方法,main()函数里会初始化app的运行时环境,然后去创建 ApplicationThread,Looper,Handler 对象,并开启主线程消息循环Looper.loop()。
主要代码:
    final ApplicationThread mAppThread = new ApplicationThread();

    //main()方法
    public static void main(String[] args) {
    ...
        Looper.prepareMainLooper();//这里面涉及looper,后面讲handler机制展开剖析

        ActivityThread thread = new ActivityThread();
        thread.attach(false, startSeq);//进行 Binder 通信,通知system_server进程执行

        if (sMainThreadHandler == null) {
            sMainThreadHandler = thread.getHandler();
        }

        if (false) {
            Looper.myLooper().setMessageLogging(new
                    LogPrinter(Log.DEBUG, "ActivityThread"));
        }

        Looper.loop();
        throw new RuntimeException("Main thread loop unexpectedly exited");
    }
ActivityThread的main()调用 ActivityThread#attach(false) 方法进行 Binder 通信,通知system_server进程执行 ActivityManagerService里的attachApplication(mAppThread) 方法,用于初始化Application和Activity。
核心代码:
  private void attach(boolean system, long startSeq) {
        sCurrentActivityThread = this;
        mSystemThread = system;
        if (!system) {
            ViewRootImpl.addFirstDrawHandler(new Runnable() {
                @Override
                public void run() {
                    ensureJitEnabled();
                }
            });
            android.ddm.DdmHandleAppName.setAppName("<pre-initialized>",
                    UserHandle.myUserId());
            RuntimeInit.setApplicationObject(mAppThread.asBinder());
            final IActivityManager mgr = ActivityManager.getService();//ActivityManagerService
            try {
                mgr.attachApplication(mAppThread, startSeq);
            } catch (RemoteException ex) {
                throw ex.rethrowFromSystemServer();
            }
...}
看其中的mgr.attachApplication(mAppThread, startSeq);这里就使用到了AIDL,最后走进了AMS里面的attachApplication()方法。
3.创建并初始化 Application和Activity
核心代码:ActivityManagerService.java,这里面的代码量很大,请看注释内容。
@Override
    public final void attachApplication(IApplicationThread thread, long startSeq) {
        synchronized (this) {
            int callingPid = Binder.getCallingPid();
            final int callingUid = Binder.getCallingUid();
            final long origId = Binder.clearCallingIdentity();
            attachApplicationLocked(thread, callingPid, callingUid, startSeq);
            //1.关键代码,往里走
            Binder.restoreCallingIdentity(origId);
        }
    }
//2.attachApplicationLocked里的thread调用bindApplication方法
//IApplicationThread 在ActivtyThread里是一个Private的内部类,
//里面实现了bindApplication方法。里面最终回通过mH.sendMessage方法(handler)把事件分发出去
//sendMessage(H.BIND_APPLICATION, data);
//3.那么在Activity里的Handler里,通过handleMessage方法收到msg.what为BIND_APPLICATION去创建app
在system_server进程中,ActivityManagerService的attachApplication(mAppThread)里依次初始化了Application和Activity,分别有2个关键函数:
第一个: thread#bindApplication() 方法通知主线程Handler 创建 Application 对象、绑定 Context 、执行 Application#onCreate() 生命周期,先讲application的创建
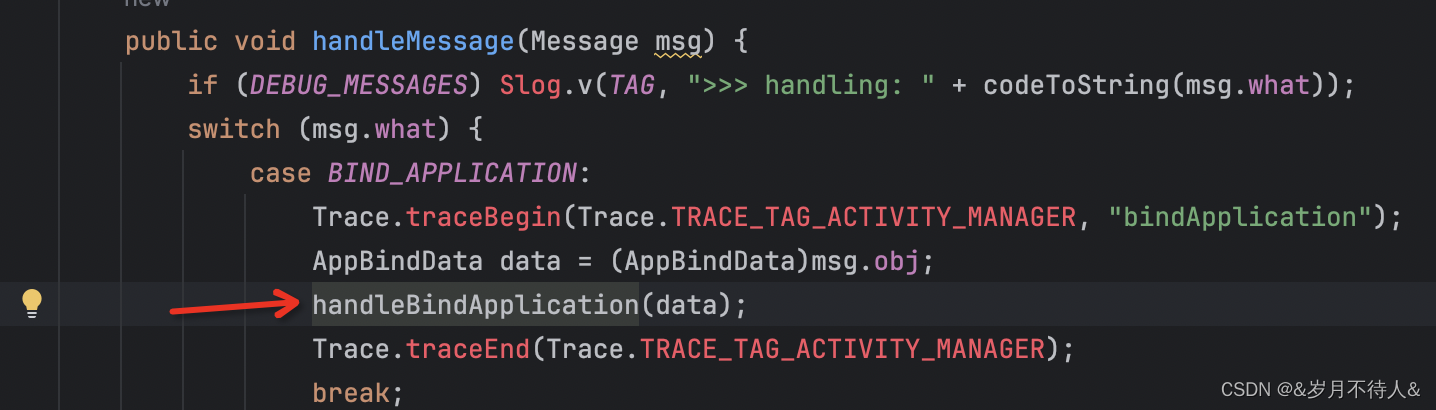
handleBindApplication核心代码
private void handleBindApplication(AppBindData data) {
      Application app = data.info.makeApplication(data.restrictedBackupMode, null);//创建Application对象
      mInstrumentation.callApplicationOnCreate(app);//调用Application.onCreate,执行application的生命周期
}
在ActivityThread创建的时候,会将自己的ApplicationThread绑定到AMS中:
ActivityThread.main()
└── ActivityThread.attach()
└── IActivityManager.attachApplication(mAppThread)
└── Binder.transact()执行流程从应用进程进入到系统进程:
ActivityManagerService.onTransact()
└── ActivityManagerService.attachApplication(IApplicationThread thread)
└── IApplicationThread.bindApplication(processName, appInfo ...)(切到ActivityThread里面的ApplicationThread)└── Binder.transact()
然后在ApplicationThread里
ApplicationThread.onTransact()
└── ApplicationThread.bindApplication()
└── ActivityThread.H.handleMessage(BIND_APPLICATION)
└── ActivityThread.handleBindApplication()
└── Application.onCreate()
第二个:Activity的创建(在AMS里的bindAppliocation方法里)
- mStackSupervisor的attachApplicationLocked() 方法中调用realStartActivityLocked()方法,
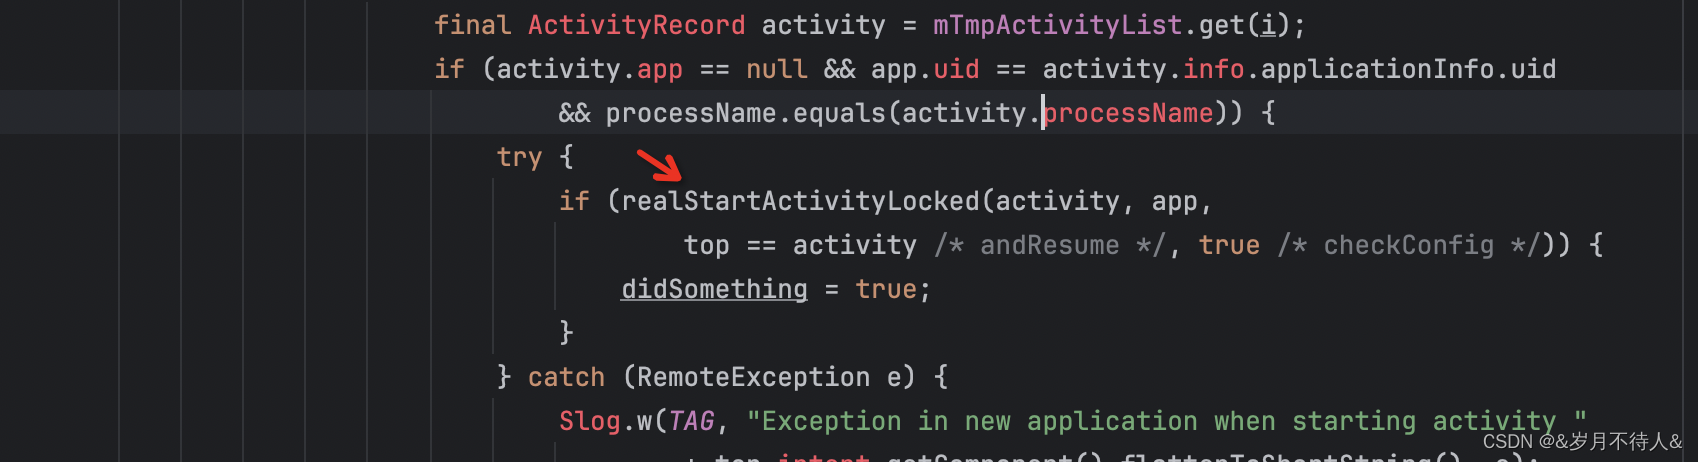
ActivityStackSupervisor.realStartActivityLocked()表示要启动一个Activity,ActivityRecord作为参数。从ActivityRecord中提取出Token对象,作为跨进程调用的参数,通过IApplicationThread.scheduleLaunchActivity()传递到应用进程。进而通过主线程Handler消息通知创建 Activity 对象。
是的,一个让我百思不得解的地方终于找到了,因为android 9.0以前,realStartActivityLocked里面是:
final boolean realStartActivityLocked(ActivityRecord r, ProcessRecord app,
            boolean andResume, boolean checkConfig) throws RemoteException {
        ···
        try {
            ···
            app.thread.scheduleLaunchActivity(new Intent(r.intent), r.appToken,
                    System.identityHashCode(r), r.info,
                    // TODO: Have this take the merged configuration instead of separate global and
                    // override configs.
                    mergedConfiguration.getGlobalConfiguration(),
                    mergedConfiguration.getOverrideConfiguration(), r.compat,
                    r.launchedFromPackage, task.voiceInteractor, app.repProcState, r.icicle,
                    r.persistentState, results, newIntents, !andResume,
                    mService.isNextTransitionForward(), profilerInfo);
             ···
        } catch (RemoteException e) {
            ···
        }
        ···
    }
我在9.0里找不到啊,后面仔细阅读代码,才发现改了:
try里的代码:
 clientTransaction.addCallback(LaunchActivityItem.obtain(new Intent(r.intent),
                        System.identityHashCode(r), r.info,
                        // TODO: Have this take the merged configuration instead of separate global
                        // and override configs.
                        mergedConfiguration.getGlobalConfiguration(),
                        mergedConfiguration.getOverrideConfiguration(), r.compat,
                        r.launchedFromPackage, task.voiceInteractor, app.repProcState, r.icicle,
                        r.persistentState, results, newIntents, mService.isNextTransitionForward(),
                        profilerInfo));
      final ActivityLifecycleItem lifecycleItem;
                if (andResume) {
                    lifecycleItem = ResumeActivityItem.obtain(mService.isNextTransitionForward());
                } else {
                    lifecycleItem = PauseActivityItem.obtain();
                }
                clientTransaction.setLifecycleStateRequest(lifecycleItem);
但是最后还是会走到相同的方法里去创建activity。
关于9.0后这块代码的详情可以去看这个博客
android AMS—— 生命周期管理 - 简书
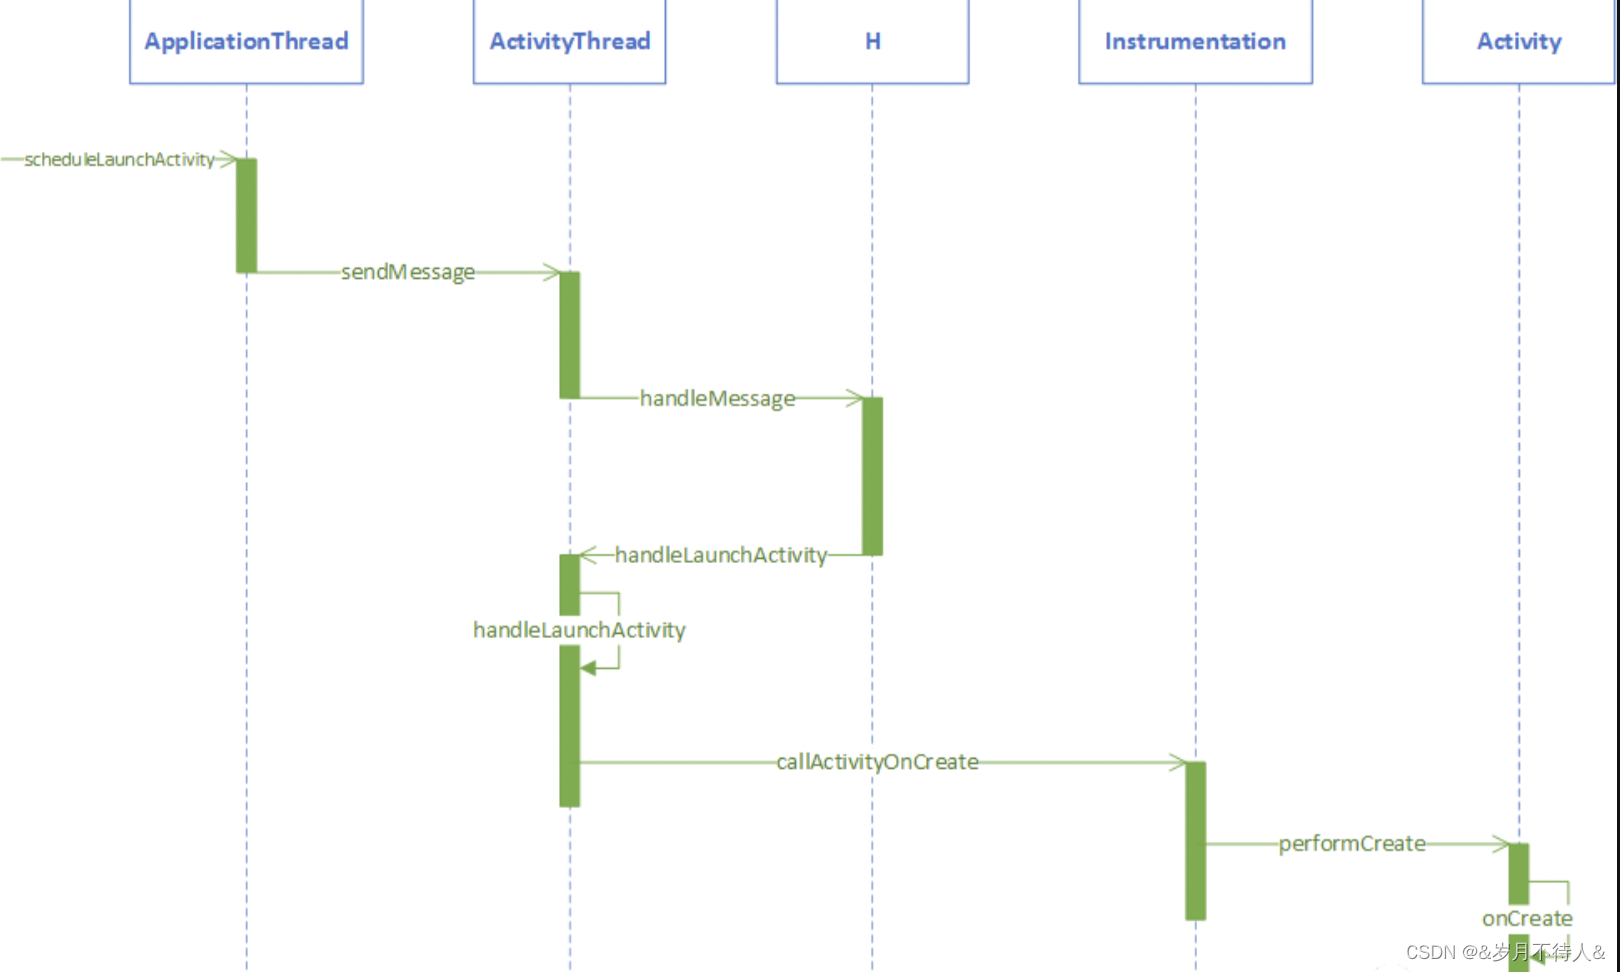
Activity对象,是通过ActivityThread的handleLaunchActivity()中的performLaunchActivity()创建的
private void handleLaunchActivity(ActivityClientRecord r, Intent customIntent) {
        Activity a = performLaunchActivity(r, customIntent);
}
然后再调用 mInstrumentation() Activity#onCreate() 生命周期。
private Activity performLaunchActivity(ActivityClientRecord r, Intent customIntent) {  ...代码量很大,我就不贴了
//创建activity
  if (r.isPersistable()) {
                    mInstrumentation.callActivityOnCreate(activity, r.state, r.persistentState);
                } else {
                    mInstrumentation.callActivityOnCreate(activity, r.state);
                }
}
ActiviyThread(app进程)的方法调用:(9.0以前)
ApplicationThread.onTransact()
└── ApplicationThread.scheduleLaunchActivity(...token, ...)
// token将被封装进ActivityClientRecord这个数据结构中
└── ActivityThread.H.handleMessage()
└── ActivityThread.handleLaunchActivity(LAUNCH_ACTIVITY)
└── ActivityThread.performLaunchActivity(ActivityClientRecord, ...)
// 从ActivityRecord取出token,下面的r就是record
└──mInstrumentation.callActivityOnCreate(activity, r.state, r.persistentState);
创建activity流程图
4.布局&绘制
后面看了源码补上
启动流程图
三、zygote进程
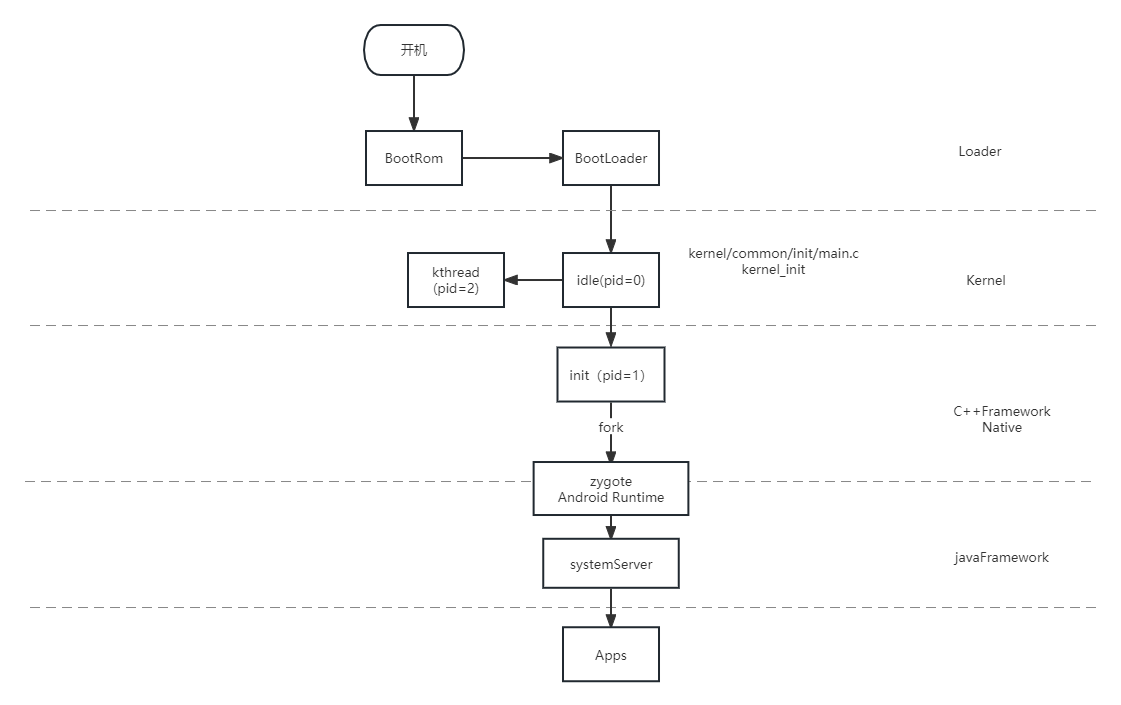
- Zygote进程是所有的android进程的父进程,包括SystemServer和各种应用进程都是通过Zygote进程fork出来的。Zygote(孵化)进程相当于是android系统的根进程,后面所有的进程都是通过这个进程fork出来的
- 虽然Zygote进程相当于Android系统的根进程,但是事实上它也是由Linux系统的init进程启动的。
各个进程的先后顺序
init进程 --> Zygote进程 --> SystemServer进程 -->各种应用进程
进程作用说明
init进程:Android手机开机Linux内核启动后,会加载system/core/init/init.rc文件,启动init进程,他是linux的根进程,android系统是基于linux系统的,因此可以算作是整个android操作系统的第一个进程;
作用:
- 各种复杂工作
- 负责开关机画面
- 文件系统的创建和挂载
- 启动Zygote(孵化器)进程
- 启动ServiceManager,它是Binder服务管理器,管理所有Android系统服务
Zygote进程:android系统的根进程,主要作用:可以作用Zygote进程fork出SystemServer进程和各种应用进程;
SystemService进程:主要是在这个进程中启动系统的各项服务,比如ActivityManagerService,PackageManagerService,WindowManagerService服务等等;
各种应用进程:启动自己编写的客户端应用时,一般都是重新启动一个应用进程,有自己的虚拟机与运行环境;
启动流程
Zygote进程mian方法主要执行逻辑:
- 初始化DDMS;调用enableDdms(),设置DDMS可用,可以发现DDMS启动的时机还是比较早的,在整个Zygote进程刚刚开始要启动额时候就设置可用,初始化各种参数
- 注册Zygote进程的socket通讯;(registerZygoteSocket)
- 初始化Zygote中的各种类,资源文件,OpenGL,类库,Text资源等等;(preload)
- 初始化完成之后fork出SystemServer进程;()
- fork出SystemServer进程之后,关闭socket连接;
public static void main(String argv[]) {
    try {
        //设置ddms可以用
        RuntimeInit.enableDdms();
        SamplingProfilerIntegration.start();
        boolean startSystemServer = false;
        String socketName = "zygote";
        registerZygoteSocket(socketName);//注册
        preload();//初始化
        if (startSystemServer) {
            startSystemServer(abiList, socketName);//启动systemService
        }
        closeServerSocket();//关闭socket连接
    } catch (MethodAndArgsCaller caller) {
        caller.run();
    } catch (RuntimeException ex) {
        Log.e(TAG, "Zygote died with exception", ex);
        closeServerSocket();
        throw ex;
    }
}
四、SystemService进程
SystemServer是由zygote进程fork出来的第一个进程,SystemServer和Zygote是Android Framework最重要的2个进程。
SystemServer进程主要的作用是在这个进程中启动各种系统服务,他是通过创建SystemServiceManager对象去启动服务的,他启动的服务比如ActivityManagerService,PackageManagerService,WindowManagerService服务,以及各种系统性的服务其实都是在SystemServer进程中启动的,而当我们的应用需要使用各种系统服务的时候其实也是通过与SystemServer进程通讯获取各种服务对象的句柄的。它的启动函数为main函数。
tips:SertemServer进程在尝试启动服务之前会首先尝试与Zygote建立socket通讯,只有通讯成功之后才会开始尝试启动服务;
SystemService的执行main()方法,里面会直接走到run方法里面去。
源码位置:
public static void main(String[] args) {
        new SystemServer().run();
    }
run方法里代码量挺大的:
1.设置系统当前时间为该时间点。
2.设置系统的语言环境等
3.设置虚拟机运行内存,加载运行库,设置SystemServer的异步消息
4.准备主线程循环,初始化本地服务,初始化context,启动各种服务
5.开启loop循环
private void run() {
    if (System.currentTimeMillis() < EARLIEST_SUPPORTED_TIME) {
        Slog.w(TAG, "System clock is before 1970; setting to 1970.");
        SystemClock.setCurrentTimeMillis(EARLIEST_SUPPORTED_TIME);
    }//时间

    if (!SystemProperties.get("persist.sys.language").isEmpty()) {
        final String languageTag = Locale.getDefault().toLanguageTag();
        SystemProperties.set("persist.sys.locale", languageTag);
        SystemProperties.set("persist.sys.language", "");
        SystemProperties.set("persist.sys.country", "");
        SystemProperties.set("persist.sys.localevar", "");
    }//语言

    Slog.i(TAG, "Entered the Android system server!");
    EventLog.writeEvent(EventLogTags.BOOT_PROGRESS_SYSTEM_RUN, SystemClock.uptimeMillis());

    SystemProperties.set("persist.sys.dalvik.vm.lib.2", VMRuntime.getRuntime().vmLibrary());///虚拟机

    if (SamplingProfilerIntegration.isEnabled()) {
        SamplingProfilerIntegration.start();
        mProfilerSnapshotTimer = new Timer();
        mProfilerSnapshotTimer.schedule(new TimerTask() {
            @Override
            public void run() {
                SamplingProfilerIntegration.writeSnapshot("system_server", null);
            }
        }, SNAPSHOT_INTERVAL, SNAPSHOT_INTERVAL);
    }

    // Mmmmmm... more memory!
    VMRuntime.getRuntime().clearGrowthLimit();
    // 系统服务器必须一直运行,所以需要
    // 尽可能高效地使用内存。
     VMRuntime.getRuntime().setTargetHeapUtilization(0.8f);

    // Some devices rely on runtime fingerprint generation, so make sure
    // we've defined it before booting further.
    Build.ensureFingerprintProperty();

    // Within the system server, it is an error to access Environment paths without
    // explicitly specifying a user.
    Environment.setUserRequired(true);

    // Ensure binder calls into the system always run at foreground priority.
    BinderInternal.disableBackgroundScheduling(true);

    //准备主循环线程(本线程)。
    android.os.Process.setThreadPriority(
            android.os.Process.THREAD_PRIORITY_FOREGROUND);
    android.os.Process.setCanSelfBackground(false);
    Looper.prepareMainLooper();

    // 初始化原生服务.
    System.loadLibrary("android_servers");

    // Check whether we failed to shut down last time we tried.
    // This call may not return.
    performPendingShutdown();

    // 初始化系统上下文。通过ActivityThread.systemMain方法创建context的
    createSystemContext();

    // 创建系统服务管理器。
    mSystemServiceManager = new SystemServiceManager(mSystemContext);
    //将SystemServiceManager对象保存SystemServer进程中的一个数据结构中。
    LocalServices.addService(SystemServiceManager.class, mSystemServiceManager);

    // Start services.
    try {
    //startBootstrapServices() 主要用于启动系统Boot级服务,例如ActivityManagerService,PowerManagerService,PackageManagerService
    //startCoreServices() 主要用于启动系统核心的服务,BatteryService(电池相关服务),UsageStatsService,WebViewUpdateService服务等
    //startOtherServices() 主要用于启动一些非紧要或者是非需要及时启动的服务
        startBootstrapServices();
        startCoreServices();
        startOtherServices();
    } catch (Throwable ex) {
        Slog.e("System", "******************************************");
        Slog.e("System", "************ Failure starting system services", ex);
        throw ex;
    }

    // For debug builds, log event loop stalls to dropbox for analysis.
    if (StrictMode.conditionallyEnableDebugLogging()) {
        Slog.i(TAG, "Enabled StrictMode for system server main thread.");
    }

    // Loop forever.
    Looper.loop();
    throw new RuntimeException("Main thread loop unexpectedly exited");
}
五、总结
1.在Android中,通过包名和Activity类名就可以打开一个APP。实际上,项目里的startActivity()方法并不是真正创建进程、拉起APP的地方。而是通过一系列的调用,把请求传递给SystemServer的AMS。AMS收到来自客户端的请求后,再通知zygote进程来fork一个新进程,来启动App的。
2.这个过程涉及到3个进程:App进程、AMS(SystemServer进程)、zygote进程。
- App进程(ActivityThread)与AMS通过Binder机制进行跨进程通信(AIDL)。
- AMS(SystemServer进程)与zygote通过Socket进行跨进程通信。
- 应用启动是一个跨进程的复杂工作,应用启动流程基本是围绕着SystemServer进程的ActivityManagerService和应用进程的ActivityThread展开。
3.在Android系统中,任何一个Activity(任何一个四大组件)的启动都是由SystemServer进程(AMS)和App进程(主要是ActivityThread)相互配合来完成的。在ActivityThread的main方法中,调用 ActivityThread的attach(false) 方法进行 Binder 通信,通知system_server进程执行 ActivityManagerService的attachApplication(mAppThread) 方法,用于初始化Application和Activity。
4.对于Activity,在App进程中,主要是通过ActivityThread的,而在System Server中,则是使用AMS通过ActivityRecord来维护Activity运行时的状态信息,第一次启动某个Activity时,AMS会创建ActivityRecord记录该Activity的信息,比如ActivityRecord里的ActivityState代表了该Activity目前处于什么生命周期。在Activity类中有一个IBinder类型的属性:private IBinder mToken;,这个主要是作为系统进程(AMS)里Activity的唯一标识,当我们展示Dialog的时候,WindowManagerGlobal#addView()也是通过这个token来得知弹窗View要添加到哪个Activity里。ActivityRecord的构造函数里会创建这个appToken。
5.系统进程维护的是ActivityRecord,应用进程维护的是Activity,两者之间的映射关系就是利用Token来维系的。app进程的Activity在创建的时候,就被赋予了一个Token,拿着这个Token才能完成后续与系统进程的通信。例如在发生Activity切换时,app进程会将上一个Activity的Token(AMS.startActivity()的参数resultTo)传递给系统进程,系统进程会根据这个Token找到ActivityRecord,对其完成调度后,再通知应用进程执行Activity的生命周期方法。
6.Instrumentation:每个Activity都持有一个Instrumentation,它是由ActivityThread创建出来的一个单例。 这个类就是完成对Application和Activity初始化和生命周期的工具类,ActivityThread要创建或执行Activity生命周期方法时,都需要通过Instrumentation来进行具体的操作。
关于App开机到启动App的流程图,当然,本文主要讲的是Framework层的代码
文章可以去看这个:android启动流程-从开机到zygote创建_android的启动流程-CSDN博客
源码阅读真的好心累哦,上面我贴的代码里,其实很多源码我没有贴出来,只贴了主流程的一些代码。
与君共勉,加油


![[技术报告]InternLM2 Technical Report](https://img-blog.csdnimg.cn/direct/4aaeb7df60ce4fe49686e8b6679dd13c.png)