1.widgets_文本和字体
在
flutter当中几乎所有的对象都是widget,他跟原生开发的控线不一样,flutter开发当中,widget的概念更广泛一点,
不仅可以表示ui元素,也可以表示一些功能性的组件,例如手势检测等
- 基础组件
- 文本和字体
对于html当中对应就是lab或者label或者span这样的行内元素


- 文本和字体
2.widgets_按钮

3.widgets_图片和图标
图片
- 加载本地资源
- 加载网络资源
Widget build(BuildContext context) {
const style = TextStyle(
color:const Color(0xffff0000),//Colors.yellow
fontSize:20,
fontFamily:'yahei',
decoration: TextDecoration.underline,
decorationStyle: TextDecorationStyle.dashed
);
return Scaffold(
appBar: AppBar(
title: Text('Hello world!'),
actions: <Widget>[
IconButton(
icon: Icon(Icons.shopping cart),
tooltip: 'Open shopping cart',
onPressed: () {
print('Shopping cart opened')
},
),
],
),
body:Column(
children: <Widget>[
Image.asset(static/pircture/mvp.png,
width:200,
)//放图片路径,可以右击文件然后新建一个文件夹放图片
]
)
)
}
这边要解开
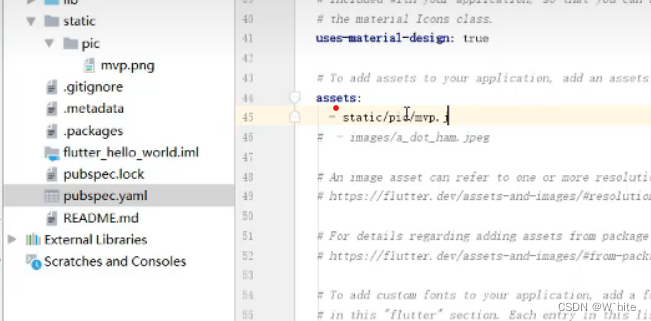
- 如果想加载网络图片
//network代表要使用网络资源
Image.network("http://......",
width:150)
//控制图片填充效果
fit:BoxFit.cover
//设定颜色混合(拿别的颜色混到图片里去)
color:Color.pink,
colorBlendMode:BlendMode.difference,

图标
- 使用icon这个类
Icon(Icons.access_alarm)//闹铃图标

- 如果图标不够用了,想使用一个新的图标,可以支持icon font(淘宝的矢量图标库)

- 解压缩包,找到
ttf文件,就是我们要使用库

- 在pubspec中引入

- 新建一个文件fonts来引入路径
- 定义一个自己的图标库,在lib中定义一个
Dart File文件叫Myicon.dart
import 'package:flutter/material.dart';
class MyIcon [
	static const IconData huawei = const IconData(
		0xe82e,
		fontFamily:'myGoodIcon',
		matchTextDirection: true
	);
	static const IconData oppo = const IconData(
		0xe82d,
		fontFamily:'myGoodIcon',
		matchTextDirection: true
	);
	static const IconData xiaomi= const IconData(
		0x832,
		fontFamily:'myGoodIcon',
		matchTextDirection: true
	);
]
- 写完上面代码后,到
main.dart文件中引入
import 'MYIcon.dart'
- 然后就可以直接用了

- 可以设置颜色
Icon(MyIcon.huawei,color:Color.yellow)
- pub里面报错的话,可能是缩进问题

3.widgets_下拉框
- 下拉框里面有选项,有选项的话还需要知道选的是第几个,这才是一个正真的下拉框
class MyDropDownButton extends StatefulWidgets {
State<StatefulWidget> createState() {
return _MyDropDownButton();
}
}
class _MyDropDownButton extends State<MyDropDownButton> {
List getCityList() [
List<DropdownMeunItem> cityList = new List();
cityList.add(DropdownMenuItem(child: new Text("上海"), value:"shanghai"));
cityList.add(DropdownMenuItem(child: new Text("北京"), value:"beijing"));
cityList.add(DropdownMenuItem(child: new Text("广州"), value:"guangzhou"));
cityList.add(DropdownMenuItem(child: new Text("深圳"), value:"shenzhen"));
return cityList;
]
Widget build(BuildContext context) {
return new Column(
children:<Widget>[
new DropdownButton(
items:getCityList(),
hint: new Text("请选择城市"),
onChanged: null
)
]
)
}
}
- 想要它显示出来,在Scaffold里面添加
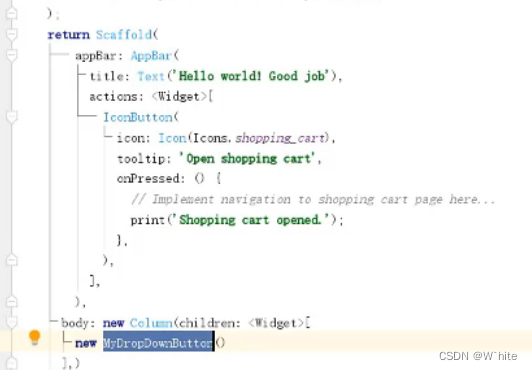
- 还需要写一个变量来存选中的city
class MyDropDownButton extends StatefulWidgets {
State<StatefulWidget> createState() {
return _MyDropDownButton();
}
}
class _MyDropDownButton extends State<MyDropDownButton> {
List getCityList() [
List<DropdownMeunItem> cityList = new List();
cityList.add(DropdownMenuItem(child: new Text("上海"), value:"shanghai"));
cityList.add(DropdownMenuItem(child: new Text("北京"), value:"beijing"));
cityList.add(DropdownMenuItem(child: new Text("广州"), value:"guangzhou"));
cityList.add(DropdownMenuItem(child: new Text("深圳"), value:"shenzhen"));
return cityList;
]
var selectedCity;
Widget build(BuildContext context) {
return new Column(
children:<Widget>[
new DropdownButton(
items:getCityList(),
hint: new Text("请选择城市"),
value: selectedCity,
onChanged: (val) {
setState(() {
this.selectedCity = val;//把值赋给临时变量
});
}
)
],
);
}
}
4.widgets_单选框多选框
单选框
import 'package:flutter/material.dart';
void main() {
runApp(MyApp());
}
class MyApp extends StatelessWidget {
Widget build(BuildContext context) {
return MaterialApp(
home: Scaffold(
appBar: AppBar(
title: Text('Single Selection Example'),
),
body: SingleSelectionWidget(),
),
);
}
}
class SingleSelectionWidget extends StatefulWidget {
_SingleSelectionWidgetState createState() => _SingleSelectionWidgetState();
}
class _SingleSelectionWidgetState extends State<SingleSelectionWidget> {
String selectedFruit = '';
Widget build(BuildContext context) {
return Column(
children: <Widget>[
RadioListTile(
title: Text('Apple'),
value: 'apple',
groupValue: selectedFruit,
onChanged: (value) {
setState(() {
selectedFruit = value;
});
},
),
RadioListTile(
title: Text('Banana'),
value: 'banana',
groupValue: selectedFruit,
onChanged: (value) {
setState(() {
selectedFruit = value;
});
},
),
],
);
}
}
多选框
import 'package:flutter/material.dart';
void main() {
runApp(MyApp());
}
class MyApp extends StatelessWidget {
Widget build(BuildContext context) {
return MaterialApp(
home: Scaffold(
appBar: AppBar(
title: Text('Multiple Selection Example'),
),
body: MultipleSelectionWidget(),
),
);
}
}
class MultipleSelectionWidget extends StatefulWidget {
_MultipleSelectionWidgetState createState() => _MultipleSelectionWidgetState();
}
class _MultipleSelectionWidgetState extends State<MultipleSelectionWidget> {
List<String> selectedFruits = [];
Widget build(BuildContext context) {
return Column(
children: <Widget>[
CheckboxListTile(
title: Text('Strawberry'),
value: selectedFruits.contains('strawberry'),
onChanged: (value) {
setState(() {
if (value) {
selectedFruits.add('strawberry');
} else {
selectedFruits.remove('strawberry');
}
});
},
),
CheckboxListTile(
title: Text('Mango'),
value: selectedFruits.contains('mango'),
onChanged: (value) {
setState(() {
if (value) {
selectedFruits.add('mango');
} else {
selectedFruits.remove('mango');
}
});
},
),
],
);
}
}
- 使用RadioListTile和CheckboxListTile小部件来创建单选框和多选框。通过修改value属性以及处理onChanged回调函数,您可以实现单选和多选的功能。
5.widgets_输入框
- 在Flutter中,可以使用TextField小部件来创建输入框,让用户可以在应用程序中输入文本。TextField提供了各种属性和回调函数,以允许您自定义输入框的外观和行为
import 'package:flutter/material.dart';
void main() {
runApp(MyApp());
}
class MyApp extends StatelessWidget {
Widget build(BuildContext context) {
return MaterialApp(
home: Scaffold(
appBar: AppBar(
title: Text('Text Input Example'),
),
body: TextInputWidget(),
),
);
}
}
class TextInputWidget extends StatefulWidget {
_TextInputWidgetState createState() => _TextInputWidgetState();
}
class _TextInputWidgetState extends State<TextInputWidget> {
TextEditingController _textEditingController = TextEditingController();
Widget build(BuildContext context) {
return Padding(
padding: EdgeInsets.all(16.0),
child: TextField(
controller: _textEditingController,
decoration: InputDecoration(
labelText: 'Enter your text here',
border: OutlineInputBorder(),
),
),
);
}
void dispose() {
_textEditingController.dispose();
super.dispose();
}
}
