💡💡💡本专栏所有程序均经过测试,可成功执行💡💡💡
尽管Ultralytics 推出了最新版本的 YOLOv8 模型。但YOLOv5作为一个anchor base的目标检测的算法,YOLOv5可能比YOLOv8的效果更好。注意力机制是提高模型性能最热门的方法之一,本文给大家带来的教程是将YOLOv5的backbone的Conv用repvgg模块替换来提取特征。文章在介绍主要的原理后,将手把手教学如何进行模块的代码添加和修改,并将修改后的完整代码放在文章的最后,方便大家一键运行,小白也可轻松上手实践。此外还增加了进阶模块,来提高学有能力的同学进一步增长知识。帮助您更好地学习深度学习目标检测YOLO系列的挑战。
专栏地址: YOLOv5改进+入门——持续更新各种有效涨点方法 点击即可跳转
目录
1.原理
2. RepVGG代码实现
2.1 将RepVGG添加到YOLOv5中
2.2 新增yaml文件
2.3 注册模块
2.4 执行程序
3. 完整代码分享
4. 进阶
5. 总结
1.原理

论文地址:RepVGG: Making VGG-style ConvNets Great Again点击即可跳转
官方代码:官方代码仓库点击即可跳转
RepVGG 是一种卷积神经网络架构,它通过对经典的VGG网络进行改进,提高了其在推理过程中的性能和效率。RepVGG的名称来自“Re-parameterizable VGG”,意指它在训练和推理阶段采用了不同的参数化方法。以下是对RepVGG的详细介绍:
-
设计思想
-
Re-parameterization:RepVGG的核心思想是在训练和推理阶段使用不同的网络结构。在训练阶段,RepVGG使用多分支结构,以增强模型的表示能力;而在推理阶段,这些多分支结构会被合并为单一分支,以提高计算效率。
-
简化的推理结构:在推理阶段,RepVGG变成了一个由普通卷积层和激活函数组成的简单网络。这种设计大大减少了计算量和内存占用,使得推理速度显著提升。
-
架构
RepVGG的架构主要基于VGG,但在每个卷积层前后引入了1x1卷积层。这些1x1卷积层在训练时有助于提升网络的表示能力,而在推理时可以通过数学转换将其与主分支的卷积层合并,从而简化网络。
具体来说,RepVGG在训练阶段使用了三种卷积操作:
-
3x3卷积:这是VGG架构的主要卷积操作。
-
1x1卷积:增加非线性和特征组合能力。
-
Identity mapping:保持特征的一致性。
在推理阶段,这三种操作会被重新参数化为一个等效的3x3卷积层,从而简化计算。

2. RepVGG代码实现
2.1 将RepVGG添加到YOLOv5中
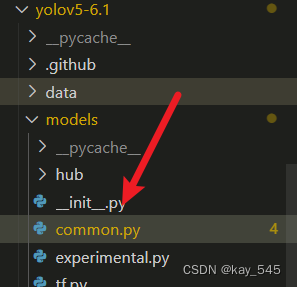
关键步骤一: 将下面代码粘贴到/projects/yolov5-6.1/models/common.py文件中
def conv_bn(in_channels, out_channels, kernel_size, stride, padding, groups=1):
result = nn.Sequential()
result.add_module('conv', nn.Conv2d(in_channels=in_channels, out_channels=out_channels,
kernel_size=kernel_size, stride=stride, padding=padding, groups=groups,
bias=False))
result.add_module('bn', nn.BatchNorm2d(num_features=out_channels))
return result
class RepVGGBlock(nn.Module):
'''RepVGGBlock is a basic rep-style block, including training and deploy status
This code is based on https://github.com/DingXiaoH/RepVGG/blob/main/repvgg.py
'''
def __init__(self, in_channels, out_channels, kernel_size=3,
stride=1, padding=1, dilation=1, groups=1, padding_mode='zeros', deploy=False, use_se=False):
super(RepVGGBlock, self).__init__()
""" Initialization of the class.
Args:
in_channels (int): Number of channels in the input image
out_channels (int): Number of channels produced by the convolution
kernel_size (int or tuple): Size of the convolving kernel
stride (int or tuple, optional): Stride of the convolution. Default: 1
padding (int or tuple, optional): Zero-padding added to both sides of
the input. Default: 1
dilation (int or tuple, optional): Spacing between kernel elements. Default: 1
groups (int, optional): Number of blocked connections from input
channels to output channels. Default: 1
padding_mode (string, optional): Default: 'zeros'
deploy: Whether to be deploy status or training status. Default: False
use_se: Whether to use se. Default: False
"""
self.deploy = deploy
self.groups = groups
self.in_channels = in_channels
self.out_channels = out_channels
assert kernel_size == 3
assert padding == 1
padding_11 = padding - kernel_size // 2
self.nonlinearity = nn.ReLU()
if use_se:
raise NotImplementedError("se block not supported yet")
else:
self.se = nn.Identity()
if deploy:
self.rbr_reparam = nn.Conv2d(in_channels=in_channels, out_channels=out_channels, kernel_size=kernel_size, stride=stride,
padding=padding, dilation=dilation, groups=groups, bias=True, padding_mode=padding_mode)
else:
self.rbr_identity = nn.BatchNorm2d(num_features=in_channels) if out_channels == in_channels and stride == 1 else None
self.rbr_dense = conv_bn(in_channels=in_channels, out_channels=out_channels, kernel_size=kernel_size, stride=stride, padding=padding, groups=groups)
self.rbr_1x1 = conv_bn(in_channels=in_channels, out_channels=out_channels, kernel_size=1, stride=stride, padding=padding_11, groups=groups)
def forward(self, inputs):
'''Forward process'''
if hasattr(self, 'rbr_reparam'):
return self.nonlinearity(self.se(self.rbr_reparam(inputs)))
if self.rbr_identity is None:
id_out = 0
else:
id_out = self.rbr_identity(inputs)
return self.nonlinearity(self.se(self.rbr_dense(inputs) + self.rbr_1x1(inputs) + id_out))
def get_equivalent_kernel_bias(self):
kernel3x3, bias3x3 = self._fuse_bn_tensor(self.rbr_dense)
kernel1x1, bias1x1 = self._fuse_bn_tensor(self.rbr_1x1)
kernelid, biasid = self._fuse_bn_tensor(self.rbr_identity)
return kernel3x3 + self._pad_1x1_to_3x3_tensor(kernel1x1) + kernelid, bias3x3 + bias1x1 + biasid
def _pad_1x1_to_3x3_tensor(self, kernel1x1):
if kernel1x1 is None:
return 0
else:
return torch.nn.functional.pad(kernel1x1, [1, 1, 1, 1])
def _fuse_bn_tensor(self, branch):
if branch is None:
return 0, 0
if isinstance(branch, nn.Sequential):
kernel = branch.conv.weight
running_mean = branch.bn.running_mean
running_var = branch.bn.running_var
gamma = branch.bn.weight
beta = branch.bn.bias
eps = branch.bn.eps
else:
assert isinstance(branch, nn.BatchNorm2d)
if not hasattr(self, 'id_tensor'):
input_dim = self.in_channels // self.groups
kernel_value = np.zeros((self.in_channels, input_dim, 3, 3), dtype=np.float32)
for i in range(self.in_channels):
kernel_value[i, i % input_dim, 1, 1] = 1
self.id_tensor = torch.from_numpy(kernel_value).to(branch.weight.device)
kernel = self.id_tensor
running_mean = branch.running_mean
running_var = branch.running_var
gamma = branch.weight
beta = branch.bias
eps = branch.eps
std = (running_var + eps).sqrt()
t = (gamma / std).reshape(-1, 1, 1, 1)
return kernel * t, beta - running_mean * gamma / std
def switch_to_deploy(self):
if hasattr(self, 'rbr_reparam'):
return
kernel, bias = self.get_equivalent_kernel_bias()
self.rbr_reparam = nn.Conv2d(in_channels=self.rbr_dense.conv.in_channels, out_channels=self.rbr_dense.conv.out_channels,
kernel_size=self.rbr_dense.conv.kernel_size, stride=self.rbr_dense.conv.stride,
padding=self.rbr_dense.conv.padding, dilation=self.rbr_dense.conv.dilation, groups=self.rbr_dense.conv.groups, bias=True)
self.rbr_reparam.weight.data = kernel
self.rbr_reparam.bias.data = bias
for para in self.parameters():
para.detach_()
self.__delattr__('rbr_dense')
self.__delattr__('rbr_1x1')
if hasattr(self, 'rbr_identity'):
self.__delattr__('rbr_identity')
if hasattr(self, 'id_tensor'):
self.__delattr__('id_tensor')
self.deploy = True
class RepBlock(nn.Module):
'''
RepBlock is a stage block with rep-style basic block
'''
def __init__(self, in_channels, out_channels, n=1):
super().__init__()
self.conv1 = RepVGGBlock(in_channels, out_channels)
# 和yolov6官方的区别是这里没有用一个RepVGGBlock
self.block = nn.Sequential(*(RepVGGBlock(out_channels, out_channels) for _ in range(n - 1))) if n > 1 else None
# self.block = nn.Sequential(*[RepVGGBlock(out_channels, out_channels) for _ in range(n)])
def forward(self, x):
x = self.conv1(x)
if self.block is not None:
x = self.block(x)
return xRepVGG 的主要流程可以分为训练阶段和推理阶段两个部分。这两个阶段使用不同的网络结构,具体如下:
-
训练阶段
在训练阶段,RepVGG 采用多分支的复杂网络结构,目的是增强模型的表示能力和学习能力。其主要流程如下:
输入图像:输入一个图像到网络中进行处理。
卷积层:
3x3 卷积:每个卷积层的核心操作,用于提取图像的局部特征。
1x1 卷积:用于增加特征的非线性组合和特征混合。
Identity Mapping:保留原始特征,帮助网络学习更深层次的特征。
激活函数:在每个卷积层后应用非线性激活函数(如ReLU),增加网络的非线性表达能力。
池化层:在某些位置插入池化层(如最大池化层),降低特征图的分辨率,减少计算量并增加感受野。
全连接层:将卷积层输出的特征图展平,传递到全连接层,进行最终的分类或回归任务。
损失函数和反向传播:计算损失函数(如交叉熵损失),并通过反向传播算法调整网络的权重,使其逐渐优化。
-
推理阶段
在推理阶段,RepVGG 会将训练阶段的多分支结构重新参数化为单一分支的简单结构,以提高计算效率。其主要流程如下:
重新参数化:
将训练阶段的 3x3 卷积、1x1 卷积 和 Identity Mapping 合并为一个等效的 3x3 卷积。
这种合并可以通过数学推导和权重转换实现,确保推理阶段的网络结构更加简洁和高效。
简化网络结构:推理阶段的 RepVGG 只包含简单的卷积层和激活函数,没有额外的分支和复杂的运算。
输入图像:输入图像到简化后的网络结构中。
卷积层和激活函数:使用简化后的卷积层和激活函数进行特征提取和处理。
池化层:如训练阶段一样,插入必要的池化层,降低特征图的分辨率。
全连接层:将卷积层输出的特征图展平,传递到全连接层,进行最终的分类或回归任务。
输出结果:最终得到分类结果或其他推理任务的输出。
2.2 新增yaml文件
关键步骤二:在下/projects/yolov5-6.1/models下新建文件 yolov5_repvgg.yaml并将下面代码复制进去
# YOLOv5 🚀 by Ultralytics, GPL-3.0 license

# Parameters
nc: 80  # number of classes
depth_multiple: 1.0  # model depth multiple
width_multiple: 1.0  # layer channel multiple
anchors:
  - [10,13, 16,30, 33,23]  # P3/8
  - [30,61, 62,45, 59,119]  # P4/16
  - [116,90, 156,198, 373,326]  # P5/32

# YOLOv5 v6.0 backbone
backbone:
  # [from, number, module, args]
  [[-1, 1, Conv, [64, 6, 2, 2]],  # 0-P1/2
   [-1, 1, RepVGGBlock, [128, 3, 2]],  # 1-P2/4
   [-1, 3, C3, [128]],
   [-1, 1, Conv, [256, 3, 2]],  # 3-P3/8
   [-1, 6, C3, [256]],
   [-1, 1, Conv, [512, 3, 2]],  # 5-P4/16
   [-1, 9, C3, [512]],
   [-1, 1, Conv, [1024, 3, 2]],  # 7-P5/32
   [-1, 3, C3, [1024]],
   [-1, 1, SPPF, [1024, 5]],  # 9
  ]

# YOLOv5 v6.0 head
head:
  [[-1, 1, Conv, [512, 1, 1]],
   [-1, 1, nn.Upsample, [None, 2, 'nearest']],
   [[-1, 6], 1, Concat, [1]],  # cat backbone P4
   [-1, 3, C3, [512, False]],  # 13

   [-1, 1, Conv, [256, 1, 1]],
   [-1, 1, nn.Upsample, [None, 2, 'nearest']],
   [[-1, 4], 1, Concat, [1]],  # cat backbone P3
   [-1, 3, C3, [256, False]],  # 17 (P3/8-small)

   [-1, 1, Conv, [256, 3, 2]],
   [[-1, 14], 1, Concat, [1]],  # cat head P4
   [-1, 3, C3, [512, False]],  # 20 (P4/16-medium)

   [-1, 1, Conv, [512, 3, 2]],
   [[-1, 10], 1, Concat, [1]],  # cat head P5
   [-1, 3, C3, [1024, False]],  # 23 (P5/32-large)

   [[17, 20, 23], 1, Detect, [nc, anchors]],  # Detect(P3, P4, P5)
]温馨提示:本文只是对yolov5l基础上添加swin模块,如果要对yolov8n/l/m/x进行添加则只需要指定对应的depth_multiple 和 width_multiple。
# YOLOv5n
depth_multiple: 0.33  # model depth multiple
width_multiple: 0.25  # layer channel multiple

# YOLOv5s
depth_multiple: 0.33  # model depth multiple
width_multiple: 0.50  # layer channel multiple

# YOLOv5l
depth_multiple: 1.0  # model depth multiple
width_multiple: 1.0  # layer channel multiple

# YOLOv5m
depth_multiple: 0.67  # model depth multiple
width_multiple: 0.75  # layer channel multiple

# YOLOv5x
depth_multiple: 1.33  # model depth multiple
width_multiple: 1.25  # layer channel multiple
2.3 注册模块
关键步骤:在yolo.py中注册, 大概在260行左右添加 ‘RepVGGBlock’

2.4 执行程序
在train.py中,将cfg的参数路径设置为yolov5_repvgg.yaml的路径
建议大家写绝对路径,确保一定能找到

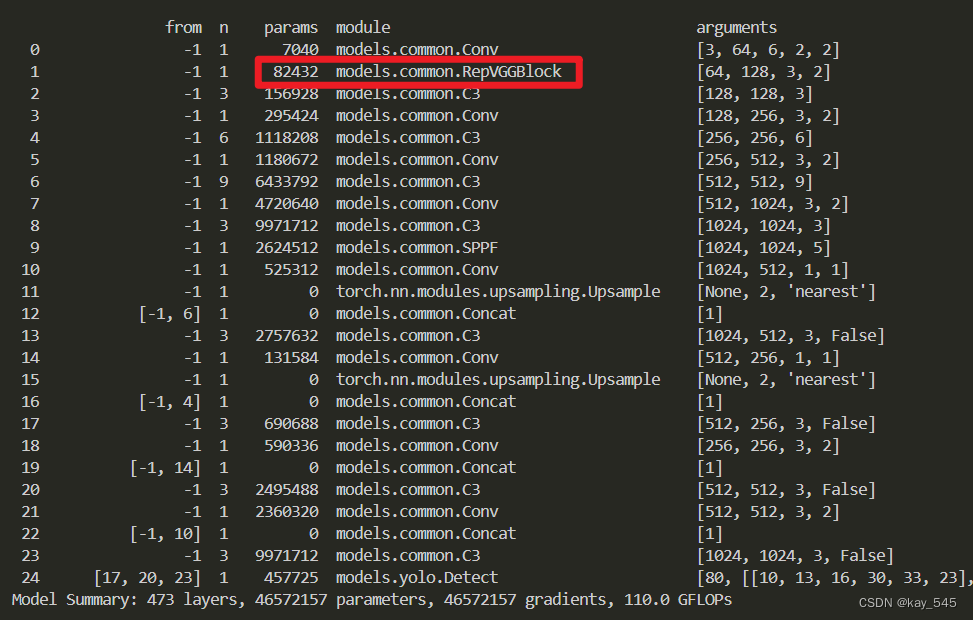
🚀运行程序,如果出现下面的内容则说明添加成功🚀
3. 完整代码分享
https://pan.baidu.com/s/1TAOAYPwSfssTbQw2iJ1pHw?pwd=yppx提取码: yppx
4. 进阶
你能将整个backbone部分换成RepVGG吗?这样会大幅度降低整个网络的GFLOPs[大约能降低一半]
5. 总结
RepVGG 是一种新的卷积神经网络(CNN)架构,旨在结合 VGG 模型的简单性与复杂网络的性能优势。其关键创新在于训练和推理架构的分离,通过一种称为结构重参数化(structural re-parameterization)的技术实现。在训练阶段,RepVGG 使用包含身份映射和 1×1 卷积的多分支架构,以增强模型的表示能力;在推理阶段,这些分支被合并为单一的 3×3 卷积层,从而简化网络结构并提高计算效率。RepVGG 在 ImageNet 数据集上取得了超过 80% 的 top-1 准确率,且相比 ResNet-50 和 ResNet-101 等模型,具有更快的推理速度和更高的准确性。其简单的架构不仅提高了内存利用率,还易于实施诸如通道剪枝等技术,表现出极高的灵活性和内存效率。RepVGG 在图像分类和语义分割任务中均表现出色,展示了其在各类应用中的广泛适用性和高效性能。这使得 RepVGG 成为学术界和工业界中非常实际且强大的选择。




![【Linux】-Spark分布式内存计算集群部署[20]](https://img-blog.csdnimg.cn/direct/3a5740f066064622b922b13773fb10a9.png)

