文章目录
- 一、YOLO 系列算法的简单回顾
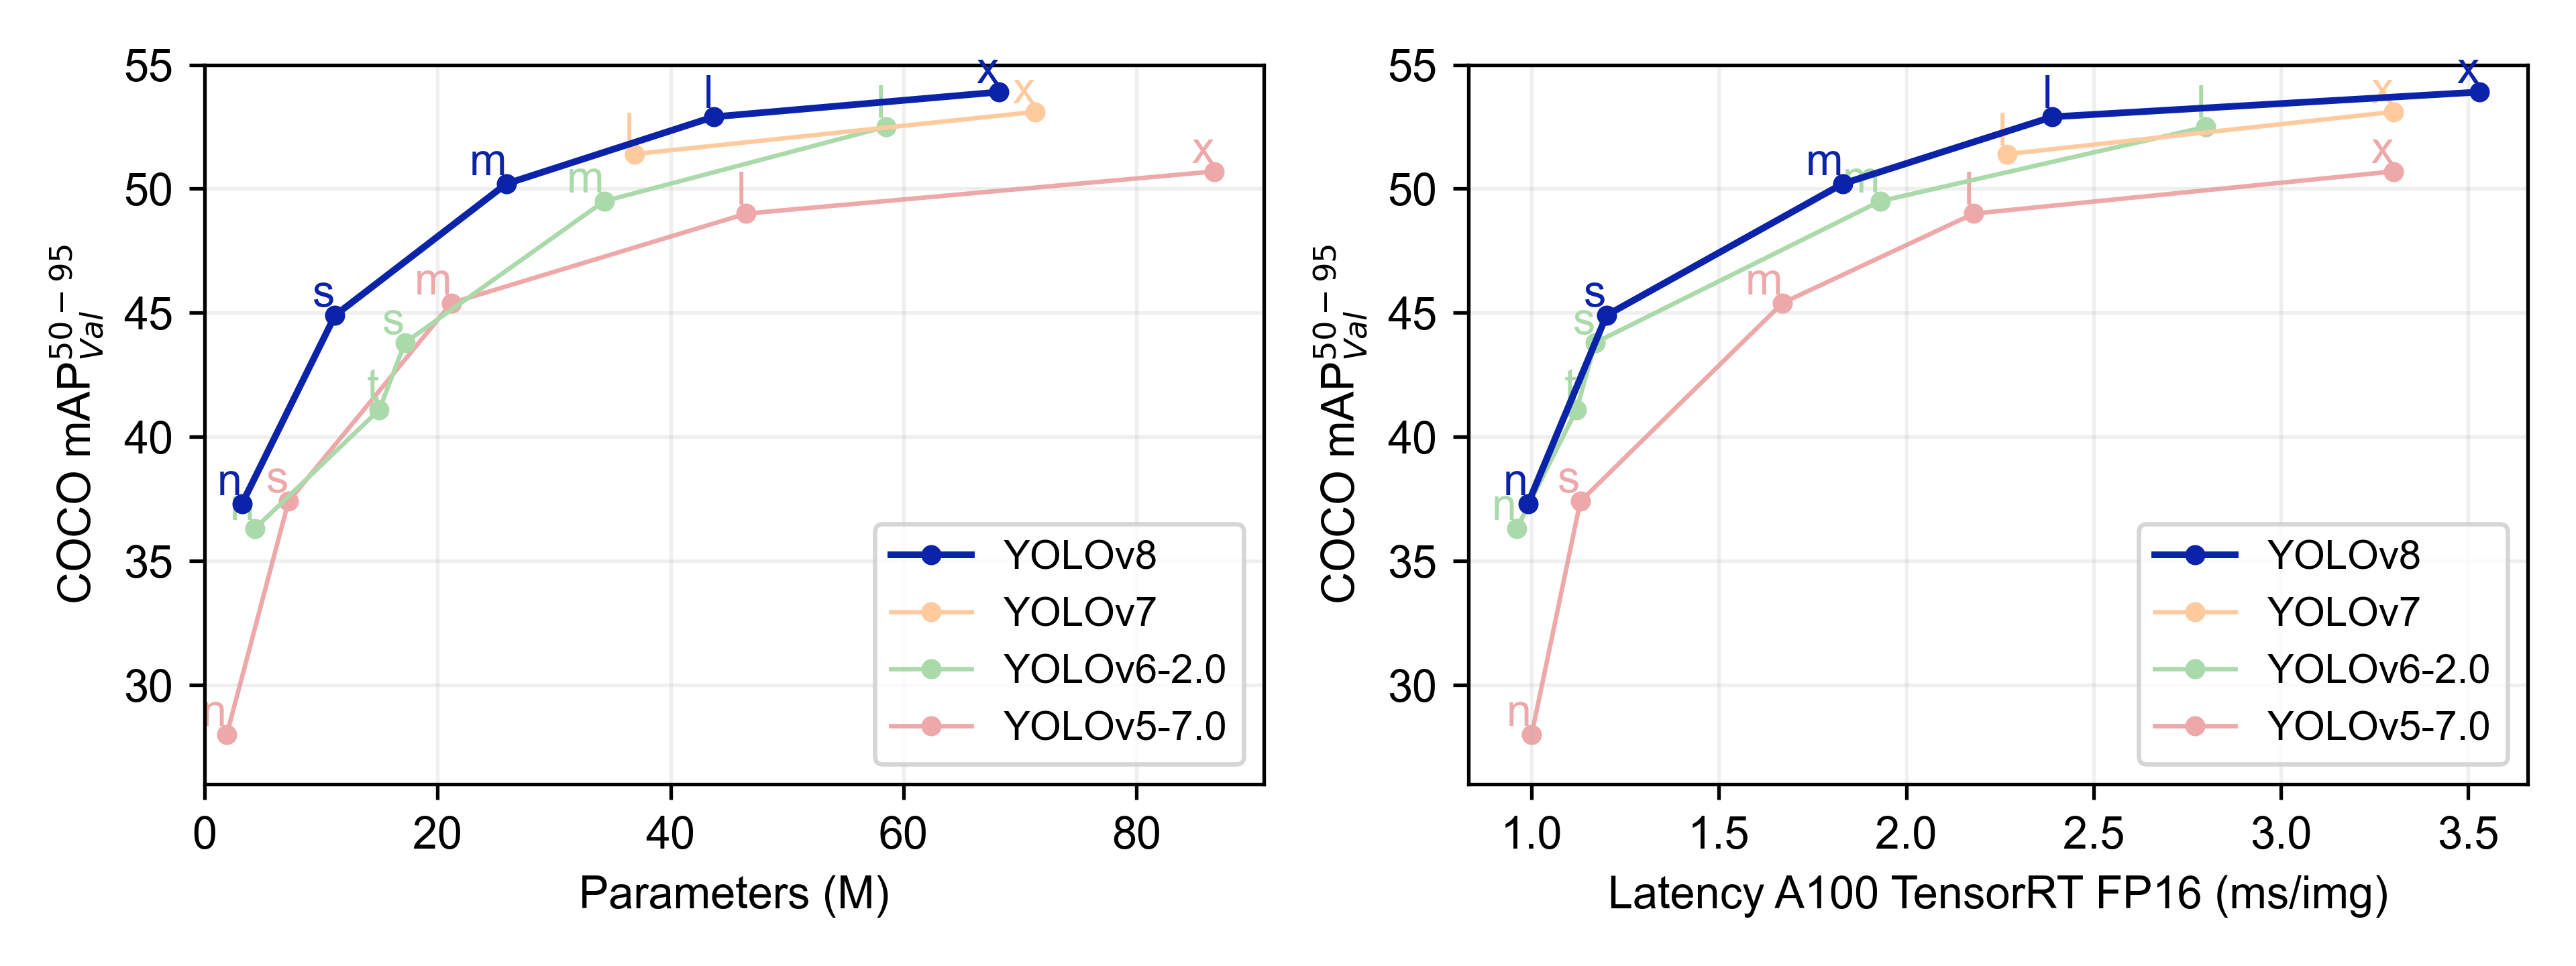
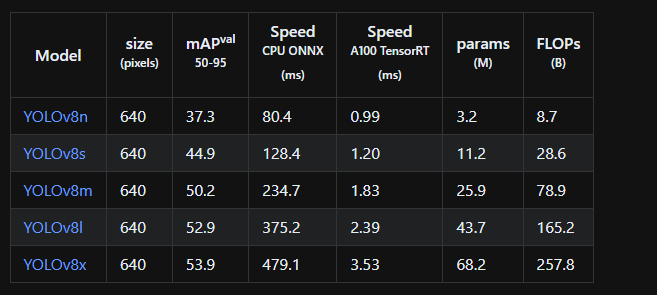
- 二、YOLOv8 简介
- 2.1 安装和简单使用
- 2.2 Ultralytics HUB
- 2.2.1 Upload Dataset
- 2.3 YOLOv8 主要改动
- 三、YOLOv8 细节详述
论文:暂无
官方文档:https://docs.ultralytics.com/
代码:https://github.com/ultralytics/ultralytics
出处:2023.01 | Ultralytics (同 YOLOv5)
一、YOLO 系列算法的简单回顾
YOLO (You Only Look Once) 是目前非常流行的一种目标检测和图像分割的框架:
- YOLOv1:2015 年被提出,其 anchor-free 的新模式和高效的框架结构赢得了很多研究者的关注
- YOLOv2:2016 年被提出,在 v1 的基础上添加了 BN、anchor box、dimension cluster 等
- YOLOv3:2018 年被提出,使用了更高效的 backbone、特征金字塔、focal loss
- YOLOv4:2020 年被提出,引入了很多 BoF 和 BoS 方法,如 Mosic 数据增强、anchor-free detection head、CSP、PAN 等
- YOLOv5:2021 年被提出,注重提升模型的性能,添加了很多新的特征用于支持全景分割和目标跟踪
- YOLOv6:2020 年被提出,注重将 YOLO 用于工业领域,引入了 RepVGG、CSP、self-distillation、TAL 等多种模块,并选择了最优的结构作为 YOLOv6
- YOLOv7:2022 年被提出,也是专门为实时目标检测而设计,引入了很多可训练的 BoF 模块,在不带来额外推理消耗的情况下,提升检测效果
二、YOLOv8 简介
YOLOv8 是由 Ultralytics 提出的,YOLOv8 的一个最大的特点是可扩展性,不仅仅支持一种算法,而是和前面的所有 YOLO 算法框架兼容的,可以通过修改配置参数来轻松的修改训练使用的 YOLO 算法。
YOLOv8 支持以下 3 个任务:
- 目标检测
- 实例分割
- 图像分类
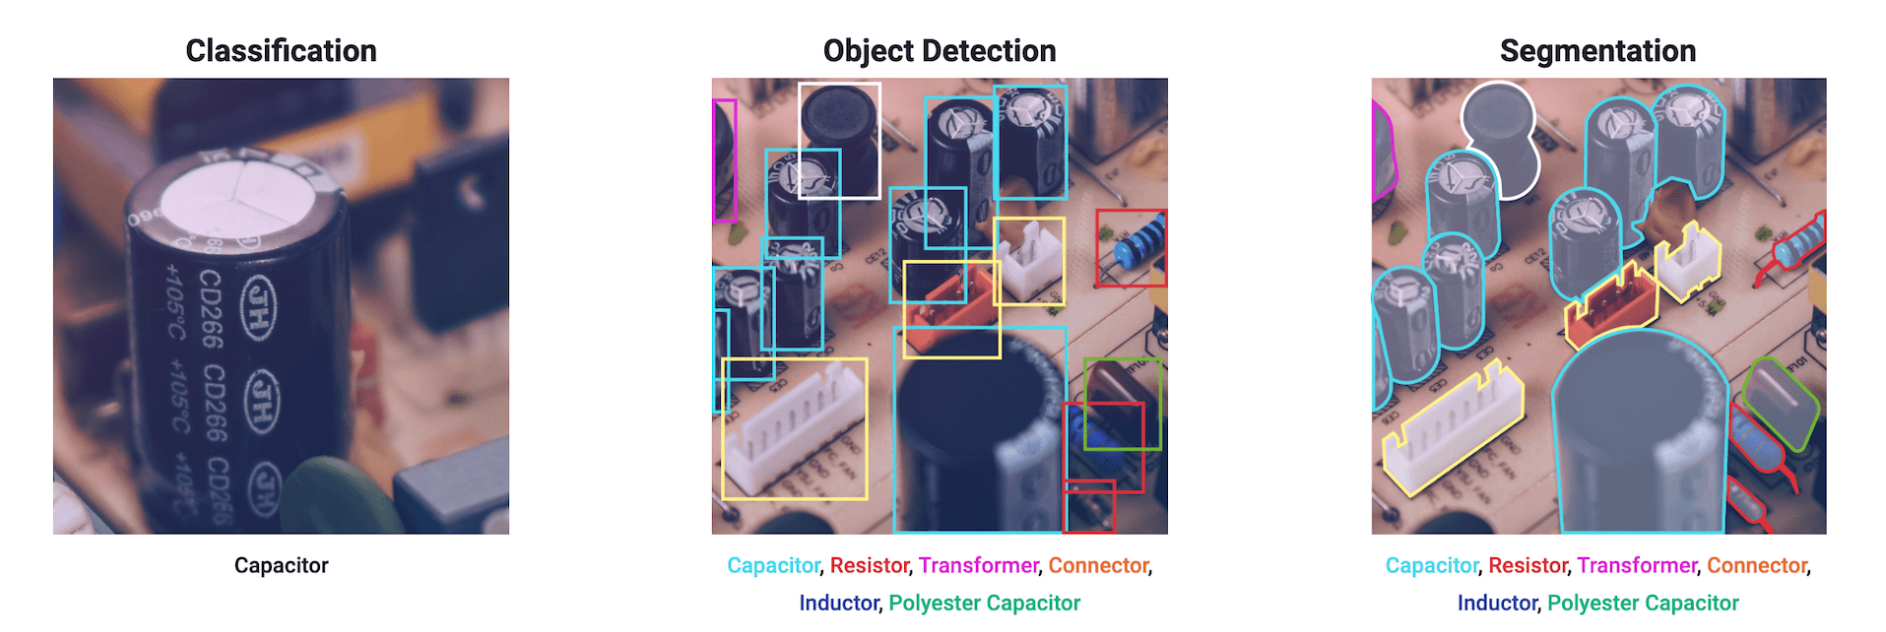
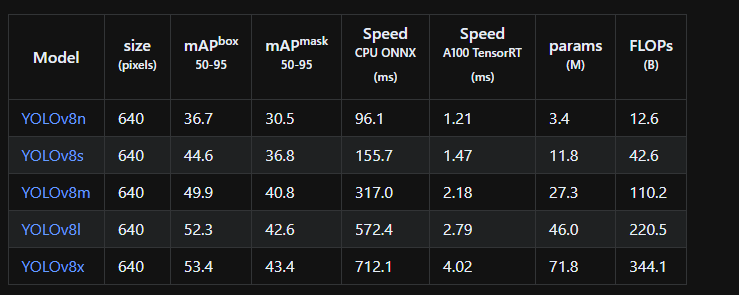
目标检测上的效果:
实例分割上的效果:
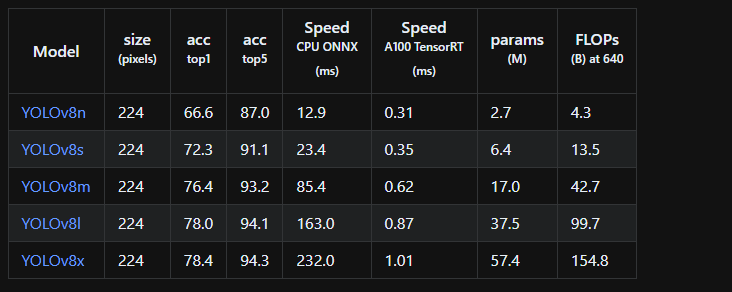
图像分类上的效果:
2.1 安装和简单使用
# 方法 1:直接安装
pip install ultralytics

# 方法 2:通过 clone 的方法安装
git clone https://github.com/ultralytics/ultralytics
cd ultralytics
pip install -e '.[dev]'
下面以目标检测任务来展示一下相关命令的简单使用,实例分割和图像分类只需要修改 task 和对应的 model 即可!
1、简单使用:
#  python
from ultralytics import YOLO

# Load a model
model = YOLO("yolov8n.yaml")  # build a new model from scratch
model = YOLO("yolov8n.pt")  # load a pretrained model (recommended for training)

# Use the model
results = model.train(data="coco128.yaml", epochs=3)  # train the model
results = model.val()  # evaluate model performance on the validation set
results = model("https://ultralytics.com/images/bus.jpg")  # predict on an image
success = model.export(format="onnx")  # export the model to ONNX format
# CLI(command line interface, 命令行)
yolo task=detect    mode=train    model=yolov8n.yaml      args...
          classify       predict        yolov8n-cls.yaml  args...
          segment        val            yolov8n-seg.yaml  args...
                         export         yolov8n.pt        format=onnx  args...
# train
yolo task=detect mode=train model=yolov8n.pt data=coco128.yaml device=0
yolo task=detect mode=train model=yolov8n.pt data=coco128.yaml device=\'0,1,2,3\'
2、训练:
# python
from ultralytics import YOLO

# Load a model
model = YOLO("yolov8n.yaml")  # build a new model from scratch
model = YOLO("yolov8n.pt")  # load a pretrained model (recommended for training)

# Train the model
results = model.train(data="coco128.yaml", epochs=100, imgsz=640)
# CLI ()
yolo task=detect mode=train data=coco128.yaml model=yolov8n.pt epochs=100 imgsz=640
3、验证:
# python
from ultralytics import YOLO

# Load a model
model = YOLO("yolov8n.pt")  # load an official model
model = YOLO("path/to/best.pt")  # load a custom model

# Validate the model
results = model.val()  # no arguments needed, dataset and settings remembered
# CLI
yolo task=detect mode=val model=yolov8n.pt  # val official model
yolo task=detect mode=val model=path/to/best.pt  # val custom model
4、预测可视化:
# python
from ultralytics import YOLO

# Load a model
model = YOLO("yolov8n.pt")  # load an official model
model = YOLO("path/to/best.pt")  # load a custom model

# Predict with the model
results = model("https://ultralytics.com/images/bus.jpg")  # predict on an image
# CLI
yolo task=detect mode=predict model=yolov8n.pt source="https://ultralytics.com/images/bus.jpg"  # predict with official model
yolo task=detect mode=predict model=path/to/best.pt source="https://ultralytics.com/images/bus.jpg"  # predict with custom model
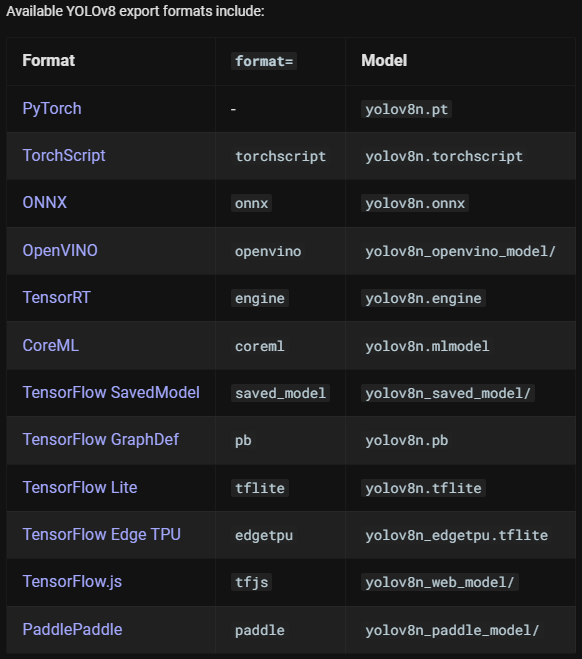
5、模型转换 Export
# python
from ultralytics import YOLO

# Load a model
model = YOLO("yolov8n.pt")  # load an official model
model = YOLO("path/to/best.pt")  # load a custom trained

# Export the model
model.export(format="onnx")
# CLI
yolo mode=export mod
el=yolov8n.pt format=onnx  # export official model
yolo mode=export model=path/to/best.pt format=onnx  # export custom trained model
2.2 Ultralytics HUB
YOLOv5 的数据格式回顾:
- images
	- train
		- img1.jpg
	- val
		- img2.jpg
- labels
	- train
		- img1.txt
	- val
		- img2.txt
其中,labels 中的 txt 内容示例如下:
类别  	 x_center       y_center         width          height

45		 0.479492 		0.688771 		0.955609 		0.5955
45		 0.736516 		0.247188 		0.498875 		0.476417
50		 0.637063 		0.732938 		0.494125 		0.510583
45		 0.339438 		0.418896 		0.678875 		0.7815
49		 0.646836 		0.132552 		0.118047 		0.0969375
49		 0.773148 		0.129802 		0.0907344 		0.0972292
49		 0.668297 		0.226906		0.131281 		0.146896
49		 0.642859 		0.0792187 		0.148063 		0.148062
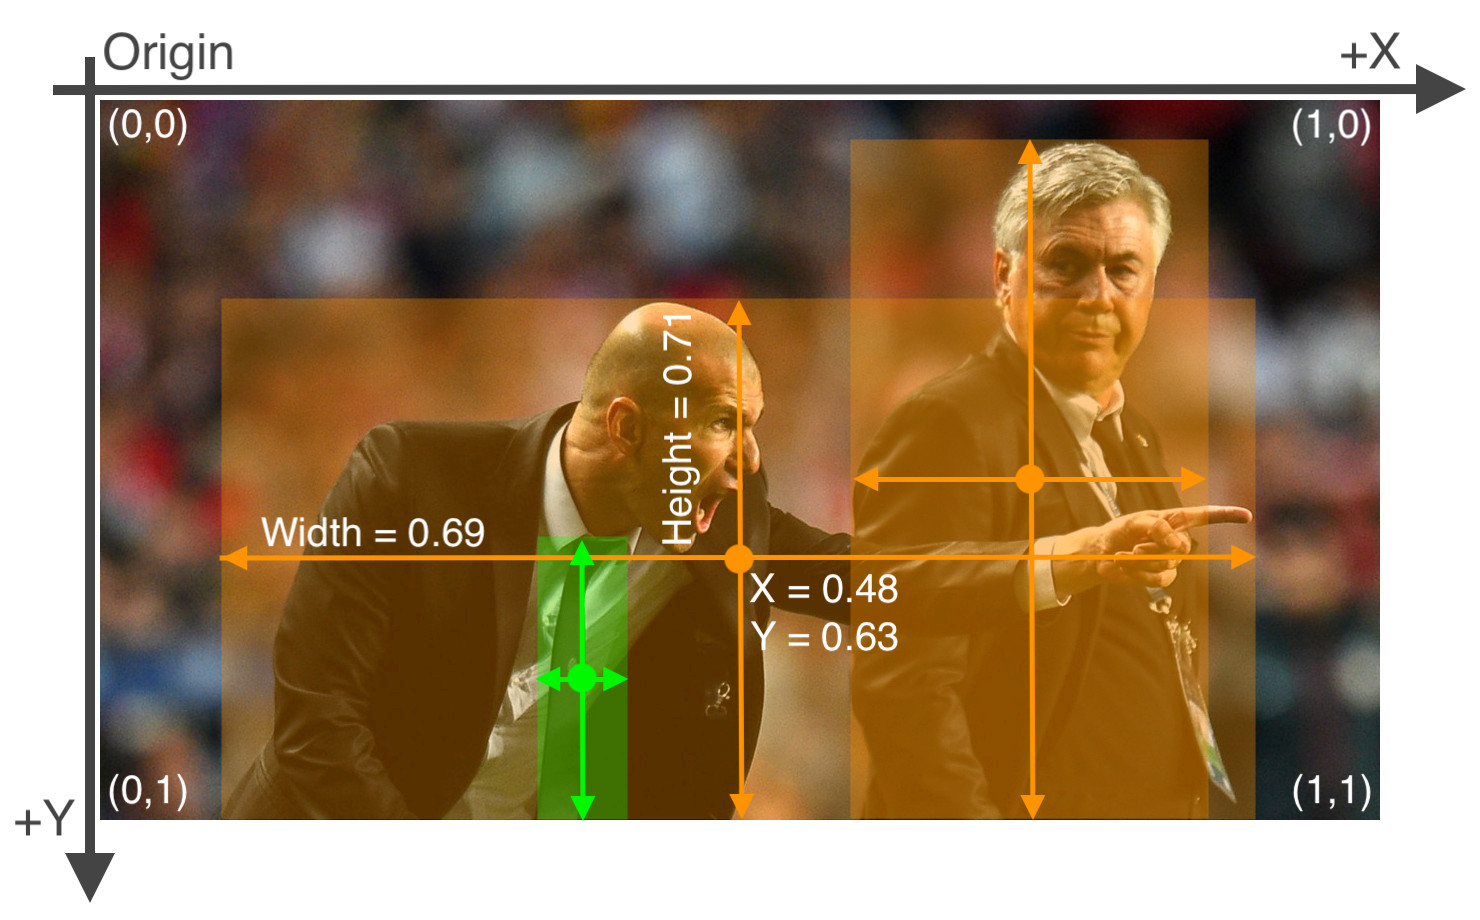
上面的 5 列数据分别表示框的类别编号(coco 中的类别编号)、框中心点 x 坐标,框中心点 y 坐标,框宽度 w,框高度 h
框的坐标参数如何从 COCO 格式 (x_min, y_min, w, h) 转换为 YOLO 可用的格式 (x_center, y_center, w, h):
- YOLO 中的所有坐标参数都要归一化到 (0, 1) 之间,如下图所示
x_center和width如何从坐标点转换为 0~1 的参数:x_center = x_coco/img_witdh,width = width_coco/img_widthy_center和height如何从坐标点转换为 0~1 的参数:y_center = y_coco/img_height,height = height_coco/img_height
2.2.1 Upload Dataset
Ultralytics HUB 使用的数据集合 YOLOv5 一样,使用相同的组织结构和标签形式
在上传自己的数据集的时候,首先要确认的是 dataset root 中存在你的 dataset YAML,然后使用 zip 命令将数据集打包,上传至 https://hub.ultralytics.com/。
以 ultralytics/hub/coco6.zip 为例,coco6.yaml 要放到 coco6 文件夹里边,并一同打包用于上传,整理的格式如下:
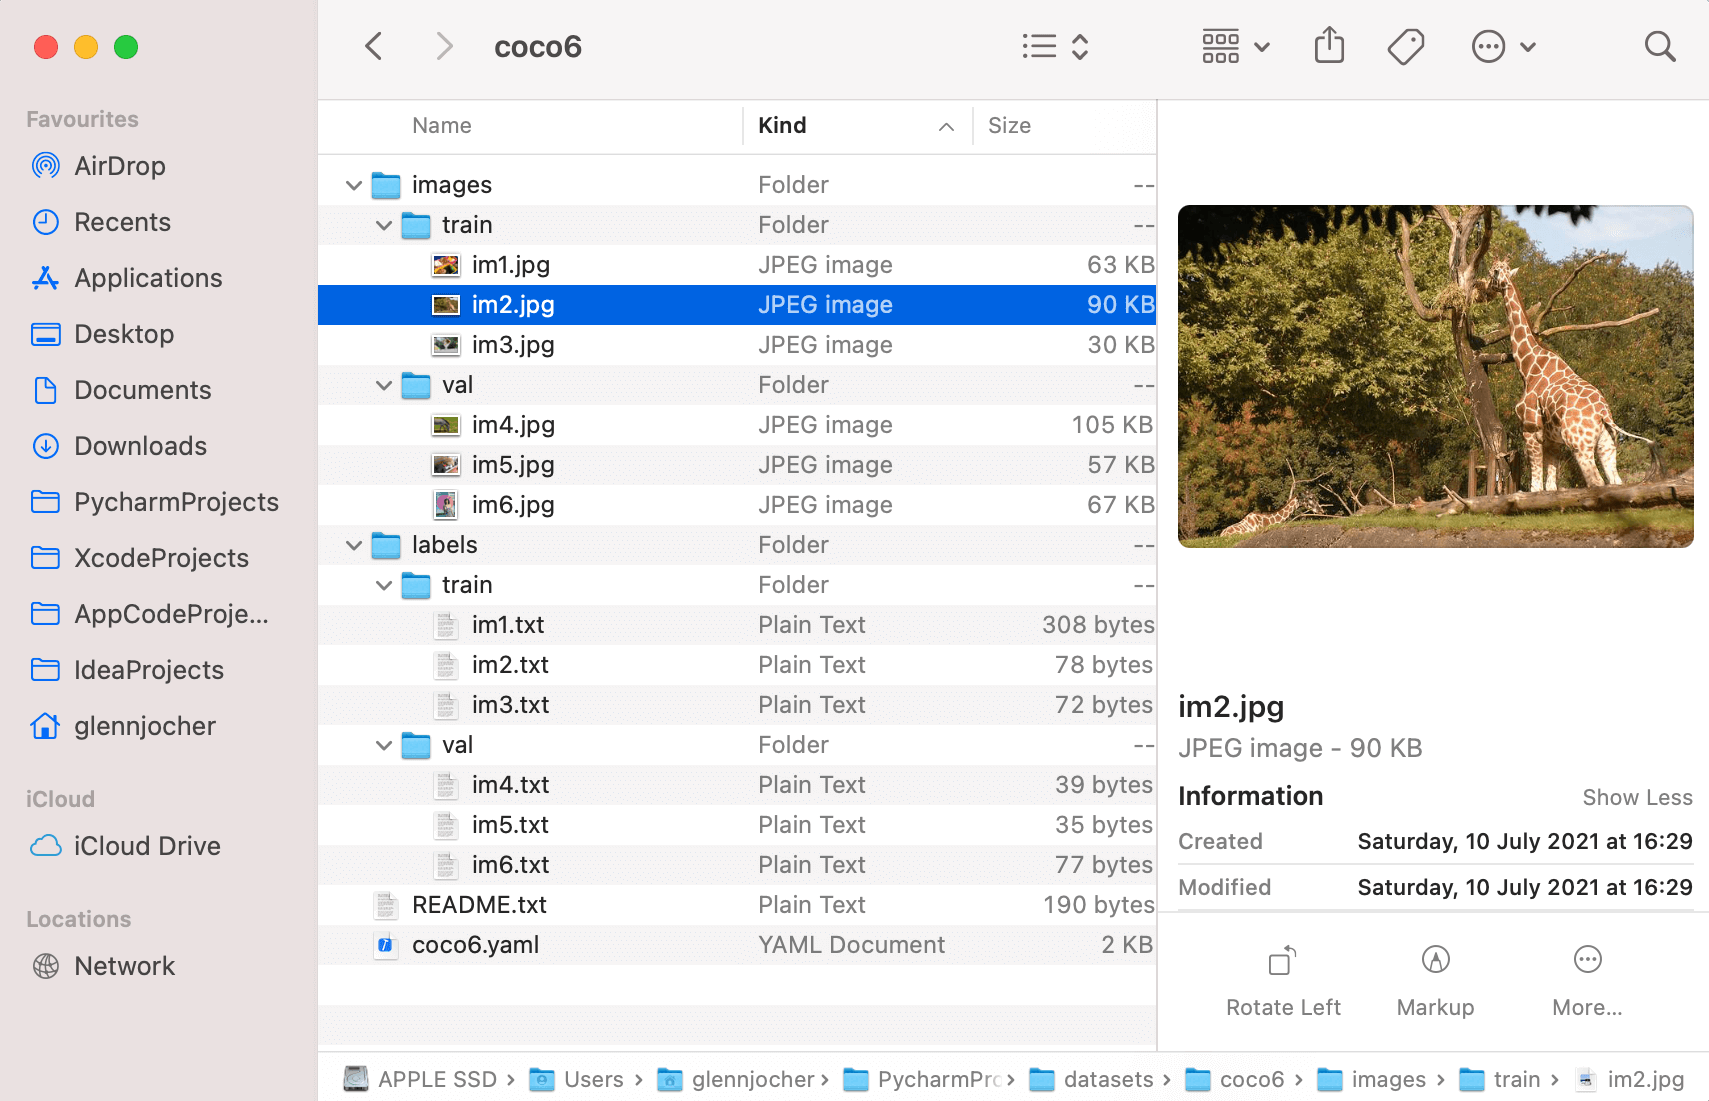
YAML 中的内容格式和 YOLOv5 的相同,格式如下:
# Train/val/test sets as 1) dir: path/to/imgs, 2) file: path/to/imgs.txt, or 3) list: [path/to/imgs1, path/to/imgs2, ..]
path:  # dataset root dir (leave empty for HUB)
train: images/train  # train images (relative to 'path') 8 images
val: images/val  # val images (relative to 'path') 8 images
test:  # test images (optional)

# Classes
names:
  0: person
  1: bicycle
  2: car
  3: motorcycle
  ...
将 COCO 格式的 json 转换成 YOLOv5 格式的 json 方式如下:
import os
import json
from pathlib import Path


def coco2yolov5(coco_json_path, yolo_txt_path):
    with open(coco_json_path, 'r') as f:
        info = json.load(f)
        coco_anno = info["annotations"]
        coco_images = info["images"]
        for img in coco_images:
            img_info = {
                "file_name": img["file_name"],
                "img_id": img["id"],
                "img_width": img["width"],
                "img_height": img["height"]
            }
            for anno in coco_anno:
                image_id = anno["image_id"]
                category_id = anno["category_id"]
                bbox = anno["bbox"]
                line = str(category_id - 1)
                if image_id == img_info["img_id"]:
                    txt_name = Path(img_info["file_name"]).name.split('.')[0]
                    yolo_txt = yolo_txt_path + '{}.txt'.format(txt_name)
                    with open(yolo_txt, 'a') as wf:
                        # coco: [x_min, y_min, w, h]
                        yolo_bbox = []
                        yolo_bbox.append(round((bbox[0] + bbox[2]) / img_info["img_width"], 6))
                        yolo_bbox.append(round((bbox[1] + bbox[3]) / img_info["img_height"], 6))
                        yolo_bbox.append(round(bbox[2] / img_info["img_width"], 6))
                        yolo_bbox.append(round(bbox[3] / img_info["img_height"], 6))
                        for bbox in yolo_bbox:
                            line += ' ' + str(bbox)
                        line += '\n'
                        wf.writelines(line)


if __name__ == "__main__":
    coco_json_path = "part1_all_coco.json"
    yolo_txt_path = "val/"
    if not os.path.exists(yolo_txt_path):
        os.makedirs(yolo_txt_path)
    coco2yolov5(coco_json_path, yolo_txt_path)
然后登陆 Ultralytics HUB 并上传 dataset:
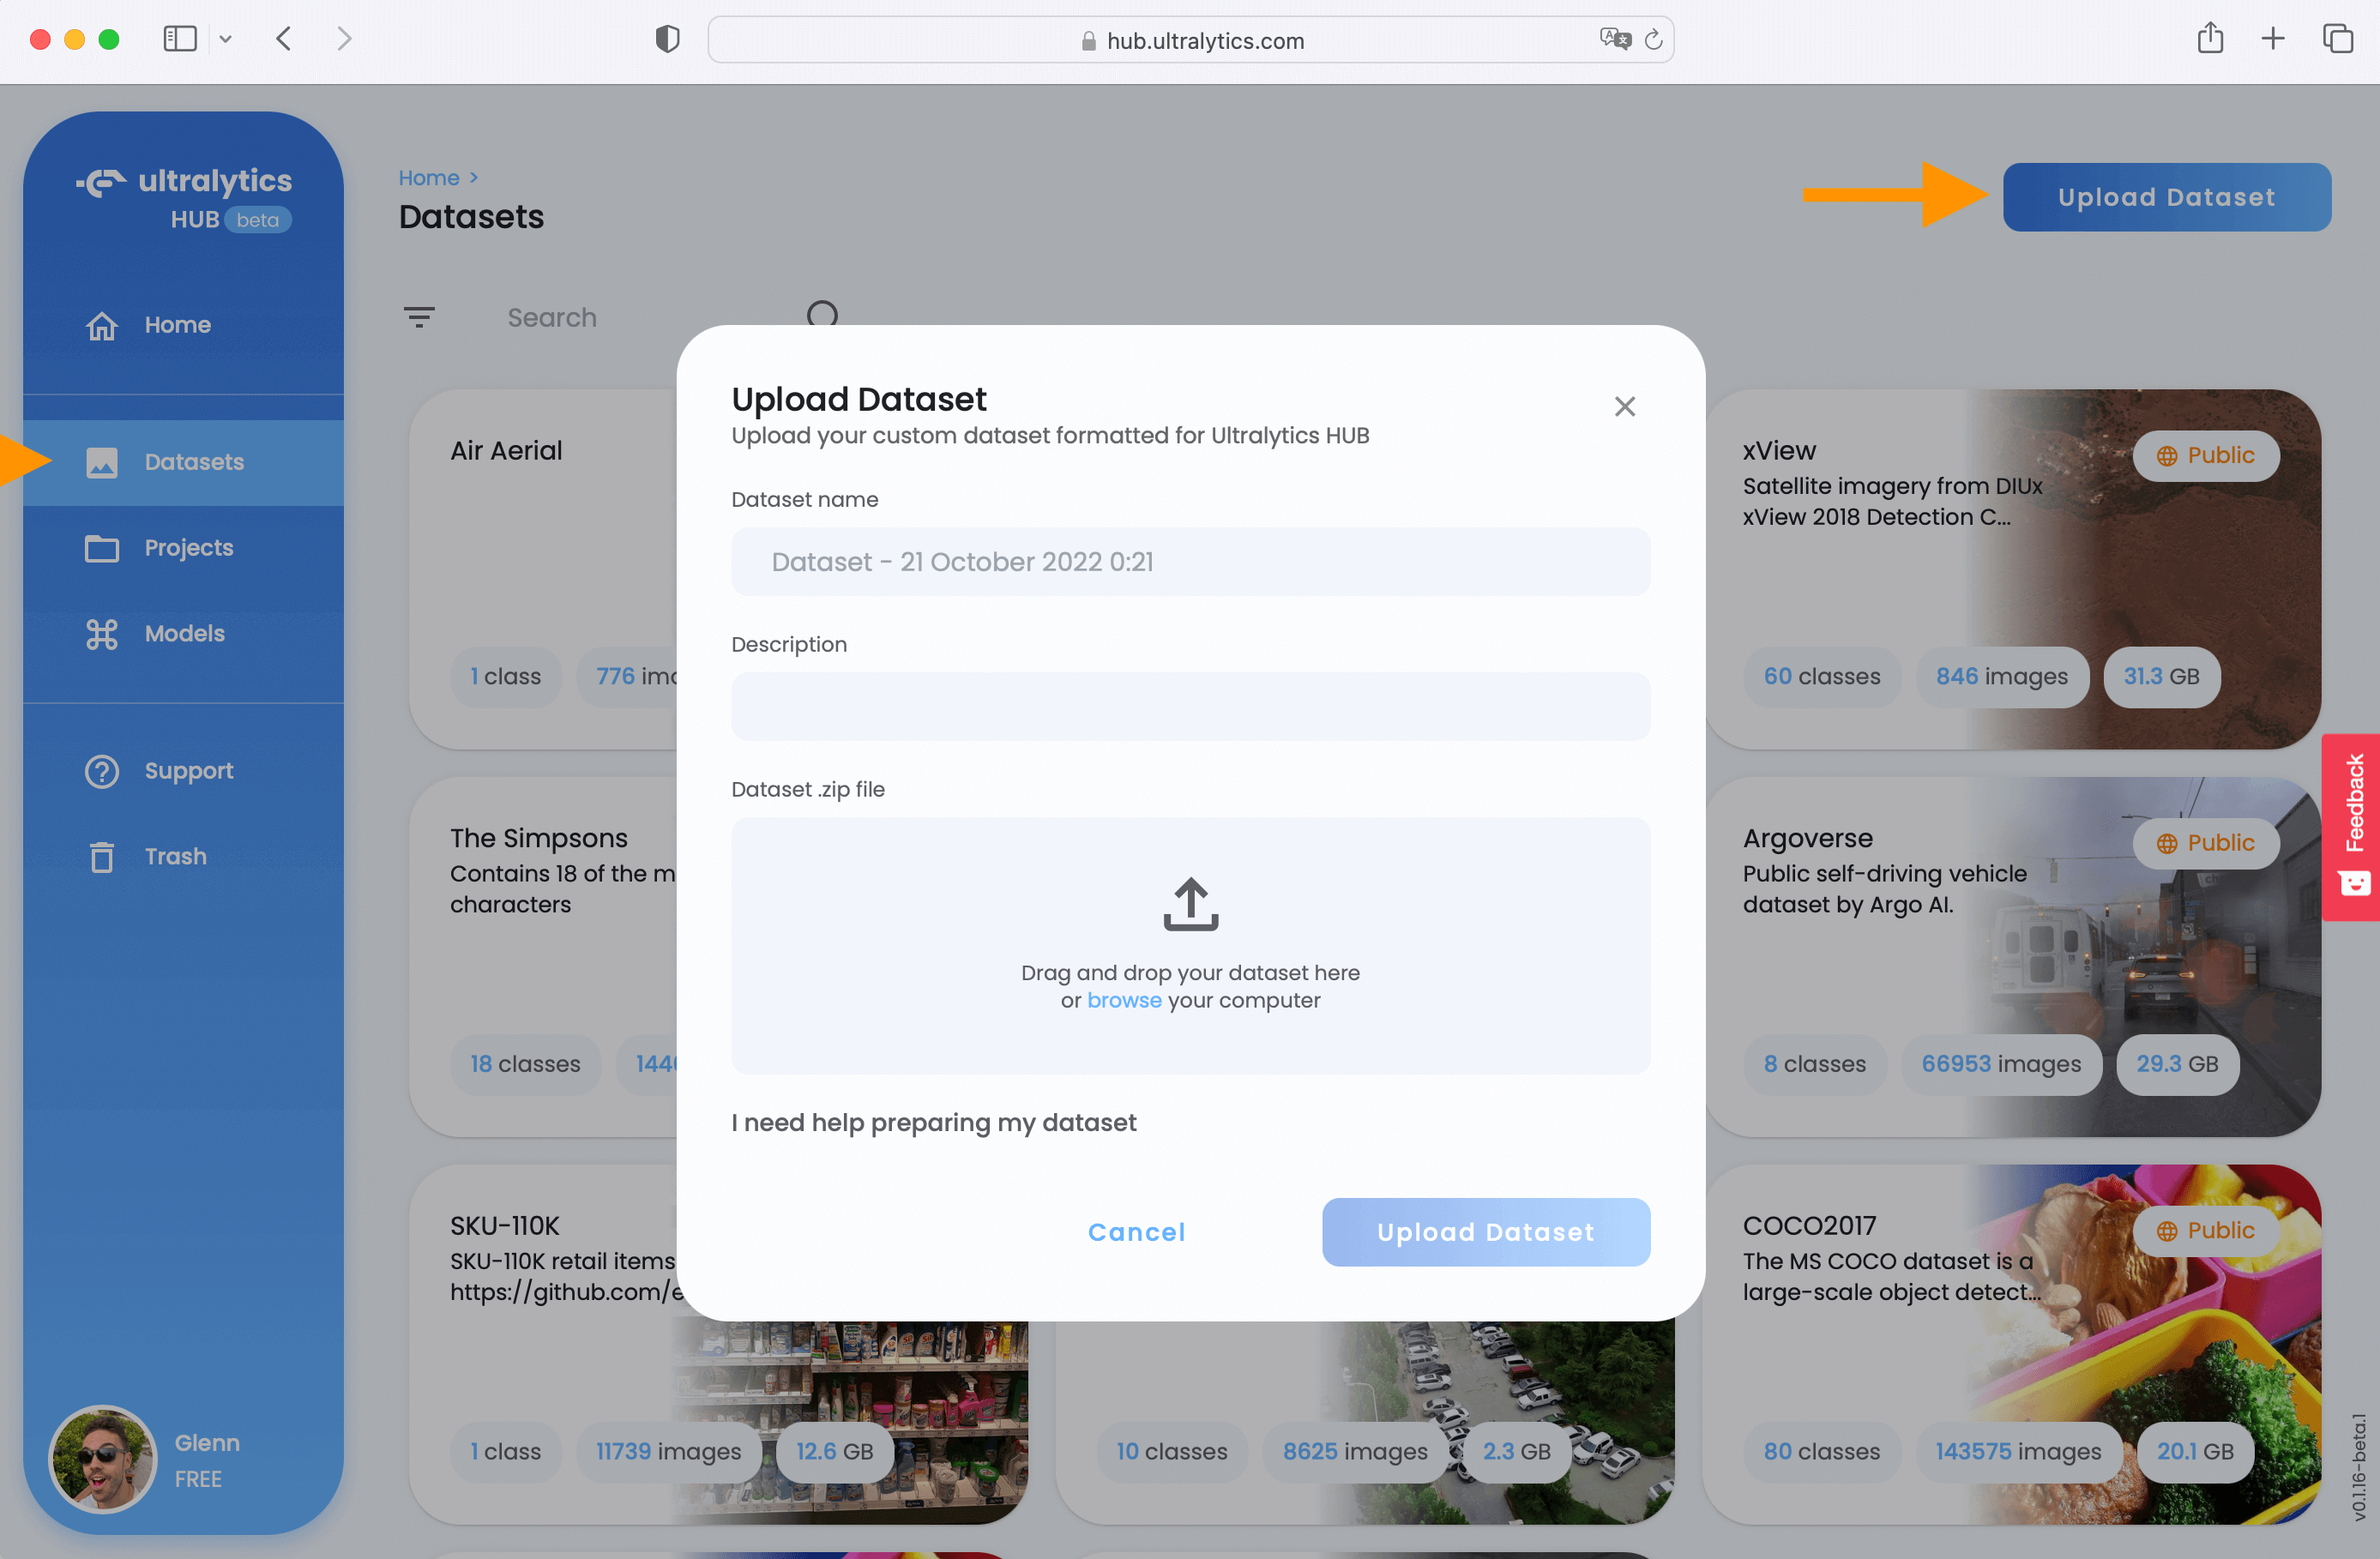
训练好后,可以下载 Ultralytics App 然后在移动端进行部署。
2.3 YOLOv8 主要改动
YOLOv8(Anchor-free)相对于 YOLOv5(Anchor-based)的改动如下:
- Backbone:v8 中仍然使用 CSP 的思想,使用了 C2f 替换了 v5 中的 C3 模块,每个 stage 的 blocks 个数从 [3, 6, 9, 3] 变成了 [3, 6, 6, 3],同时还使用了 v5 中的 SPPF 模块
- Neck:将 v5 中的 PAN-FPN 中的 top-down 上采样阶段中的卷积删除了
- Head:使用了解耦头,有三个 branch,包括 cls、reg、projection conv (DFL 使用)
- Label Assign:是 anchor-free 的形式,使用 TAL 动态匹配的方式,且未在前面训练阶段使用 ATSS,TAL 从任务对齐的角度触发,根据设计的指标动态选择高质量的 anchor 作为正样本,并且融入到了 loss 的设计中
- Loss:分类使用交叉熵损失(也添加了 varifocal loss,但注释掉了),回归使用的 DFL + CIoU loss
Label Assignment:
为了应对 NMS,anchor 分配应该满足如下两个规则:
- 分类和回归都良好的 anchor 应该能够预测搞分类分数和精确的定位
- 分类和回归效果未对齐的 anchor 应该有一个低的排序分数然后被抑制
TAL 是怎么做的:
- 引入了 anchor 的分类和回归是否对齐的衡量指标:anchor alignment metric
- 指标是怎么计算的: t = s α × u β t = s^{\alpha} \times u^{\beta} t=sα×uβ,其中 s 为分类 score,u 为 IoU 的值, α \alpha α 和 β \beta β 用于控制分类和回归这两个任务在 anchor 对齐度量中的影响,t 在这两个任务的联合优化中起着关键作用,以实现任务对齐的目标。
- 理论上的优势:让网络从联合优化的角度动态关注高质量的 anchor(即任务对齐程度更高的 anchor)
- 如何使用该指标 t 来进行正负样本的分配:对于每个 gt,选择 m 个 t 值最大的 anchor 作为正样本,其他的 anchor 作为负样本
- 如何将 t 嵌入分类损失函数实现动态分配:
- 为了增加对齐指标高的 anchor 的分类得分,且降低对齐指标低的 anchor 分类得分,在训练期间,使用归一化后的 t ^ \hat{t} t^ 来替换 anchor 原本学习的二进制标签,如何归一化呢, t ^ \hat{t} t^ 的最大值是每个 gt 对应的 anchor 的最大 IoU 值 (u)
- 分类交叉熵损失为 L c l s _ p o s = Σ i = 1 N p o s B C E ( s i , t i ^ ) L_{cls\_pos}=\Sigma_{i=1}^{N_{pos}} \ BCE(s_i, \hat{t_i}) Lcls_pos=Σi=1Npos BCE(si,ti^)
- 此外,还可以使用 Focal loss 的形式来减轻训练时的正负样本不平衡: L c l s = Σ i = 1 N p o s ∣ t i ^ − s i ∣ B C E ( s i , t i ^ ) + Σ j = 1 N n e g s j γ B C E ( s j , 0 ) L_{cls} = \Sigma_{i=1}^{N_{pos}} | \hat{t_i}-s_i|\ BCE(s_i, \hat{t_i}) +\Sigma_{j=1}^{N_{neg}}s_j^{\gamma}\ BCE(s_j, 0) Lcls=Σi=1Npos∣ti^−si∣ BCE(si,ti^)+Σj=1Nnegsjγ BCE(sj,0)
- 如何将 t 嵌入回归损失函数实现动态分配:
- 已知高质量(分类和回归都很好)的 anchor 有利于模型性能的优化,低质量的 anchor 可能会对模型训练产生负面的影响,所以更关注具有较大 t 的 anchor 来提高回归精度也很重要。这里,也会根据 t ^ \hat{t} t^ 来重新为每个 anchor 加权来计算回归损失,故 GIoU 重新定义如下:
- L r e g = Σ i = 1 N p o s t i ^ L G I o U ( b i , b i ^ ) L_{reg} = \Sigma_{i=1}^{N_{pos}}\ \hat{t_i} \ L_{GIoU}(b_i, \hat{b_i}) Lreg=Σi=1Npos ti^ LGIoU(bi,bi^)
- TAL 的总训练损失为 L c l s + L r e g L_{cls}+L_{reg} Lcls+Lreg
TOOD 为什么被 YOLOv6、PP-YOLOE、PicoDet、YOLOv8 都选择了?
- 首先,单阶段目标检测器的分类和定位不对齐的问题在前面好多方法中都有提及到,GFL 中也做了一大段的分析,在训练的时候分别训练分类和回归头,在预测的时候,使用分类得分来作为 NMS 的排序依据进行框的消除,没有将分类和定位联合起来
- FCOS 中,使用 centerness 得分和分类得分相乘来对 NMS 中的框排序,但 centerness 是基于分类特征得到的,而非定位特征来得到的,不是很好的衡量定位准确性的参数
- ATSS 中,对每个 gt,选取和 gt 的中心点距离最近的前 N 个框,计算保留下来的框和 gt 的 IoU,将 IoU>均值+方差的 anchor 分配为正样本
- OTA 中,将正负样本分配建模成了一个最优传输的问题,gt 为需求方,anchor 为提供方,以 loss 为 anchor 传递到 gt 上的传输花费,计算所有 anchor 传输给每个 gt 的传输花费, 然后使用优化方法去优化传输矩阵,根据 dynamic k 方法来选择花费最低的前 k 个 anchor 作为该 gt 的正样本
- SimOTA,将 OTA 中的优化方法去掉,直接选择每个传输花费最小的前 k 个 anchor 作为该 gt 的正样本,dynamic k(即某个 gt 需要 k 个 anchor)是根据各个 anchor 和 gt 的 IoU 来计算的,如果对于一个 gt,存在很多高质量(高 IoU)的 anchor,则多分配一些 anchor 负责该 gt,如果某个 gt 存在很少数量的优质 anchor,则少分配一些 anchor 来负责该 gt,也能避免带入一些有害的信息。
- Varifocal 中,作者对 IoU 和 Centerness 分支都做了实验,证明上面的这些基于 IoU 的方法都可以为网络带来一些提升,但是,这种独立使用 IoU 和 cls score 的方法并非最优解,因为两个不完善的预测相乘的操作可能会导致 NMS 排序的依据变差,所以 Varifocal 方法中,是直接将 IoU 合并到了分类分支中,构建了 IACS (IoU-Aware Classification Score),来作为分类分支的学习目标(故此,Varifocal 中的分类学习目标并非二值 0/1 值,而是 0~1 中的值,也就是 IACS 值),同时构建了 Varifocal Loss,对负样本进行降权重。Varifocal Loss 为
- TOOD 中,作者认为最优预测不应该是两者简单相乘后的乘积,而是应该同时拥有好的定位和分类得分,即分类头和定位头的一致性更高的 anchor 对网络更加重要,TOOD 设计了 T-Head 在 head 端进行两个任务的对齐,还设计了对一致性的衡量方法,比前述的几种方法都更加全面。
三、YOLOv8 细节详述
待论文出来后完善




![[极客大挑战 2019]Upload](https://img-blog.csdnimg.cn/4972ec012b2a43de8f2f29e4bd32a903.png)

