文章目录
- 1. 前题回顾
- 2. 主线流程源码分析
- 3. Netty底层的零拷贝
- 4. ByteBuf内存池设计
书接上文
1. 前题回顾
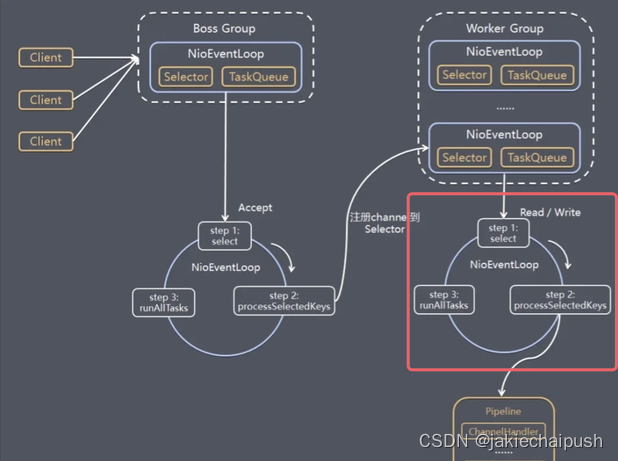
上一篇博客我们分析了Netty服务端启动的底层原理,主要就是将EventLoop里面的线程注册到了Select中,然后调用select方法监听客户端连接,我们这里从这个EventLoop里面线程的run方法开始分析。
2. 主线流程源码分析
进入EventLoop的run方法:
@Override
    protected void run() {
        for (;;) {
            try {
                try {
                    switch (selectStrategy.calculateStrategy(selectNowSupplier, hasTasks())) {
                    case SelectStrategy.CONTINUE:
                        continue;

                    case SelectStrategy.BUSY_WAIT:
                        // fall-through to SELECT since the busy-wait is not supported with NIO

                    case SelectStrategy.SELECT:
                        select(wakenUp.getAndSet(false));

                        // 'wakenUp.compareAndSet(false, true)' is always evaluated
                        // before calling 'selector.wakeup()' to reduce the wake-up
                        // overhead. (Selector.wakeup() is an expensive operation.)
                        //
                        // However, there is a race condition in this approach.
                        // The race condition is triggered when 'wakenUp' is set to
                        // true too early.
                        //
                        // 'wakenUp' is set to true too early if:
                        // 1) Selector is waken up between 'wakenUp.set(false)' and
                        //    'selector.select(...)'. (BAD)
                        // 2) Selector is waken up between 'selector.select(...)' and
                        //    'if (wakenUp.get()) { ... }'. (OK)
                        //
                        // In the first case, 'wakenUp' is set to true and the
                        // following 'selector.select(...)' will wake up immediately.
                        // Until 'wakenUp' is set to false again in the next round,
                        // 'wakenUp.compareAndSet(false, true)' will fail, and therefore
                        // any attempt to wake up the Selector will fail, too, causing
                        // the following 'selector.select(...)' call to block
                        // unnecessarily.
                        //
                        // To fix this problem, we wake up the selector again if wakenUp
                        // is true immediately after selector.select(...).
                        // It is inefficient in that it wakes up the selector for both
                        // the first case (BAD - wake-up required) and the second case
                        // (OK - no wake-up required).

                        if (wakenUp.get()) {
                            selector.wakeup();
                        }
                        // fall through
                    default:
                    }
                } catch (IOException e) {
                    // If we receive an IOException here its because the Selector is messed up. Let's rebuild
                    // the selector and retry. https://github.com/netty/netty/issues/8566
                    rebuildSelector0();
                    handleLoopException(e);
                    continue;
                }

                cancelledKeys = 0;
                needsToSelectAgain = false;
                final int ioRatio = this.ioRatio;
                if (ioRatio == 100) {
                    try {
                        processSelectedKeys();
                    } finally {
                        // Ensure we always run tasks.
                        runAllTasks();
                    }
                } else {
                    final long ioStartTime = System.nanoTime();
                    try {
                        processSelectedKeys();
                    } finally {
                        // Ensure we always run tasks.
                        final long ioTime = System.nanoTime() - ioStartTime;
                        runAllTasks(ioTime * (100 - ioRatio) / ioRatio);
                    }
                }
            } catch (Throwable t) {
                handleLoopException(t);
            }
            // Always handle shutdown even if the loop processing threw an exception.
            try {
                if (isShuttingDown()) {
                    closeAll();
                    if (confirmShutdown()) {
                        return;
                    }
                }
            } catch (Throwable t) {
                handleLoopException(t);
            }
        }
    }
而run方法这里会执行一个select(wakenUp.getAndSet(false));方法,我们进入该方法:
 private void select(boolean oldWakenUp) throws IOException {
        Selector selector = this.selector;
        try {
            int selectCnt = 0;
            long currentTimeNanos = System.nanoTime();
            long selectDeadLineNanos = currentTimeNanos + delayNanos(currentTimeNanos);

            long normalizedDeadlineNanos = selectDeadLineNanos - initialNanoTime();
            if (nextWakeupTime != normalizedDeadlineNanos) {
                nextWakeupTime = normalizedDeadlineNanos;
            }

            for (;;) {
                long timeoutMillis = (selectDeadLineNanos - currentTimeNanos + 500000L) / 1000000L;
                if (timeoutMillis <= 0) {
                    if (selectCnt == 0) {
                        selector.selectNow();
                        selectCnt = 1;
                    }
                    break;
                }

                // If a task was submitted when wakenUp value was true, the task didn't get a chance to call
                // Selector#wakeup. So we need to check task queue again before executing select operation.
                // If we don't, the task might be pended until select operation was timed out.
                // It might be pended until idle timeout if IdleStateHandler existed in pipeline.
                if (hasTasks() && wakenUp.compareAndSet(false, true)) {
                    selector.selectNow();
                    selectCnt = 1;
                    break;
                }

                int selectedKeys = selector.select(timeoutMillis);
                selectCnt ++;

                if (selectedKeys != 0 || oldWakenUp || wakenUp.get() || hasTasks() || hasScheduledTasks()) {
                    // - Selected something,
                    // - waken up by user, or
                    // - the task queue has a pending task.
                    // - a scheduled task is ready for processing
                    break;
                }
                if (Thread.interrupted()) {
                    // Thread was interrupted so reset selected keys and break so we not run into a busy loop.
                    // As this is most likely a bug in the handler of the user or it's client library we will
                    // also log it.
                    //
                    // See https://github.com/netty/netty/issues/2426
                    if (logger.isDebugEnabled()) {
                        logger.debug("Selector.select() returned prematurely because " +
                                "Thread.currentThread().interrupt() was called. Use " +
                                "NioEventLoop.shutdownGracefully() to shutdown the NioEventLoop.");
                    }
                    selectCnt = 1;
                    break;
                }

                long time = System.nanoTime();
                if (time - TimeUnit.MILLISECONDS.toNanos(timeoutMillis) >= currentTimeNanos) {
                    // timeoutMillis elapsed without anything selected.
                    selectCnt = 1;
                } else if (SELECTOR_AUTO_REBUILD_THRESHOLD > 0 &&
                        selectCnt >= SELECTOR_AUTO_REBUILD_THRESHOLD) {
                    // The code exists in an extra method to ensure the method is not too big to inline as this
                    // branch is not very likely to get hit very frequently.
                    selector = selectRebuildSelector(selectCnt);
                    selectCnt = 1;
                    break;
                }

                currentTimeNanos = time;
            }

            if (selectCnt > MIN_PREMATURE_SELECTOR_RETURNS) {
                if (logger.isDebugEnabled()) {
                    logger.debug("Selector.select() returned prematurely {} times in a row for Selector {}.",
                            selectCnt - 1, selector);
                }
            }
        } catch (CancelledKeyException e) {
            if (logger.isDebugEnabled()) {
                logger.debug(CancelledKeyException.class.getSimpleName() + " raised by a Selector {} - JDK bug?",
                        selector, e);
            }
            // Harmless exception - log anyway
        }
    }
上面代码核心的一句就是int selectedKeys = selector.select(timeoutMillis);,这里就调用了Nio中的Selector的select方法。假如现在客户端有连接事件来了,这个方法就会结束阻塞,然后回到run方法,执行下面代码:
if (ioRatio == 100) {
                    try {
                        processSelectedKeys();
                    } finally {
                        // Ensure we always run tasks.
                        runAllTasks();
                    }
                }
处理连接事件的核心函数就是processSelectedKeys();,我们进入该方法:
private void processSelectedKeys() {
        if (selectedKeys != null) {
            processSelectedKeysOptimized();
        } else {
            processSelectedKeysPlain(selector.selectedKeys());
        }
    }
如果select轮询到的事件selectedKeys不为空,就执行processSelectedKeysOptimized方法,我们进入该方法:
private void processSelectedKeysOptimized() {
		//遍历selectedKeys
        for (int i = 0; i < selectedKeys.size; ++i) {
            final SelectionKey k = selectedKeys.keys[i];
            // null out entry in the array to allow to have it GC'ed once the Channel close
            // See https://github.com/netty/netty/issues/2363
            selectedKeys.keys[i] = null;

            final Object a = k.attachment();

            if (a instanceof AbstractNioChannel) {
                processSelectedKey(k, (AbstractNioChannel) a);
            } else {
                @SuppressWarnings("unchecked")
                NioTask<SelectableChannel> task = (NioTask<SelectableChannel>) a;
                processSelectedKey(k, task);
            }

            if (needsToSelectAgain) {
                // null out entries in the array to allow to have it GC'ed once the Channel close
                // See https://github.com/netty/netty/issues/2363
                selectedKeys.reset(i + 1);

                selectAgain();
                i = -1;
            }
        }
    }
上面代码就是便利所有的selectionKey然后调用 processSelectedKey(k, (AbstractNioChannel) a);函数进行处理。我们进入该方法:
private void processSelectedKey(SelectionKey k, AbstractNioChannel ch) {
        final AbstractNioChannel.NioUnsafe unsafe = ch.unsafe();
        if (!k.isValid()) {
            final EventLoop eventLoop;
            try {
                eventLoop = ch.eventLoop();
            } catch (Throwable ignored) {
                // If the channel implementation throws an exception because there is no event loop, we ignore this
                // because we are only trying to determine if ch is registered to this event loop and thus has authority
                // to close ch.
                return;
            }
            // Only close ch if ch is still registered to this EventLoop. ch could have deregistered from the event loop
            // and thus the SelectionKey could be cancelled as part of the deregistration process, but the channel is
            // still healthy and should not be closed.
            // See https://github.com/netty/netty/issues/5125
            if (eventLoop != this || eventLoop == null) {
                return;
            }
            // close the channel if the key is not valid anymore
            unsafe.close(unsafe.voidPromise());
            return;
        }

        try {
            int readyOps = k.readyOps();
            // We first need to call finishConnect() before try to trigger a read(...) or write(...) as otherwise
            // the NIO JDK channel implementation may throw a NotYetConnectedException.
            if ((readyOps & SelectionKey.OP_CONNECT) != 0) {
                // remove OP_CONNECT as otherwise Selector.select(..) will always return without blocking
                // See https://github.com/netty/netty/issues/924
                int ops = k.interestOps();
                ops &= ~SelectionKey.OP_CONNECT;
                k.interestOps(ops);

                unsafe.finishConnect();
            }

            // Process OP_WRITE first as we may be able to write some queued buffers and so free memory.
            if ((readyOps & SelectionKey.OP_WRITE) != 0) {
                // Call forceFlush which will also take care of clear the OP_WRITE once there is nothing left to write
                ch.unsafe().forceFlush();
            }

            // Also check for readOps of 0 to workaround possible JDK bug which may otherwise lead
            // to a spin loop
            if ((readyOps & (SelectionKey.OP_READ | SelectionKey.OP_ACCEPT)) != 0 || readyOps == 0) {
                unsafe.read();
            }
        } catch (CancelledKeyException ignored) {
            unsafe.close(unsafe.voidPromise());
        }
    }
上面方法就是处理事件的核心代码(注意我们现在是分析的客户端发来连接事件的场景)。上面方法是非常重要的,我们详细分析一下:
- 首先执行
int readyOps = k.readyOps();函数这里就是拿到当前的事件类型 - 然后Netty就会判断事件的类型,判断当前的事件类型是读事件、写事件还是连接事件
if ((readyOps & SelectionKey.OP_WRITE) != 0) {
                // Call forceFlush which will also take care of clear the OP_WRITE once there is nothing left to write
                ch.unsafe().forceFlush();
            }

            // Also check for readOps of 0 to workaround possible JDK bug which may otherwise lead
            // to a spin loop
            if ((readyOps & (SelectionKey.OP_READ | SelectionKey.OP_ACCEPT)) != 0 || readyOps == 0) {
                unsafe.read();
            }
- 由于我们这里分析的是客户端连接事件,即
SelectionKey.OP_ACCEPT事件,所以这里我们会执行unsafe.read();方法我们进入该方法
//实现是NioMessageUnsafe
		 private final List<Object> readBuf = new ArrayList<Object>();
		@Override
        public void read() {
            assert eventLoop().inEventLoop();
            final ChannelConfig config = config();
            final ChannelPipeline pipeline = pipeline();
            final RecvByteBufAllocator.Handle allocHandle = unsafe().recvBufAllocHandle();
            allocHandle.reset(config);

            boolean closed = false;
            Throwable exception = null;
            try {
                try {
                    do {
                        int localRead = doReadMessages(readBuf);
                        if (localRead == 0) {
                            break;
                        }
                        if (localRead < 0) {
                            closed = true;
                            break;
                        }

                        allocHandle.incMessagesRead(localRead);
                    } while (allocHandle.continueReading());
                } catch (Throwable t) {
                    exception = t;
                }

                int size = readBuf.size();
                for (int i = 0; i < size; i ++) {
                    readPending = false;
                    pipeline.fireChannelRead(readBuf.get(i));
                }
                readBuf.clear();
                allocHandle.readComplete();
                pipeline.fireChannelReadComplete();

                if (exception != null) {
                    closed = closeOnReadError(exception);

                    pipeline.fireExceptionCaught(exception);
                }

                if (closed) {
                    inputShutdown = true;
                    if (isOpen()) {
                        close(voidPromise());
                    }
                }
            } finally {
                // Check if there is a readPending which was not processed yet.
                // This could be for two reasons:
                // * The user called Channel.read() or ChannelHandlerContext.read() in channelRead(...) method
                // * The user called Channel.read() or ChannelHandlerContext.read() in channelReadComplete(...) method
                //
                // See https://github.com/netty/netty/issues/2254
                if (!readPending && !config.isAutoRead()) {
                    removeReadOp();
                }
            }
        }
首先上面调用的第一个核心函数是doReadMessages(readBuf);,readBuf就是上面声明的一个List集合private final List<Object> readBuf = new ArrayList<Object>();按照这个方法的字面意思我们可以理解为来读客户端发过来的消息的。我们进入该方法:
//由于现在是连接事件,所以用NioServerSocektChannel这个实现类
 @Override
    protected int doReadMessages(List<Object> buf) throws Exception {
        //这里就是获取了一个Nio里面的SocketChannel(这里就是NIO的代码,accept方法返回一个SocketChannel)
        SocketChannel ch = SocketUtils.accept(javaChannel());
        try {
            if (ch != null) {
            	//下面代码首先将NIO原生的SocketChannel封装为了netty中的NioSocketChannel,然后添加到了前面的list集合中了
                buf.add(new NioSocketChannel(this, ch));
                return 1;
            }
        } catch (Throwable t) {
            logger.warn("Failed to create a new channel from an accepted socket.", t);

            try {
                ch.close();
            } catch (Throwable t2) {
                logger.warn("Failed to close a socket.", t2);
            }
        }

        return 0;
    }
上面代码的逻辑是,首先对于连接事件它这里首先获得了一个SocketChannel对象,然后将这个原生的SocketChannel对象封装成了一个NioSocketChannel对象,然后添加到了前面代码声明的List集合中了。这里我们看一下将SocketChannel对象封装为NioSocketChannel对象底层到底做了些什么事:
 public NioSocketChannel(Channel parent, SocketChannel socket) {
        super(parent, socket);
        config = new NioSocketChannelConfig(this, socket.socket());
    }
//进入super方法
 protected AbstractNioByteChannel(Channel parent, SelectableChannel ch) {
 		//parent就是当前的NIOServerSocketChannel,SelectionKey标记为读事件
        super(parent, ch, SelectionKey.OP_READ);
    }

protected AbstractNioChannel(Channel parent, SelectableChannel ch, int readInterestOp) {
        super(parent);
        //记录当前的channel
        this.ch = ch;
        //记录这个channel所感兴趣的事件
        this.readInterestOp = readInterestOp;
        try {
        //然后将channel设置为非阻塞
            ch.configureBlocking(false);
        } catch (IOException e) {
            try {
                ch.close();
            } catch (IOException e2) {
                logger.warn(
                            "Failed to close a partially initialized socket.", e2);
            }

            throw new ChannelException("Failed to enter non-blocking mode.", e);
        }
    }

//继续进入super方法
 protected AbstractChannel(Channel parent) {
 		//指定父管道
        this.parent = parent;
        id = newId();
        unsafe = newUnsafe();
        //创建一个管道
        pipeline = newChannelPipeline();
    }
上面代码的流程就是将我们创建的SocketChannel封装为NioSocketChannel的过程,在这个过程中它记录了我们创建的Channel以及记录了Channel感兴趣的事件,以及创建了channel对应的管道(一种组合设计模式),但是并没有将Channel注册到Selector中。doReadMessages在这就执行完毕了,回到read方法:
public void read() {
            assert eventLoop().inEventLoop();
            final ChannelConfig config = config();
            final ChannelPipeline pipeline = pipeline();
            final RecvByteBufAllocator.Handle allocHandle = unsafe().recvBufAllocHandle();
            allocHandle.reset(config);

            boolean closed = false;
            Throwable exception = null;
            try {
                try {
                    do {
                        int localRead = doReadMessages(readBuf);
                        if (localRead == 0) {
                            break;
                        }
                        if (localRead < 0) {
                            closed = true;
                            break;
                        }

                        allocHandle.incMessagesRead(localRead);
                    } while (allocHandle.continueReading());
                } catch (Throwable t) {
                    exception = t;
                }

                int size = readBuf.size();
                for (int i = 0; i < size; i ++) {
                    readPending = false;
                    pipeline.fireChannelRead(readBuf.get(i));
                }
                readBuf.clear();
                allocHandle.readComplete();
                pipeline.fireChannelReadComplete();

                if (exception != null) {
                    closed = closeOnReadError(exception);

                    pipeline.fireExceptionCaught(exception);
                }

                if (closed) {
                    inputShutdown = true;
                    if (isOpen()) {
                        close(voidPromise());
                    }
                }
            } finally {
                // Check if there is a readPending which was not processed yet.
                // This could be for two reasons:
                // * The user called Channel.read() or ChannelHandlerContext.read() in channelRead(...) method
                // * The user called Channel.read() or ChannelHandlerContext.read() in channelReadComplete(...) method
                //
                // See https://github.com/netty/netty/issues/2254
                if (!readPending && !config.isAutoRead()) {
                    removeReadOp();
                }
            }
        }
然后执行下面的重要代码:
int size = readBuf.size();
                for (int i = 0; i < size; i ++) {
                    readPending = false;
                    pipeline.fireChannelRead(readBuf.get(i));
                }
首先这里就是readBuf也就是前面的list的大小(前面我们知道这里面存储的实际是NioSocketChannel,这个list大小就是客户端连接的数量),然后遍历所有的NioSocketChannel,然后调用pipeline.fireChannelRead方法。首先我们看看这个pipeline是什么:
final ChannelPipeline pipeline = pipeline();
思考这个pipeline是什么?
这个pipeline其实就是NioServerSocketChannel的pipeline,所以这里调用的是ServerSocketChannel对应的fireChannelRead,也就是执行ServerSocketChannel对应的pipieline里面的Handler逻辑(调用channelread方法)。
那在这里调用做了什么是,这里需要回到上一篇博客,在服务端创建过程中,向其pipiline中加入了一个ServerBootStrapAcceptor的handler,所里这里执行的是这个handler
ch.eventLoop().execute(new Runnable() {
                    @Override
                    public void run() {
                        pipeline.addLast(new ServerBootstrapAcceptor(
                                ch, currentChildGroup, currentChildHandler, currentChildOptions, currentChildAttrs));
                    }
                });
然后调用它的channelRead方法:
        @Override
        @SuppressWarnings("unchecked")
        //msg在这里就是前面创建的NioSocketChannel
        public void channelRead(ChannelHandlerContext ctx, Object msg) {
        	//然后就获得了该ServerSocketChannel创建的子NioSocketChannel
            final Channel child = (Channel) msg;
            //然后获得子NioSocketChannel对应的pipeline(此时就是socketChannel对应的pipeline)
            //childHandler就是我们在写netty服务端程序时加入的一个通道初始化对象】
            /**
            .childHandler((ChannelInitializer)(ch)->{
			 	//对workerGroup的SocketChannel设置处理器
			 	ch.pipeline().addLast(new NettyServerHandler());
			 	});
            **/
            //这里的代码就是向socketchannel的pipeline中加入了通道初始化对象的handler
            child.pipeline().addLast(childHandler);

            setChannelOptions(child, childOptions, logger);
            setAttributes(child, childAttrs);

            try {
            //childGroup就是初始化netty服务端事创建的workEventLoopGroup
                childGroup.register(child).addListener(new ChannelFutureListener() {
                    @Override
                    public void operationComplete(ChannelFuture future) throws Exception {
                        if (!future.isSuccess()) {
                            forceClose(child, future.cause());
                        }
                    }
                });
            } catch (Throwable t) {
                forceClose(child, t);
            }
        }
childGroup.register(child)就将socketChannel注册到了WorkEventLoopGroup中,这里的逻辑和BooEventLoopGroup注册ServerSocketChannel中的逻辑是一样的(底层主要是将channel注册到selector中)。我们进入该方法:
//MultithreadEventLoopGroup的方法
  @Override
    public ChannelFuture register(Channel channel) {
        return next().register(channel);
    }
next就是获得workerEventLoopGroup的下一个EventLoopGroup,然后调用EventLoopGroup的register方法。我们进入该方法:
 @Override
    public ChannelFuture register(Channel channel) {
        return register(new DefaultChannelPromise(channel, this));
    }
然后这里的逻辑和ServerSocketChennel的注册逻辑是几乎一样的,这里我们知道在NioServerSocketChannel会被注册到对应的EventLoop的Selector上。这里同样是需要把NioSocketChannel注册到某个EventLoop的Selector上,这个逻辑就是在该方法中实现的。
到此SocketChannel的创建和注册就分析完了。现在Netty客户端就可以向服务端发送数据了,现在我们开始分析Netty服务端是如何处理这个流程的。这里我们同样需要回到上面的processSelectedKey方法。
private void processSelectedKey(SelectionKey k, AbstractNioChannel ch) {
        final AbstractNioChannel.NioUnsafe unsafe = ch.unsafe();
        if (!k.isValid()) {
            final EventLoop eventLoop;
            try {
                eventLoop = ch.eventLoop();
            } catch (Throwable ignored) {
                // If the channel implementation throws an exception because there is no event loop, we ignore this
                // because we are only trying to determine if ch is registered to this event loop and thus has authority
                // to close ch.
                return;
            }
            // Only close ch if ch is still registered to this EventLoop. ch could have deregistered from the event loop
            // and thus the SelectionKey could be cancelled as part of the deregistration process, but the channel is
            // still healthy and should not be closed.
            // See https://github.com/netty/netty/issues/5125
            if (eventLoop != this || eventLoop == null) {
                return;
            }
            // close the channel if the key is not valid anymore
            unsafe.close(unsafe.voidPromise());
            return;
        }

        try {
            int readyOps = k.readyOps();
            // We first need to call finishConnect() before try to trigger a read(...) or write(...) as otherwise
            // the NIO JDK channel implementation may throw a NotYetConnectedException.
            if ((readyOps & SelectionKey.OP_CONNECT) != 0) {
                // remove OP_CONNECT as otherwise Selector.select(..) will always return without blocking
                // See https://github.com/netty/netty/issues/924
                int ops = k.interestOps();
                ops &= ~SelectionKey.OP_CONNECT;
                k.interestOps(ops);

                unsafe.finishConnect();
            }

            // Process OP_WRITE first as we may be able to write some queued buffers and so free memory.
            if ((readyOps & SelectionKey.OP_WRITE) != 0) {
                // Call forceFlush which will also take care of clear the OP_WRITE once there is nothing left to write
                ch.unsafe().forceFlush();
            }

            // Also check for readOps of 0 to workaround possible JDK bug which may otherwise lead
            // to a spin loop
            if ((readyOps & (SelectionKey.OP_READ | SelectionKey.OP_ACCEPT)) != 0 || readyOps == 0) {
                unsafe.read();
            }
        } catch (CancelledKeyException ignored) {
            unsafe.close(unsafe.voidPromise());
        }
然后这里读事件是OP_READ事件,所以这里还是要调用unsafe.read();,继续进入read方法(实现类现在是NioByteUnsafe类):
     @Override
        public final void read() {
            final ChannelConfig config = config();
            if (shouldBreakReadReady(config)) {
                clearReadPending();
                return;
            }
            final ChannelPipeline pipeline = pipeline();
            final ByteBufAllocator allocator = config.getAllocator();
            final RecvByteBufAllocator.Handle allocHandle = recvBufAllocHandle();
            allocHandle.reset(config);

            ByteBuf byteBuf = null;
            boolean close = false;
            try {
                do {
                   //首先分配一个byteBuf
                    byteBuf = allocHandle.allocate(allocator);
                    //将收到的数据读入ByteBuf
                    allocHandle.lastBytesRead(doReadBytes(byteBuf));
                    if (allocHandle.lastBytesRead() <= 0) {
                        // nothing was read. release the buffer.
                        byteBuf.release();
                        byteBuf = null;
                        close = allocHandle.lastBytesRead() < 0;
                        if (close) {
                            // There is nothing left to read as we received an EOF.
                            readPending = false;
                        }
                        break;
                    }

                    allocHandle.incMessagesRead(1);
                    readPending = false;
                    pipeline.fireChannelRead(byteBuf);
                    byteBuf = null;
                } while (allocHandle.continueReading());

                allocHandle.readComplete();
                pipeline.fireChannelReadComplete();

                if (close) {
                    closeOnRead(pipeline);
                }
            } catch (Throwable t) {
                handleReadException(pipeline, byteBuf, t, close, allocHandle);
            } finally {
                // Check if there is a readPending which was not processed yet.
                // This could be for two reasons:
                // * The user called Channel.read() or ChannelHandlerContext.read() in channelRead(...) method
                // * The user called Channel.read() or ChannelHandlerContext.read() in channelReadComplete(...) method
                //
                // See https://github.com/netty/netty/issues/2254
                if (!readPending && !config.isAutoRead()) {
                    removeReadOp();
                }
            }
        }
    }
上面首先 byteBuf = allocHandle.allocate(allocator);这就生成了一个ByteBuf(我们知道Netty底层数据交互都是给予ByteBuf实现的,这句代码底层涉及了0拷贝,我们这里后面在分析)。 allocHandle.lastBytesRead(doReadBytes(byteBuf));这句代码就将收到的客户端数据读取到了byteBuf中,首先我们先看doReadBytes(byteBuf)函数:
  @Override
    protected int doReadBytes(ByteBuf byteBuf) throws Exception {
        final RecvByteBufAllocator.Handle allocHandle = unsafe().recvBufAllocHandle();
        allocHandle.attemptedBytesRead(byteBuf.writableBytes());
        return byteBuf.writeBytes(javaChannel(), allocHandle.attemptedBytesRead());
    }
byteBuf.writeBytes(javaChannel(), allocHandle.attemptedBytesRead());这里就是将channel中的数据,写到ByteBuf中。回到read()方法。下面就是调用pipeline.fireChannelRead(byteBuf);这里就是将ByteBuf中的数据经过pipeline中所有的Handler进行处理。到此,结合上一部分的源码分析,到此Netty所有的主线源码就分析完了。
3. Netty底层的零拷贝
了解Netty的零拷贝之前,我们需要对Netty的直接内存有所了解,直接内存并不是虚拟机运行时数据区的一部分,也不是Java虚拟机规范中定义的内存区域,某些情况下这部分内存也会被频繁的使用,而且也可能导致OOM问题,Java里面的DirectByteBuffer可以分配一块直接内存(堆外内存),元空间对应的内存也被称为直接内存,它们对应的是机器的物理内存。
ByteBuf类有两个方法,一个是allocate方法,它分配的内存就是直接在Java堆上面分配的,另一个方法是allocateDirect方法,它就是分配的直接内存。allocate我们可以想到它底层一定是new了一个数组,我们重点分析allocateDirect底层在干什么,我们进入该方法:
public static ByteBuffer allocateDirect(int capacity) {
        return new DirectByteBuffer(capacity);
    }
可以发现它底层就是创建了一个NIO的DirectByteBuffer对象。我们继续进入该对象:
DirectByteBuffer(int cap) {                   // package-private

        super(-1, 0, cap, cap);
        boolean pa = VM.isDirectMemoryPageAligned();
        int ps = Bits.pageSize();
        long size = Math.max(1L, (long)cap + (pa ? ps : 0));
        Bits.reserveMemory(size, cap);

        long base = 0;
        try {
            base = unsafe.allocateMemory(size);
        } catch (OutOfMemoryError x) {
            Bits.unreserveMemory(size, cap);
            throw x;
        }
        unsafe.setMemory(base, size, (byte) 0);
        if (pa && (base % ps != 0)) {
            // Round up to page boundary
            address = base + ps - (base & (ps - 1));
        } else {
            address = base;
        }
        cleaner = Cleaner.create(this, new Deallocator(base, size, cap));
        att = null;


    }
base = unsafe.allocateMemory(size);这里就是真正分配直接内存的逻辑,allocateMemory是一个本地方法,它底层就是用malloc分配了一块内存。又遇见创建的是堆外内存,我们创建的DirectByteBuffer是有这块堆外内存的引用的,当方法执行完毕,DirectByteBuffer会被JVM回收掉,所以对堆外内存的引用也会回收掉,而这个堆外内存也会被回收掉。
使用直接内存的优缺点如下:
- 优点:不占用堆空间,减少了发生GC的可能,java虚拟机上,本地IO会直接操作直接内存(直接内存->系统调用->硬盘/网卡),而非直接内存则需要二次拷贝(堆内存->直接内存->系统调用->硬盘/网卡)
- 缺点:初始化分配比较慢,没有JVM直接帮助管理内存,容易发生内存溢出。为例避免一致没有FULL GC,最终导致直接内存把物理内存耗完了。(我们可以通过-XX:MaxDirectMemorySize来指定直接内存的大小,当达到阈值是,会调用system.gc()来进行一次FULL GC,简介把那些没有被使用的直接内存回收掉)
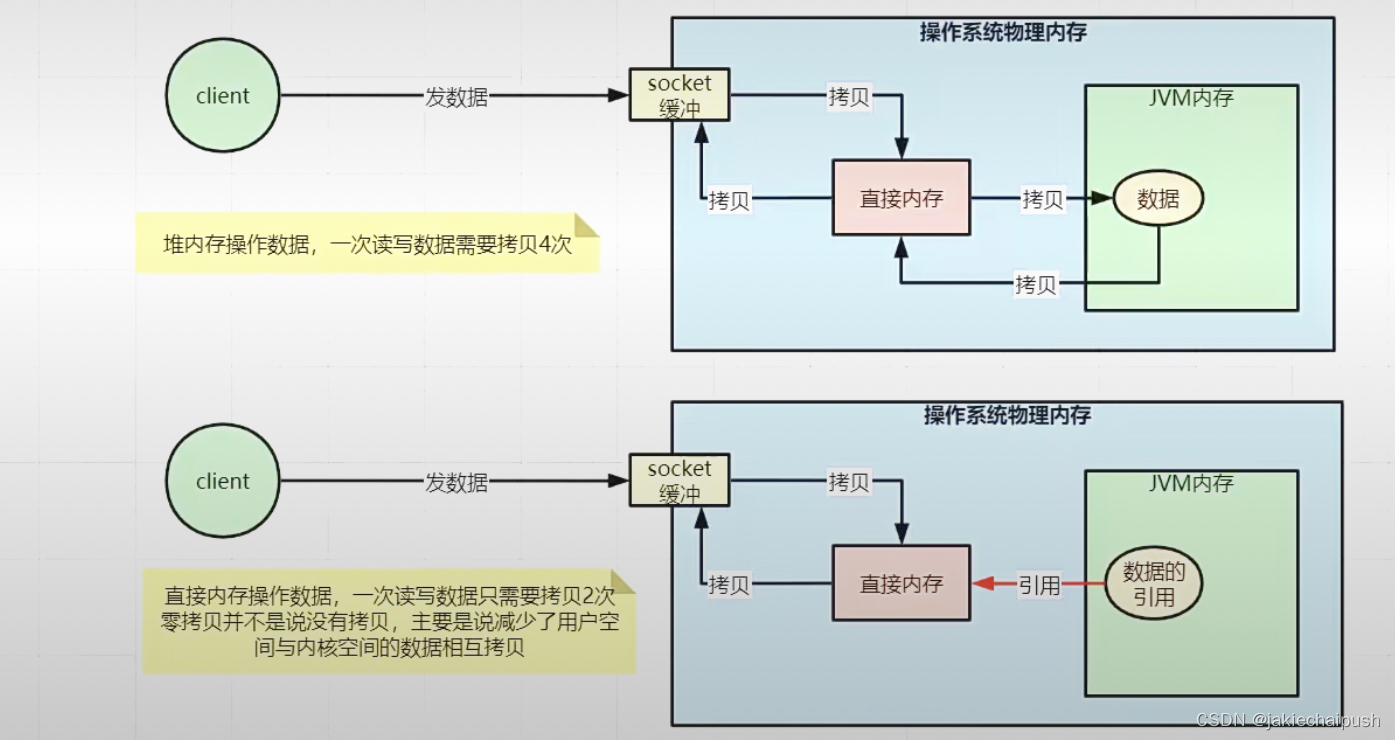
对于上图,上面一部分不使用直接内存,首先客户端client发送数据过来,socket缓存区接受到数据,然后操作系统会把Socket缓存区的数据拷贝到直接内存(DMA控制器),这是第一次拷贝,然后JDK把直接内存的数据拷贝到堆内存,这是第二次拷贝。对于操作直接内存的就只需要前面的第一次拷贝即可。
Netty的接收和发送ByteBuf采用Direct BUFFERS,使用堆外直接内存进行Socket读写,不需要进行字节缓冲区的二次拷贝。 我们回到Read方法,解决上面遗留的点:
byteBuf = allocHandle.allocate(allocator)
进入allocate方法:
  @Override
        public ByteBuf allocate(ByteBufAllocator alloc) {
            return alloc.ioBuffer(guess());
        }


 @Override
    public ByteBuf ioBuffer(int initialCapacity) {
        if (PlatformDependent.hasUnsafe() || isDirectBufferPooled()) {
            return directBuffer(initialCapacity);
        }
        return heapBuffer(initialCapacity);
    }
可以看到了 directBuffer(initialCapacity);,可以看出netty默认使用的是直接内存。
4. ByteBuf内存池设计
随着JVM虚拟机和JIT即时编译技术的发展,对象的分配和回收是个非常轻量的工作。但是对于缓存区Buffer(相当于一个内存块),情况缺稍有不同,特别是对于堆外内存直接内存的分配和回收,是一件非常耗时的操作。为了尽量避免重用缓存区,Netty提供了基于ByteBuf内存池的缓存区重用机制。需要的时候直接从池值中获取ByteBuf就行,使用完毕后会放回池子中。


![NSSCTF | [SWPUCTF 2021 新生赛]jicao](https://img-blog.csdnimg.cn/direct/c94a49ce360a4ba9ba2bc00132a3cad5.png)