今天是第六专题,主要内容是:导入ArduinoJson功能库,借助该库解析从【心知天气】官往返回的JSON数据,并显示在 TFT 屏幕上。
如您需要了解其它专题的内容,请点击下面的链接。
第一专题内容,请参考:连接点亮SPI-TFT屏幕和UI布局设计
第二专题内容,请参考:WIFI模式设置及连接
第三专题内容,请参考:连接SHT30传感器,获取并显示当前环境温湿度数据(I2C)
第四专题内容,请参考:通过NTPClient库获取实时网络时间并显示在TFT屏幕上
第五专题内容,请参考:获取关于城市天气实况和天气预报的JSON信息(心知天气版)
一、【心知天气】官网JSON数据特点
1、通过API返回的JSON数据,是未经压缩的明文JSON数据,可以直接使用ArduinoJson功能库解析需要的数值,JSON数据解析过程简单方便。
2、天气实况数据。付费用户可获取全部数据;免费用户只返回天气现象文字、天气现象代码和气温 3 项数据,可供使用的数据比较少。数据更新频率,国内城市在 15 分钟左右,国际城市在 20 分钟左右。
3、天气预报数据。可获取指定城市未来最多 15 天每天的白天和夜间预报。一般每天更新 3-4 次。付费用户可获取全部数据,免费用户只返回 3 天天气预报,可供使用的数据比较少。
说明:如果仅作程序调试使用,可申请开通试用版,能通过API获取全部数据,试用期14天。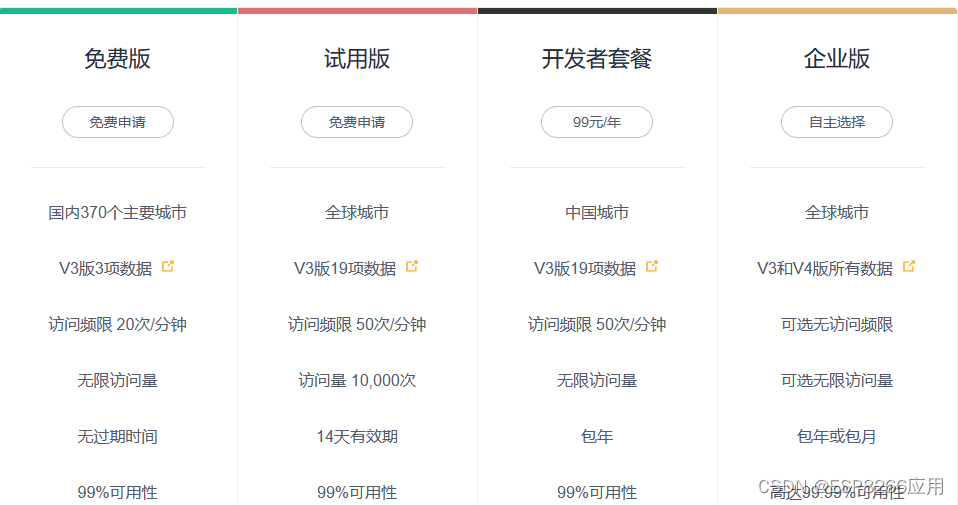
二、添加ArduinoJson库
1、ArduinoJson库。是为 Arduino 和 IOT(Internet Of Things,物联网)开的 C++ JSON库,使用简单、高效,通用性强,在Github具备很高的活跃度。支持JSON数据的序列化、反序列化(或称序列化还原、解析)、MessagePack、流数据、过滤以及其他功能。官网链接,Github站点。
2、添加库方法。打开 PlatformIO 界面,选择 Libraries 图标,在搜索栏内输入 ArduinoJson,在查询结果中选择ArduinoJson by Benoit Blanchon库,,添加到项目中。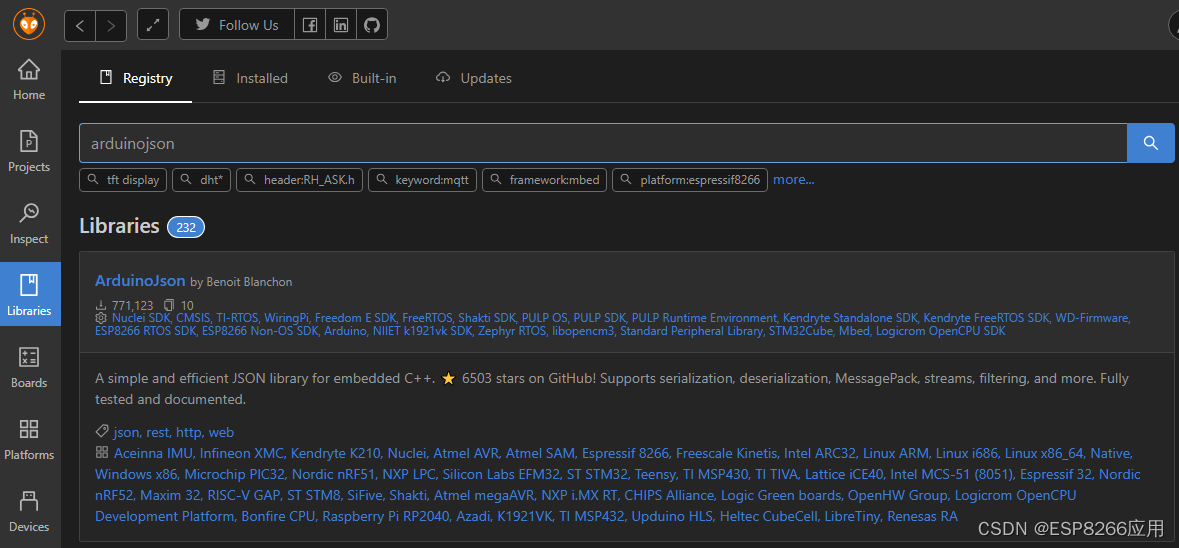
3、使用方法。解析JSON天气信息数据的程序代码,我们一般借助ArduinoJson官网提供的工具助手(Assistant),先生成基本代码,然后根据项目需要进行取舍,或进行格式转换后,再复制到项目中。本文第三部分我们进行示例说明。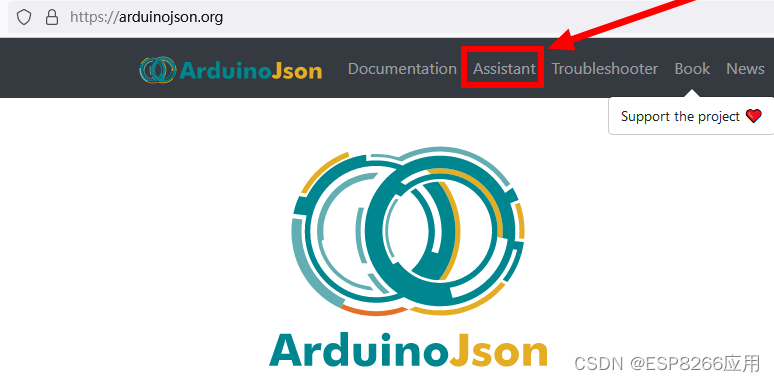
4、重要文档。关于安装库,建构和解析JSON,官方示例,API参考,FAQ等有关信息,请查阅官网 documentation 的内容。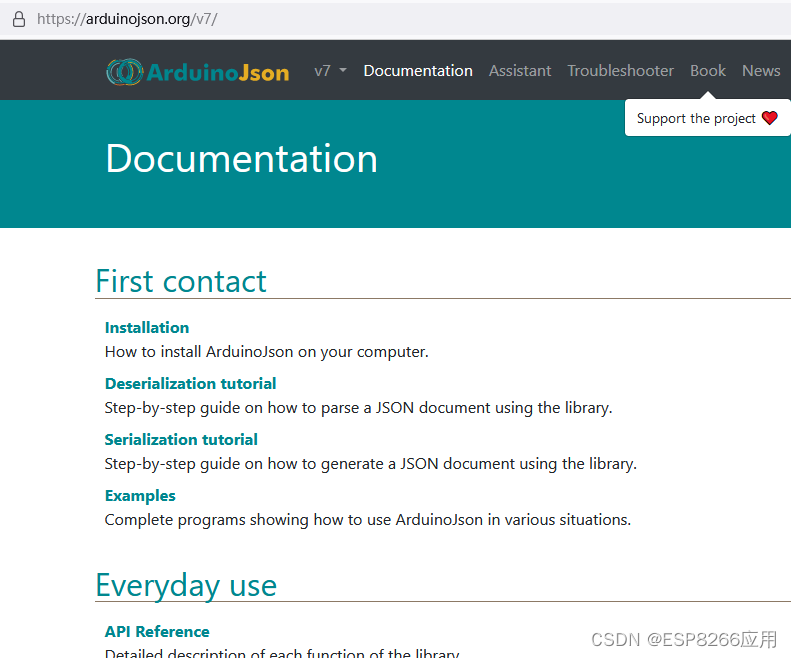
三、解析JSON数据方法步骤
这是从【心知天气】官网通过API请求返回的原始JSON数据。
// 这是从【心知天气】官网通过API请求返回的原始JSON数据
{"results":[{"location":{"id":"WWE0TGW4PX6N","name":"济南","country":"CN","path":"济南,济南,山东,中国","timezone":"Asia/Shanghai","timezone_offset":"+08:00"},"now":{"text":"晴","code":"0","temperature":"28","feels_like":"27","pressure":"989","humidity":"31","visibility":"26.6","wind_direction":"南","wind_direction_degree":"201","wind_speed":"30.0","wind_scale":"5","clouds":"15","dew_point":""},"last_update":"2024-05-10T11:07:41+08:00"}]}
在这部分,我们以【心知天气】返回的JSON数据为例,来说明生成解析代码的方法。
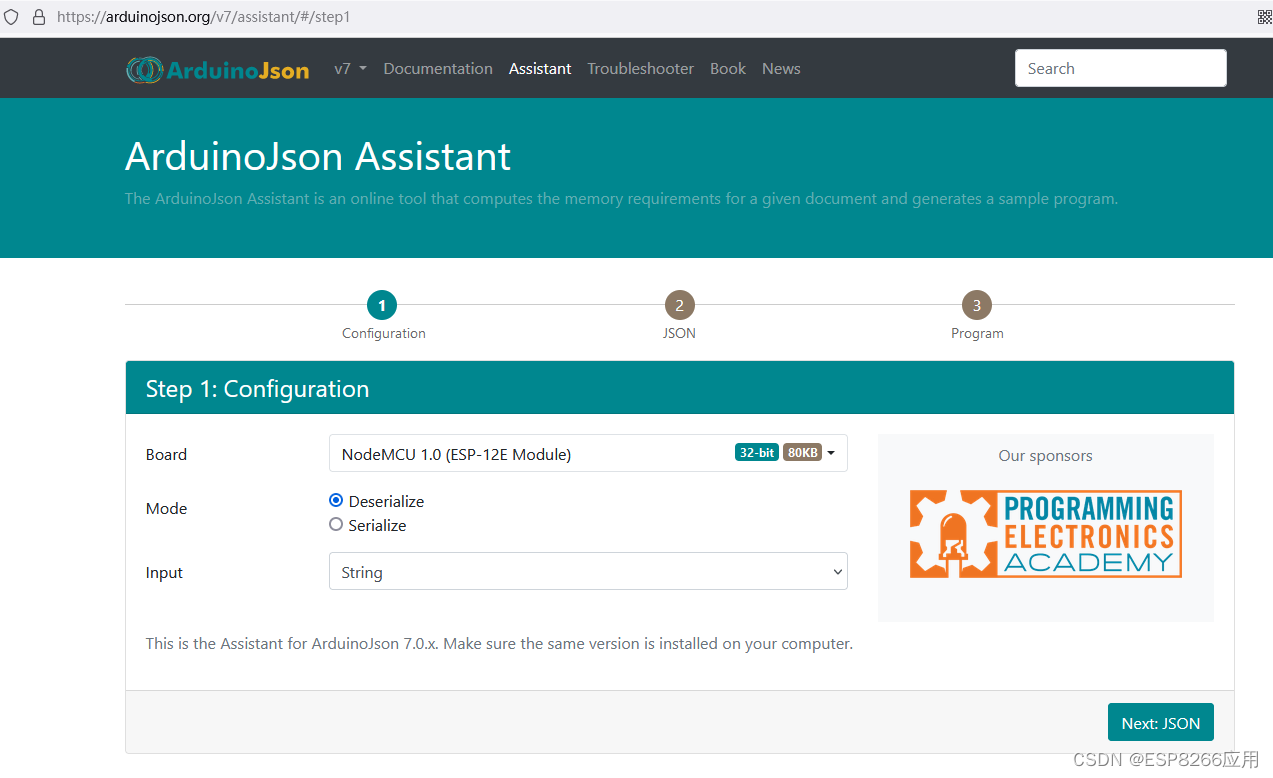
1、打开ArduinoJson官网。点选页面上方菜单栏 [Assistant],显示以下界面。Board项,选择NodeMCU 1.0 (ESP-12E Module);Mode项,选择 Deserialize ;Input项,选择 String。点击右下方按钮 [Next:JSON]。
2、复制JSON代码。将上述JSON原始数据复制到页面的【Input】输入框内,点击右下方按钮 【Next:Program】。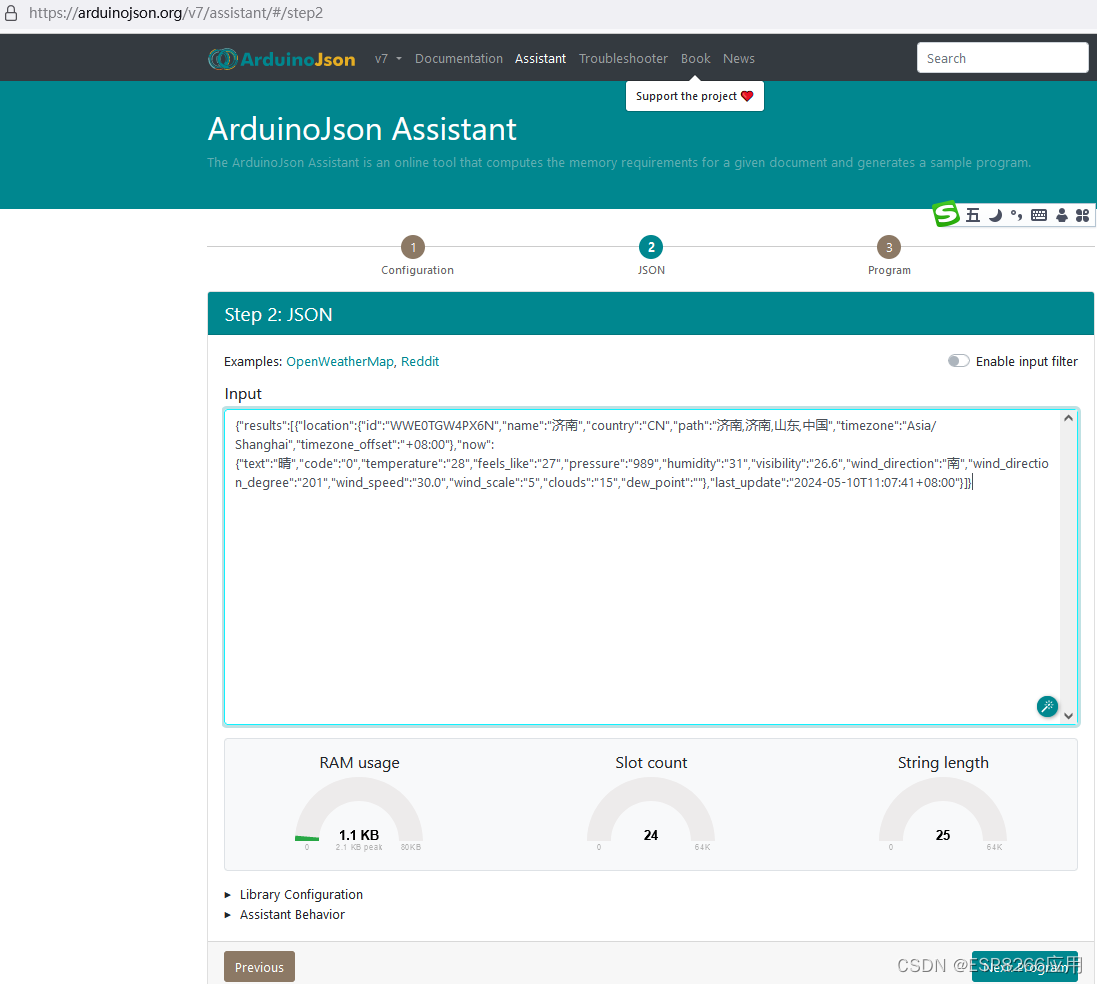
3、生成解析程序代码。以下输入框内,就是使用助手自动生成解析代码。将代码复制到项目中,稍加调整修改后,就可以很方便地取出JSON内的数值了。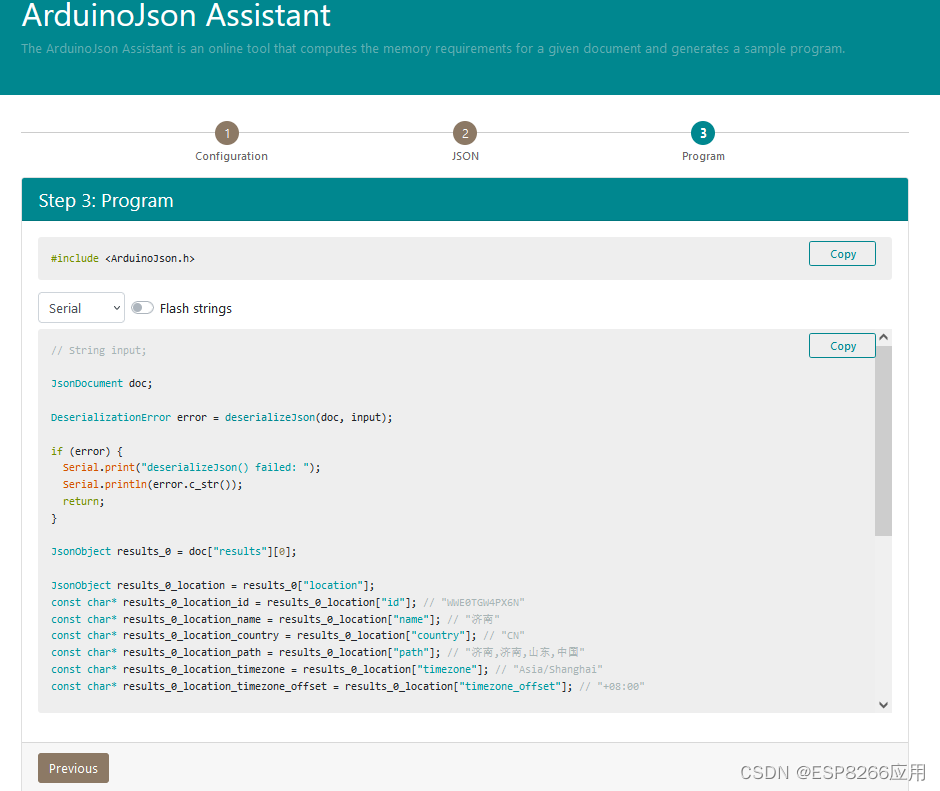
4、测试。新建一个项目,把以下代码复制到 main.cpp 中,然后编译上传到开发板。
#include <Arduino.h>
#include <ArduinoJson.h>

void setup()
{
  // Initialize serial port
  Serial.begin(9600);
  while (!Serial)
    continue;

  // JSON input string.
  const char *json = "{\"results\":[{\"location\":{\"id\":\"WWE0TGW4PX6N\",\"name\":\"济南\",\"country\":\"CN\",\"path\":\"济南,济南,山东,中国\",\"timezone\":\"Asia/Shanghai\",\"timezone_offset\":\"+08:00\"},\"now\":{\"text\":\"晴\",\"code\":\"0\",\"temperature\":\"28\",\"feels_like\":\"27\",\"pressure\":\"989\",\"humidity\":\"31\",\"visibility\":\"26.6\",\"wind_direction\":\"南\",\"wind_direction_degree\":\"201\",\"wind_speed\":\"30.0\",\"wind_scale\":\"5\",\"clouds\":\"15\",\"dew_point\":\"\"},\"last_update\":\"2024-05-10T11:07:41+08:00\"}]}";

  // String input;
  JsonDocument doc;
  DeserializationError error = deserializeJson(doc, json);

  if (error)
  {
    Serial.print("deserializeJson() failed: ");
    Serial.println(error.c_str());
    return;
  }

  JsonObject results_0 = doc["results"][0];

  // Fetch the values
  Serial.println("");
  Serial.println("");

  Serial.print("地区名称: ");
  Serial.println(doc["results"][0]["location"]["name"].as<String>());

  Serial.print("当前天气: ");
  Serial.println(doc["results"][0]["now"]["text"].as<String>());

  Serial.print("当前温度: ");
  Serial.println(doc["results"][0]["now"]["temperature"].as<String>());

  Serial.print("空气湿度: ");
  Serial.println(doc["results"][0]["now"]["humidity"].as<String>());

  Serial.print("能见度: ");
  Serial.println(doc["results"][0]["now"]["visibility"].as<String>());

  Serial.print("风向: ");
  Serial.println(doc["results"][0]["now"]["wind_direction"].as<String>());

  Serial.print("风力: ");
  Serial.println(doc["results"][0]["now"]["wind_scale"].as<String>() + "级");

  Serial.print("风速: ");
  Serial.println(doc["results"][0]["now"]["wind_speed"].as<String>() + "公里/每小时");

  Serial.print("更新时间: ");
  Serial.println(doc["results"][0]["last_update"].as<String>().substring(0, 16));
}

void loop(){}
如果您在串口监视器看到如下输出信息,那就说明成功了。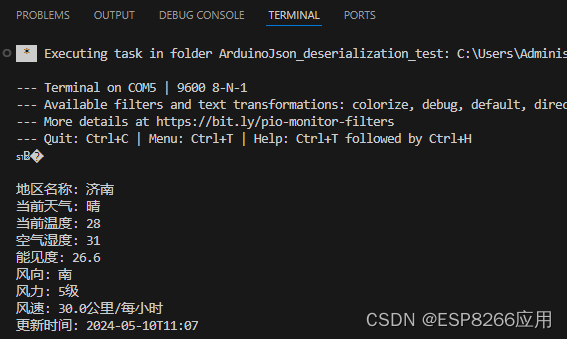
四、本项目获取和解析JSON数据结构和功能函数
关于获取和解析天气信息JSON数据的数据结构和函数,都封装在weather_xinzhi.h文件中,其中主要包括 2 个数据结构 和 4 个功能 函数。
1、实况天气数据结构:struct weather_now_data{},用于保存解析成功后的实况天气信息。
struct weather_now_data
{
  // 天气现象文字,包括阴晴雨雪等天气状态的描述
  String text = "";
  // 天气现象代码
  int code = -1;
  // 温度,单位为c摄氏度
  String temperature = "0";
  // 体感温度,默认单位:摄氏度
  int feels_like = 0;
  // 大气压强,默认单位:百帕
  int pressure = -1;
  // 相对湿度,0~100,单位为百分比
  int humidity = -1;
  // 能见度,默认单位:公里
  int visibility = -1;
  // 风向文字
  String wind_direction = "";
  // 风向角度,范围0~360,0为正北,90为正东,180为正南,270为正西
  String wind_direction_degree = "-1";
  // 风速,单位为km/h公里每小时或mph英里每小时
  int wind_speed = -1;
  // 风力等级
  String wind_scale = "-1";
  // 数据更新时间(该城市的本地时间)
  String last_update = "";
} wd;2、天气预报数据结构:struct weather_tmr_data{},用于保存获取到的天气预报信息。
struct weather_tmr_data
{
  String location_name;              // 预报地区名称
  String date = "";                  // 日期(该城市的本地时间)
  String text_day = "";              // 白天天气现象文字
  String code_day = "";              // 白天天气现象代码
  String text_night = "";            // 晚间天气现象文字
  String code_night = "";            // 晚间天气现象代码
  String high = "";                  // 当天最高温度
  String low = "";                   // 当天最低温度
  String precip = "";                // 降水概率,范围0~1,单位百分比(目前仅支持国外城市)
  String wind_direction = "";        // 风向文字
  String wind_direction_degree = ""; // 风向角度,范围0~360
  String wind_speed = "";            // 风速,单位km/h(当unit=c时)、mph(当unit=f时)
  String wind_scale = "";            // 风力等级
  String rainfall = "";              // 降水量,单位mm
  String humidity = "";              // 相对湿度,0~100,单位为百分比
  String last_update = "";           // 数据更新时间(该城市的本地时间)
};

weather_tmr_data wtd[3];3、获取实况天气函数:void get_now_Weather()
// 获取实况天气函数
void get_now_Weather()
{
  // 检查WI-FI是否已连接
  if (WiFi.status() == WL_CONNECTED)
  {
    // 准备发起请求
    std::unique_ptr<BearSSL::WiFiClientSecure> client(new BearSSL::WiFiClientSecure);
    client->setInsecure();
    HTTPClient https;

    // Serial.print("[HTTPS] begin...\n");

    // 请求接口
    if (https.begin(*client, "https://api.seniverse.com/v3/weather/now.json?key=" + key + "&location=" + city_name + "&language=zh-Hans&unit=c"))
    {
      // 获取HTTP的状态码,一般200=成功,出现其他的比如404、500 均为各种报错
      int httpCode = https.GET();
      Serial.println(httpCode);

      if (httpCode > 0)
      {
        if (httpCode == HTTP_CODE_OK || httpCode == HTTP_CODE_MOVED_PERMANENTLY)
        {
          // 从接口获取数据
          String payload = https.getString();
          Serial.println(payload);

          // 调用解析函数
          JsonDocument doc;
          DeserializationError err = deserializeJson(doc, payload);

          if (err.code() == DeserializationError::Ok)
          {
            get_now_weather_data(doc);
          }
          else
          {
            Serial.println("数据解析出错");
          }
        }
      }
      else
      {
        Serial.printf("[HTTP] GET... failed, error: %s\n", https.errorToString(httpCode).c_str());
      }
      https.end();
    }
  }
}4、获取未来几天的天气预报函数:void get_tmr_Weather(),可以在 https.begin() 函数中,根据需要修改起始日期和天数。
// 获取未来3天的天气预报
void get_tmr_Weather()
{
  // 检查WI-FI是否已连接
  if (WiFi.status() == WL_CONNECTED)
  {
    // 准备发起请求
    std::unique_ptr<BearSSL::WiFiClientSecure> client(new BearSSL::WiFiClientSecure);
    client->setInsecure();
    HTTPClient https;

    // 请求接口
    if (https.begin(*client, "https://api.seniverse.com/v3/weather/daily.json?key=" + key + "&location=" + city_name + "&language=zh-Hans&unit=c&start=1&days=3"))
    {
      // 获取HTTP的状态码,一般200=成功,出现其他的比如404、500 均为各种报错
      int httpCode = https.GET();
      Serial.println(httpCode);

      if (httpCode > 0)
      {
        if (httpCode == HTTP_CODE_OK || httpCode == HTTP_CODE_MOVED_PERMANENTLY)
        {
          // 从接口获取数据
          String payload = https.getString();
          Serial.println(payload);

          // 调用解析函数
          JsonDocument doc;
          DeserializationError err = deserializeJson(doc, payload);

          if (err.code() == DeserializationError::Ok)
          {
            get_tmr_weather_data(doc);
          }
          else
          {
            Serial.println("数据解析出错");
          }
        }
      }
      else
      {
        Serial.printf("[HTTP] GET... failed, error: %s\n", https.errorToString(httpCode).c_str());
      }
      https.end();
    }
  }
}5、提取实况天气具体数值的函数:void get_now_weather_data(JsonDocument &doc)
void get_now_weather_data(JsonDocument &doc)
{
  // 将数据保存到weahter_data 的结构体,方便后续调用
  wd.text = doc["results"][0]["now"]["text"].as<String>();
  wd.code = doc["results"][0]["now"]["code"];
  wd.temperature = doc["results"][0]["now"]["temperature"].as<String>();
  wd.feels_like = doc["results"][0]["now"]["feels_like"].as<int>();
  wd.pressure = doc["results"][0]["now"]["pressure"].as<int>();
  wd.humidity = doc["results"][0]["now"]["humidity"].as<int>();
  wd.visibility = doc["results"][0]["now"]["visibility"].as<int>();
  wd.wind_direction = doc["results"][0]["now"]["wind_direction"].as<String>();
  wd.wind_direction_degree = doc["results"][0]["now"]["wind_direction_degree"].as<String>();
  wd.wind_speed = doc["results"][0]["now"]["wind_speed"].as<int>();
  wd.wind_scale = doc["results"][0]["now"]["wind_scale"].as<String>();
  wd.last_update = doc["results"][0]["last_update"].as<String>().substring(0, 16);
  wd.last_update.replace("T", " ");
}
6、提取未来天气预报具体数值的函数:void get_tmr_weather_data(JsonDocument &doc)
void get_tmr_weather_data(JsonDocument &doc)
{
  // 将数据保存到weahter_tmr_data 的结构体,方便后续调用
  wtd[0].location_name = doc["results"][0]["location"]["name"].as<String>();                          日期(该城市的本地时间)
  wtd[0].date = doc["results"][0]["daily"][0]["date"].as<String>();                                   日期(该城市的本地时间)
  wtd[0].text_day = doc["results"][0]["daily"][0]["text_day"].as<String>();                           // 白天天气现象文字
  wtd[0].code_day = doc["results"][0]["daily"][0]["code_day"].as<String>();                           // 白天天气现象代码
  wtd[0].text_night = doc["results"][0]["daily"][0]["text_night"].as<String>();                       // 晚间天气现象文字
  wtd[0].code_night = doc["results"][0]["daily"][0]["code_night"].as<String>();                       // 晚间天气现象代码
  wtd[0].high = doc["results"][0]["daily"][0]["high"].as<String>();                                   // 当天最高温度
  wtd[0].low = doc["results"][0]["daily"][0]["low"].as<String>();                                     // 当天最低温度
  wtd[0].precip = doc["results"][0]["daily"][0]["precip"].as<String>();                               // 降水概率,范围0~1,单位百分比(目前仅支持国外城市)
  wtd[0].wind_direction = doc["results"][0]["daily"][0]["wind_direction"].as<String>();               // 风向文字
  wtd[0].wind_direction_degree = doc["results"][0]["daily"][0]["wind_direction_degree"].as<String>(); // 风向角度,范围0~360
  wtd[0].wind_speed = doc["results"][0]["daily"][0]["wind_speed"].as<String>();                       // 风速,单位km/h(当unit=c时)、mph(当unit=f时)
  wtd[0].wind_scale = doc["results"][0]["daily"][0]["wind_scale"].as<String>();                       // 风力等级
  wtd[0].rainfall = doc["results"][0]["daily"][0]["rainfall"].as<String>();                           // 降水量,单位mm
  wtd[0].humidity = doc["results"][0]["daily"][0]["humidity"].as<String>();                           // 相对湿度,0~100,单位为百分比
  wtd[0].last_update = doc["results"][0]["last_update"].as<String>().substring(0, 16);                // 数据更新时间(该城市的本地时间)
  wtd[0].last_update.replace("T", " ");
} 7、说明。关于 main.cpp 内容的修改,主要集中在调用既有功能函数和调整显示位置方面,请大家自行阅读代码。
特别提醒修改两项内容:(1)WiFi连接的 ssid 和 password;(2)心知天气私钥。
免费用户获的信息数据受到限制,可以申请开通试用版,测试体验全部信息数据。
// 项目 main.cpp 主要内容
#include <Arduino.h>
#include <TFT_eSPI.h>
#include <ArduinoJson.h>

// 连接wifi用的库
#include <ESP8266WiFi.h>
#include <ESP8266HTTPClient.h>

/**
   配置您所在环境的wifi 账号和密码
   注意:切勿连接 5G的频率、不要使用双频融合(路由器)
   注意:账号密码必须完全正确,包括字母大小写、空格、中划线、下划线
*/
const char *ssid = "xcb940";
const char *password = "87589940abc";

//const char *ssid = "LGCWZS";
//const char *password = "87129168";

// 构造函数,实例化 TFT 屏幕对象
TFT_eSPI tft = TFT_eSPI();

// WiFi 连接函数声明
void connectWiFi();

// 程序用到的字库文件,后面会详细说明
#include "hefeng-min-40px.h"
#include "weather_font20.h"
#include "weather_font16.h"

// 网络时钟的刷新频率
unsigned long last_ntp = 0;
const long interval_ntp = 1000; // 网络时钟的刷新频率(毫秒)

// 今日天气的刷新频率
unsigned long last_weather = 0;
const long interval_weather = 1000 * 60 * 5; // 今日天气的刷新频率(毫秒),每300毫秒更新一次

// 明日天气的刷新频率
unsigned long last_tmr_weather = 0;
const long interval_tmr_weather = 1000 * 60 * 60; // 明天天气的刷新频率(毫秒),每3600毫秒更新一次

// 温湿度传感器的刷新频率
unsigned long last_sht = 0;
const long interval_sht = 3000; // 温湿度传感器的刷新频率(毫秒),每3000毫秒更新一次

// 心知天气免费版密钥**************
// const String key = "**************";

// 心知天气试用版密钥**************,有效期14天,自2024-05-09始
const String key = "**************";

// 你的城市ID,获取方法参考课程
const String city_name = "jinan";

#include "sht30.h"
#include "ntptime.h"
#include "weather_xinzhi.h"

void setup()
{
  Serial.begin(115200);

  tft.init();
  tft.setSwapBytes(true);
  tft.setRotation(0);
  tft.fillScreen(TFT_BLACK);
  tft.setTextColor(TFT_WHITE, TFT_BLACK, true);

  tft.setTextSize(2);

  // 联网
  tft.println("Wi-Fi >> " + String(ssid));
  // initWiFi();
  connectWiFi();

  tft.println("");
  tft.setTextColor(TFT_WHITE, TFT_BLACK, true);

  tft.println("");

  // 今日天气
  tft.println("Get Today weather");
  get_now_Weather();
  get_tmr_Weather();

  tft.setTextSize(1);
  tft.println("");
  tft.setTextSize(2);

  // 对时
  tft.println("Get NTP Time");
  initNtp();

  // 温湿度传感器
  tft.println("");
  tft.println("load Sensor Data..");
  sht30_setup();

  tft.setTextColor(TFT_WHITE, TFT_BLACK, true);
  tft.println("");
  tft.println("start...");

  delay(500);
  tft.fillScreen(TFT_BLACK);
}

void loop()
{
  // 获取单片机启动至今的毫秒数
  unsigned long currentMillis = millis();

  // 显示当前日期,星期几,农历
  // update ntp 时间
  if (last_ntp == 0 || currentMillis - last_ntp >= interval_ntp)
  {
    last_ntp = currentMillis;
    loopNtp();

    tft.loadFont(weather_font16);
    tft.setTextColor(TFT_WHITE, TFT_BLACK, true);
    tft.drawString(dt.localDate + "  " + weekOfDate1(dt.year, dt.month, dt.day) + " " + outputLunarDate(dt.year, dt.month, dt.day), 0, 0);
    tft.unloadFont();

    tft.setTextSize(5);
    tft.setTextColor(TFT_GREEN, TFT_BLACK, true);
    tft.drawString(dt.localTime, 0, 30);
  }

  // 今日天气
  if (last_weather == 0 || currentMillis - last_weather >= interval_weather)
  {
    if (last_weather > 0)
    {
      get_now_Weather();
    }
    last_weather = currentMillis;

    // 擦除指定区域
    tft.fillRect(55, 90, 240, 40, TFT_BLACK);

    tft.setTextColor(TFT_YELLOW, TFT_BLACK, true);
    tft.loadFont(hefeng40);
    // tft.drawString(icon(wd.now_icon), 10, 90);
    tft.unloadFont();

    tft.loadFont(weather_font20);
    tft.setTextColor(TFT_WHITE, TFT_BLACK, true);
    tft.drawString("Now: " + String(wd.temperature) + "° " + wd.text, 55, 90);
    tft.drawString(wd.wind_direction + "风" + String(wd.wind_scale) + "级 " + wd.wind_speed + "KM/H", 55, 110);

    tft.drawLine(0, 140, 240, 140, TFT_WHITE);
  }

  // 明日天气
  if (last_tmr_weather == 0 || currentMillis - last_tmr_weather > interval_tmr_weather)
  {
    if (last_tmr_weather > 0){
      get_tmr_Weather();
    }
    last_tmr_weather = currentMillis;

    // 擦除指定区域
    tft.fillRect(55, 150, 240, 40, TFT_BLACK);

    tft.loadFont(hefeng40);
    tft.setTextColor(TFT_YELLOW, TFT_BLACK, true);
    // tft.drawString(icon(wtd[1].iconDay), 10, 150);
    tft.unloadFont();

    tft.loadFont(weather_font20);
    tft.setTextColor(TFT_WHITE, TFT_BLACK, true);
    tft.drawString("明天 " + String(wtd[0].low) + "° - " + String(wtd[0].high) + "°", 55, 150);
    tft.drawString(wtd[0].text_day+ ", " + "风力" + wtd[0].wind_scale + "级", 55, 170);

    // 这条线其实没必要重新绘制
    tft.drawLine(0, 200, 240, 200, TFT_WHITE);
  }

  // 温湿度传感器的数据
  if (last_sht == 0 || currentMillis - last_sht > interval_sht)
  {
    last_sht = currentMillis;

    sht30();

    tft.loadFont(weather_font20);
    tft.setTextColor(TFT_WHITE, TFT_BLACK, true);

    tft.drawString("室温:", 0, 210);
    tft.setTextColor(TFT_GREEN, TFT_BLACK, true);
    tft.drawString(String(sht_data.temperature) + "C ", 40, 210);

    tft.setTextColor(TFT_WHITE, TFT_BLACK, true);
    tft.drawString("湿度", 120, 210);

    tft.setTextColor(TFT_GREEN, TFT_BLACK, true);
    tft.drawString(String(sht_data.humidity) + "%  ", 170, 210); //+3(原为120)的x轴位置,因为视觉上似乎贴的优点近了
  }
}

// 连接wifi
void connectWiFi()
{

  Serial.print("Connecting to ");
  Serial.println(ssid);

  // 设置WiFi工作在终端模式,参数可选填WIFI_AP、WIFI_STA、WIFI_AP_STA、WIFI_OFF
  WiFi.mode(WIFI_STA);

  // 开始连接
  WiFi.begin(ssid, password);

  // 检查连接是否成功
  while (WiFi.status() != WL_CONNECTED)
  {
    delay(500);
    Serial.print(".");
    tft.print(".");
  }

  tft.println("");
  tft.println("");
  tft.setTextColor(TFT_GREEN, TFT_BLACK, true);
  tft.println(WiFi.localIP());

  // 设置:当路由器断开连接时,是否启动自动重新连接功能。true: 启用自动重新连接;false:不启用此功能
  WiFi.setAutoReconnect(true);

  // 设置:是否将WiFi参数保存于Flash中,默认为true,即在每次调用WiFi.begin()、WiFi.softAP()、WiFi.disconnect、WiFi.softAPdisconnect方法时都会将相关数据写入到Flash中;
  //       当设置为false时,以上动作将不会把数据写入Flash中,仅仅改变内存中的WiFi设置
  WiFi.persistent(true);

  // 连接成功后,在串口监视器显示自身IP地址,以下5行代码作调试用
  Serial.println("");
  Serial.println("WiFi connected");
  Serial.println("IP address: ");
  Serial.println(WiFi.localIP());
  Serial.println("");
}
五、项目运行展示
NodeMcu1.0_天气时钟温湿度展示
六、项目源代码下载
百度网盘下载地址:
https://pan.baidu.com/s/1-cENF6LaInjF3sw_qs40Vg?pwd=me32,
提取码:me32
部分代码来自于网络大神,如有异议,请联系。
参考文档
1. JSON 基本使用_json怎么用-CSDN博客
2. JSON——概述、JSON语法、序列化和反序列化_所有文档都可以通过json序列化吗-CSDN博客

