《博主简介》
小伙伴们好,我是阿旭。专注于人工智能、AIGC、python、计算机视觉相关分享研究。
✌更多学习资源,可关注公-仲-hao:【阿旭算法与机器学习】,共同学习交流~
👍感谢小伙伴们点赞、关注!
《------往期经典推荐------》
一、AI应用软件开发实战专栏【链接】
| 项目名称 | 项目名称 |
|---|---|
| 1.【人脸识别与管理系统开发】 | 2.【车牌识别与自动收费管理系统开发】 |
| 3.【手势识别系统开发】 | 4.【人脸面部活体检测系统开发】 |
| 5.【图片风格快速迁移软件开发】 | 6.【人脸表表情识别系统】 |
| 7.【YOLOv8多目标识别与自动标注软件开发】 | 8.【基于YOLOv8深度学习的行人跌倒检测系统】 |
| 9.【基于YOLOv8深度学习的PCB板缺陷检测系统】 | 10.【基于YOLOv8深度学习的生活垃圾分类目标检测系统】 |
| 11.【基于YOLOv8深度学习的安全帽目标检测系统】 | 12.【基于YOLOv8深度学习的120种犬类检测与识别系统】 |
| 13.【基于YOLOv8深度学习的路面坑洞检测系统】 | 14.【基于YOLOv8深度学习的火焰烟雾检测系统】 |
| 15.【基于YOLOv8深度学习的钢材表面缺陷检测系统】 | 16.【基于YOLOv8深度学习的舰船目标分类检测系统】 |
| 17.【基于YOLOv8深度学习的西红柿成熟度检测系统】 | 18.【基于YOLOv8深度学习的血细胞检测与计数系统】 |
| 19.【基于YOLOv8深度学习的吸烟/抽烟行为检测系统】 | 20.【基于YOLOv8深度学习的水稻害虫检测与识别系统】 |
| 21.【基于YOLOv8深度学习的高精度车辆行人检测与计数系统】 | 22.【基于YOLOv8深度学习的路面标志线检测与识别系统】 |
| 23.【基于YOLOv8深度学习的智能小麦害虫检测识别系统】 | 24.【基于YOLOv8深度学习的智能玉米害虫检测识别系统】 |
| 25.【基于YOLOv8深度学习的200种鸟类智能检测与识别系统】 | 26.【基于YOLOv8深度学习的45种交通标志智能检测与识别系统】 |
| 27.【基于YOLOv8深度学习的人脸面部表情识别系统】 | 28.【基于YOLOv8深度学习的苹果叶片病害智能诊断系统】 |
| 29.【基于YOLOv8深度学习的智能肺炎诊断系统】 | 30.【基于YOLOv8深度学习的葡萄簇目标检测系统】 |
| 31.【基于YOLOv8深度学习的100种中草药智能识别系统】 | 32.【基于YOLOv8深度学习的102种花卉智能识别系统】 |
| 33.【基于YOLOv8深度学习的100种蝴蝶智能识别系统】 | 34.【基于YOLOv8深度学习的水稻叶片病害智能诊断系统】 |
| 35.【基于YOLOv8与ByteTrack的车辆行人多目标检测与追踪系统】 | 36.【基于YOLOv8深度学习的智能草莓病害检测与分割系统】 |
| 37.【基于YOLOv8深度学习的复杂场景下船舶目标检测系统】 | 38.【基于YOLOv8深度学习的农作物幼苗与杂草检测系统】 |
| 39.【基于YOLOv8深度学习的智能道路裂缝检测与分析系统】 | 40.【基于YOLOv8深度学习的葡萄病害智能诊断与防治系统】 |
| 41.【基于YOLOv8深度学习的遥感地理空间物体检测系统】 | 42.【基于YOLOv8深度学习的无人机视角地面物体检测系统】 |
| 43.【基于YOLOv8深度学习的木薯病害智能诊断与防治系统】 | 44.【基于YOLOv8深度学习的野外火焰烟雾检测系统】 |
| 45.【基于YOLOv8深度学习的脑肿瘤智能检测系统】 | 46.【基于YOLOv8深度学习的玉米叶片病害智能诊断与防治系统】 |
| 47.【基于YOLOv8深度学习的橙子病害智能诊断与防治系统】 | 48.【车辆检测追踪与流量计数系统】 |
| 49.【行人检测追踪与双向流量计数系统】 |
二、机器学习实战专栏【链接】,已更新31期,欢迎关注,持续更新中~~
三、深度学习【Pytorch】专栏【链接】
四、【Stable Diffusion绘画系列】专栏【链接】
五、YOLOv8改进专栏【链接】,持续更新中~~
六、YOLO性能对比专栏【链接】,持续更新中~
《------正文------》
效果展示
先展示一下热力图显示效果:


引言
在计算机视觉中,热力图(Heatmap)经常被用作一种可视化工具,用于表现网络模型的关注点或预测结果。在一些任务中,例如目标检测,关键点检测或语义分割等,模型可以通过生成一个“热力图”来表达不同位置的预测概率。这个“热力图”通常与原始输入图像的大小相同,或者稍微小一些,每一个位置(像素)的值都代表了该位置匹配特定类别或者特性的预测概率。然后,热力图还可以用于生成预测框,或者定位关键点等。由于其形式直观,便于理解,因此热力图也经常用来帮助理解和分析模型的预测逻辑和行为。
本文将介绍如何使用YOLOv8模型结合Grad-CAM(梯度加权类激活映射)技术生成YOLOv8不同网络层中的图像热力图。这是一种基于梯度的可视化方法,通过计算特征图的梯度来生成热力图。这种方法可以帮助您更直观地理解模型在不同区域的关注程度,从而提高对模型的理解和应用能力。
安装环境
在进行热力图计算前,我们需要先安装好需要的环境ultralytics与grad-cam,命令如下:
pip install ultralytics -i https://pypi.tuna.tsinghua.edu.cn/simple
pip install grad-cam -i https://pypi.tuna.tsinghua.edu.cn/simple
完整源码
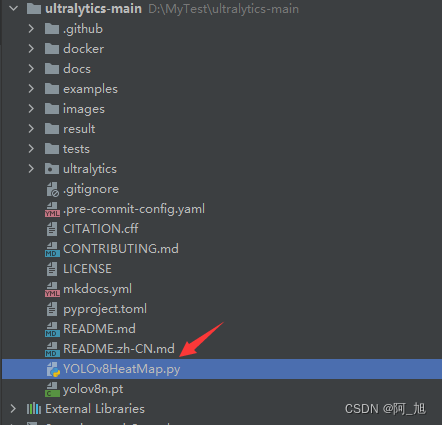
新建一个YOLOv8HeatMap.py文件,写入如下代码。然后放入YOLOv8源码中,如下图所示:
import warnings
warnings.filterwarnings('ignore')
warnings.simplefilter('ignore')
import torch, yaml, cv2, os, shutil, sys
import numpy as np
np.random.seed(0)
import matplotlib.pyplot as plt
from tqdm import trange
from PIL import Image
from ultralytics.nn.tasks import attempt_load_weights
from ultralytics.utils.torch_utils import intersect_dicts
from ultralytics.utils.ops import xywh2xyxy, non_max_suppression
from pytorch_grad_cam import GradCAMPlusPlus, GradCAM, XGradCAM, EigenCAM, HiResCAM, LayerCAM, RandomCAM, EigenGradCAM
from pytorch_grad_cam.utils.image import show_cam_on_image, scale_cam_image
from pytorch_grad_cam.activations_and_gradients import ActivationsAndGradients

def letterbox(im, new_shape=(640, 640), color=(114, 114, 114), auto=True, scaleFill=False, scaleup=True, stride=32):
    # Resize and pad image while meeting stride-multiple constraints
    shape = im.shape[:2]  # current shape [height, width]
    if isinstance(new_shape, int):
        new_shape = (new_shape, new_shape)

    # Scale ratio (new / old)
    r = min(new_shape[0] / shape[0], new_shape[1] / shape[1])
    if not scaleup:  # only scale down, do not scale up (for better val mAP)
        r = min(r, 1.0)

    # Compute padding
    ratio = r, r  # width, height ratios
    new_unpad = int(round(shape[1] * r)), int(round(shape[0] * r))
    dw, dh = new_shape[1] - new_unpad[0], new_shape[0] - new_unpad[1]  # wh padding
    if auto:  # minimum rectangle
        dw, dh = np.mod(dw, stride), np.mod(dh, stride)  # wh padding
    elif scaleFill:  # stretch
        dw, dh = 0.0, 0.0
        new_unpad = (new_shape[1], new_shape[0])
        ratio = new_shape[1] / shape[1], new_shape[0] / shape[0]  # width, height ratios

    dw /= 2  # divide padding into 2 sides
    dh /= 2

    if shape[::-1] != new_unpad:  # resize
        im = cv2.resize(im, new_unpad, interpolation=cv2.INTER_LINEAR)
    top, bottom = int(round(dh - 0.1)), int(round(dh + 0.1))
    left, right = int(round(dw - 0.1)), int(round(dw + 0.1))
    im = cv2.copyMakeBorder(im, top, bottom, left, right, cv2.BORDER_CONSTANT, value=color)  # add border
    return im, ratio, (dw, dh)

class ActivationsAndGradients:
    """ Class for extracting activations and
    registering gradients from targetted intermediate layers """

    def __init__(self, model, target_layers, reshape_transform):
        self.model = model
        self.gradients = []
        self.activations = []
        self.reshape_transform = reshape_transform
        self.handles = []
        for target_layer in target_layers:
            self.handles.append(
                target_layer.register_forward_hook(self.save_activation))
            # Because of https://github.com/pytorch/pytorch/issues/61519,
            # we don't use backward hook to record gradients.
            self.handles.append(
                target_layer.register_forward_hook(self.save_gradient))

    def save_activation(self, module, input, output):
        activation = output

        if self.reshape_transform is not None:
            activation = self.reshape_transform(activation)
        self.activations.append(activation.cpu().detach())

    def save_gradient(self, module, input, output):
        if not hasattr(output, "requires_grad") or not output.requires_grad:
            # You can only register hooks on tensor requires grad.
            return

        # Gradients are computed in reverse order
        def _store_grad(grad):
            if self.reshape_transform is not None:
                grad = self.reshape_transform(grad)
            self.gradients = [grad.cpu().detach()] + self.gradients

        output.register_hook(_store_grad)

    def post_process(self, result):
        logits_ = result[:, 4:]
        boxes_ = result[:, :4]
        sorted, indices = torch.sort(logits_.max(1)[0], descending=True)
        return torch.transpose(logits_[0], dim0=0, dim1=1)[indices[0]], torch.transpose(boxes_[0], dim0=0, dim1=1)[indices[0]], xywh2xyxy(torch.transpose(boxes_[0], dim0=0, dim1=1)[indices[0]]).cpu().detach().numpy()

    def __call__(self, x):
        self.gradients = []
        self.activations = []
        model_output = self.model(x)
        post_result, pre_post_boxes, post_boxes = self.post_process(model_output[0])
        return [[post_result, pre_post_boxes]]

    def release(self):
        for handle in self.handles:
            handle.remove()

class yolov8_target(torch.nn.Module):
    def __init__(self, ouput_type, conf, ratio) -> None:
        super().__init__()
        self.ouput_type = ouput_type
        self.conf = conf
        self.ratio = ratio

    def forward(self, data):
        post_result, pre_post_boxes = data
        result = []
        for i in trange(int(post_result.size(0) * self.ratio)):
            if float(post_result[i].max()) < self.conf:
                break
            if self.ouput_type == 'class' or self.ouput_type == 'all':
                result.append(post_result[i].max())
            elif self.ouput_type == 'box' or self.ouput_type == 'all':
                for j in range(4):
                    result.append(pre_post_boxes[i, j])
        return sum(result)

class yolov8_heatmap:
    def __init__(self, weight, device, method, layer, backward_type, conf_threshold, ratio, show_box, renormalize):
        device = torch.device(device)
        ckpt = torch.load(weight)
        model_names = ckpt['model'].names
        model = attempt_load_weights(weight, device)
        model.info()
        for p in model.parameters():
            p.requires_grad_(True)
        model.eval()

        target = yolov8_target(backward_type, conf_threshold, ratio)
        target_layers = [model.model[l] for l in layer]
        method = eval(method)(model, target_layers, use_cuda=device.type == 'cuda')
        method.activations_and_grads = ActivationsAndGradients(model, target_layers, None)

        colors = np.random.uniform(0, 255, size=(len(model_names), 3)).astype(np.uint8)
        self.__dict__.update(locals())

    def post_process(self, result):
        result = non_max_suppression(result, conf_thres=self.conf_threshold, iou_thres=0.65)[0]
        return result

    def draw_detections(self, box, color, name, img):
        xmin, ymin, xmax, ymax = list(map(int, list(box)))
        cv2.rectangle(img, (xmin, ymin), (xmax, ymax), tuple(int(x) for x in color), 2)
        cv2.putText(img, str(name), (xmin, ymin - 5), cv2.FONT_HERSHEY_SIMPLEX, 0.8, tuple(int(x) for x in color), 2, lineType=cv2.LINE_AA)
        return img

    def renormalize_cam_in_bounding_boxes(self, boxes, image_float_np, grayscale_cam):
        """Normalize the CAM to be in the range [0, 1]
        inside every bounding boxes, and zero outside of the bounding boxes. """
        renormalized_cam = np.zeros(grayscale_cam.shape, dtype=np.float32)
        for x1, y1, x2, y2 in boxes:
            x1, y1 = max(x1, 0), max(y1, 0)
            x2, y2 = min(grayscale_cam.shape[1] - 1, x2), min(grayscale_cam.shape[0] - 1, y2)
            renormalized_cam[y1:y2, x1:x2] = scale_cam_image(grayscale_cam[y1:y2, x1:x2].copy())
        renormalized_cam = scale_cam_image(renormalized_cam)
        eigencam_image_renormalized = show_cam_on_image(image_float_np, renormalized_cam, use_rgb=True)
        return eigencam_image_renormalized

    def process(self, img_path, save_path):
        # img process
        img = cv2.imread(img_path)
        img = letterbox(img)[0]
        img = cv2.cvtColor(img, cv2.COLOR_BGR2RGB)
        img = np.float32(img) / 255.0
        tensor = torch.from_numpy(np.transpose(img, axes=[2, 0, 1])).unsqueeze(0).to(self.device)

        try:
            grayscale_cam = self.method(tensor, [self.target])
        except AttributeError as e:
            return

        grayscale_cam = grayscale_cam[0, :]
        cam_image = show_cam_on_image(img, grayscale_cam, use_rgb=True)

        pred = self.model(tensor)[0]
        pred = self.post_process(pred)
        if self.renormalize:
            cam_image = self.renormalize_cam_in_bounding_boxes(pred[:, :4].cpu().detach().numpy().astype(np.int32), img, grayscale_cam)
        if self.show_box:
            for data in pred:
                data = data.cpu().detach().numpy()
                cam_image = self.draw_detections(data[:4], self.colors[int(data[4:].argmax())], f'{self.model_names[int(data[4:].argmax())]} {float(data[4:].max()):.2f}', cam_image)

        cam_image = Image.fromarray(cam_image)
        cam_image.save(save_path)

    def __call__(self, img_path, save_path, grad_name):
        # remove dir if exist
        # if os.path.exists(save_path):
        #     shutil.rmtree(save_path)
        # make dir if not exist
        if not os.path.exists(save_path):
            os.makedirs(save_path, exist_ok=True)

        if os.path.isdir(img_path):
            for img_path_ in os.listdir(img_path):
                name = img_path_.rsplit('.')[0]
                end_name = img_path_.rsplit('.')[-1]
                self.process(f'{img_path}/{img_path_}', f'{save_path}/{name}_{grad_name}.{end_name}')
        else:
            self.process(img_path, f'{save_path}/result_{grad_name}.png')

def get_params():
    # 绘制热力图方法列表
    grad_list = [
        'GradCAM',
        'GradCAMPlusPlus',
        'XGradCAM',
        'EigenCAM',
        'HiResCAM',
        'LayerCAM',
        'RandomCAM',
        'EigenGradCAM'
    ]
    # 自定义需要绘制热力图的层索引,可以用列表绘制不同层的热力图,如[10, 12, 14, 16, 18],将多层的话会将结果进行汇总到一张图上
    layers = [10, 12, 14, 16, 18]
    for grad_name in grad_list:
        params = {
            'weight': 'yolov8n.pt', # 训练好的权重路径
            'device': 'cuda:0',  # cpu或者cuda:0
            'method': grad_name, # GradCAMPlusPlus, GradCAM, XGradCAM, EigenCAM, HiResCAM, LayerCAM, RandomCAM, EigenGradCAM
            'layer': layers,  # 计算梯度的层, 指定层的索引
            'backward_type': 'class', # class, box, all
            'conf_threshold': 0.2, # 置信度阈值默认0.2, 根据情况调节
            'ratio': 0.02, # 建议0.02-0.1,取前多少数据,默认是0.02,只取置信度排序后的前百分之2的目标进行计算热力图。
            'show_box': False,  #是否显示检测框
            'renormalize': True   #是否优化热力图显示结果
        }
        yield params

if __name__ == '__main__':
    for each in get_params():
        model = yolov8_heatmap(**each)
        # model第一个参数:单张图片路径或者图片文件夹路径; 第二个参数:保存路径; 第三个参数:绘制热力图方法
        # model(r'images/00052.jpg', 'result', each['method'])
        model(r'images', 'result', each['method'])
源码详解
上述代码实现了一个用于生成YOLOv8网络热力图的工具,它使用了pytorch_grad_cam库来计算梯度激活图(GradCAM)。主要包含以下几个部分:
导入需要的库
import warnings
warnings.filterwarnings('ignore')
warnings.simplefilter('ignore')
import torch, yaml, cv2, os, shutil, sys
import numpy as np
np.random.seed(0)
import matplotlib.pyplot as plt
from tqdm import trange
from PIL import Image
from ultralytics.nn.tasks import attempt_load_weights
from ultralytics.utils.torch_utils import intersect_dicts
from ultralytics.utils.ops import xywh2xyxy, non_max_suppression
from pytorch_grad_cam import GradCAMPlusPlus, GradCAM, XGradCAM, EigenCAM, HiResCAM, LayerCAM, RandomCAM, EigenGradCAM
from pytorch_grad_cam.utils.image import show_cam_on_image, scale_cam_image
from pytorch_grad_cam.activations_and_gradients import ActivationsAndGradients
letterbox 函数
对输入图像进行预处理,包括缩放和填充,以适应特定的尺寸要求,同时保持宽高比。
def letterbox(im, new_shape=(640, 640), color=(114, 114, 114), auto=True, scaleFill=False, scaleup=True, stride=32):
im: 输入图像。new_shape: 目标图像的新尺寸,默认为 640x640。color: 用于边缘填充的颜色,默认为灰色(114, 114, 114)。auto: 是否自动调整填充大小以满足步长约束。scaleFill: 是否拉伸图像以填充新形状。scaleup: 是否允许放大图像。stride: 模型步长,用于确保输出尺寸是该数值的倍数。
ActivationsAndGradients 类
一个辅助类,用于从模型的中间层提取激活和梯度。它注册了前向传播钩子以在每个目标层捕获这些信息。
yolov8_target 类
根据给定的输出类型(‘class’、‘box’ 或 ‘all’)和置信度阈值,从模型输出中选择感兴趣的检测结果。
yolov8_heatmap 类
class yolov8_heatmap:
    def __init__(self, weight, cfg, device, method, layer, backward_type, conf_threshold, ratio):
初始化时加载模型、设置热力图计算方法、指定要计算梯度的层,以及其它相关参数。
process 方法:处理单个图像或图像文件夹,生成热力图并保存结果。
draw_detections 方法:在图像上绘制检测框。
renormalize_cam_in_bounding_boxes 方法:将热力图归一化到边界框内。
get_params 函数:生成参数字典,用于遍历不同的热力图方法。
get_params函数详解
def get_params():
    # 绘制热力图方法列表
    grad_list = [
        'GradCAM',
        'GradCAMPlusPlus',
        'XGradCAM',
        'EigenCAM',
        'HiResCAM',
        'LayerCAM',
        'RandomCAM',
        'EigenGradCAM'
    ]
    # 自定义需要绘制热力图的层索引,可以用列表绘制不同层的热力图,如[10, 12, 14, 16, 18],将多层的话会将结果进行汇总到一张图上
    layers = [10, 12, 14, 16, 18]
    for grad_name in grad_list:
        params = {
            'weight': 'yolov8n.pt', # 训练好的权重路径
            'device': 'cuda:0',  # cpu或者cuda:0
            'method': grad_name, # GradCAMPlusPlus, GradCAM, XGradCAM, EigenCAM, HiResCAM, LayerCAM, RandomCAM, EigenGradCAM
            'layer': layers,  # 计算梯度的层, 指定层的索引
            'backward_type': 'class', # class, box, all
            'conf_threshold': 0.2, # 置信度阈值默认0.2, 根据情况调节
            'ratio': 0.02, # 建议0.02-0.1,取前多少数据,默认是0.02,只取置信度排序后的前百分之2的目标进行计算热力图。
            'show_box': False,  #是否显示检测框
            'renormalize': True   #是否优化热力图显示结果
        }
        yield params
这段代码定义了一个名为 get_params 的函数,它用于设置并返回一个字典格式的生成器,包含了一系列参数,这些参数是用于配置和运行yolov8_heatmap 类的。下面我将逐个解释这些参数的含义和作用。
参数说明:
weight
'rtdetr-l.pt': 这个参数指定了模型的权重文件。在这种情况下,它是一个预先训练的YOLOv8模型的权重文件。这个文件包含了模型的所有训练参数,是模型运行的基础。
device
'cuda:0': 这个参数指定了模型运行的设备。在这里,'cuda:0'表明模型将在第一个NVIDIA GPU上运行。如果没有GPU或希望在CPU上运行,可以将其更改为'cpu'。
method
- 有8种热力图生成算法可选:
GradCAMPlusPlus, GradCAM, XGradCAM, EigenCAM, HiResCAM, LayerCAM, RandomCAM, EigenGradCAM。
layer
'[10]': 这个参数指定了用于生成热图的网络层。可以自行选择单一层,如[10]或者多个层列表[10, 12, 14, 16, 18],最终会对多层结果汇总到一张热力图上。
backward_type
'all': 这个参数决定了反向传播的类型。它可以是'class'、'box'或'all'。'class'仅关注类别预测,'box'仅关注边界框预测,而'all'结合了两者。
conf_threshold
0.2: 这是一个置信度阈值,用于过滤模型的预测。仅当模型对其预测的置信度高于0.2时,这些预测才会被考虑。
ratio
取前多少数据,默认是0.02,就是只取置信度由大到小排序后的前百分之2的目标进行计算热力图。
这个可能比较难理解,一般0.02就可以了,这个值不是越大越好,最大建议是0.1。
主函数部分
创建yolov8_heatmap实例,并使用get_params生成的参数遍历不同的热力图方法,为指定的图像或图像文件夹生成热力图。
if __name__ == '__main__':
    for each in get_params():
        model = yolov8_heatmap(**each)
        # model第一个参数:单张图片路径或者图片文件夹路径; 第二个参数:保存路径; 第三个参数:绘制热力图方法
        # model(r'images/00052.jpg', 'result', each['method'])
        model(r'images', 'result', each['method'])
参数说明
第一个参数:单张图片路径或者图片文件夹路径;
第二个参数:‘result’,为保存路径;
第三个参数:绘制热力图方法。
通过循环可一次性保存8种热力图计算结果。可自行挑选结果较好的热力图计算方式进行展示,图片保存的命名规则为图片名+热力图计算方法名称.jpg。保存的结果如下:
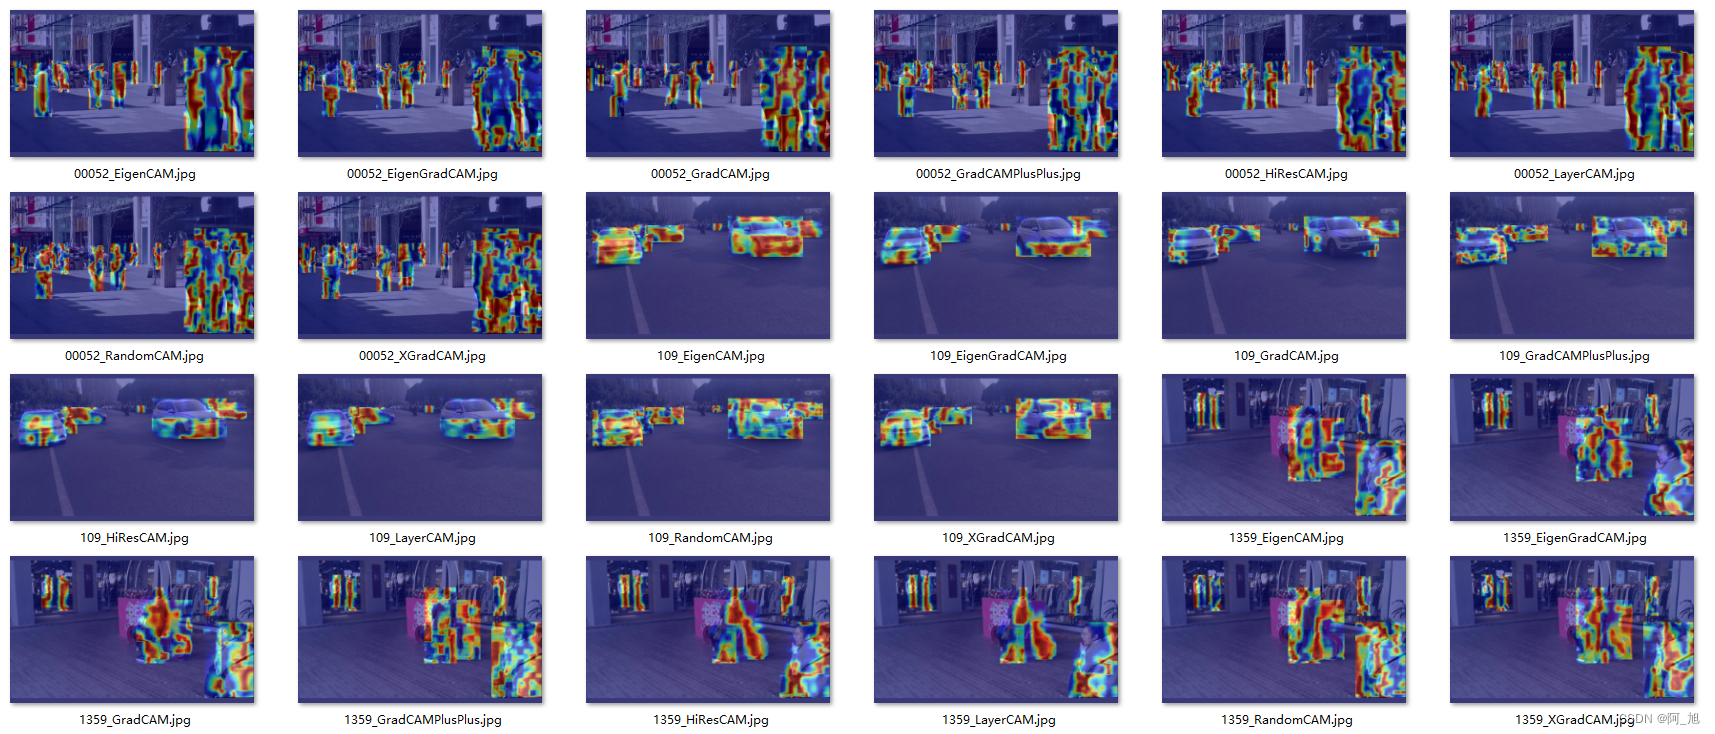
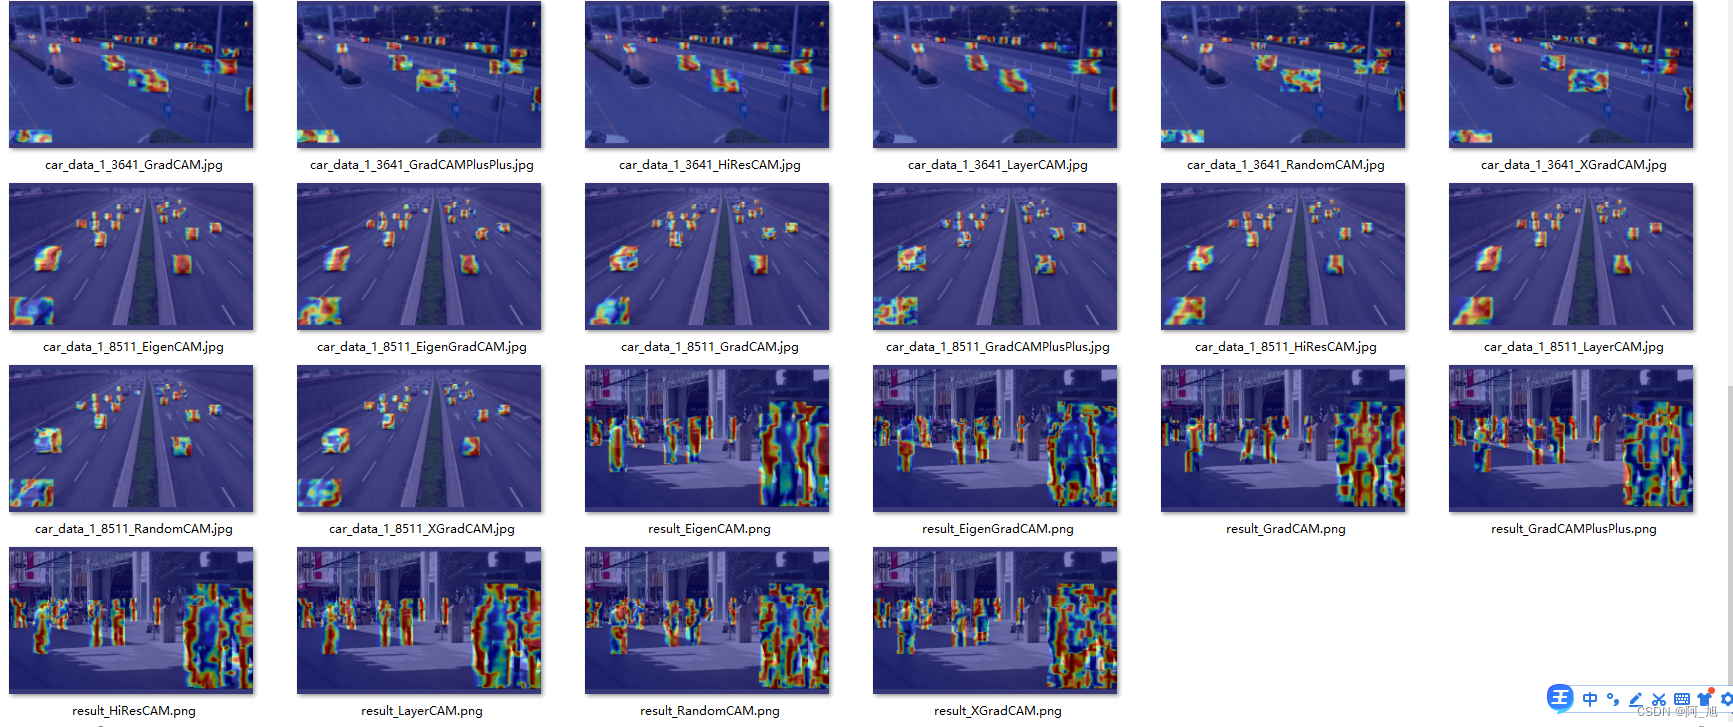
整体而言,这个工具可以用来分析YOLOv8模型的特征可视化,特别是在目标检测任务中,帮助理解模型是如何关注图像的特定区域来做出预测的,可以增加论文的结果展示对比,丰富论文不同模型的对比角度,还是十分实用的。
文章参考:https://blog.csdn.net/qq_37706472/article/details/128714604
好了,这篇文章就介绍到这里,喜欢的小伙伴感谢给点个赞和关注,更多精彩内容持续更新~~
关于本篇文章大家有任何建议或意见,欢迎在评论区留言交流!

