又学习了一种方法,类别引导diffusion模型,使用mnist数据集,记录一下它的用法吧。
Diffusion实战篇:
【Diffusion实战】训练一个diffusion模型生成S曲线(Pytorch代码详解)
【Diffusion实战】训练一个diffusion模型生成蝴蝶图像(Pytorch代码详解)
【Diffusion实战】引导一个diffusion模型根据文字生成图像(Pytorch代码详解)
Diffusion综述篇:
【Diffusion综述】医学图像分析中的扩散模型(一)
【Diffusion综述】医学图像分析中的扩散模型(二)
1、数据集装载
使用mnist数据集来训练类别引导diffusion模型,因为其比较简单清晰:
import torch
import torchvision
from torchvision import transforms
from torch import nn
from torch.nn import functional as F
from torch.utils.data import DataLoader
from diffusers import DDPMScheduler, UNet2DModel
from matplotlib import pyplot as plt
from tqdm.auto import tqdm
from PIL import Image
import numpy as np

device = torch.device("cuda" if torch.cuda.is_available() else "cpu")
print(f'Using device: {device}')

dataset = torchvision.datasets.MNIST(root="mnist/", train=True, download=False,
                                     transform=torchvision.transforms.ToTensor())
train_dataloader = DataLoader(dataset, batch_size=8, shuffle=True)

# 查看MNIST数据集样本
x, y = next(iter(train_dataloader))
print('Input shape:', x.shape)
print('Labels:', y)
plt.imshow(torchvision.utils.make_grid(x)[0], cmap='Greys')
plt.axis('off')
plt.show()
看一看我们朴素的样本:

2、创建条件扩散模型
创建了一个名为ClassConditionedUnet的条件扩散模型,定义了一个可学习的嵌入层,用以将数字类别映射到特征向量上,将类别嵌入与原始输入拼接之后,送入常规的UNet网络即可。
知识传送:【python函数】torch.nn.Embedding函数用法图解
class ClassConditionedUnet(nn.Module):
  def __init__(self, num_classes=10, class_emb_size=4):
    super().__init__()

    # 嵌入层将数字类别映射到特征向量上
    self.class_emb = nn.Embedding(num_classes, class_emb_size)

    # 一个常规的UNet网络
    self.model = UNet2DModel(
        sample_size=28,           # 图像尺寸
        in_channels=1 + class_emb_size, # 增加一个通道, 用于条件生成
        out_channels=1,           # 输出通道
        layers_per_block=2,       # 残差连接层数目
        block_out_channels=(32, 64, 64),
        down_block_types=(
            "DownBlock2D",        # a regular ResNet downsampling block
            "AttnDownBlock2D",    # a ResNet downsampling block with spatial self-attention
            "AttnDownBlock2D",
        ),
        up_block_types=(
            "AttnUpBlock2D",
            "AttnUpBlock2D",      # a ResNet upsampling block with spatial self-attention
            "UpBlock2D",          # a regular ResNet upsampling block
          ),
    )

  def forward(self, x, t, class_labels):
    bs, ch, w, h = x.shape  # [8, 1, 28, 28]

    # 类别条件以额外通道的形式输入
    class_cond = self.class_emb(class_labels)  # [8, 4]
    class_cond = class_cond.view(bs, class_cond.shape[1], 1, 1).expand(bs, class_cond.shape[1], w, h)  # [8, 4, 28, 28]

    # 拼接原始输入与类别条件映射
    net_input = torch.cat((x, class_cond), 1)   # (8, 5, 28, 28)

    # 模型预测
    return self.model(net_input, t).sample  # (8, 1, 28, 28)

noisy_xb = torch.randn(8, 1, 28, 28).to(device)
timesteps = torch.linspace(0, 999, 8).long().to(device)
y = torch.tensor([1, 1, 1, 1, 1, 1, 1, 1]).to(device)
model = ClassConditionedUnet().to(device)
with torch.no_grad():
    model_prediction = model(noisy_xb, timesteps, y)
model_prediction.shape  # 验证输出与输出尺寸相同
3、模型训练
训练过程就跟之前的一样啦~
# 创建调度器
noise_scheduler = DDPMScheduler(num_train_timesteps=1000, beta_schedule='squaredcos_cap_v2')
train_dataloader = DataLoader(dataset, batch_size=128, shuffle=True)

n_epochs = 10
net = ClassConditionedUnet().to(device)
loss_fn = nn.MSELoss()
opt = torch.optim.Adam(net.parameters(), lr=1e-3)

losses = []
for epoch in range(n_epochs):
    for x, y in tqdm(train_dataloader):

        # 获取数据并添加噪声
        x = x.to(device) * 2 - 1  # 归一化到[-1, 1]
        y = y.to(device)
        noise = torch.randn_like(x)
        timesteps = torch.randint(0, 999, (x.shape[0],)).long().to(device)
        # 前向加噪
        noisy_x = noise_scheduler.add_noise(x, noise, timesteps)

        # 获得模型预测结果
        pred = net(noisy_x, timesteps, y)  # 此处传入了类别标签

        # 损失计算
        loss = loss_fn(pred, noise)

        # 损失回传, 参数更新
        opt.zero_grad()
        loss.backward()
        opt.step()

        # 损失保存
        losses.append(loss.item())

    # 输出损失
    avg_loss = sum(losses[-100:])/100
    print(f'Finished epoch {epoch}. Average of the last 100 loss values: {avg_loss:05f}')

# 查看损失曲线
plt.figure(dpi=300)
plt.plot(losses)
plt.show()
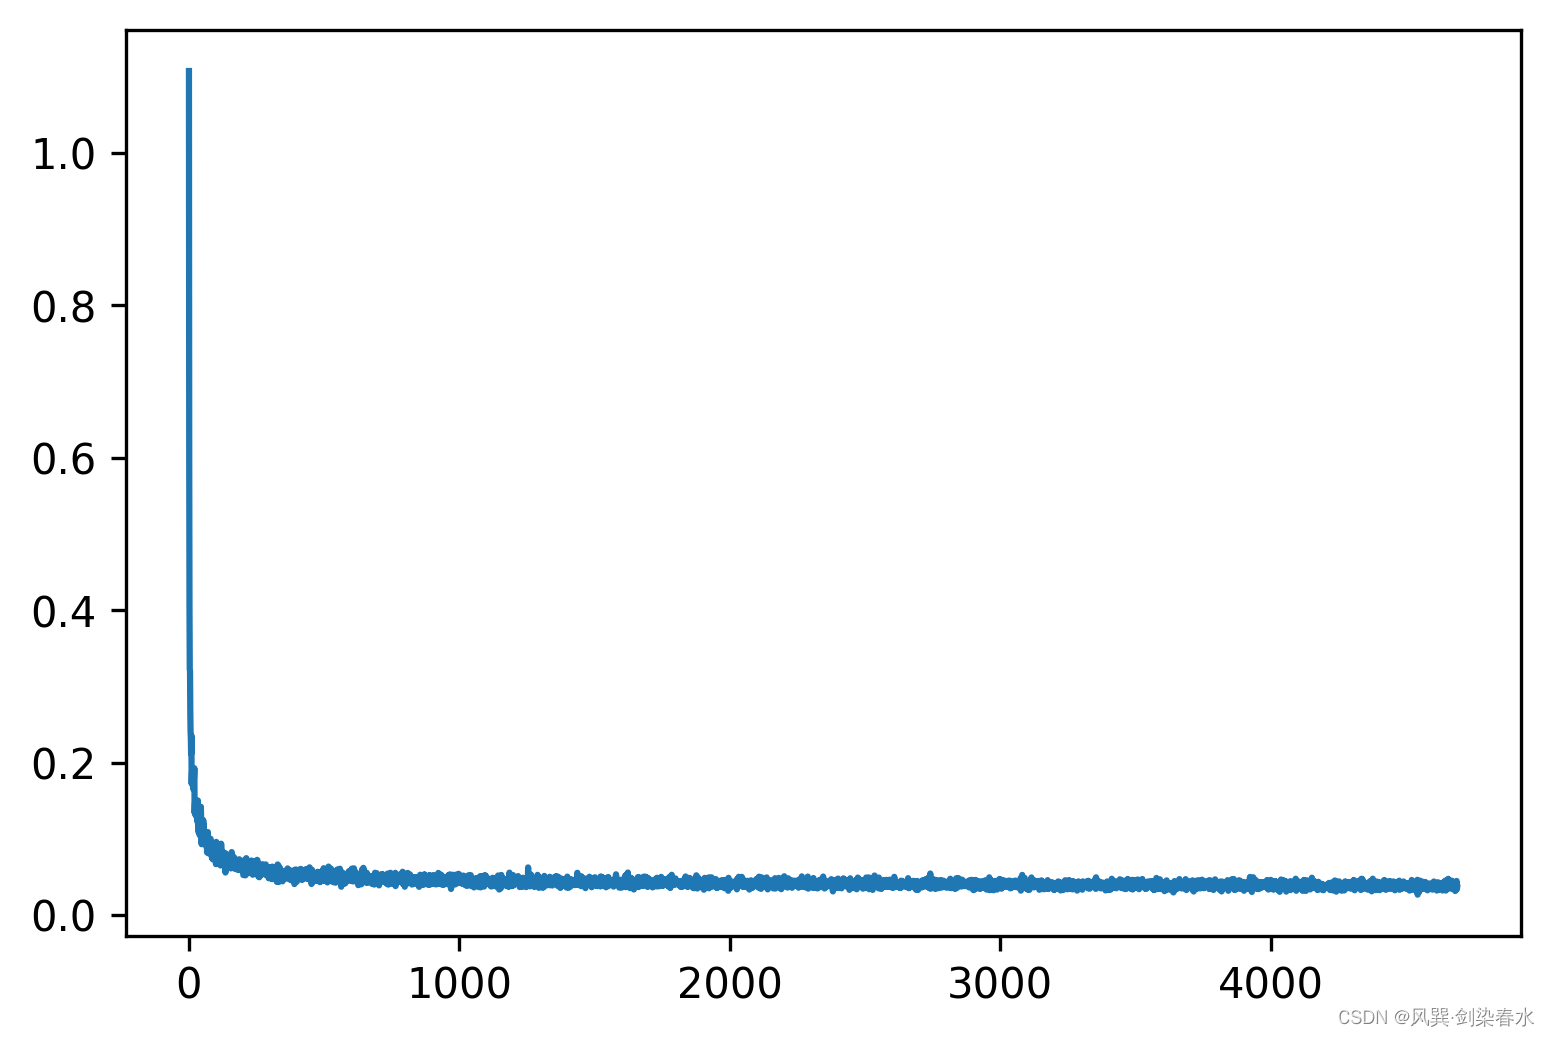
输出损失曲线为:
4、模型推理
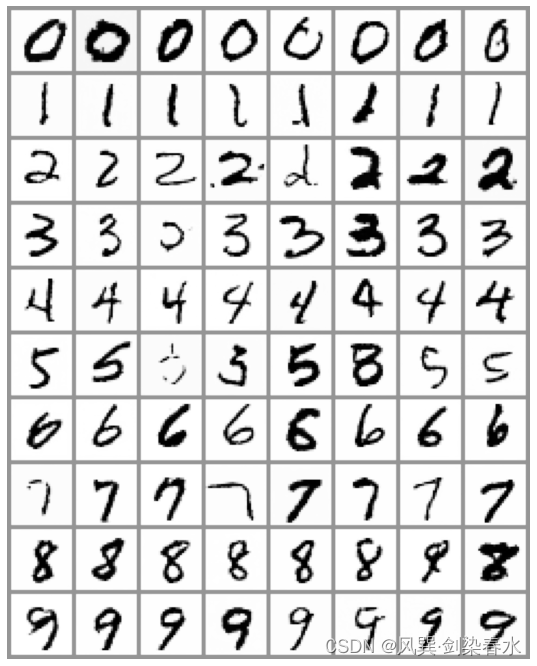
进行采样循环,用类别标签引导图像生成:
x = torch.randn(80, 1, 28, 28).to(device)  # 随机噪声
y = torch.tensor([[i]*8 for i in range(10)]).flatten().to(device)  # 类别标签

# 采样循环
for i, t in tqdm(enumerate(noise_scheduler.timesteps)):

    # 模型预测结果
    with torch.no_grad():
        residual = net(x, t, y)

    # 根据预测噪声和时间步更新图像
    x = noise_scheduler.step(residual, t, x).prev_sample

# 结果可视化
fig, ax = plt.subplots(1, 1, figsize=(12, 12))
ax.imshow(torchvision.utils.make_grid(x.detach().cpu().clip(-1, 1), nrow=8)[0], 'Greys')
ax.axis('off')
类别引导效果如下,效果还是挺好的哩:
5、代码汇总
import torch
import torchvision
from torchvision import transforms
from torch import nn
from torch.nn import functional as F
from torch.utils.data import DataLoader
from diffusers import DDPMScheduler, UNet2DModel
from matplotlib import pyplot as plt
from tqdm.auto import tqdm
from PIL import Image
import numpy as np

device = torch.device("cuda" if torch.cuda.is_available() else "cpu")
print(f'Using device: {device}')

# -----------------------------------------------------------------------------
# 1、数据集装载
dataset = torchvision.datasets.MNIST(root="mnist/", train=True, download=False,
                                     transform=torchvision.transforms.ToTensor())
train_dataloader = DataLoader(dataset, batch_size=8, shuffle=True)

# 查看MNIST数据集样本
x, y = next(iter(train_dataloader))
print('Input shape:', x.shape)
print('Labels:', y)
plt.imshow(torchvision.utils.make_grid(x)[0], cmap='Greys')
plt.axis('off')
plt.show()
# -----------------------------------------------------------------------------

# -----------------------------------------------------------------------------
# 2、创建条件扩散模型
class ClassConditionedUnet(nn.Module):
  def __init__(self, num_classes=10, class_emb_size=4):
    super().__init__()

    # 嵌入层将数字类别映射到特征向量上
    self.class_emb = nn.Embedding(num_classes, class_emb_size)

    # 一个常规的UNet网络
    self.model = UNet2DModel(
        sample_size=28,           # 图像尺寸
        in_channels=1 + class_emb_size, # 增加一个通道, 用于条件生成
        out_channels=1,           # 输出通道
        layers_per_block=2,       # 残差连接层数目
        block_out_channels=(32, 64, 64),
        down_block_types=(
            "DownBlock2D",        # a regular ResNet downsampling block
            "AttnDownBlock2D",    # a ResNet downsampling block with spatial self-attention
            "AttnDownBlock2D",
        ),
        up_block_types=(
            "AttnUpBlock2D",
            "AttnUpBlock2D",      # a ResNet upsampling block with spatial self-attention
            "UpBlock2D",          # a regular ResNet upsampling block
          ),
    )

  def forward(self, x, t, class_labels):
    bs, ch, w, h = x.shape  # [8, 1, 28, 28]

    # 类别条件以额外通道的形式输入
    class_cond = self.class_emb(class_labels)  # [8, 4]
    class_cond = class_cond.view(bs, class_cond.shape[1], 1, 1).expand(bs, class_cond.shape[1], w, h)  # [8, 4, 28, 28]

    # 拼接原始输入与类别条件映射
    net_input = torch.cat((x, class_cond), 1)   # (8, 5, 28, 28)

    # 模型预测
    return self.model(net_input, t).sample  # (8, 1, 28, 28)

noisy_xb = torch.randn(8, 1, 28, 28).to(device)
timesteps = torch.linspace(0, 999, 8).long().to(device)
y = torch.tensor([1, 1, 1, 1, 1, 1, 1, 1]).to(device)
model = ClassConditionedUnet().to(device)
with torch.no_grad():
    model_prediction = model(noisy_xb, timesteps, y)
model_prediction.shape  # 验证输出与输出尺寸相同
# -----------------------------------------------------------------------------

# -----------------------------------------------------------------------------
# 3、模型训练
# 创建调度器
noise_scheduler = DDPMScheduler(num_train_timesteps=1000, beta_schedule='squaredcos_cap_v2')
train_dataloader = DataLoader(dataset, batch_size=128, shuffle=True)

n_epochs = 10
net = ClassConditionedUnet().to(device)
loss_fn = nn.MSELoss()
opt = torch.optim.Adam(net.parameters(), lr=1e-3)

losses = []
for epoch in range(n_epochs):
    for x, y in tqdm(train_dataloader):

        # 获取数据并添加噪声
        x = x.to(device) * 2 - 1  # 归一化到[-1, 1]
        y = y.to(device)
        noise = torch.randn_like(x)
        timesteps = torch.randint(0, 999, (x.shape[0],)).long().to(device)
        # 前向加噪
        noisy_x = noise_scheduler.add_noise(x, noise, timesteps)

        # 获得模型预测结果
        pred = net(noisy_x, timesteps, y)  # 此处传入了类别标签

        # 损失计算
        loss = loss_fn(pred, noise)

        # 损失回传, 参数更新
        opt.zero_grad()
        loss.backward()
        opt.step()

        # 损失保存
        losses.append(loss.item())

    # 输出损失
    avg_loss = sum(losses[-100:])/100
    print(f'Finished epoch {epoch}. Average of the last 100 loss values: {avg_loss:05f}')

# 查看损失曲线
plt.figure(dpi=300)
plt.plot(losses)
plt.show()
# -----------------------------------------------------------------------------

# -----------------------------------------------------------------------------
# 4、模型推理
x = torch.randn(80, 1, 28, 28).to(device)  # 随机噪声
y = torch.tensor([[i]*8 for i in range(10)]).flatten().to(device)  # 类别标签

# 采样循环
for i, t in tqdm(enumerate(noise_scheduler.timesteps)):

    # 模型预测结果
    with torch.no_grad():
        residual = net(x, t, y)

    # 根据预测噪声和时间步更新图像
    x = noise_scheduler.step(residual, t, x).prev_sample

# 结果可视化
fig, ax = plt.subplots(1, 1, figsize=(12, 12))
ax.imshow(torchvision.utils.make_grid(x.detach().cpu().clip(-1, 1), nrow=8)[0], 'Greys')
ax.axis('off')
# -----------------------------------------------------------------------------
diffusion的修炼境界又提升了一级~
