前言
从今天开始,我们详解介绍制作实时天气时钟项目的方法步骤,主要分以下几个专题分别进行:(1)连接点亮SPI-TFT屏幕和UI布局设计;(2)NodeMCU的WIFI模式设置及连接;(3)连接I2C-SHT30传感器,获取显示当前温湿度数据;(4)连接NTP服务器,获取并显示网络时钟数据;(5)连接 [和风天气](商业气象服务商)服务器,获取并显示实时天气数据;(6)按照UI设计实时更新显示各项数据,等等。
第二专题内容,请参考
【NodeMCU实时天气时钟温湿度项目 2】WIFI模式设置及连接-CSDN博客
第三专题内容,请参考
【NodeMCU实时天气时钟温湿度项目 3】连接SHT30传感器,获取并显示当前环境温湿度数据(I2C)-CSDN博客
今天是第一专题的内容。
一、项目需求清单
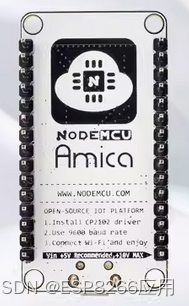
1. MCU开发平台:NodeMCU 1.0 (ESP-12E Module)

2. 软件开发环境:VSCode + PlatformIO
Platforms:Espressif 8266
Framework: Arduino
3. TFT显示屏:1.3寸液晶屏模组,240x240 IPS高清SPI串口屏,驱动芯片ST7789


4. 传感器:SHT3X温湿度传感器

4. 面包板、杜邦线若干
5. 第三方库:TFT_eSPI,NTPClient,ArduinoJson,etc ...
二、硬件电路连接关系


三、添加TFT_eSPI 图形库
方法一:直接打开 PlatformIO 界面,在箭头指向的搜索栏内,输入TFT_eSPI,添加库。

方法二:当创建工程完成后,在该工程中添加库。
1. 打开当前工程文件夹
2. 依次进入.pio\libdeps\nodemcuv2\目录,直接将下载解压后的文件,拷贝到此目录。


四、配置TFT_eSPI 图形库
1、依次进入项目文件夹下的 .pio\libdeps\nodemcuv2\TFT_eSPI 文件夹。

2、使用NotePad++打开 User_Setup.h文件,复制以下代码,替换该文件内容。
#define USER_SETUP_INFO "User_Setup"

#define ST7789_DRIVER      // Full configuration option, define additional parameters below for this display
#define TFT_WIDTH  240 // ST7789 240 x 240 and 240 x 320
#define TFT_HEIGHT 240 // ST7789 240 x 240

// For NodeMCU - use pin numbers in the form PIN_Dx where Dx is the NodeMCU pin designation
#define TFT_MOSI  PIN_D7  // Automatically assigned with ESP8266 if not defined
#define TFT_SCLK  PIN_D5  // Automatically assigned with ESP8266 if not defined

//*** 2.4寸TFT,8P,320*240, display cs pin is attached to MCU pin GND. //*** 1.3寸TFT,7P, 240*240, this line is not attached any MCU pin.
//#define TFT_CS    PIN_D8  // Chip select control pin D8
#define TFT_DC    PIN_D3  // Data Command control pin
#define TFT_RST   PIN_D4  // Reset pin (could connect to NodeMCU RST, see next line)

#define LOAD_GLCD   // Font 1. Original Adafruit 8 pixel font needs ~1820 bytes in FLASH
#define LOAD_FONT2  // Font 2. Small 16 pixel high font, needs ~3534 bytes in FLASH, 96 characters
#define LOAD_FONT4  // Font 4. Medium 26 pixel high font, needs ~5848 bytes in FLASH, 96 characters
#define LOAD_FONT6  // Font 6. Large 48 pixel font, needs ~2666 bytes in FLASH, only characters 1234567890:-.apm
#define LOAD_FONT7  // Font 7. 7 segment 48 pixel font, needs ~2438 bytes in FLASH, only characters 1234567890:-.
#define LOAD_FONT8  // Font 8. Large 75 pixel font needs ~3256 bytes in FLASH, only characters 1234567890:-.

#define LOAD_GFXFF  // FreeFonts. Include access to the 48 Adafruit_GFX free fonts FF1 to FF48 and custom fonts

#define SMOOTH_FONT
#define SPI_FREQUENCY  27000000
#define SPI_READ_FREQUENCY  20000000
#define SPI_TOUCH_FREQUENCY  2500000
五、项目UI布局设计展示
下图是项目最终完成后的TFT显示布局,显示内容为静态文本,仅作为布局设计的展示。
今后几个专题,我们将从网络获取实时日期时间、实时天气和明天天气,从温湿度传感器获取实时的空间数据。
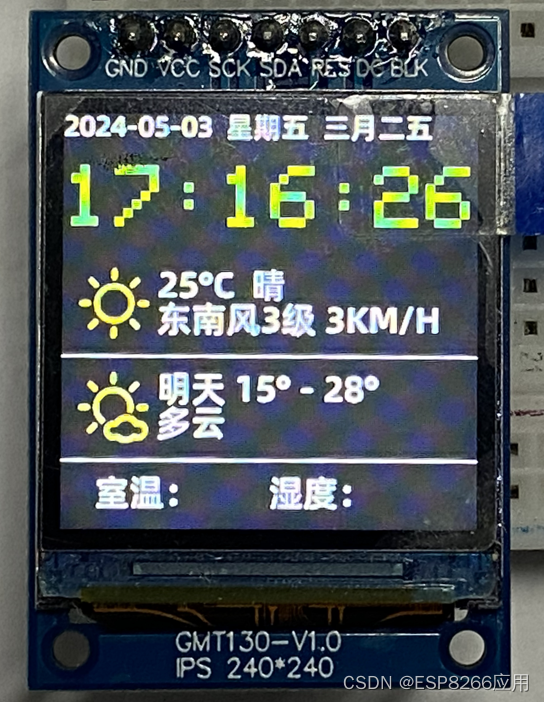
以下代码是项目主文件 main.cpp 具体内容,供参考。
//main.cpp   ---项目主文件

#include <Arduino.h>
#include <TFT_eSPI.h>

//构造函数,实例化 TFT 屏幕对象
TFT_eSPI tft = TFT_eSPI();

//程序用到的字库文件,后面再详细说明
#include "hefeng-min-40px.h"
#include "weather_font20.h"
#include "weather_font16.h"

void setup()
{
  //设置串口波特率
  Serial.begin(115200);

  //等待串口稳定
  Serial.println("");
  Serial.println("");
  Serial.println("");

  //TFT初始化设置
  tft.init();
  tft.setSwapBytes(true);
  tft.setRotation(0);
  tft.fillScreen(TFT_BLACK);
  tft.setTextColor(TFT_WHITE, TFT_BLACK, true);

  // 显示当前日期,星期几,农历
  tft.loadFont(weather_font16);
  tft.setTextColor(TFT_WHITE, TFT_BLACK, true);
  tft.drawString("2024-05-03  星期五  三月二五", 0, 0);
  tft.unloadFont();

  tft.setTextSize(5);
  tft.setTextColor(TFT_GREEN, TFT_BLACK, true);
  tft.drawString("17:16:26", 0, 30);

  // 今日天气
  // 擦除指定区域
  tft.fillRect(55, 90, 240, 40, TFT_BLACK);
  tft.setTextColor(TFT_YELLOW, TFT_BLACK, true);
  tft.loadFont(hefeng40);
  tft.drawString("\uf101", 10, 90);
  tft.unloadFont();

  tft.loadFont(weather_font20);
  tft.setTextColor(TFT_WHITE, TFT_BLACK, true);
  tft.drawString("25°C  晴", 55, 90);
  tft.drawString("东南风3级 3KM/H", 55, 110);

  tft.drawLine(0, 140, 240, 140, TFT_WHITE);

  // 明日天气
  // 擦除指定区域
  tft.fillRect(55, 150, 240, 40, TFT_BLACK);

  tft.loadFont(hefeng40);
  tft.setTextColor(TFT_YELLOW, TFT_BLACK, true);
  tft.drawString("\uf103", 10, 150);
  tft.unloadFont();

  tft.loadFont(weather_font20);
  tft.setTextColor(TFT_WHITE, TFT_BLACK, true);
  tft.drawString("明天 15° - 28°", 55, 150);
  tft.drawString("多云", 55, 170);

  tft.drawLine(0, 200, 240, 200, TFT_WHITE);

  // 温湿度传感器的数据
  tft.loadFont(weather_font20);
  tft.setTextColor(TFT_WHITE, TFT_BLACK, true);

  tft.drawString("室温:", 20, 210);
  tft.setTextColor(TFT_GREEN, TFT_BLACK, true);

  tft.setTextColor(TFT_WHITE, TFT_BLACK, true);
  tft.drawString("湿度:", 120, 210);

  tft.setTextColor(TFT_GREEN, TFT_BLACK, true);
}

void loop()
{
}
六、项目源代码下载
百度网盘下载链接:https://pan.baidu.com/s/1zejX6A5kA70HZqXS0XWqYA?pwd=ueef
提取码:ueef
将项目导入 【VSCode + PlatformIO】环境下,编译上传到开发板后,TFT屏幕即按照UI布局设计的样式,显示出有关的信息。
参考文档:欢迎留言交流
1. platformio添加外部库文件方法_platformio添加自己的库-CSDN博客
2. 【NodeMcu-ESP8266】点亮 1.3寸/2.4寸TFT液晶屏(SPI,ST7789)-CSDN博客
