设计模式-原型模式
- 一 官方定义
- 二 案例演示
- 解决方案一 - 一般实现方式
- 实现过程
- 案例分析
- 解决方案二
- 使用场景
- 实现过程一
- 实现过程 二
- 案例分析
- 三 浅拷贝和深拷贝
- 浅拷贝问题演示
- 实现过程
- 案例分析
- 解决方案-----深拷贝实现方式一:重写clone()方法
- 扩展思考
一 官方定义
原型模式的简单程度仅低于单例模式和迭代器模式。使用场景非常多
原型模式: 用原型实例指定创建对象的种类,并且通过拷贝这些原型创建新的对象 即实现了一个原型接口,该接口用于创建当前对象的克隆,当直接创建对象的代价比较大时,则采用这种模式
二 案例演示
需求:打印很多份简历 简历信息都是一样的
解决方案一 - 一般实现方式
实现过程
Resume 简历类
/**
 * @Description 简历类
 */
@Data
@AllArgsConstructor
public class Resume {

    private String name;

    private String job;  //期望职位

    private String salary; //期望薪资

}
测试类
/**
 * @Description 客户端  打印很多份简历  简历信息是一样的
 */
public class Client {

    public static void main(String[] args) {

        Resume resume = new Resume("李逵", "Java开发", "面议");

        for (int i = 0; i < 10; i++) {

            Resume clone = new Resume(resume.getName(), resume.getJob(), resume.getSalary());

            System.out.println(clone + "已打印成功");

        }
    }
}
结果
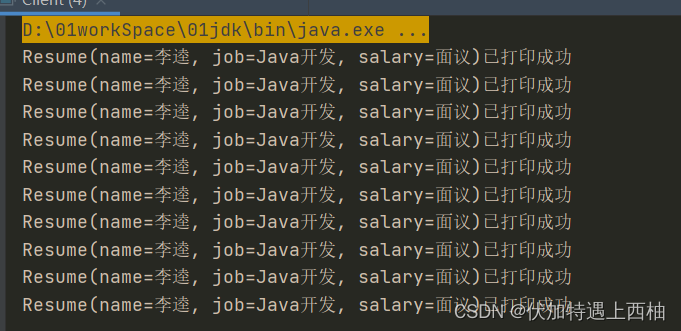
案例分析
优势 简单 容易理解
劣势 效率非常低
解决方案二
使用原型模式来实现。核心原理是 实现Cloneable接口重写clone方法。
使用场景
当需要一个类的大量对象的时候
如果一个对象初始化太过繁琐
实现过程一
Resume 简历类
①实现Cloneable接口
②重写clone方法
@Data
@AllArgsConstructor
public class Resume implements Cloneable{

    private String name;

    private String job;  //期望职位

    private String salary; //期望薪资

    @Override
    protected Resume clone(){
        Resume clone = null;
        try {
            clone = (Resume) super.clone();
        } catch (CloneNotSupportedException e) {
            e.getMessage();
        }
        return clone;
    }
}
测试类1
public class Client {

    public static void main(String[] args) {
        Resume resume = new Resume("李逵", "Java开发", "面议");
        for (int i = 0; i < 10; i++) {
            Resume clone =  resume.clone();
            System.out.println(clone);
            System.out.println("clone = " + clone.hashCode());
        }
    }
}
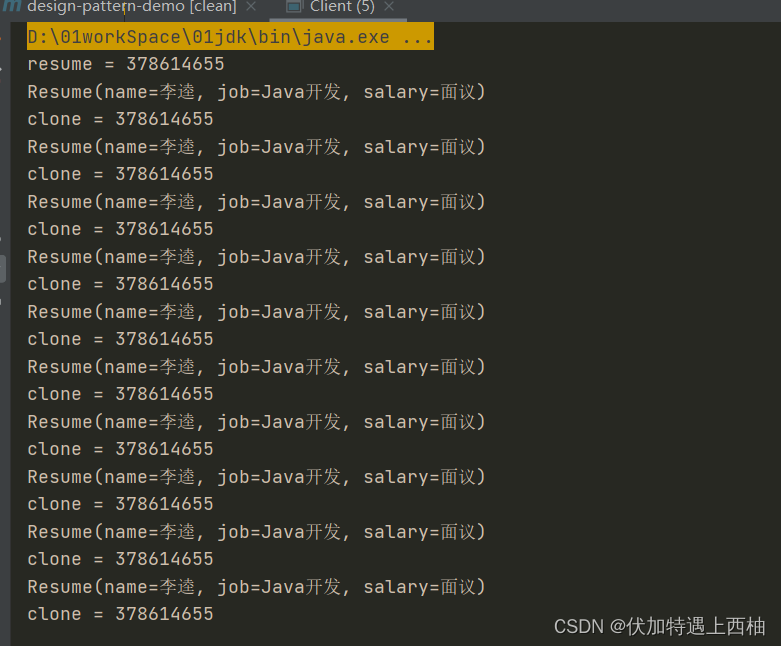
结果
测试类2
public class Client {

    public static void main(String[] args) {
        Resume resume = new Resume("李逵", "Java开发", "面议");
        System.out.println("resume = " + resume.hashCode());
        for (int i = 0; i < 10; i++) {
            Resume clone =  (Resume)resume.clone();
            clone.setJob("教师2"+i);
            System.out.println(clone);
            System.out.println("clone = " + clone.hashCode());
        }
    }
}
结果
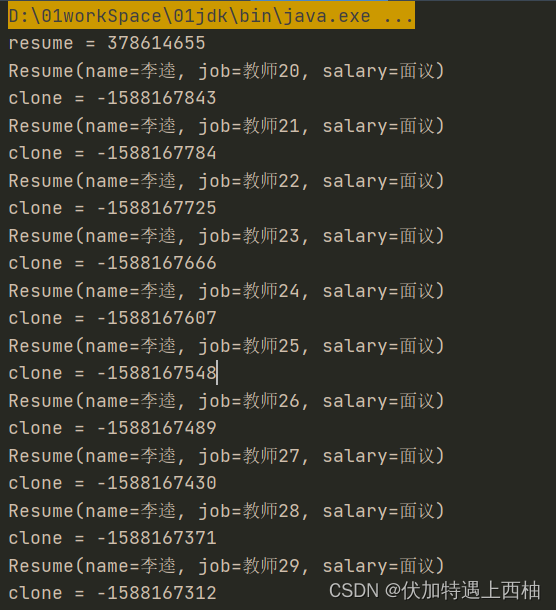
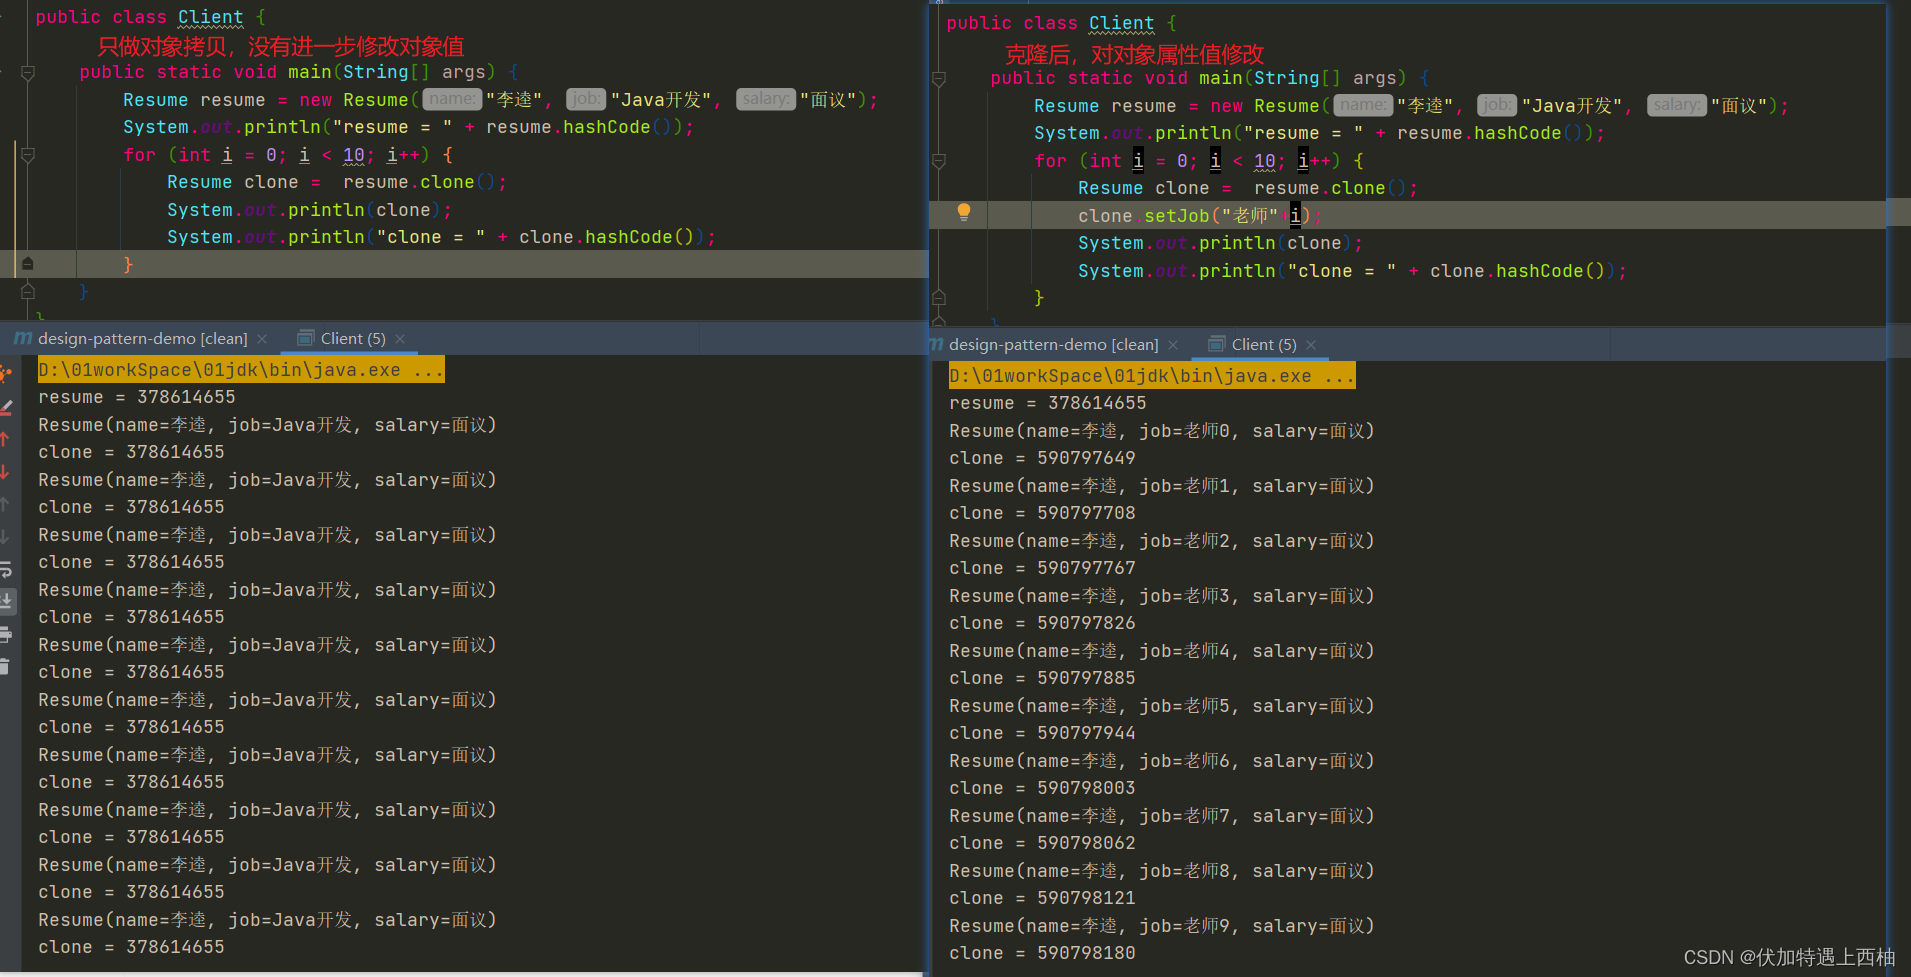
使用lombok注解标记实体类,克隆对象发现如果对象值没有任何修改,hashCode值一样,做的是浅拷贝。克隆对象如果对象值有修改,做的是深拷贝。最终排查是由于@Data注解它是一个混合注释,它包含了@Getter @Setter @RequiredArgsConstructor @ToString @EqualsAndHashCode的功能。@EqualsAndHashCode中属性callSuper 默认为false。所以同类型比较时,当字段相同时,hashcode值是一样的。
解决办法:使用@Getter@Sette r单个注解
@Data取代Get,Set方法的使用总结以及注意事项
实现过程 二
Resume类
public class Resume implements Cloneable{

    private String name;


    private String job;  //期望职位

    private String salary; //期望薪资

    public String getName() {
        return name;
    }
    public Resume(String name, String job, String salary) {
        this.name = name;
        this.job = job;
        this.salary = salary;
    }

    public void setName(String name) {
        this.name = name;
    }

    public String getJob() {
        return job;
    }

    public void setJob(String job) {
        this.job = job;
    }

    public String getSalary() {
        return salary;
    }

    public void setSalary(String salary) {
        this.salary = salary;
    }


    @Override
    public String toString() {
        return "Resume{" +
                "name='" + name + '\'' +
                ", job='" + job + '\'' +
                ", salary='" + salary + '\'' +
                '}';
    }

    @Override
    protected Object clone(){

        Resume resume = null;

        Resume clone = null;
        try {
            clone = (Resume) super.clone();
        } catch (CloneNotSupportedException e) {
            e.getMessage();
        }

        return clone;

    }
}
测试类
public class Client {

    public static void main(String[] args) {

        Resume resume = new Resume("李逵", "Java开发", "面议");

        for (int i = 0; i < 10; i++) {

            Resume clone = (Resume) resume.clone();

            System.out.println(clone);
            System.out.println("clone = " + clone.hashCode());

        }
    }
}
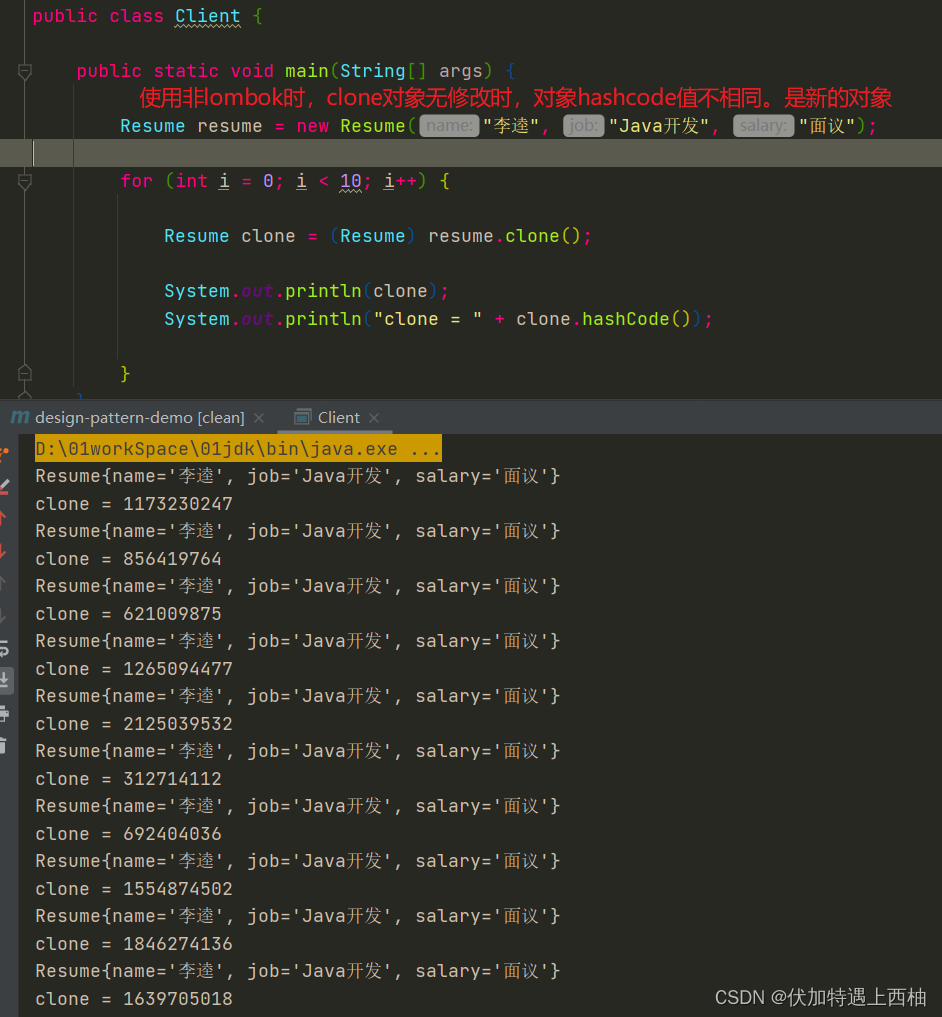
案例分析
在clone()方法上面增加了一个注解@Override,在Cloneable接口中没有任何方法,那么这个重写的方法是从哪里来的呢。想想看java中所有的类老祖宗是谁? 对嘛 ,Object类,每个类默认都继承了这个类。所以重写是非常正确的----重写了Object类中的clone方法。
三 浅拷贝和深拷贝
浅拷贝
对于数据类型是基本数据类型的成员变量,浅拷贝会直接进行值传递
对于数据类型是引用数据类型的成员变量,那么浅拷贝会进行引用传递
深拷贝
复制对象的所有基本数据类型的成员变量值
为所有引用数据类型的成员变量申请存储空间,并复制每个引用数据类型成员变量所引用的对象,直到该对象可达的所有对象
进行深拷贝会复制整个对象,包含对象的引用类型
浅拷贝问题演示
Object类提供的方法clone只是拷贝对象,器对象内部的数组、引用对象等都不拷贝,还是指向原生对象的内部元素地址,这种拷贝就是浅拷贝。确实非常浅,两个对象都不拷贝,还是指向原生对象的内部元素大家都能改,是一种非常不安全的方式。
实现过程
Witness类
//证明人类
public class Witness {

    private String name;

    private String job; //职务

    public Witness(String name, String job) {
        this.name = name;
        this.job = job;
    }

    public String getName() {
        return name;
    }

    public void setName(String name) {
        this.name = name;
    }

    public String getJob() {
        return job;
    }

    public void setJob(String job) {
        this.job = job;
    }

    @Override
    public String toString() {
        return "Witness{" +
                "name='" + name + '\'' +
                ", job='" + job + '\'' +
                '}';
    }
}
Resume类
//简历类2.0
@Getter
@Setter
@ToString
public class Resume implements Cloneable{

    private String name;

    private String job;

    private String salary;

    private Witness witness; //证明人

    public Resume(String name, String position, String salary) {
        this.name = name;
        this.job = position;
        this.salary = salary;
    }
    @Override
    protected Object clone() {

        Resume resume = null;

        try{
            resume = (Resume) super.clone();

        }catch (CloneNotSupportedException e){

            e.printStackTrace();
        }
        return resume;
    }
}
测试类
public class Client {

    public static void main(String[] args) {

        Resume resume = new Resume("小李", "java开发", "面议");
        Witness witness = new Witness("三叔", "养猪场CTO");
        resume.setWitness(witness);

        Resume clone = (Resume) resume.clone();
        Resume clone1 = (Resume) resume.clone();
        resume.setName("小红" );
        witness.setName("李白");
        Resume clone2 = (Resume) resume.clone();


        System.out.println("clone = " + clone);
        System.out.println("clone1 = " + clone1);
        System.out.println("clone2 = " + clone2);


        System.out.println( "clone=" + clone.hashCode()+ "  witness=" +clone.getWitness().hashCode());

        System.out.println("clone1=" + clone1.hashCode()+ "  witness1=" +clone1.getWitness().hashCode());

        System.out.println("clone2=" + clone2.hashCode()+ "  witness2=" +clone2.getWitness().hashCode());
    }
}
结果
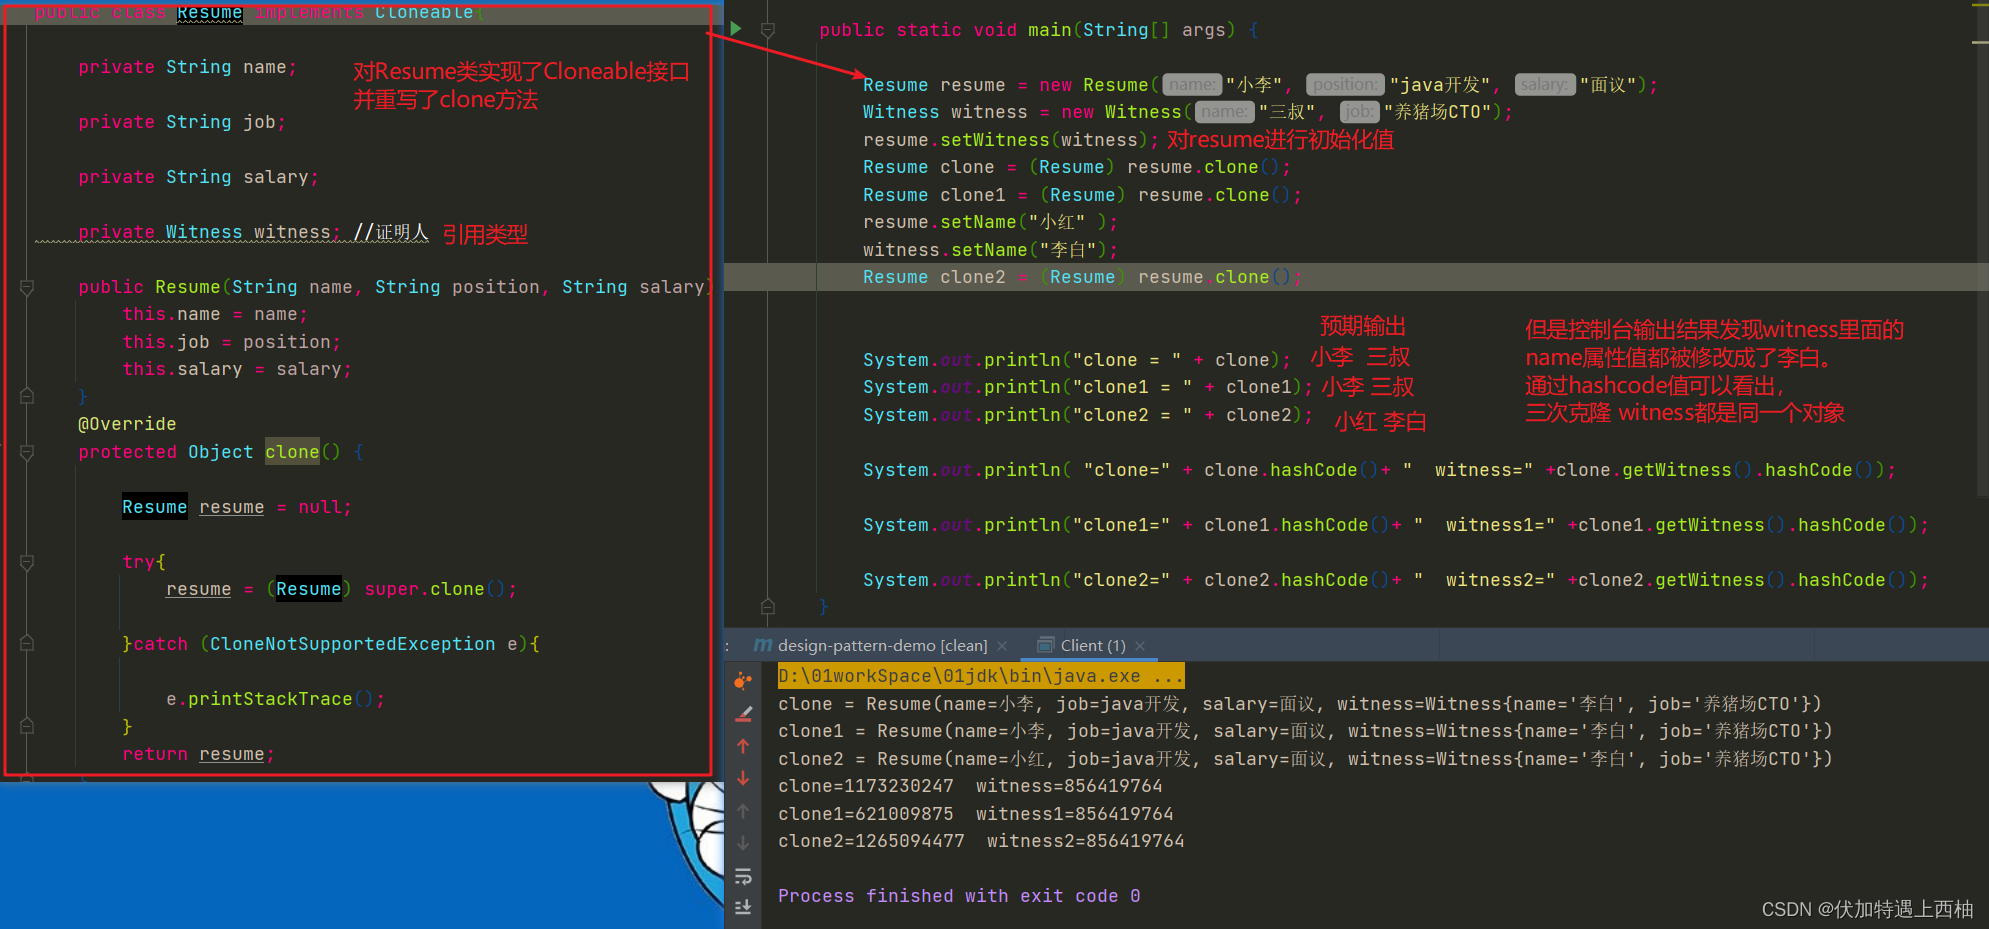
案例分析
复制的对象中有引用类型时 例如数组,集合,对象。并不会将这些类型复制一份,只是引传递。对其修改时会在原来的基础上进行修改。
解决方案-----深拷贝实现方式一:重写clone()方法
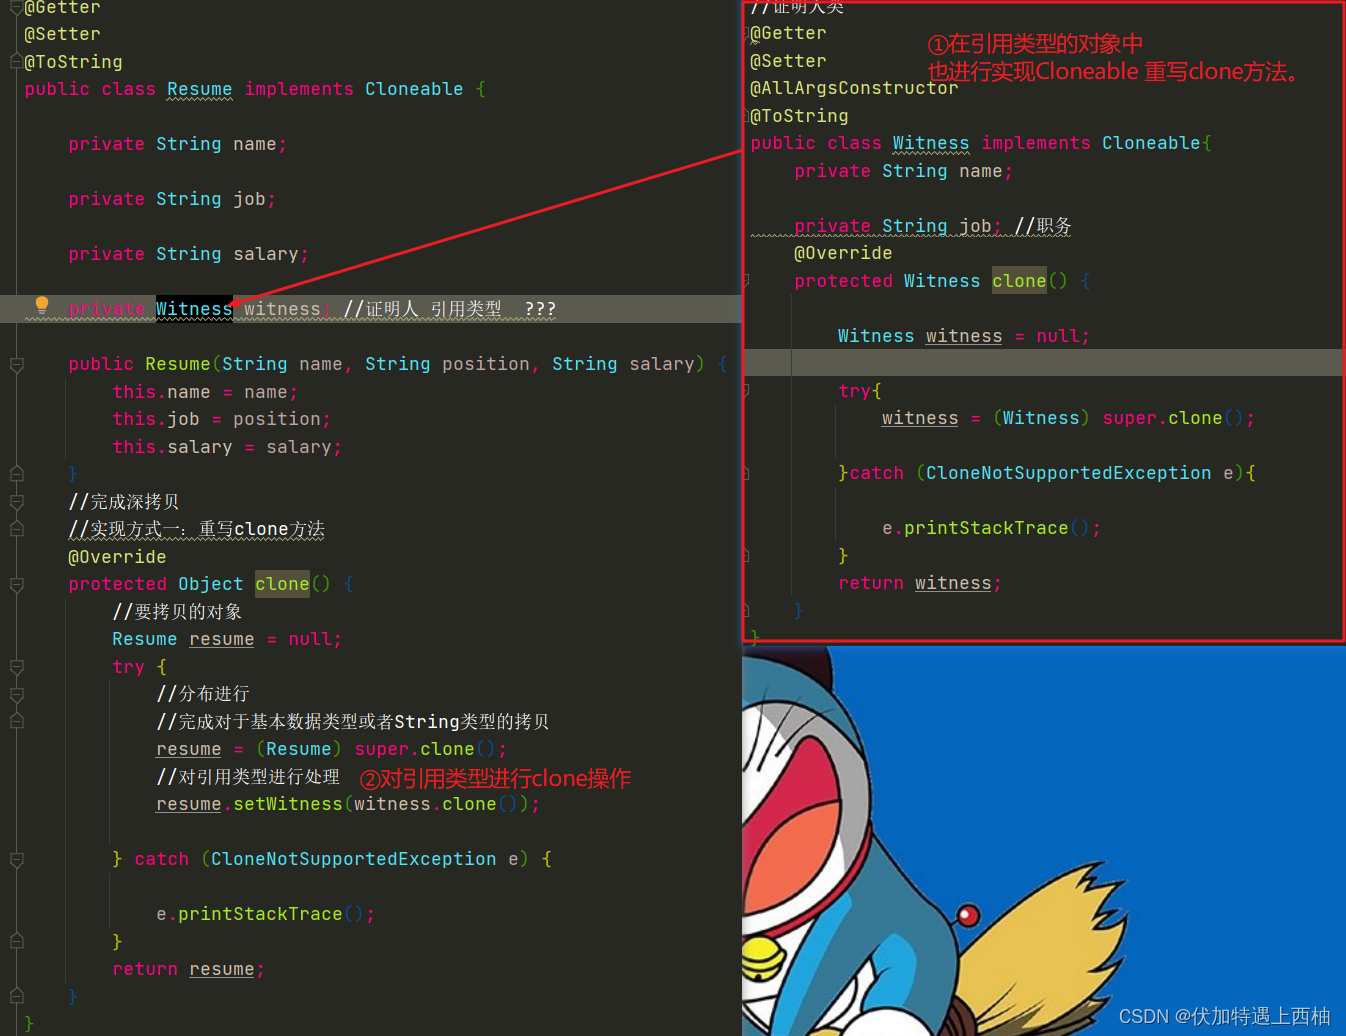
在引用类型的对象中也进行实现Cloneable 重写clone方法。
//证明人类
@Getter
@Setter
@AllArgsConstructor
@ToString
public class Witness implements Cloneable{
    private String name;

    private String job; //职务
    @Override
    protected Witness clone() {

        Witness witness = null;

        try{
            witness = (Witness) super.clone();

        }catch (CloneNotSupportedException e){

            e.printStackTrace();
        }
        return witness;
    }
}
在使用类中处理引用类型
//简历类2.0
@Getter
@Setter
@ToString
public class Resume implements Cloneable {

    private String name;

    private String job;

    private String salary;

    private Witness witness; //证明人 引用类型  ???

    public Resume(String name, String position, String salary) {
        this.name = name;
        this.job = position;
        this.salary = salary;
    }
    //完成深拷贝
    //实现方式一:重写clone方法
    @Override
    protected Object clone() {
        //要拷贝的对象
        Resume resume = null;
        try {
            //分布进行
            //完成对于基本数据类型或者String类型的拷贝
            resume = (Resume) super.clone();
            //对引用类型进行处理
            resume.setWitness(witness.clone());

        } catch (CloneNotSupportedException e) {

            e.printStackTrace();
        }
        return resume;
    }
}
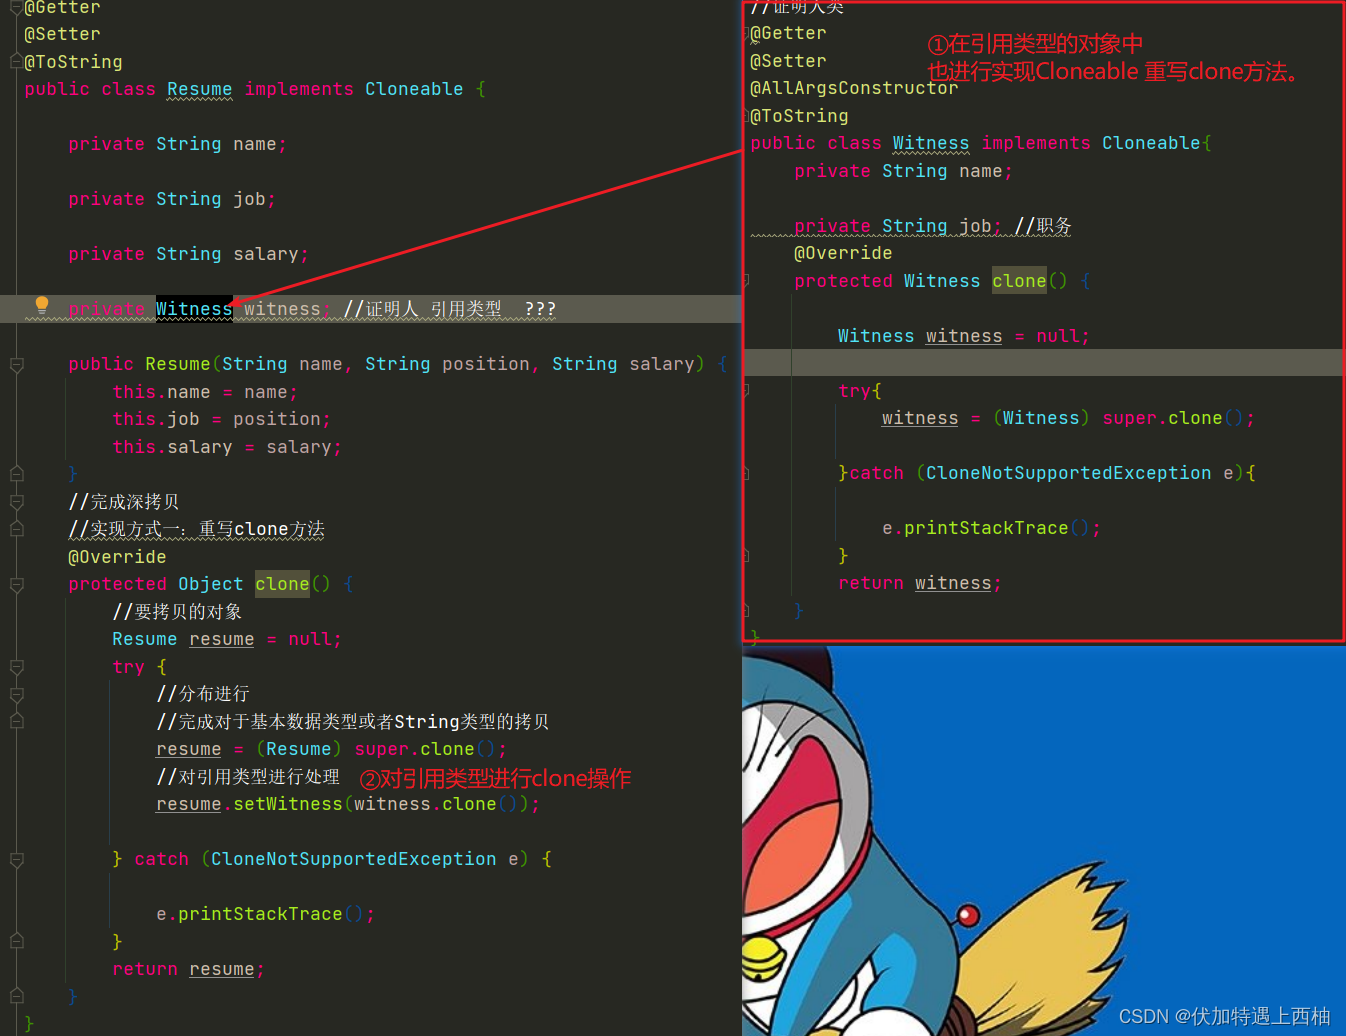
测试类
扩展思考
如果是级联引用对象呢? 比如在Witness类中定义引用类型对象DeepCloneableTarget
@Getter
@Setter
@ToString
public class DeepCloneableTarget implements Cloneable {

    private String cloneName;

    private String cloneClass;

    //引用类型呢?

    public DeepCloneableTarget(String cloneName, String cloneClass) {

        this.cloneName = cloneName;

        this.cloneClass = cloneClass;
    }

    //使用默认的就可以

    @Override
    protected DeepCloneableTarget clone() throws CloneNotSupportedException {
        return (DeepCloneableTarget) super.clone();
    }
}
Witness类
//证明人类
@Getter
@Setter
@AllArgsConstructor
@ToString
public class Witness implements Cloneable{
    private String name;

    private String job; //职务

    private DeepCloneableTarget deepCloneableTarget;
    @Override
    protected Witness clone() {

        Witness witness = null;

        try{
            witness = (Witness) super.clone();

        }catch (CloneNotSupportedException e){

            e.printStackTrace();
        }
        return witness;
    }
}
Resume类
@Getter
@Setter
@ToString
public class Resume implements Cloneable {

    private String name;

    private String job;

    private String salary;

    private Witness witness; //证明人 引用类型  ???

    public Resume(String name, String position, String salary) {
        this.name = name;
        this.job = position;
        this.salary = salary;
    }
    //完成深拷贝
    //实现方式一:重写clone方法
    @Override
    protected Object clone() {
        //要拷贝的对象
        Resume resume = null;
        try {
            //分布进行
            //完成对于基本数据类型或者String类型的拷贝
            resume = (Resume) super.clone();
            //对引用类型进行处理
            resume.setWitness(witness.clone());

            resume.getWitness().setDeepCloneableTarget(witness.getDeepCloneableTarget().clone());

        } catch (CloneNotSupportedException e) {

            e.printStackTrace();
        }
        return resume;
    }
}
测试类
public class Client {

    public static void main(String[] args) throws CloneNotSupportedException {

        Resume resume = new Resume("小李", "java开发", "面议");
        DeepCloneableTarget deepCloneableTarget = new DeepCloneableTarget("克隆", "花花");
        Witness witness = new Witness("三叔", "养猪场CTO",deepCloneableTarget);
        resume.setWitness(witness);
        Resume clone = (Resume) resume.clone();
        Resume clone1 = (Resume) resume.clone();
        resume.setName("小红" );
        witness.setName("李白");
        deepCloneableTarget.setCloneClass("草草");
        Resume clone2 = (Resume) resume.clone();

        System.out.println("clone = " + clone);
        System.out.println("clone1 = " + clone1);
        System.out.println("clone2 = " + clone2);

        System.out.println( "clone=" + clone.hashCode()+ "  witness=" +clone.getWitness().hashCode()+" DeepCloneableTarget"+clone.getWitness().getDeepCloneableTarget().hashCode());

        System.out.println("clone1=" + clone1.hashCode()+ "  witness1=" +clone1.getWitness().hashCode()+" DeepCloneableTarget1"+clone1.getWitness().getDeepCloneableTarget().hashCode());

        System.out.println("clone2=" + clone2.hashCode()+ "  witness2=" +clone2.getWitness().hashCode()+" DeepCloneableTarget2"+clone2.getWitness().getDeepCloneableTarget().hashCode());


    }
}
结果
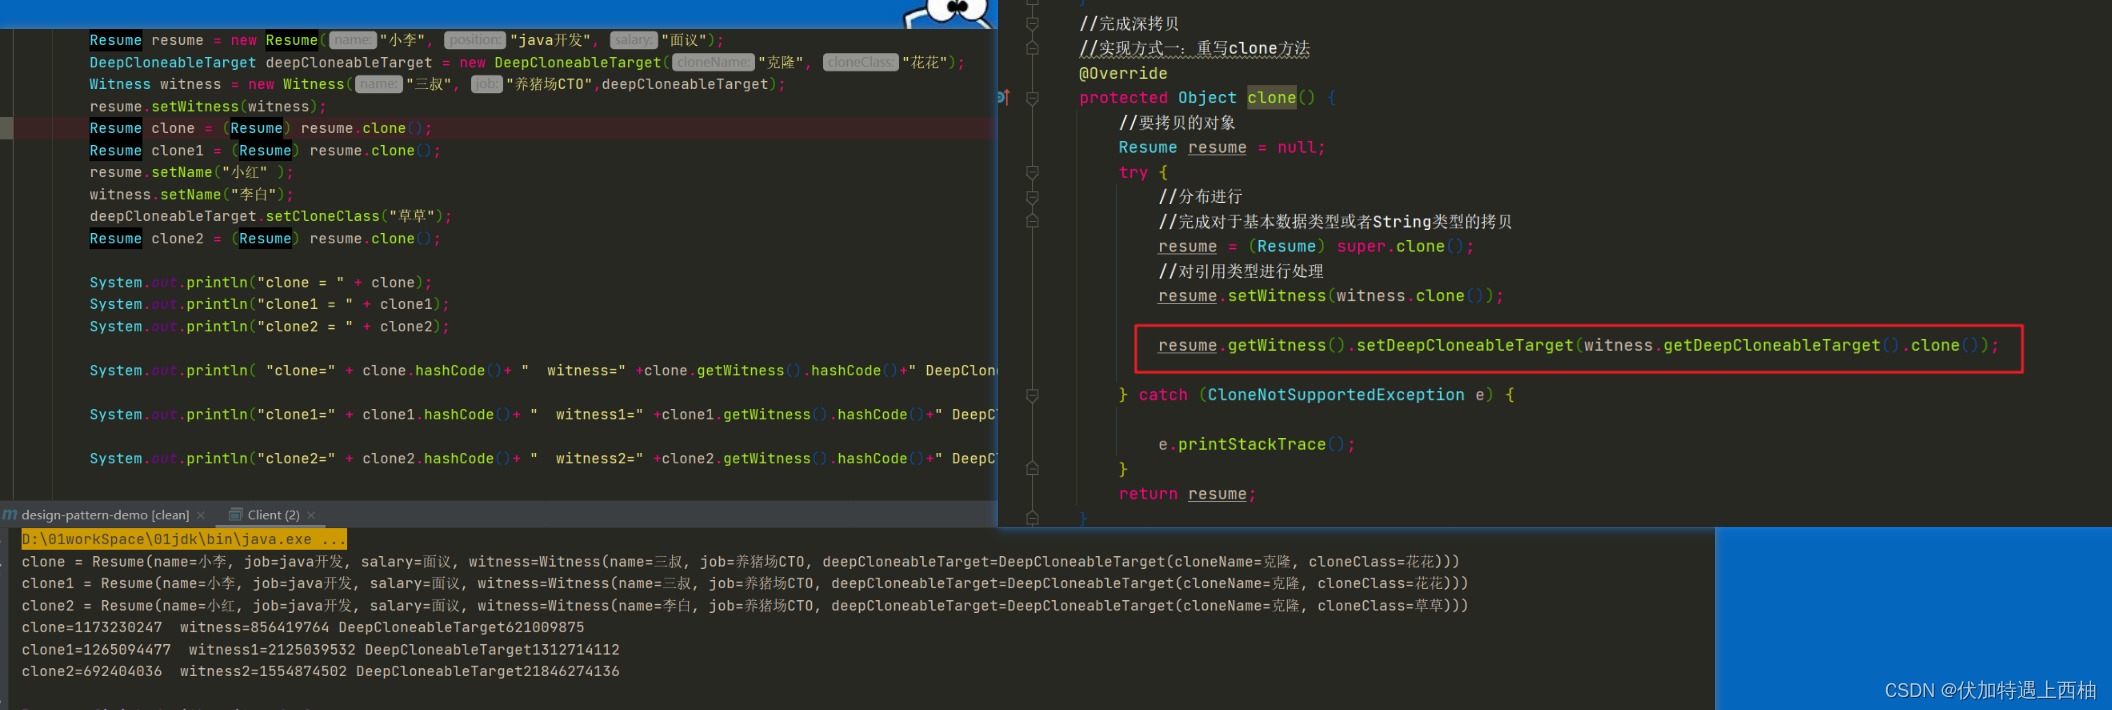
解决方案—深拷贝实现方式二:序列化方式
通过扩展思考案例我们可以发现如果存在级联嵌套引用那么,需要手动写clone方法,非常不方便。那么有没有一种简便的方式来实现深拷贝呢?答案是肯定的。本节就详细介绍序列化方式实现深拷贝。
步骤:
①:级联对象实现序列化接口
②:在拷贝的对象中添加流式克隆
拷贝对象类
Resume
//简历类2.0
@Getter
@Setter
@ToString
public class Resume implements Serializable, Cloneable {

    private static final long serialVersionUID = 1L;
    private String name;

    private String job;

    private String salary;

    private Witness witness; //证明人 引用类型  ???

    public Resume(String name, String position, String salary) {
        this.name = name;
        this.job = position;
        this.salary = salary;
    }
    //完成深拷贝
    //实现方式二:通过对象序列化的方式
    public Object deepClone(){

        //类需要实现序列化接口
        //创建流对象
        ByteArrayOutputStream bos  = null;
        ObjectOutputStream oos  = null;
        ByteArrayInputStream bis = null;
        ObjectInputStream ois = null;

        //序列化操作
        try {
            bos = new ByteArrayOutputStream();
            oos = new ObjectOutputStream(bos);
            //序列化
            oos.writeObject(this);

            //反序列化操作
            bis = new ByteArrayInputStream(bos.toByteArray());
            ois = new ObjectInputStream(bis);
            Resume resume = (Resume) ois.readObject();
            return resume;
        } catch (Exception e) {
            e.printStackTrace();
        } finally {

            //关闭流对象
            try {
                bos.close();
                oos.close();
                bis.close();
                ois.close();
            } catch (IOException e) {
                e.printStackTrace();
            }
        }

        return null;

    }

}
级联类一 实现序列化接口,克隆接口
Witness
//证明人类
@Getter
@Setter
@AllArgsConstructor
@ToString
public class Witness implements Serializable, Cloneable{
    private String name;

    private String job; //职务

    private DeepCloneableTarget deepCloneableTarget;
    @Override
    protected Witness clone() {

        Witness witness = null;

        try{
            witness = (Witness) super.clone();

        }catch (CloneNotSupportedException e){

            e.printStackTrace();
        }
        return witness;
    }
}
级联类二 实现序列化接口,克隆接口
@Getter
@Setter
public class DeepCloneableTarget implements Serializable, Cloneable {

	private String cloneName;

	private String cloneClass;

	public DeepCloneableTarget(String cloneName, String cloneClass) {
		this.cloneName = cloneName;
		this.cloneClass = cloneClass;
	}


	@Override
	protected Object clone() throws CloneNotSupportedException {
		return super.clone();
	}

	@Override
	public String toString() {
		return "DeepCloneableTarget{" +
				"cloneName='" + cloneName + '\'' +
				", cloneClass='" + cloneClass + '\'' +
				'}';
	}
}
测试类
public class Client {

    public static void main(String[] args) {
        Resume resume = new Resume("小李", "java开发", "面议");
        DeepCloneableTarget deepCloneableTarget = new DeepCloneableTarget("克隆", "花花");
        Witness witness = new Witness("三叔", "养猪场CTO",deepCloneableTarget);
        resume.setWitness(witness);
        Resume clone = (Resume) resume.deepClone();
        Resume clone1 = (Resume) resume.deepClone();
        resume.setName("小红" );
        witness.setName("李白");
        deepCloneableTarget.setCloneClass("草草");
      Resume clone2 = (Resume) resume.deepClone();

        System.out.println("clone = " + clone);
        System.out.println("clone1 = " + clone1);
        System.out.println("clone2 = " + clone2);

        System.out.println( "clone=" + clone.hashCode()+ "  witness=" +clone.getWitness().hashCode()+" DeepCloneableTarget"+clone.getWitness().getDeepCloneableTarget().hashCode());

        System.out.println("clone1=" + clone1.hashCode()+ "  witness1=" +clone1.getWitness().hashCode()+" DeepCloneableTarget1"+clone1.getWitness().getDeepCloneableTarget().hashCode());

        System.out.println("clone2=" + clone2.hashCode()+ "  witness2=" +clone2.getWitness().hashCode()+" DeepCloneableTarget2"+clone2.getWitness().getDeepCloneableTarget().hashCode());

    }
}
结果
通过结果发现能够正确深拷贝对象

谈谈Java序列化与深拷贝
设计模式 (三)原型模式(提供代码,浅显易懂)
