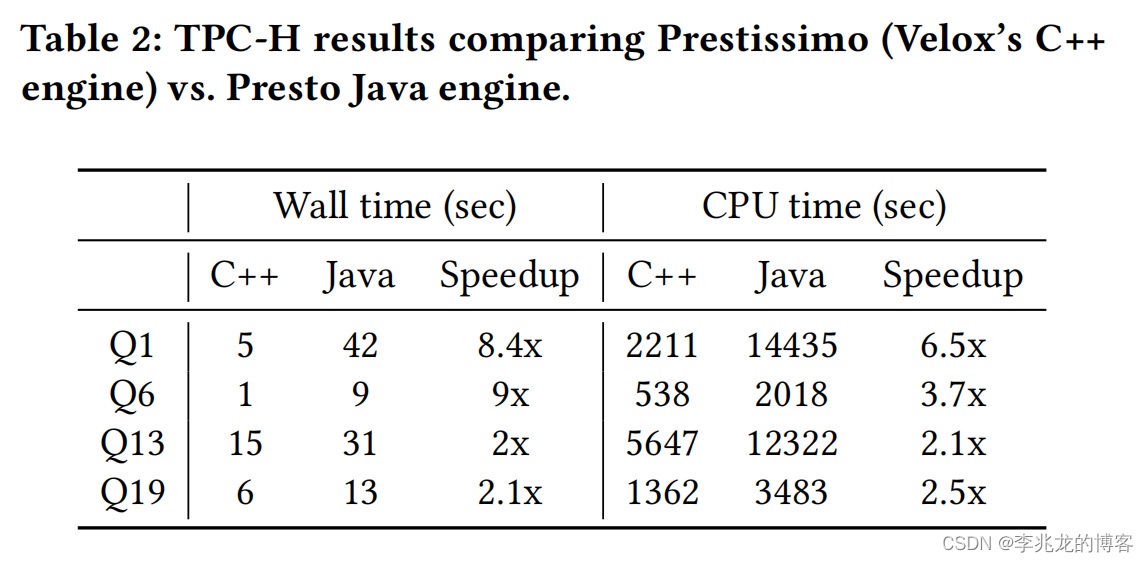
利用github pages建立Serverless个人博客
概述
使用github pages,可以在github上部署静态网站。利用这个功能,可以很方便地实现个人博客的发布托管。
比如我的个人博客:Buttering’s Blog
对应代码仓库:buttering/EasyBlog: 自动将本地博客部署到github中展示
相关技术
1. 博客处理
采用go语言对md格式的博客进行处理,主要目的是处理文档中的图片,将其保存在图床,并将文档中的图片链接替换为图床链接。
2. 图床
采用github仓库直接作为图床。图片和博客存放在同一个仓库中。
3. Hexo博客框架
Hexo是一个快速、简洁且高效的博客框架,能很方便地生成静态的博客网站。采用Fluid主题。
4. CI/CD流程
采用github actions,自动实现博客上传后网站的生成和部署。
5. 更多功能
使用hexo-renderer-markdown-it-plus插件,实现对latex的支持。
使用giscus评论插件,利用github discussions实现博客的评论功能。
实现
0. 项目框架
项目所有文章和图片都位于同一个github仓库中:
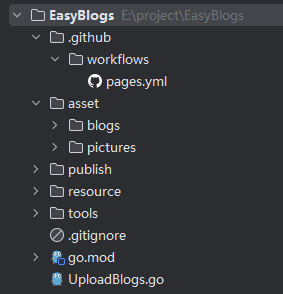
- .github:存放github action的配置文件
- asset:存放处理后的博客和图片,pictures起到了图床的作用
- publish:Hexo部署在此子目录
- resource:存放githubPub公钥
- tools:一些自己写的工具函数
- UploadBlogs:实现博客处理和自动push的脚本
1. 博客预处理
对md格式的博客进行预处理,使用正则表达式提取其中的图片路径:
- 对于本地图片,直接将其拷贝到asset/pictures目录中;
- 对于网络图片,将其下载在asset/pictures目录中。
在pictures目录中,对文章名和图片进行了哈希处理,如图:
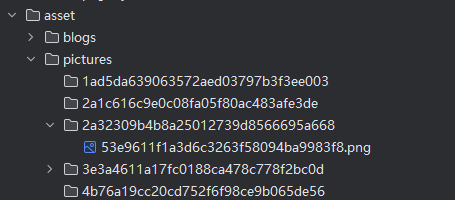
博客则直接按照原文件名放在blogs目录下。
博客中图片的链接会被替换为形如 https://raw.githubusercontent.com/buttering/EasyBlogs/master/asset/pictures/bdf03a9b9bdacaaf60d1f899c0222865/74d51bfa109b4065ccb3ba37b6922bb3.png的url。
raw.githubusercontent.com 是github用来存储用户上传文件的服务地址。
package main

import (
	"EasyBlogs/tools"
	"fmt"
	"github.com/go-git/go-git/v5"
	"github.com/go-git/go-git/v5/plumbing/object"
	"github.com/go-git/go-git/v5/plumbing/transport/ssh"
	"io"
	"log"
	"net/http"
	"net/url"
	"os"
	"path"
	"path/filepath"
	"regexp"
	"strings"
	"time"
)

type markdownPicture struct {
	isUrl             bool
	sourcePicturePath string
	start             int // md中源图片路径的起始偏移量
	end               int
	hashName          string // 均将包含后缀的文件名进行hash,且后拼接上原有后缀名
	targetUrl         string // 修改后在github仓库中的url
}

type Blog struct {
	name          string
	hashName      string
	pictures      []markdownPicture
	directoryPath string // 源文件文件夹路径
	legal         bool   // 成功通过解析
}

var (
	BLOG_PATH      string
	PICTURE_PATH   string
	REPOSITORY_URL string
)

func getBlogList(path string) (blogsList []Blog) {
	blogsList = make([]Blog, 0, 10)

	fileList, err := os.ReadDir(path)
	if err != nil {
		panic(err)
	}

	for _, file := range fileList {
		if !file.IsDir() && filepath.Ext(file.Name()) == ".md" {
			fileName := file.Name()

			blogsList = append(blogsList, Blog{fileName, tools.Hash(fileName), nil, path, false})
		}
	}
	return
}

func extractPicture(blog *Blog) {
	isUrl := func(path string) bool {
		return strings.HasPrefix(path, `http://`) || strings.HasPrefix(path, `https://`)
	}

	content, err := os.ReadFile(filepath.Join(blog.directoryPath, blog.name))
	if err != nil {
		println(err)
		return
	}

	re, _ := regexp.Compile(`!\[.*?]\((.*?)\)`)
	matches := re.FindAllSubmatchIndex(content, -1)

	for _, match := range matches {
		start := match[2]
		end := match[3]

		picturePath := string(content[start:end])
		var pictureName string
		if isUrl(picturePath) {
			u, err := url.Parse(picturePath)
			if err != nil {
				println("解析图片url:", picturePath, " 失败")
				continue
			}
			pictureName = path.Base(u.Path)
		} else if filepath.IsAbs(picturePath) {
			pictureName = filepath.Base(picturePath)
		} else { // 相对路径的本地文件
			picturePath = filepath.Join(blog.directoryPath, picturePath)
			pictureName = filepath.Base(picturePath)
		}
		hashName := tools.Hash(pictureName) + path.Ext(pictureName)

		blog.pictures = append(
			blog.pictures,
			markdownPicture{
				isUrl(picturePath),
				picturePath,
				start,
				end,
				hashName,
				REPOSITORY_URL + "/" + blog.hashName + "/" + hashName,
			},
		)
	}

	blog.legal = true
}

func copyBlog(blog *Blog) {
	fmt.Println("拷贝博客:“" + blog.name + "”")

	blogTargetPath := filepath.Join(BLOG_PATH, blog.name)
	pictureTargetPath := filepath.Join(PICTURE_PATH, blog.hashName)
	if _, err := os.Stat(blogTargetPath); !os.IsNotExist(err) {
		println("文章“" + blog.name + "”已经存在")
		blog.legal = false
		return
	}

	if err := os.Mkdir(pictureTargetPath, 0777); err != nil {
		println("为博客“" + blog.name + "”创建对应picture文件夹失败")
		blog.legal = false
		return
	}

	content, _ := os.ReadFile(filepath.Join(blog.directoryPath, blog.name))

	offset := 0
	for _, picture := range blog.pictures {
		start := picture.start + offset
		end := picture.end + offset
		content = append(content[:start], append([]byte(picture.targetUrl), content[end:]...)...)
		offset += len(picture.targetUrl) - (end - start)
	}

	err := os.WriteFile(blogTargetPath, content, 0644)
	if err != nil {
		println("复制文件“" + blog.name + "”错误")
		blog.legal = false
	}

}

func copyPicture(blog Blog) {
	pictureTargetPath := filepath.Join(PICTURE_PATH, blog.hashName)

	for _, picture := range blog.pictures {
		fmt.Println("导入图片:“" + picture.sourcePicturePath + "”")

		var sourceFile interface{}
		if picture.isUrl {
			for i := 0; i < 5; i++ {
				response, err := http.Get(picture.sourcePicturePath)
				if err == nil && response.StatusCode == http.StatusOK {
					sourceFile = response.Body
					break
				}
				time.Sleep(50 * time.Millisecond)
			}
			if sourceFile == nil {
				println("下载图片“" + picture.sourcePicturePath + "”失败")
				continue
			}

		} else {
			file, err := os.Open(picture.sourcePicturePath)
			if err != nil {
				println("打开图片“" + picture.sourcePicturePath + "”失败")
				continue
			}
			sourceFile = file
		}

		destinationFile, _ := os.Create(filepath.Join(pictureTargetPath, picture.hashName))
		_, err := io.Copy(destinationFile, sourceFile.(io.Reader))
		if err != nil {
			println("复制图片“" + picture.sourcePicturePath + "”失败")
		}
	}
}

func gitOperate(blogList []Blog) {
	if len(blogList) == 0 {
		return
	}
	repositoryPath, _ := filepath.Abs(".")
	r, err := git.PlainOpen(repositoryPath)
	if err != nil {
		println("打开仓库失败")
		return
	}
	w, err := r.Worktree()
	if err != nil {
		println("打开仓库失败")
		println(err.Error())
		return
	}

	_, err = w.Add("./asset")
	if err != nil {
		println("向仓库添加文件失败")
		println(err.Error())
		return
	}
	status, _ := w.Status()
	println("git 状态:")
	println(status.String())

	nameList := tools.Map(blogList, func(blog Blog) string {
		return blog.name
	})
	var summary string
	if len(nameList) == 1 {
		summary = fmt.Sprintf("提交文件 [%s]", blogList[0].name)
	} else {
		summary = fmt.Sprintf(
			"提交 %d 个博客\n"+
				"\n"+
				"文件列表: [%s]",
			len(blogList),
			strings.Join(nameList, ", "),
		)
	}
	commit, err := w.Commit(summary, &git.CommitOptions{
		Author: &object.Signature{
			Name: "Wang",
			When: time.Now(),
		},
	})

	obj, _ := r.CommitObject(commit)
	fmt.Println("提交文件:")
	fmt.Println(obj.String())

	// user必须是"git"。。。困扰了半天,最后查issue发现的。真够郁闷的。
	privateKey, err := ssh.NewPublicKeysFromFile("git", "./resource/githubPublicKey", "")

	if err != nil {
		println(err.Error())
	}

	for i := 0; i < 3; i++ {
		err = r.Push(&git.PushOptions{
			RemoteName: "origin",
			RemoteURL:  `git@github.com:buttering/EasyBlogs.git`,
			Auth:       privateKey,
			Progress:   os.Stdout,
		})
		if err == nil {
			break
		}
		println("第 %d 次上传失败")
	}
	if err != nil {
		println("重试次数已达上限,上传失败")
		return
	}

	fmt.Println("提交成功!")
}

func init() {
	path, _ := filepath.Abs(".")
	BLOG_PATH = filepath.Join(path, "asset", "blogs")
	PICTURE_PATH = filepath.Join(path, "asset", "pictures")
	REPOSITORY_URL = `https://raw.githubusercontent.com/buttering/EasyBlogs/master/asset/pictures`
}

func main() {
	filePath := "E:/desktop/blog"
	//yamlPath := "./asset/blogs-list.yaml"
	blogList := getBlogList(filePath)
	for i := range blogList {
		extractPicture(&blogList[i])
		copyBlog(&blogList[i])
		copyPicture(blogList[i])
	}
	if len(blogList) == 0 {
		return
	}

	// 改用github page进行博客部署,不需要额外记录博客信息
	//yamlOperate(yamlPath, blogList)
	//dbOperate(blogList)
	gitOperate(blogList)

}
2. 引入Hexo框架
Hexo框架的使用方式很简单,只需使用Hexo CLI建立基本框架,而后将博客和相关资源移入指定文件夹,然后运行Hexo服务器即可。这里为实现Serverless,后两部交由github action实现。
安装Hexo并初始化站点
保证电脑中安装了Node.js。Hexo的部署目录为publish。
npm install -g hexo-cli
nexo init publish
cd publish
npm install
执行后,Hexo会自动在publish目录建立一个空白站点,目录如下:
.
├── _config.yml
├── package.json
├── scaffolds
├── source
|   └── _posts
└── themes
- _config.yml:站点的配置文件
- _posts:Hexo会自动将其中的文档转化为静态资源
- themes:主题文件夹
安装fluid主题
初始的Hexo站点已经很完善了,但是为了更加个性化,安装了fluid主题:配置指南 | Hexo Fluid 用户手册 (fluid-dev.com)
# 仍是在publish目录
npm install --save hexo-theme-fluid
然后在博客目录下创建 _config.fluid.yml,将主题的 _config.yml(位于publish\themes\fluid_config.yml)内容复制进去。这个_config.fluid.yml是主题的覆盖配置,之后要自定义主题,只需修改其中的内容即可。
修改publish下的_config.yml如下:
theme: fluid  # 指定主题
language: zh-CN  # 指定语言,会影响主题显示的语言,按需修改
最后创建主题的关于页
hexo new page about
测试博客
自此,一个本地的博客网站即搭建成功,可以尝试将文档移入_post文件夹,而后运行hexo g 和 hexo s ,就可以在浏览器看到博客。
最后记得使用hexo clean 清空生成的文件,避免影响到后面的部署。
3. github actions配置
在预处理函数的最后一步,实现了git的自动提交和推送。在成功向github推送后,就轮到github action实现博客网站的自动部署了。
配置github仓库
首先将本地的git仓库上传至github,且设置为公开。
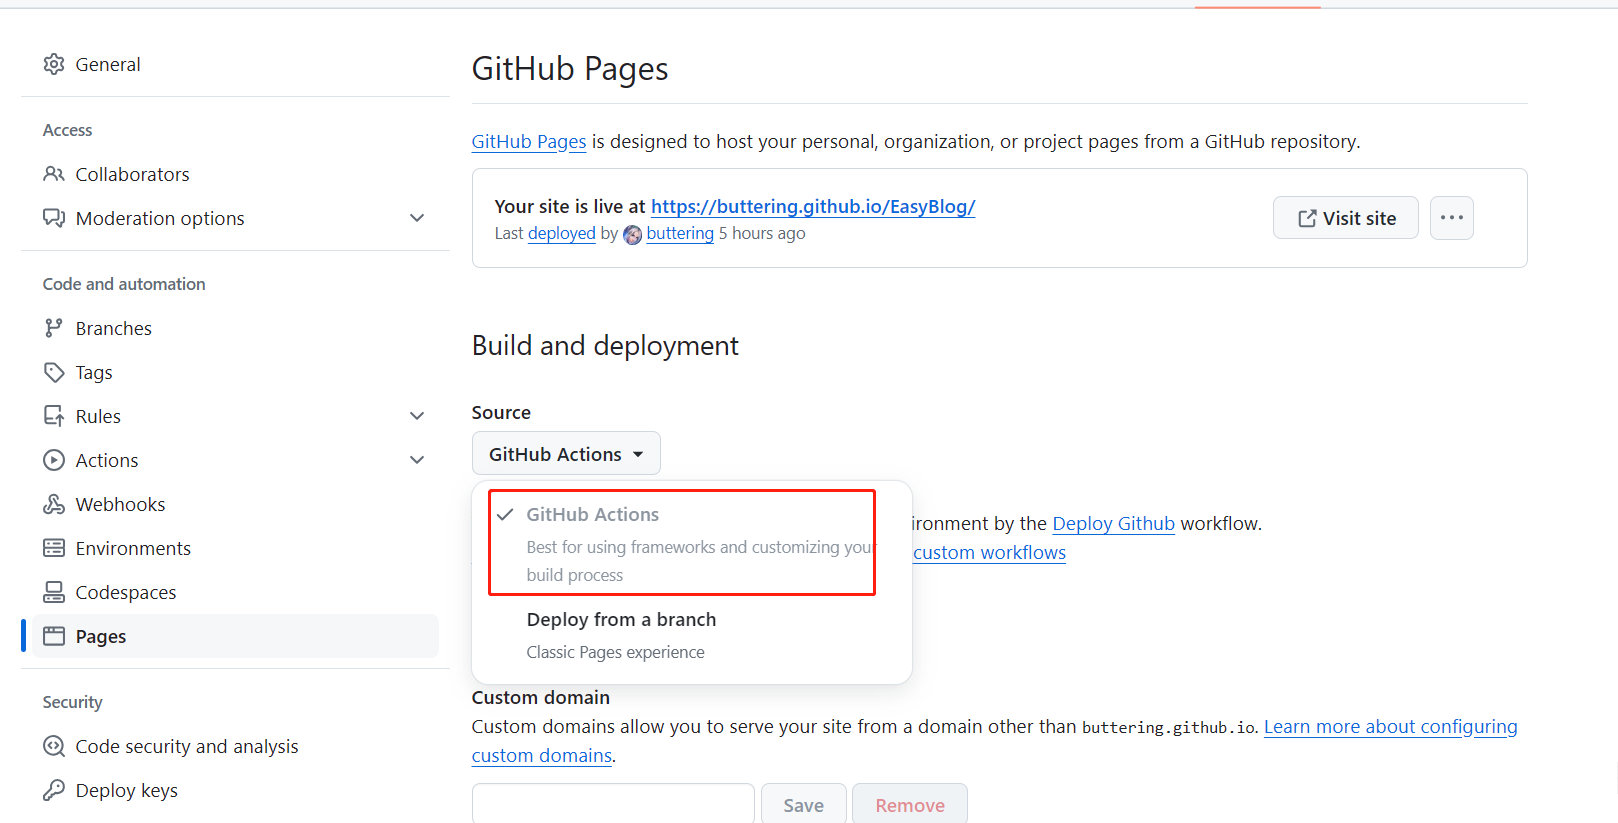
进入github 项目的设置页面开启page功能。设置Source为GitHub Actions。
编写actions脚本文件
回到本地,在项目根目录创建 .github/workflows/xxx.yml 文件。
这里需要一些github actions的知识,简单地说 Actions 就是在设定的时机触发创建一个虚拟云环境,然后执行一连串动作,从而实现自动部署的功能。
可以直接复制以下内容:
name: Deploy Github

# 在master分支发生push事件时触发。
on:
  push:
    branches:
      - master
  workflow_dispatch:

jobs:
  build:
    runs-on: ubuntu-latest
    steps:
      - name: 检出仓库
        uses: actions/checkout@v4

      - name: Install pandoc
        run: |
          cd /tmp
          wget -c https://github.com/jgm/pandoc/releases/download/2.14.0.3/pandoc-2.14.0.3-1-amd64.deb
          sudo dpkg -i pandoc-2.14.0.3-1-amd64.deb

      - name: 安装Node.js 18
        uses: actions/setup-node@v4
        with:
          node-version: '18'

      - name: Cache NPM dependencies
        uses: actions/cache@v4
        with:
          path: node_modules
          key: ${{ runner.OS }}-npm-cache
          restore-keys: |
            ${{ runner.OS }}-npm-cache

      - name: 安装相关依赖
        working-directory: publish
        run: |
          npm install --silent --no-fund
          npm un hexo-renderer-marked --save
          npm i hexo-renderer-markdown-it-plus --save

      - name: 复制博客文件
        run: |
          cd publish
          rm -rf source/_posts
          mkdir source/_posts
          cp -rf ../asset/blogs/* ./source/_posts/

      - name: 构建网站
        working-directory: publish
        run: npm run build

      - name: Upload Pages artifact
        uses: actions/upload-pages-artifact@v3
        with:
          path: ./publish/public

  deploy:
    needs: build
    permissions:
      pages: write
      id-token: write
    environment:
      name: github-pages
      url: ${{ steps.deployment.outputs.page_url }}
    runs-on: ubuntu-latest
    steps:
      - name: Deploy to GitHub Pages
        id: deployment
        uses: actions/deploy-pages@v4
在完成了环境的初始化后,会自动将位于 asset/blog 中的博客文件复制到 publish/source/_post 目录内。而后的构建步骤,就会利用 _post 目录中的博客文件生成网站。
修改配置
编辑 _config.yml,将 url: 更改为 <你的 GitHub 用户名>.github.io/<repository 的名字>。
提交并自动部署
在提交前,记得编辑.gitignore文件:
/resource/githubPublicKey
/publish/node_modules/
/publish/public/
在之后的每次提交,都会触发actions流程,生成站点。部署完成后,前往 https://<你的 GitHub 用户名>.github.io/<repository 的名字> 查看站点。
4. 开启latex功能
hexo默认的渲染器不支持复杂的数学公式。
Latex的渲染分为前端渲染和后端渲染两种方法,这里选择后端渲染,需要更换渲染器(已经在actions脚本中完成了)。
npm un hexo-renderer-marked --save
npm i hexo-renderer-markdown-it-plus --save
修改 _config.fluid.yml:
post:
  math:
    enable: true
    specific: false
    engine: katex
使用hexo-renderer-markdown-it-plus插件进行latex渲染时,如果使用mathjax,一些不完全符合md语法的标题会渲染失败(如一级标题前没有空行),因此要将引擎改为katex。
可以参考配置指南 | Hexo Fluid 用户手册 (fluid-dev.com) 和 CHENXCHEN/hexo-renderer-markdown-it-plus
5. 实现评论功能
使用 Giscus插件,且基于 GitHub Discussion实现评论功能。
开启 GitHub Discussion
进入github仓库->Settings->General->Features,勾选 Discussions。

安装 Github Apps
点击链接GitHub Apps - giscus ,为本仓库安装应用。
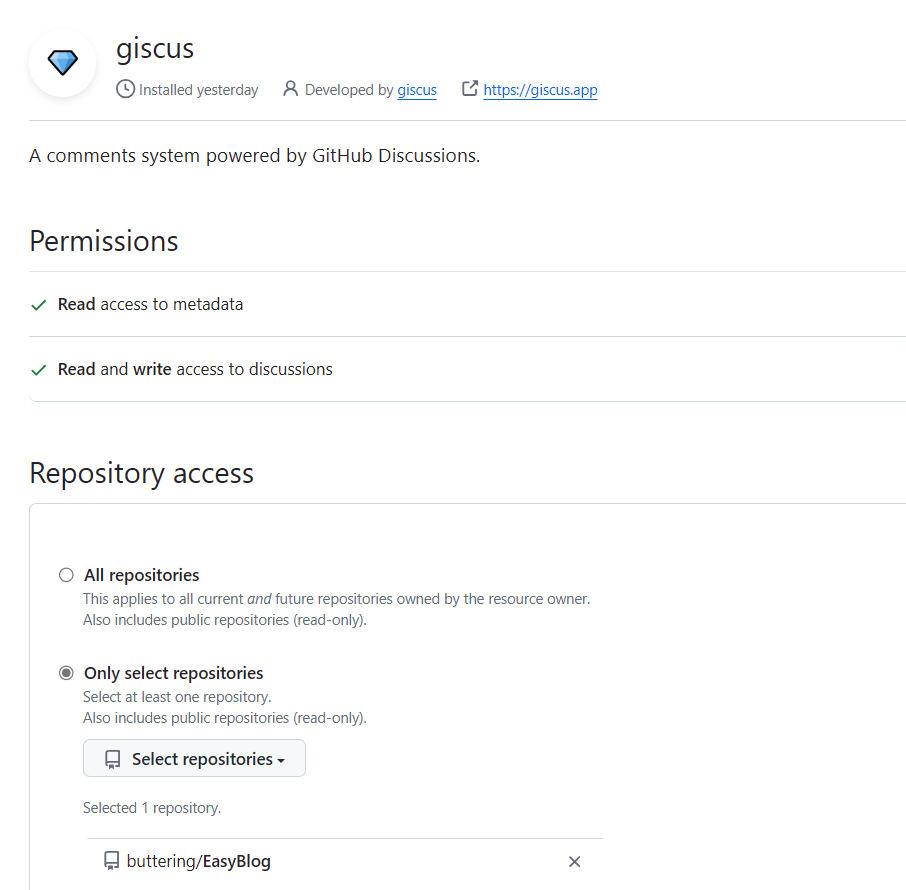
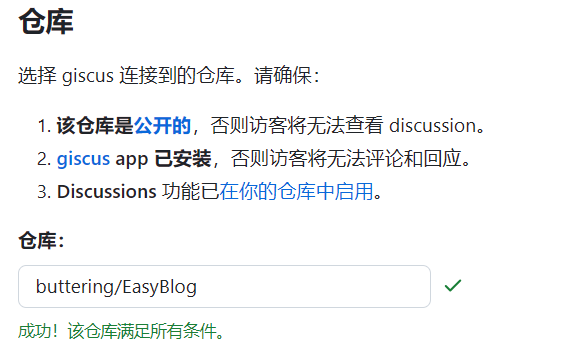
可以到 giscus仓库 检查自己的仓库是否满足giscus要求的条件。
配置插件
由于使用了fluid主题,因此只需修改配置文件即可开启评论。
修改 _config.fluid.yml:
  comments:
    enable: true
    # 指定的插件,需要同时设置对应插件的必要参数
    # The specified plugin needs to set the necessary parameters at the same time
    # Options: utterances | disqus | gitalk | valine | waline | changyan | livere | remark42 | twikoo | cusdis | giscus | discuss
    type: giscus

# Giscus
# 基于 GitHub Discussions,类似于 Utterances
# Based on GitHub Discussions, similar to Utterances
# See: https://giscus.app/
giscus:
  repo: buttering/EasyBlog
  repo-id:
  category: Announcements
  category-id:
  theme-light: light
  theme-dark: dark
  mapping: title
  reactions-enabled: 1
  emit-metadata: 0
  input-position: bottom
  lang: zh-CN
在配置基于 Github Discussions 的博客评论系统时(例如 giscus),往往需要获取 repo 的 repo-id, category-id 等属性,因此这里介绍一种获取这些信息的方法
首先打开以下 Github Docs 地址:Github Docs Explorer,然后授权 Github 账户,并输入以下内容
{
  repository(owner: "userName", name: "repoName") {
    id
    discussionCategories (first: 5) {
      nodes {
        name
        id
      }
    }
  }
}
- 将
userName换成具体的 Github 用户名; - 将
repoName换成保存评论数据的 Repo 名称。
点击运行按钮,即可得到形如 "id": "R_kgDOKjFfn1" 和 DIC_kwdOJPFfnc4CU9... 就是我们需要的 repoId 和 categoryId。
因为网站中文章的url是直接使用文章名进行定位的,如 https://buttering.github.io/EasyBlog/2022/10/15/使用plotly离线模式报错UnicodeEncodeError:gbk codec can't encode character in position的解决方法/,如果 mapping: 的值设为 pathname 或者 url,其在 github discussions中出现的标题,中文会被base64字符代替,严重影响观感,设为 title 可以解决这个问题。