从浅入深 学习 SpringCloud 微服务架构(八)Sentinel(1)
一、sentinel:概述
1、前言 – 服务熔断 Hystrix 的替换方案。
1)2018年底 Netflix 官方宣布 Hystrix 已经足够稳定,不再积极开发 Hystrix,该项目将处于维护模式。就目前来看 Hystrix 是比较稳定的,并且 Hystrix 只是停止开发新的版本,并不是完全停止维护,Bug什么的依
然会维护的。因此短期内,Hystrix 依然是继续使用的。但从长远来看,Hystrix总会达到它的生命周期,那么Spring Cloud生态中是否有替代产品呢?
2)服务熔断 Hystrix 替换方案介绍
- Alibaba Sentinel
Sentinel 是阿里巴巴开源的一款断路器实现,目前在 Spring Cloud 的孵化器项目 SpringCloud Alibaba
中的一员 Sentinel 本身在阿里内部已经被大规模采用,非常稳定。因此可以作为一个较好的替代品。
- Resilience4J
Resilicence4J 一款非常轻量、简单,并且文档非常清晰、丰富的熔断工具,这也是 Hystrix 官方推荐的替代产品。
不仅如此,Resilicence4j 还原生支持 Spring Boot 1.x/2.x,而且监控也不像 Hystrix 一样弄
Dashboard/Hystrix 等一堆轮子,
而是支持和 Micrometer(Pivotal 开源的监控门面,Spring Boot 2.x
中的 Actuator 就是基于 Micrometer的)、prometheus (开源监控系统,来自谷歌的论文)、
以及 Dropwizard metrics ( Spring Boot曾经的模仿对象,类似于Spring Boot)进行整合。
2、Sevtinel 简介
1)随着微服务的流行,服务和服务之间的稳定性变得越来越重要。Sentinel 以流量为切入点,从流量控制、熔断降级、系统负载保护等多个维度保护服务的稳定性。
2)Sentinel 具有以下特征:
-
丰富的应用场景:
Sentinel 承接了阿里巴巴近10年的双十一大促流量的核心场景,
例如秒杀(即突发流量控制在系统容量可以承受的范围)、消息削峰填谷、集群流量控制、实时熔断下游不可用应用等。 -
完备的实时监控:
Sentinel 同时提供实时的监控功能。
您可以在控制台中看到接入应用的单台机器秒级数据,甚至500台以下规模的集群的汇总运行情况。 -
广泛的开源生态:
Sentinel 提供开箱即用的与其它开源框架/库的整合模块,
例如与SpringCloud、Dubbo、gRPC的整合。您只需要引入相应的依赖并进行简单的配置即可快速地接入Sentinel。 -
完善的 SPI 扩展点:
Sentinel提供简单易用、完善的SPI扩展接口。您可以通过实现扩展接口来快速地定制逻辑。
例如定制规则管理、适配动态数据源等。

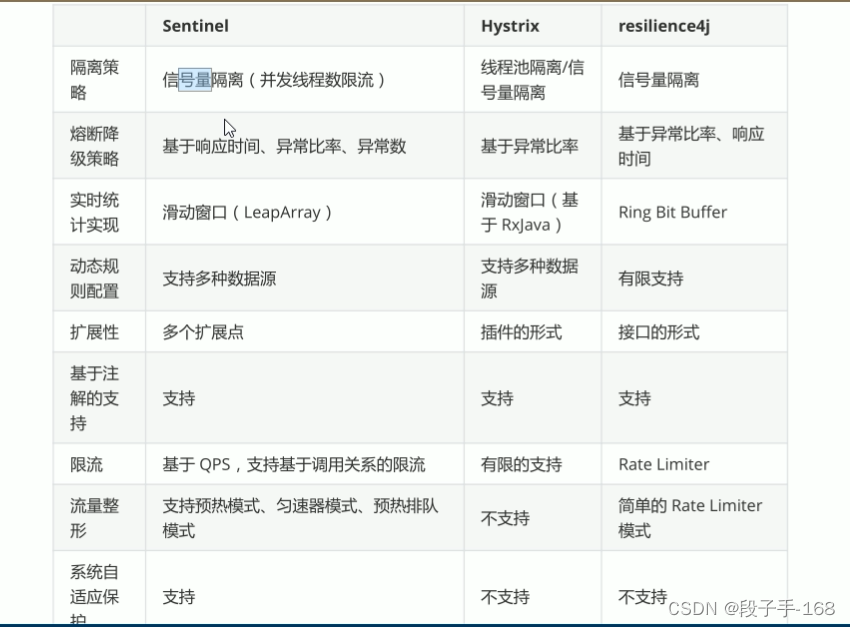
3、Sentinel 和 Hystrix, resilience4j 的区别:
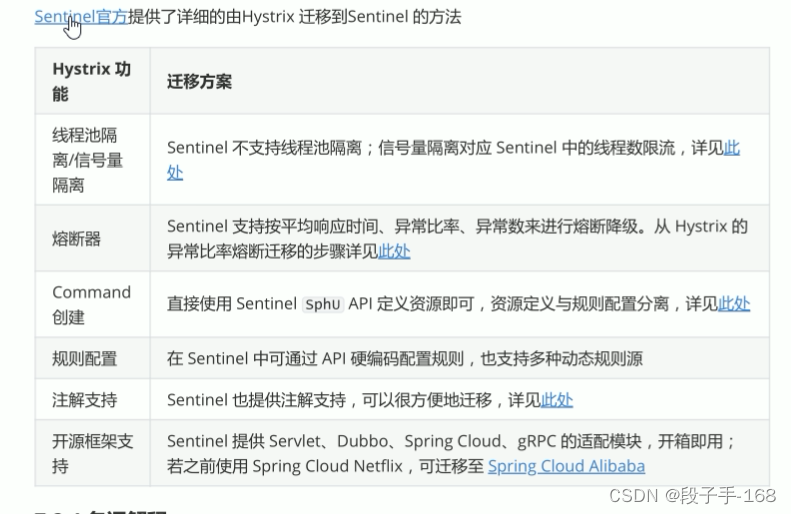
4、Sentinel 支持从 Hystrix 迁移到 Sentinel
二、sentinel:管理控制台的安装与执行
1、Sentinel 服务熔断 名词解释
1)Sentinel 可以简单的分为 Sentinel 核心库和 Dashboard。
核心库不依赖 Dashboard,但是结合 Dashboard 可以取得最好的效果。
2)使用 Sentinel 来进行熔断保护,主要分为几个步骤:
- 1.定义资源
- 2.定义规则
- 3.检验规则是否生效。
3)说明:
- 资源: 可以是任何东西,一个服务,服务里的方法,甚至是一段代码。
- 规则: Sentinel 支持以下几种规则: 流量控制规则、熔断降级规则、系统保护规则、来源访问控制规则和热点参数规则。Sentinel 的所有规则都可以在内存态中动态地查询及修改,修改之后立即生效。
先把可能需要保护的资源定义好,之后再配置规则。也可以理解为,只要有了资源,我们就可以在任何时候灵活地定义各种流量控制规则。
在编码的时候,只需要考虑这个代码是否需要保护,如果需要保护,就将之定义为一个资源。
2、Sentinel 中的管理控制台
1)下载 Sentinel 启动控制台
- 获取 Sentinel 控制台
从官方网站下载 Sertinetl 控制台 jar 包:
https://github.com/alibaba/Sentinel/releases/download/1.6.3/sentinel-dashboard-1.6.3.jar
2)启动 Sentinel 控制台:
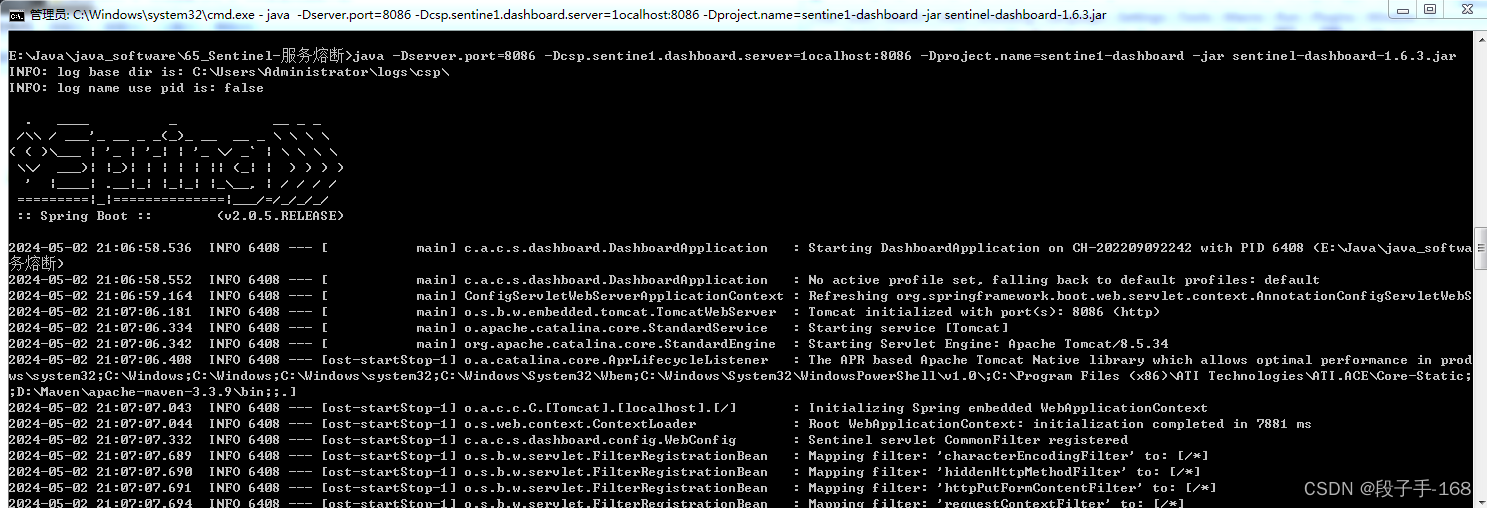
- 使用如下命令启动 Sentinel 控制台:
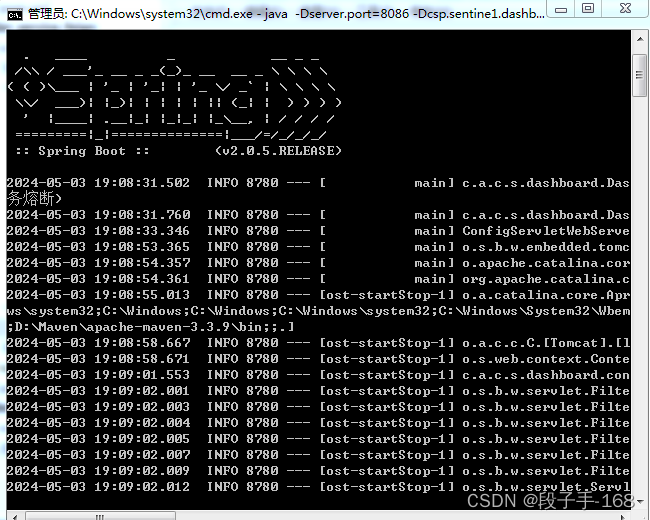
java -Dserver.port=8080 -Dcsp.sentine1.dashboard.server=1ocalhost:8080 -Dproject.name=sentine1-dashboard -jar sentine1-dashboard.jar
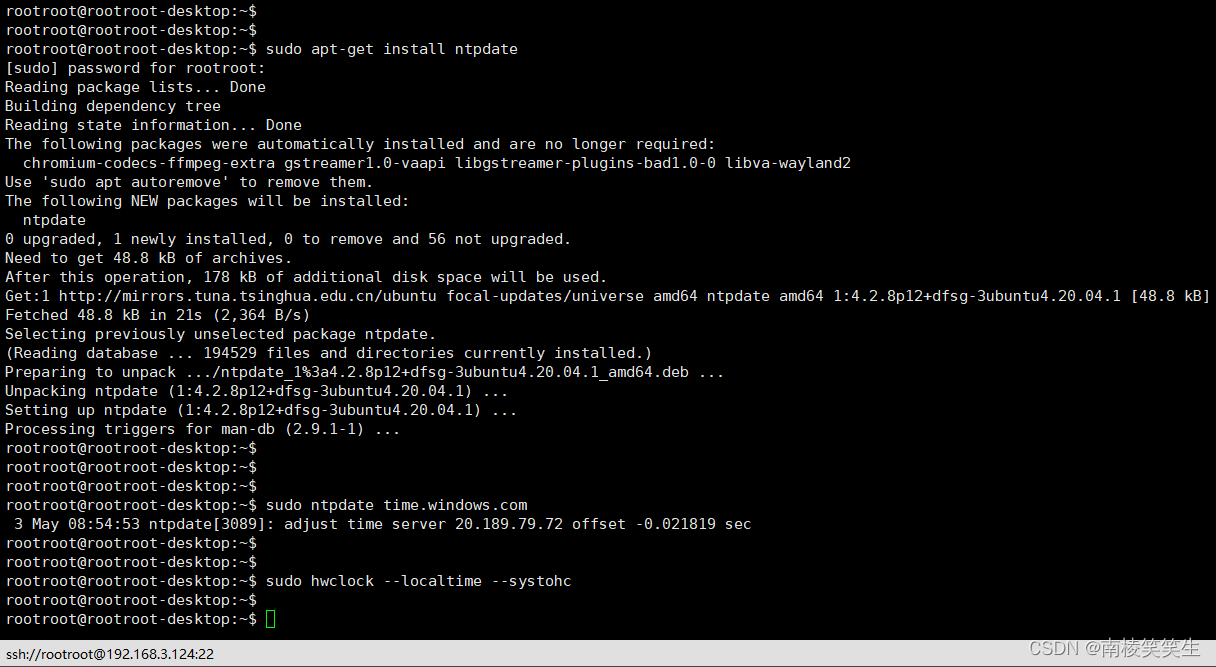
这里下载的是 sentine1-dashboard-1.6.3.jar 我使用 8086 端口,执行命令是:
java -Dserver.port=8086 -Dcsp.sentine1.dashboard.server=1ocalhost:8086 -Dproject.name=sentine1-dashboard -jar sentinel-dashboard-1.6.3.jar
3)相关参数说明:
其中 -Dserver.port=8080 用于指定 Sentinel 控制台端口为 8080。
从 Sentinel 1.6.0 起,Sentinel 控制台引入基本的登录功能,默认用户名和密码都是 sentine1。可以参考 鉴权模块文档配置用户名和密码。
启动 Sentinel 控制台需要 JDK 版本为 1.8 及以上版本。
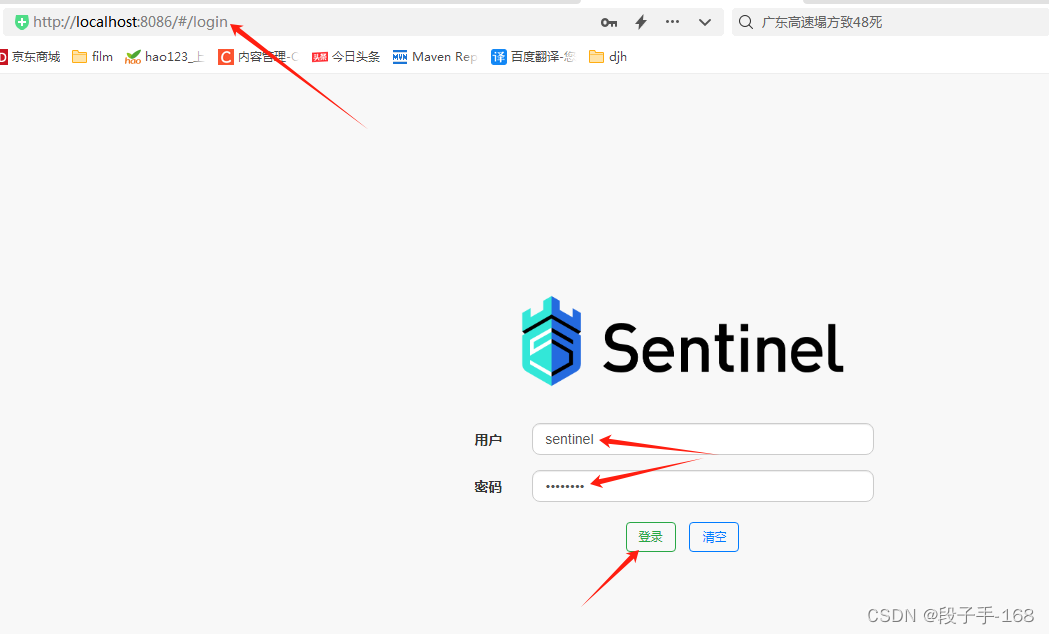
4)登录 Sertinel 控制台
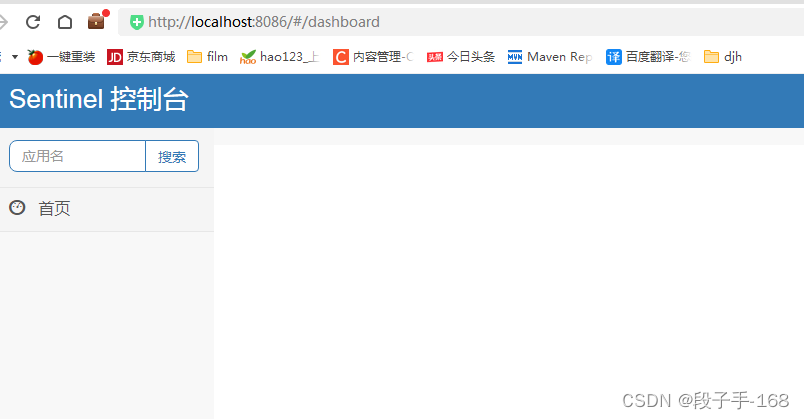
浏览器地址栏输入:localhost:8086 默认用户名和密码都是 sentine1
三、搭建案例 使用 sentinel:客户端接入管理控制台
1、Sentinel 组件 使用步骤:
1)管理 Sentinel 控制台
-
从官方网站下载 Sentinel 控制台 jar 包:
https://github.com/alibaba/Sentinel/releases/download/1.6.3/sentinel-dashboard-1.6.3.jar -
使用如下命令启动 Sentinel 控制台:
java -Dserver.port=8086 -Dcsp.sentine1.dashboard.server=1ocalhost:8086 -Dproject.name=sentine1-dashboard -jar sentinel-dashboard-1.6.3.jar
-
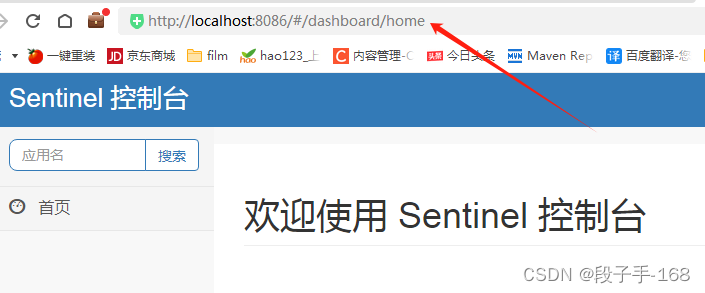
启动 Sentinel 服务成功后,登录 Sertinel 控制台
浏览器地址栏输入:localhost:8086 默认用户名和密码都是 sentinel
2)客户端能接入 Sentinel 控制台,将所有的服务交给控制台管理。
- 客户端接和 Sentinel 管理控制台。
- 在客户端(需要管理微服务上)引入坐标。
- 在客户端配置启动参数。
2、搭建案例—准备 mysql 数据库表,创建 spring_cloud_sentinel_demo 的 maven 父工程
2.1 准备 mysql 数据库表。
-
创建数据库:
create database shop; -
使用数据库:
use shop; -
创建数据表:
	CREATE TABLE `tb_product` (
	  `id` int NOT NULL AUTO_INCREMENT,
	  `product_name` varchar(40) DEFAULT NULL COMMENT '名称',
	  `status` int DEFAULT NULL COMMENT '状态',
	  `price` decimal(10,2) DEFAULT NULL COMMENT '单价',
	  `product_desc` varchar(255) CHARACTER SET utf8 COLLATE utf8_general_ci DEFAULT NULL COMMENT '描述',
	  `caption` varchar(255) DEFAULT NULL COMMENT '标题',
	  `inventory` int DEFAULT NULL COMMENT '库存',
	  PRIMARY KEY (`id`)
	) ENGINE=InnoDB AUTO_INCREMENT=3 DEFAULT CHARSET=utf8mb3
- 向 mysql 数据表中插入数据:
insert into `tb_product` (`id`, `product_name`, `status`, `price`, `product_desc`, `caption`, `inventory`) values('1','iPhone 15 Pro','1','7999.00','iPhone 15 Pro 6.7 英寸或 6.1 英寸, 超视网膜 XDR 显示屏,ProMotion 自适应刷新率技术,钛金属搭配亚光质感玻璃背板, 灵动岛功能, A17 Pro 芯片,配备 6 核图形处理器, Pro 级摄像头系统,主摄 4800 万像素 | 超广角 | 长焦, 10 倍, 支持 USB 3, 视频播放最长可达 29 小时。 ','iPhone 15 Pro 巅峰之作','99');
2.2 springcloud 与 springcloud-Alibaba 和 springboot 版本依赖关系(推荐使用)。
| Spring Cloud Version | Spring Cloud Alibaba Version | Spring Boot Version |
|---|---|---|
| Spring Cloud Greenwich | 20 RELEASE | 2.1.X.RELEASE |
| Spring Cloud Finchley | 2.0.0.RELEASE | 2.0.X.RELEASE |
| Spring Cloud Edgware | 1.5.0.RELEASE | 1.5.X.RELEASE |
2.3 创建 artifactId 名为 spring_cloud_sentinel_demo 的 maven 工程。
父工程,不写代码,可以删除 src 目录。
	--> idea --> File
	--> New --> Project
	--> Maven
		Project SDK: ( 1.8(java version "1.8.0_131" )
	--> Next
	--> Groupld : ( djh.it )
		Artifactld : ( spring_cloud_sentinel_demo )
		Version : 1.0-SNAPSHOT
	--> Name: ( spring_cloud_sentinel_demo )
		Location: ( \spring_cloud_sentinel_demo\ )
	--> Finish
2.4 在父工程 spring_cloud_sentinel_demo 的 pom.xml 文件中导入依赖坐标。
<?xml version="1.0" encoding="UTF-8"?>
<project xmlns="http://maven.apache.org/POM/4.0.0"
         xmlns:xsi="http://www.w3.org/2001/XMLSchema-instance"
         xsi:schemaLocation="http://maven.apache.org/POM/4.0.0 http://maven.apache.org/xsd/maven-4.0.0.xsd">
    <modelVersion>4.0.0</modelVersion>

    <groupId>org.example</groupId>
    <artifactId>spring_cloud_sentinel_demo</artifactId>
    <packaging>pom</packaging>
    <version>1.0-SNAPSHOT</version>
    <modules>
        <module>eureka_service</module>
        <module>product_service</module>
        <module>order_service_feign</module>
        <module>order_service_rest</module>
    </modules>

    <parent>
        <groupId>org.springframework.boot</groupId>
        <artifactId>spring-boot-starter-parent</artifactId>
        <version>2.1.6.RELEASE</version>
    </parent>

    <properties>
        <project.build.sourceEncoding>UTF-8</project.build.sourceEncoding>
        <project.reporting.outputEncoding>UTF-8</project.reporting.outputEncoding>
        <java.version>1.8</java.version>
    </properties>

    <dependencies>
        <dependency>
            <groupId>org.springframework.boot</groupId>
            <artifactId>spring-boot-starter-web</artifactId>
        </dependency>
        <dependency>
            <groupId>org.springframework.boot</groupId>
            <artifactId>spring-boot-starter-logging</artifactId>
        </dependency>
        <dependency>
            <groupId>org.springframework.boot</groupId>
            <artifactId>spring-boot-starter-test</artifactId>
            <scope>test</scope>
        </dependency>
        <dependency>
            <groupId>org.projectlombok</groupId>
            <artifactId>lombok</artifactId>
            <version>1.18.4</version>
            <scope>provided</scope>
        </dependency>
    </dependencies>

    <dependencyManagement>
        <dependencies>
            <dependency>
                <groupId>org.springframework.cloud</groupId>
                <artifactId>spring-cloud-dependencies</artifactId>
                <version>Greenwich.RELEASE</version>
                <type>pom</type>
                <scope>import</scope>
            </dependency>
        </dependencies>
    </dependencyManagement>

    <repositories>
        <repository>
            <id>spring-snapshots</id>
            <name>Spring Snapshots</name>
            <url>http://repo.spring.io/libs-snapshot-local</url>
            <snapshots>
                <enabled>true</enabled>
            </snapshots>
        </repository>
        <repository>
            <id>spring-milestones</id>
            <name>Spring Milestones</name>
            <url>http://repo.spring.io/libs-milestone-local</url>
            <snapshots>
                <enabled>false</enabled>
            </snapshots>
        </repository>
        <repository>
            <id>spring-releases</id>
            <name>Spring Releases</name>
            <url>http://repo.spring.io/libs-release-local</url>
            <snapshots>
                <enabled>false</enabled>
            </snapshots>
        </repository>
    </repositories>

    <pluginRepositories>
        <pluginRepository>
            <id>spring-snapshots</id>
            <name>Spring Snapshots</name>
            <url>http://repo.spring.io/libs-snapshot-local</url>
            <snapshots>
                <enabled>true</enabled>
            </snapshots>
        </pluginRepository>
        <pluginRepository>
            <id>spring-milestones</id>
            <name>Spring Milestones</name>
            <url>http://repo.spring.io/libs-milestone-local</url>
            <snapshots>
                <enabled>false</enabled>
            </snapshots>
        </pluginRepository>
    </pluginRepositories>

    <build>
        <plugins>
            <plugin>
                <groupId>org.springframework.boot</groupId>
                <artifactId>spring-boot-maven-plugin</artifactId>
            </plugin>
        </plugins>
    </build>

</project>
<!-- spring_cloud_sentinel_demo\pom.xml -->
3、搭建案例—在父工程 spring_cloud_sentinel_demo 下,创建子工程eureka_service(子模块)。
3.1 创建 子工程 eureka_service(子模块)
	--> 右键 spring_cloud_sentinel_demo 父工程
	--> Modules
	--> Maven
	--> Groupld : ( djh.it )
		Artifactld : ( eureka_service )
		Version : 1.0-SNAPSHOT
	--> Next
	--> Module name: ( eureka_service )
		Content root : ( \spring_cloud_sentinel_demo\eureka_service )
		Module file location: ( \spring_cloud_sentinel_demo\eureka_service )
	--> Finish
3.2 在子工程 eureka_service (子模块)中的 pom.xml 中导入依赖
<?xml version="1.0" encoding="UTF-8"?>
<project xmlns="http://maven.apache.org/POM/4.0.0"
         xmlns:xsi="http://www.w3.org/2001/XMLSchema-instance"
         xsi:schemaLocation="http://maven.apache.org/POM/4.0.0 http://maven.apache.org/xsd/maven-4.0.0.xsd">
    <parent>
        <artifactId>spring_cloud_sentinel_demo</artifactId>
        <groupId>org.example</groupId>
        <version>1.0-SNAPSHOT</version>
    </parent>
    <modelVersion>4.0.0</modelVersion>

    <artifactId>eureka_service</artifactId>

    <dependencies>
        <dependency>
            <groupId>org.springframework.cloud</groupId>
            <artifactId>spring-cloud-starter-netflix-eureka-server</artifactId>
        </dependency>
    </dependencies>

</project>
<!--  spring_cloud_sentinel_demo\eureka_service\pom.xml -->
3.3 在子工程 eureka_service (子模块)中,创建配置文件 application.yml 配置文件。
##  \spring_cloud_sentinel_demo\eureka_service\src\main\resources\application.yml

# 如果演示 eureka 高可用,可以模拟两个 EurekaServer, 一个端口 9000,一个端口 8000,两个需要相互注册。

server:
  port: 9000  # 启动端口 命令行注入。

spring:
  application:
    name: service-eureka  #spring应用名, # 注意 FeignClient 不支持名字带下划线

eureka: # 配置 eureka_server
  instance:
    hostname: localhost
  client:
    register-with-eureka: false  # 是否将自己注册到注册中心,不配置时,默认 true。 配置高可用时,须注销此行,或配置为 true
    fetch-registry: false  # 是否从 Eureka 中获取注册信息,不配置时,默认 true。 配置高可用时,须注销此行,或配置为 true
    service-url: # 配置暴露给 EurekaClient 的请求地址
      defaultZone: http://${eureka.instance.hostname}:${server.port}/eureka/
  #      defaultZone: http://127.0.0.1:9000/eureka/  # 配置高可用时,须配置为另一个 EurekaServerApplication 的端口号,如:8000
  server:
    enable-self-preservation: false  # 关闭自我保护机制
    eviction-interval-timer-in-ms: 4000  # 设置剔除服务间隔时间为 4000 毫秒(4秒)。此参数默认为 true。
3.4 在子工程 eureka_service (子模块)中,创建 启动类 EurekaServerApplication.java
/**
 *   spring_cloud_sentinel_demo\eureka_service\src\main\java\djh\it\eureka\EurekaServerApplication.java
 *
 *   2024-5-2  eureka 注册中心,启动类 EurekaServerApplication.java
 */

package djh.it.eureka;

import org.springframework.boot.SpringApplication;
import org.springframework.boot.autoconfigure.SpringBootApplication;
import org.springframework.cloud.netflix.eureka.server.EnableEurekaServer;

@SpringBootApplication
@EnableEurekaServer  //激活 Eureka
public class EurekaServerApplication {
    public static void main(String[] args) {
        SpringApplication.run(EurekaServerApplication.class, args);
    }
}
4、搭建案例—在父工程 spring_cloud_sentinel_demo 下,创建子工程 product_service(子模块)。
4.1 在父工程 spring_cloud_sentinel_demo 下,创建 生产者 子工程 product_service(子模块)
	--> 右键 spring_cloud_sentinel_demo 父工程
	--> Modules
	--> Maven
	--> Groupld : ( djh.it )
		Artifactld : ( product_service )
		Version : 1.0-SNAPSHOT
	--> Next
	--> Module name: ( product_service )
		Content root : ( spring_cloud_sentinel_demo\product_service )
		Module file location: ( spring_cloud_sentinel_demo\product_service )
	--> Finish
4.2 在 生产者 子工程 product_service (子模块)中的 pom.xml 中导入依赖
<?xml version="1.0" encoding="UTF-8"?>
<project xmlns="http://maven.apache.org/POM/4.0.0"
         xmlns:xsi="http://www.w3.org/2001/XMLSchema-instance"
         xsi:schemaLocation="http://maven.apache.org/POM/4.0.0 http://maven.apache.org/xsd/maven-4.0.0.xsd">
    <parent>
        <artifactId>spring_cloud_sentinel_demo</artifactId>
        <groupId>org.example</groupId>
        <version>1.0-SNAPSHOT</version>
    </parent>
    <modelVersion>4.0.0</modelVersion>

    <artifactId>product_service</artifactId>

    <dependencies>
        <dependency>
            <groupId>mysql</groupId>
            <artifactId>mysql-connector-java</artifactId>
            <version>5.1.32</version>
<!--            <version>8.0.26</version>  -->
        </dependency>
        <dependency>
            <groupId>org.springframework.boot</groupId>
            <artifactId>spring-boot-starter-data-jpa</artifactId>
        </dependency>
        <!-- 导入 eureka 注册中心 -->
        <dependency>
            <groupId>org.springframework.cloud</groupId>
            <artifactId>spring-cloud-starter-netflix-eureka-client</artifactId>
        </dependency>
    </dependencies>
</project>
<!-- spring_cloud_sentinel_demo\product_service\pom.xml -->
4.3、在 生产者 子工程 product_service (子模块)中,创建 商品实体类 Product.java
/**
 *  spring_cloud_sentinel_demo\product_service\src\main\java\djh\it\product\domain\Product.java
 *
 *  2024-5-2 商品实体类 Product.java
 */
package djh.it.product.domain;

import lombok.Data;
import javax.persistence.Entity;
import javax.persistence.Id;
import javax.persistence.Table;
import java.math.BigDecimal;

@Data
@Entity
@Table(name="tb_product")  //对应数据库中的数据表
public class Product {

    @Id
    private Long id;
    private String productName;
    private Integer status;
    private BigDecimal price;
    private String productDesc;
    private String caption;
    private Integer inventory;

    public void setProductName(String productName) {
        this.productName = productName;
    }
}
4.4、在 生产者 子工程 product_service (子模块)中,创建 dao 持久层接口类 ProductDao.java
/**
 *   spring_cloud_sentinel_demo\product_service\src\main\java\djh\it\product\dao\ProductDao.java
 *
 *  2024-5-2  dao 持久层接口 ProductDao.java
 */
package djh.it.product.dao;

import djh.it.product.domain.Product;
import org.springframework.data.jpa.repository.JpaRepository;
import org.springframework.data.jpa.repository.JpaSpecificationExecutor;

public interface ProductDao
        extends JpaRepository<Product, Long>, JpaSpecificationExecutor<Product> {

}
4.5 在 生产者 子工程 product_service (子模块)中,创建 service 服务层 接口类 ProductService.java
/**
 *   spring_cloud_sentinel_demo\product_service\src\main\java\djh\it\product\service\ProductService.java
 *
 *  2024-5-2  service 服务层 接口 ProductService.java
 */
package djh.it.product.service;

import djh.it.product.domain.Product;

public interface ProductService {
    //根据id查询
    Product findById(Long id);
    //保存
    void save(Product product);
    //更新
    void update(Product product);
    //删除
    void delete(Long id);
}
4.6 在 生产者 子工程 product_service (子模块)中,创建 service 服务层 实现类 ProductServiceImpl.java
/**
 *  spring_cloud_sentinel_demo\product_service\src\main\java\djh\it\product\service\Impl\ProductServiceImpl.java
 *
 *  2024-5-2  service 服务层 实现类
 */
package djh.it.product.service.impl;

import djh.it.product.domain.Product;
import djh.it.product.dao.ProductDao;
import djh.it.product.service.ProductService;
import org.springframework.beans.factory.annotation.Autowired;
import org.springframework.stereotype.Service;

@Service
public class ProductServiceImpl implements ProductService {

    @Autowired
    private ProductDao productDao;

    @Override
    public Product findById(Long id) {
        return productDao.findById(id).get();
    }

    @Override
    public void save(Product product) {
        productDao.save(product);
    }

    @Override
    public void update(Product product) {
        productDao.save(product);
    }

    @Override
    public void delete(Long id) {
        productDao.deleteById(id);
    }
}
4.7、在 生产者 子工程 product_service (子模块)中,创建 商品的 controller 类 ProductController.java
/**
* spring_cloud_sentinel_demo\product_service\src\main\java\djh\it\product\controller\ProductController.java
*
* 2024-5-2 商品的 controller 类 ProductController.java
*/
package djh.it.product.controller;
import djh.it.product.domain.Product;
import djh.it.product.service.ProductService;
import org.springframework.beans.factory.annotation.Autowired;
import org.springframework.beans.factory.annotation.Value;
import org.springframework.web.bind.annotation.*;
@RestController
@RequestMapping("/product")
public class ProductController {
@Autowired
private ProductService productService;
//获取服务器端口号
@Value("${server.port}")
private String port;
//获取服务器IP地址
@Value("${spring.cloud.client.ip-address}") //springcloud 自动获取当前应用的IP地址
private String ip;
@RequestMapping(value = "/{id}", method = RequestMethod.GET)
public Product findById(@PathVariable Long id){
// try {
// Thread.sleep(2000l); //延迟2秒
// } catch (InterruptedException e) {
// e.printStackTrace();
// }
Product product = productService.findById(id);
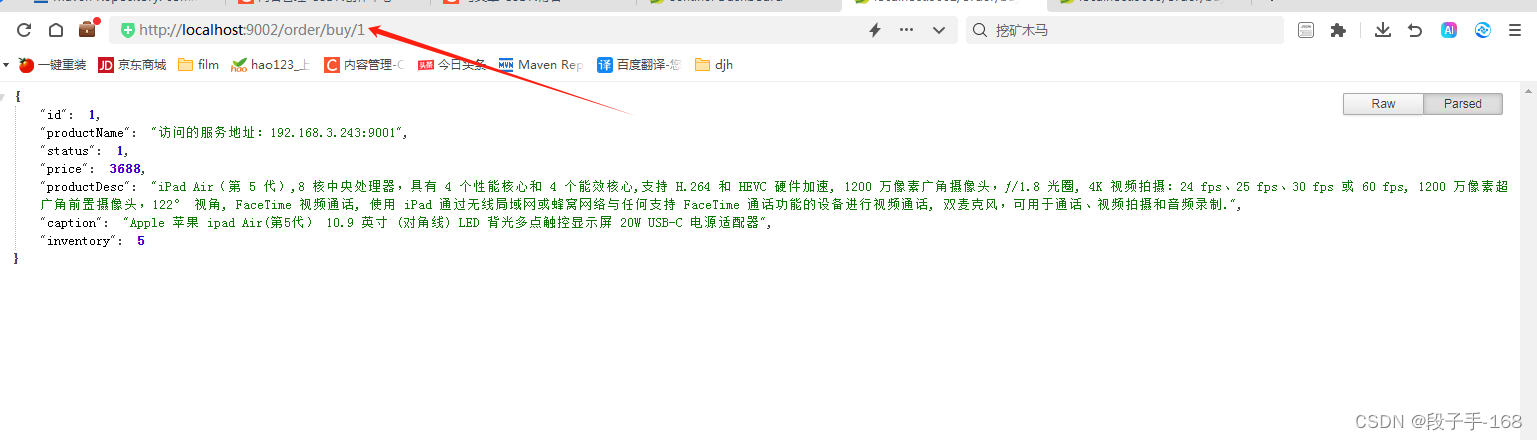
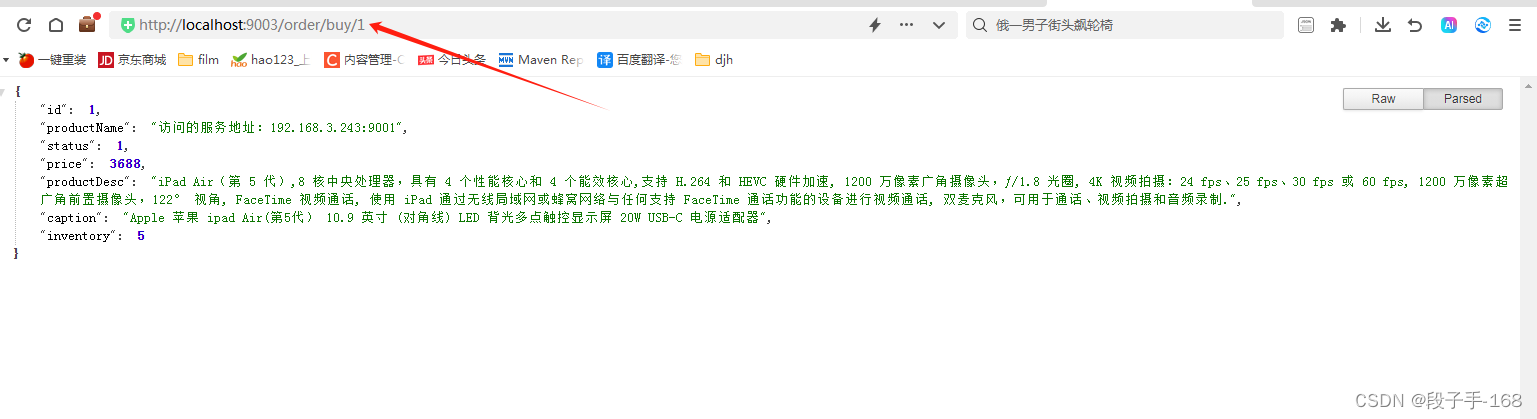
product.setProductName("访问的服务地址:"+ip+":"+port);
return product;
}
@RequestMapping(value = "", method = RequestMethod.POST)
public String save (@RequestBody Product product){
productService.save(product);
return "保存成功";
}
}
4.8、在 生产者 子工程 product_service (子模块)中,创建配置文件 application.yml
##  spring_cloud_sentinel_demo\product_service\src\main\resources\application.yml

server:
  port: 9001  # 启动端口 命令行注入。
#  port: ${port:9001}  # 启动端口设置为动态传参,如果未传参数,默认端口为 9001

spring:
  application:
    name: service-product  #spring应用名, # 注意 FeignClient 不支持名字带下划线
  #  main:
  #    allow-bean-definition-overriding: true # SpringBoot2.1 需要设定。
  datasource:
    driver-class-name: com.mysql.jdbc.Driver  # mysql 驱动
    url: jdbc:mysql://localhost:3306/shop?useUnicode=true&characterEncoding=utf8&useSSL=false&serverTimezone=Asia/Shanghai
    username: 'root'
    password: '012311'
  jpa:
    database: MySQL
    show-sql: true
    open-in-view: true

eureka:  # 配置 Eureka
  client:
    service-url:
      defaultZone: http://localhost:9000/eureka/  # 多个 eurekaserver 用 , 隔开。
  instance:
    prefer-ip-address: true  # 使用 ip 地址注册
    instance-id: ${spring.cloud.client.ip-address}:${server.port}
4.9、在 生产者 子工程 product_service (子模块)中,创建 启动类 ProductApplication.java
/**
 *   spring_cloud_sentinel_demo\product_service\src\main\java\djh\it\product\ProductApplication.java
 *
 *   2024-5-2  启动类 ProductApplication.java
 */
package djh.it.product;

import org.springframework.boot.SpringApplication;
import org.springframework.boot.autoconfigure.SpringBootApplication;
import org.springframework.boot.autoconfigure.domain.EntityScan;
import org.springframework.cloud.netflix.eureka.EnableEurekaClient;

@SpringBootApplication
@EntityScan("djh.it.product.domain")
@EnableEurekaClient  //激活 EurekaClient 同 @EnableDiscoveryClient 注解
public class ProductApplication {
    public static void main(String[] args) {
        SpringApplication.run(ProductApplication.class, args);
    }
}
5、搭建案例—在父工程 spring_cloud_sentinel_demo 下,创建子工程 order_service_feign(子模块)
5.1 创建 消费者 子工程 order_service_feign(子模块)通过 feign 调用微服务。
	--> 右键 spring_cloud_sentinel_demo 父工程
	--> Modules
	--> Maven
	--> Groupld : ( djh.it )
		Artifactld : ( order_service_feign )
		Version : 1.0-SNAPSHOT
	--> Next
	--> Module name: ( order_service_feign )
		Content root : ( \spring_cloud_sentinel_demo\order_service_feign )
		Module file location: ( \spring_cloud_sentinel_demo\order_service_feign )
	--> Finish
5.2 在消费者子工程(子模块) order_service_feign 的 pom.xml 中导入依赖
<?xml version="1.0" encoding="UTF-8"?>
<project xmlns="http://maven.apache.org/POM/4.0.0"
         xmlns:xsi="http://www.w3.org/2001/XMLSchema-instance"
         xsi:schemaLocation="http://maven.apache.org/POM/4.0.0 http://maven.apache.org/xsd/maven-4.0.0.xsd">
    <parent>
        <artifactId>spring_cloud_sentinel_demo</artifactId>
        <groupId>org.example</groupId>
        <version>1.0-SNAPSHOT</version>
    </parent>
    <modelVersion>4.0.0</modelVersion>

    <artifactId>order_service_feign</artifactId>

    <dependencies>
        <dependency>
            <groupId>mysql</groupId>
            <artifactId>mysql-connector-java</artifactId>
           <version>5.1.32</version>
<!--            <version>8.0.26</version>-->
        </dependency>
        <dependency>
            <groupId>org.springframework.boot</groupId>
            <artifactId>spring-boot-starter-data-jpa</artifactId>
        </dependency>
        <!-- 导入 eureka 注册中心 -->
        <dependency>
            <groupId>org.springframework.cloud</groupId>
            <artifactId>spring-cloud-starter-netflix-eureka-client</artifactId>
        </dependency>
        <!-- springcloud 整合 openFeign -->
        <dependency>
            <groupId>org.springframework.cloud</groupId>
            <artifactId>spring-cloud-starter-openfeign</artifactId>
        </dependency>
        <!-- Hystrix 组件 对 RestTemplate 的支持4步:1)引入 Hystrix 依赖坐标 -->
        <dependency>
            <groupId>org.springframework.cloud</groupId>
            <artifactId>spring-cloud-starter-netflix-hystrix</artifactId>
        </dependency>
        <!-- 引入 hystrix 的监控信息 -->
        <dependency>
            <groupId>org.springframework.boot</groupId>
            <artifactId>spring-boot-starter-actuator</artifactId>
        </dependency>
        <dependency>
            <groupId>org.springframework.cloud</groupId>
            <artifactId>spring-cloud-starter-netflix-hystrix-dashboard</artifactId>
        </dependency>
    </dependencies>

</project>
<!-- spring_cloud_sentinel_demo\order_service_feign\pom.xml -->
5.3、在消费者子工程(子模块) order_service_feign 中,创建配置文件 application.yml
##  spring_cloud_sentinel_demo\order_service\src\main\resources\application.yml

server:
  port: 9002  # 启动端口 命令行注入。
#  port: ${port:9002}  # 启动端口设置为动态传参,如果未传参数,默认端口为 9002

spring:
  application:
    name: service-order_feign  #spring应用名, # 注意 FeignClient 不支持名字带下划线
  #  main:
  #    allow-bean-definition-overriding: true # SpringBoot2.1 需要设定。
  datasource:
    driver-class-name: com.mysql.jdbc.Driver  # mysql 驱动
    url: jdbc:mysql://localhost:3306/shop?useUnicode=true&characterEncoding=utf8&useSSL=false&serverTimezone=Asia/Shanghai
    # MySQL8.0 可以写成  root, 012311 或  'root', '012311'   # MySQL5.7 只能写成 'root', '012311'  # 注意用户名和密码后一定不能有空格。
    username: 'root'
    password: '012311'
  jpa:
    database: MySQL
    show-sql: true
    open-in-view: true

eureka:  # 配置 Eureka
  client:
    service-url:
      defaultZone: http://localhost:9000/eureka/  # 多个 eurekaserver 用 , 隔开。
  instance:
    prefer-ip-address: true  # 使用 ip 地址注册
    instance-id: ${spring.cloud.client.ip-address}:${server.port}

# 配置 feign 日志的输出。
# 日志配置:NONE:GI 不输出日志,BASIC:适用于生产环境追踪问题,HEADERS:在BASIC基础上,记录请求和响应头信息,FULL:记录所有。
logging:
  level:
    djh.it.order.feign.ProductFeignClient: debug

feign:
  client:
    config:
      default:
        connectTimeout: 5000   #服务之间建立连接所用的时间  #不设置 connectTimeout 会导致 readTimeout 设置不生效
        readTimeout: 5000   #建立连接后从服务端读取到数据用的时间
      service-product:  # 需要调用的服务名称
        loggerLevel: FULL
  hystrix:  # 开启对 hystrix 的支持。
    enabled: true

hystrix:  # 配置 hystrix 熔断(Hystrix:基于 RestTemplate 的统一降级配置)
  command:
    default:
      execution:
        isolation:
          thread:
            timeoutInMilliseconds: 5000  # 默认的熔断超时时间为1秒,若1秒没有返回数据,会自动触发降级逻辑。

management:   # 配置 Actuator 获取 hystrix 的监控数据 暴躁端点。
  endpoints:
    web:
      exposure:
        include: '*'   # 暴露所有端点。
5.4、在消费者子工程(子模块) order_service_feign 中,创建 商品实体类 Product.java
/**
 *   spring_cloud_sentinel_demo\order_service\src\main\java\djh\it\order\domain\Product.java
 *
 *  2024-5-2  商品实体类 Product.java
 */
package djh.it.order.domain;

import lombok.Data;
import java.math.BigDecimal;

@Data
public class Product {

    private Long id;
    private String productName;
    private Integer status;
    private BigDecimal price;
    private String productDesc;
    private String caption;
    private Integer inventory;

    public void setProductName(String productName) {
        this.productName = productName;
    }
}
5.5 在消费者子工程(子模块) order_service_feign 中,创建 controller 类 OrderController.java
/**
 *   spring_cloud_sentinel_demo\order_service\src\main\java\djh\it\order\controller\OrderController.java
 *
 *  2024-5-2 订单的 controller 类 OrderController.java
 */
package djh.it.order.controller;

import com.netflix.hystrix.contrib.javanica.annotation.HystrixCommand;
import djh.it.order.domain.Product;
import djh.it.order.restemplate.ProductFeignClient;
import org.springframework.web.bind.annotation.PathVariable;
import org.springframework.web.bind.annotation.RequestMapping;
import org.springframework.web.bind.annotation.RequestMethod;
import org.springframework.web.bind.annotation.RestController;

import javax.annotation.Resource;

@RestController
@RequestMapping("/order")
public class OrderController {

    @Resource    //按类型名称注入 调用 feign 组件的接口类 ProductFeignClient
    //@Autowired   //自动注入 调用 feign 组件的接口类 ProductFeignClient //有时变量名报红,可替换为 @Resource 注解
    private ProductFeignClient productFeignClient;

    /**
     *  Hystrix 组件 对 RestTemplate 的支持4步:4)使用注解配置熔断保护
     *      fallbackmethod : 配置熔断之后的降级方法
     * @param id
     * @return
     */
    @HystrixCommand  //配置了公共的熔断设置后,就不需要传参数。
    @RequestMapping(value = "/buy/{id}", method = RequestMethod.GET)
    public Product findById(@PathVariable Long id){
        Product product = null;
       //调用 feign 组件的接口类 的方法
        product = productFeignClient.findById(id);
        return product;
    }
}
5.6 在消费者子工程(子模块) order_service_feign 中,创建 feign 组件的接口类 ProductFeignClient.java
/**
 *   spring_cloud_sentinel_demo\order_service\src\main\java\djh\it\order\feign\ProductFeignClient.java
 *
 *   2024-5-2  创建 调用 feign 组件的接口类 ProductFeignClient.java
 *   声明需要调用的微服务名称 @FeignClient, name: 服务提供者的名称, fallback:配置熔断发生的降级方法。
 */

package djh.it.order.restemplate;

import djh.it.order.domain.Product;
import djh.it.order.restemplate.impl.ProductFeignClientCallBack;
import org.springframework.cloud.openfeign.FeignClient;
import org.springframework.web.bind.annotation.PathVariable;
import org.springframework.web.bind.annotation.RequestMapping;
import org.springframework.web.bind.annotation.RequestMethod;

@FeignClient(name="service-product", fallback = ProductFeignClientCallBack.class)  //调用 FeignClient 并添加降级方法的支持
public interface ProductFeignClient {
    //配置需要调用的微服务接口
    @RequestMapping(value = "/product/{id}", method = RequestMethod.GET)
    public Product findById(@PathVariable("id") Long id);
}
5.7 在消费者子工程(子模块) order_service_feign 中,创建 feign 组件的实现类 ProductFeignClient.java
/**
 *   spring_cloud_hystrix_demo\order_service\src\main\java\djh\it\order\feign\ProductFeignClientCallBack.java
 *
 *   2024-5-2  创建 feign 组件的接口类 ProductFeignClient 的实现类 ProductFeignClientCallBack.java
 *   配置熔断触发的降级逻辑。
 */

package djh.it.order.restemplate.impl;

import djh.it.order.domain.Product;
import djh.it.order.restemplate.ProductFeignClient;
import org.springframework.stereotype.Component;

@Component
public class ProductFeignClientCallBack implements ProductFeignClient {
    // 熔断降级的方法
    public Product findById(Long id) {
        Product product = new Product();
        product.setProductName("hystrix:基于 feign 调用的熔断配置 -- feign 调用触发熔断降级的方法。");
        return product;
    }
}
5.8 在消费者子工程(子模块) order_service_feign 中,创建 启动类 OrderApplication.java
/**
 *    spring_cloud_sentinel_demo\order_service\src\main\java\djh\it\order\OrderFeignApplication.java
 *
 *   2024-5-2  启动类 OrderFeignApplication.java
 */
package djh.it.order;

import org.springframework.boot.SpringApplication;
import org.springframework.boot.autoconfigure.SpringBootApplication;
import org.springframework.boot.autoconfigure.domain.EntityScan;
import org.springframework.cloud.client.circuitbreaker.EnableCircuitBreaker;
import org.springframework.cloud.netflix.eureka.EnableEurekaClient;
import org.springframework.cloud.netflix.hystrix.dashboard.EnableHystrixDashboard;
import org.springframework.cloud.openfeign.EnableFeignClients;

@SpringBootApplication
@EntityScan("djh.it.order.domain")
@EnableEurekaClient  //激活 EurekaClient,同 @EnableDiscoveryClient 注解相同。
@EnableFeignClients  //激活 Feign
@EnableCircuitBreaker  // 2)激活 hystrix,  Hystrix 组件 对 RestTemplate 的支持4步:
@EnableHystrixDashboard  // 激活 Hystrix 基于图形化的 DashBoard(仪表板)监控平台
public class OrderFeignApplication {
    public static void main(String[] args) {
        SpringApplication.run(OrderFeignApplication.class, args);
    }
}
6、搭建案例—在父工程 spring_cloud_sentinel_demo 下,创建子工程 order_service_rest(子模块)
6.1 创建 消费者 子工程 order_service_rest(子模块)通过 resTemplate 调用微服务。
	--> 右键 spring_cloud_sentinel_demo 父工程
	--> Modules
	--> Maven
	--> Groupld : ( djh.it )
		Artifactld : ( order_service_rest )
		Version : 1.0-SNAPSHOT
	--> Next
	--> Module name: ( order_service_rest )
		Content root : ( \spring_cloud_sentinel_demo\order_service_rest )
		Module file location: ( \spring_cloud_sentinel_demo\order_service_rest )
	--> Finish
6.2 在消费者子工程(子模块) order_service_rest 的 pom.xml 中导入依赖
<?xml version="1.0" encoding="UTF-8"?>
<project xmlns="http://maven.apache.org/POM/4.0.0"
         xmlns:xsi="http://www.w3.org/2001/XMLSchema-instance"
         xsi:schemaLocation="http://maven.apache.org/POM/4.0.0 http://maven.apache.org/xsd/maven-4.0.0.xsd">
    <parent>
        <artifactId>spring_cloud_sentinel_demo</artifactId>
        <groupId>org.example</groupId>
        <version>1.0-SNAPSHOT</version>
    </parent>
    <modelVersion>4.0.0</modelVersion>

    <artifactId>order_service_rest</artifactId>

    <dependencies>
        <dependency>
            <groupId>mysql</groupId>
            <artifactId>mysql-connector-java</artifactId>
           <version>5.1.32</version>
<!--            <version>8.0.26</version>-->
        </dependency>
        <dependency>
            <groupId>org.springframework.boot</groupId>
            <artifactId>spring-boot-starter-data-jpa</artifactId>
        </dependency>
        <!-- 导入 eureka 注册中心 -->
        <dependency>
            <groupId>org.springframework.cloud</groupId>
            <artifactId>spring-cloud-starter-netflix-eureka-client</artifactId>
        </dependency>
        <!-- springcloud 整合 openFeign -->
        <dependency>
            <groupId>org.springframework.cloud</groupId>
            <artifactId>spring-cloud-starter-openfeign</artifactId>
        </dependency>
        <!-- Hystrix 组件 对 RestTemplate 的支持4步:1)引入 Hystrix 依赖坐标 -->
        <dependency>
            <groupId>org.springframework.cloud</groupId>
            <artifactId>spring-cloud-starter-netflix-hystrix</artifactId>
        </dependency>
        <!-- 引入 hystrix 的监控信息 -->
        <dependency>
            <groupId>org.springframework.boot</groupId>
            <artifactId>spring-boot-starter-actuator</artifactId>
        </dependency>
        <dependency>
            <groupId>org.springframework.cloud</groupId>
            <artifactId>spring-cloud-starter-netflix-hystrix-dashboard</artifactId>
        </dependency>
    </dependencies>

</project>
<!-- spring_cloud_sentinel_demo\order_service_feign\pom.xml -->
6.3、在消费者子工程(子模块) order_service_rest 中,创建配置文件 application.yml
##  spring_cloud_sentinel_demo\order_service\src\main\resources\application.yml

server:
  port: 9003  # 启动端口 命令行注入。
#  port: ${port:9003}  # 启动端口设置为动态传参,如果未传参数,默认端口为 9003

spring:
  application:
    name: service-order_rest  #spring应用名, # 注意 FeignClient 不支持名字带下划线
  #  main:
  #    allow-bean-definition-overriding: true # SpringBoot2.1 需要设定。
  datasource:
    driver-class-name: com.mysql.jdbc.Driver  # mysql 驱动
    url: jdbc:mysql://localhost:3306/shop?useUnicode=true&characterEncoding=utf8&useSSL=false&serverTimezone=Asia/Shanghai
    # MySQL8.0 可以写成  root, 012311 或  'root', '012311'   # MySQL5.7 只能写成 'root', '012311'  # 注意用户名和密码后一定不能有空格。
    username: 'root'
    password: '012311'
  jpa:
    database: MySQL
    show-sql: true
    open-in-view: true

eureka:  # 配置 Eureka
  client:
    service-url:
      defaultZone: http://localhost:9000/eureka/  # 多个 eurekaserver 用 , 隔开。
  instance:
    prefer-ip-address: true  # 使用 ip 地址注册
    instance-id: ${spring.cloud.client.ip-address}:${server.port}

# 配置 feign 日志的输出。
# 日志配置:NONE:GI 不输出日志,BASIC:适用于生产环境追踪问题,HEADERS:在BASIC基础上,记录请求和响应头信息,FULL:记录所有。
logging:
  level:
    djh.it.order.feign.ProductFeignClient: debug

hystrix:  # 配置 hystrix 熔断(Hystrix:基于 RestTemplate 的统一降级配置)
  command:
    default:
      execution:
        isolation:
          thread:
            timeoutInMilliseconds: 5000  # 默认的熔断超时时间为1秒,若1秒没有返回数据,会自动触发降级逻辑。

management:   # 配置 Actuator 获取 hystrix 的监控数据 暴躁端点。
  endpoints:
    web:
      exposure:
        include: '*'   # 暴露所有端点。
6.4、在消费者子工程(子模块) order_service_rest 中,创建 商品实体类 Product.java
/**
 *   spring_cloud_sentinel_demo\order_service\src\main\java\djh\it\order\domain\Product.java
 *
 *  2024-5-2  商品实体类 Product.java
 */
package djh.it.order.domain;

import lombok.Data;
import java.math.BigDecimal;

@Data
public class Product {

    private Long id;
    private String productName;
    private Integer status;
    private BigDecimal price;
    private String productDesc;
    private String caption;
    private Integer inventory;

    public void setProductName(String productName) {
        this.productName = productName;
    }
}
6.5 在消费者子工程(子模块) order_service_rest 中,创建 controller 类 OrderController.java
/**
 *   spring_cloud_sentinel_demo\order_service\src\main\java\djh\it\order\controller\OrderController.java
 *
 *  2024-5-2 订单的 controller 类 OrderController.java
 */
package djh.it.order.controller;

import com.netflix.hystrix.contrib.javanica.annotation.HystrixCommand;
import djh.it.order.domain.Product;
import org.springframework.beans.factory.annotation.Autowired;
import org.springframework.web.bind.annotation.PathVariable;
import org.springframework.web.bind.annotation.RequestMapping;
import org.springframework.web.bind.annotation.RequestMethod;
import org.springframework.web.bind.annotation.RestController;
import org.springframework.web.client.RestTemplate;

import javax.annotation.Resource;

@RestController
@RequestMapping("/order")
public class OrderController {

    @Autowired  // 注入 restTemplate 对象
    private RestTemplate restTemplate;

    /**
     *  Hystrix 组件 对 RestTemplate 的支持4步:4)使用注解配置熔断保护
     *      fallbackmethod : 配置熔断之后的降级方法
     * @param id
     * @return
     */
    @HystrixCommand(fallbackMethod = "orderFallBack")
    @RequestMapping(value = "/buy/{id}", method = RequestMethod.GET)
    public Product findById(@PathVariable Long id){
        Product product = null;
        //product = restTemplate.getForObject("http://127.0.0.1:9001/product/1", Product.class);
        product = restTemplate.getForObject("http://service-product/product/1", Product.class);
        return product;
    }

    /**
     *  Hystrix 组件 对 RestTemplate 的支持4步:3)降级方法
     *   例如:如果访问的 service-product 服务器宕机,就会触发此降级方法
     * @param id
     * @return
     */
    public Product orderFallBack(Long id){
        Product product = new Product();
        product.setProductName("触发降级方法");
        return product;
    }
}
6.6 在消费者子工程(子模块) order_service_rest 中,创建 启动类 OrderApplication.java
/**
 *    spring_cloud_sentinel_demo\order_service\src\main\java\djh\it\order\OrderFeignApplication.java
 *
 *   2024-5-2  启动类 OrderFeignApplication.java
 */
package djh.it.order;

import org.springframework.boot.SpringApplication;
import org.springframework.boot.autoconfigure.SpringBootApplication;
import org.springframework.boot.autoconfigure.domain.EntityScan;
import org.springframework.cloud.client.circuitbreaker.EnableCircuitBreaker;
import org.springframework.cloud.client.loadbalancer.LoadBalanced;
import org.springframework.cloud.netflix.eureka.EnableEurekaClient;
import org.springframework.cloud.netflix.hystrix.dashboard.EnableHystrixDashboard;
import org.springframework.context.annotation.Bean;
import org.springframework.web.client.RestTemplate;

@SpringBootApplication
@EntityScan("djh.it.order.domain")
@EnableEurekaClient  //激活 EurekaClient,同 @EnableDiscoveryClient 注解相同。
//@EnableFeignClients  //激活 Feign
@EnableCircuitBreaker  // 2)激活 hystrix,  Hystrix 组件 对 RestTemplate 的支持4步:
@EnableHystrixDashboard  // 激活 Hystrix 基于图形化的 DashBoard(仪表板)监控平台
public class OrderRestemplateApplication {
    @LoadBalanced
    @Bean
    public RestTemplate restTemplate(){
        return new RestTemplate();
    }
    public static void main(String[] args) {
        SpringApplication.run(OrderRestemplateApplication.class, args);
    }
}
7、客户端能接入 Sentinel 控制台,将所有的服务交给控制台管理。
7.1 在客户端(需要管理微服务上)引入坐标。
- 修改 父工程 spring_cloud_sentinel_demo 的 pom.xml 文件,引入坐标:
<?xml version="1.0" encoding="UTF-8"?>
<project xmlns="http://maven.apache.org/POM/4.0.0"
         xmlns:xsi="http://www.w3.org/2001/XMLSchema-instance"
         xsi:schemaLocation="http://maven.apache.org/POM/4.0.0 http://maven.apache.org/xsd/maven-4.0.0.xsd">
    <modelVersion>4.0.0</modelVersion>

    <groupId>org.example</groupId>
    <artifactId>spring_cloud_sentinel_demo</artifactId>
    <packaging>pom</packaging>
    <version>1.0-SNAPSHOT</version>
    <modules>
        <module>eureka_service</module>
        <module>product_service</module>
        <module>order_service_feign</module>
        <module>order_service_rest</module>
    </modules>

    <parent>
        <groupId>org.springframework.boot</groupId>
        <artifactId>spring-boot-starter-parent</artifactId>
        <version>2.1.6.RELEASE</version>
    </parent>

    <properties>
        <project.build.sourceEncoding>UTF-8</project.build.sourceEncoding>
        <project.reporting.outputEncoding>UTF-8</project.reporting.outputEncoding>
        <java.version>1.8</java.version>
    </properties>

    <dependencies>
        <dependency>
            <groupId>org.springframework.boot</groupId>
            <artifactId>spring-boot-starter-web</artifactId>
        </dependency>
        <dependency>
            <groupId>org.springframework.boot</groupId>
            <artifactId>spring-boot-starter-logging</artifactId>
        </dependency>
        <dependency>
            <groupId>org.springframework.boot</groupId>
            <artifactId>spring-boot-starter-test</artifactId>
            <scope>test</scope>
        </dependency>
        <dependency>
            <groupId>org.projectlombok</groupId>
            <artifactId>lombok</artifactId>
            <version>1.18.4</version>
            <scope>provided</scope>
        </dependency>
    </dependencies>

    <dependencyManagement>
        <dependencies>
            <dependency>
                <groupId>org.springframework.cloud</groupId>
                <artifactId>spring-cloud-dependencies</artifactId>
                <version>Greenwich.RELEASE</version>
                <type>pom</type>
                <scope>import</scope>
            </dependency>
            <dependency>
                <groupId>com.alibaba.cloud</groupId>
                <artifactId>spring-cloud-alibaba.dependencies</artifactId>
                <version>2.1.0.RELEASE</version>
                <type>pom</type>
                <scope>import</scope>
            </dependency>
        </dependencies>
    </dependencyManagement>

    <repositories>
        <repository>
            <id>spring-snapshots</id>
            <name>Spring Snapshots</name>
            <url>http://repo.spring.io/libs-snapshot-local</url>
            <snapshots>
                <enabled>true</enabled>
            </snapshots>
        </repository>
        <repository>
            <id>spring-milestones</id>
            <name>Spring Milestones</name>
            <url>http://repo.spring.io/libs-milestone-local</url>
            <snapshots>
                <enabled>false</enabled>
            </snapshots>
        </repository>
        <repository>
            <id>spring-releases</id>
            <name>Spring Releases</name>
            <url>http://repo.spring.io/libs-release-local</url>
            <snapshots>
                <enabled>false</enabled>
            </snapshots>
        </repository>
    </repositories>

    <pluginRepositories>
        <pluginRepository>
            <id>spring-snapshots</id>
            <name>Spring Snapshots</name>
            <url>http://repo.spring.io/libs-snapshot-local</url>
            <snapshots>
                <enabled>true</enabled>
            </snapshots>
        </pluginRepository>
        <pluginRepository>
            <id>spring-milestones</id>
            <name>Spring Milestones</name>
            <url>http://repo.spring.io/libs-milestone-local</url>
            <snapshots>
                <enabled>false</enabled>
            </snapshots>
        </pluginRepository>
    </pluginRepositories>

    <build>
        <plugins>
            <plugin>
                <groupId>org.springframework.boot</groupId>
                <artifactId>spring-boot-maven-plugin</artifactId>
            </plugin>
        </plugins>
    </build>

</project>
<!-- spring_cloud_sentinel_demo\pom.xml -->
- 修改 消费者子工程(子模块) order_service_feign 的 pom.xml 文件,引入坐标:
<?xml version="1.0" encoding="UTF-8"?>
<project xmlns="http://maven.apache.org/POM/4.0.0"
         xmlns:xsi="http://www.w3.org/2001/XMLSchema-instance"
         xsi:schemaLocation="http://maven.apache.org/POM/4.0.0 http://maven.apache.org/xsd/maven-4.0.0.xsd">
    <parent>
        <artifactId>spring_cloud_sentinel_demo</artifactId>
        <groupId>org.example</groupId>
        <version>1.0-SNAPSHOT</version>
    </parent>
    <modelVersion>4.0.0</modelVersion>

    <artifactId>order_service_feign</artifactId>

    <dependencies>
        <dependency>
            <groupId>mysql</groupId>
            <artifactId>mysql-connector-java</artifactId>
           <version>5.1.32</version>
<!--            <version>8.0.26</version>-->
        </dependency>
        <dependency>
            <groupId>org.springframework.boot</groupId>
            <artifactId>spring-boot-starter-data-jpa</artifactId>
        </dependency>
        <!-- 导入 eureka 注册中心 -->
        <dependency>
            <groupId>org.springframework.cloud</groupId>
            <artifactId>spring-cloud-starter-netflix-eureka-client</artifactId>
        </dependency>
        <!-- springcloud 整合 openFeign -->
        <dependency>
            <groupId>org.springframework.cloud</groupId>
            <artifactId>spring-cloud-starter-openfeign</artifactId>
        </dependency>
        <!-- Hystrix 组件 对 RestTemplate 的支持4步:1)引入 Hystrix 依赖坐标 -->
        <dependency>
            <groupId>org.springframework.cloud</groupId>
            <artifactId>spring-cloud-starter-netflix-hystrix</artifactId>
        </dependency>
        <!-- 引入 hystrix 的监控信息 -->
        <dependency>
            <groupId>org.springframework.boot</groupId>
            <artifactId>spring-boot-starter-actuator</artifactId>
        </dependency>
        <dependency>
            <groupId>org.springframework.cloud</groupId>
            <artifactId>spring-cloud-starter-netflix-hystrix-dashboard</artifactId>
        </dependency>
        <!-- 引入 sentinel 熔断 -->
        <dependency>
            <groupId>com.alibaba.cloud</groupId>
            <artifactId>spring-cloud-starter-alibaba-sentinel</artifactId>
            <version>2.0.0.RELEASES</version>
        </dependency>
    </dependencies>

</project>
<!-- spring_cloud_sentinel_demo\order_service_feign\pom.xml -->
- 在消费者子工程(子模块) order_service_rest 的 pom.xml 文件,引入坐标:
<?xml version="1.0" encoding="UTF-8"?>
<project xmlns="http://maven.apache.org/POM/4.0.0"
         xmlns:xsi="http://www.w3.org/2001/XMLSchema-instance"
         xsi:schemaLocation="http://maven.apache.org/POM/4.0.0 http://maven.apache.org/xsd/maven-4.0.0.xsd">
    <parent>
        <artifactId>spring_cloud_sentinel_demo</artifactId>
        <groupId>org.example</groupId>
        <version>1.0-SNAPSHOT</version>
    </parent>
    <modelVersion>4.0.0</modelVersion>

    <artifactId>order_service_rest</artifactId>

    <dependencies>
        <dependency>
            <groupId>mysql</groupId>
            <artifactId>mysql-connector-java</artifactId>
           <version>5.1.32</version>
<!--            <version>8.0.26</version>-->
        </dependency>
        <dependency>
            <groupId>org.springframework.boot</groupId>
            <artifactId>spring-boot-starter-data-jpa</artifactId>
        </dependency>
        <!-- 导入 eureka 注册中心 -->
        <dependency>
            <groupId>org.springframework.cloud</groupId>
            <artifactId>spring-cloud-starter-netflix-eureka-client</artifactId>
        </dependency>
        <!-- springcloud 整合 openFeign -->
        <dependency>
            <groupId>org.springframework.cloud</groupId>
            <artifactId>spring-cloud-starter-openfeign</artifactId>
        </dependency>
        <!-- Hystrix 组件 对 RestTemplate 的支持4步:1)引入 Hystrix 依赖坐标 -->
        <dependency>
            <groupId>org.springframework.cloud</groupId>
            <artifactId>spring-cloud-starter-netflix-hystrix</artifactId>
        </dependency>
        <!-- 引入 hystrix 的监控信息 -->
        <dependency>
            <groupId>org.springframework.boot</groupId>
            <artifactId>spring-boot-starter-actuator</artifactId>
        </dependency>
        <dependency>
            <groupId>org.springframework.cloud</groupId>
            <artifactId>spring-cloud-starter-netflix-hystrix-dashboard</artifactId>
        </dependency>
        <!-- 引入 sentinel 熔断 -->
        <dependency>
            <groupId>com.alibaba.cloud</groupId>
            <artifactId>spring-cloud-starter-alibaba-sentinel</artifactId>
            <version>2.0.0.RELEASES</version>
        </dependency>
    </dependencies>

</project>
<!-- spring_cloud_sentinel_demo\order_service_feign\pom.xml -->
7.2 在客户端配置启动参数。
- 修改 消费者子工程(子模块) order_service_feign 的 application.yml 文件,配置启动参数:
##  spring_cloud_sentinel_demo\order_service\src\main\resources\application.yml

server:
  port: 9002  # 启动端口 命令行注入。
#  port: ${port:9002}  # 启动端口设置为动态传参,如果未传参数,默认端口为 9002

spring:
  application:
    name: service-order_feign  #spring应用名, # 注意 FeignClient 不支持名字带下划线
  #  main:
  #    allow-bean-definition-overriding: true # SpringBoot2.1 需要设定。
  datasource:
    driver-class-name: com.mysql.jdbc.Driver  # mysql 驱动
    url: jdbc:mysql://localhost:3306/shop?useUnicode=true&characterEncoding=utf8&useSSL=false&serverTimezone=Asia/Shanghai
    # MySQL8.0 可以写成  root, 012311 或  'root', '012311'   # MySQL5.7 只能写成 'root', '012311'  # 注意用户名和密码后一定不能有空格。
    username: 'root'
    password: '012311'
  jpa:
    database: MySQL
    show-sql: true
    open-in-view: true

  cloud:   # 配置 sentinel 服务熔断
    sentinel:
      transport:
        dashboard: localhost:8086  # sentienl 控制台的请求地址。

eureka:  # 配置 Eureka
  client:
    service-url:
      defaultZone: http://localhost:9000/eureka/  # 多个 eurekaserver 用 , 隔开。
  instance:
    prefer-ip-address: true  # 使用 ip 地址注册
    instance-id: ${spring.cloud.client.ip-address}:${server.port}
- 修改 消费者子工程(子模块) order_service_rest 的 application.yml 文件,配置启动参数:
##  spring_cloud_sentinel_demo\order_service\src\main\resources\application.yml

server:
  port: 9003  # 启动端口 命令行注入。
#  port: ${port:9003}  # 启动端口设置为动态传参,如果未传参数,默认端口为 9003

spring:
  application:
    name: service-order_rest  #spring应用名, # 注意 FeignClient 不支持名字带下划线
  #  main:
  #    allow-bean-definition-overriding: true # SpringBoot2.1 需要设定。
  datasource:
    driver-class-name: com.mysql.jdbc.Driver  # mysql 驱动
    url: jdbc:mysql://localhost:3306/shop?useUnicode=true&characterEncoding=utf8&useSSL=false&serverTimezone=Asia/Shanghai
    # MySQL8.0 可以写成  root, 012311 或  'root', '012311'   # MySQL5.7 只能写成 'root', '012311'  # 注意用户名和密码后一定不能有空格。
    username: 'root'
    password: '012311'
  jpa:
    database: MySQL
    show-sql: true
    open-in-view: true

  cloud:   # 配置 sentinel 服务熔断
    sentinel:
      transport:
        dashboard: localhost:8086  # sentienl 控制台的请求地址。

eureka:  # 配置 Eureka
  client:
    service-url:
      defaultZone: http://localhost:9000/eureka/  # 多个 eurekaserver 用 , 隔开。
  instance:
    prefer-ip-address: true  # 使用 ip 地址注册
    instance-id: ${spring.cloud.client.ip-address}:${server.port}
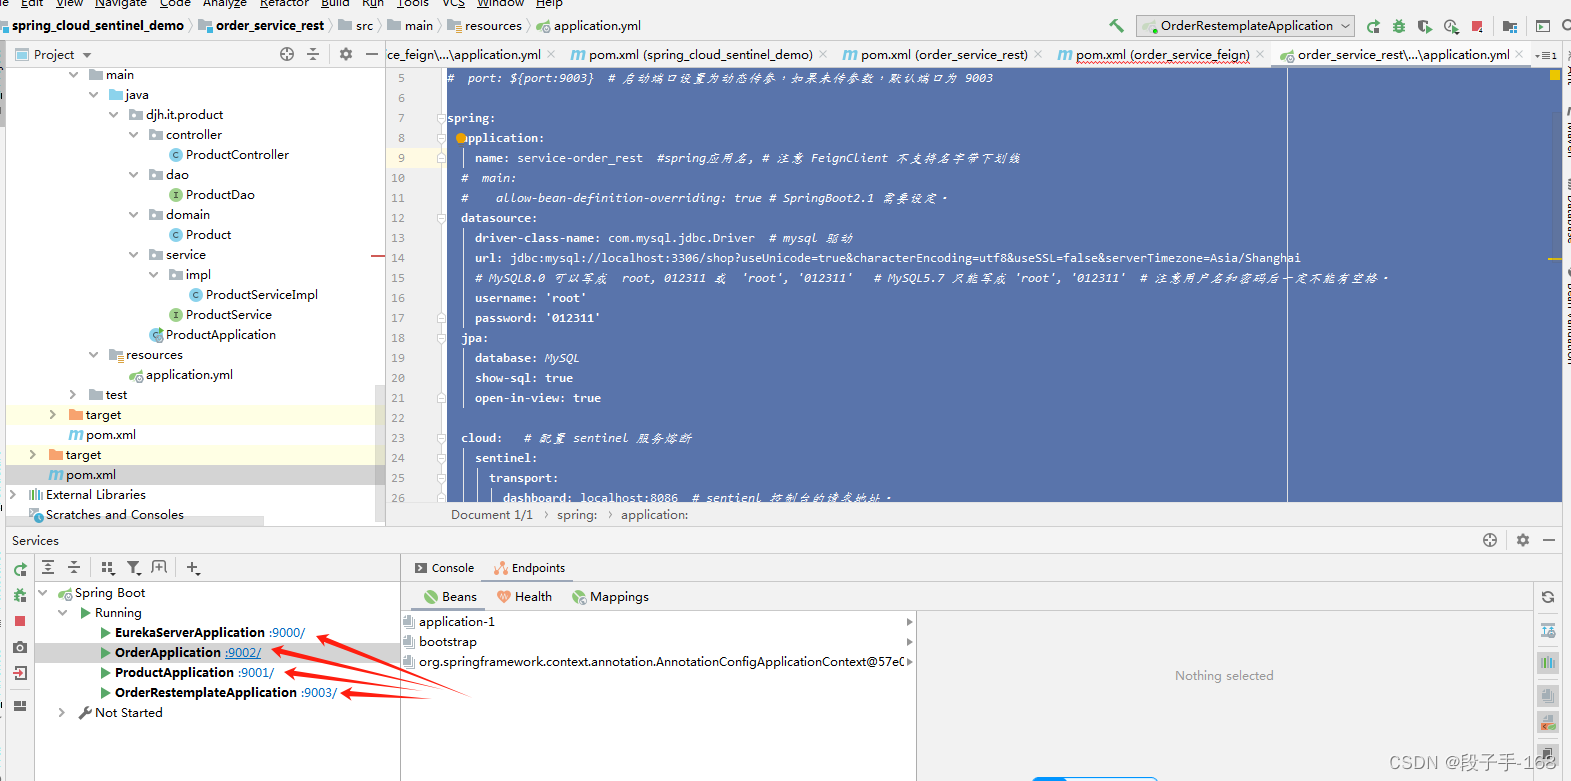
7.3 重新 运行(service-eureka, service-product, service-order_feign, service-order_rest, )4个启动类,并启动 Sentinel 控制台:
- 运行4个启动类:
- 使用命令启动 Sentinel 控制台:
java -Dserver.port=8086 -Dcsp.sentine1.dashboard.server=1ocalhost:8086 -Dproject.name=sentine1-dashboard -jar sentinel-dashboard-1.6.3.jar
- 查看机器列表以及健康情况
默认情况下 Sentinel 控制台是懒加载模式,也就是没有请求访问,查询不到服务。
Sentinel 会在客户端首次调用的时候进行初始化,开始向控制台发送心跳包。
也可以配置 sentihel.eager=true,取消 Sentinel 控制台懒加载。
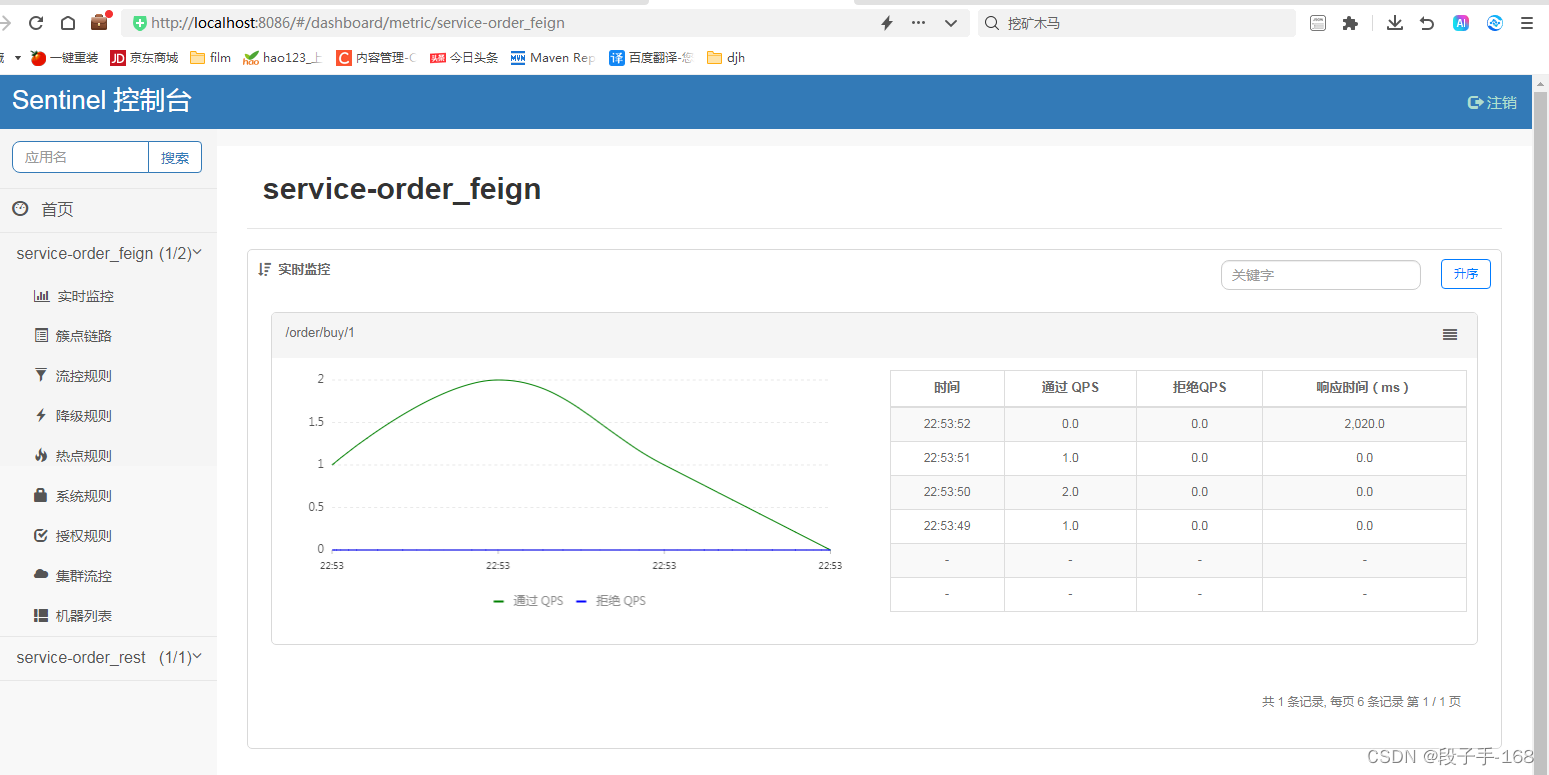
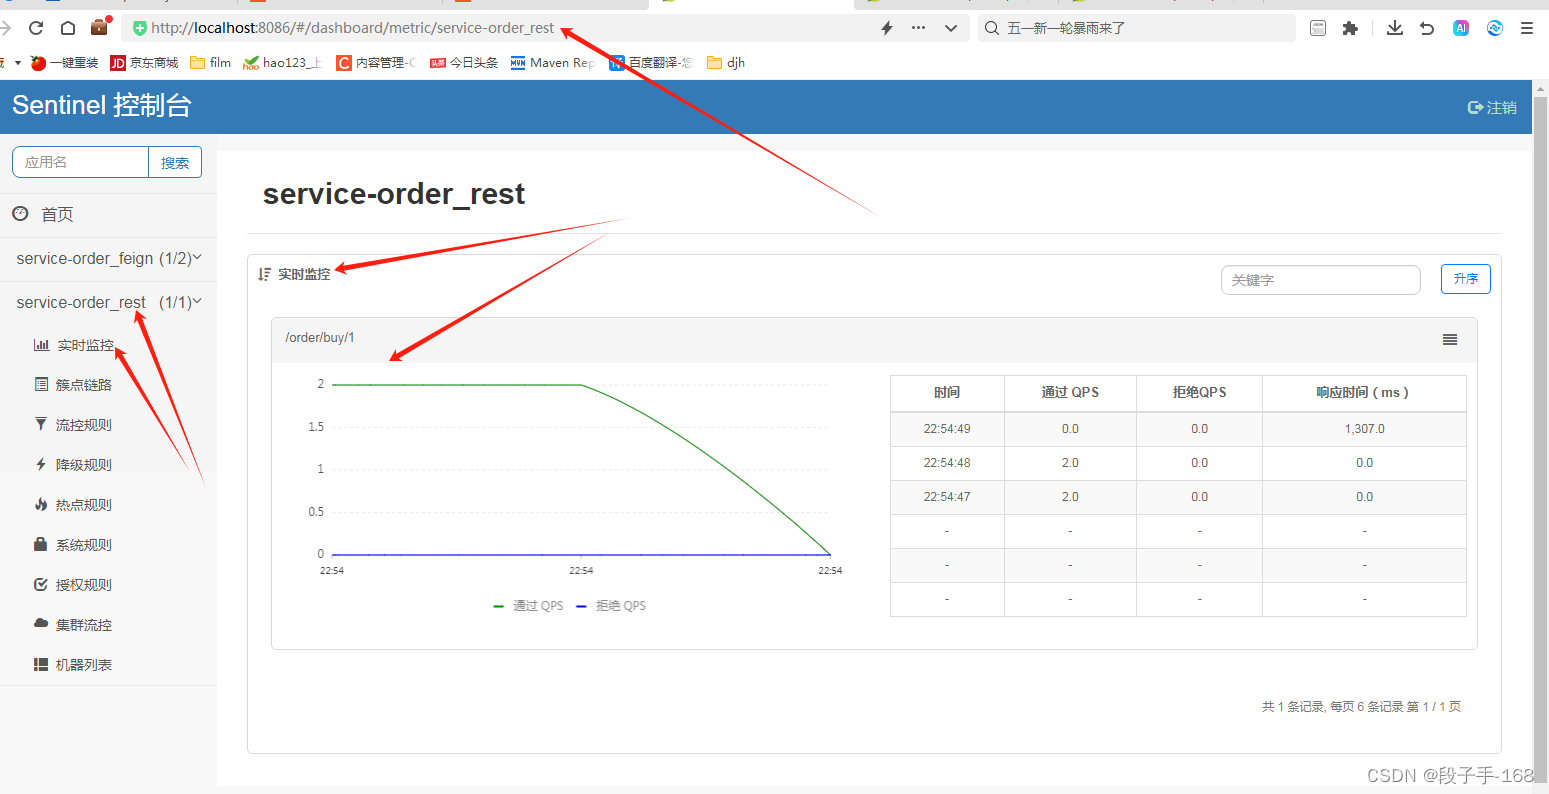
- 启动 Sentinel 服务成功后,登录 Sertinel 控制台,发起服务请求,查看列表:
浏览器地址栏输入:localhost:8086 默认用户名和密码都是 sentine1
- 浏览器访问请求后,再次查看控制台,就会有记录:
- http://localhost:9002/order/buy/1
- http://localhost:9003/order/buy/1
- http://localhost:8086
- http://localhost:8086/#/dashboard/metric/service-order_feign
- http://localhost:8086/#/dashboard/metric/service-order_rest
上一节链接请点击:
# 从浅入深 学习 SpringCloud 微服务架构(七)Hystrix(4)