实现自己的路由框架
在较大型的Android app中常会用到组件化技术,针对不同的业务/基础功能对模块进行划分,从上到下为壳工程、业务模块、基础模块。其中业务模块依赖基础模块,壳工程依赖业务模块。同级的横向模块(比如多个业务模块)因为不能相互依赖,怎样实现它们之间的路由跳转呢?
我尝试使用kotlin实现一下自己的路由框架,由简到繁、由浅入深。刚开始只求有功能,不求完美,一步步最终优化到比较完善的样子。
1.菜鸟版
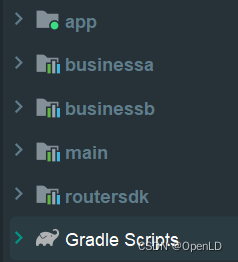
工程中只包含上图中的5个模块,其中main、businessa、businessb、routersdk均为Android Library,只有app是可运行的application。
app作为壳工程依赖着剩下的4个模块,main、businessa、businessb作为业务模块依赖着routersdk这个基础模块。
此时依据模块之间的依赖关系,想要实现路由其实只需要在基础模块routersdk中创建一个Router类维护一个映射表并实现两个关键方法。
一个方法register()用来注册路由跳转的键值对,键为path字符串,value为跳转的XXXActivity的class即可。
另一个方法jumpTo()用来具体跳转,实现的时候传入对应的路由path参数,当path在映射表中时直接调用Intent的startActivity()方法完成跳转即可。
‘’
package com.lllddd.routersdk

import android.app.Activity
import android.content.Intent
import android.os.Bundle
import android.widget.Toast

/**
 * author: lllddd
 * created on: 2024/5/2 14:34
 * description:路由类
 */
object Router {

    private val routerMap: MutableMap<String, Class<out Activity>> = mutableMapOf()

    fun register(key: String, value: Class<out Activity>) {
        routerMap[key] = value
    }

    fun jumpTo(activity: Activity, path: String, params: Bundle? = null) {
        if (!routerMap.containsKey(path)) {
            Toast.makeText(activity, "找不到路由目的页面!!!", Toast.LENGTH_LONG).show()
            return
        }

        val destinationActivity = routerMap[path]
        val intent = Intent(activity, destinationActivity)
        if (params != null) {
            intent.putExtras(params)
        }

        activity.startActivity(intent)
    }
}
接着在Application的子类MyRouterApp中调用Router的注册方法,将3个业务模块的页面路由分别注册进Router中的路由表,那么路由的注册就已完成。
‘’
package com.lllddd.myrouter.app

import android.app.Application
import com.lllddd.businessa.BusinessAMainActivity
import com.lllddd.businessb.BusinessBMainActivity
import com.lllddd.main.MainActivity
import com.lllddd.routersdk.Router

/**
 * author: lllddd
 * created on: 2024/5/2 15:06
 * description:
 */
class MyRouterApp : Application() {
    override fun onCreate() {
        super.onCreate()
        Router.register("businessa/main", BusinessAMainActivity::class.java)
        Router.register("businessb/main", BusinessBMainActivity::class.java)
        Router.register("app/main", MainActivity::class.java)
    }
}
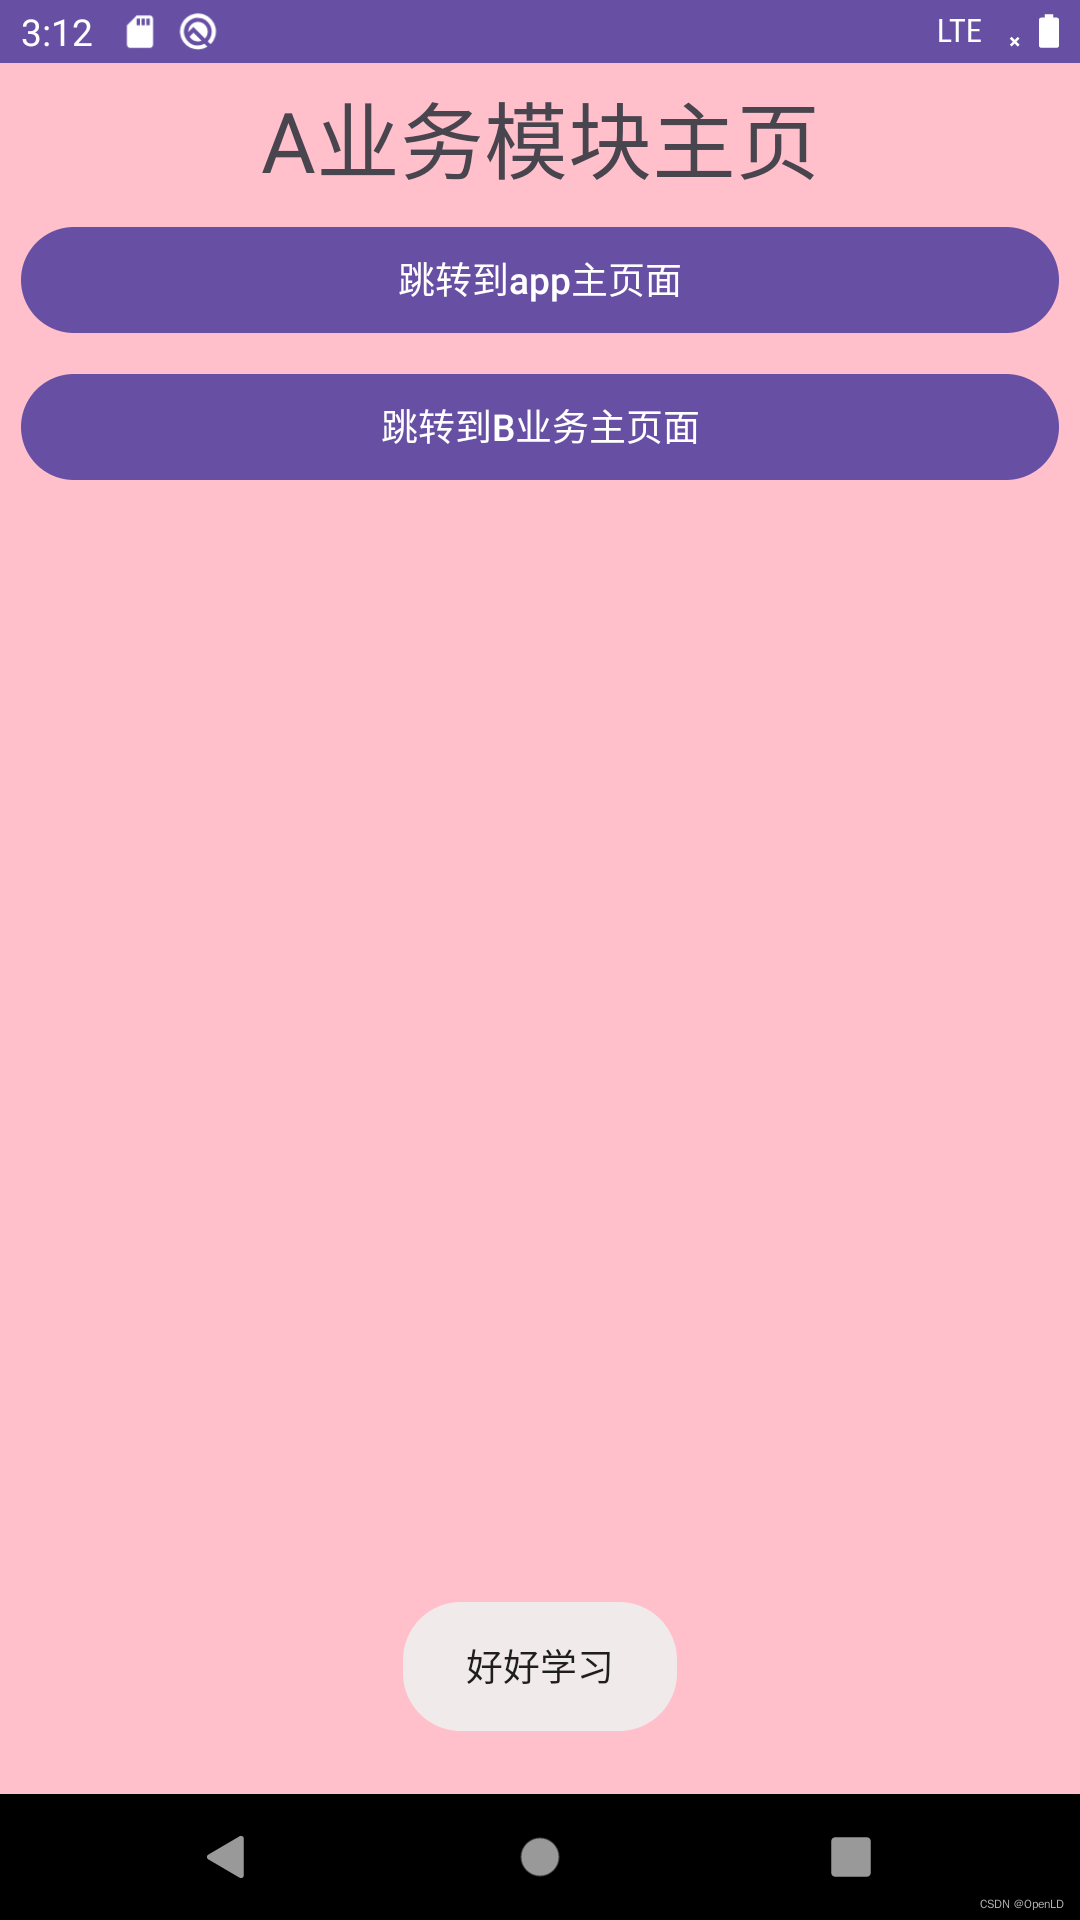
上方我们注册了3条路由关系。businessa/main对应BusinessAMainActivity,businessb/main对应BusinessBMainActivity,app/main对应MainActivity。
此时假如要想在app模块中的MainActivity页面路由到businessa模块的BusinessAMainActivity页面或businessb模块的BusinessBMainActivity页面,只需要如下这样写。
‘’
package com.lllddd.main

import android.os.Bundle
import android.widget.Button
import androidx.appcompat.app.AppCompatActivity
import com.lllddd.routersdk.Router

class MainActivity : AppCompatActivity() {

    private lateinit var mBtnJumpA: Button
    private lateinit var mBtnJumpB: Button

    override fun onCreate(savedInstanceState: Bundle?) {
        super.onCreate(savedInstanceState)
        setContentView(R.layout.activity_main)

        initWidgets()

    }

    private fun initWidgets() {
        mBtnJumpA = findViewById(R.id.btn_jump_a)
        mBtnJumpA.setOnClickListener {
            val bundle = Bundle()
            bundle.putString("param", "好好学习")
            Router.jumpTo(this, "businessa/main", bundle)
        }

        mBtnJumpB = findViewById(R.id.btn_jump_b)
        mBtnJumpB.setOnClickListener {
            val bundle = Bundle()
            bundle.putString("param", "天天向上")
            Router.jumpTo(this, "businessb/main", bundle)
        }

    }
}
此时我们只需要将path传给Router.jumpTo()作为参数就能正确跳转到同级别的业务模块中。


2.进阶版
菜鸟版方式很容易就让我实现了一个菜鸟版的路由框架。但是它存在一些很明显的问题,首先就是注册关系必须要在MyRouterApp(Application)类中去维护,那么在模块众多多人协作开发时完全没有解耦,造成了MyRouterApp难以维护,模块职责不清的问题。其次,app模块中实际上没有任何页面,只是一个壳工程,但是它也要依赖routersdk,这样的情况也不合理。
我就在想能不能让路由关系注册这样的操作分散在各自的业务模块中,这样就能很好地解决上面两个问题。
很自然的想到在routersdk模块中定义一个接口用来约束装载路由的方法。
‘’
package com.lllddd.routersdk

import android.app.Activity

/**
 * author: lllddd
 * created on: 2024/5/2 20:12
 * description:各个业务模块装载路由信息的接口
 */
interface ILoadRouters {
    /**
     * 装载路由信息
     *
     * @param loadRouters 路由表
     */
    fun loadRouters(routerMap: MutableMap<String, Class<out Activity>>)
}
之后在每个业务模块中新建一个路由类实现该接口。
main模块中的实现类如下。
‘’
package com.lllddd.main.router

import android.app.Activity
import com.lllddd.main.MainActivity
import com.lllddd.routersdk.ILoadRouters

/**
 * author: lllddd
 * created on: 2024/5/2 20:21
 * description:业务main模块的路由装载类
 */
class MainRouter : ILoadRouters {
    override fun loadRouters(routerMap: MutableMap<String, Class<out Activity>>) {
        routerMap["main/main"] = MainActivity::class.java
    }
}
businessa模块中的实现类如下。
‘’
package com.lllddd.businessa.router

import android.app.Activity
import com.lllddd.businessa.BusinessAMainActivity
import com.lllddd.routersdk.ILoadRouters

/**
 * author: lllddd
 * created on: 2024/5/2 20:16
 * description:业务模块A的路由装载类
 */
class BusinessARouter : ILoadRouters {
    override fun loadRouters(routerMap: MutableMap<String, Class<out Activity>>) {
        routerMap["/businessa/main"] = BusinessAMainActivity::class.java
    }
}
businessb模块中的实现类如下。
‘’
package com.lllddd.businessb.router

import android.app.Activity
import com.lllddd.businessb.BusinessBMainActivity
import com.lllddd.routersdk.ILoadRouters

/**
 * author: lllddd
 * created on: 2024/5/2 20:19
 * description:业务模块B的路由装载类
 */
class BusinessBRouter : ILoadRouters {
    override fun loadRouters(routerMap: MutableMap<String, Class<out Activity>>) {
        routerMap["businessb/main"] = BusinessBMainActivity::class.java
    }
}
这样一来,我们只需要在Router类中增加一个init()方法,在该方法中调用各模块的loadRouters()方法即可。
‘’
package com.lllddd.routersdk

import android.app.Activity
import android.content.Intent
import android.os.Bundle
import android.widget.Toast

/**
 * author: lllddd
 * created on: 2024/5/2 14:34
 * description:路由类
 */
object Router {

    private val routerMap: MutableMap<String, Class<out Activity>> = mutableMapOf()

    fun init() {
        ABusinessRouter().loadRouters(routerMap)
        BBusinessRouter().loadRouters(routerMap)
        MainRouter().loadRouters(routerMap)
    }

//    fun register(key: String, value: Class<out Activity>) {
//        routerMap[key] = value
//    }

    fun jumpTo(activity: Activity, path: String, params: Bundle? = null) {
        if (!routerMap.containsKey(path)) {
            Toast.makeText(activity, "找不到路由目的页面!!!", Toast.LENGTH_LONG).show()
            return
        }

        val destinationActivity = routerMap[path]
        val intent = Intent(activity, destinationActivity)
        if (params != null) {
            intent.putExtras(params)
        }

        activity.startActivity(intent)
    }
}
此时MyRouterApp中只需要直接调用Router的init()初始化方法即可。
‘’
package com.lllddd.myrouter.app

import android.app.Application
import com.lllddd.routersdk.Router

/**
 * author: lllddd
 * created on: 2024/5/2 15:06
 * description:
 */
class MyRouterApp : Application() {
    override fun onCreate() {
        super.onCreate()

        // 初始化路由SDK
        Router.init()
    }
}
思路虽然没错,但是Router中的init()方法却是飘红的,这里作为基础模块,怎么可能拿到业务模块的类引用从而实例化出ABusiniessRouter、BBusinissRouter、MainRouter呢?
所以当前的init()方法一定是行不通的,既然基础模块不能直接使用上层业务模块中的类,那我们只能重新想办法。
此处突然想到了一个好办法,那就是反射,我在这里反射出来ABusiniessRouter、BBusinissRouter、MainRouter这3个对象不就好了。说干就干,改造后的init()代码是这样的。
‘’
fun init() {
//        ABusinessRouter().loadRouters(routerMap)
//        BBusinessRouter().loadRouters(routerMap)
//        MainRouter().loadRouters(routerMap)

        val aBizClazz = Class.forName("com.lllddd.businessa.router.BusinessARouter")
        val aBizRouter = aBizClazz.newInstance()
        val methodABiz = aBizClazz.methods.find { it.name == "loadRouters" }
        methodABiz?.invoke(aBizRouter, routerMap)


        val bBizClazz = Class.forName("com.lllddd.businessb.router.BusinessBRouter")
        val bBizRouter = bBizClazz.newInstance()
        val methodBBiz = bBizClazz.methods.find { it.name == "loadRouters" }
        methodBBiz?.invoke(bBizRouter, routerMap)

        val mainClazz = Class.forName("com.lllddd.main.router.MainRouter")
        val mainRouter = mainClazz.newInstance()
        val methodMain = mainClazz.methods.find { it.name == "loadRouters" }
        methodMain?.invoke(mainRouter, routerMap)
    }
看起来确实不再报错了,demo也正常运行。但是造成的问题是每次增减一个业务模块,就需要在基础模块routersdk的Router类的init()方法中增删代码,而且对应业务模块的路由类是通过反射在此逐一实例化的,用起来也不方便。
那么有没有更好的办法呢?
当然是有,这里需要结合类加载、PMS、反射的知识来综合处理。
我只要想办法遍历整个应用apk,想办法找到满足规则com.lllddd.xxx.router.xxx.kt的kotlin文件完整包路径即可。
此时就需要借助PMS拿到我们的apk。当应用安装后运行时,对应的apk文件其实是在下面这个路径中的
/data/app/com.lllddd.myrouter-m-SApQoUtVytou1_nl1aUA==/base.apk
之后可以利用类加载技术中的DexFile匹配正则规则来遍历apk找到符合规则的类路径,即
com.lllddd.businessa.router.BusinessARouter
com.lllddd.businessb.router.BusinessBRouter
com.lllddd.main.router.MainRouter
之后还是在Router的init()方法中利用反射调用每个XXXRouter的loadRouters()方法就能实现路由注册。
我将相关的关键操作封装进ClassHelper类。
‘’
package com.lllddd.routersdk

import android.app.Application
import android.content.Context
import dalvik.system.DexFile
import java.util.regex.Pattern

/**
 * author: lllddd
 * created on: 2024/5/2 21:43
 * description:类帮助者
 */
class ClassHelper {
    companion object {
        /**
         * 获取当前的apk文件
         *
         * @param context 应用上下文
         * @return apk文件路径列表
         */
        private fun getSourcePaths(context: Context): List<String> {
            val applicationInfo = context.applicationInfo

            val pathList = mutableListOf<String>()

            // /data/app/com.lllddd.myrouter-m-SApQoUtVytou1_nl1aUA==/base.apk
            pathList.add(applicationInfo.sourceDir)

            if (applicationInfo.splitSourceDirs != null) {
                val array = applicationInfo.splitSourceDirs

                for (ele in array) {
                    pathList.add(ele)
                }
            }

            return pathList
        }

        /**
         * 根据Router类所在包名的正则规则,拿到所有Router的完整包名路径,以便后期反射调用
         *
         * @param context 应用上下文
         * @param packageRegex Router类所在包名的正则规则
         * @return 所有Router的完整包名路径
         */
        fun getFileNameByPackageName(context: Application, packageRegex: String): Set<String> {
            val set = mutableSetOf<String>()
            val pathList = getSourcePaths(context)

            val pattern = Pattern.compile(packageRegex)

            for (path in pathList) {
                var dexFile: DexFile? = null
                try {
                    dexFile = DexFile(path)

                    val entries = dexFile.entries()

                    if (entries != null) {
                        while (entries.hasMoreElements()) {
                            val className = entries.nextElement()
                            val matcher = pattern.matcher(className)
                            if (matcher.find()) {
                                set.add(className)
                            }
                        }
                    }
                } finally {
                    dexFile?.close()
                }
            }

            return set
        }
    }
}
之后Router中的init()方法直接调用ClassHelper中的方法并遍历反射即可。
‘’
 fun init(application: Application) {
        // 方案1:飘红
//        ABusinessRouter().loadRouters(routerMap)
//        BBusinessRouter().loadRouters(routerMap)
//        MainRouter().loadRouters(routerMap)

        // 方案2:并不优雅
//        val aBizClazz = Class.forName("com.lllddd.businessa.router.BusinessARouter")
//        val aBizRouter = aBizClazz.newInstance()
//        val methodABiz = aBizClazz.methods.find { it.name == "loadRouters" }
//        methodABiz?.invoke(aBizRouter, routerMap)
//
//        val bBizClazz = Class.forName("com.lllddd.businessb.router.BusinessBRouter")
//        val bBizRouter = bBizClazz.newInstance()
//        val methodBBiz = bBizClazz.methods.find { it.name == "loadRouters" }
//        methodBBiz?.invoke(bBizRouter, routerMap)
//
//        val mainClazz = Class.forName("com.lllddd.main.router.MainRouter")
//        val mainRouter = mainClazz.newInstance()
//        val methodMain = mainClazz.methods.find { it.name == "loadRouters" }
//        methodMain?.invoke(mainRouter, routerMap)

        // 方案3:自动扫包
        val set = ClassHelper.getFileNameByPackageName(
            application,
            "com.lllddd.[a-zA-Z0-9]+\\.router\\.[a-zA-Z0-9]+"
        )
        for (fileName in set) {
            val clazz = Class.forName(fileName)
            val router = clazz.newInstance()
            val method = clazz.methods.find { it.name == "loadRouters" }
            method?.invoke(router, routerMap)
        }
    }
3.完善版
未完待续…


![JSP简介——[JSP]1](https://img-blog.csdnimg.cn/direct/4e8a23fd4dd94eb48de2fe48f7c8da70.png)