【 声明:版权所有,欢迎转载,请勿用于商业用途。 联系信箱:feixiaoxing @163.com】
在大部分linux程序开发中,一般是没有界面的。不过不排除有些场合,是需要用界面进行数据交互、调参使用的。这种情况下一般就用pyqt5做一个简单的界面就可以。特别是功能比较单一的时候,如果还要花大量的时间去做界面相关的工作,往往是得不偿失的。加之对于树莓派4b这样的界面,直接用mobaxterm可以直接进行界面开发,非常方便。

1、安装pyqt5
在树莓派4b上面安装pyqt5,只需要一条命令就可以了,
sudo apt-get install python3-pyqt52、测试方法
这个时候测试界面,很多同学希望可以有一个屏幕进行开发。其实这是不需要的。我们需要的只是一个mobaxterm软件。这样哪怕直接输入python demo.py也就是在pc电脑上显示出对应的效果。
3、第一个测试程序
本着耳听为虚、眼见为实的原则,我们编写第一个程序demo.py程序,
import sys
from PyQt5.QtWidgets import QApplication, QWidget, QPushButton, QMessageBox

class DemoApp(QWidget):
    def __init__(self):
        super().__init__()
        self.initUI()

    def initUI(self):
        self.setGeometry(100, 100, 300, 200)  # Set window size and position
        self.setWindowTitle('PyQt5 Demo')  # Set window title

        # Create a button
        self.button = QPushButton('Click Me', self)
        self.button.setGeometry(100, 50, 100, 30)  # Set button size and position
        self.button.clicked.connect(self.showMessageBox)  # Connect button click event to function

    def showMessageBox(self):
        # Show a message box when the button is clicked
        QMessageBox.information(self, 'Message', 'Button Clicked!')

if __name__ == '__main__':
    # Create the PyQt5 application
    app = QApplication(sys.argv)
    # Create and show the demo application window
    demo = DemoApp()
    demo.show()
    # Run the application event loop
    sys.exit(app.exec_())
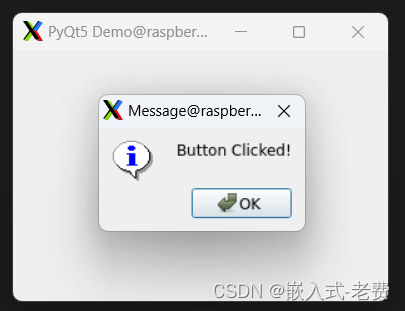
程序比较简单,就是显示一个按钮,单击按钮后,有一个弹窗。效果如下所示,
4、第二个测试程序
和第一个测试程序相比较,这一次多了一个菜单,我们来看看菜单时怎么做的,姑且暂时文件命名为menu.py,
import sys
from PyQt5.QtWidgets import QApplication, QMainWindow, QAction, QMenu

class MenuDemo(QMainWindow):
    def __init__(self):
        super().__init__()
        self.initUI()

    def initUI(self):
        self.setWindowTitle('PyQt5 Menu Demo')
        self.setGeometry(100, 100, 400, 300)

        # Create actions for the File menu
        file_menu = self.menuBar().addMenu('File')
        new_action = QAction('New', self)
        new_action.triggered.connect(self.newFile)
        file_menu.addAction(new_action)

        exit_action = QAction('Exit', self)
        exit_action.triggered.connect(self.close)
        file_menu.addAction(exit_action)

        # Create actions for the Edit menu
        edit_menu = self.menuBar().addMenu('Edit')
        cut_action = QAction('Cut', self)
        cut_action.triggered.connect(self.cutText)
        edit_menu.addAction(cut_action)

        copy_action = QAction('Copy', self)
        copy_action.triggered.connect(self.copyText)
        edit_menu.addAction(copy_action)

    def newFile(self):
        print("New File created.")

    def cutText(self):
        print("Text cut.")

    def copyText(self):
        print("Text copied.")

if __name__ == '__main__':
    app = QApplication(sys.argv)
    demo = MenuDemo()
    demo.show()
    sys.exit(app.exec_())
代码执行后,效果是这样的,

5、第三个测试程序
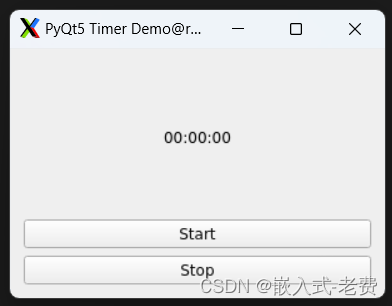
第三个测试是关于定时器的,就两个按钮,一个是开始,一个是结束。暂时把这个文件命名为timer.py,
import sys
from PyQt5.QtWidgets import QApplication, QWidget, QVBoxLayout, QLabel, QPushButton
from PyQt5.QtCore import QTimer, QTime, Qt

class TimerDemo(QWidget):
    def __init__(self):
        super().__init__()
        self.initUI()

    def initUI(self):
        self.setWindowTitle('PyQt5 Timer Demo')
        self.setGeometry(100, 100, 300, 200)

        self.label = QLabel('00:00:00', self)
        self.label.setAlignment(Qt.AlignCenter)

        self.start_button = QPushButton('Start', self)
        self.start_button.clicked.connect(self.startTimer)

        self.stop_button = QPushButton('Stop', self)
        self.stop_button.clicked.connect(self.stopTimer)

        layout = QVBoxLayout()
        layout.addWidget(self.label)
        layout.addWidget(self.start_button)
        layout.addWidget(self.stop_button)

        self.setLayout(layout)

        self.timer = QTimer()
        self.timer.timeout.connect(self.updateTime)

        self.elapsed_time = QTime()

    def startTimer(self):
        self.timer.start(1000)  # Timer triggers every 1000ms (1 second)
        self.elapsed_time.start()

    def stopTimer(self):
        self.timer.stop()

    def updateTime(self):
        elapsed = int(self.elapsed_time.elapsed() / 1000)  # Elapsed time in seconds
        time_display = QTime(0, 0).addSecs(elapsed).toString('hh:mm:ss')
        self.label.setText(time_display)

if __name__ == '__main__':
    app = QApplication(sys.argv)
    demo = TimerDemo()
    demo.show()
    sys.exit(app.exec_())
整个程序运行起来的效果是这样的,
6、总结
如果我们开发的重点是算法和驱动程序,那么不需要在linux界面耽误太多的时间。或者说,即使是编写界面,也是在windows上位机上面开发界面,而不是现在的linux上面开发。
当然,如果真的用pyqt5做最终的产品开发也是可以的。需要做的,就是美工、布局上优化一下,增加一下开机启动,并且做到全屏显示就可以了。实际上,pyqt5的功能还是非常多的,建议大家可以好好使用一下。

