使用Python自动化处理Word文档
在日常工作中,我们经常需要处理大量的Word文档,这时自动化脚本就显得尤为重要。本文将介绍如何使用Python中的`python-docx`库来创建和修改Word文档。
安装`python-docx`库
在开始之前,确保你已经安装了`python-docx`库。如果还没有安装,可以通过以下命令进行安装:
```bash
pip install python-docx
创建一个新的Word文档
首先,我们从创建一个新的Word文档开始:
from docx import Document
document = Document()
添加标题
使用add_heading方法添加标题:
document.add_heading('Document Title', 0)
添加段落和样式
接下来,我们添加一个普通段落,并为特定的文字设置粗体和斜体样式:
p = document.add_paragraph('A plain paragraph having some ')
p.add_run('bold').bold = True
p.add_run(' and some ')
p.add_run('italic.').italic = True
添加列表
我们还可以添加无序列表和有序列表:
document.add_paragraph('first item in unordered list', style='List Bullet')
document.add_paragraph('first item in ordered list', style='List Number')
插入图片
使用add_picture方法插入图片,并设置图片宽度:
document.add_picture('1.png', width=Inches(1.25))
创建表格
创建一个表格并填充数据:
records = (
    (3, '101', 'Spam'),
    (7, '422', 'Eggs'),
    (4, '631', 'Spam, spam, eggs, and spam')
)

table = document.add_table(rows=1, cols=3)
hdr_cells = table.rows[0].cells
hdr_cells[0].text = 'Qty'
hdr_cells[1].text = 'Id'
hdr_cells[2].text = 'Desc'
for qty, id, desc in records:
    row_cells = table.add_row().cells
    row_cells[0].text = str(qty)
    row_cells[1].text = id
    row_cells[2].text = desc
添加分页符
最后,我们在文档末尾添加一个分页符:
document.add_page_break()
保存文档
完成所有编辑后,我们将文档保存为demo.docx:
document.save('demo.docx')
效果预览
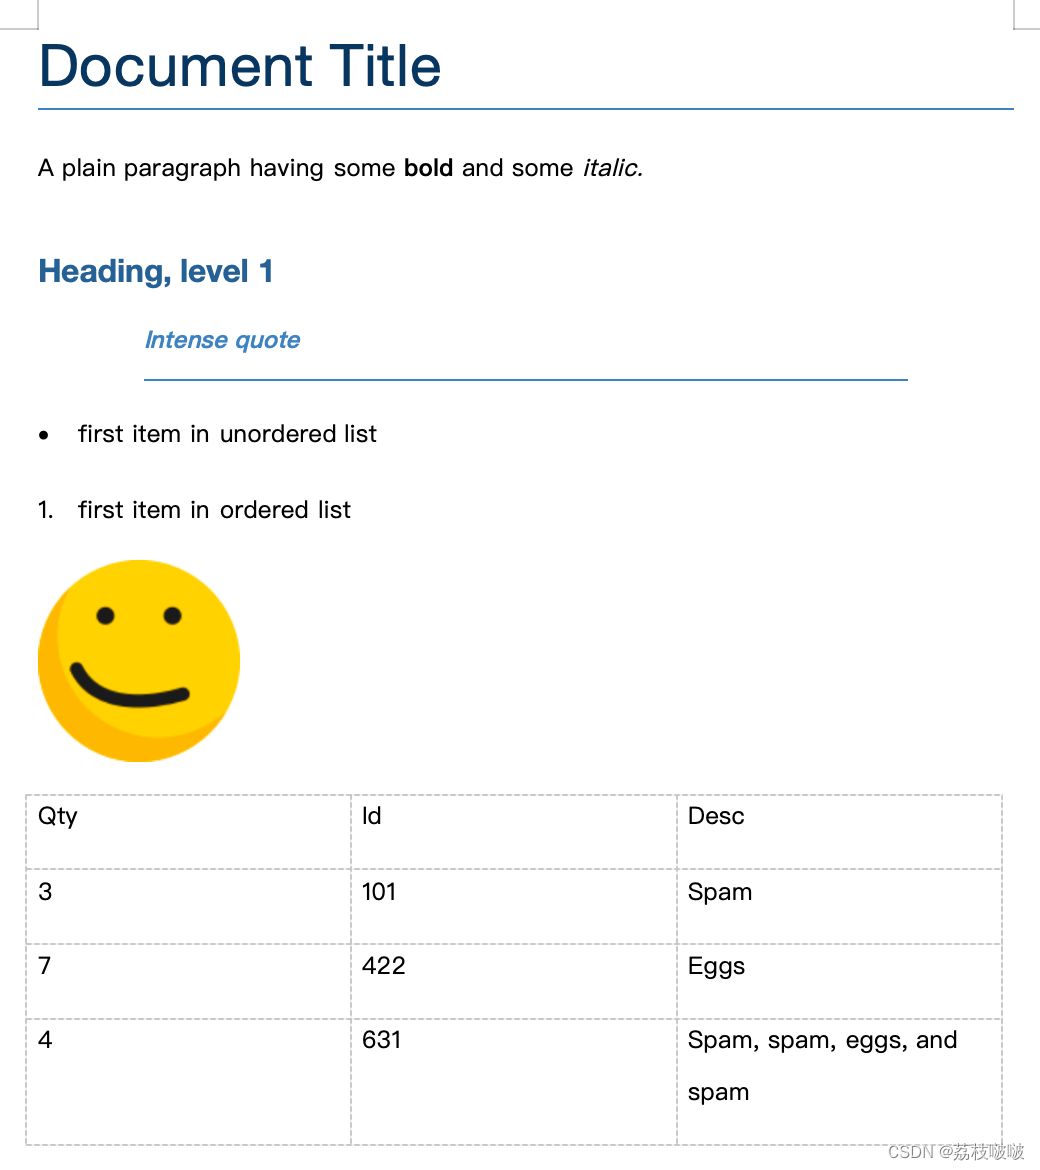
通过以上步骤,我们可以快速创建一个包含标题、段落、图片、表格和分页符的Word文档。python-docx库提供了丰富的功能,可以满足我们大部分的文档处理需求。
以上就是使用python-docx库进行Word文档自动化处理的简介。希望这篇文章能帮助你提高工作效率。
参考
官方实例:
python-docx — python-docx 1.1.0 documentation
