前面已经介绍了 Spring 的基本使用以及创建,本文将介绍使用注解的方式实现对 Spring 更简单的存储对象和读取对象.
将对象存储到 Spring 中
创建 Spring 项目
前面已经做过详细步骤,此处不再赘述. 链接在此 Spring 基本使用及创建
pom.xml 和 Spring 配置项
pom.xml:
<?xml version="1.0" encoding="UTF-8"?>
<project xmlns="http://maven.apache.org/POM/4.0.0"
         xmlns:xsi="http://www.w3.org/2001/XMLSchema-instance"
         xsi:schemaLocation="http://maven.apache.org/POM/4.0.0 http://maven.apache.org/xsd/maven-4.0.0.xsd">
    <modelVersion>4.0.0</modelVersion>

    <groupId>org.example</groupId>
    <artifactId>spring_review</artifactId>
    <version>1.0-SNAPSHOT</version>

    <properties>
        <maven.compiler.source>8</maven.compiler.source>
        <maven.compiler.target>8</maven.compiler.target>
    </properties>
    <dependencies>
        <dependency>
            <groupId>org.springframework</groupId>
            <artifactId>spring-context</artifactId>
            <version>5.2.3.RELEASE</version>
        </dependency>
        <dependency>
            <groupId>org.springframework</groupId>
            <artifactId>spring-beans</artifactId>
            <version>5.2.3.RELEASE</version>
        </dependency>
    </dependencies>
</project>
Spring 配置项:即配置扫描路径(想要将对象成功的存储到 Spring 中,我们需要配置⼀下存储对象的扫描包路径,只有被配置的包下的所有类,添加了注解才能被正确的识别并保存到 Spring 中)
<?xml version="1.0" encoding="UTF-8"?>
<beans xmlns="http://www.springframework.org/schema/beans"
       xmlns:xsi="http://www.w3.org/2001/XMLSchema-instance"
       xmlns:content="http://www.springframework.org/schema/context"
       xsi:schemaLocation="http://www.springframework.org/schema/beans http://www.springframework.org/schema/beans/spring-beans.xsd http://www.springframework.org/schema/context https://www.springframework.org/schema/context/spring-context.xsd">
    <content:component-scan base-package="demo"></content:component-scan>

</beans>
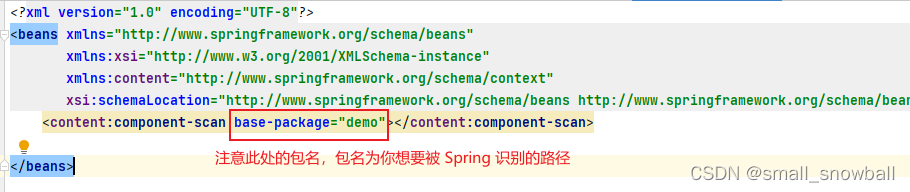
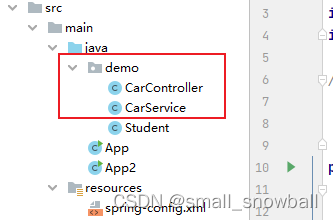
这样一来,demo 包下的所有类都可以让 Spring 识别到.
添加注解存储 Bean 对象
/**
* Created with IntelliJ IDEA.
* Description: 使⽤ @Controller 存储 bean
*/
@Controller
public class CarController {
public void crateCar(String component){
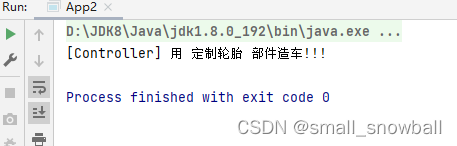
System.out.println("[Controller] 用 " + component + " 部件造车!!!");
}
}
创建启动类
和前面一样.
public class App2 {
    public static void main(String[] args) {
        // 1. 得到对象容器
        ApplicationContext context = new ClassPathXmlApplicationContext("spring-config.xml");
        // 2. 加载 Bean 对象
        CarController carController = (CarController) context.getBean("carController");
        // 3. 使用 Bean 对象
        carController.crateCar("定制轮胎");
    }
}
结果如下:
上述使用 Controller 注解对 Bean 对象进行存储,是注解的一种,下面对 Spring 中其余的注解进行举例说明.
使用 @Service 注解存储 Bean 对象:
/**
* Created with IntelliJ IDEA.
* Description: 使⽤ @Service 存储 bean
*/
@Service
public class CarService {
public void crateCar(String component){
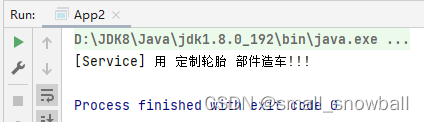
System.out.println("[Service] 用 " + component + " 部件造车!!!");
}
}
public class App2 {

    public static void main(String[] args) {
        // 1. 得到对象容器
        ApplicationContext context = new ClassPathXmlApplicationContext("spring-config.xml");
        // 2. 加载 Bean 对象
        CarService carService = (CarService) context.getBean("carService");
        // 3. 使用 Bean 对象
        carService.crateCar("定制轮胎");
    }
}
使用 @Component 注解存储 Bean 对象:
/**
* Created with IntelliJ IDEA.
* Description: 使⽤ @Component 存储 bean
*/
@Component
public class CarComponent {
public void crateCar(String component){
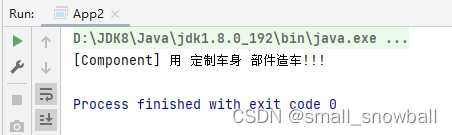
System.out.println("[Component] 用 " + component + " 部件造车!!!");
}
}
public class App2 {
    public static void main(String[] args) {
        // 1. 得到对象容器
        ApplicationContext context = new ClassPathXmlApplicationContext("spring-config.xml");
        // 2. 加载 Bean 对象
        CarComponent carComponent = (CarComponent) context.getBean("carComponent");
        // 3. 使用 Bean 对象
       carComponent.crateCar("定制车身");
    }
}
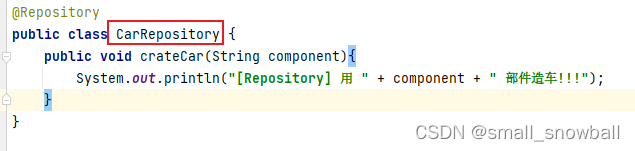
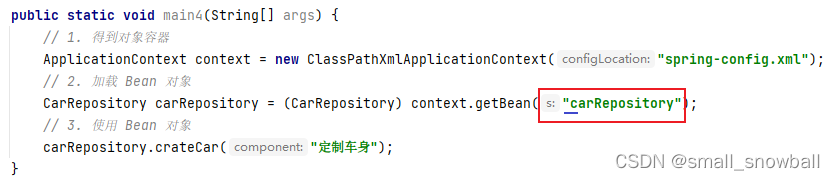
使用 @Repository 注解存储 Bean 对象:
/**
* Created with IntelliJ IDEA.
* Description: 使⽤ @Repository 存储 bean
*/
@Repository
public class CarRepository {
public void crateCar(String component){
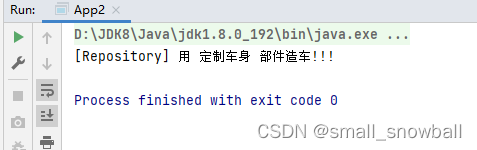
System.out.println("[Repository] 用 " + component + " 部件造车!!!");
}
}
public class App2 {
    public static void main(String[] args) {
        // 1. 得到对象容器
        ApplicationContext context = new ClassPathXmlApplicationContext("spring-config.xml");
        // 2. 加载 Bean 对象
        CarRepository carRepository = (CarRepository) context.getBean("carRepository");
        // 3. 使用 Bean 对象
        carRepository.crateCar("定制车身");
    }
}
看到此处就会发现,其实它们的功能是一样的,那么为什么还需要这么多的类注解呢?
Spring 注解
原因:就是让程序员看到类注解之后,就能直接了解当前类的⽤途,如下:
注解分为类注解和方法注解两大类.
类注解:
- @Component:以下4个注解的父类
- @Controller:表示这个类是业务逻辑层的类;
- @Service:服务层的类;
- @Repository:持久层的类;
- @Configuration:配置层的类;
它们之间的关系:属于@Component 的“⼦类”。 看下面源码
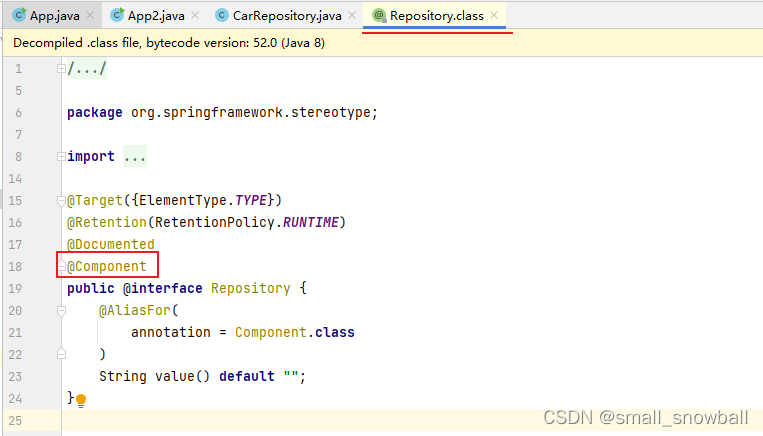
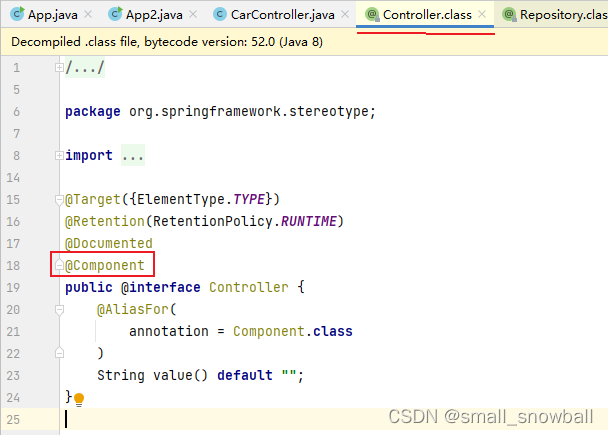
就会发现它们其中都会存在 @Component 注解,说明它们本身就是属于 @Component 的“⼦类”.
方法注解:
- @Bean
下面为方法注解的举例说明,方法注解就是放到某个方法上的。
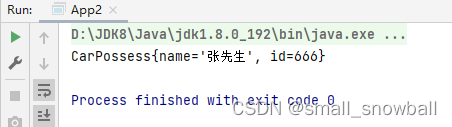
创建一个 CarPossess 类,将 carPossess 对象存储到 Spring 容器中:
@Controller
public class CarPossess {
    private String name;
    private int id;
    @Bean //将对象注入到 Spring 容器中
    public CarPossess carPossess1(){
        CarPossess carPossess = new CarPossess();
        carPossess.setName("张先生");
        carPossess.setId(666);
        return carPossess;
    }

    public String getName() {
        return name;
    }

    public void setName(String name) {
        this.name = name;
    }

    public int getId() {
        return id;
    }

    public void setId(int id) {
        this.id = id;
    }

    @Override
    public String toString() {
        return "CarPossess{" +
                "name='" + name + '\'' +
                ", id=" + id +
                '}';
    }
}
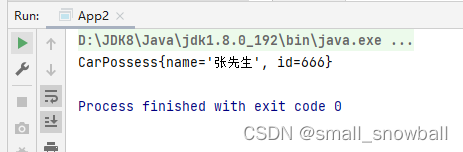
public class App2 {
    public static void main(String[] args) { // 从 Spring 容器中得到 carPossess 对象
        ApplicationContext context = new ClassPathXmlApplicationContext("spring-config.xml");
        CarPossess carPossess = (CarPossess) context.getBean("carPossess1");
        System.out.println(carPossess.toString());
    }
}
补充:
- Bean 的命名规则:
-
⾸字⺟和第⼆个字⺟都不为⼤写,⾸字⺟⼩写来获取 Bean;如:
-
⾸字⺟和第⼆个字⺟都是⼤写,那么直接使⽤原 Bean 名来获取 Bean.
例如 CRepository 类,就需要用 context.getBean(“CRepository”) 来获取 Bean.
- Bean 的重命名:
可以通过 name 属性给 Bean 对象进行重命名操作,如下:
@Bean(name = {"p1"}) //将对象注入到 Spring 容器中
    public CarPossess carPossess1(){
        CarPossess carPossess = new CarPossess();
        carPossess.setName("张先生");
        carPossess.setId(666);
        return carPossess;
    }

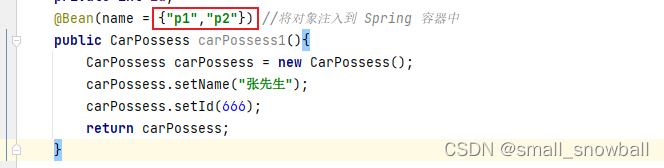
这里 name 属性其实是一个数组,也可以设置多个名字:

注意:
- 使用重命名后 Bean 默认获取方法就不行了,即不能使用方法名进行获取
- 如果多个 Bean 使用相同的名称,那么程序执行不会报错,但是第一个 Bean 之后的对象不会被存放到容器中,也就是只有在第一次创建 Bean 的时候会将容器和 Bean 名称关联起来,后续再有相同名称的 Bean 存储时候,容器会自动忽略。
- @Bean(name ={}) 中 name ={} 可以不写, 可以直接重命名(下面例子会用到)
从 Spring 中获取对象(对象装配)
获取 bean 对象也叫做对象装配,指的是把对象取出来放到某个类中,有时候也叫对象注⼊.
例如将 CarPossess 类注入到 CarService 类中。其中 CarPossess 类中包含 carPossess 对象,换言之就是将该对象注入到 CarService 类中,能在 CarService 这个类中对该对象进行使用以及操作.
有以下三种实现方式:
- 属性注入
- 构造方法注入
- Setter 注入
属性注入
属性注入使用 @Autowired 注解实现
实现将 CarPossess 类注入到 CarService 类中.
CarPossess 类实现:
@Controller
public class CarPossess {
    private String name;
    private int id;
    @Bean(name = {"p1","p2"}) //将对象注入到 Spring 容器中
    public CarPossess carPossess1(){
        CarPossess carPossess = new CarPossess();
        carPossess.setName("张先生");
        carPossess.setId(666);
        return carPossess;
    }

    /*
    *  属性注入
    * */
    public CarPossess getCarPossess(String name,int id){
        CarPossess carPossess = new CarPossess();
        carPossess.setId(id);
        carPossess.setName(name);
        return carPossess;
    }

    /*
    *  构造方法注入 / Setter 注入
    * */
    public int add(){
        System.out.println("执行 CarPossess 中的 add方法");
        return 1;
    }

    public String getName() {
        return name;
    }

    public void setName(String name) {
        this.name = name;
    }

    public int getId() {
        return id;
    }

    public void setId(int id) {
        this.id = id;
    }

    @Override
    public String toString() {
        return "CarPossess{" +
                "name='" + name + '\'' +
                ", id=" + id +
                '}';
    }
}
CarService 类实现:
@Service
public class CarService {

    /*
    * 属性注入
    * */
    @Autowired
    private CarPossess carPossess;  // 将 CarPossess 类注入到 CarService 类中

    public CarPossess getCarPossess(String name,int id){
        return carPossess.getCarPossess(name,id); // 调用 CarPossess 类里面的方法
    }
}
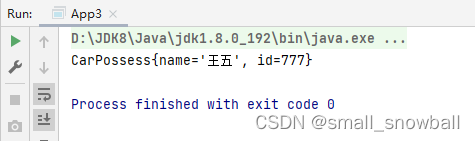
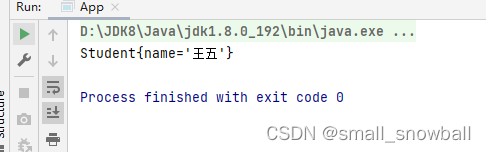
检验是否获取到对象:
public class App3 {
    public static void main(String[] args) {
        ApplicationContext context = new ClassPathXmlApplicationContext("spring-config.xml");
        CarService carService = (CarService) context.getBean(CarService.class);
        System.out.println(carService.getCarPossess("王五",777).toString());
    }
}
输出结果:
构造方法注入(Spring 推荐注入方式)
构造⽅法注⼊是在类的构造⽅法中实现注⼊.
@Service
public class CarService2 {

    private CarPossess carPossess;

    @Autowired
    public CarService2(CarPossess carPossess){
        this.carPossess = carPossess;
    }

    public void sayHi(){
        System.out.println("执行 CarService2 中的 sayHi 方法");
        carPossess.add();
    }
}
检测是否可以获取到 carPossess 对象:
/*
    * 构造方法测试
    * */
    public static void main(String[] args) {
        ApplicationContext context = new ClassPathXmlApplicationContext("spring-config.xml");
        CarService2 carService2 = (CarService2) context.getBean("carService2");
        carService2.sayHi();
    }
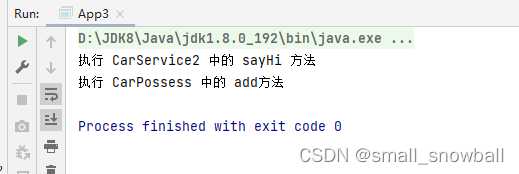
其中需要注意,当类中只有一个构造方法时 @Autowired 注解可以省略,当类中有多个构造方法时需要使用 @Autowired 注解来明确指定到底使⽤哪个构造⽅法,否则会报错.
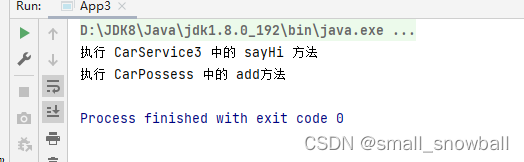
Setter 注入
@Service
public class CarService3 {
    private CarPossess carPossess;

    @Autowired
    public void  setCarPossess(CarPossess carPossess){
        this.carPossess = carPossess;
    }

    public void sayHi(){
        System.out.println("执行 CarService3 中的 sayHi 方法");
        carPossess.add();
    }
}
/*
    * Setter
    * */
    public static void main(String[] args) {
        ApplicationContext context = new ClassPathXmlApplicationContext("spring-config.xml");
        CarService3 carService3 = (CarService3) context.getBean("carService3");
        carService3.sayHi();
    }
三种注入方式的区别:
- 属性注入简洁方便,但只能用于 IoC 容器中(即通用性低),即且无法注入一个不可变的对象(被final 修饰的对象);
- 构造方法注入是 Spring 推荐的方式,可注入不可变对象、注入对象不会被修改(因为构造方法只加载一次)、通用性好(可适用于任何环境,无论是 IoC 框架还是非 IoC 框架);
- Setter 注入,每一个 Setter 只针对一个对象,无法注入不可变的对象、注入的对象可被修改(setter 本来就是一个方法,是方法就有可能被调用和修改)
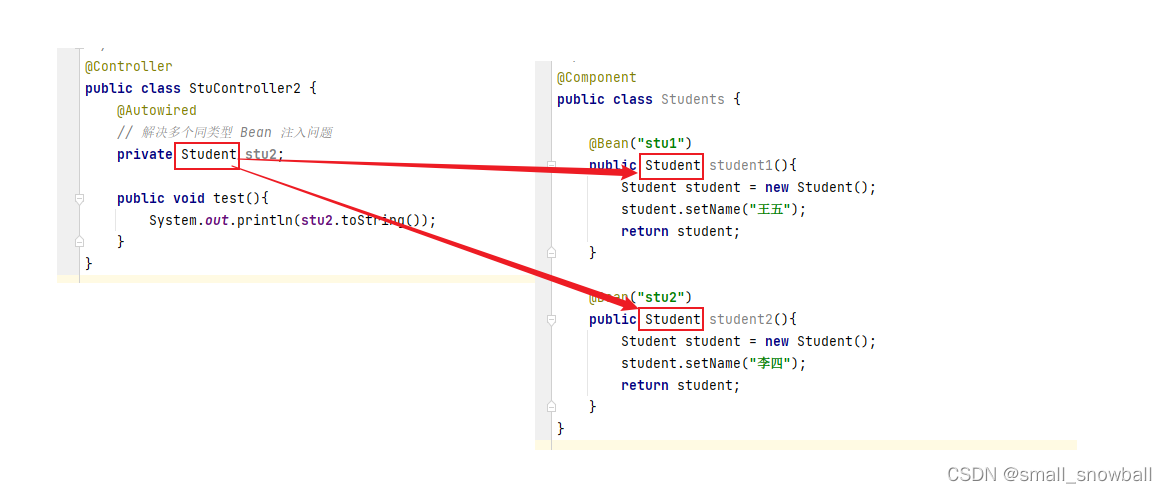
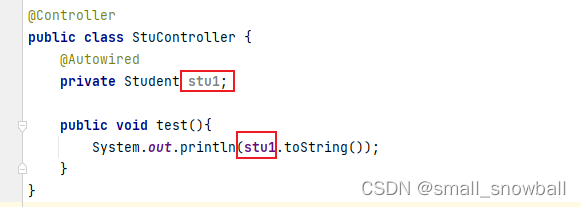
多个同类型的 Bean 存储到容器中,获取时报错
准备工作:创建一个 Students 类,生成两个 Student 对象,创建 StuController 类,将 Student 对象注入到 StuController 类中.
代码如下:
public class Student {
    private String name;

    @Override
    public String toString() {
        return "Student{" +
                "name='" + name + '\'' +
                '}';
    }
    public String getName() {
        return name;
    }
    public void setName(String name) {
        this.name = name;
    }
}
@Component
public class Students {

    @Bean("stu1")
    public Student student1(){
        Student student = new Student();
        student.setName("王五");
        return student;
    }

    @Bean("stu2")
    public Student student2(){
        Student student = new Student();
        student.setName("李四");
        return student;
    }
}
@Controller
public class StuController {
    @Autowired
    private Student student;

    public void test(){
        System.out.println(student.toString());
    }
}
public class App {
    public static void main(String[] args) {
        ApplicationContext context = new ClassPathXmlApplicationContext("spring-config.xml");
        StuController stuController = (StuController) context.getBean("stuController");
        stuController.test();
    }
}
以上为多个 Student 对象存储到容器中 问题,运行后会发现报错,

意思是找不到唯一的 Bean. 解决方法:
-
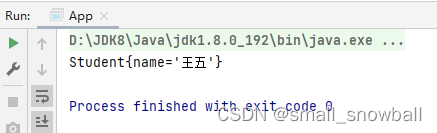
将 StuController 类中属性注入改为具体的 Bean 名称;如下:
或
-
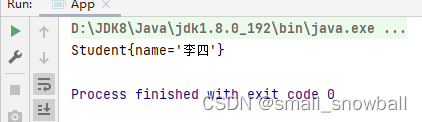
在注入的时候使用 @Qualifier 注解,如下:
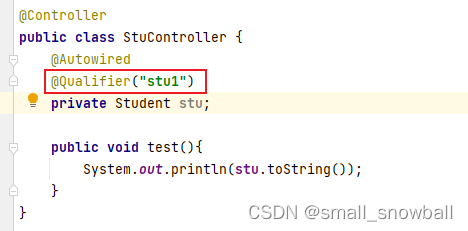
-
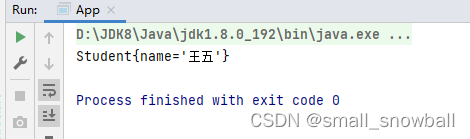
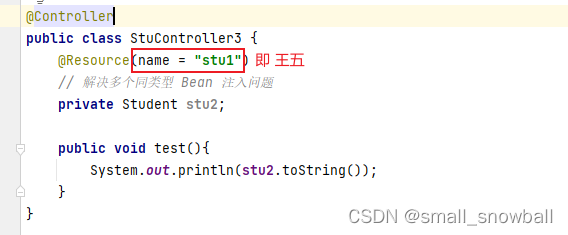
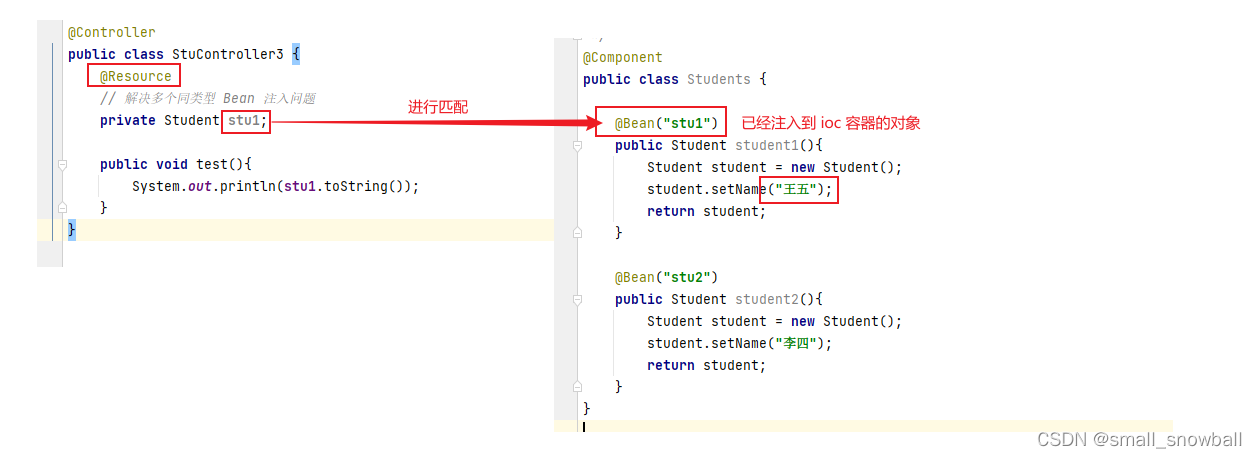
使用 @Resource 注解
上面已经提到属性注入时使用 @Autowired 注解,而 @Resource 注解是属性注入的另一个注解,换言之,属性注入还可以使用 @Resource 注解。
对于 @Resource 注解,它可以设置一个 name 属性,用这个属性来描述 Spring 启动的时候到底注入哪个对象,如下:
@Autowired 与 @Resource 注解的区别:
- @Autowired 由 Spring 提供,@Resource 来⾃于 JDK;
- @Autowired 默认通过 byType 方式注入,@ Resource 默认通过 byName 方式注入;
- @Autowired 可⽤于 Setter 注⼊、构造函数注⼊和属性注⼊,⽽ @Resource 只能⽤于 Setter 注⼊和属性注⼊,不能⽤于构造函数注⼊;
- @Autowired 默认通过 byType 方式注入,当有同一个类型多个对象的时候,会根据 byName 方式注入。
byName:拿变量名,去匹配 IoC 容器里面的对象,如下:
当设置 name 属性的时候,就会根据 name 属性来进行注入,如上述 使用 @Resource 注解举例,输出的是 stu1 对象王五,而不是 stu2 对象李四。
byType:拿变量类型,去匹配 IoC 容器里面的该类型,如下:
此处会发现,同一个类型存在多个 Bean(对象),对于这种情况上面已经提到过,需要将 student 改为具体的对象名,如 stu1/stu2.
这也说明了上述两个注解区别的最后一条。