原文:https://blog.iyatt.com/?p=14717
前言
前面刚刚对 Spring Boot 有了个概念,再来学学 Node.js,顺便当学 JavaScript,为后面入前端做准备。
环境
Node.js 20.12.2
官方 API 文档:https://nodejs.org/docs/latest/api/
CommonJS:https://nodejs.org/api/modules.html
ECMAScript Modules:https://nodejs.org/api/modules.html
模块导入方式
分为 CommonJS(CJS)和 ECMAScript Modules(ESM)。
CJS 使用 require 导入,使用 modules.export 或 exports 导出。ESM 使用 import 导入,使用 export 导出。
CJS 在运行时加载模块,导入和导出是同步的。ESM 是静态加载,在代码解析的时候进行,导入和导出操作是异步的。
扩展名使用 .js 时默认识别为 CJS,扩展名使用 .mjs 时默认识别为 ESM。Node.js 的早期版本只支持 CJS,后面的开始支持 ESM,新项目可以直接使用 ES。
本篇实践以 ESM 进行,下面展示两种方式的对比。
下面的例子会在 8080 端口创建一个 http 服务,展示字符串“Hello World!”,可以通过浏览器访问:http://localhost:8080
CJS
const http = require('node:http');

const hostname = '127.0.0.1';
const port = 8080;

const server = http.createServer((req, res) => {
  res.statusCode = 200;
  res.setHeader('Content-Type', 'text/plain');
  res.end('Hello World!\n');
});

server.listen(port, hostname, () => {
  console.log(`Server running at http://${hostname}:${port}/`);
});

ESM
导入指定模块
import { createServer } from 'node:http';

const hostname = '127.0.0.1';
const port = 8080;

const server = createServer((req, res) => {
  res.statusCode = 200;
  res.setHeader('Content-Type', 'text/plain');
  res.end('Hello World!\n');
});

server.listen(port, hostname, () => {
  console.log(`Server running at http://${hostname}:${port}/`);
});
变量修饰
变量修饰有三种:var、let 和 const
const 和一般编程语言里一样,表示常量,声明时必须初始化,且不可再次赋值,具有块级作用域。如果 const 修饰的是一个对象或数组,虽然不能更换变量索引的对象或数组,但是可以修改对象属性或数组元素。
let 相当于一般编程语言里的局部变量,声明时可以初始化也可以不初始化,后期可以再次赋值,也是块级作用域,比如在大括号内声明的只能在大括号内访问。
var 与另外两种不同,如果在函数外声明,则为全局变量,整个程序中都可以访问。在函数内声明,则仅在函数内可访问。还可以多次声明,后续声明覆盖前面的声明。
同步与异步
Node.js 提供的很多函数都分为同步和异步两个版本,同步版函数通常名字多一个 Sync。
同步可以这样理解:你要泡茶,得先烧水,在烧水得过程中就在旁边等着,直到水烧开了,才倒水泡茶。
异步:同样泡茶,开始烧水,但是你不在旁边等着,跑去看电视了,等水烧好了,再回来倒水泡茶。
异步执行的时候,如果一个操作会花一些实践,那么就不会干等着,会去先执行别的任务。如果是同步就会等着完成一件再做另外一件。从性能来说,异步的性能更高,不会让计算机闲着,但是现实不是总能异步的,如果后续的操作都依赖前面的工作结果,就必须采用同步,等待完成后得到结果才能执行别的任务。应用中根据实际需要来决定使用同步还是异步。
下面用写文件来展示同步和异步
异步
从执行结果可以看到,使用异步写文件,写文件这个操作会花费“较多”时间,但是主线程不会等着它完成,而是先去执行后面的打印“hello world”,在打印这个操作完成以后,写文件的动作才完成。
import { writeFile } from 'node:fs';

writeFile('test.txt', 'hello world', (err) =>
{
    if (err)
    {
        console.error(err);
        return;
    }
    console.log('写入成功');
});

console.log('hello world');

同步
同步写文件,在执行写文件的时候就会阻塞主线程,直到完成以后才能继续往下执行。
import { writeFileSync } from 'node:fs';

try
{
    writeFileSync('test.txt', 'hello world');
    console.log('写入成功');
}
catch (err)
{
    console.error(err);
    process.exit(1);
}

console.log('hello world');

文件操作 fs
上面同步与异步举例使用的写文件操作,这里就略过了。
换行符
在不同的操作系统中,默认的换行符是不一样的。
Windows:\r\n(回车符+换行符)
Unix/Linux/macOS:\n(换行符),其中早期的 macOS 采用的换行符是 \r(回车符)
要保证良好的跨平台性,就不要指定某一种,但是自己写每种情况又显得多余,因为 Node.js 提供了换行符。像下面这样导入 EOL就行,这是一个换行符字符串。
import { EOL from 'os';
追加文件
专用文件追加函数
import { writeFileSync, appendFileSync, appendFile } from 'fs';
import { EOL } from 'os';

try
{
    writeFileSync('test.txt', 'hello world' + EOL); // 写入文件
    appendFileSync('test.txt', 'hello Node.js' + EOL); // 同步追加文件
}
catch (err)
{
    console.error(err);
    process.exit(1);
}

appendFile('test.txt', 'hello hello' + EOL, err => // 异步追加文件
{
    if (err)
    {
        console.error(err);
        return;
    }
    console.log('写入成功');
});
写文件追加模式
import { writeFileSync } from 'fs';
import { EOL } from 'os';

try
{
    writeFileSync('test.txt', 'hello world' + EOL); // 写入文件
    writeFileSync('test.txt', 'hello Node.js' + EOL, { flag: 'a' }); // 追加文件
    console.log('写入成功');
}
catch
{
    console.error(err);
    process.exit(1);
}
流式写文件
类似一般编程语言里的打开文件操作,打开后会创建一个操作文件的句柄,通过句柄来读写文件,最后关闭句柄。
import { createWriteStream } from 'fs';
import { EOL } from 'os';

const ws = createWriteStream('test.txt');

ws.on('finish', () => // 监听写入完成事件
{
    console.log('写入文件成功');
});

ws.on('error', (err) => // 监听写入错误事件
{
    console.error('写入文件失败:', err);
    return;
});

// 写入文件
ws.write('hello' + EOL);
ws.write('world' + EOL);

// 结束写入
ws.end();
读文件
import { readFileSync, readFile } from 'node:fs';

// 同步
try
{
    const data = readFileSync('test.txt');
    console.log(data.toString());
}
catch(err)
{
    console.error(err);
}

// 异步
readFile('test.txt', (err, data) =>
{
    if (err)
    {
        console.error(err);
        process.exit(1);
    }
    console.log(data.toString());
});
流式读文件
按缓存大小读取
import { createReadStream } from 'node:fs';

var rs = createReadStream('test.txt');

rs.on('data', (data) =>
{
    console.log(data.toString());
});

rs.on('error', (error) =>
{
    console.log(error);
});

rs.on('end', () =>
{
    console.log('(读取完成)');
});
按行读取
import { createReadStream } from 'node:fs';
import { createInterface } from 'node:readline';

var rs = createReadStream('test.txt');
const rl = createInterface(
{
    input: rs,
    crlfDelay: Infinity
});

rl.on('line', (line) => {
    console.log(line);
});

rl.on('error', (error) => {
    console.log(error);
});

rl.on('close', () => {
    console.log('(读取完成)');
});
复制文件
使用一个 69M 的视频文件测试
一次性复制
import { readFileSync, writeFileSync } from 'node:fs';

try
{
    const data = readFileSync('test1.mp4');
    writeFileSync('test2.mp4', data);
}
catch(error)
{
    console.error(error);
}

console.log(process.memoryUsage().rss / 1024 / 1024);
使用内存 106M

流式复制
import { createReadStream, createWriteStream } from 'node:fs';

const rs = createReadStream('test1.mp4');
const ws = createWriteStream('test2.mp4');

rs.on('data', (chunk) => {
   ws.write(chunk);
});
// 也可以使用管道
// rs.pipe(ws);

rs.on('error', (err) => {
    console.errot(err);
});

console.log(process.memoryUsage().rss / 1024 / 1024);
使用内存 36M
在读写的文件较大时,使用流式读写会比较节省内存,默认缓冲区大小为 64KB,一次性最多读入 64KB 到内存,等取出后才能继续读取。

其它文件操作
如重命名文件/移动文件,创建文件夹,删除文件夹,查看文件信息等等,参考文档:https://nodejs.org/api/fs.html
路径 path
在 CJS 中可以直接使用 __dirname 和 __filename 获取文件所在目录和文件自身路径的,但是 ESM 中不可用。
CJS
console.log(__dirname);
console.log(__filename);

ESM
获取目录和路径的实现参考
import { fileURLToPath } from 'url';
import { dirname, resolve } from 'path';

const __filename = fileURLToPath(import.meta.url);
var __dirname = dirname(__filename); // 方法一:已知文件全名的情况下
var __dirname = resolve(); // 方法二:未知文件全名的情况下

console.log(__dirname);
console.log(__filename);

路径拼接
在不同的操作系统下路径连接符号不同,在 Windows 下是反斜杠,在 Linux 下是斜杠。通过 Node.js 的路径拼接函数就能根据所在平台进行处理,保证跨平台性。
获取操作系统路径分割符
import { sep } from 'node:path';

console.log(sep);

拼接路径
import { resolve } from 'node:path';

const path1 = resolve('D:', 'hello', 'world', 'test.txt');
console.log(path1);

const path2 = resolve('hello', 'world', 'test.txt');
console.log(path2);

路径解析
import { parse, resolve } from 'node:path';

const path = resolve('index.mjs');
const parseObject = parse(path);
console.log(parseObject);
返回结果是一个对象,包含了根目录,目录,文件名,扩展名,纯文件名

其它函数
文档:https://nodejs.org/api/path.html
Web 服务 http
简单的 web 服务器
import { createServer } from 'node:http';

const server = createServer((req, res) =>
{
    res.setHeader('Content-Type', 'text/html;charset=UTF-8');
    res.end('你好,世界!');
})

const port = 80;
server.listen(port, () =>
{
    console.log(`服务器运行在 http://localhost:${port}/`);
});

获取请求
import { createServer } from 'node:http';
import { parse } from 'node:url';

const server = createServer((req, res) =>
{
    console.log('-'.repeat(100));
    console.log('请求 URL:' + req.url);
    console.log('请求方法:' + req.method);
    console.log('http 版本:' + req.httpVersion);
    console.log('请求头:' + JSON.stringify(req.headers));
    console.log(parse(req.url, true));
    console.log('-'.repeat(100));

    // 回复客户端
    res.setHeader('Content-Type', 'text/html;charset=UTF-8');
    res.end('你好,世界!');
});

const port = 80;
server.listen(port, () =>
{
    console.log(`服务器运行在 http://localhost:${port}/`);
});
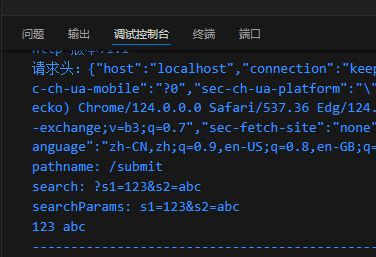
访问:http://localhost/submit?s1=123&s2=abc

服务器端获取

另外一种解析方式
import { createServer } from 'node:http';

const server = createServer((req, res) =>
{
    console.log('-'.repeat(100));
    console.log('请求 URL:' + req.url);
    console.log('请求方法:' + req.method);
    console.log('http 版本:' + req.httpVersion);
    console.log('请求头:' + JSON.stringify(req.headers));
    let url = new URL(req.url, `http://${req.headers.host}`);
    console.log('pathname: ' + url.pathname);
    console.log('search: ' + url.search);
    console.log('searchParams: ' + url.searchParams);
    console.log(url.searchParams.get('s1') + ' ' + url.searchParams.get('s2'));
    console.log('-'.repeat(100));

    // 回复客户端
    res.setHeader('Content-Type', 'text/html;charset=UTF-8');
    res.end('你好,世界!');
})

const port = 80;
server.listen(port, () =>
{
    console.log(`服务器运行在 http://localhost:${port}/`);
});
应用
请求
import { createServer } from 'node:http';

const server = createServer((req, res) =>
{
    let { method } = req;
    let { pathname } = new URL(req.url, `http://${req.headers.host}`);

    res.setHeader('Content-Type', 'text/html; charset=utf-8');
    console.log(method, pathname);
    if (method === 'GET' && pathname === '/login')
    {
        res.end('登录页面');
    }
    else if (method === 'GET' && pathname === '/register')
    {
        res.end('注册页面');
    }
    else
    {
        res.statusCode = 404;
        res.end('Not Found');
    }
});

const port = 80;
server.listen(port, () =>
{
    console.log(`服务器运行在 http://localhost:${port}/`);
});


响应
加载 html 文件作为响应内容
index.mjs
import { createServer } from 'node:http';
import { readFileSync } from 'node:fs';

const server = createServer((req, res) =>
{
    let data = readFileSync('index.html');
    res.setHeader('Content-Type', 'text/html; charset=utf-8');
    res.end(data);
});

const port = 80;
server.listen(port, () =>
{
    console.log(`服务器运行在 http://localhost:${port}/`);
});
index.html
<!DOCTYPE html>
<html lang="zh">
    <head>
        <meta charset="UTF-8">
        <title>表格</title>
        <style>
            td{
                padding: 20px 40px;
            }
            table tr:nth-child(odd){
                background-color: #f11212;
            }
            table tr:nth-child(even){
                background-color: #5b0af1;
            }
            table, td{
                border-collapse: collapse;
            }
        </style>
    </head>
    <body>
        <table border="1">
            <tr><td>1</td><td>2</td><td>3</td></tr>
            <tr><td>4</td><td>5</td><td>6</td></tr>
            <tr><td>7</td><td>8</td><td>9</td></tr>
            <tr><td>10</td><td>11</td><td>12</td></tr>
        </table>
        <script>
            let tds = document.querySelectorAll('td');
            tds.forEach(item => {
                item.onclick = function(){
                    item.style.backgroundColor = '#000000';
                }
            })
        </script>
    </body>
</html>
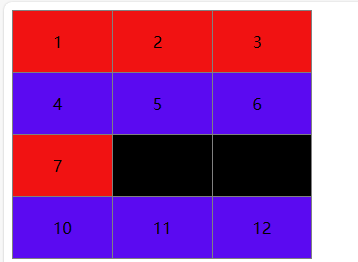
点击单元格变色
html、css、js 拆分
index.html
<!DOCTYPE html>
<html lang="zh">
    <head>
        <meta charset="UTF-8">
        <title>表格</title>
        <link rel="stylesheet" href="index.css">
    </head>
    <body>
        <table border="1">
            <tr><td>1</td><td>2</td><td>3</td></tr>
            <tr><td>4</td><td>5</td><td>6</td></tr>
            <tr><td>7</td><td>8</td><td>9</td></tr>
            <tr><td>10</td><td>11</td><td>12</td></tr>
        </table>
        <script src="index.js"></script>
    </body>
</html>
index.css
td{
    padding: 20px 40px;
}
table tr:nth-child(odd){
    background-color: #f11212;
}
table tr:nth-child(even){
    background-color: #5b0af1;
}
table, td{
    border-collapse: collapse;
}
index.js
let tds = document.querySelectorAll('td');
tds.forEach(item => {
    item.onclick = function(){
        item.style.backgroundColor = '#000000';
    }
})
main.mjs
import { createServer } from 'node:http';
import { readFileSync } from 'node:fs';

const server = createServer((req, res) =>
{
    var { pathname } = new URL(req.url, `http://${req.headers.host}`);
    if (pathname === '/'){
        res.setHeader('Content-Type', 'text/html; charset=utf-8');
        let html = readFileSync('index.html', 'utf-8');
        res.end(html);
    }
    else if (pathname.endsWith('.css')){
        res.setHeader('Content-Type', 'text/css; charset=utf-8');
        let css = readFileSync(pathname.slice(1), 'utf-8');
        res.end(css);
    }
    else if (pathname.endsWith('.js')){
        res.setHeader('Content-Type', 'application/javascript; charset=utf-8');
        let js = readFileSync(pathname.slice(1), 'utf-8');
        res.end(js);
    }
    else{
        res.statusCode = 404;
        res.end('404 Not Found');
    }
});

const port = 80;
server.listen(port, () =>
{
    console.log(`服务器运行在 http://localhost:${port}/`);
});
部署静态资源站
用的我主页的源码,主页地址:https://iyatt.com
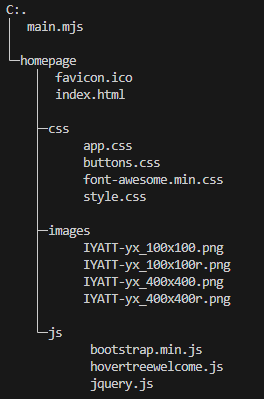
文件结构如图
下面是 Node.js 代码
import { createServer } from 'node:http';
import { readFile } from 'node:fs';
import { extname, resolve } from 'node:path';

const root = resolve('homepage'); // 网站根目录
const mimeTypes = { // 支持的文件类型和对应的MIME类型(开发中可以使用第三方模块)
    '.html': 'text/html; charset=utf-8',
    '.css': 'text/css',
    '.js': 'application/javascript',
    '.png': 'image/png',
    '.jpg': 'image/jpeg',
    '.gif': 'image/gif',
    '.ico': 'image/x-icon',
};

const server = createServer((req, res) =>
{
    const { pathname } = new URL(req.url, `http://${req.headers.host}`);

    if (req.method !== 'GET') { // 只处理 GET 请求
        res.statusCode = 405;
        res.end('<h1>405 Method Not Allowed</h1>');
        return;
    }

    if (pathname === '/') { // 访问根目录跳转 index.html
        res.statusCode = 301;
        res.setHeader('Location', '/index.html');
        res.end();
    }
    else {
        const ext = extname(pathname);
        readFile(resolve(root, pathname.slice(1)), (err, data) => {
            if (err) {
                switch (err.code) {
                    case 'ENOENT': { // 文件不存在
                        res.statusCode = 404;
                        res.end('<h1>404 Not Found</h1>');
                        break;
                    }
                    case 'EPERM': { // 权限不足
                        res.statusCode = 403;
                        res.end('<h1>403 Forbidden</h1>');
                        break;
                    }
                    default: { // 其他错误
                        res.statusCode = 500;
                        res.end('<h1>500 Internal Server Error</h1>');
                        break;
                    }
                }
            }
            else {
                if (mimeTypes[ext]) { // 设定已知的 Content-Type
                    res.setHeader('Content-Type', mimeTypes[ext]);
                }
                else { // 未知的产生下载行为
                    res.setHeader('Content-Type', 'application/octet-stream');
                }
                res.end(data);
            }
        });
    }
});

const port = 80;
server.listen(port, () =>
{
    console.log(`服务器运行在 http://localhost:${port}/`);
});
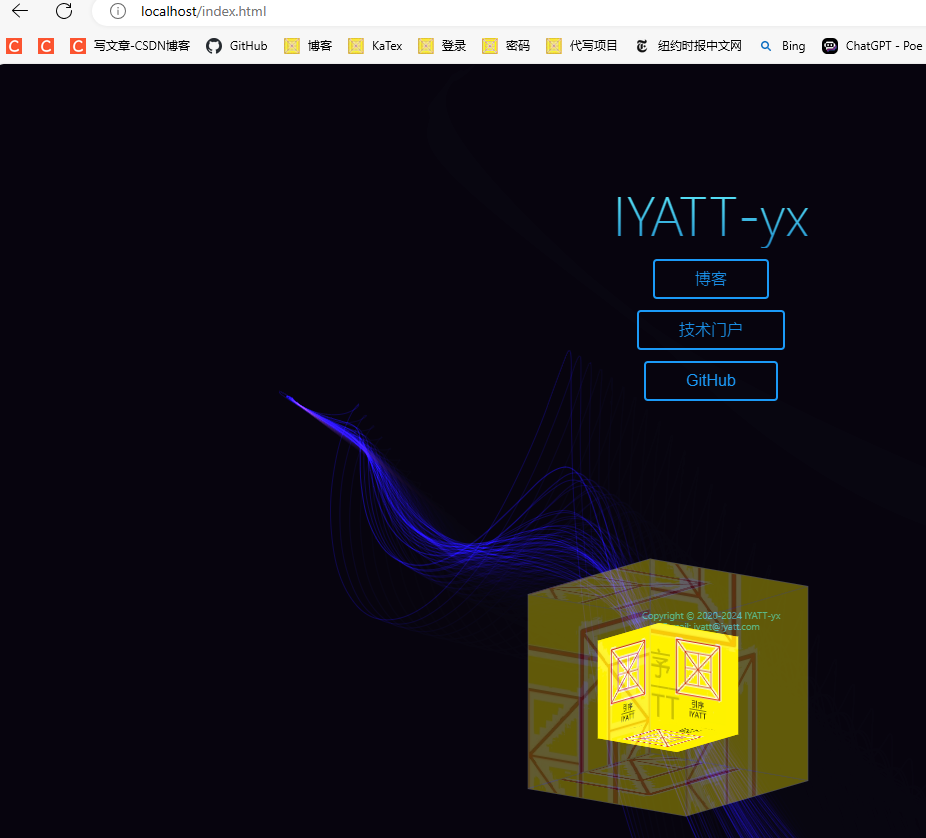
正常访问
访问资源中的一张图片
找不到文件

没有权限访问文件

下载行为

模块
基于 ESM 的模块导出
导出
自定义模块实现 1
针对单个函数、变量导出,在要导出的函数和变量前加上 export
modules.mjs
export function testFunction1() {
    console.log('测试函数1');
}

export function testFunction2() {
    console.log('测试函数2');
}

export const testConstant = '这是一个常量';
自定义模块实现 2
集中导出,使用 export {} 把要导出的函数、变量放进去
modules.mjs
function testFunction1() {
    console.log('测试函数1');
}

function testFunction2() {
    console.log('测试函数2');
}

const testConstant = '这是一个常量';

export { testFunction1, testFunction2, testConstant }
使用模块
index.mjs
export function testFunction1() {
    console.log('测试函数1');
}

export function testFunction2() {
    console.log('测试函数2');
}

export const testConstant = '这是一个常量';

别名
给要导出的内容设置别名,使用集中导出
modules.mjs
function testFunction1() {
    console.log('测试函数1');
}

function testFunction2() {
    console.log('测试函数2');
}

const testConstant = '这是一个常量';

export { testFunction1 as test1, testFunction2 as test2, testConstant as test }
index.mjs
import { test1, test2, test } from "./modules.mjs";

console.log(test);
test1();
test2();
默认导出
前面的普通导出,在导入使用的时候需要添加一个括号,而默认导出可以不用添加括号。只是在一个模块中只允许一个默认导出,使用方法在普通导出的基础上把 export 换成 export default 就行。如果是设置一个变量为默认导出不能直接在 const/var/let 前写,要额外写导出。比如
const testConstant = '这是一个常量';
export default testConstant;
下面将一个函数默认导出
modules.mjs
export function testFunction1() {
    console.log('测试函数1');
}

export default function testFunction2() {
    console.log('测试函数2');
}
使用
如果一次性导入多个,默认导出的必须写在前面
index.mjs
import testFunction2, { testFunction1 } from "./modules.mjs";

testFunction1();
testFunction2();
包管理工具
Node.js 的官方包管理工具是 npm,也有一些第三方的包管理工具,比如 yarn。
关于 npm 的官方说明:https://nodejs.org/en/learn/getting-started/an-introduction-to-the-npm-package-manager
包安装或依赖安装
安装包使用命令
npm install
# 或
npm i
安装指定包可以在命令后跟上包名,搜索包可前往:https://www.npmjs.com/
如果要全局安装就加上参数 -g,一般是命令工具采用全局安装的方式,这样不管在什么路径下都能使用,可以参考要安装的东西的文档决定什么方式安装。使用命令查看全局安装路径
npm root -g

如果不使用 -g 参数,默认安装是在当前工作路径下创建一个文件夹 node_modules,并在里面放置安装的东西。另外在工作路径下会产生一个 package-lock.json 文件,里面会记录安装的包的名字、版本、地址、校验信息。在发布自己开发的软件的时候通常不打包 node_modules 文件夹,可以极大地缩小打包体积,在用户使用这个软件的时候可以通过上面的安装命令来自动完成依赖安装,安装的时候不需要指定包名,会读取 package-lock.json 文件获取开发者使用的依赖。
站在软件开发者的角度,对于使用的依赖又分普通依赖和开发依赖,默认安装是标注为普通依赖,即使用 -S 参数,使用 -D 参数安装的则为开发依赖。开发者编写一个软件安装的普通依赖,发布出去,使用 npm i 自动安装依赖会同样安装。而开发依赖一般只是用于开发者测试使用,用户运行开发者编写的软件并不依赖,可以不需要安装,开发者使用 -D 安装这些依赖,则发布出去,用户安装依赖时就不会安装这些依赖。(下图是文档原文)
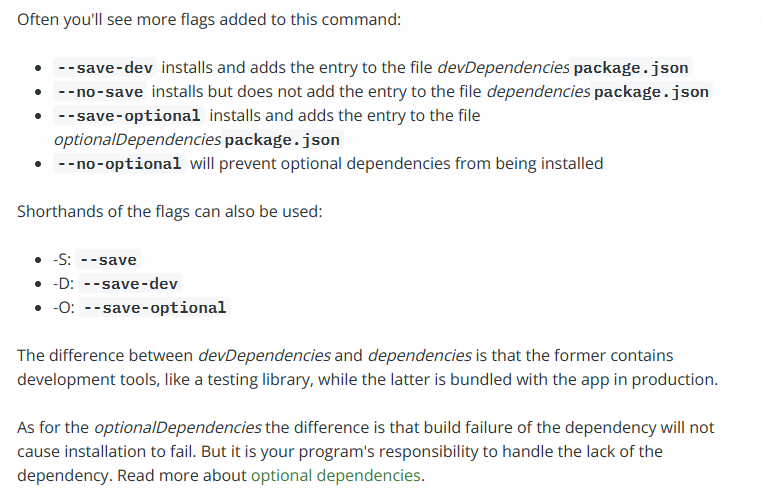
简单来说,如果开发者编写一个软件用到的某些依赖的功能是要集成到编写的软件中,这种依赖开发者就要安装为普通依赖,也可以叫做生产依赖。同时另外存在一些依赖,它们不是软件功能的组成,但是是开发者进行开发需要使用的工具或者测试框架,只是开发者需要,软件运行本身不用,开发者就要把这些依赖作为开发依赖安装。
创建一个项目
创建一个文件夹,终端工作路径切换到文件夹下,执行
npm init
默认项目名会使用文件夹的名称,但是项目名称不能用中文,如果文件夹含有中文,就自行设置英文名称,也可以直接设置其它名称
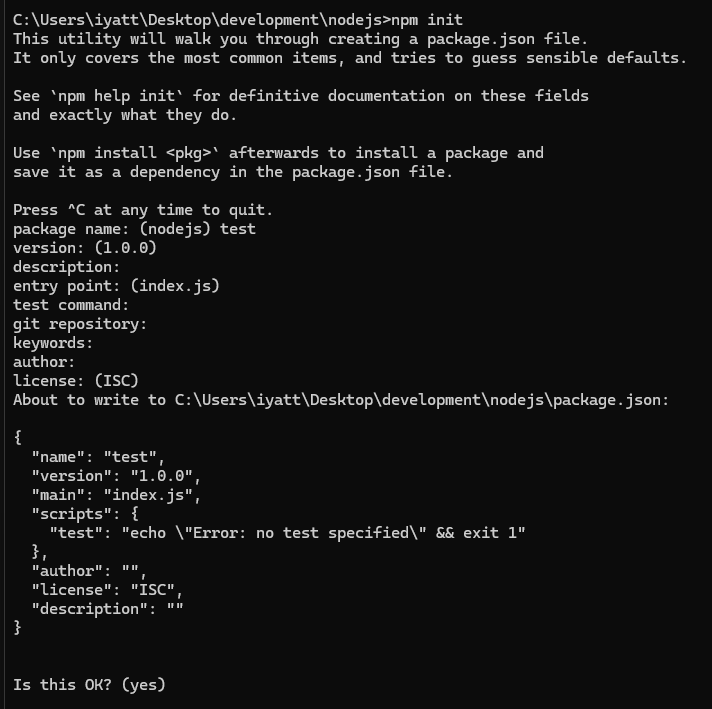
上面的命令就是引导创建一个 package.json 文件
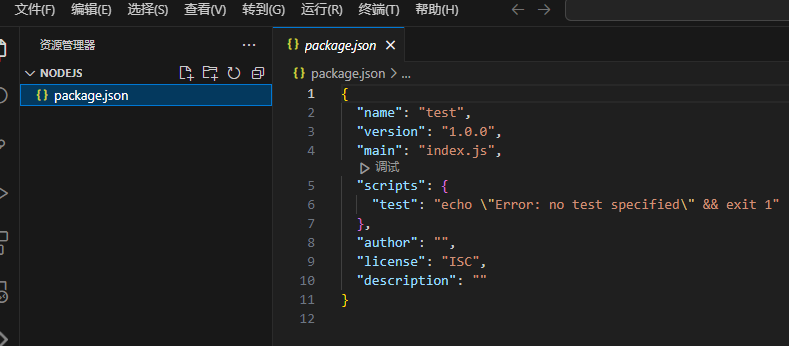
配置命令别名
我写了一个源文件 index.mjs
console.log('Hello, world!');
修改 package.json
中 scripts 部分,添加了两个别名 server 和 start 和别名对应执行的命令
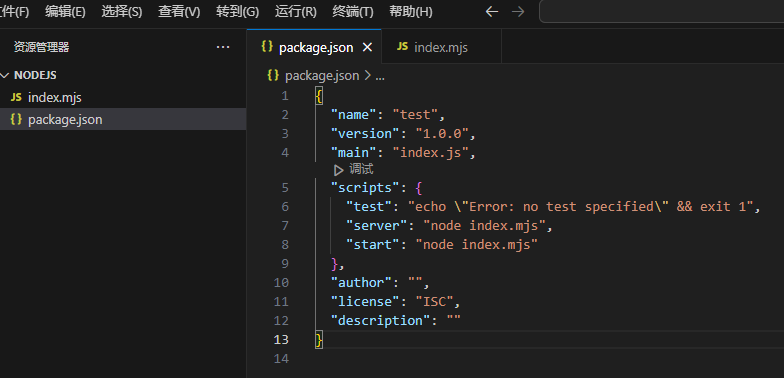
就可以使用 npm run 别名 的方式执行,其中 start 这个别名特殊,可以直接通过 npm start 执行
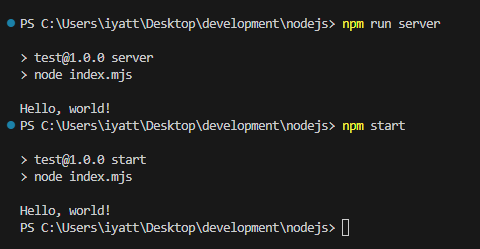
在项目极其复杂,运行时添加参数较多的情况下,通过别名可以更方便的运行
发布包
在 npm 源站注册一个账号:https://www.npmjs.com/
然后创建一个示例演示发布
创建一个包名为 iyatt-package
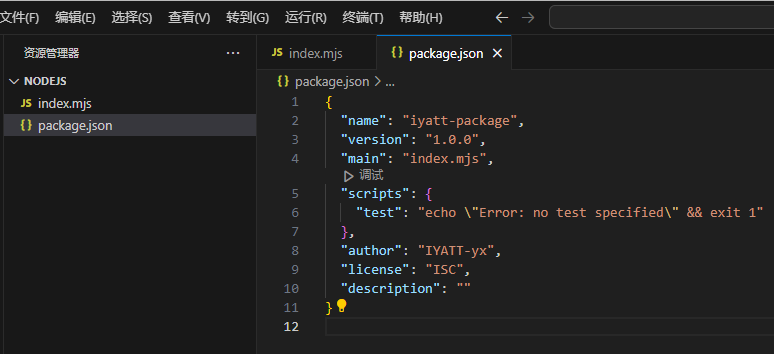
编写源码
index.mjs
export function add(num1, num2) {
    return num1 + num2;
}
如果修改过 npm 源站的,在进行发布操作的时候要换回官方的源站才行,镜像站不支持发布包。
npm 登录注册的账号
npm login
发布
npm publish
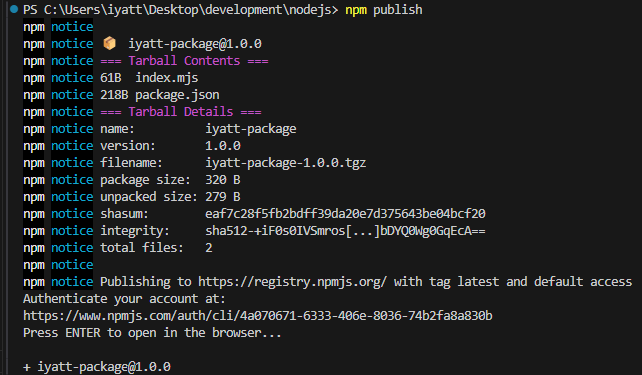
在 npm 源站上就能搜到了
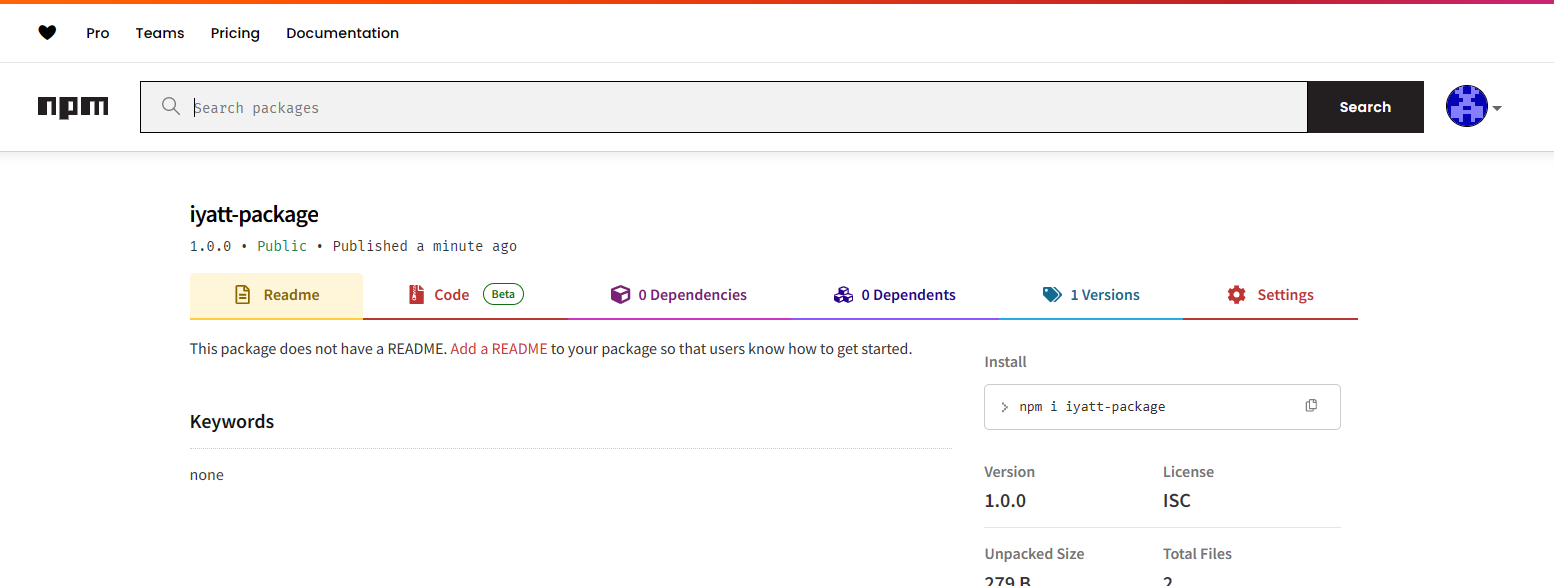
可以执行命令从源站下载安装这个包

写一段代码测试包调用
import { add } from 'iyatt-package';

console.log(add(1, 2));

如果后面要发布新版本的包,把 package.json 里的版本改一下,再执行发布命令就可以。
如果要删除发布的包可以到 npm 源站上操作,更为方便。
版本管理
用于管理 Node.js 版本的工具挺多的,比如 nvm 和 n 等,其中 n 不支持 Windows,Windows 下推荐使用 nvm-windows: https://github.com/coreybutler/nvm-windows
需要前往项目页 Release 下载安装包,项目页上有使用说明,可以用于升级 Node.js,在多个版本之间切换等等。
如果是 Linux 可以使用 n 来管理,安装也方便,直接使用 npm
npm i -g n
npm 源站上有 n 命令的使用说明:https://www.npmjs.com/package/n


